Schlage HandPunch GT-400 User manual

FlexClock
Hand Geometry Time Clock Setup Guide
HandPuncH® GT-400
®

ADDITIONAL QUESTIONS
If you have any additional questions regarding the installation or use of your
FlexClock, please contact your service provider.
SETUP
USE CAUTION when making connections to the back board to avoid damage.
Be aware of possible damage due to electrostatic discharge (ESD). ESD is of
particular concern when working on carpeted surfaces and in dry environments.
Use a ground strap to minimize ESD concerns.
DO NOT apply power until you are ready to congure the terminal!
If using the optional backup battery, connect backup battery BEFORE main
power has been supplied!
1. Connect the earth ground. The earth ground connection is made to the
ground pin on the terminal. Bundle all ground connections into one crimp
lug and attach the lug to the ground pin with an 8-32 nut.
2. Connect the Ethernet cable to the Ethernet connection socket inside the
terminal casing.
3. DO NOT apply power until you are ready to congure the terminal!
Connect power using the barrel connector.
4.
If using the optional backup battery, locate the backup battery relay.
Connect backup battery BEFORE the main power has been connected (step 3).
5. Make other back board connections as necessary. Use the diagram on the
next page as a reference.
Need More?
For a video walk-through visit the following website:
http://www.payrollservers.us/shareddocs/training/source/gt-400/setup.htm
Follow this QR
code to nd the
video on your
mobile device.

IMPORTANT
The pre-installed wall plate must be removed before assembly to the wall. The
plate is hinged at the bottom. It slides down a little as it tilts from the top. If the
wall plate does not tilt easily, check that the screws have not been pre-installed.
Remove the left and right side caps, which will need to remain removed before
wall mounting the unit. There are two small slots at the top of the caps where a
slotted screwdriver may be inserted and twisted to remove them.
If there are screws present beneath the caps, remove them. The wall plate
should easily tilt away from the reader. To re-install the caps after the unit is
mounted on the wall, rst engage the lower rear tab and then snap the caps
over the top.
In the installation kit, optional tamper-resistant screws and a special wrench
have been included if higher security is needed. For FCC compliance, the clamp
ferrite shield must be installed on the power supply cable approximately 5”
from the power supply. Loop the cable as shown below.
NETWORK SETUP
Your FlexClock automatically sets itself up on your network, as long as your
network supports this capability. Most small business networks do.
If your network requires a manual or“static” conguration, your company’s IT
department should be able to tell you whether you need to set up a“Static IP
address”. Usually, you do not need to do this. If you do, you can reach a hidden
Network Conguration menu. To access this menu, press SPACE twice and enter
the following password: 2663.
For rewall administrators only: FlexClock will make outgoing connections on
TCP ports 8288 and 8289. By default, most rewalls allow this sort of outgoing
connection without any additional setup. FlexClock only makes outgoing
connections, so it does not need any setup for inbound connections.
Initial Setup
All of the clock settings are retrieved from the timekeeping server. This includes
settings like the time and date, time zone, Daylight Savings Time settings, etc.
Once the clock is connected to the network, you can press the 9 key to force it
to communicate.
If you receive the message “UNKNOWN SERIAL #”, it means your clock has not
been set up online. Note that it can take up to 10 minutes after the clock has
been added to the site for it to actually become active.
Once your clock is set up, it will periodically transmit automatically. There is no
need to force it to transmit with the 9 key, although you can do this at any time.
310

CLOCKING IN & OUT
Clocking in and out is simple: Press 1 to clock in. Press 2 to clock out.
After you press 1 or 2, enter your PIN number and then place your hand on
the reader.
If the PIN number entered has never been enrolled with a hand, then no
hand check is required. This is intended as a convenience to new-hires. Once
a PIN number is enrolled with a hand, the hand will be required in order to
use the clock in the future.
Additional prompts (such as department, job, or tip prompts) may appear.
These are congured from the timekeeping web site. The 4 and 5 keys can
also be used to clock “in” and “out”, if enabled from the website. This allows
an alternate set of prompts to be shown to certain employees. This feature is
commonly used at restaurants. For example, non-tipped employees may use
these keys to bypass a prompt that asks “enter total tips”. Contact your service
provider for more information.
Hand Geometry & Hand Enrollment
Hand enrollment is simple and only needs to be done once per employee.
If you own more than one HandPunch® GT-400, the hand enrollments will
automatically be copied to all of your other clocks. The timekeeping server
stores a backup copy of the hand template les, and they will automatically
be restored if you ever replace or clear the memory of your clock.
Accessing the Enrollment Menu
The enrollment menu can be accessed by pressing 3 from the main time
screen. The default password for the manager menu is 1234, and can be
changed through the menu.
We strongly recommend that you change this password immediately to
avoid any unauthorized changes to the setup. For example, if employees can
delete their own hand enrollments, then they can bypass the hand check
entirely — re-introducing the risk of “buddy punching”.
TROUBLESHOOTING
Troubleshooting Network Connection
You can always force the time clock to attempt to contact its server at any time
by pressing the 9 key.
The time clock’s ability to transmit depends on your Internet connection. If you
are having trouble transmitting, ensure your Internet connection is up.
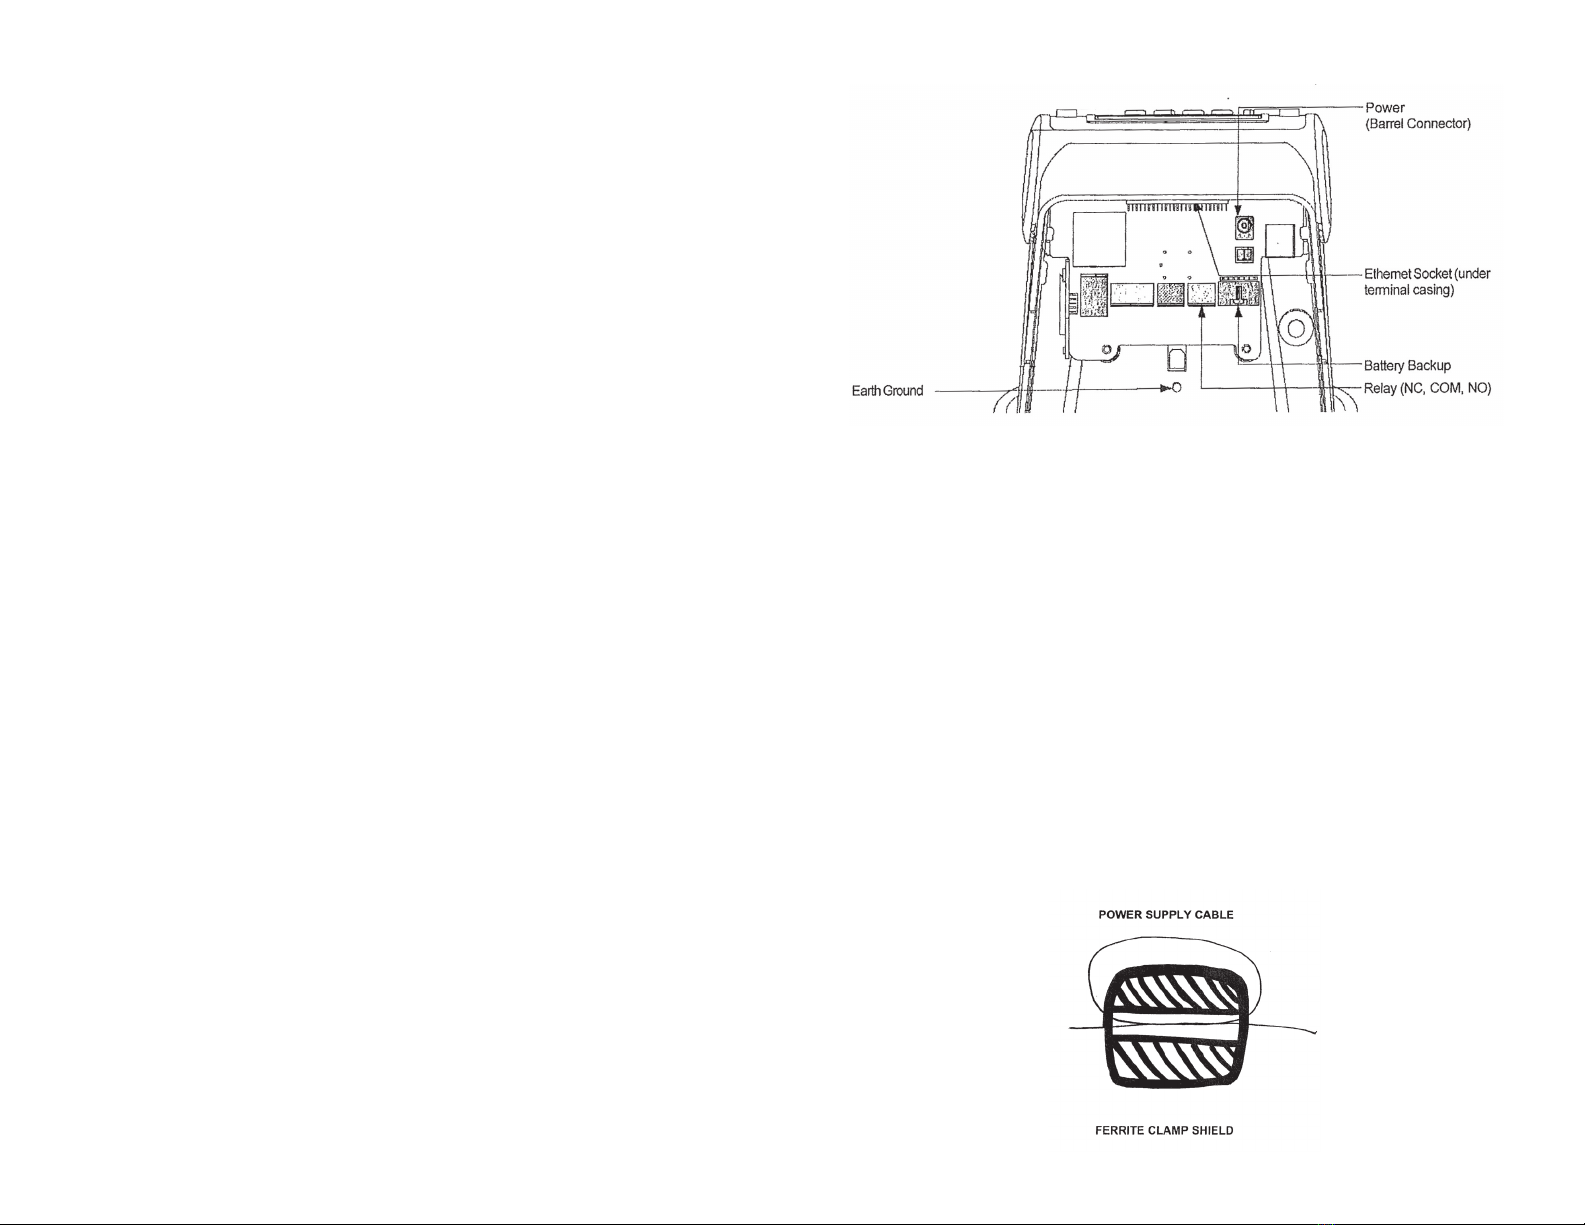
You can unplug the clock’s power at any time and plug it back in to force it to
acquire a new IP address using “DHCP” (Dynamic Host Control Protocol).
Troubleshooting Hand Recognition
Problem: Hand enrolled, but isn’t recognized (red light)
· Is the placement correct? (Follow exact placement as diagram.)
· Is hand injured? A thick bandage may throw off the sensor.
· Is hand reader clean and undamaged?
· Has enrollment been deleted? (Deletions can occur on other clocks, and
pass from clock to clock, if you have more than one.)
· Has the same number been enrolled by somebody else? (This also can
happen on another clock.)
· Is the hand possibly not enrolled? (Use the Hand Test mode, option 7, as an
easy way to find out.)
· Try deleting and re-enrolling the hand.
Problem: System allows punches without hand verication
A common technical support complaint is that the clock seems to be accepting
punches without requiring any hand verication at all. This is normal if an
employee PIN number is entered that has never had a hand enrolled. This
is intentional, so that new hires can immediately begin using the clock with
minimal inconvenience. Once a hand has been associated with that PIN,
however, the clock will always require hand verication in order to accept that
PIN in the future.
It is true that employees can simply make up non-existent PIN numbers and
clock them in and out, without any verication. But this provides them no
benet. Since they cannot be matched to any employee’s time card, the website
shows them as“unmatched punches”, where they can be viewed by a supervisor
and then either posted to a time card manually (if considered valid), or simply
deleted.
4 9

ABOUT HAND GEOMETRY
Hand geometry is a form of biometry that identies users by the shape of their
hands. Hand geometry readers measure a user’s hand along many dimensions
and compare those measurements to measurements stored in a le.
Viable hand geometry devices have been manufactured since the early 1980s,
making hand geometry the rst biometric to nd widespread computerized
use. It remains popular today as many common applications include access
control and time-and-attendance operations.
Since hand geometry is not thought to be as unique as ngerprints or irises,
ngerprinting and iris recognition remain the preferred technology for
high-security applications. Hand geometry is very reliable when combined
with other forms of identication, such as identication cards or personal
identication numbers. In large populations, hand geometry is not suitable
for so-called one-to-many applications, in which a user is identied from his
biometric without any other identication.
ENROLLING HANDS
To enroll a hand, press 1 from the Enrollment Menu.
First, you’ll be asked to enter the PIN number for the employee. This is the same
number used to identify the employee on the timekeeping website.
Then, the employee will be asked to place their hand on the reader a total of
three times: two to capture the enrollment, and once more for verication.
Setting a Manager Password
From the enrollment menu, the master manager password can be set. The
master manager password always has access to the enrollment menu, and never
needs hand verication. The default is 1234. You should change it immediately,
and keep the password secure.
Your payroll company can generate a one-time “unlock” code to reset this
password if it is ever lost. The master manager password always has full access to
the enrollment menu. It is not possible to reduce the master manager password
to only “limited” access.
The manager password is set per-clock. Manager passwords do not
automatically copy from clock to clock.
58

SETTING MANAGER HAND TEMPLATES
From the enrollment menu, you can also set up to four (4) manager hands. This
lets you give employees access to the manager menu.
The employees’ hands must already be enrolled. Further, they can only enter
the hand menu with their hand template - NOT with their PIN number.
You can create two kinds of managers. A “limited” manager can only enroll new
employees. A “full” manager has access to all options in the enrollment menu,
including creating and deleting other managers.
Manager privileges are set per-clock. Although hand templates automatically
copy from clock to clock, the manager settings do not copy.
Daylight Saving Time
Your clock automatically adjusts for Daylight Saving Time (DST) as instructed by
the server. The adjustment takes place immediately when the clock reaches the
designated time (i.e. 2:00 AM).
Daylight Saving adjustments occur on a Sunday.
From Sunday through Tuesday, the clock will show a “DST check mark” icon next
to the time, to remind employees that the DST correction has taken place.
The timekeeping website automatically performs adjustments to ensure
everything is correct. There should rarely, if ever, be a need to adjust time cards
— even if employees worked overnight during the time change.
If you live in an area that does not observe Daylight Saving Time (such as
Arizona), then the automatic adjustment is disabled by your payroll provider
from the website.
TEST MODE
On the enrollment menu, option 7 (Tests) allows you to test the hand
geometry reader without punching anybody in or out.
In test mode, the clock will attempt to verify the hand on the reader based on
the PIN number entered. The test mode can be used to train employees on the
best way to touch the reader.
If a hand cannot be veried repeatedly, you should re-enroll it.
The “score” is an indication of how well the hand matched the original
template. You should try for a score of 100 whenever possible.
Re-downloading Hand Templates
At any time, you can force the clock to re-download the entire hand database
from the server. This is done by selecting option 5 from the menu. You can
choose whether the clock should download prints from other clocks (assuming
you have more than one), or whether it should download only prints enrolled
on the same clock.
When you select the re-download option, nobody can use the clock until the
re-download has complete. It normally only takes a couple minutes.
6 7
Other manuals for HandPunch GT-400
1
This manual suits for next models
1
Table of contents
Popular Security Sensor manuals by other brands

Solight
Solight 1D36 operating manual

HomeMatic
HomeMatic HM-Sec-MDIR-3 Installation and operating manual

Team Digital
Team Digital BlocD8 quick start guide

EBS
EBS MD-10 quick start guide

Bosch
Bosch DS778 installation guide

ITI
ITI 60-873-95 - Security ShatterPro Crystal Glassbreak... Installation guidelines