SCHUNK MWS 20 User instructions

Translation of the original manual
Miniature-Change-System
MWS 20 - 30
Assembly and Operating Manual
Superior Clamping and Gripping
www.comoso.com

Imprint
2 02.01|MWS 20 - 30|en
Imprint
Copyright:
This manual remains the copyrighted property of SCHUNK GmbH & Co. KG. It is solely
supplied to our customers and operators of our products and forms part of the product.
This documentation may not be duplicated or made accessible to third parties, in particu-
lar competitive companies,
without our prior permission.
Technical changes:
We reserve the right to make alterations for the purpose of technical improvement.
Document number: 0389230
Edition: 02.01 |06/06/2014|en
© SCHUNK GmbH & Co. KG
All rights reserved.
Dear customer,
congratulations on choosing a SCHUNK product. By choosing SCHUNK, you have opted for
the highest precision, top quality and best service.
You are going to increase the process reliability of your production and achieve best
machining results – to the customer's complete satisfaction.
SCHUNK products are inspiring.
Our detailed assembly and operation manual will support you.
Do you have further questions? You may contact us at any time – even after purchase.
Kindest Regards
Yours SCHUNK GmbH & Co. KG
Spann- und Greiftechnik
Bahnhofstr. 106 – 134
D-74348 Lauffen/Neckar
Tel. +49-7133-103-0
Fax +49-7133-103-2399
www.schunk.com
www.comoso.com

Table of contents
02.01|MWS 20 - 30|en
3
Table of contents
1 About this manual.................................................................................................... 5
1.1 Warnings................................................................................................................... 5
1.1.1 Key words...................................................................................................... 5
1.1.2 Symbols ......................................................................................................... 5
1.2 Applicable documents .............................................................................................. 5
2 Basic safety notes .................................................................................................... 6
2.1 Intended use............................................................................................................. 6
2.2 Not intended use ...................................................................................................... 6
2.3 Environmental and operating conditions................................................................. 6
2.4 Product safety........................................................................................................... 6
2.4.1 Protective equipment ................................................................................... 7
2.4.2 Constructional changes, attachments, or modifications.............................. 7
2.5 Personnel qualification............................................................................................. 7
2.6 Using personal protective equipment...................................................................... 7
2.7 Notes on particular risks........................................................................................... 8
3 Warranty.................................................................................................................. 9
4 Scope of delivery ...................................................................................................... 9
5 Accessories............................................................................................................... 9
6 Technical Data......................................................................................................... 10
7 Product design ........................................................................................................ 11
7.1 Application possibilities.......................................................................................... 11
8 Mounting ................................................................................................................ 12
8.1 Mounting the MWK at the robot ........................................................................... 13
8.2 Mounting the MWA to the tool ............................................................................. 14
8.3 Assignment ............................................................................................................. 15
8.3.1 Assignment MWK........................................................................................ 15
8.3.2 Assignment MWA........................................................................................ 17
8.4 Installation of additional O-rings............................................................................ 19
8.5 Mounting of additional pins ................................................................................... 21
9 Function and Handling............................................................................................. 24
9.1 Commissioning ....................................................................................................... 24
10 Troubleshooting ...................................................................................................... 26
10.1 The system cannot be connected?......................................................................... 26
10.2 The system cannot be locked by the actuating ring? ............................................ 26
10.3 No signal is arriving at the tool?............................................................................. 26

www.comoso.com

Table of contents
4 02.01|MWS 20 - 30|en
10.4 Air is escaping from the MWS? .............................................................................. 26
11 Maintenance and Care ............................................................................................ 27
11.1 Maintenance instructions ...................................................................................... 27
11.2 Maintenance and lubrication intervals .................................................................. 27
11.3 Lubricants/Lubrication points (basic lubrication) .................................................. 27
12 Assembly drawing ................................................................................................... 28
www.comoso.com

About this manual
02.01|MWS 20 - 30|en
5
About this manual
This instruction is an integral part of the product and contains im-
portant information for a safe and proper assembly, commission-
ing, operation, maintenance and help for easier trouble shooting.
Before using the product, read and note the instructions, especial-
ly the chapter "Basic safety notes".
Warnings
The following key words and symbols are used to highlight dan-
gers.
Key words
DANGER Dangers for persons.
Non-compliance will inevitably cause irreversible injury or death.
WARNING Dangers for persons.
Non-compliance may cause irreversible injury or death.
CAUTION Dangers for persons.
Non-observance may cause minor injuries.
NOTICE Information about avoiding material damage
Symbols
Warning about a danger point
General mandatory sign to prevent material damage
Applicable documents
•General terms of business
•Catalog data sheet of the purchased product
The documents listed here, can be downloaded on our homepage
www.schunk.com
1
1.1
1.1.1
1.1.2
1.2
www.comoso.com

Basic safety notes
6 02.01|MWS 20 - 30|en
Basic safety notes
Intended use
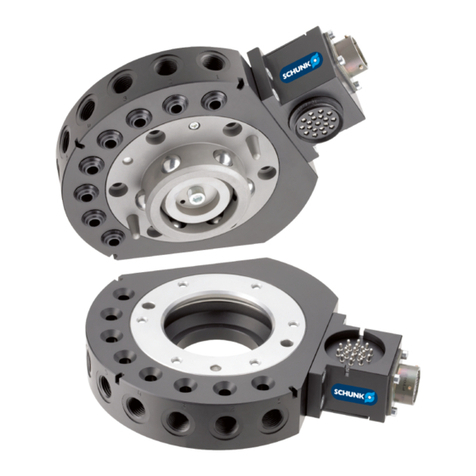
The MWS Miniature-Change-System (Change Head MWK + Change
Adapter MWA) were designed for a quick change of parts and auto-
mation components on a robot in context of the technical data.
The product is intended for industrial use.
To use this unit as intended, it is also essential to observe the tech-
nical data and installation and operation notes in this manual and to
comply with the maintenance intervals.
Not intended use
It is not an intended use if the module is used, for example, as a
pressing tool.
Environmental and operating conditions
•Make sure that the module has a sufficient size for the application.
•Observe Maintenance and lubrication intervals (11.2, Page 27).
•Make sure that the environment is free from splash water and va-
pors as well as from abrasion or processing dust. Exceptions are
modules that are designed especially for contaminated environ-
ments.
Product safety
Dangers arise from the module, if:
•the module is not used in accordance with its intended purpose.
•the module is not installed or maintained properly.
•the safety and installation notes are not observed.
Avoid any manner of working that may interfere with the function
and operational safety of the module.
Wear protective equipment.
NOTE
More information are contained in the relevant chapters.
2
2.1
2.2
2.3
2.4
www.comoso.com

Basic safety notes
02.01|MWS 20 - 30|en
7
Protective equipment
Provide protective equipment per EC Machinery Directive.
Constructional changes, attachments, or modifications
Additional drill holes, threads, or attachments that are not offered as
accessories by SCHUNK may be attached only with permission of
SCHUNK.
Personnel qualification
The assembly, initial commissioning, maintenance, and repair of the
module may be performed only by trained specialist personnel. Every
person called upon by the operator to work on the module must
have read and understood the complete assembly and operating ma-
nual, especially the chapter "Basic safety notes" (2, Page 6). This
applies particularly to personnel only used occasionally, such as
maintenance personnel.
Using personal protective equipment
When using this product, observe the relevant industrial safety regu-
lations and use the personal protective equipment (PPE) required!
•Use protective gloves, safety shoes and safety goggles.
•Observe safe distances.
•Minimal safety requirements for the use of equipment.
2.4.1
2.4.2
2.5
2.6
www.comoso.com

Basic safety notes
8 02.01|MWS 20 - 30|en
Notes on particular risks
Generally valid:
•Remove the energy supplies before installation, modification,
maintenance, or adjustment work.
•Make sure that no residual energy remains in the system.
•Do not move parts by hand when the energy supply is connected.
•Do not reach into the open mechanism or the movement area of
the module.
•Perform maintenance, modifications, and additions outside of the
danger zone.
•For all work, secure the unit against accidental operation.
•Take a precautionary approach by maintenance and disassembly.
•Only specially trained staff should disassemble the module.
WARNING
Risk of injury from objects falling and being ejected
•The danger zone must be surrounded by a safety fence during
operation.
2.7
www.comoso.com

Warranty / Scope of delivery / Accessories
02.01|MWS 20 - 30|en
9
Warranty
The warranty is valid for 24 months from the delivery date to the
production facility under the following conditions:
•Intended use in 1-shift operation
•Observe the mandatory maintenance and lubrication intervals
•Observe the environmental and operating conditions
Parts touching the work piece and wear parts are not part of the
warranty.
Scope of delivery
The scope of delivery includes:
•Miniature Change Head MWK in the ordered model.
•Miniature Change Adapter MWA in the ordered model.
•Accessory pack
Accessories
The following accessories that are required for the module must
be ordered seperately:
•Electro module
3
4
5
www.comoso.com

Technical Data
10 02.01|MWS 20 - 30|en
Technical Data
Type MWS 20 MWS30
Noise emission [dB(A)] ≤ 70
Operating temperature range [°C] +5 to +60
Number of pneumatic energy transmission 2
Number of electric energy transmission 4 (optional) 8 (optional)
Electric energy transmission
Min.
Max.
Umin=5VDC, Imin=120 mA
Umax=24VDC, Imax=1A
Standard interface similar to ISO 29262 / DIN 32565
Pressure medium Compressed air, standard for quality of
the compressed air according to
ISO 8573-1: 7 4 4
Further technical data can be found in the catalog data sheet.
The most recent version applies.
6
www.comoso.com

Product design
02.01|MWS 20 - 30|en
11
Product design
Fig. 1 Structure of the MWS
1 Miniature Change Head (MWK) 2 actuating ring with lever
3 milled groove (marking) 4 centering pin
5 Miniature Change Adapter (MWA) 6 milled groove (marking)
Application possibilities
Fig. 2
7
7.1
www.comoso.com

Mounting
12 02.01|MWS 20 - 30|en
Mounting
Fig. 3 Mounting example
1 Robot arm 2 MWK
3 MWA 4 Tool
(for example a gripper)
8
www.comoso.com

Mounting
02.01|MWS 20 - 30|en
13
Mounting the MWK at the robot
WARNING
Risk of injury during assembly!
•Switch off the energy supply.
Fig. 4 Positions of the screws
1 Screw (ISO 4762) 2 Centering sleeve
The pins required for the electrical feed through are installed at
SCHUNK. If more pins are required by the customer, the instal-
lation of these pins must be done prior to installation.
1 Use head screws (1) from the enclosed pack.
MWK 20: 3 screws M2x8
MWK 30: 5 screws M2x8
2 If a precise alignment is required, the additional sleeves (2)
must be used from the enclosed pack.
8.1
www.comoso.com

Mounting
14 02.01|MWS 20 - 30|en
Mounting the MWA to the tool
WARNING
Risk of injury during assembly!
•Switch off the energy supply.
Fig. 5 Positions of the screws at MWA 20
1 Screw (ISO 4762) 2 Centering sleeve
The pins required for the electrical feed through are installed at
SCHUNK. If more pins are required by the customer, the instal-
lation of these pins must be done prior to installation.
1 If there are no possibilities for mounting at the tool, an addi-
tional adapter plate must be prepared.
2 Use head screws (1) for mounting the MWA.
MWK 20: 3 screws M2x8
MWK 30: 5 screws M2x8
8.2
www.comoso.com

Mounting
02.01|MWS 20 - 30|en
15
Assignment
Assignment MWK
NOTE
Electrical pins are not suitable for the transmission of measuring
signals!
Fig. 6 View of the MWK 20 in combined assignment (with view to the connection side to the MWA)
Item 2P-0E 2P-4E
1 - E
2 P P
3 - E
4 - E
5 P P
6 - E
Feed through: P= pneumatic E= electrical
8.3
8.3.1
MWS 20
www.comoso.com

Mounting
16 02.01|MWS 20 - 30|en
Fig. 7 View of the MWK 30 in combined assignment (with view to the connection side to the MWA)
Item 2P-4E 2P-6E 2P-8E
1 E E E
2 P P P
3 E E E
4 E E E
5 - E E
6 - E E
7 P P P
8 - - E
9 - - E
10 E E E
Feed through: P= pneumatic E= electrical
MWS 30
www.comoso.com

Mounting
02.01|MWS 20 - 30|en
17
Assignment MWA
NOTE
Electrical pins are not suitable for the transmission of measuring
signals!
Fig. 8 View of the MWA 20 in combined assignment (with view to the connection side to the MWK)
Item 2P-0E 2P-4E
1 - E
2 P P
3 - E
4 - E
5 P P
6 - E
Feed through: P= pneumatic E= electrical
8.3.2
MWS 20
www.comoso.com

Mounting
18 02.01|MWS 20 - 30|en
Fig. 9 View of the MWA 30 in combined assignment (with view to the connection side to the MWK)
Item 2P-4E 2P-6E 2P-8E
1 E E E
2 P P P
3 E E E
4 E E E
5 - E E
6 - E E
7 P P P
8 - - E
9 - - E
10 E E E
Feed through: P= pneumatic E= electrical
MWS 30
www.comoso.com

Mounting
02.01|MWS 20 - 30|en
19
Installation of additional O-rings
NOTE
The electrical feed-throughs can also be replaced by O-rings. This
allows the maximum number of air feed-throughs to be increased.
On the other hand, the O-rings can also be replaced by electrcial
feed-throughs.
Size Number
MWS 20 max. 6
MWS 30 max. 10
Mounting the O-rings for the compressed air feed-through
Fig. 10 View of the connection side toward the robot
Fig. 11 View of the connection side toward the MWA
8.4
MWK
www.comoso.com

Mounting
20 02.01|MWS 20 - 30|en
Fig. 12 View of the connection side toward the MWK
Fig. 13 View of the connection side toward the gripper
1 Place o-rings centrically at the positions provided.
2 Press in the O-rings using a suitable tool, e.g. a punch (see Fig-
ure) in axial direction.
3 Turn unit over.
4 Press in the O-rings in axial direction on the opposite side of
the mounted O-rings.
MWA
www.comoso.com
This manual suits for next models
1
Table of contents
Other SCHUNK Robotics manuals

SCHUNK
SCHUNK AGE-Z Series User instructions

SCHUNK
SCHUNK GSM-P User instructions

SCHUNK
SCHUNK FDB-AC Series User instructions

SCHUNK
SCHUNK EMH Series User instructions

SCHUNK
SCHUNK EGH User instructions

SCHUNK
SCHUNK SVH User instructions

SCHUNK
SCHUNK AGE-S-XYZ User instructions

SCHUNK
SCHUNK SWS-001 User instructions