SCIEX P/ACE MDQ Plus Operating manual

P/ACE™ MDQ Plus Capillary
Electrophoresis System
System Maintenance Guide
RUO-IDV-05-4904-A
January 2019

This document is provided to customers who have purchased SCIEX equipment to use in the
operation of such SCIEX equipment. This document is copyright protected and any reproduction of
this document or any part of this document is strictly prohibited, except as SCIEX may authorize in
writing.
Software that may be described in this document is furnished under a license agreement. It is
against the law to copy, modify, or distribute the software on any medium, except as specifically
allowed in the license agreement. Furthermore, the license agreement may prohibit the software
from being disassembled, reverse engineered, or decompiled for any purpose. Warranties are as
stated therein.
Portions of this document may make reference to other manufacturers and/or their products, which
may contain parts whose names are registered as trademarks and/or function as trademarks of their
respective owners. Any such use is intended only to designate those manufacturers' products as
supplied by SCIEX for incorporation into its equipment and does not imply any right and/or license to
use or permit others to use such manufacturers' and/or their product names as trademarks.
SCIEX warranties are limited to those express warranties provided at the time of sale or license of
its products and are SCIEX’s sole and exclusive representations, warranties, and obligations.
SCIEX makes no other warranty of any kind whatsoever, expressed or implied, including without
limitation, warranties of merchantability or fitness for a particular purpose, whether arising from a
statute or otherwise in law or from a course of dealing or usage of trade, all of which are expressly
disclaimed, and assumes no responsibility or contingent liability, including indirect or consequential
damages, for any use by the purchaser or for any adverse circumstances arising therefrom.
For Research Use Only. Not for use in Diagnostic Procedures.
AB Sciex is operating as SCIEX.
The trademarks mentioned herein are the property of AB Sciex Pte. Ltd. or their respective owners.
AB SCIEX™ is being used under license.
© 2019 AB Sciex
P/ACE™ MDQ Plus Capillary Electrophoresis System System Maintenance Guide
2 / 88 RUO-IDV-05-4904-A | B54955AB
AB Sciex LLC
500 Old Connecticut Path
Framingham, Massachusetts 01701
USA

System Maintenance Guide P/ACE™ MDQ Plus Capillary Electrophoresis System
RUO-IDV-05-4904-A | B54955AB 3 / 88
Contents
Chapter 1 Installation Procedures . . . . . . . . . . . . . . . . . . . . . . . . . . . . . . . . . . . . . . 5
Install the UV or PDA Detector . . . . . . . . . . . . . . . . . . . . . . . . . . . . . . . . . . . . . . . 6
Install Wavelength Filters for the UV Detector . . . . . . . . . . . . . . . . . . . . . . . . . . . 9
Calibrate the PDA Detector . . . . . . . . . . . . . . . . . . . . . . . . . . . . . . . . . . . . . . . . . 14
Install the LIF Detector. . . . . . . . . . . . . . . . . . . . . . . . . . . . . . . . . . . . . . . . . . . . . 15
Installation Requirements . . . . . . . . . . . . . . . . . . . . . . . . . . . . . . . . . . . . . . . . . 16
Install the LIF Detector Filters . . . . . . . . . . . . . . . . . . . . . . . . . . . . . . . . . . . . . 16
Install the LIF Detector in the P/ACE™ MDQ Plus Instrument . . . . . . . . . . . 18
Connect the Probe to the Clamp Bar. . . . . . . . . . . . . . . . . . . . . . . . . . . . . . . . . 19
Calibrate the LIF Detector . . . . . . . . . . . . . . . . . . . . . . . . . . . . . . . . . . . . . . . . . . 20
Troubleshoot the LIF Detector Calibration. . . . . . . . . . . . . . . . . . . . . . . . . . . . 23
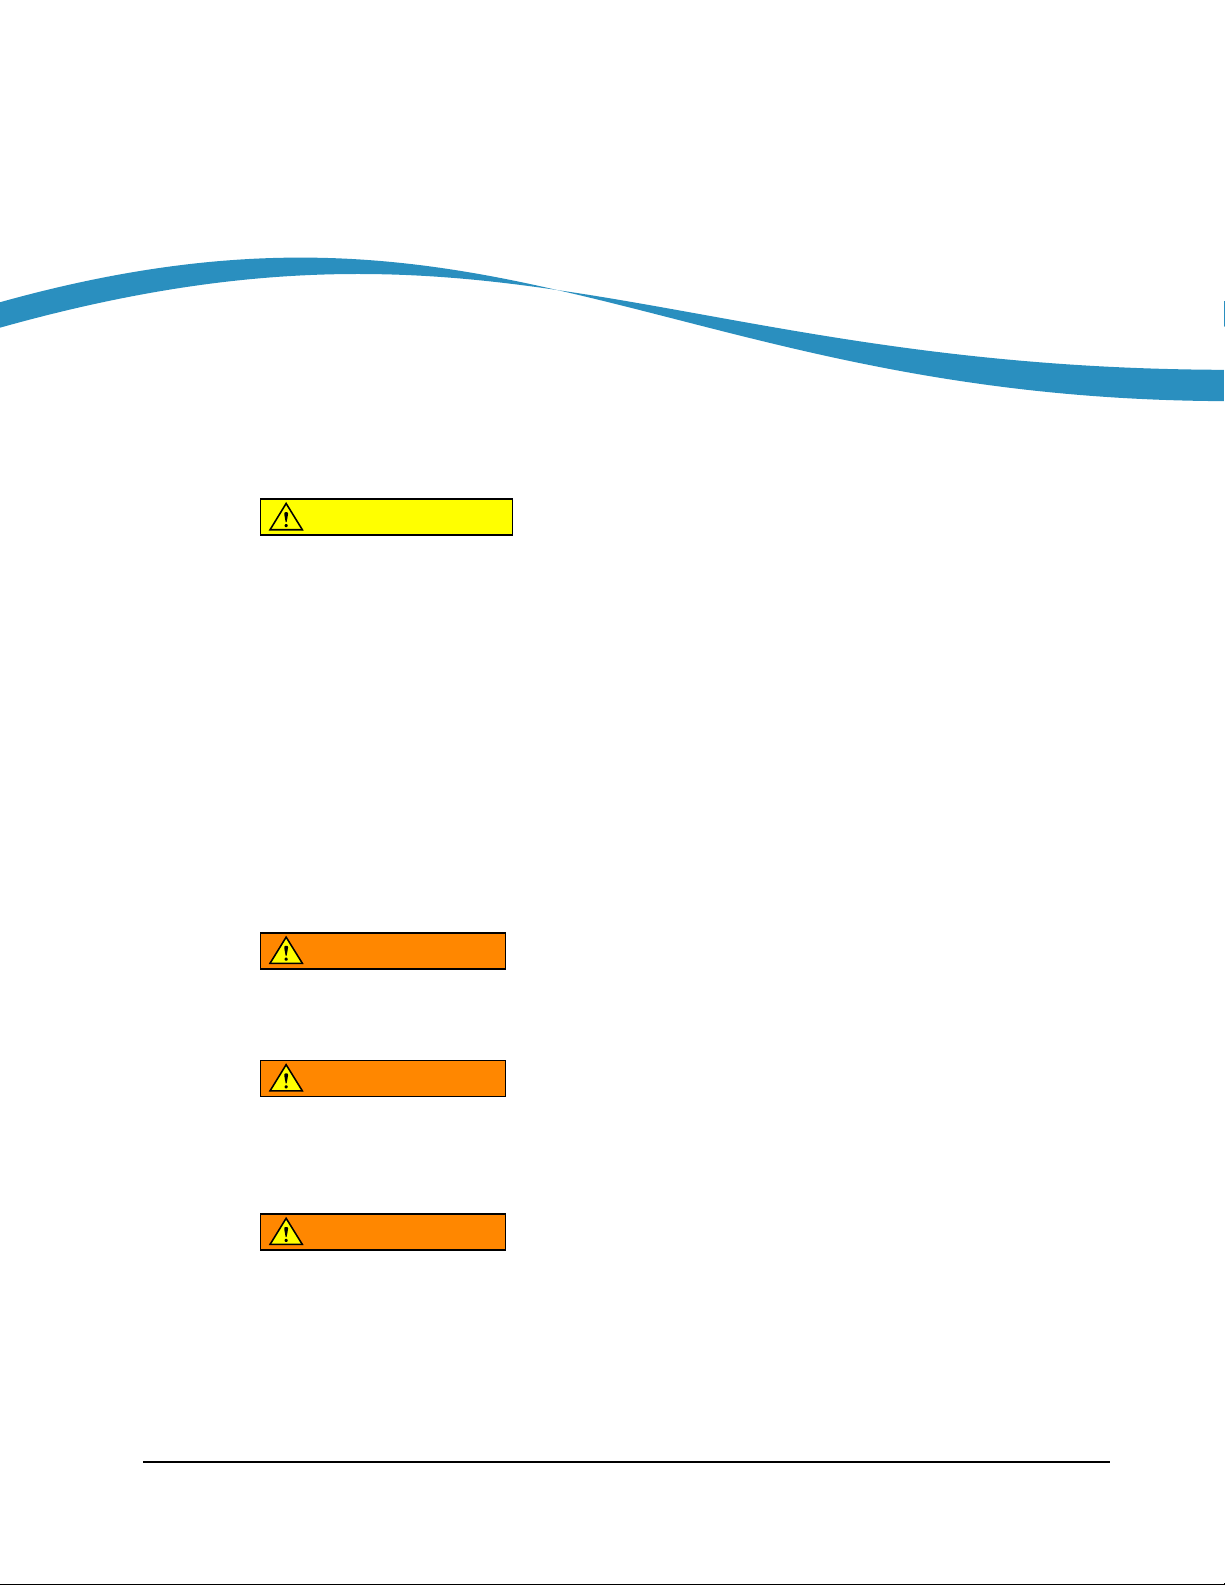
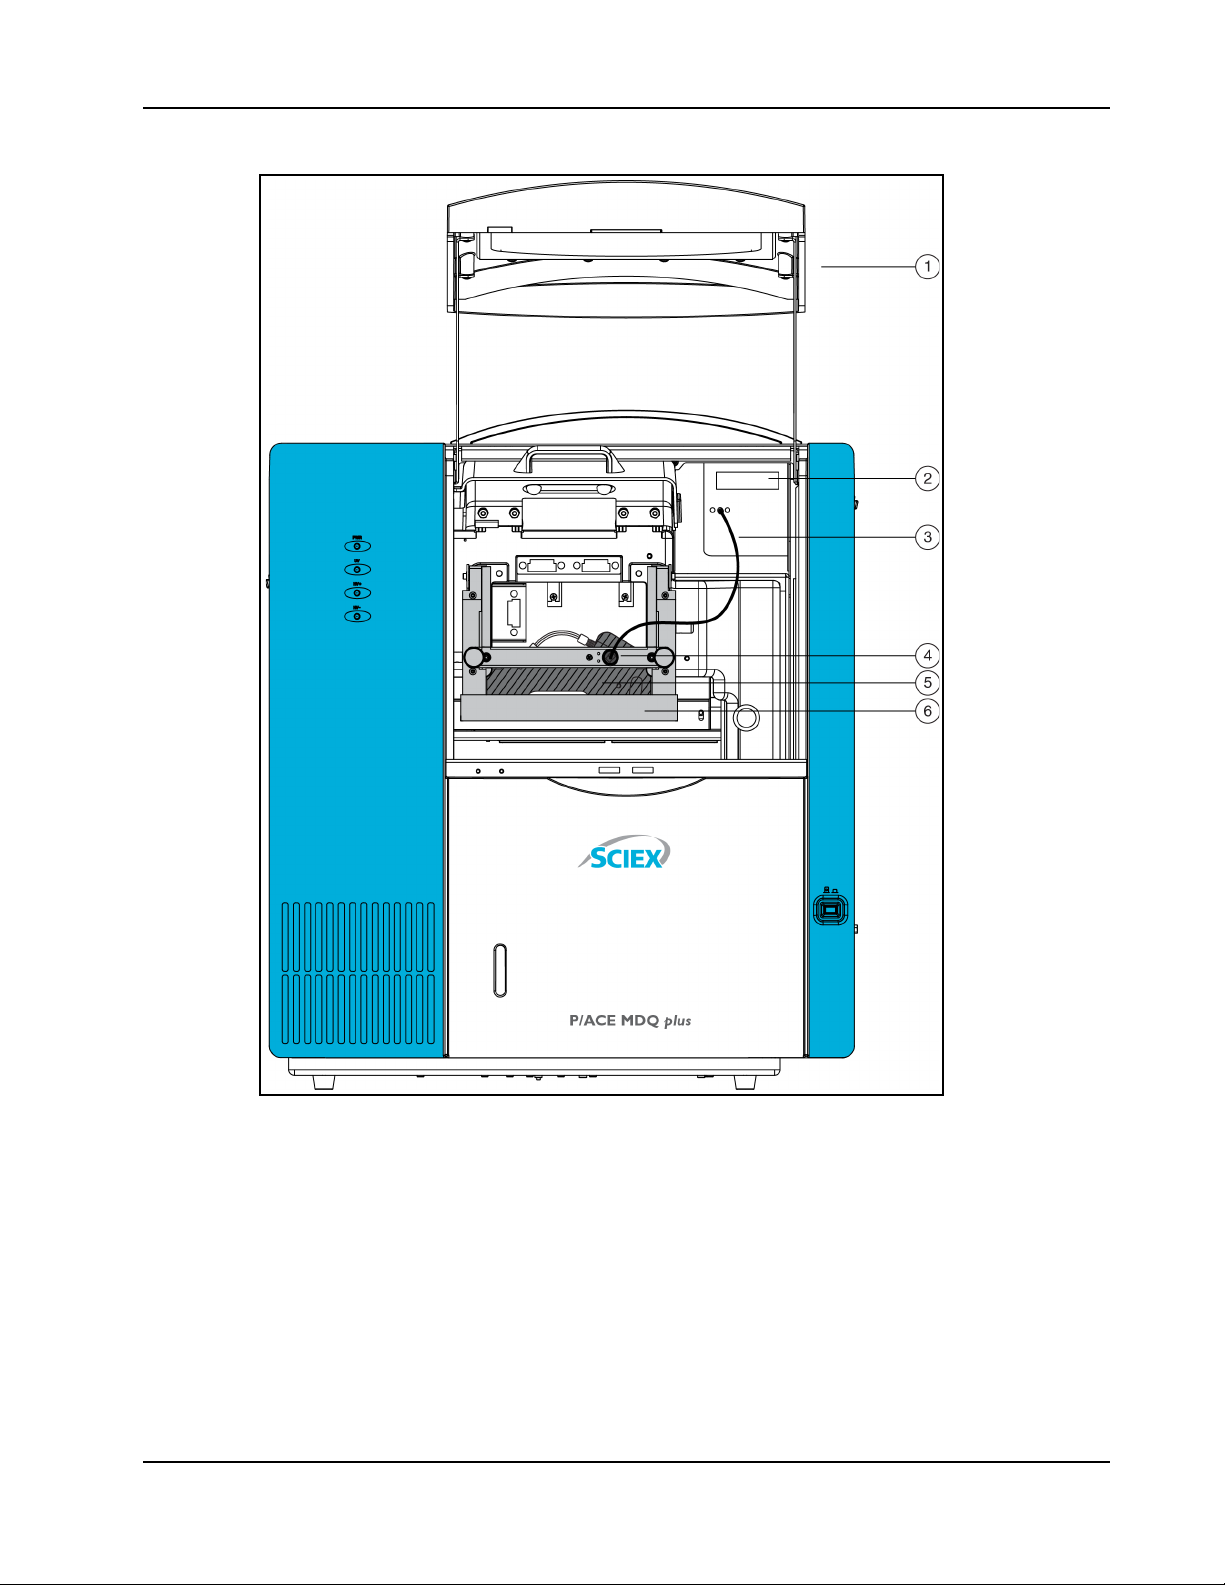
Install the Capillary Cartridge. . . . . . . . . . . . . . . . . . . . . . . . . . . . . . . . . . . . . . . . 24
Rebuild a Capillary Cartridge . . . . . . . . . . . . . . . . . . . . . . . . . . . . . . . . . . . . . . 24
Install the Capillary Cartridge into the P/ACE™ MDQ Plus Instrument . . . . . 42
Install the Universal Vials and Caps. . . . . . . . . . . . . . . . . . . . . . . . . . . . . . . . . . . 44
Fill the Universal Vials . . . . . . . . . . . . . . . . . . . . . . . . . . . . . . . . . . . . . . . . . . . 44
Fill the Micro Vials . . . . . . . . . . . . . . . . . . . . . . . . . . . . . . . . . . . . . . . . . . . . . . 45
Chapter 2 Maintenance Procedures . . . . . . . . . . . . . . . . . . . . . . . . . . . . . . . . . . . . 47
Clean the Ejecting Levers, Electrodes, and Interface Block. . . . . . . . . . . . . . . . . 48
Remove the Ejecting Levers . . . . . . . . . . . . . . . . . . . . . . . . . . . . . . . . . . . . . . . 49
Remove the Electrodes . . . . . . . . . . . . . . . . . . . . . . . . . . . . . . . . . . . . . . . . . . . 50
Replace the Electrodes in the Interface Block . . . . . . . . . . . . . . . . . . . . . . . . . 52
Replace the Ejecting Levers . . . . . . . . . . . . . . . . . . . . . . . . . . . . . . . . . . . . . . . 52
Refill the Capillary Coolant . . . . . . . . . . . . . . . . . . . . . . . . . . . . . . . . . . . . . . . . . 53
Clean the Fiber Optic Cable (UV and PDA Detectors) . . . . . . . . . . . . . . . . . . . . 54
Replace the Deuterium Lamp . . . . . . . . . . . . . . . . . . . . . . . . . . . . . . . . . . . . . . . . 56
Procedures for Instrument Care . . . . . . . . . . . . . . . . . . . . . . . . . . . . . . . . . . . . . . 62
Replace the Quad Rings . . . . . . . . . . . . . . . . . . . . . . . . . . . . . . . . . . . . . . . . . . 62
Replace the Fuses . . . . . . . . . . . . . . . . . . . . . . . . . . . . . . . . . . . . . . . . . . . . . . . 63
Procedures for LIF Detector Care and Maintenance . . . . . . . . . . . . . . . . . . . . . . 65
Inspect the LIF . . . . . . . . . . . . . . . . . . . . . . . . . . . . . . . . . . . . . . . . . . . . . . . . . 65
Clean the LIF Modules . . . . . . . . . . . . . . . . . . . . . . . . . . . . . . . . . . . . . . . . . . . 65
Store the LIF Probe . . . . . . . . . . . . . . . . . . . . . . . . . . . . . . . . . . . . . . . . . . . . . . 65
Chapter 3 Connect the System to a Mass Spectrometer . . . . . . . . . . . . . . . . . . . 67
About CE-MS Mode. . . . . . . . . . . . . . . . . . . . . . . . . . . . . . . . . . . . . . . . . . . . . . . 67
Install the Capillary in the Standard Cartridge . . . . . . . . . . . . . . . . . . . . . . . . . . . 68
Install the Capillary in the EDA-Only Cartridge . . . . . . . . . . . . . . . . . . . . . . . . . 71

P/ACE™ MDQ Plus Capillary Electrophoresis System System Maintenance Guide
4 / 88 RUO-IDV-05-4904-A | B54955AB
Install the Ground Connection. . . . . . . . . . . . . . . . . . . . . . . . . . . . . . . . . . . . . . . .73
Chapter A Evaluating UV Filters . . . . . . . . . . . . . . . . . . . . . . . . . . . . . . . . . . . . . .75
Overview . . . . . . . . . . . . . . . . . . . . . . . . . . . . . . . . . . . . . . . . . . . . . . . . . . . . . . . .75
Chapter B Performance Tests for the LIF Detector . . . . . . . . . . . . . . . . . . . . . . .79
Relative Fluorescent Units (RFU) . . . . . . . . . . . . . . . . . . . . . . . . . . . . . . . . . . . . .79
Calibration Correction Factor (CCF). . . . . . . . . . . . . . . . . . . . . . . . . . . . . . . . . . .79
Applying the CCF . . . . . . . . . . . . . . . . . . . . . . . . . . . . . . . . . . . . . . . . . . . . . . . . .80
Automatic Calibration . . . . . . . . . . . . . . . . . . . . . . . . . . . . . . . . . . . . . . . . . . . .80
Calibration Method . . . . . . . . . . . . . . . . . . . . . . . . . . . . . . . . . . . . . . . . . . . . . .81
Calibration Results. . . . . . . . . . . . . . . . . . . . . . . . . . . . . . . . . . . . . . . . . . . . . . .82
Non-fluorescent Solutions . . . . . . . . . . . . . . . . . . . . . . . . . . . . . . . . . . . . . . . . . . .82
LIF Calibration for Other Capillaries . . . . . . . . . . . . . . . . . . . . . . . . . . . . . . . . . .83
LIF Calibration for Different Fluorescent Solutions . . . . . . . . . . . . . . . . . . . . . . .83
Standard System Performance Test . . . . . . . . . . . . . . . . . . . . . . . . . . . . . . . . . . . .84
Calibration Method . . . . . . . . . . . . . . . . . . . . . . . . . . . . . . . . . . . . . . . . . . . . . .84
Calibration Results. . . . . . . . . . . . . . . . . . . . . . . . . . . . . . . . . . . . . . . . . . . . . . .85
Troubleshooting. . . . . . . . . . . . . . . . . . . . . . . . . . . . . . . . . . . . . . . . . . . . . . . . . . .86
Contact Us . . . . . . . . . . . . . . . . . . . . . . . . . . . . . . . . . . . . . . . . . . . . . . . . . . . . . . . . .87
Customer Training. . . . . . . . . . . . . . . . . . . . . . . . . . . . . . . . . . . . . . . . . . . . . . . . .87
Online Learning Center . . . . . . . . . . . . . . . . . . . . . . . . . . . . . . . . . . . . . . . . . . . . .87
SCIEX Support . . . . . . . . . . . . . . . . . . . . . . . . . . . . . . . . . . . . . . . . . . . . . . . . . . .87
CyberSecurity . . . . . . . . . . . . . . . . . . . . . . . . . . . . . . . . . . . . . . . . . . . . . . . . . . . .87
Documentation. . . . . . . . . . . . . . . . . . . . . . . . . . . . . . . . . . . . . . . . . . . . . . . . . . . .88

System Maintenance Guide P/ACE™ MDQ Plus Capillary Electrophoresis System
RUO-IDV-05-4904-A | B54955AB 5 / 88
CHAPTER 1
Installation Procedures
CAUTION
Prior to using the system, refer to the safety content in the System Overview Guide
for detailed information on the safe use and operation of the system.
This chapter contains the following installation procedures for the SCIEX P/ACE™ MDQ Plus
capillary electrophoresis system. Begin by installing the detector, and then continue to remaining
items.
• Install the UV or PDA Detector on page 6
• Install Wavelength Filters for the UV Detector on page 9
• Calibrate the PDA Detector on page 14
• Install the LIF Detector on page 15
• Install the Capillary Cartridge on page 24
• Install the Universal Vials and Caps on page 44
WARNING
Disconnect the power before any instrument disassembly. Failure to do
so can cause electrical shock or other injury.
WARNING
Maintenance or repair procedures not specifically described in this
guide present a risk of electrical shock or injury. Refer additional
servicing to SCIEX.
WARNING
Do not attempt to defeat any of the instrument interlocks or safety
mechanisms.

P/ACE™ MDQ Plus Capillary Electrophoresis System System Maintenance Guide
6 / 88 RUO-IDV-05-4904-A | B54955AB
Install the UV or PDA Detector
Required Materials
• UV or PDA detector
• Fiber optic cable (UV cable is 2-ended and the PDA cable is 3-ended)
1 Verify the UV source optic module is installed.
2 Verify that power is off and no capillary cartridge is installed.
3 Lift the cartridge cover door and find the detector mounting location as shown in Figure 1.1
(for a UV detector) and Figure 1.2 (for a PDA detector).
4 Remove the detector from the package and remove the protective connector caps.
5 Position the detector on the mounting location. Carefully slide the detector back to make
contact with the back-plane receptacle.
6 Tighten the thumbscrew until tight.
7 Unpack the fiber optic cable and remove the protective covers from each end (two covers for
the UV cable and three covers for the PDA cable). Make sure to keep the protective covers
for storing the cable when it is not in use.
8 Connect the cable to the clamp arm first, then to the detector.
9 Depending on the detector, either:
• If needed, Install Wavelength Filters for the UV Detector on page 9.
• Calibrate the PDA Detector on page 14.

System Maintenance Guide P/ACE™ MDQ Plus Capillary Electrophoresis System
RUO-IDV-05-4904-A | B54955AB 7 / 88
Figure 1.1 P/ACE™ MDQ Plus Instrument–Front View With UV Detector Installed
1. Outer Door Cover
2. UV Detector
3. Two-ended Fiber Optic Cable
4. Clamp Bar
5. Capillary Cartridge
6. Interface Block

P/ACE™ MDQ Plus Capillary Electrophoresis System System Maintenance Guide
8 / 88 RUO-IDV-05-4904-A | B54955AB
Figure 1.2 P/ACE™ MDQ Plus Instrument–Front View With PDA Detector Installed
1. Outer Door Cover
2. PDA Detector
3. Three-ended Fiber Optic Cable
4. Clamp Bar
5. Capillary Cartridge
6. Interface Block

System Maintenance Guide P/ACE™ MDQ Plus Capillary Electrophoresis System
RUO-IDV-05-4904-A | B54955AB 9 / 88
Install Wavelength Filters for the UV Detector
The P/ACE™ MDQ Plus system includes 200 nm, 214 nm, 230 nm, and 254 nm filters by default.
The following section is for reference, if a different filter is required for your application.
Required Materials
• Filters
• Latex gloves
• Small forceps
1 Using the Direct Control window, move the trays to the load position.
2 Lift the outer door and then the cartridge cover door. The cartridge cover door is to the left of
the UV detector as shown in Figure 1.1.
3 Loosen the two thumbscrews and lift the clamp bar.
4 Remove the capillary cartridge from the interface block.
5 Turn the system power off.
6 Loosen the two thumbscrews and remove the optics source assembly. Put the assembly on a
clean work surface. The optics source assembly is located right behind the interface block and
has a horizontal bar handle as shown in Figure 1.3.
7 Remove the filter wheel access cover and rotate the filter wheel until the correct filter is
visible (Figure 1.3).

P/ACE™ MDQ Plus Capillary Electrophoresis System System Maintenance Guide
10 / 88 RUO-IDV-05-4904-A | B54955AB
Figure 1.3 Remove the Filter Wheel Access Cover
8 Put on latex gloves and use small forceps to remove the filters from the filter wheel. Touching
the optical surfaces of the filters without gloves leaves skin oil that can cause improper filter
performance.
9 Inspect each filter for a burned spot. Replace any filters that appear damaged.
The filters are affected by heat and time. It is good practice to periodically check filter
performance with a spectrometer or to replace the filters.
10 Insert the new filter with the reflective side facing inward (Figure 1.4).
1. Open cover at the indicated point
2. Access Cover
3. Thumbscrews (2), one on each side

System Maintenance Guide P/ACE™ MDQ Plus Capillary Electrophoresis System
RUO-IDV-05-4904-A | B54955AB 11 / 88
Figure 1.4 Install a New Filter
11 When all filters have been inspected or replaced, reinstall the filter wheel access cover.
12 Place the optics source assembly in the mounting location. Align the two upper guide pins and
tighten the two thumbscrews.
13 Reinstall the capillary cartridge in the interface block.
14 Lower the insertion bar and tighten the two thumbscrews.
15 Close the cartridge cover door.
16 Turn the system power on and start the P/ACE™ MDQ Plus software.
17 Click Tools > Enterprise Login.
18 Right-click an instrument icon and click Configure > Instrument. (System Administration
mode must be enabled, and the user must have instrument administration privileges to
configure the instrument.)

P/ACE™ MDQ Plus Capillary Electrophoresis System System Maintenance Guide
12 / 88 RUO-IDV-05-4904-A | B54955AB
19 Click Configure on the instrument Configuration dialog.
The P/ACE MDQ plus Configuration dialog appears (Figure 1.5).
Figure 1.5 P/ACE™ MDQ Plus Configuration Dialog
20 Click the green arrow to move the selected detector icon from Available modules in the left
pane to Configured modules in the right pane.
21 Double-click the icon in the Configured modules list to open the P/ACE MDQ plus System
Instrument Configuration dialog (Figure 1.6).
Figure 1.6 P/ACE™ MDQ Plus System Instrument Configuration Dialog
an

System Maintenance Guide P/ACE™ MDQ Plus Capillary Electrophoresis System
RUO-IDV-05-4904-A | B54955AB 13 / 88
22 In the Filter area of the dialog, type the wavelength for each of the installed filters and then
click OK to save the settings and close the dialog.
Figure 1.7 Filter Area Detail

P/ACE™ MDQ Plus Capillary Electrophoresis System System Maintenance Guide
14 / 88 RUO-IDV-05-4904-A | B54955AB
Calibrate the PDA Detector
The PDA detector must be calibrated following installation, after you change the lamp or other
optical components, and when required as part of maintenance.
After the OPCAL cartridge is installed, calibrate the PDA detector as follows:
1 From the main menu, open an instrument configured with a PDA detector.
2From the Control menu, click Direct Control. The Direct Control window appears.
Figure 1.8 PDA Detector–Direct Control Window

System Maintenance Guide P/ACE™ MDQ Plus Capillary Electrophoresis System
RUO-IDV-05-4904-A | B54955AB 15 / 88
3 Click the rainbow above the lamp. The PDA Detector Parameters dialog appears.
Figure 1.9 PDA Detector Parameters Dialog
4 Click Calibrate to start the calibration sequence. The calibration requires approximately two
minutes. Do not try to access the instrument during the calibration process.
Install the LIF Detector
WARNING
It is not safe to operate the solid-state laser module on any system other
than the P/ACE™ MDQ Plus capillary electrophoresis system. The 488
nm solid-state laser draws more current than the interconnect module,
previously used with the 488 nm argon ion laser, and will damage older
CE models. The new CE models (2009 and after) include a higher-rated
wiring harness to safely operate with the increased current.
Before installing the solid-state laser, close the 32 Karat software.

P/ACE™ MDQ Plus Capillary Electrophoresis System System Maintenance Guide
16 / 88 RUO-IDV-05-4904-A | B54955AB
WARNING
To prevent a possible shock hazard, power down the instrument before
continuing with component installation.
Installation Requirements
A SCIEX FSE must complete the initial installation of the 488 nm solid-state laser. This procedure
includes proper laser configuration, installation of the updated wiring harness, setup of the LIF
detector (if necessary), and verification of operation including system safety features.
Install the Solid-State Laser Module
WARNING
To prevent a possible shock hazard, power down the instrument before
continuing with component installation.
If currently installed, remove the UV or PDA detector module from the P/ACE™ MDQ Plus
instrument’s upper-right corner. Insert the solid-state laser module and secure by finger tightening
the thumbscrews at the front of the module.
Install the LIF Detector Filters
Before you install the LIF detector module, install the filters and filter housing.
The filters installed in channel 1 have a 488 nm rejection filter and a 520 nm emission filter. To
use channel 2 requires a change to the detector. Contact SCIEX for assistance setting up and using
channel 2.
The filter housing sits in the right side of the LIF detector and has two filter holders, one for each
detector channel (Figure 1.10). You can use one or more filters in each filter holder, depending on
the application and the width of the filter. Typical operation is with two filters: one rejection filter
and one emission filter. The rejection filter prevents scattered laser light from passing into the
detector. The emission filter is a band-pass filter that allows only the light at a selected wavelength
to pass into the detector.
Depending on the application and laser, you can use any standard 0.5 inch diameter filters with
wavelengths between of 350 nm to 750 nm. The total thickness of the filters cannot exceed
0.350 inches.

System Maintenance Guide P/ACE™ MDQ Plus Capillary Electrophoresis System
RUO-IDV-05-4904-A | B54955AB 17 / 88
Install a Filter in the Filter Housing
1 Hold the filter housing in the same orientation as shown in Figure 1.10.
Figure 1.10 Install Filters in the Filter Housing
2 Hold the filter with the arrow on the outside edge of the filter pointing up.
NOTE Make sure to handle filters by the edges.
3 Carefully put the filter into the filter holder.
4 When all filters are in the filter holder, insert the spring and install the filter holder in the
appropriate location (channel 1 or 2) in the filter housing.
NOTE If there is no arrow on the edge of the filter, look at both sides of the filter
and find the side with the more reflective surface. The more reflective side
has a wide-edge rim that extends beyond the filter surface. Install the filter
with the more reflective side toward the light source (the laser). In LIF
detection, laser light comes from the center of the filter housing. While
holding the housing in the correct orientation, install a filter with the arrow
— or reflective side with the wider rim — pointing up (toward the filter
housing).
NOTE If you install a filter incorrectly, performance degrades even though the
filter appears operational.
1. Notch Filter
2. Emissions (Band Pass) Filter (Bottom View)
3. Emissions (Band Pass) Filter (Top View)

P/ACE™ MDQ Plus Capillary Electrophoresis System System Maintenance Guide
18 / 88 RUO-IDV-05-4904-A | B54955AB
Install the Filter Housing in the Detector
Insert the filter housing into the opening in the right side of the detector (Figure 1.11). Make sure
the keyed corner of the filter housing lines up with the keyed corner of the detector module. The
housing is designed so it only fits in the opening in the orientation shown in the following figure.
Refer to Figure 1.11.
After you change filters, allow the system to stabilize for 15 minutes before use.
Figure 1.11 Install the Filter Housing
Install the LIF Detector in the P/ACE™ MDQ Plus Instrument
WARNING
To prevent a possible shock hazard, power down the P/ACE™ MDQ Plus
instrument before continuing with component installation.
Before installing the LIF detector, remove the UV source optics module by loosening the knobs
at the sides of the interface block. Remove the module using the handle.

System Maintenance Guide P/ACE™ MDQ Plus Capillary Electrophoresis System
RUO-IDV-05-4904-A | B54955AB 19 / 88
Connect the LIF detector to the P/ACE™ MDQ Plus instrument. Keep the two female connectors
on the LIF detector level with the two male connectors found on the instrument. Lock the detector
module in position by fastening the captive screws until finger-tight.
Connect the Probe to the Clamp Bar
IMPORTANT Be sure to install the LIF cartridge in the instrument and secure the
clamp bar before connecting the probe.
To connect the probe to the LIF cartridge, align the two pins on the left side of the probe and probe
body to the two pin holes and the probe hole in the clamp bar. Squeeze the probe to open its jaws
and carefully attach the probe to the clamp bar (Figure 1.12).
When not in use, install the probe in the probe holder on the 488 nm laser module. This provides
mechanical protection for the probe and shields it from dust and other particles.
Figure 1.12 Connect the Probe to the LIF Cartridge

P/ACE™ MDQ Plus Capillary Electrophoresis System System Maintenance Guide
20 / 88 RUO-IDV-05-4904-A | B54955AB
Calibrate the LIF Detector
LIF detector calibration allows for normalization of the signal generated by an analyte relative to
a known concentration of sodium fluorescein. Perform calibration after installation of a new
capillary or after changing a detector or cartridge.
Required Materials
• LIF Performance Test mix (PN 726022)
• Double deionized water (DDI H2O)
NOTE System Administration must be enabled, and the user must have
instrument administration privileges. From the Enterprise window, click
Tools > System Administration to enable System Administration mode.
1 Right-click the instrument icon and click Configure Instrument.
2 Click Configure in the instrument Configuration window. The 32 Karat Software
Configuration dialog appears.
3 Double-click the detector icon in the right pane of the P/ACE MDQ plus Configuration
dialog.
4 Click LIF Calibration Wizard in the P/ACE MDQ plus System Instrument
Configuration dialog.
5 Click Auto, then click Next to continue (Figure 1.13).
Other manuals for P/ACE MDQ Plus
2
Table of contents
Other SCIEX Medical Equipment manuals
Popular Medical Equipment manuals by other brands

InTouch Health
InTouch Health Vici Quick reference guide

Organ recovery systems
Organ recovery systems LifePort Kidney Transporter LKT101P Operator's manual

Med-Mizer
Med-Mizer AllCare user manual

OsteoSys
OsteoSys SONOST-2000 user manual

Ossur
Ossur ICEROSS SEAL-IN X LINERS Instructions for use

Otto Bock
Otto Bock 13E135 Instructions for use