• Zasilanie dzwonek : 3*C / LR14 nie znajdują się w zestawie.
• Zasilanie przycisku : 1*12 V znajdują się w zestawie.
• Wymiary : 88*127*25 mm.
• Gong przeznaczony wyłącznie do użytku wewnętrznego.
• Śrubki zawarte.
• Zasięg 30 metrów w wolnym polu.
Parametry
WYPŁACANYCH PRZEZ :
SCS Sentinel France - Route de St Symphorien - BP 69
85130 Les Landes Génusson
• Voeding bel : 3*C / LR14 niet meegeleverd.
• Voeding drukknop : 1*12 V meegeleverd.
• Afmetingen : 88*127*25 mm.
• De gong is strikt voorbehouden voor gebruik binnenshuis.
• Schroeven opgenomen.
• Bereik 30 meter in vrije ruimte.
Kenmerken
GEDISTRIBUEERD DOOR :
SCS Sentinel France - Route de St Symphorien - BP 69
85130 Les Landes Génusson
• Alimentazione campanello : 3*C / LR14 non fornite.
• Alimentazione pulsante : 1*12 V fornite.
• Dimensioni 88*127*25 mm.
• Questo campanello è strettamente riservato all’utilizzo in ambienti interni.
• Viti in dotazione.
• Portata 30 metri in campo libero.
Caratteristiche
DISTRIBUITO DA :
SCS Sentinel France - Route de St Symphorien - BP 69
85130 Les Landes Génusson
• Alimentación Timbre : 3*C / LR14 (no incluidas).
• Alimentación Pulsador : 1*12V incluida.
• Dimensiones: 88*127*25 mm.
• Utilización únicamente interior.
• Tornillos suministrados.
• Alcance de 30 metros en campo libre.
Características
DISTRIBUIDOS POR :
SCS Sentinel France - Route de St Symphorien - BP 69
85130 Les Landes Génusson
• Chime power supply : 3*C / LR14 (not included).
• Button power supply : 1*12V (included).
• Dimensions: 88*127*25 mm.
• The chime is strictly reserved for interior use.
• Screws supplied.
• 30-metre free-eld range.
Characteristics
DISTRIBUTED BY:
SCS Sentinel France - Route de St Symphorien - BP 69
85130 Les Landes Génusson
Eigenschaften
VERTRIEBEN DURCH :
SCS Sentinel France - Route de St Symphorien - BP 69
85130 Les Landes Génusson
• Stromversorgung Türgong : 3*C / LR14 (nicht enthalten).
• Stromversorgung Drucktaster : 1*12V (im Lieferumfang).
• Abmessungen 88*127*25 mm.
• Dieser Türgong ist ausschließlich für den Gebrauch im Innenbereich bestimmt.
• Mitgelieferten Schrauben.
• Reichweite 30 m im Freifeld.
Installation
1.
Installation
1.
Instalación
1.
Installazione
1.
Montaż
Installatie
Installation :
• Öffnen Sie die Klingel durch Drücken der 2 Seiten zusammen, legen Sie 3 x C / LR14 (nicht enthalten).
• Öffnen Sie die Batterie Druckknopf mit einem Schraubenzieher, legen Sie die 12V-Batterie (im Lieferumfang).
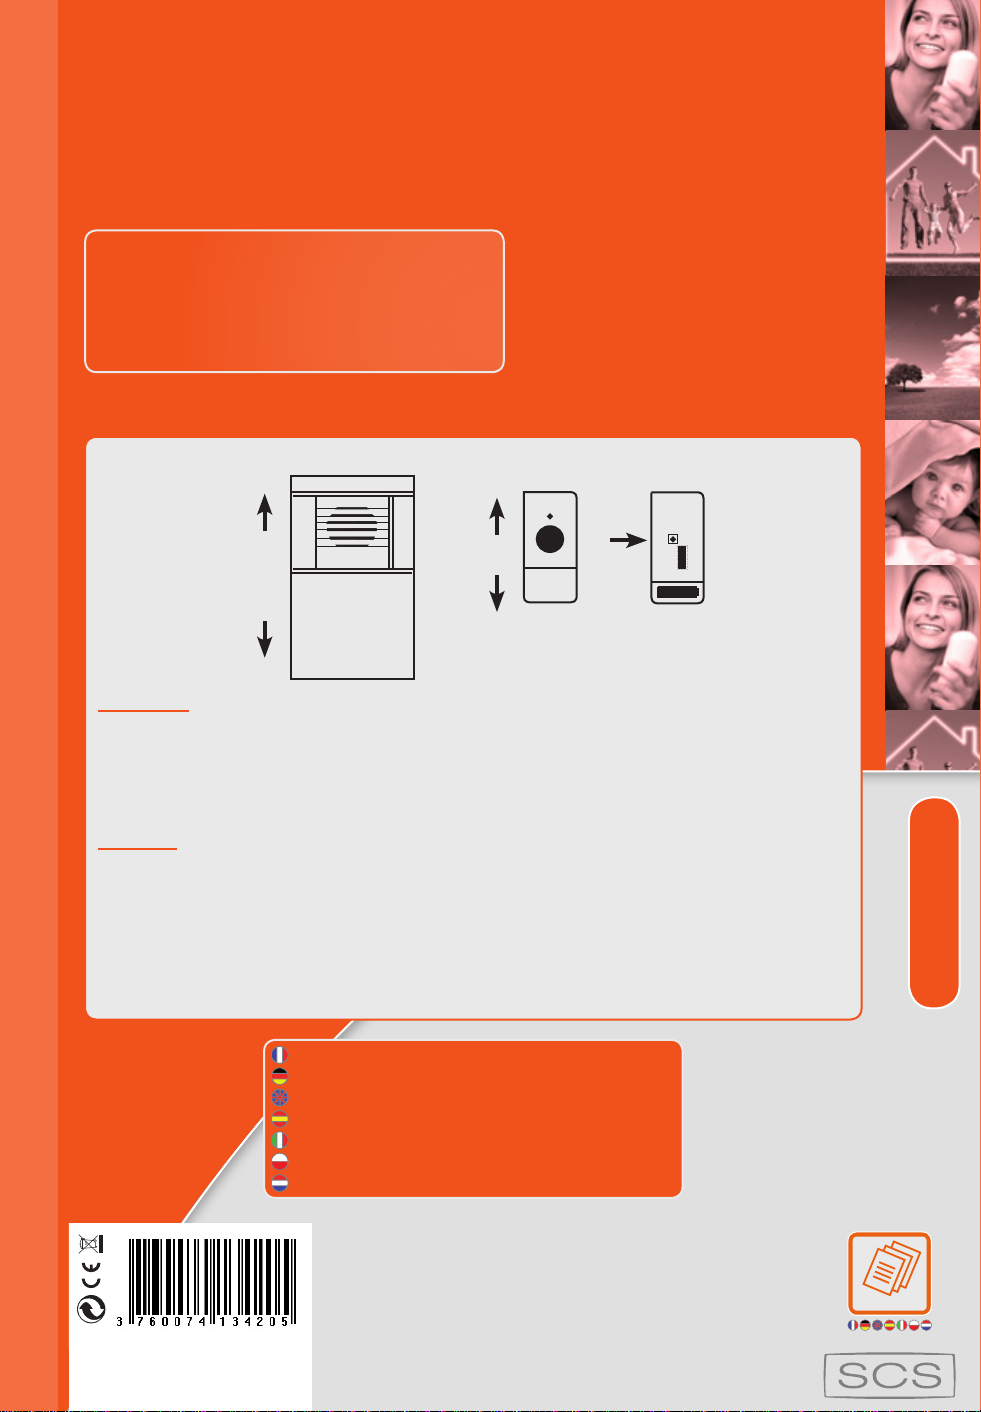
• Position und befestigen Sie die Klingel und Taste vertikal an der Wand (siehe Abbildung oben) mit Schrauben und Dübel einstecken.
Wichtig:
• Installieren Sie keine Klingel an der Tür oder über einer Wärmequelle (Heizung).
• Der Taster ist wetterfest aber nicht wasserdicht, vergewissern Sie sich, um an einem geeigneten Ort intall oder eine Silikondichtung um den Knopf.
• Das Glockenspiel ist beschränkt auf den Innenbereich.
• Die Klingel und Taster, einfach zu installieren, muss unbedingt senkrecht eingebaut werden. Alle verschiedenen Posen würde die Garantie annullieren.
Installation :
• Open the chime by pressing the 2 sides together, insert 3 x C / LR14 (not included).
• Open the battery push button with a screwdriver, insert the 12V battery (included).
• Position and attach the chime and button vertically on the wall (see diagram above) using screws and anchors provided.
Important :
• Do not install a chime on a door or above a heat source (heater).
• The push button is weatherproof but not waterproof, make sure to intall in a suitable location or make a silicone seal around the button.
• The chime is restricted to indoor use.
• The chime and push button, easy to install, must imperatively be installed vertically. All different poses would cancel the warranty.
Instalación :
• Abra el timbre pulsando los 2 lados, juntos, introduzca 3 C / LR14 (no incluidas).
• Abrir la parte de la batería con un destornillador, introduzca la batería de 12 V (incluida).
• Coloque y je el timbre y el botón en posición vertical sobre la pared (ver diagrama anterior) con tornillos y anclajes incluidos.
Importante:
• No instalar un timbre en una puerta o encima de una fuente de calor (calefacción).
• El botón pulsador es resistente a la intemperie, pero no a prueba de agua, asegúrese de instalar el pulsador en un lugar adecuado o hacer una junta de silicona alrededor del botón.
• El Timbre está restringida a los espacios interiores.
• El timbre y el pulsador, fácil de instalar, obligatoriamente debe ser instalado en posición vertical. Todas las diferentes poses anularía la garantía.
Installazione
• Aprire la suoneria premendo il tasto 2 lati insieme, inserire 3 x C / LR14 (non incluse).
• Aprire il pulsante della batteria con un cacciavite, inserire la batteria 12V (inclusa).
• Posizionare e collegare le suoneria e pulsante in verticale sul muro (vedi schema sopra) con viti e tasselli in dotazione.
Importante:
• Non installare un campanello su una porta o sopra una fonte di calore (caldaia).
• Il pulsante è resistente alle intemperie ma non è impermeabile, assicuratevi di intall in un luogo idoneo o fare un sigillo di silicone attorno al pulsante.
• Il campanello è limitato al solo uso interno.
• Campanello e pulsante, facile da installare, deve imperativamente essere installato verticalmente. Tutte le diverse pose annullerebbe la garanzia.
Montaż dzwonek :
• Open gongu naciskając 2 stronach, wstawić 3 x C / LR14 (nie dołączone).
• Otwórz przycisk za pomocą śrubokręta, włóż akumulator 12V (w zestawie).
• Ustawić i podłączyć dzwonek i przycisk pionowo na ścianie (patrz wykres powyżej) za pomocą śrub i kołków pod warunkiem.
Ważne:
• Nie instaluj dzwonek do drzwi lub nad źródłem ciepła (ogrzewanie).
• Przycisk jest wodoodporny, ale nie jest wodoszczelny, upewnij się, nienaruszony w odpowiednim miejscu lub dokonać silikonowej uszczelki wokół przycisku.
• gong jest ograniczone do użytku wewnątrz pomieszczeń.
• dzwonek i przycisk, łatwy w instalacji, musi bezwzględnie być instalowane pionowo. Wszystkie różne pozy unieważni gwarancję.
Installatie de bel :
• Open de gong door te drukken op de 2 kanten op elkaar, plaatst u 3 x C / LR14 (niet meegeleverd).
• Open het batterijvak drukknop met een schroevendraaier, steek de 12V batterij (inbegrepen).
• Plaats en verticaal bevestigen de bel en knop aan de muur (zie afbeelding hierboven) met behulp van schroeven en pluggen.
Belangrijk:
• Doe een gong niet installeren op een deur of boven een warmtebron (verwarming).
• De drukknop is weerbestendig maar niet waterdicht, zorg ervoor dat intall in een geschikte locatie of een siliconen afdichting rond de knop.
• De gong is beperkt tot gebruik binnenshuis.
• De bel en drukknop, eenvoudig te installeren, moet verplicht verticaal geplaatst worden. Alle verschillende poses zou de garantie vervalt
ONDEIS 30 W.indd 2 04/01/2011 14:48:45