Scynce DRAGON XL 600 Installation and operating instructions

the science of yield
USER MANUAL &
INSTALLATION GUIDE

2
the science of yield
MANUAL FOR END USER AND INSTALLER
Thank you for purchasing the Dragon XL. This manual contains all the information needed to quickly familiarize yourself with
the product. Please review this information carefully, before installing and/or operating the product.
We recommend you keep this manual on hand for future reference.
For further information please contact:
SCYNCE
4641 East Ivy Street, Mesa, AZ 85205
www.scynce.ag
Page 3
Page 3
Page 4
Page 4
Page 5
Page 6
Page 6
Page 9
Product description
Specifications
Thermal management
Light output
Light energy distribution
Precautions and safety instructions
Installation
Maintenance & Troubleshooting
TABLE OF CONTENTS

3
the science of yield
PRODUCT DESCRIPTION
SPECIFICATIONS
INTENDED USE/S
Dragon XL 1200 and XL 600 are fixtures intended for
overhead illumination of horticultural crops. For other
applications in professional horticulture, please contact a
representative at SCYNCE.
Any use other than the approved intended use described
above is considered unintended use.
SCYNCE cannot be held responsible for possible
consequential damage caused by improper, incorrect or
inadvisable use.
SYMBOLS USED
The following symbols are used in this manual to draw attention to
specific topics or actions
A warning indicates the possibility
of injury to the user and/or damage
to the product should the user
not perform the procedures as
described.
A note alerts the user to potential
problems which may occur if a
procedure is not carried out as
described.
Not for use in dwellings
WARNING
ATTENTION
Manufactures Identification 120deg Optic: 52617 - 70deg Optic: 52616
Name: Dragon XL 1200
Market Introduction: 2017
GENERAL SPECS
MECHANICAL
TECHNICAL SPECIFICATIONS
Product Dims (L.W.H): 1232 x 178 x 131 mm (48.5 x 7 x 5 in)
Product Weight: 18.14 kg (40lbs)
Housing : Powder coated aluminum
Ingress Protection Rating: IP66
Installation Environment Suitable for damp locations
ELECTRICAL
Main Voltage +/- 10%: 120 – 277 VAC. 50/60 Hz
Power Draw: Max. 1280 W
Power Factor: > 0.9
Color Spectra: Four channels: 2700K White / 4000K White / 6500K White / 660 nm Red
Dimmable: Four channel independent dimming, 0%-100%, with Scheduling
DRAGON XL 1200

4
the science of yield
ELECTRICAL
OTHER
OTHER
Main Voltage +/- 10%: 120 – 277 VAC. 50/60 Hz
Power Draw: Max. 640 W
Power Factor: > 0.9
Color Spectra: Four channels: 2700K White / 4000K White / 6500K White / 660 nm Red
Dimmable: Four channel independent dimming, 0%-100%, with Scheduling
Ambient Operating Temp: -40 ~ 40°C
Certification: Tested to UL1598, UL8750, UL8800, CSA C22.2 NO 250.0-08, CSA C22.2 NO. 250.13
Warranty: 5 year (standard) please refer to https://www.scynce.ag/product-warranty for full details
Ambient Operating Temp: -40 ~ 40°C
Certification: Tested to UL1598, UL8750, UL8800, CSA C22.2 NO 250.0-08, CSA C22.2 NO. 250.13
Warranty: 5 year (standard) please refer to https://www.scynce.ag/product-warranty for full details
Manufactures Identification 120deg Optic: 52619
70deg Optic: 52618
Name: Dragon XL 600
Market Introduction: 2018
MECHANICAL
TECHNICAL SPECIFICATIONS
Product Dims (L.W.H): 671 x 178 x 131 mm (26.5 x 7 x 5 in)
Product Weight: 9.97 kg (22lbs)
Housing: Powder coated aluminum
Ingress Protection Rating: IP66 Suitable for damp locations
Not for use in dwellings
GENERAL SPECS
DRAGON XL 600

5
the science of yield
To ensure safe operation of the lighting equipment it is
necessary to control the temperature of the room by
mechanical ventilation or cooling system to below the
maximum ambient operating temperature of 40°C (104°F).
LIGHT OUTPUT
The Dragon XL1200 & XL600 have two distribution optical angle options. 70˚ distribution angle has eective penetration of
light into the crop and is typically used in greenhouse applications where the fixtures need to be mount 6+ feet over the canopy.
120˚ distribution angle has exceptional uniformity of the light onto the crop and is our standard option for indoor, warehouse and
greenhouse where 100% artificial light is required.
120º OPTIC 70° OPTICS
Luminous Intensity Distribution Curve Luminous Intensity Distribution Curve
OPTICAL DISTRIBUTION
The luminosity distribution curve for the 70˚ and 120˚ optics are depicted below. The 120˚ optic oers intensity (radiated energy) that is
slightly brighter on the outside of the beam. When hanging fixtures with 120˚ optic it is important to overlap the beams to achieve an even
intensity on the plant canopy. The 70˚ optic oers a higher intensity that is evenly distributed across the 70˚ beam. By controlling the
beam with optics, light energy is gathered and focused, taking full advantage of the LED directed radiation pattern. If you need assistance
with fixture layout to achieve a desired PAR level at the plant contact your Scynce sales representative, we can help.
THERMAL MANAGEMENT
All Scynce fixtures have built-in dynamic thermal
monitoring. The Dragon XL 1200/XL 600 utilizes
an active cooling system. Should the light begin to
overheat, the fan will automatically increase in speed. If
the light continues to overheat the onboard processor
will automatically reduce output to protect the light
while still maintaining a minimal level of output.
Never block the cooling ports on the Dragon XL1200
& XL 600. Doing so will cause the performance of the
product to reduce and may cause permanent damage.
Dynamic cooling air flow flow
WARNING

6
the science of yield
ENERGY DISTRIBUTION
PAR (Photosynthetically Active Radiation) is a region of the electromagnetic spectrum (400 to 700 nm) that
promotes photosynthesis.
PPF (Photosynthetic Photon Flux) tells us how much PAR a light-source emits. PPF does not measure PAR at a
specific location (such as your crop canopy), but it tells you how many photons within the PAR region are coming
out of the light source every second.
PPFD (Photosynthetic Photon Flux Density) measures the number of photons within the PAR region at a specific
location (such as your crop canopy) every second. Most PAR meters report PPFD (μmol/m2/s) measurements.
* For more detailed PAR maps, including how the fixtures work in an array, please visit: www.scynce.ag
PRECAUTIONARY MEASURES AND
SAFETY INSTRUCTIONS
WARNING
• Always adhere to the local building and electrical codes
when installing or using the fixture.
• HIGH VOLTAGE- Switch o the main voltage before
commencing installation or maintenance work.
• Do not open or disassemble the fixture, it contains no
serviceable parts inside. Opening the fixture can be
dangerous and will void the warranty.
• Never look directly into the light source while fixture is
turned on. Doing so can cause damage to the eyes.
• The end user is responsible for ensuring correct installation
and use of the product. Incorrect installation can cause
damage to the product. The warranty shall become void if
the product and/or electronic components are damaged
due to incorrect installation.
• The performance of the fixture may be compromised
if operated outside of the recommended ambient
temperature guidelines.
ATTENTION
XL 600, 120 ˚ OPTIC
4’ x 4’ Grow Area
6” Measurement point grid spacing
18” Mounting height
Average PPFD: 827 umol/m2/s
XL 1200, 120 ˚ OPTIC
4’ x 6’ Grow Area
6” Measurement point grid spacing
24” Mounting height
Average PPFD: 842 umol/m2/s
a. 120 degrees is the ideal optic for indoor and vertical applications. The fixtures can be mounted between 12” (for vegetables) and
36” (for taller flowering plants) over the canopy.
b. 70 degrees - This will be ideal for greenhouses and indoor applications where the fixtures need to be mounted much higher and
further away from the canopy.

7
the science of yield
• THIS PRODUCT MUST BE INSTALLED IN
ACCORDANCE WITH THE APPLICABLE
INSTALLATION CODE BY A PERSON FAMILIAR
WITH THE CONSTRUCTION AND OPERATION OF
THE PRODUCT AND THE HAZARDS INVOLVED
ATTENTION
INSTALLING THE FIXTURE
INSTALLATION PREP
MOUNTING THE LIGHT FIXTURE
ELECTRICAL CONNECTION
CONTROLING THE LIGHT
1. Switch o main voltage
2. Refer to your light plan. Arrange boxed light
fixtures in specified mounting locations.
3. Remove the fixture from the packaging and
check contents.
4. Gather any additional tools and/or hardware that
may be required to mount the fixture.
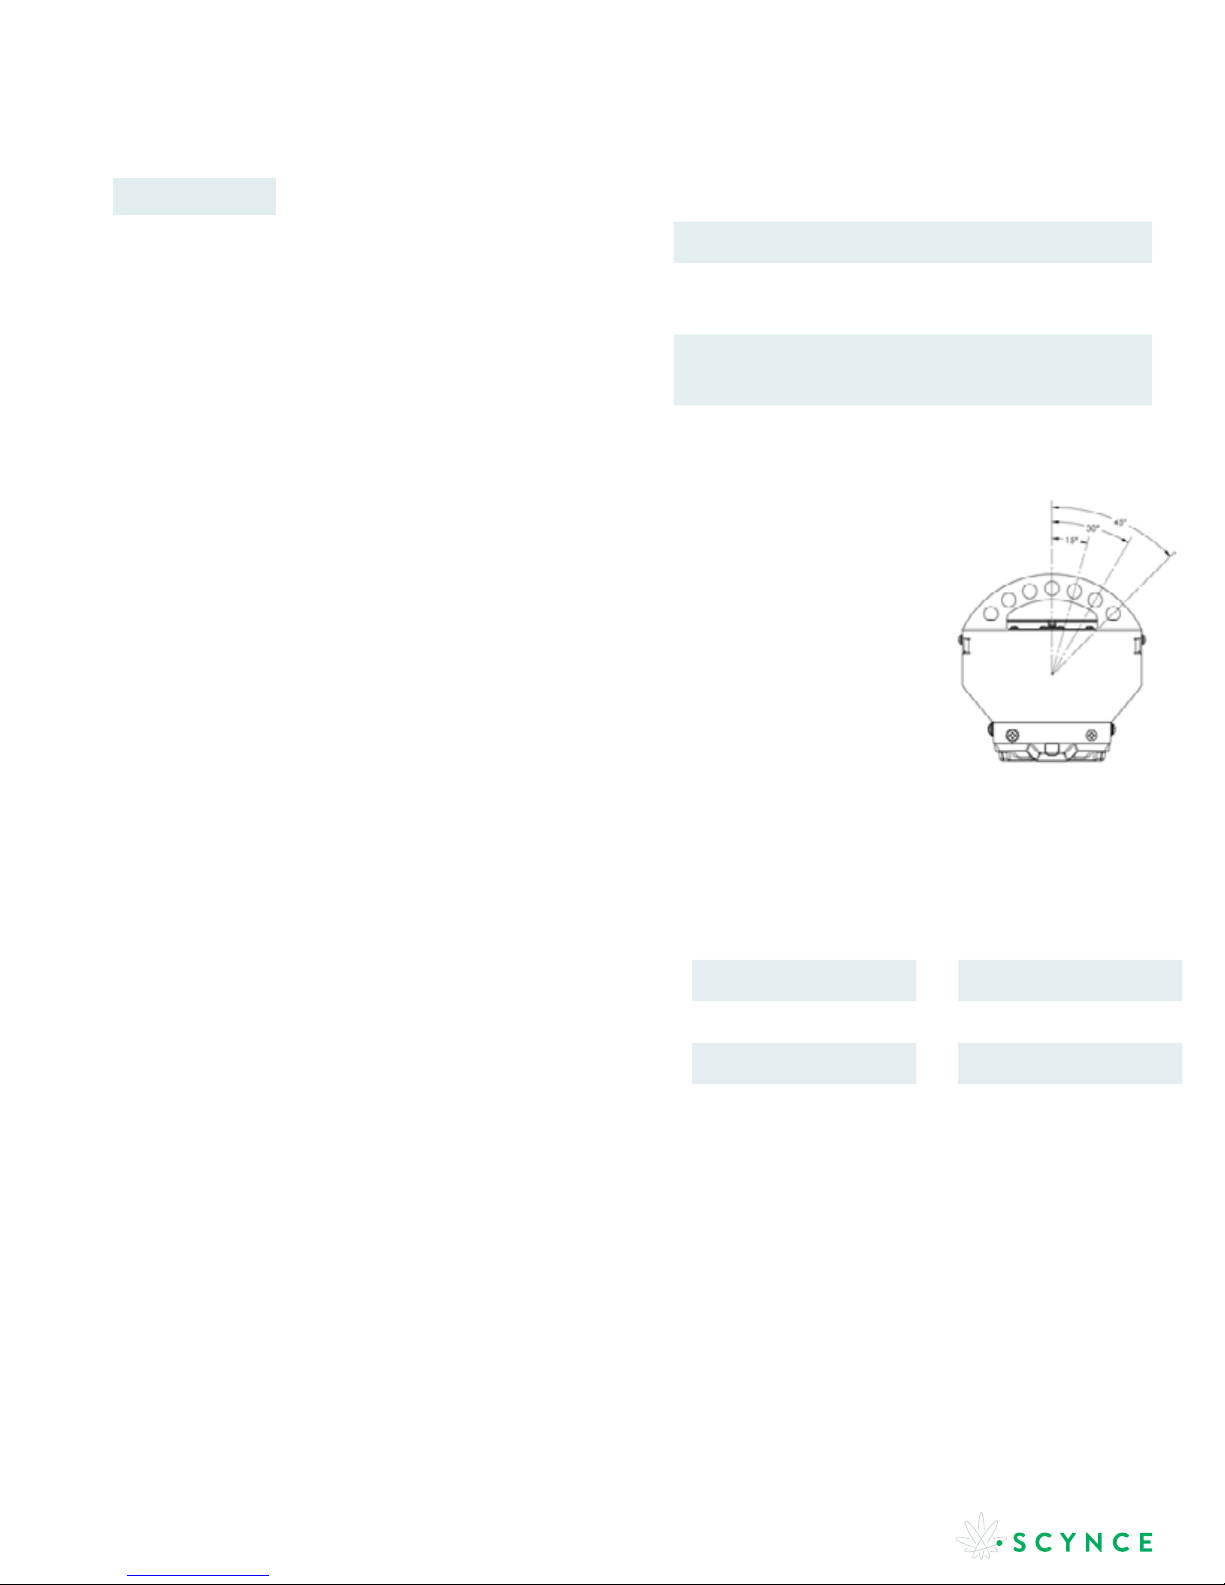
The Dragon XL 1200/LX 600 is designed to hung using the mounting brackets at either end
of the fixture’s cowling. There are four mounting hole options, each of which will aim the
fixture at a dierent angle. The optional aiming angles are; 0° 15°, 30°, and 45°.
See Figure 1 for additional details.
When mounting the Dragon XL1200 or XL600 fixtures in an array a minimum distance of 8
inches side to side and a minimum distance of 1 inch end to end must be maintained. When
mounting next to a ceiling or wall, movable partitions, and the like, insure a minimum distance
of 1.5 inches is between the fixture and the ceiling and 8 inches between the fixture and the
wall and other adjacent objects.
Dragon XL 1200/XL 600 is equipped with a 7ft power cord,
terminated with a standard wall pug (NEMA 5-15).
Simply plug the light in and you are ready to go.
Always ensure that fixtures are compliant with local building codes.
When routing the fixture power cord ensure that;
- The cord is not concealed or extended through a wall, floor,
ceiling, or other parts of the building structure.
- The cord is not located above a suspended ceiling or
dropped ceiling.
- The cord is not permanently axed to the building structure.
- The cord is routed so that it is not subject to strain and is
protected from physical damage.
- The cord is visible over its entire length.
Dragon XL 1200/XL 600 is equipped with four
independent channels of LEDs (White 2700K, White
4200K, White 6000K, and Red 600 nm). Each
channel can be independently dimmed from 0% to 100%.
Channel dimming can be adjusted on-demand using the
mobile app (See Mobile App Instructions for details) or
by setting up an embedded schedule in the light (See
Scheduling Instructions for details).
Figure 1: Fixture
mounting detail
To ensure safe operation of the lighting equipment it is
necessary to control the temperature of the room by
mechanical ventilation or cooling system to below the
maximum ambient operating temperature of 40ºC (104ºF).
SINGLE
PHASE CORD
TERMINATION
DOUBLE
PHASE CORD
TERMINATION
BLACK Line
WHITE Neutral
GREEN Ground
BLACK Line
WHITE Line
GREEN Ground

8
the science of yield
MAINTENANCE
WARNING
• High Voltage - Switch o the main voltage before commencing maintenance work.
• Caution - Fixture reaches high temps while in use.
• Do not open or disassemble the product. Opening the product can prove hazardous and will void the warranty.
• Caution - Risk of Fire
• Caution - Risk of shock
ATTENTION
ATTENTION
• Check the product at regular intervals for build-up of dust and dirt. Clean the product if necessary.
Contamination can lead to overheating and reduced light output performance.
• Clean the fixture with water and a damp cloth or a polycarbonate safe cleaner such as Novus #1 Cleaner.
Ensure that the polycarbonate lens is always clean.
In the event that the product is defective or damaged, contact the dealer from whom you purchased the fixtures, or
SCYNCE directly. Never switch on a defective or damaged fixture.
Do Not remove or
damage the Gore
breathers. Removal or
damage of the breather
could allow condensation
and contaminants to
enter the fixture.
Gore Breather
(white)
• Always allow the fixture to cool to room temperature before cleaning it.
• Never clean the fixture with corrosive cleaning agents or other aggressive liquids. The following cleaners are
known to cause damage to polycarbonate.
o Solvents; Acetone, Alcohol…
o Window Cleaner; Windex, 409…
o Alkaline Cleaners
• Never use abrasive cleaners, abrasive pads, or gritty cloths to clean, the polycarbonate lenses will scratch.
• Never scrape the polycarbonate lenses to remove build-up. Only use a vinegar and water solution (1:100 ratio)
to remove build-up of limescale on the lens.

9
the science of yield
The fixture does not emit any light. Reset the fixture by disconnecting the main voltage for more than 5 seconds and
then reconnect.
In the event that the fixture switches o again, lower the ambient temperature.
Check main voltage line for correct voltage range (120-277vac).
Reload default settings.
If the issue persists, contact supplier for assistance.
Only half of the fixture lights turn on Reset the fixture by disconnecting the main voltage from the fixture for more than
5 seconds and then reconnecting.
If the issue persists, contact supplier for assistance.
The fixture emits too little light when
compared to the other fixture(s).
Reload default settings.
Contact the installer and have the wiring checked.
If the issue persists, contact supplier for assistance.
Fixture will not respond to Dim Control. Reload default settings.
Contact the installer and have the wiring checked.
If the issue persists, contact supplier for assistance.
TROUBLESHOOTING
WARNING ATTENTION
Never switch on a defective or damaged fixture. In the event the
product is defective or damaged, contact the dealer where you
purchased the fixture or contact SCYNCE directly.
In the event a single fixture is not working correctly, disconnect power from circuit
and re-apply power prior to any other trouble shooting.
WHAT CAN YOU SEE? WHAT SHOULD I DO?
Do not open or disassemble the product. Opening the
product can prove hazardous and will void the warranty.

10
the science of yield
PRODUCT DIMENSIONS
117
178
171
122
6X 15°
1232
1126
74
131
2X 185

11
the science of yield
PRODUCT DIMENSIONS
116.8
171
117
159
6X 18°
185
671
131
565
60
This manual suits for next models
1
Table of contents
Other Scynce Lawn And Garden Equipment manuals