SD GlucoNavii Link0.3 NFC User manual

Link 0.3 NFC
Link 0.3 NFC
Mentor NFC
Men
tor
tor
tor
tor
tor
tor
tor
tor
tor
tor
tor
tor
tor
tor
tor
tor
tor
tor
tor
tor
tor
tor
tor
tor
tor
tor
tor
NF
NF
C
Link0.3
NFC
FCC ID : RPJ01GM14
0168
0123

I
SD GlucoNavii® Link0.3 NFC BLOOD GLUCOSE MONITORING SYSTEM
Dear SD GlucoNavii® Link0.3 NFC System Owner;
Thank you for choosing SD GlucoNavii® Link0.3 NFC Blood Glucose
Monitoring System. Your new SD GlucoNavii® Link0.3 NFC Blood Glucose
Monitoring System is an important tool that can help you better manage
your diabetes. Important steps for using the System are inside this guide.
Please read it carefully.
If you have questions, we are here to help.
Please contact SD Biosensor, Inc.
Tel : +82-31-300-0400
Fax : +82-31-300-0499
website : www.sdbiosensor.com
We oer assistance 24 hours a day, 365 days a year in many languages.
You can also visit www.sdbiosensor.com for diabetes management tools
and product demonstrations.
Please refer to the instructions with following symbols in this User
Instruction Guide.
To identify conditions
or practices that could
result in damage to
equipment or other
property.
To provide an additional
useful information.
Before using any product to test your blood glucose, read
all instructions and practice the test. Do all quality control
checks as directed and consult with a diabetes health
care professional. These recommendations apply to all
blood glucose monitoring systems and are supported
by the American Association of Diabetes Educators, the
American Diabetes Association, the U.S. Food and Drug
Administration, and the Advanced Medical Technology
Association.
CAUTION
NOTE
NOTE
nuGsWUZGumj|GluYWXZW[X^YUGGGX YWXZTW[TX^GGG㝘䟸G\aXYa[X

2
SD GlucoNavii® Link0.3 NFC BLOOD GLUCOSE MONITORING SYSTEM
TABLE OF CONTENTS
Chapter 1 : Understanding Your New System
1. Before You Start Testing
2. Special Information for Healthcare Providers and
Caregivers
3. Indication for Use
4. Product Description and the Principle of the use
5. The Complete SD GlucoNavii® Link0.3 NFC Blood
Glucose Monitoring System
6. SD GlucoNavii® Link0.3 NFC Meter
7. SD GlucoNavii® Link0.3 NFC
8. SD GlucoNavii® Link0.3 NFC Accessories
9. Changing the Battery
10. Meter Set up
11. Using SD GlucoNavii® Link0.3 NFC Test Strips
Chapter 2 : Control Solution Test
1. Performing a Control Solution Test
2. Troubleshooting Control Solution Test
Chapter 3 : Testing Your Blood Glucose
1. Getting a Drop of Blood
2. Performing a Blood Glucose Test
3. Understanding Test Results
4
4
6
6
6
7
8
12
13
14
16
26
TABLE OF CONTENTS
28
29
32
34
34
36
38
nuGsWUZGumj|GluYWXZW[X^YUGGGY YWXZTW[TX^GGG㝘䟸G\aXYa[X

3
SD GlucoNavii® Link0.3 NFC BLOOD GLUCOSE MONITORING SYSTEM
TABLE OF CONTENTS
Chapter 4 : Using NFC function
1. Information on NFC function
2. Information on Caution for NFC
3. Using NFC function
4. How to use GlucoNavii App
5. How to use GlucoNavii DMS for PC
Chapter 5 : Using the Meter Memory
1. Searching Test Results
2. Downloading results to a computer
Chapter 6 : Maintenance and Troubleshooting
1. Performing a SD Glucose check strip
2. Cleaning the meter
3. Maintenance, Testing and Transportation
4. Cleaning the Lancing Device
5. Screen Messages and Troubleshooting
6. Warnings, Precautions and Limitations
Chapter 7 : Product Technical Information
1. System Specications
Annex 1 : Information for Healthcare Professionals
Annex 2 : Symbol
Annex 3 : References
40
40
40
41
42
43
45
46
50
51
51
52
53
54
55
62
64
64
66
67
69
nuGsWUZGumj|GluYWXZW[X^YUGGGZ YWXZTW[TX^GGG㝘䟸G\aXYa[X

4
Understanding Your New System
SD GlucoNavii® Link0.3 NFC BLOOD GLUCOSE MONITORING SYSTEM
CHAPTER 1 :
Understanding Your New System
The SD GlucoNavii® Link0.3 NFC Blood Glucose Monitoring
System
1. Before You Start Testing
About the meter and test strips
tCarefully read and follow the instructions in the User
Instruction Guide and Package Inserts for the test strips
and SD Glucose control solution. It is very important to
follow the instructions in order to prevent an incorrect
result or improper treatment.
tThe meter, test strips, and SD Glucose control solution are
only for use outside the body (in vitro).
tYour new meter is designed for testing fresh capillary
whole blood samples (for example, blood from your
ngertip, palm, upper arm, or forearm) or fresh venous
blood.
tOnly use SD GlucoNavii® Link0.3 test strips. Other test
strips will give inaccurate results or E-1 error message.
tDo not use the SD GlucoNavii® Link0.3 NFC blood glucose
monitoring system for testing of serum or plasma or
arterial blood.
tInspect the container of test strips before using them for
the rst time. If you see any damage to the container cap
or if anything prevents the cap from closing properly, do
not use the test strips. Contact SD Biosensor, Inc. Damaged
test strips can cause inaccurate results, which could lead
to improper treatment.
About your new meter
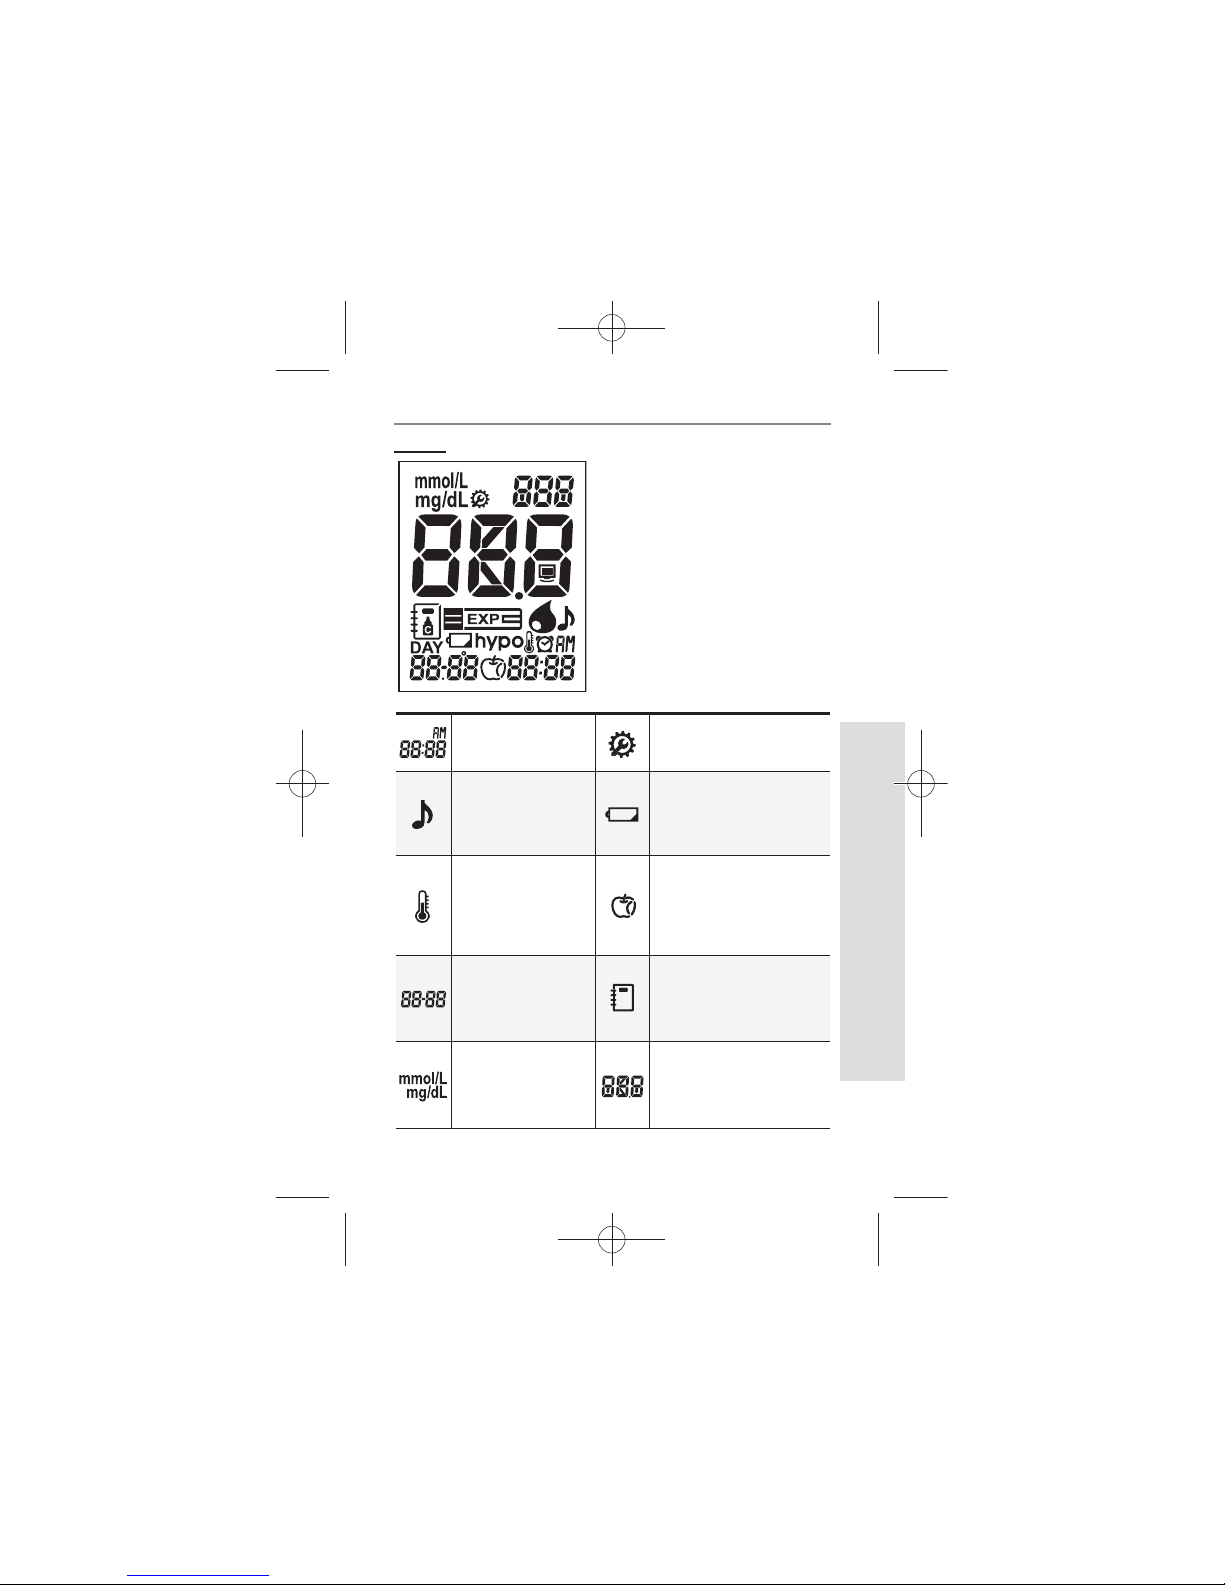
tSet the beep, date, time, hypo warning, post-meal alarm
and alarm on your meter before you begin testing.
tSD GlucoNavii® Link0.3 NFC system has been found to be
accurate at altitudes up to 12,388 feet. (3,776 meters)
nuGsWUZGumj|GluYWXZW[X^YUGGG[ YWXZTW[TX^GGG㝘䟸G\aXYa[X

5
Understanding Your New System
SD GlucoNavii® Link0.3 NFC BLOOD GLUCOSE MONITORING SYSTEM
tKeep the meter and testing supplies away
from small children.
tThe battery door, test strips, lancets,
protective disks, and control solution cap are
choking hazards.
tDo not eat the test strips.
tDo not swallow or inject SD Glucose control
solution, or use control solutions for any
purpose.
CAUTION
Important Information
tDehydration:
Severe dehydration resulting from excessive
water loss may cause false low results. If you believe you
are suering from severe dehydration, consult a healthcare
professional immediately.
tLow glucose results: If your test result is lower than 70
mg/dL or is shown as Lo, it may mean hypoglycemia(low
blood glucose). This may require immediate treatment
according to your healthcare professional’s recommenda-
tions. Although this result could be due to a test error, it is
safer to treat rst, and then repeat the test.
tHigh glucose results: If your test result is greater than 180
mg/dL or is shown as HI, it may mean hyperglycemia(high
blood glucose). If you do not have symptoms, rst repeat
the test. Your healthcare professional can work with you
to decide what actions, if any, you should take if you
continue to get results higher than 180 mg/dL or if you
have symptoms.
tRepeated unexpected results: If you continue to get
unexpected results, check your system with control
solution. See Checking the System with Control Solution.
If you are experiencing symptoms that are not consistent
with your blood glucose results and you have followed
all instructions in this User Instruction Guide, call your
nuGsWUZGumj|GluYWXZW[X^YUGGG\ YWXZTW[TX^GGG㝘䟸G\aXYa[X

6
Understanding Your New System
SD GlucoNavii® Link0.3 NFC BLOOD GLUCOSE MONITORING SYSTEM
healthcare professional. Never ignore symptoms or make
signicant changes to your diabetes control program
without speaking to your healthcare professional.
tConsult your physician to determine if it is appropriate for
your child to be taught how to use the meter system or
any other medical products.
2. Special Information for Healthcare Providers and
Caregivers
tDo not use this device to measure blood glucose in
people who are experiencing cardiovascular collapse
(severe shock) or decreased peripheral blood ow.
tHematocrit: A hematocrit (percentage of your blood
that is red blood cells) that is over 60% or below 20% can
cause false results.
3. Indication for use (Purpose of the devices)
Your new SD GlucoNavii® Link0.3 NFC meter and
accessories
work together to measure the amount of glucose (sugar)
in your blood.
Your SD GlucoNavii® Link0.3 NFC blood glucose
monitoring
system is indicated for monitoring glucose in fresh
capillary whole blood or fresh venous blood. Testing
is done outside the body. (in vitro diagnostic use) This
system is indicated for home (over-the-counter or OTC) by
person with diabetes, or in clinical settings by healthcare
professionals, as an aid to monitor the eectiveness of
diabetes control. This system should not be used for the
diagnosis of diabetes.
The SD GlucoNavii® Link0.3 NFC blood glucose monitoring
system is suitable for self-testing.
4. Product Description and the Principle of the use
SD GlucoNavii® Link0.3 test strip is designed with an
electrode that measures glucose levels. Glucose in the
blood sample mixes with reagent on the test strip that
nuGsWUZGumj|GluYWXZW[X^YUGGG] YWXZTW[TX^GGG㝘䟸G\aXYa[X

7
Understanding Your New System
SD GlucoNavii® Link0.3 NFC BLOOD GLUCOSE MONITORING SYSTEM
cause a small electric current. The amount of current that
is created depends on how much glucose is in the blood.
SD GlucoNavii® Link0.3 NFC meter measures the current
that is created and converts the measurement to the
amount of glucose that is in the blood.
The blood glucose result is displayed on the meter’s LCD
display.
By touching a drop of blood to the tip of the SD
GlucoNavii® Link0.3 test strip, the strip’s reaction chamber
automatically draws the blood into the strip through
capillary action. When the chamber is full, SD GlucoNavii®
Link0.3 NFC meter start to measure the blood glucose
level. It is a simple and practical system for the daily
monitoring of your blood glucose level.
5. The Complete GlucoNavii® Link0.3 NFC BGMS
The system includes:
tSD GlucoNavii® Link0.3 NFC Meter
tSD Glucose Check strip
t3V battery type CR2032
tUser Instruction Guide
tQuick Guide
tCarrying Case
tLancing device
tLancet
<Option>
tSD GlucoNavii® Link0.3 Test strips
tSD GlucoNavii® Link0.3 Package Insert
tSD Glucose Control Solution
tSD Glucose Control Solution Package Insert
tSelf-test Diary
tGlucoNavii Application for Android phone
tGlucoNavii DMS for PC
tNFC Reader/Writer
nuGsWUZGumj|GluYWXZW[X^YUGGG^ YWXZTW[TX^GGG㝘䟸G\aXYa[X

8
Understanding Your New System
SD GlucoNavii® Link0.3 NFC BLOOD GLUCOSE MONITORING SYSTEM
Display
Shows blood glucose
result, messages, and
glucose result stored in
memory.
Link0.3
NFC
6. SD GlucoNavii® Link0.3 NFC Meter
Arrow Buttons
Use for meter setup and
review of memory moving
to the right and left.
ON/OFF Button
Press to turn meter ON or
OFF.
Test Strip Slot
Insert test strip here.
Battery Cover
Remove cover to
change battery.
Location of NFC function
Tap a smartphone or SD NFC
R/W for communication.
Data port
Cominucate test results
with a personal computer.
(If you have software)
nuGsWUZGumj|GluYWXZW[X^YUGGG_ YWXZTW[TX^GGG㝘䟸G\aXYa[X

9
Understanding Your New System
SD GlucoNavii® Link0.3 NFC BLOOD GLUCOSE MONITORING SYSTEM
Indicates
Measurement time
Indicates during the meter
setting
Indicates beep
setting
Warns when the
battery is low or must be
replaced
Indicates if
environmental
temperature is
exceeded during
testing
Indicates post-meal or
pre-meal
Testing date
Indicates a test result stored
in memory
Unit of test result Test result and nfc
message
Display
nuGsWUZGumj|GluYWXZW[X^YUGGG` YWXZTW[TX^GGG㝘䟸G\aXYa[Y

10
Understanding Your New System
SD GlucoNavii® Link0.3 NFC BLOOD GLUCOSE MONITORING SYSTEM
Indicates the
average result Test strip
Tell you when to
apply the sample
and indicates if you
select whole blood
for blood reference
type
Indicates a control
solution test result
Indicates alarm
setting
Indicates hypo warning
Indicates S/W communication
nuGsWUZGumj|GluYWXZW[X^YUGGGXW YWXZTW[TX^GGG㝘䟸G\aXYa[Y

11
Understanding Your New System
SD GlucoNavii® Link0.3 NFC BLOOD GLUCOSE MONITORING SYSTEM
1) Strip Stand-by Display
After turning on the meter, the below will be displayed
automatically to show the test strip icon ashing. In this
Strip Stand-by Display, it’s able to enter setting mode of the
meter or search the test results.
2) Blood Stand-by Display
If a test strip is inserted into the meter in either Strip Stand-
by Display or turning o, the below will be displayed
automatically to show the appropriate test result after
applying blood sample. And if you pull o the test strip,
it will return to Strip Stand-by Display. In this Blood Stand-
by Display, the ON/OFF button doesn’t act. But if you need
to check the meter or the test strip, you may use a control
solution. Then the control solution icon in the left-side of
test strip icon will be displayed by pressing left button
during 3 seconds.
nuGsWUZGumj|GluYWXZW[X^YUGGGXX YWXZTW[TX^GGG㝘䟸G\aXYa[Y

12
Understanding Your New System
SD GlucoNavii® Link0.3 NFC BLOOD GLUCOSE MONITORING SYSTEM
7. SD GlucoNavii® Link0.3 Test Strip
SD GlucoNavii® Link0.3 NFC System measures the amount
of glucose in whole blood. Blood is applied in the Yellow
Window (TOP EDGE) of SD GlucoNavii® Link0.3 Test Strip
and is automatically drawn into the reaction cell where
the reaction takes place.
(Top Edge)
nuGsWUZGumj|GluYWXZW[X^YUGGGXY YWXZTW[TX^GGG㝘䟸G\aXYa[Y

13
Understanding Your New System
SD GlucoNavii® Link0.3 NFC BLOOD GLUCOSE MONITORING SYSTEM
SD GlucoNavii® control solution
NFC Reader/Writer
8. SD GlucoNavii® Link0.3 NFC Accessories
1
2
Lancing Device
Cap & Comfort dial with puncture depth
selection
Arming
Knob
Release
Button
Check
Strip
Lancet SD Glucose check strip
Electrode
Arming
Knob
nuGsWUZGumj|GluYWXZW[X^YUGGGXZ YWXZTW[TX^GGG㝘䟸G\aXYa[Z

14
Understanding Your New System
SD GlucoNavii® Link0.3 NFC BLOOD GLUCOSE MONITORING SYSTEM
9. Changing the Battery
Inserting and replacing the Battery
Your meter is shipped with one 3V battery type CR2032
that needs to be inserted before testing. The battery that
comes with your meter can be found in the mesh pocket
of your carrying case. Battery life will vary depending on
usage, so always keep a spare on hand. The meter saves
battery power by automatically turning o after 1 minute
without inserting a test strip or 3 minutes with a test strip,
from non-use. If the meter does automatically shut o, all
tests in memory are saved.
STEP-1: Push the recessed plastic tab of the battery
compartment forward to ip and open the battery door.
nuGsWUZGumj|GluYWXZW[X^YUGGGX[ YWXZTW[TX^GGG㝘䟸G\aXYa[Z

15
Understanding Your New System
SD GlucoNavii® Link0.3 NFC BLOOD GLUCOSE MONITORING SYSTEM
STEP-2: Insert the 3V battery (type CR2032) into the
compartment with “+”side facing you.
STEP-3: Snap battery cover back in place.
STEP-4: Push the ON/OFF button or insert a strip to start
testing.
After inserting or replacing the battery, conrm
that the time and date are set correctly. If they
are not, use the ON/OFF and left/right buttons to
reset the meter before testing. See the“10. Meter
Set up”.
NOTE
nuGsWUZGumj|GluYWXZW[X^YUGGGX\ YWXZTW[TX^GGG㝘䟸G\aXYa[[

16
Understanding Your New System
SD GlucoNavii® Link0.3 NFC BLOOD GLUCOSE MONITORING SYSTEM
10. Meter Set up
STEP-1 : Setting the Audible Beep
1. In Strip Stand-by Display, if you press the ON/OFF
button during 3 seconds, the display for setting the
beep will appear, the rst step of the setting mode.
2. Set the beep mode on or o by pressing either
the left or the right button and then selecting the
preferred feature by pressing the ON/OFF button. If
you select the beep on feature, a‘beep’sound is made
at the same time; otherwise, if you select the beep o
feature, no sound is made.
[ During 3 sec. ]
Link0.3
[ Left or right
button ]
Link0.3 Link0.3
[ ON/OFF
button ]
nuGsWUZGumj|GluYWXZW[X^YUGGGX] YWXZTW[TX^GGG㝘䟸G\aXYa[^

17
Understanding Your New System
SD GlucoNavii® Link0.3 NFC BLOOD GLUCOSE MONITORING SYSTEM
STEP-2: Setting the Hypo warning
1. After beep setting, the display for setting the hypo
warning will appear, the second of setting mode.
2. Set the hypo warning mode ‘o’ or the result you want
to select among 60, 70, 80 mg/dL(3.3, 3.9, 4.4 mmol/L)
by pressing either the left or the right button and then
selecting the preferred feature by pressing the ON/OFF
button.
tYou can set the meter to let you know when
your result indicates a possible low blood
glucose (hypoglycemia). You can also select
what blood glucose level you want this
indicator to have 60, 70, 80 mg/dL(3.3, 3.9, 4.4
mmol/L).
tIf your results are lower than selected hypo
result, the candy symbol will appear on LCD
with a ‘beep’sound. It is very important to
manage your hypoglycemia.
NOTE
nuGsWUZGumj|GluYWXZW[X^YUGGGX^ YWXZTW[TX^GGG㝘䟸G\aXYa[^

18
Understanding Your New System
SD GlucoNavii® Link0.3 NFC BLOOD GLUCOSE MONITORING SYSTEM
STEP3: Setting the date and time
[ Date Setting ]
1. The third step of setting mode is the Date & Time
setting. After setting the hypo warning, the display for
setting Date & Time will appear, the third step of the
setting mode. Set the correct year by pressing either
the left or the right button and then select the correct
year by pressing the ON/OFF button.
Your new meter comes with a preset time and
date. You may need to change the time to your
time zone. Having the right time and date in your
meter is important if you use the meter memory.
It also helps your healthcare team interpret your
results.
NOTE
nuGsWUZGumj|GluYWXZW[X^YUGGGX_ YWXZTW[TX^GGG㝘䟸G\aXYa[^

19
Understanding Your New System
SD GlucoNavii® Link0.3 NFC BLOOD GLUCOSE MONITORING SYSTEM
[ Left or right
button ]
Link0.3 Link0.3
[ ON/OFF
button ]
2. Next will appear the setting display for month and day
format. The meter can display the month and day in
either a Month-Day (m-d) format or a Day-Month (d-
m) format. Set the preferred format on the display by
pressing either the left or the right button and select by
pressing the ON/OFF button.
3. Set the correct month or day on the display by pressing
either the left or the right button and select by pressing
the ON/OFF button.
nuGsWUZGumj|GluYWXZW[X^YUGGGX` YWXZTW[TX^GGG㝘䟸G\aXYa\W
Table of contents
Other SD Medical Equipment manuals