SDS Cuspidor 1655 Operating instructions
Summit Dental Systems
Toll Free: (800) 275-3368
www.summitdental.com
Page 1 of 24
Installation
Operation
Maintenance
Troubleshooting
Version Dec/17
1655 Cuspidor

Summit Dental Systems
Toll Free: (800) 275-3368
www.summitdental.com
Page 2 of 24
Table of Contents
Important Information............................................................................................................................ 4
Weight & Dimensions........................................................................................................................... 6
Operator’s Instructions......................................................................................................................... 7
Cleaning Your Cuspidor....................................................................................................................... 8
Post Leveling.......................................................................................................................................... 9
Installation Instructions....................................................................................................................... 10
Troubleshooting Guide....................................................................................................................... 19
Parts List............................................................................................................................................... 20
WARRANTY......................................................................................................................................... 23

Summit Dental Systems
Toll Free: (800) 275-3368
www.summitdental.com
Page 3 of 24
Congratulations!
All of us at Summit Dental Systems want you to know that your 1655
Palm Beach Cuspidor has been built with the finest materials available.
The assembly and testing was completed by technicians devoted to making
SDS products perform to all prescribed specifications.
Our five year limited warranty is just one of the ways we express our
confidence that you will be completely satisfied with your purchase.
We appreciate your support and look forward to meeting your future
professional needs through our expanding product line.
Cesar Coral
President
Summit Dental Systems
Toll Free: (800) 275-3368
www.summitdental.com
Page 4 of 24
Important Information
Technical Specifications
Factory Pre-set Air Regulator Pressure:
80 PSI
Factory Pre-set Water Regulator Pressure: 40 PSI
Handpiece Pressure:
30-35
PSI (for most high-speed handpieces)
40-45
PSI (for most low-speed handpieces)
Unpacking
Pay careful attention when unpacking the cuspidor and its accessories. Damage
caused by mishandling the equipment during unpacking or installation is not
covered under warranty.
New Owner
Please read, sign and submit the warranty registration form that is located at the
end of this manual. Failure to return this form may void the warranty.
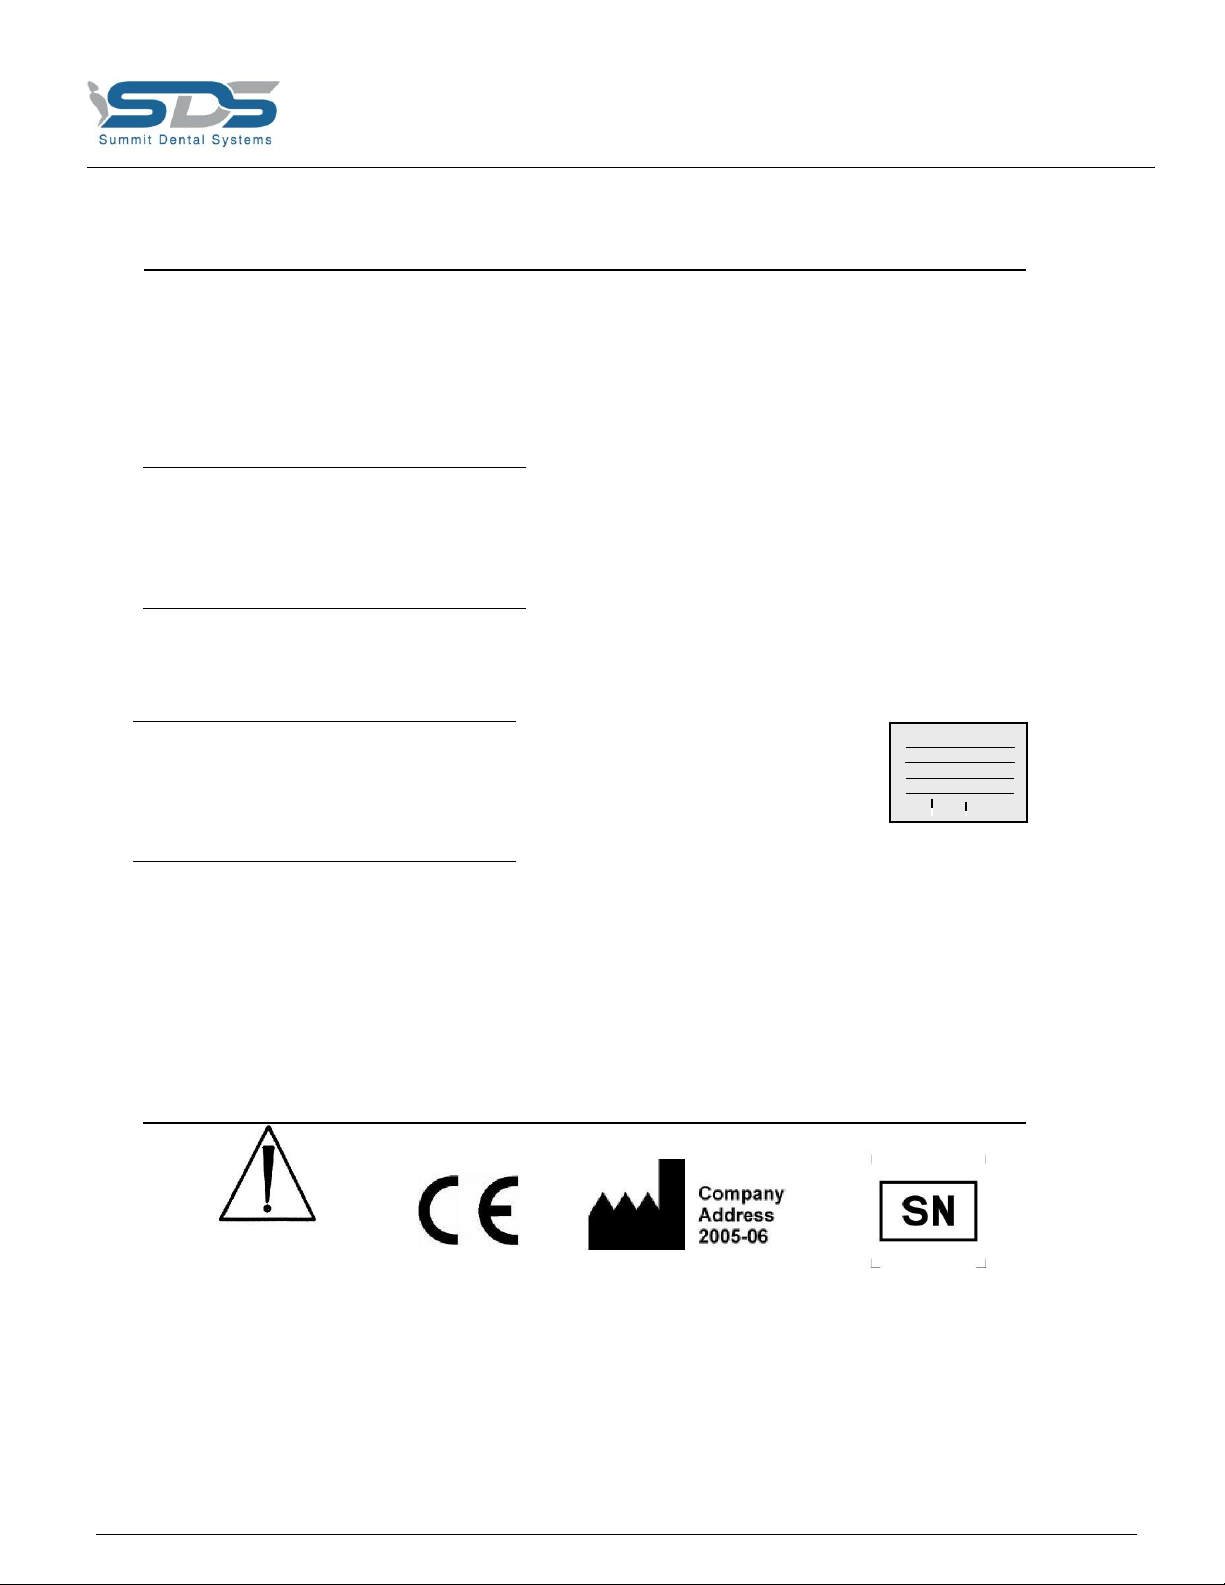
Serial Number
Record this serial number in a convenient location. You will be
asked for this number when requesting service or warranty
information. (see drawing on next page for location of label).
Warning
SUMMIT DENTAL SYSTEMS
Ft, Lauderdale, FL USA
MODEL No:
SERIAL No:
PRODUCT:
VOLTS HERTZ AMPS
Medical Electrical Equipment needs special precautions regarding EMC and
needs to be installed and put into service according to the EMC information
provided in this manual.
Portable and mobile RF communications equipment can affect Medical
Electrical Equipment.
Attention
Manufacturer and
Serial Number
CE-mark
Date of manufacture
Attention, consult
accompanying operation
instructions.

Summit Dental Systems
Toll Free: (800) 275-3368
www.summitdental.com
Page 5 of 24
European Authorized Representative
MT Promedt Consulting GmbH
Altenhofstrasse 80
D-66386 St. Ingbert, Germany
Phone: +49 (0)6894-581020
Fax: +49 (0)6894-581021
Questions?
Read this manual carefully. If you have any questions, please call Summit Dental
Systems Technical Service at 1-800.275.3368 (USA) or (954) 730-3636 (Outside
USA).
CAUTION
!When adjusting the bowl rinse or cup fill flow control valves, do not over tighten the
screws. This may result in unnecessary damage to the tubing.
CAUTION
Do not attempt to over extend the breakaway assembly. Over extension to the
!breakaway assembly may cause unnecessary damage to the cuspidor.
SUMMIT DENTAL SYSTEMS
Ft, Lauderdale, FL USA
MODEL No:
SERIAL No:
PRODUCT:
VOLTS HERTZ AMPS
Product Label
Location
The product label can be located
behind the post mounted utility
box cover.
Summit Dental Systems
Toll Free: (800) 275-3368
www.summitdental.com
Page 6 of 24
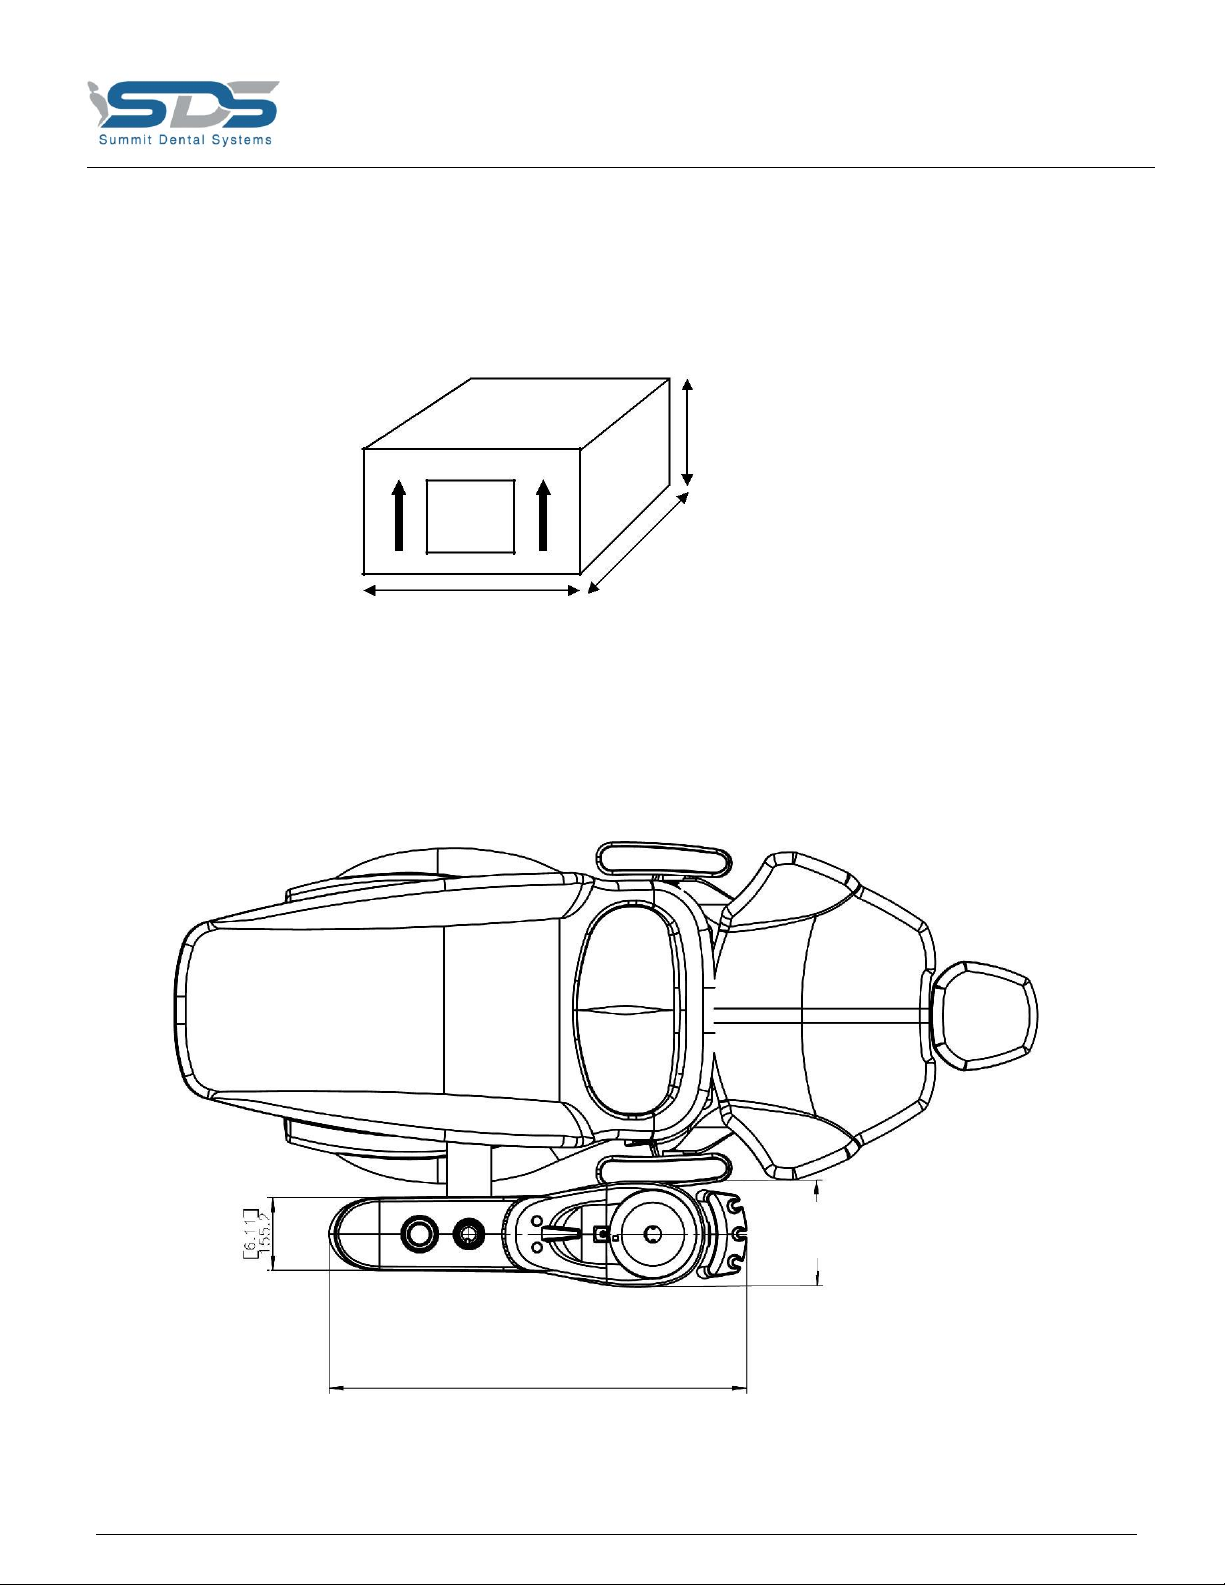
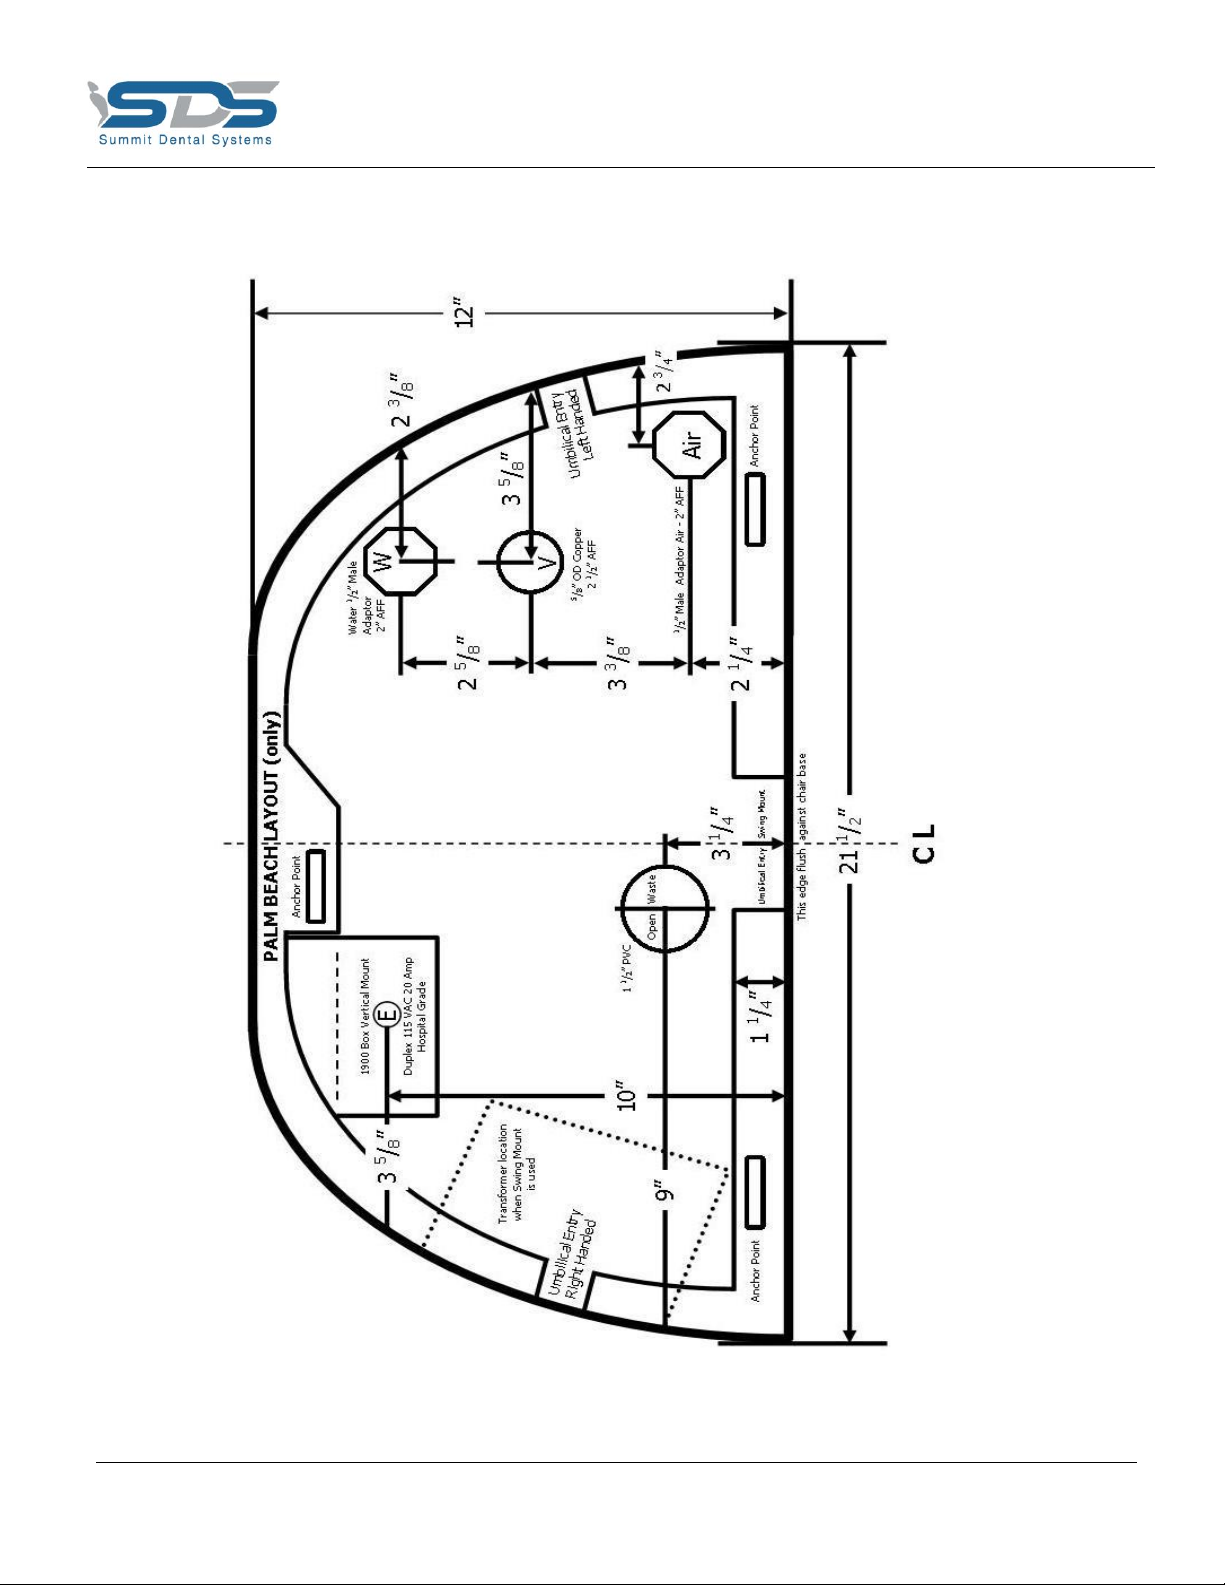
Weight & Dimensions
Shipping Information
13”/330.2mm
23.5”/596.9mm
39”/990.6mm
Shipping Weight:
54 lbs/24.49mm
General Dimensions
6.11”
8.89”
155.2mm
225.7mm
35.27” / 896mm

Summit Dental Systems
Toll Free: (800) 275-3368
www.summitdental.com
Page 7 of 24
Operator’s Instructions
A. Automatic Cup Fill Control
B. Timed Bowl Rinse
C. Solids Collector
D. City/Bottle Switch
E. Water Bottle Switch
F. Air Quick Disconnect
G. Water Quick Disconnect
H. Cup Fill Level Control
I. Bowl Rinse Time Control
J. Bowl Rinse Pressure Control
H. Cup Fill Pressure Control
•Press and release cup fill button. The Cup Fill will automatically turn
off
•Press and release bowl rinse button. The Bowl Rinse will
automatically turn off
•Move cuspidor to access collection screen for disposal
•Alternate from city or bottled water
•Pressurizes the self-contained water bottle system
•Air supply to accessories
•Water supply to accessories
•Adjusts the water level in the cup fill.
•Adjusts the amount of time water flow in the bowl rinse.
•Pinch valve on tubing. Controls amount of pressure at rinse nozzle.
•Pinch valve on tubing. Controls water pressure from cup filler spout
Summit Dental Systems
Toll Free: (800) 275-3368
www.summitdental.com
Page 8 of 24
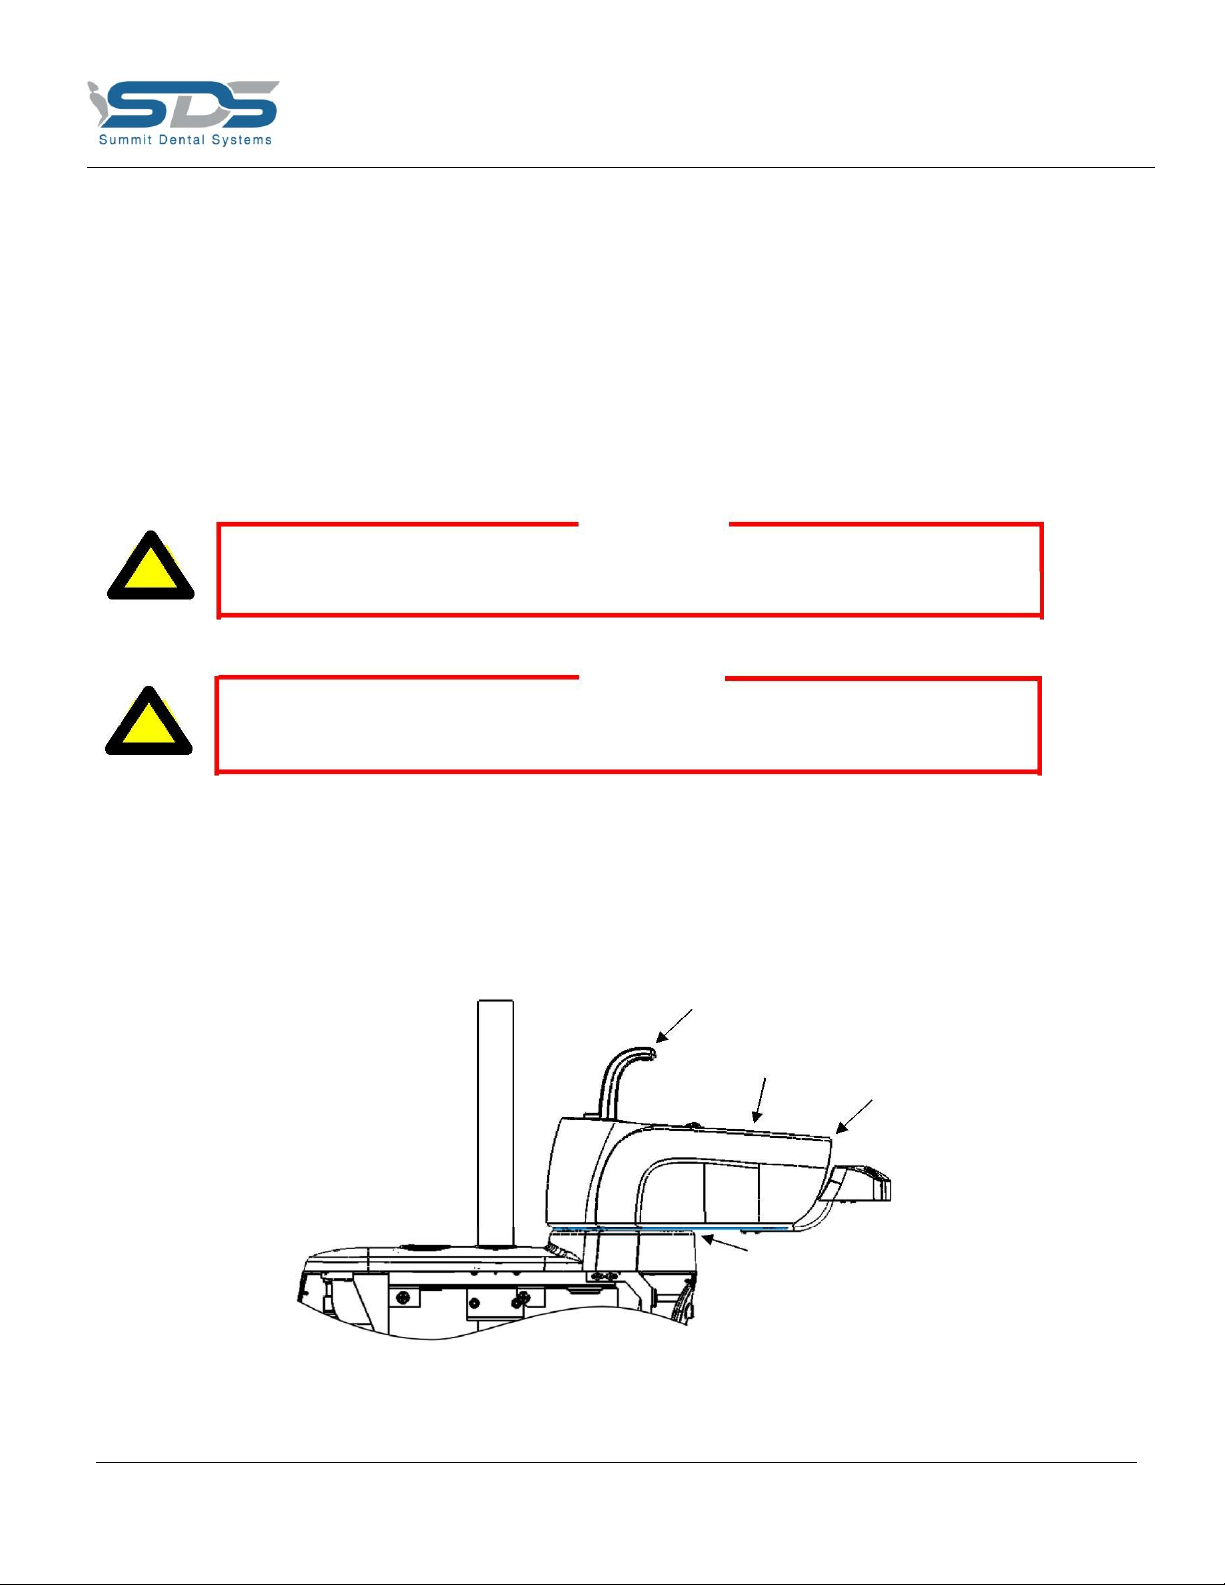
Cleaning Your Cuspidor
Daily Maintenance
At the end of every day.
1. Remove bowl screen from the cuspidor bowl and clean or discard (bio-hazard).
2. Raise the chair to its highest position and activate the bowl rinse several times, long
enough for the water to flow down the drain for approximately 60 seconds.
3. This will help prevent clogs in the drain line.
CAUTION
!Do not empty the bowl screen into the cuspidor. This can clog the cuspidor drain.
3. Remove the solids collector screen and discard.
CAUTION
!Bio-Hazard –use gloves mask and goggles.
4. Your cuspidor is designed for quick and easy cleaning. The smooth surfaces,
removable porcelain bowl and contoured spouts help facilitate more complete
cleaning.
Contoured Spouts
Bowl Screen
Porcelain Bowl
Solids Collector

Summit Dental Systems
Toll Free: (800) 275-3368
www.summitdental.com
Page 9 of 24
Post Leveling
1. Install the post with the bushing at the top; be certain that the post bottoms in the
post socket ad that the hole in the side of the post is facing toward the head of the
chair. Look at the post socket and locate the eight leveling screws (see figure above).
2. Place a 6 to 12 inch level in the upright post (a magnetic level works best). While
holding the post as upright as possible, tighten the upper four leveling screws until
they just contact the post on all four sides. Position the level so that it is in line with
the front to back level screws.
3. Level the post front to back. Now move the level 90 degrees and repeat the above
procedure with the remaining screws for leveling side to side. Re-check level in both
directions, and then fully tighten all leveling screws.
4. To ensure that the unit is absolutely level, it will be necessary to level the base
unit on the post once the post has been leveled.
Summit Dental Systems
Toll Free: (800) 275-3368
www.summitdental.com
Page 10 of 24
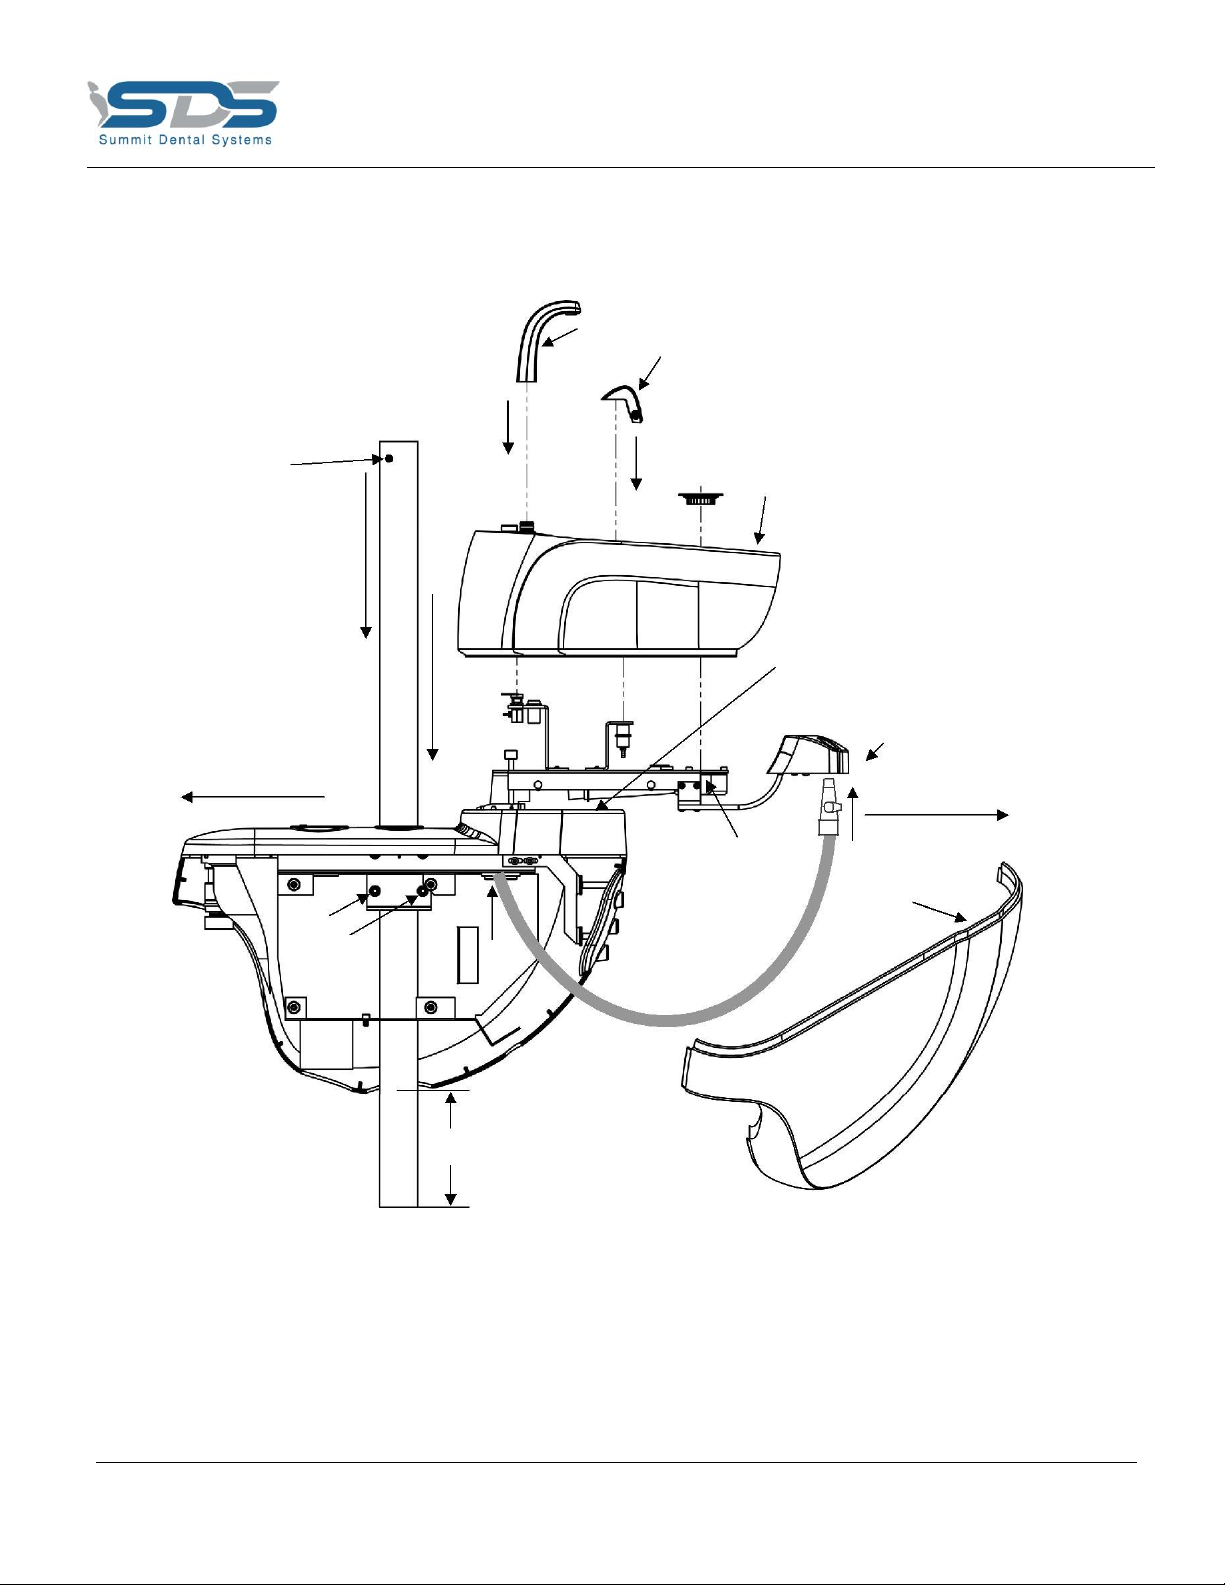
Installation Instructions
Cup Fill & Bowl
Rinse Spouts
Stop Pin
5oClock
Porcelain Bowl
Solids Canister
HVE & SE
Hangers
6oClock
12oClock
Drain Channel
Assembly
4 - ¼” Socket Set
Cover
4¼”
1. Lay cuspidor down on soft surface to prevent scratching outer cover.
2. Remove magnetic cover to expose mounting screws.
3. Insert light post into center hole of cuspidor until 4 ¼” of post protrudes out from bottom of
cuspidor.

Summit Dental Systems
Toll Free: (800) 275-3368
www.summitdental.com
Page 11 of 24
4. Tighten the two lowest ¼” socket head screws making sure that the stop pin is at 5oclock position
when cuspidor is at 12+6oclock position when mounted on chair. This position will stop the
horizontal arm of the Palm Beach light at 6oclock.
5. Lift the entire assembly and put light post bottom into chair mounting bracket and level.
6. Once level, adjust the cuspidor to the desired height and tighten all 4 socket head screws.
7. Attach the porcelain bowl to the bowl socket by slowly pressing down. This will allow the
cuspidor to properly set in the bowl socket.
8. Coat O-ring on cup fill and bowl flush spouts with O-ring lube before inserting them into their
respective sockets. If these spouts are removed for periodic cleaning, re-coat with O-ring lube as
necessary.
9. Insert the Cup Fill & Bowl Spouts in to their respected sockets, with the rubber gray seals
underneath the bowl and flush against the sockets.
10. Attach the HVE and Saliva Ejector tubing in their corresponding sockets of the solids canister
and place valves in hangers.
Adjust Bowls Rinse Water Flow
1. Test water flow around bowl
2. If needed put small round instrument in hole and rotate to get
desired water flow around bow.

Summit Dental Systems
Toll Free: (800) 275-3368
www.summitdental.com
Page 12 of 24
Test Bowl Rinse
1. Activate bowl rinse.
2. If bowl does not rinse long enough adjust 3-way bleed valve clockwise
3. If rinses to short turn 3-way bleed valve counter-clockwise
Test Cup Fill
1. Activate cup fill.
2. If bowl does not fill enough adjust 3-way bleed valve clockwise
3. If cup fills too much turn 3-way bleed valve counter-clockwise
Summit Dental Systems
Toll Free: (800) 275-3368
www.summitdental.com
Page 13 of 24
Junction Box Plumbing Layout
Not to Scale

Summit Dental Systems
Toll Free: (800) 275-3368
www.summitdental.com
Page 14 of 24
Cuspidor Umbilical Connections
ƒWhite 1/8” - spare
ƒRed 1/8” – from air filter housing to in port on master switch
ƒYellow 1/8” – signal air from master switch to air operated solenoids in Junction
Box
ƒOrange 1/4” – drive air to unit
ƒBlue ¼” C – regulated and filtered water supply to cup filler relay valve in cuspidor
ƒBlue ¼” B – regulated non-filtered water to bowl flush solenoid in cuspidor ƒ Clear
Blue 1/8” – to city water toggle valve in cuspidor
Post Mount Unit and Cuspidor Utility Box Connections
FROM PALM BEACH UNIT ARM
ƒ1/8” red – master valve ƒ 1/8”
yellow –pilot air to unit ƒ 1/4”
orange –drive air
ƒ1/8” pink – bio filter air, purge, syringe
ƒ1/8” blue – water to unit
ƒ1/8” orange – air coolant
ƒ1/8” green – purge
ƒ1/8” clear – handpiece valves, remote bowl and cup fill valves, biofilter
ƒ1/8” white – spare
Junction Box Connections for Post Mount Unit
ƒ1/8” red to master
ƒ1/8” yellow pilot air to unit
ƒ¼” orange drive air to unit
ƒ¼” gray foot control inlet
ƒ1/8” blue water to unit ƒ¼”
blue water to cuspidor ƒ 1/8”
green purge
Foot Control Connections
1/4”
Orange
Drive air out
1/4”
Gray
Drive air in

Summit Dental Systems
Toll Free: (800) 275-3368
www.summitdental.com
Page 15 of 24
Umbilical Entering Tray Head

Summit Dental Systems
Toll Free: (800) 275-3368
www.summitdental.com
Page 16 of 24
Utility Center Tubing Diagram
Post and Swing Mounted Unit
Water and Air Regulator Assembly
Description
Part #
Wet & Dry Ft Ctrl
5-020-0058
Tubing, Sand 4H
5-070-0025
Water Regulator
5-070-0103
Filter Shut-Off Block
5-070-0102
Air Regulator
5-070-0111
¼” Gray Tubing
5-070-0040
Description
Part #
¼” Blue Tubing
5-070-0049
1/8” Blue Tubing
5-070-0028
1/8” Red Tubing
5-070-0027
¼” Orange Tubing
5-070-0047
1/8” Green Tubing
5-070-0083
1/8” Yellow Tubing
5-070-0026

Summit Dental Systems
Toll Free: (800) 275-3368
www.summitdental.com
Page 17 of 24
Flow Diagram & Parts - Box Assembly

Summit Dental Systems
Toll Free: (800) 275-3368
www.summitdental.com
Page 18 of 24
Flow Diagram & Parts - Housing Assembly
Item
Description
Part #
1
Cup Fill Spout
5-030-3006
2
Bowl Rinse Spout
5-030-3004
3
Cusp. Bowl Housing
2-020-3035
4
Egg, Syringe Holder
5-020-3003
6
2-Way Push Button Valve - Bowl Flush
5-030-0054
7
2-Way Push Button Valve –Cup Filler
5-030-3000

Summit Dental Systems
Toll Free: (800) 275-3368
www.summitdental.com
Page 19 of 24
Troubleshooting Guide
SYMPTOM
PROBABLE CAUSE
1. Water does not drain.
A. Check drain for clogs or blockage.
2. Cup Fill and/or Bowl Rinse too slow. A. Adjust flow control valve.
B. Kinked or pinched tubing.
C. Check water pressure (40 PSI).
D. Check water filter element in Junction Box
(cup fill only).
3.
Cup Fill and/or Bowl Rinse too fast.
A. Adjust flow control pinch valves.
B. Check water pressure (40 PSI).
4.
No water flow.
A. Kinked or pinched tubing.
B. Check for blockage at pinch valve location.
C. Replace element in water filter housing
(cup fill only).
5.
Little to no suction.
A. Replace suction solids screen under
cuspidor.
B. Check vacuum pump.
C. Kinked or pinched tubing.

Summit Dental Systems
Toll Free: (800) 275-3368
www.summitdental.com
Page 20 of 24
Parts List
Table of contents
Other SDS Dental Equipment manuals


