SDS Smart Door System ADIOS User manual

Dear customer;
The product you have just bought
is one of the worlds
most sophisticated locking
system.
SDS is making continuous efforts
to supply
the state-of-the-art technology to
its customers.
Accordingly to this policy, you are
invited
to send us any question to the
following address:
info@sds-tech.com.
Thank you.
-1-
Warning !!!
Proper functioning of the electronic locking
system depends on proper installation of the
door and the system. Before installing the
system please make sure that the door
functions properly and lock / unlock is done
made easily and smooth.
Be aware to the fact that in door systems with
exterior "fixed" handle, battery will need more
frequent charging. We recommend changing
the exterior handle to "normal handle" (not
fixed!).
-2-
Terms of use

Table of contents
1. Buttons and knobs ………………………………………. 4
2. Basic operation ………………………………………. 6
3. Menu ………………………………………. 8
4. Battery pack charge ……………………………………… 11
5. System messages ………………………………………. 12
6. Troubleshooting ……..……………………………....... 13
-3-

1. Buttons and knobs
-4-

(b) Battery: divided to 4
bars. Number of bars shown
indicates the battery
amount charge.
(c) Normal operation –a
single click changes between
"automatic lock" and "manual
lock". Inside
the menu –use the arrows
for browsing and selecting
items.
(d) MENU: Login menu.
EXIT: Exit from the menu
without making changes.
(e) OK: Selecting from the
menu
(f) Appears when the lock is in
automatic mode.
(g) Appears when the lock is in
automatic mode. Indicates the lock
mode of the system.
(h) A non-flickering outer circle
around the lock does not light
indicates that the locking system is
in automatic mode and the door is
locked. A flickering circle indicates
that the locking system is in
"automatic mode" and the door is
unlocked.
(i) Short message or a display of
the serial number of key . See 5:
System messages.
2.Basic operation
Lock
LCD Display (a) Menu Options
Displays
-5-

-6-
2.Basic operation
Lock / unlock from the inside -In a closed door, each click of
the button (6) or manually moving the emergency button (7) will
change the locking mode of the system without checking
permissions checking. Successful locking of the door lights up a
green LED (4) for a short time in release from lock the light will
be orange light (4) for a short time. Mechanically locking the
button (7) is designed for emergency unlock.
Warning: do not resist any movement of the engine
with the key or manual emergency button!
Lock / unlock from the outside –Locking or Unlocking from
the outside is carried out only when the door is closed and by
using correct proximity key or system authorized code.
Successful lock - lights up a green LED (9) for a short time and
unlocked –flickering red light (10) for a short time. Door with
fixed external handle - push the door when the red light is
flickering.
Use Lock / unlock indoor knob (7) in case of emergency only !!!
Automatic Lock mode: Will automatically lock the system in
a predefined time period after closing the door wing. Toggle
between "automatic lock" and "normal lock" by pressing
button (3). For "fixed handle" type door, is no possible to use
"automatic door" mode. Be aware shift the system again to
"automatic lock" after any removal of battery pack.

-7-
Present correct key to the system
*Proximity key
*Code
▪Press 6 pre-selected
characters
▪Press # (The system will
consider only the last 6 chars
pressed).
▪Press** once on one of the
numbers (12)
▪Move the RFID key to the
middle of circle (11) –distance =
1cm.
▪Wait one second for
lock/unlock.
* if applicable in the system
** press and release
Comment 1: If more than six charts were pressed, the
system will consider only the last 6.
Comment 2: If key / code is not allowed, a red LED will
blink 3 times at the access module and will be
displayed on the upper-right side of the LCD. Five times
of inserting wrong numbers will block the keyboard for
10 minutes. Using correct RFID key will open the
blocked keyboard.
-8-
3.Menu
Warning! Do not remove the battery from the system while
carrying out operations in the menus.
Definitions:
Legal code - the hard sequence of 6 digits were introduced via the
keyboard and recognized
by the system. Code is entered by pressing the appropriate
sequence and finally clicking the
"#."
Legal Key - This is a numeric code or RFID legal code inserted to the
system.
Master Key - Is the first numerical code introduced to the system. It
cannot be deleted except
by a technician.
Key Presentation –Present the correct code/key (legal) to the
system.
The menu is a "single mission" type, i.e. after making a change in
menu there is an
automatic exit from the main screen. Making an additional change
in the menu requires a
new entry into it.
Using the menu: Enter the menu by pressing on "MENU" button
(d).Select one of the
options (a).Click the OK button to confirm (e). Click the EXIT button
(d) for existing
immediately from the unchanged menu.

-9-
Displaying the existing codes in the system
•Enter the menu : MENU READ OK
•At the upper right on the LCD the keys are displayed by
their order.
If the list is empty: - - - (three lines),
If the system has legal keys, use button (5) () for seeing
all of them.
•Keys belongs to keyboard –are marked by "K" , Key
belongs to RFID tag –are marked by "R"
•Example1 - Display = keyboard code, serial num 02
•Example2 –Display =RFID code, serial num 03
•At the end of the display, press EXIT.
Insert new key
This menu entry is security protected. To pass the security
protection, exit menu
(EXIT) and present system master key, means or
. If the system is empty (no keys) , There is no security
protection.
•Enter the menu : MENU NEW OK
•When "KEY" blink, present the new key to the system. New
key serial number will
appear at the top right side of the LCD. After 3 seconds, the
key will enter to memory.
-10-
Erase existing key
Security entry : see above - insert new key.
•Enter the menu : MENU ERASE OK
•Select an existing code by scrolling with ( ) and
press OK.
•Selected code will blink. If accepted, press OK again to
erase.
Optional - Not in use
Security level
This future is optional for special users.
Automatic Door time delay
•Enter the menu : MENU AUTO
OK
•See delay in seconds on the upper side of the LCD .
•Use button (c ) ( ) to change the delay. Max.
120 seconds.
•I n case of fixed external handle, This delay cannot
be changed. This will be 3 seconds
fixed.
•Press OK to enter delay.
Technician setup zone –not used by user.
-11-
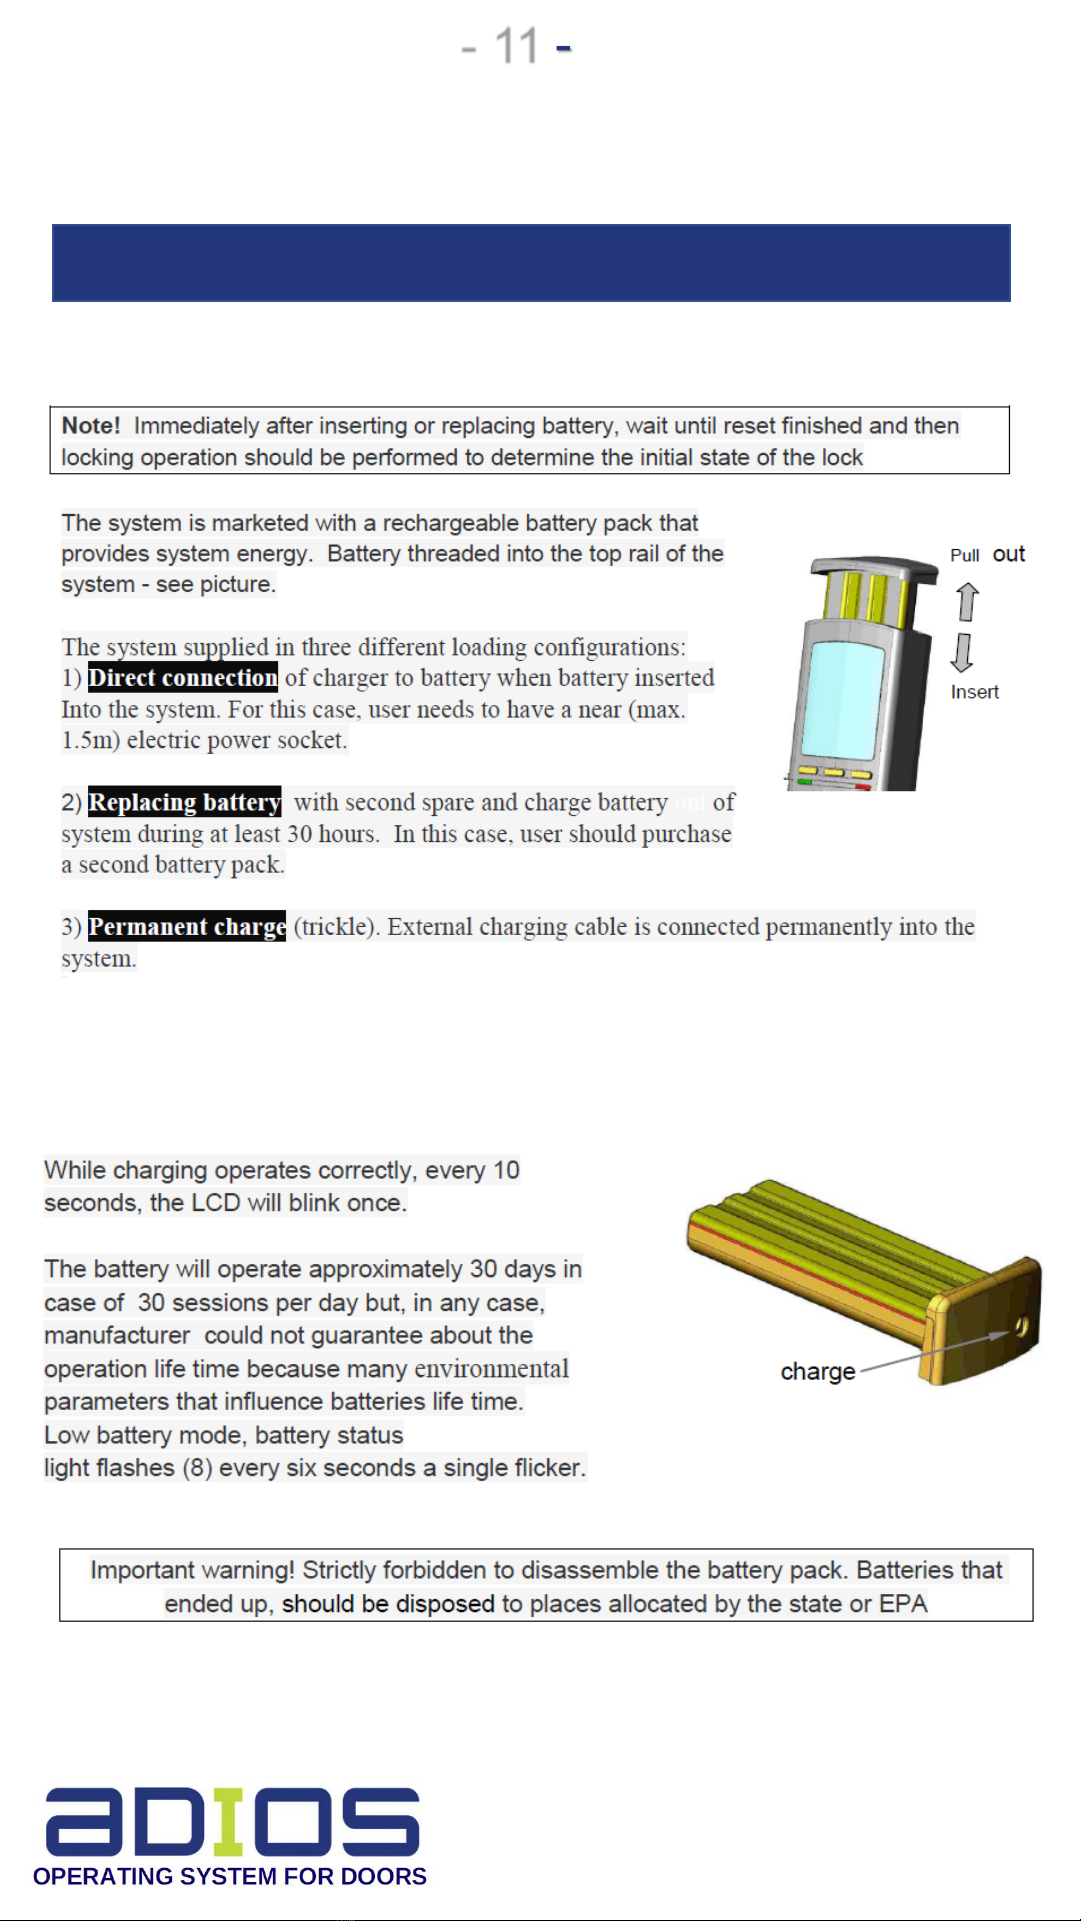
4. Battery pack charging / handling

-12-
5. System messages
System messages received by three characters on the
right-top of the display (i) LCD.
These messages have the following means:

-13-
6. Troubleshooting
Boot Execution If any problems arise which
hangs the system should remove the battery
from the system, wait about 5 seconds and
return it back. Wait for reset cycle and press
lock to start operation. If this does not resolve
the problem, please contact the service.
Other manuals for Smart Door System ADIOS
1
Table of contents
Other SDS Door Lock manuals

Popular Door Lock manuals by other brands


ZKTeco
ZKTeco LH7500 installation guide

CODELOCKS
CODELOCKS CL5510 Getting started guide

ENFORCER
ENFORCER SD-7104SGEX1Q manual

Assa Abloy
Assa Abloy Corbin Russwin CLX3300 installation instructions

DORTRONICS SYSTEMS
DORTRONICS SYSTEMS 1107 D Series Mounting instructions

ELFRI
ELFRI S6006 Series quick start guide

Lock
Lock LAL700 Installation instructions and template

IOne Digital
IOne Digital Icops I product manual

Assa Abloy
Assa Abloy Sargent 8200 Series installation instructions

logika
logika Smart Crown Lock product manual

Assa Abloy
Assa Abloy effeff 843ZY Installation and mounting instructions

BANKSTON
BANKSTON Edition Office Lever 01 installation instructions