INSTRUCTIVO DE INSTALACIÓN Y PLANTILLA PARA MANIJA RECTANGULAR
RECTANGULAR LEVER SET INSTALLATION INSTRUCTIONS AND TEMPLATE
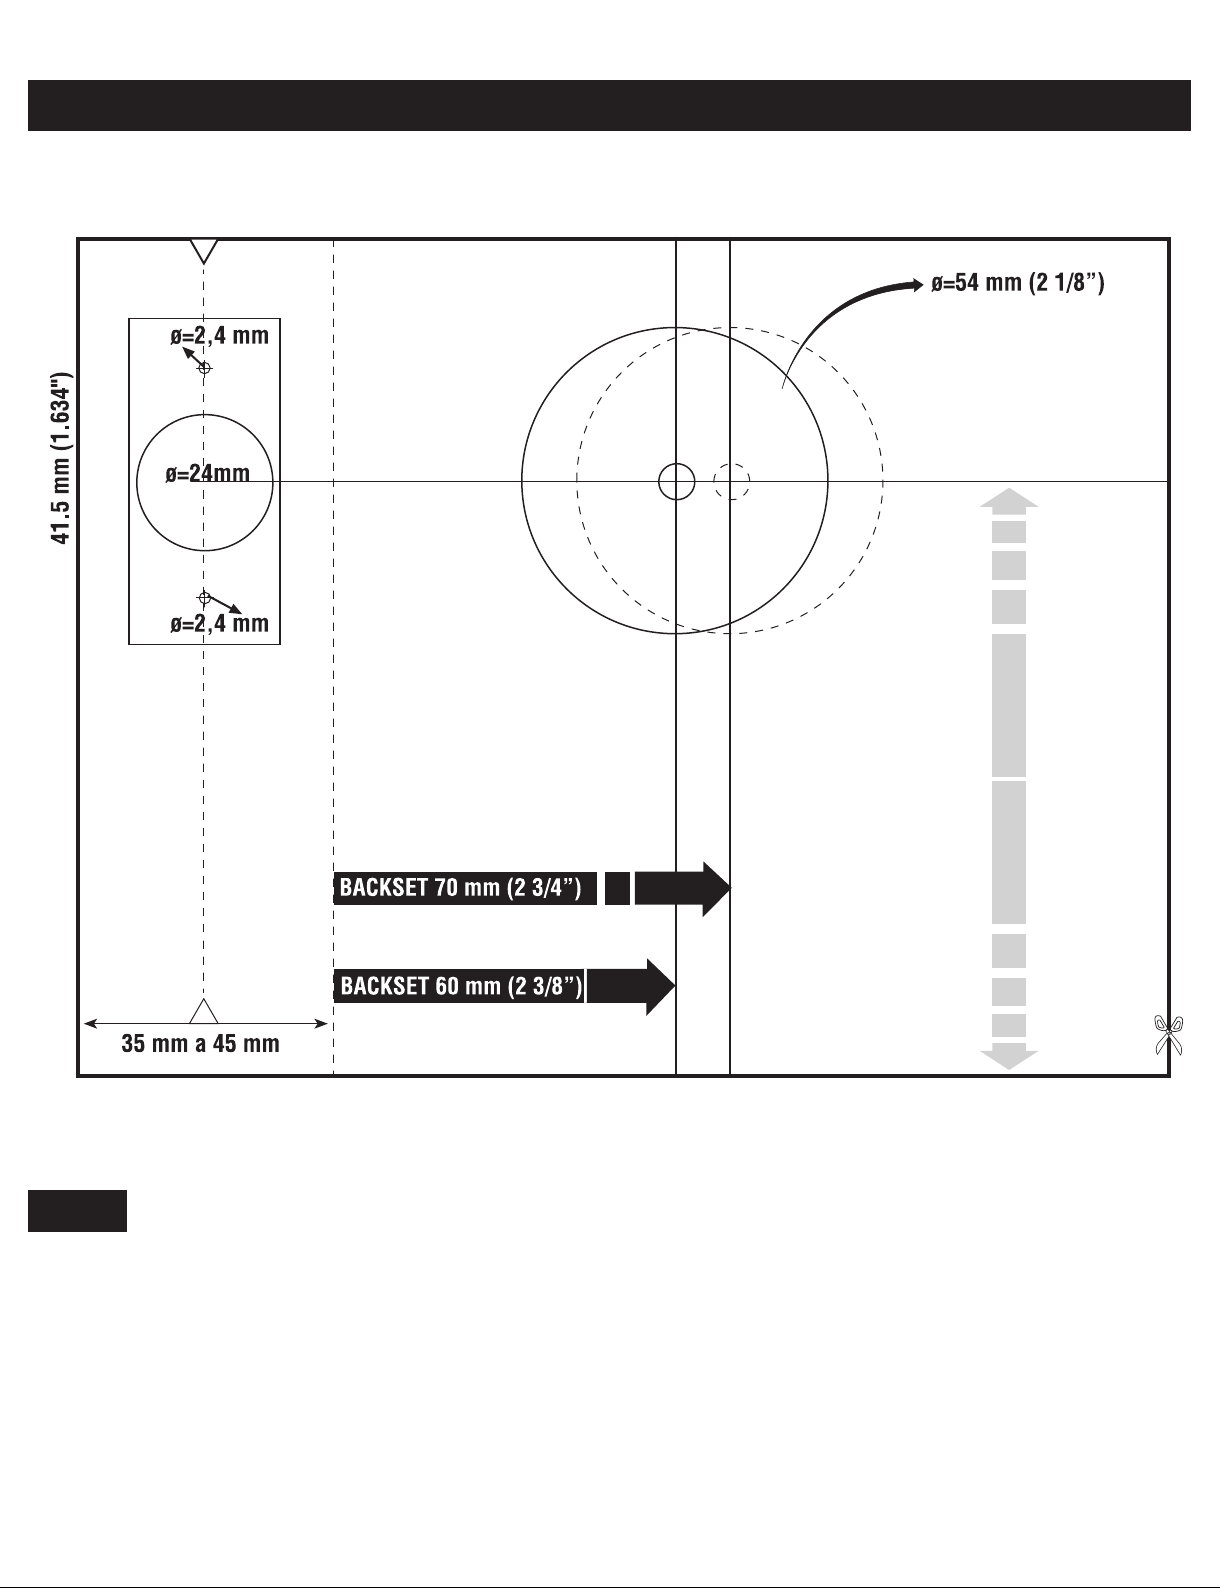
MARCADO DE PERFORACIONES
HOLE MARKING
Coloque la plantilla y doble sobre el canto de la
puerta, marque las distancias y centros a perforar.
Seleccione la distancia al canto de la puerta
(60 ó 70mm).
Se recomienda instalar de 90 a 100 cm con respecto
del piso.
PERFORACIONES
HOLES
Perfore cuidadosamente la puerta con un taladro sobre
los centros marcados anteriormente, haciendo primero
el diámetro mayor 54 mm (2 1/8”) y después el del
centro del canto de la puerta de 24 mm (15/16”).
Place the template and fold on the door edge,
check the distances and centers to drill.
Select the distance from the edge of
the door. It is recommended to install 90 to 100 cm
regarding of floor.
Carefully punch the door with a drill on the previously
marked centers, doing first the larger diameter to 54mm
(2 1/8”) and then the center of the edge of the door
of 24mm (15/16”).
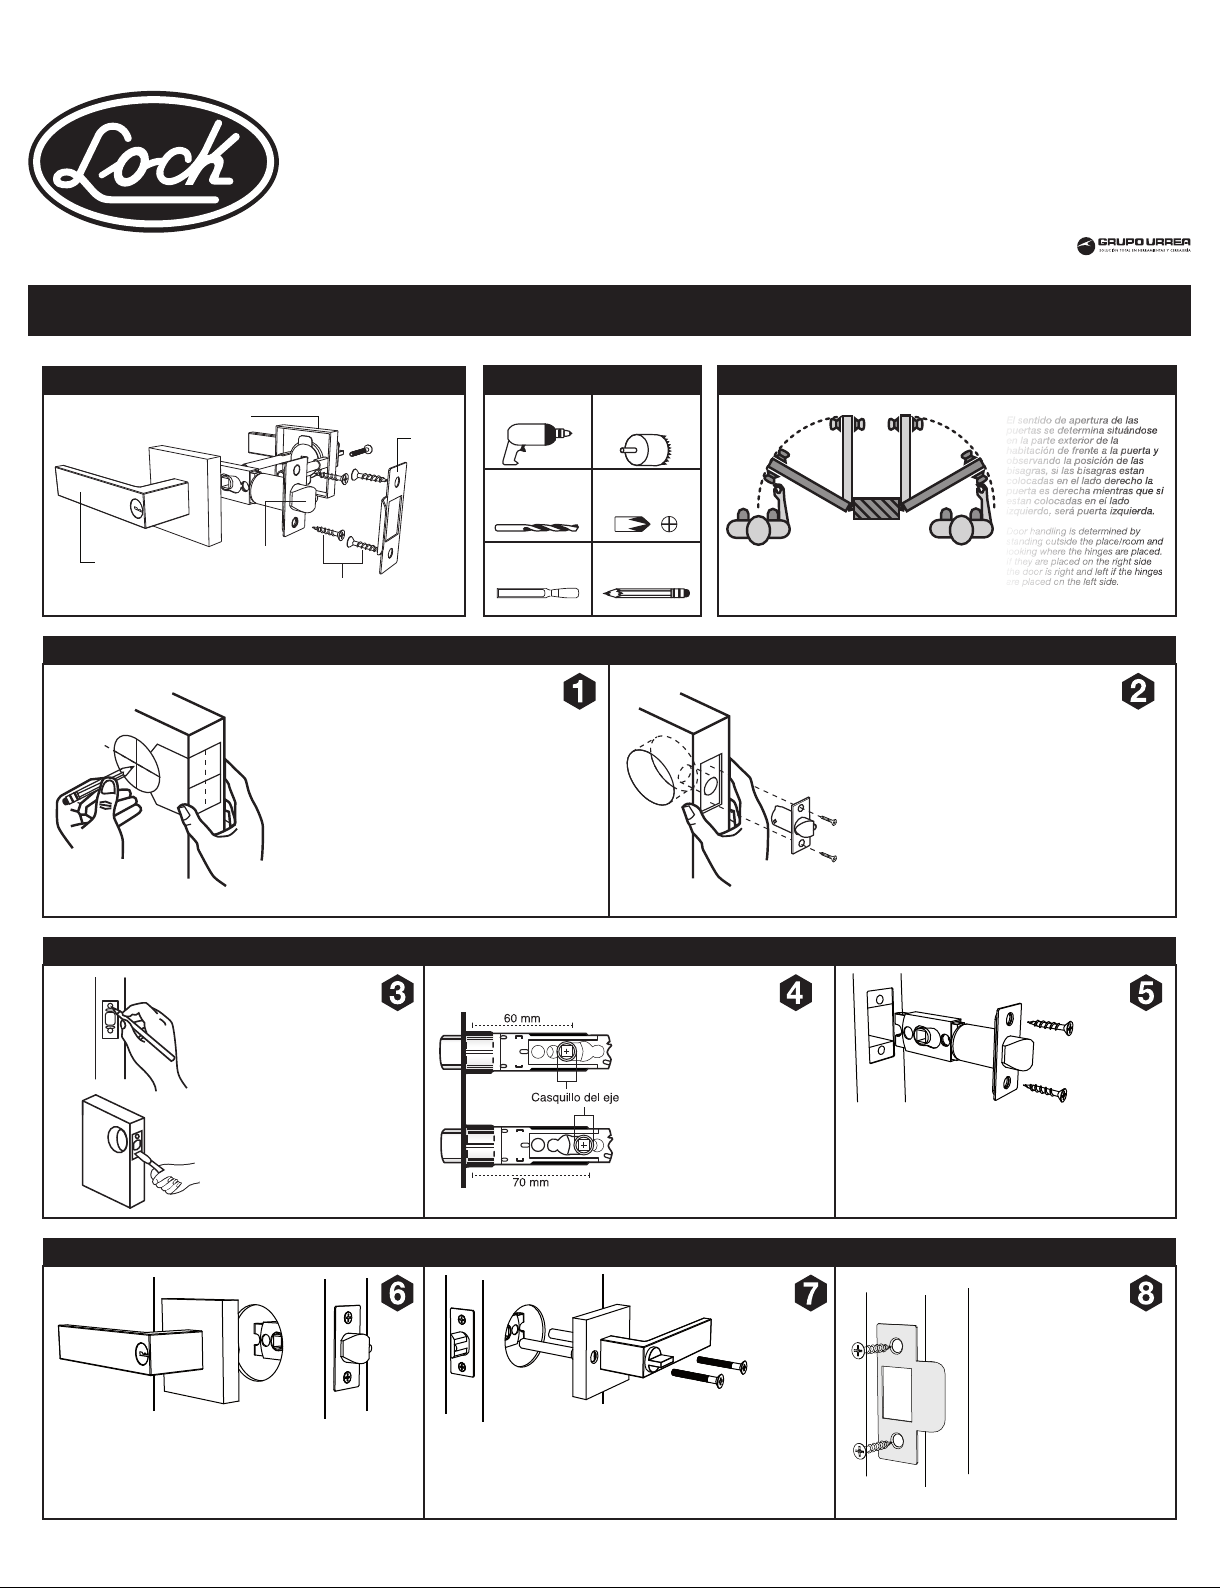
Preparación de la puerta
Door preparations
Introduzca el pestillo en el
agujero de 24 mm y dibuje el
contorno del frente, ranure con
el formón toda esa área a 3 mm
de profundidad de donde se
alojará la placa del pestillo.
Insert the bolt into the hole 24 mm
and draw the outline of the front,
slot with the chisel all this area
to 3 mm depth of where
the latch plate will lodge.
Ajuste el pestillo a la distancia
que se va a instalar, 60 ó 70 mm
(Backset de 2 3/8” ó 2 3/4”).
Adjust the latch to the distance
you are going to install, 60 or 70 mm
(Backset 2 3/8” or 2 3/4”).
Ajuste del pestillo
Setting latch
Inserte el pestillo en el agujero del canto de la puerta con
su lado inclinado según el sentido que vaya a cerrar la puerta.
Atornillar el mecanismo al canto de la puerta hasta que
quede la placa a paño con la superficie.
Insert the latch into the hole in the in the door edge with
its sloping side according to the direction that go to close
the door. Screw the mechanism on the door edge until the
plate flush with the surface.
Instalación del pestillo
Latch installation
Preparación del pestillo
Latch preparation
Instale la Cerradura de Manija exterior insertando los postes y el
perno cuadrado a los orificios del mecanismo del pestillo.
Install the lock of exterior handle by inserting the posts and the
square bolt into the holes on the latch mechanism.
Instale la “placa-contra” en el
marco de la puerta utilizando
la altura del pestillo para hacer
las perforaciones necesarias.
Install " the plate - against " in
the frame of door using the
height of the latch to do the
needed perforations.
Instale la Cerradura de Manija interior acoplándola al perno cuadrado
de la parte exterior y colocando los tornillos desde el chapetón interior
hacia los postes. Atornille y pruebe el funcionamiento.
Install the interior handle lock connecting it to the square bolt of the
outer part and positioning the screws from the interior latch toward the posts.
Screw and try the operation.
Instalación de cerradura de manija interior
Installation of interior handle lock
Fijación de cerradura de manija exterior
Fixing of exterior handle lock
Determinar el sentido de la puerta
Determining door handling
El sentido de apertura de las
puertas se determina situándose
en la parte exterior de la
habitación de frente a la puerta y
observando la posición de las
bisagras, si las bisagras estan
colocadas en el lado derecho la
puerta es derecha mientras que si
estan colocadas en el lado
izquierdo, será puerta izquierda.
Door handling is determined by
standing outside the place/room and
looking where the hinges are placed.
If they are placed on the right side
the door is right and left if the hinges
are placed on the left side.
left door
Interior
Exterior
right door
puerta
izquierda
puerta
derecha
Dibujo detallado de partes
Detailed scheme parts
Manija exterior
Outside handle
Manija interior
Inside handle Contra
Strike
Tornillos
Screws
Pestillo
Latch
Herramientas requeridas
Tools needed
#1 #2
Desarmador
Screwdriver
24 y 54 mm
Cortacírculos
Hole saw
Taladro
Power Drill
Lápiz
Pencil
Formón
Chisel
3/32"
Broca
Drill bit
NOTAS IMPORTANTES:
Deberán de usarse las partes originales contenidas en esta caja para el correcto
armado e instalación de la cerradura. Al sustituir partes se pierde la Garantía.
Lea completamente las instrucciones de instalación y si tiene alguna duda consulte al distribuidor
que le vendió el producto.
Recuerde que esta cerradura puede instalarse en puertas de 25 a 45 mm (1 3/8" a 1 3/4") de espesor.
NOTES TO CONSIDER:
Original parts included on the box should be used to get proper set up of the lock.
By replacing parts in the lock the warranty will be void.
Read carefully the installation instructions and when doubt seek help from authorized dealer or in the store you
bought this product. Remember that this lock will fit any door up to 1 3/8" a 1 3/4" (25 to 45 mm) of thickness.
Instalación de la contra
Strike installation