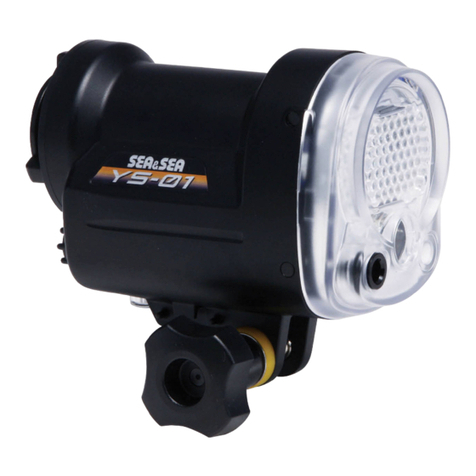
Sea & Sea YS-01 SOLIS User manual

03124
YS-01 SOLIS
UNDERWATER STROBE
Instruction Manual

E-1
Thank you for purchasing SEA&SEA products.
Please read this instruction manual carefully prior to using
your underwater strobe. Only with a thorough understanding
of this manual's content will you be able to use the strobe
correctly. After reading the manual, please be sure to keep it
in a place where you can easily come back to it at any time.
The appearance of color evenness or weld lines on the
external body of the product is normal and will not affect
its performance.
Note:
Introduction
This device complies with Part 15 of the FCC
Rules. Operation is subject to the following two
conditions: (1) this device may not cause harmful
interference, (2) this device must accept any
interference received, including interference that
cause undesired operation.
The product conforms to WEEE standards.
This symbol indicates separate collection of
waste electrical and electronic equipment in
the EU countries. Please do not throw the
equipment into the domestic refuse.
Please contact your local authorities for recycling
program information.
This products have passed SEA&SEA’s criteria-based
inspection for pressure resistance.

E-2
Contents
Safety Precautions .....................................................
Safety Precautions for Use of Battery ........................
Accessories ................................................................
Identification of Parts ..................................................
Operation ............................................................
Target light switch................................................
Ready / TTL lamp ................................................
Fixing Bolt ...........................................................
Installing the Batteries ..............................................
Connecting the Strobe ..............................................
Taking Photographs .................................................
Manual photography............................................
DS-TTL photography...........................................
Using the Diffuser ...............................................
Maintenance and Storage ........................................
Specifications ...........................................................
E-3
E-6
E-8
E-9
E-10
E-11
E-12
E-12
E-13
E-15
E-18
E-18
E-20
E-21
E-23
E-24

E-3
SEA&SEA strobes have been designed for in-water use only. Limit
the strobes use out of water to test firing only. For safe handling of
the product, please read the following precautions carefully before
use.
Situations that involve a high risk of severe injury or
death.
DANGER
Situations that could result in severe injury or death.WARNING
Situations that could result in property damage or
personal injury.
CAUTION
Failure to heed the precautions listed below could result in
serious consequences. To prevent injury or damage to yourself
and/or others, please observe the precautions as they contain
highly important information related to personal and product
safety.
DANGER
WARNING
Safety Precautions
Never attempt to disassemble, repair or alter the product yourself to prevent
significant electrical hazard due to the high-voltage circuitry in the product.
Do not heat the product or put it into a fire, this could result in explosion or
fire. Unauthorized disassembling and/or modification could result in
malfunction or flooding, and void product warranty. Take the product to a
SEA&SEA authorized service center for repair or inspection.
Use only batteries approved for use in this product. Do not mix old and new
batteries of different types.
Remove batteries before transport or storage, or when you are not going to
use the product for an extended period of time, to prevent unexpected
activation.
Pay particular attention to opening the battery cap to avoid injury. Heat from
the batteries may cause pressure buildup inside the battery compartment,
and could result in cap explosion with unexpected force.
Prevent water or foreign objects from entering the product. Discontinue use
and turn it off immediately should you notice flooding or leakage. Continuous
use could result in complete damage to the product.
Do not handle batteries with wet hands to prevent shock hazards.

E-4
Safety Precautions
CAUTION
Do not use the product in the presence of flammable gas, as this could
result in explosion or fire.
Do not fire the strobe/light with the reflector facing a desk or floor to prevent
a fire from occurring. Touching the reflector immediately after firing could
result in burns.
Do not fire the strobe or illuminate the light towards a driver of a vehicle to
avoid causing accidents.
Do not operate the product while driving a vehicle. Inattention could result in
accidents.
Keep out of reach of children to prevent accidental ingestion. If swallowed,
seek medical advice immediately.
Read the instruction manual and observe proper precautions before use of
this product.
This product has been designed and manufactured for use at a water depth
within 75m / 250ft. Please note that diving to a depth in excess of 75m /
250ft may cause damage to the product or may lead to water leakage.
Should you notice smoke or unusual smell coming from the product, turn it
off and remove the batteries immediately, taking care to avoid burns.
Continued operation could result in injury. After removing the battery, take the
product to a SEA&SEA authorized service center for inspection.
Discontinue use and turn the product off immediately should you notice
flooding or leakage.
When the product is flooded, interior pressure may build up. Please be
careful when opening the product as water may spurt out or the cap may
open explosively and cause injuries.
Do not open the battery cap in the vicinity of open flames.
The product has been constructed with an airtight seal. When packing the
product for airplane travel, do not seal-up the product to alleviate pressure
build up due to atmospheric changes.
Do not open the product in a wet or sandy environment. Protect the interior
from moisture and debris in order to prevent malfunction or flooding.
Keep away from strong magnetic fields. Do not use or store this product in
the vicinity of equipment that generates strong electro-magnetic radiation or
magnetic fields. Strong static charges or the magnetic fields could cause
malfunction, or affect the product's internal circuitry.
Do not cover or wrap the product with a cloth when firing the strobe. This
could result in deformation of the product or in fire.
Using the strobe close to your subject's eyes could cause temporary visual
impairment. Particular care should be observed if photographing infants, the
strobe should be no less than one meter (3 feet) from the subject.
Be careful when touching the product immediately after firing repeatedly or
lighting for a long time. The product may get hot enough to burn you.

Avoid strong shocks / impacts or excess stress to prevent malfunction,
damage or breakdown. Make sure that the product has been securely
mounted to other products in order to prevent injury, fall or missing.
Do not rest heavy weight on the product. It might deform the outer casing,
damage internal parts, make the waterproofing fail, or result in fire or electric
shock.
Make sure that the connectors have been secured with the connector caps
before rinsing the product with fresh water, after removal from other products.
Never use chemicals, cosmetics, any petroleum solvents such as paint
thinner, or neutral detergent on the product. They may deform and damage
the product.
Do not leave the product in places with hot temperatures such as inside of a
car or in a car trunk in summer. The heat may deform plastic parts of the
product, damaging internal parts and resulting in potential fire or electric
shock. If the product is sealed tight in hot conditions, heated air expanding
inside the product may deform the casing and ruin the watertightness.
Do not store the product in wet or high humidity place, to avoid mold, rust,
corrosion or malfunction.
If you do not use the product for an extended period of time, periodic
maintenance will keep internal electronic parts from deterioration. Once a
month, install batteries and fire a test flash / light on. Operate all other
switches as you would in normal operation. Turn the power off, then remove
batteries while the Ready lamp (red) is on for the strobe.
SEA&SEA Co., Ltd. assumes no liability for compensation of loss of
captured images or expenses caused by loss of images, even if you are
unable to shoot due to a product defect or malfunction.
SEA&SEA Co., Ltd. will not be responsible for the replacement or
compensation for cameras, lenses or those accessories damaged due to
your invalid operation.
Specifications and appearance are subject to change without notice.
Safety Precautions
E-5

E-6
Safety Precautions for Use of Battery
DANGER
Never expose the battery to flame or fire, or to excessive heat.
Never attempt to disassemble, alter or directly solder the battery. There are
no user-serviceable parts. Tampering with battery may expose you to
dangerous voltage, battery acid, or electrical shock.
Never short-circuit the terminals of a battery, as it could result in battery
leakage, heat generation, fire, or explosion. Avoid contact with all metal
objects during transporting and storage.
When recharging batteries such as nickel metal-hydride, use a charger
designed specifically for them and follow the recharging instructions.
Recharging with an inappropriate charger may cause battery leakage,
overheating, and explosion.
Move leaking batteries away from fire or open flames immediately. The
leaked fluid and its vapor are combustible.
If the battery leakage contacts your skin or clothing, flush the affected area
repeatedly with clean water. It may irritate your skin.
Should it get into your eyes, immediately rinse them with plenty of water,
avoid rubbing and seek medical advice.
Battery has a specific polarity. Never force the battery into the charger or the
strobe. Always check the +and -polarity before installation.
Incorrect orientation may cause permanent battery damage.
Never connect a battery directly to a plug outlet or car cigarette lighter.
WARNING
Keep dry. The battery is not waterproof, and may malfunction if immersed in
water or exposed to high levels of humidity. Rusting of the internal
mechanism can cause irreparable damage.
Do not remove and/or damage the case of a battery. It may cause battery
leakage, overheating or explosion.
Do not charge a rechargeable battery beyond the specified charging time, it
may cause battery leakage, fire hazard or explosion.
Never use batteries should you notice any changes such as leakage,
discoloration or deformation. When you notice the situation as abnormal,
discontinue use immediately and take the product to a SEA&SEA authorized
service center for inspection.
Keep out of reach of children to prevent accidental ingestion. If swallowed,
seek medical advice immediately.
Do not leave or use batteries in an extreme hot environment. This may
cause battery leakage, overheating or battery performance deterioration.

Avoid strong shocks / impact or excess stress to batteries.
For handling and recharging of battery, refer to the instruction manual of the
battery / dedicated charger.
Do not use or discharge the battery at ambient temperatures below 0 (32
) or above 50 (122 ) .
During recharging, the temperature should be in the vicinity from 0 to 40
(32 to 104 ).
Always recharge the rechargeable battery before use after an extended time
of storage.
Do not recharge battery in a cold environment below 0 (32 ) . Severe
cold may cause battery leakage, deterioration in performance, or shortened
life.
Dirt on the battery terminals can prevent the product from functioning.
Should the battery terminals became dirty, wipe them with a clean, dry cloth
before use.
Turn the equipment off after use. Remove batteries from the equipment
when not in use. Store in dry area with temperatures ranging from -20 to
30 (-4 to 86 ).
Use rechargeable batteries are valuable resource. Please recycle used
rechargeable batteries in accordance with local regulations.
Safety Precautions for Use of Battery
CAUTION
E-7
Do not use non-recommended batteries (such as lithium primary batteries).
Use of non-recommended batteries may cause battery leakage and
overheating and may cause the strobe to rupture, which could result in
personal injury.

E-8
Accessories
Before using this model, check to make sure that all
accessories are present.
YS-01 SOLIS
Silicone GreaseFixing Bolt
Diffuser

E-9
Identification of Parts
Fiber-optic cable
socket(Slave sensor)
(➡E-15)
LED target light
(➡E-11)
Battery cap
(➡E-13)
Mode switch
(➡E-10)
Target light
switch
(➡E-11)
Fiber-optic cable
socket(for additional strobe)
(➡E-16)Light level
control dial
(➡E-11)
Arm installation
nut
(➡E-12)
Reflector
READY / TTL lamp
(➡E-12)
Strap eyelet
(➡E-21)
Fiber-optic
cable hook
(➡E-15 )

E-10
Identification of Parts
OFF
Operation
Mode Switch
Turns the power off. Set the
mode switch to [OFF] when
you are not using the strobe.
Set the mode switch to this
position when you shoot with
manual flash using a digital
camera that pre-flashes.
Set the mode switch to this
position when you shoot with manual flash using a
digital camera that does not pre-flashes.
TTL Set the mode switch to this position when you shoot
with DS-TTL flash.
The number of times a digital camera's built-in flash will fire differs
among models. Depending on the number of pre-flashes mode
switch settings can differ, so check settings before shooting by
conducting test flashes.
When 30 minutes has passed from turning on the power, or last
emission of the strobe, the power will turn off automatically (auto
power-off). When turning on the power again, set the mode
switch to [OFF] before setting the desired mode.
CAUTION
Pre-flash
With some types of digital cameras, the light amount is
adjusted with the first flash and the image is taken with the
second flash (main flash). The first flash for adjusting the
light amount is called a pre-flash. With the normal slave
function, the strobe will fire in synchronization with the
pre-flash. As a result, it will recharge during the second flash
(main flash) and be unable to fire.
OFF
T T L
M I N
FULL

E-11
Identification of Parts
Target light switch
CAUTION
The target light turns on when you
push the target light switch. The
target light turns off when you push
the switch once again.
The target light turns off when the
strobe fires, and lights up again
when the strobe is ready to fire
(when the Ready lamp illuminates
in red).
The target light continues to be illuminated until pushing the
swith, setting the mode switch to [OFF], or until the power
turns off automatically (auto power-off).
The target light will flicker when the batteries get low, this is
not a malfunction.
Light level control dial
Light amount can be adjusted in 10
increments when the mode switch
is set to [ ] or [ ].
In DS-TTL mode you can
micro-adjust (dimming only) the light
amount.
T T L N
M I N
FULL
OFF
T T L
M I N
Push

E-12
Identification of Parts
READY / TTL lamp
Fixing Bolt
CAUTION
READY
TTL
Illuminates in red when
the strobe is ready to fire.
Illuminates in green for
approx. 3 seconds after
firing with DS-TTL flash
output.
Do not tighten the fixing bolt up on the
product unless it is being attached to
an arm.
Remove the fixing bolt from the
product when storing.
Take care not to insert the fixing bolt
from the wrong side, as this can
result in damage to the arm
installation nut.
To mount the strobe to an arm,
insert the fixing bolt in the direction
of the arrow.

E-13
AA alkaline battery
● AA Ni-MH battery
Installing the Batteries
1
2
3
4
Make sure that the mode
switch is in the OFF position
(Fig.1)
Turn the [ ] mark
counterclockwise to the [ ]
mark position (Fig.1)
Pull the battery cap straight
out
When open a battery cap, always
pull battery caps sideways.
Insert four batteries with the
polarity shown in the battery
compartment. (Fig.2)
Be careful when opening the strobe battery compartment.
Remove the battery cap in a horizontal position to prevent
water drops from entering the battery compartment.
This model can be powered by the following batteries.
Use four of each type.
Fig.1
TTL N
M I N
FUL L
OFF
Battery cap
Mode switch
Fig.2

E-14
Installing the Batteries
CAUTION
5Verify that the [ ] mark
on the battery cap is lined
up with the [ ] mark
(Fig.3)
7Turn the [ ] mark
clockwise to the [ ] mark
(Fig.4)
Turn until you hear the sound of it
clicking into place.
6Align the battery cap with
the [ ] mark, and insert
the battery cap into the
strobe (Fig.3)
Check the O-ring to make sure
there are no scratches or debris.
Battery cap
Replace the batteries when it takes 30 seconds or more until the
Ready/TTL lamp illuminates in red after firing at full.
When installing or removing batteries, thoroughly wipe water
off the strobe and dry your hands. Pay particular attention not
to allow water from your hair or wetsuit to drip into the battery
compartment. This is in order to prevent an electrical hazard,
mold, malfunction or damage to the strobe.
Never mix old and new batteries or batteries of different types.
Always replace all batteries with new batteries at the same time.
Fig.3
Fig.4
〝 Click! 〟

E-15
Connecting the Strobe
CAUTION
1
3
Some housing are not compatible with fiber-optic cable.
When you use this strobe, connect the strobe to the camera
(housing) with a fiber-optic cable (optional). Using a built-in
slave sensor, this strobe is triggered by sensing the light
from a digital camera's built-in flash. If the fiber-optic cable is
not used, depending on the shooting conditions the strobe
may not fire.
Insert the fiber-optic cable's
connector into the fiber-optic
cable socket (slave sensor) of
the strobe until it stops
Connect the fiber-optic cable's
connector to the socket in the
housing
2Secure the fiber-optic cable
with the fiber-optic cable hook
When the housing is not equipped
with the socket, attach the optional
strobe mask to the flash window of
the housing, and then connect the
fiber-optic cable.
The second fiber optic socket on the
right may be used to fire an
additional strobe. Please refer to
page E-10 for details.
Refer to page E-15 when using this
strobe as a sub-strobe.
Optional strobe
mask
Fiber-optic cable hook

E-16
Connecting the Strobe
CAUTION
Refer to the fiber-optic cable instruction manual before use.
When using this model together with the SEA&SEA DX-8000G
/ DX-1G / DX-2G set, (Discontinued products) please attach the
fiber-optic cable adapter (included in the DX-8000G / DX-1G /
DX-2G) to the housing, and then use a fiber-optic cable.
Refer to the housing instruction manual before use.
*1 When the mode switch on both the main strobe and the
sub-strobe is set to [TTL], although it will depend on the shooting
conditions, the sub-strobe may fire at full power. This is caused
by an insufficient amount of light coming from the main strobe,
accompanying the use of flash dimming functionality with the
light-level control dial. In such cases, please set the light-level
control dial on the main strobe to [FULL].
The YS-01 can be used as a sub-strobe if it is connected through
a fiber-optic cable to a main strobe that is connected to a digital
camera. Please set the mode switch on the main strobe and the
sub-strobe each according to the following list.
Fiber-optic cable
adapter
When using the second strobe
Camera Main strobe Sub-strobe
TTL *1
(Manual)
(Manual)
With pre-flash(es)
TTL
<emits pre-flashes>
(Manual)
<emits pre-flashes>
(Manual)
<does not emits pre-flashes>
Without pre-flash (Manual)

E-17
Connecting the Strobe
Main strobe
Fiber-optic cable
Sub-strobe

E-18
Taking Photographs
1
Manual photography
Light amount of the strobe can be adjusted with the light level
control dial.
Set the mode switvh to [ ] or [ ]
When shooting with a digital camera that pre-flash, set to
[ ]
When shooting with a digital camera that does not pre-flash,
set to [ ]
2
3
Adjust with the light level control dial
Take a photograph
Disable camera’s red-eye-reduction function.
Disable camera’s AF-assist light.
Please refer to our website for the latest information.

E-19
Taking Photographs
1
2
To check the mode switch
You can check whether the settings of the mode switch are
correct, by shooting the strobe with a digital camera. The number
of times a digital camera's built-in flash will fire differs depending
on the shoo
ting mode. If you change the shooting mode of the camera,
check the setting of the mode switch again for that mode.
Set the camera's built-in
flash to the forced-flash
mode, and mount the
camera to the housing.
Then, connect the housing
and this product together
with a fiber-optic cable.
Set the mode switch to [ ]
and the light level control
dial to [FULL], point the
digital camera at the front of
the strobe and shoot an
image.
The built-in flash of the camera
must flash.
3Check the image captured by
the camera
If you see a white flash in the strobe or an image that is
completely white, then the strobe has fired and the setting is
correct.
If the image shows a dark reflection from the strobe, that
means that it is not synchronized and the strobe didn't fire.
Change the mode switch to [ ], try taking another picture,
and then check the new picture.
Table of contents
Other Sea & Sea Underwater Lighting manuals
Sea & Sea
Sea & Sea YS-D3 User manual

Sea & Sea
Sea & Sea YS-D1 User manual

Sea & Sea
Sea & Sea YS-17 User manual

Sea & Sea
Sea & Sea YS-03 SOLIS User manual

Sea & Sea
Sea & Sea YS-D3 DUO User manual

Sea & Sea
Sea & Sea YS-1 User manual

Sea & Sea
Sea & Sea YS-03 SOLIS User manual

Sea & Sea
Sea & Sea YS-01 User manual

Sea & Sea
Sea & Sea YS-D3 DUO User manual
Popular Underwater Lighting manuals by other brands

Fiberli
Fiberli AC3F installation guide

emaux
emaux NP300 Series user manual

Kripsol
Kripsol PHB13.C Manual for the installation, use and maintenance

Pontec
Pontec PondoStar LED warm operating instructions

Keldan
Keldan VIDEO 18XR 35000lm CRI 86 operating instructions

RETRO
RETRO EMRX Series installation guide