3.1. CHARGING THE BATTERY PACK
IMPORTANT WARRANTY INFORMATION:
The battery pack fitted to this cordless tool is considered to be a consumable item and its ability to accept charge will reduce over
time. We will warranty it against mechanical and electrical defect for a period of one year - this does not cover fair wear and tear. If the
battery is not properly charged before first use, or regularly conditioned, its capacity will diminish. Under these circumstances we will
not replace the battery pack even if it is less than one year old.
3.1.1. To remove the battery pack from the drill, depress the two side clips on the battery. Do not touch the metal battery terminals.
3.1.2. Place the charger on a safe flat surface and connect to the mains.
3.1.3. The battery is designed to fit into the charger one way only. This is to ensure that the positive (+) and negative (-) polarities
correspond. Align the + and - polarity marks on the base of the battery with the + and - marks on the charger, insert the battery and
press lightly to seat the battery firmly into the charger (fig.2).
WARNING! DO NOT try to force battery into the charger with crossed polarities.
3.1.4. The green charge light will come on when the battery is inserted into the charger. Press the “SET” button to initiate charging, the red
light will now illuminate.
3.1.5. When charging is complete the green light will illuminate. Remove the battery from the charger. Unplug the charger from the mains.
Refit the battery into the drill base until it latches into place.
The drill is now ready for use.
Note: When new, the battery may have been shipped in a low charge
state. It will take longer to charge the battery initially and several
subsequent charges may also take a little longer, than when the
battery reaches its optimum performance.
Note: Attempting to recharge a battery immediately after use
may result in the red charge light not coming on. In such a case
allow the battery to cool for a time and try again.
3.2. USING THE DRILL
(Ensure that you have read, understood and comply with
all the safety instructions in Section 1)
WARNING! Always wear approved safety glasses when drilling.
3.2.1. Ensure the direction switch is in the mid (lock) position. Open
the chuck by holding the rear collar (fig.3.B) and turning the
front chuck collar (fig.3.A).
3.2.2. Insert the required drill or screwdriver bit fully into the chuck
and tighten chuck.
3.2.3. The speed of the drill is controlled by the variable power trigger.
After moving the direction switch to ‘forward’ or ‘reverse’ as
appropriate, squeeze the power trigger gently for a slow speed
and progressively increase the pressure on the trigger to
produce correspondingly higher speeds.
3.2.4. To select torque or drill setting, twist the torque selector (fig.3.D)
to the required setting - from 1 (the lowest) to 16 (the highest)
for torque setting or to the drill symbol for drilling.
3. OPERATING INSTRUCTIONS
2. INTRODUCTION & SPECIFICATION
Check cables are always protected against short circuit and overload.
Important: Check that the voltage marked on the charger is the same as the power supply to be used.
DO NOT pull or carry the charger by the power lead, or pull the plug from the mains socket by the power lead.
DO NOT use any other type of charger.
DO NOT try to open or dissemble the charger.
DO NOT get the charger wet, or use in wet, damp conditions (for indoor use only).
1.4. BATTERY CHARGER SAFETY INSTRUCTIONS.
WARNING! DO NOT use the charger to charge any battery other than that supplied for the drill. Other types of batteries may explode!
All mains electrical supply safety features must be followed as described in 1.3. above.
Disconnect the charger from the mains power supply when not in use.
DO NOT operate the charger if it has been dropped, or has received a sharp knock, or is damaged. Contact an authorised service agent.
DO NOT insert foreign objects or material into the hole reserved for the battery.
DO NOT force the battery into the charger. The battery will only fit one way to ensure correct polarity alignment.
DO NOT immediately charge a second battery. Consecutive charging will overheat the charger. Allow the unit to cool for 15 minutes
before charging the next battery.
DO NOT attempt to connect two chargers together.
Store the charger in the same manner as battery, see section 1.2.
Variable Speeds: ........................0-350/0-900rpm
Chuck Size: ....................................10mm
Impact Rate: ............................... 0-8000bpm
Weight Including Battery: .........................1.79kg
Battery Model No:........................ CB1801VBPV3
Noise Power ...................................81dB.A
Noise Pressure.................................92dB.A
Drilling Capacities:
Wood: .........................................10mm
Metal: ..........................................6mm
Accessories: .........................Magnetic Bit Holder
Drills:............................. 1.5, 2.5, 3, 4, 5, 6mm
Screwdriver Bits: ........................ Slotted 5, 6mm
. . . . . . . . . . . . . . . . . . . . . . . . . . . . . . . . . . . . . . . Phillips #1, #2
. . . . . . . . . . . . . . . . . . . . . . . . . . . . . . . . . . . . . . . . . Pozi #1, #2
Superbly balanced tool, intended for professional use. Features sixteen position torque control plus hammer action. Electronic variable speed
control with reverse. 10mm keyless chuck. LCD display indicates battery level. Ideal for both screw driving and drilling. 1hr Charger with BS
approved plug. Supplied in carry-case together with accessories.
Original Language VersionOriginal Language Version CP1801V.V3 Issue:1 - 08/03/10CP1801V.V3 Issue: 3 - 12/01/12
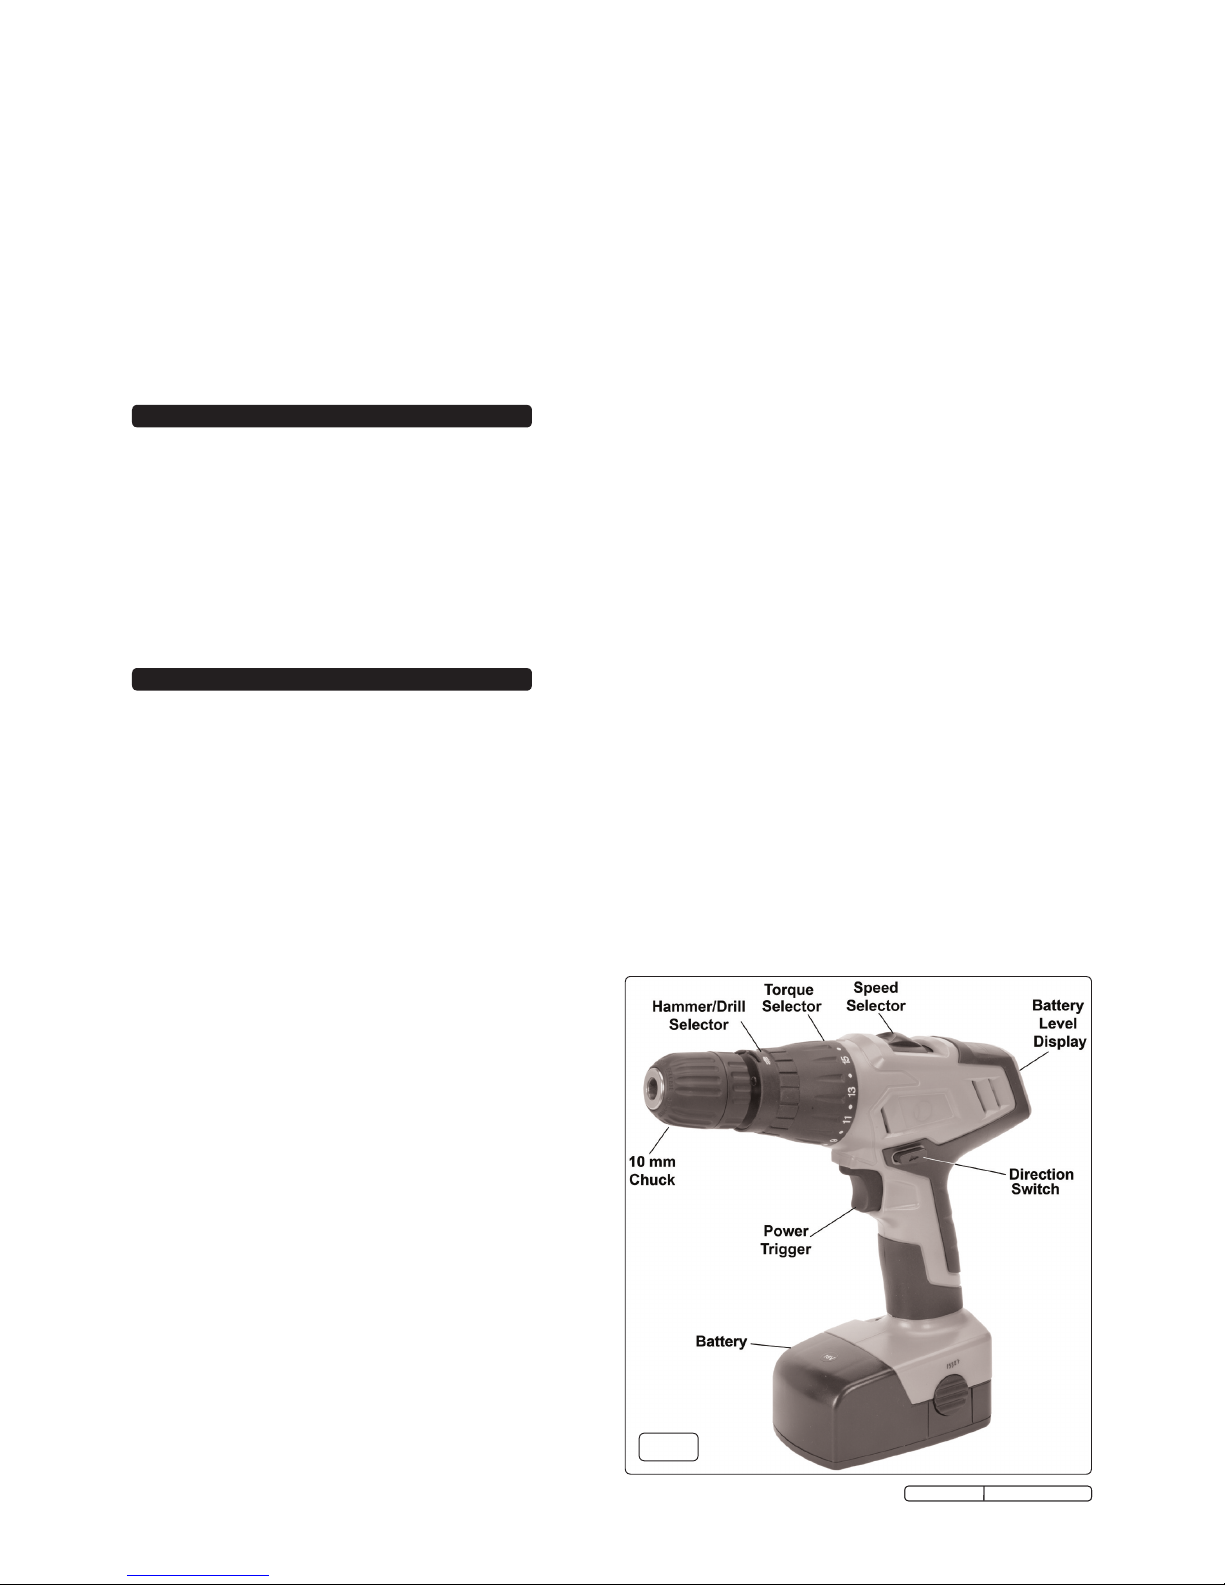
fig.1