Sealey PWH1 User manual

AUTO DARKENING WELDING HELMET
SHADE 9-13
MODEL NO: PWH1, PWH2, PWH3 and PWH4
Thank you for purchasing a Sealey product. Manufactured to a high standard, this product will, if used according to these
instructions, and properly maintained, give you years of trouble free performance.
IMPORTANT: PLEASE READ THESE INSTRUCTIONS CAREFULLY. NOTE THE SAFE OPERATIONAL REQUIREMENTS, WARNINGS & CAUTIONS. USE
THE PRODUCT CORRECTLY AND WITH CARE FOR THE PURPOSE FOR WHICH IT IS INTENDED. FAILURE TO DO SO MAY CAUSE DAMAGE AND/OR
PERSONAL INJURY AND WILL INVALIDATE THE WARRANTY. KEEP THESE INSTRUCTIONS SAFE FOR FUTURE USE.
1. SAFETY
WARNING! This helmet is not suitable for use with laser welding or CUTTING or for overhead welding applications.
9Ensure all workshop safety rules, regulations and conditions are complied with when using welding equipment. The helmet will not
oerprotectionagainstmisuseofworkshoptools,equipment,oraccessories.
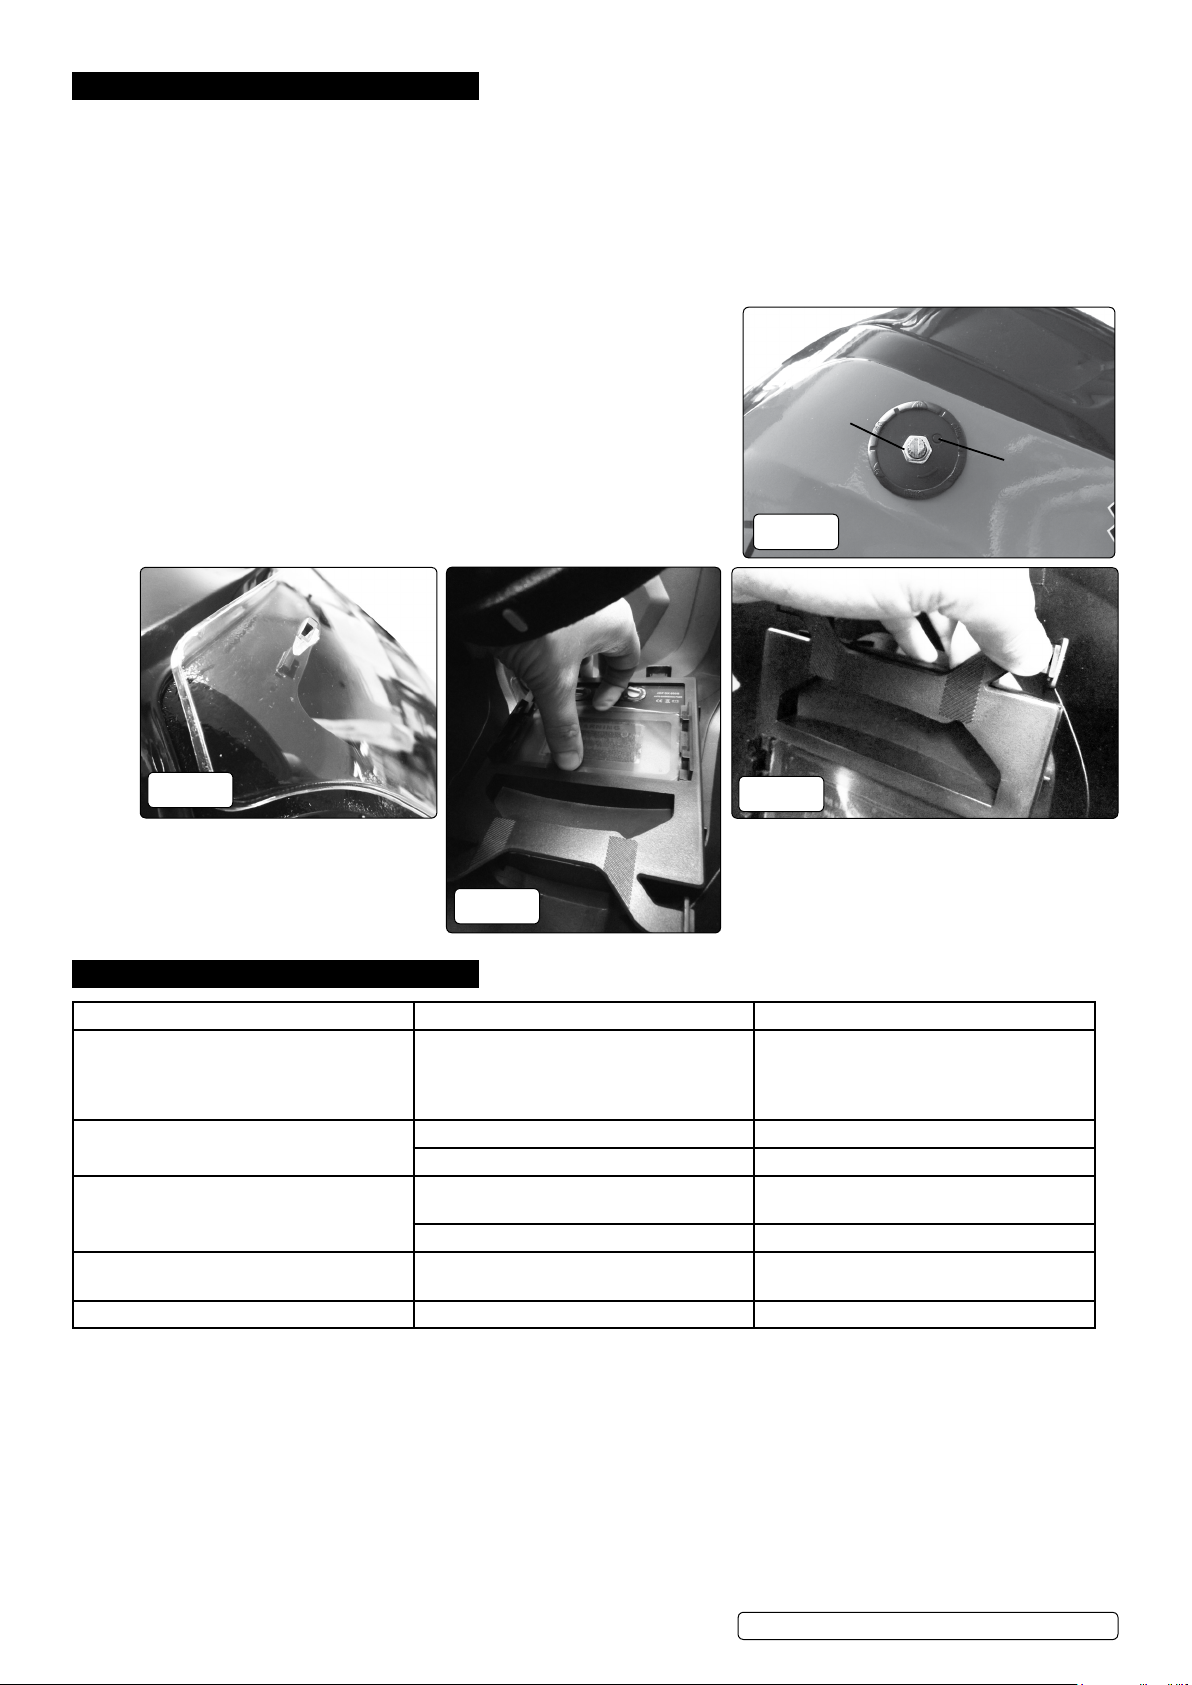
9Maintain the helmet in good condition and protect cartridge from liquid and dirt contact. Regularly replace the protective lens and
replace any damaged or worn parts. Use genuine parts only. Unauthorised parts may be dangerous and will invalidate the warranty.
9Ensure the front cover window is securely in place before use.
9Fit the helmet and adjust the head band so the helmet will sit as low and near to your face as possible.
9Use helmet only in temperatures ranging from -10°C to 60°C.
9 Removeillttingclothing,removeties,watches,ringsandotherloosejewellery.
9Maintain correct balance and footing.
9 Ensuretheoorisclearfromobstructions,notslipperyandwearnon-slipshoes.
9Keep children and unauthorised persons away from the working area.
WARNING! The helmet will only protect the eyes and face from radiation and sparks. It will not protect against explosive devices or
corrosive liquids.
8DO NOT use helmet for any purpose for which it is not designed.
8DO NOTusehelmetunlessyouhavebeeninstructedinitsusebyaqualiedperson.
8DO NOT open or tamper with the shade cartridge.
8DO NOT get the helmet wet or use in damp or wet locations.
8DO NOT leave work place with helmet in lowered position, as bright light source may darken cartridge unexpectedly.
8DO NOT place the helmet on a hot surface.
8DO NOTusehelmetwithoutfrontcoverwindowtted.Todosowillinvalidateyourwarranty.
9Clean helmet (see section 5.4) and store the helmet in a safe, dry, childproof location.
WARNING!Beforeweldingalwaysinspectthecartridgeltertoensurethatitisnotdamaged.Totestthelterpriortowelding,
directthefrontofthecartridgeltertoabrightlightsourcewhichwillcausethelenstodarken.Thenusingyourhandrapidlycover
anduncoverthesensor.Theltershouldlightenmomentarilythenreturntoadarkstate.
WARNING! DO NOT use the helmet if damaged or you suspect it may be faulty. (Contact Sealey stockist).
▲DANGER! DO NOT USE if, at any time, the face plate in the cartridge FAILS to darken when exposed to a welding spark. Remove
cartridge and return to your Sealey stockist for checking.
▲DANGER! Continued use of the product knowing that the auto darkening feature is NOT FUNCTIONING may DAMAGE YOUR
EYES and CAUSE BLINDNESS.
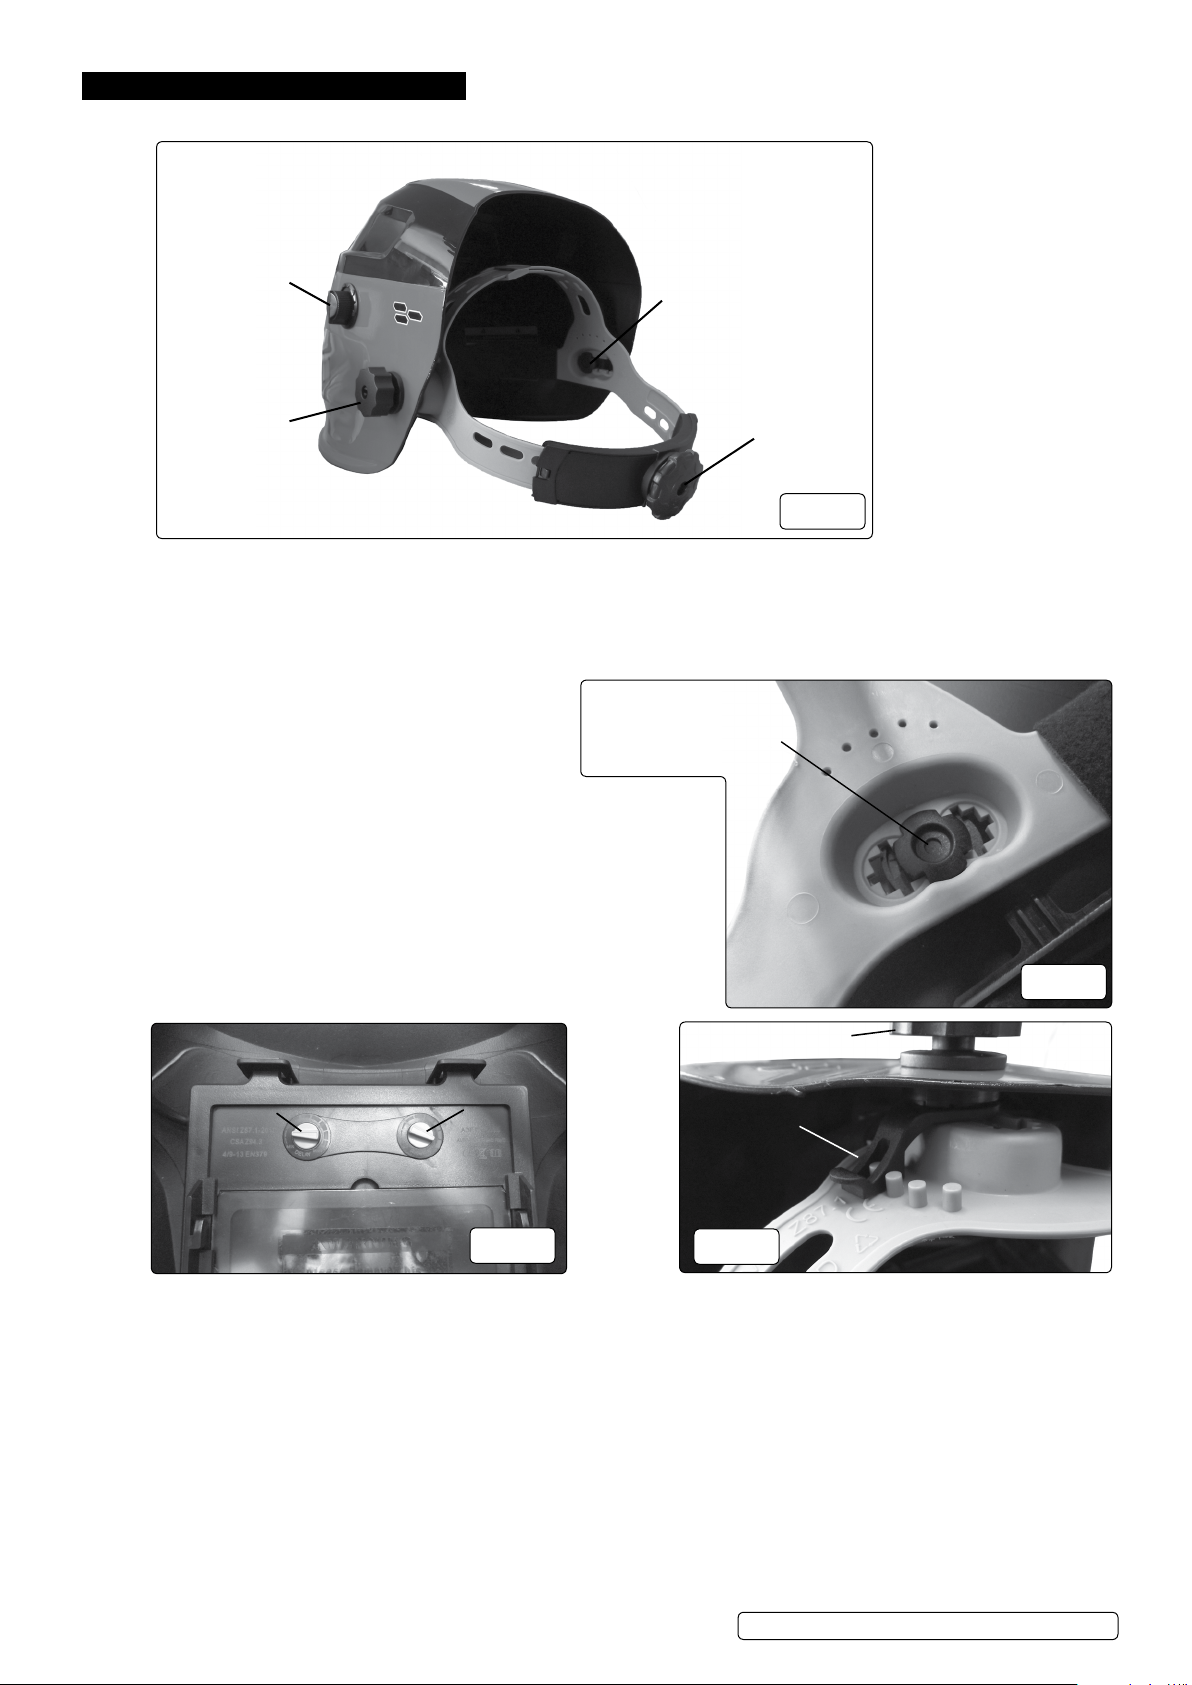
2. INTRODUCTION
Weldinghelmetwithinnitelyadjustableshadecontrolbetween9-13.ComplieswithBSEN379,BSEN175andDINstandards.Fully
automatic switching from light to dark on striking arc. Shade is selected by a rotary knob on side of helmet. Grinding function enables user to
grind without removing mask. Solar panel power supply - no batteries required. Features sensitivity and delay controls for switching light to
dark. Suitable for MIG, TIG, arc welding and grinding.
3. SPECIFICATION
Grinding Function:........................................................................................... Yes
Operating Temperature: .................................................................. -5°C to +55°C
Operating Time Light/Dark: ..................................................................... “0.04ms“
Power:.................................................................................................. Solar Cells
Shade Active:................................................................................... 9-13Variable
Shade Inactive: ................................................................................................... 4
Viewing Area: .........................................................................................92x42mm
PWH1,PWH2,PWH3,PWH4Issue117/06/19
Original Language Version
© Jack Sealey Limited
Refer to
instructions

4. OPERATION
WARNING! Before using the helmet for welding make sure you have read and understood the safety instructions in Section 1.
4.1. ADJUSTING THE FIT OF THE HELMET (SEE FIG.1)
4.1.1. The circumference of the headband is adjusted by turning the wheel on the rear.
4.1.2. The two top straps can also be adjusted by releasing the pin from the top strap and adjusting as required.
4.1.3. The distance between the headband assembly and the helmet can be adjusted by undoing the external thumbwheels both sides
andslidingtheheadbandassemblyforwardsorbackwards,asrequired.Retightenthethumbwheels.(Seegs.1and2.)
4.1.4. Testthetofthehelmetbyliftingitupandclosingitafewtimeswhilstwearingit.Iftheheadbandmoveswhilsttilting,readjustit
until it is stable.
4.2. ADJUSTING THE HELMET TILT (SEE FIG.3)
4.2.1. If the cartridge window is not aligned with the eyes when
the helmet is in the lowered position, adjust the tilt of the
helmet in relation to the headband.
4.2.2. Referringtog.2,loosentheexternalthumbwheelsandliftthetabupto
move it to make the helmet tilt up further or to tilt down further. Then
retighten the external thumbwheels.
4.3. SELECTING THE SHADE LEVEL (SEE FIG.1.)
4.4. RefertotheshadeguideinSection7andadjusttheknobonthesideofthe
helmet to the correct setting.
4.5. GRIND POSITION (SEE FIG.1)
4.5.1. Turn the shade knob anticlockwise until it clicks into the grind position.
▲DANGER!Whengrindingisnisheditmustbeturnedbacktotheappropriate
shade position before welding again. Failure to do this could damage your
eyes.
4.6. SELECTING DELAY/RESPONSE TIME (SEE FIG.4)
4.6.1. The delay time is the time in which it takes the lens to change from dark to light. This is carried out by adjusting the delay time knob
on the cartridge.
4.7. SENSITIVITY (SEE FIG.4)
4.8. For normal light conditions set the sensitivity knob to the high setting.
4.8.1. Forconditionswhenthereisanexcessoflight,whichmayaecttheperformanceofthelens,turntheknobtothelowsetting.
Forwards/backwards
adjustments
Circumference
adjustments
External
thumbwheel
Shade/grinding
knob
Forwards/backwards
adjustment
Thumbwheel
Helmet Tilt
Adjustment
Sensitivity
Delay
g.3
g.1
g.2
g.4
PWH1,PWH2,PWH3,PWH4Issue117/06/19
Original Language Version
© Jack Sealey Limited

5. MAINTENANCE
5.1. CHANGING THE CARTRIDGE
5.1.1. All components clip into the rear of the helmet.
5.1.2. Bend the tabs on the bottom of the cartridge holder inwards to release them. Pull the cartridge holder down to disengage it from the
toplugs(g.6).
5.1.3. Pulltheblackknobothepotentiometershaftonthesideothehelmetandundothenutatthebaseoftheshaftandremoveit(g.5).
5.1.4. Push the potentiometer through into the inside of the helmet. DO NOT loose the plastic disc from under the knob. Use the plastic disc
locatingpin(g.5)asareferenceforcorrectplacement.
5.1.5. Carefully unclip the cartridge from its holder and replace.
5.1.6. Reassemble in the reverse order, ensuring that the pointer on the grinding knob is correctly orientated.
5.2. REPLACING THE OUTER PROTECTIVE LENS COVER
5.2.1. Followsteps5.1.2.to5.1.5.
5.2.2. Gently slot the two tabs at the bottom of the lens into the slots at the bottom
of the opening on the helmet, push the new lens in at the top until you
hearthetabsclickintoplace,andretthecartridgeasabove(g.8)
5.3. REPLACING THE INNER PROTECTIVE COVER LENS
5.3.1. Usetherecessonthetopedgeofthelenstopullitoutandrenew(g.7).Ret
the lens under the clips at each side of the cassette.
5.4. CLEANING
5.4.1. Clean by wiping with a soft cloth. Clean cartridge surfaces regularly. DO NOT use
solvent based cleaners. Clean sensors and solar cells with methylated spirits
using a clean cloth and wipe dry with a lint free cloth.
6. TROUBLESHOOTING
Problem Cause Solution
Irregular darkening or dimming. The headband may have been unevenly
set on the two sides of the helmet (unequal
distances from the eyes to the shade
cartridge).
Readjust the distance of the shade cartridge.
Shadecartridgedoesnotdarkenorickers. The sensors are soiled or obstructed. Clean.
Front cover lens oiled or damaged. Clean or replace.
Poor vision. Operative lenses and/or shade cartridge
soiled.
Check, clean or replace.
Insucientbackgroundlighting. Adjust light.
Slow response. Operating temperature too low. DO NOT use at temperatures below -10°C
(14°F).
Welding helmet slips. Headband adjustments incorrect. Refer to section 4.
Locating Pin
Lock Nut
g.5
g.6
g.8
g.7
PWH1,PWH2,PWH3,PWH4Issue117/06/19
Original Language Version
© Jack Sealey Limited

Sealey Group, Kempson Way, Suffolk Business Park, Bury St Edmunds, Suffolk. IP32 7AR
01284 757500 01284 703534 sales@sealey.co.uk www.sealey.co.uk
ENVIRONMENT PROTECTION
Recycle unwanted materials instead of disposing of them as waste. All tools, accessories and packaging should be sorted, taken to
a recycling centre and disposed of in a manner which is compatible with the environment. When the product becomes completely
unserviceable and requires disposal, drain any fluids (if applicable) into approved containers and dispose of the product and fluids
according to local regulations.
WEEE REGULATIONS
Dispose of this product at the end of its working life in compliance with the EU Directive on Waste Electrical and Electronic Equipment
(WEEE). When the product is no longer required, it must be disposed of in an environmentally protective way. Contact your local solid
waste authority for recycling information.
Note: It is our policy to continually improve products and as such we reserve the right to alter data, specifications and component parts without prior
notice.
Important: No Liability is accepted for incorrect use of this product.
Warranty:Guaranteeis12monthsfrompurchasedate,proofofwhichisrequiredforanyclaim.
7. SHADE GUIDE AND MARKINGS
Meaningofthemarkingsonthelter:
4913 SEALEY 131379
Light state
scale no.
Lightest dark
state scale no.
Darkest state
scale no.
Manufacturers
identication.
Optical class. Diusionof
light class.
Variation in
luminance
transmittance
class.
Number of
the applied
standard.
PWH1,PWH2,PWH3,PWH4Issue117/06/19
Original Language Version
© Jack Sealey Limited
This manual suits for next models
3
Other Sealey Safety Equipment manuals

Sealey
Sealey HVG1000VL User manual

Sealey
Sealey SSP18 User manual

Sealey
Sealey WORKSAFE SSP1.V6 User manual

Sealey
Sealey TD Series User manual

Sealey
Sealey TH2502 User manual

Sealey
Sealey Worksafe SSP78.V2 User manual

Sealey
Sealey SSCL3 User manual

Sealey
Sealey Worksafe SSP78.V2 User manual

Sealey
Sealey SSCL4 User manual

Sealey
Sealey WORKSAFE SSP1.V6 User manual
Popular Safety Equipment manuals by other brands

Tractel
Tractel TracBloc Use and maintenance instructions

Safety Solutions
Safety Solutions HUTCHENS DEVICE installation manual

Dräger
Dräger X-plore 6000 Instructions for use

Petzl
Petzl Chester C64 Instructions for use

LintAlert
LintAlert ALRT31 installation manual

SafeWaze
SafeWaze 021-4068 instruction manual