manuals.online logo
Brands
  1. Home
  2. •
  3. Brands
  4. •
  5. Sealey
  6. •
  7. Safety Equipment
  8. •
  9. Sealey SSCL4 User manual

Sealey SSCL4 User manual

INSTRUCTIONS FOR:
PLATFORM SCAFFOLD TOWER
EXTENSION PACK 4
Model No. SSCL4
Thank you for purchasing a Sealey product. Manufactured to a high standard this product will, if used according to these instructions
and properly maintained, give you years of trouble free performance.
IMPORTANT: PLEASE READ THESE INSTRUCTIONS CAREFULLY. NOTE THE SAFE OPERATIONAL REQUIREMENTS, WARNINGS & CAUTIONS. USE
THE PRODUCT CORRECTLY AND WITH CARE FOR THE PURPOSE FOR WHICH IT IS INTENDED. FAILURE TO DO SO MAY CAUSE DAMAGE AND/OR
PERSONAL INJURY AND WILL INVALIDATE THE WARRANTY. PLEASE KEEP INSTRUCTIONS SAFE FOR FUTURE USE.
1. SAFETY INSTRUCTIONS
WARNING! Take care when using and moving scaffolding,
extended ladders and other such equipment in the vicinity
of power cables - risk of potentially fatal electric shock.
WARNING! Ensure Health and Safety, local authority, and
general workshop practice regulations are adhered to when
using this equipment.
3Familiarise yourself with the application and limitations of the
scaffold, as well as the potential hazards.
3Maintain the equipment in good condition.
7DO NOT use the equipment if any parts are damaged or missing
as this may cause failure and/or personal injury.
3Replace or repair damaged parts. Use genuine parts only.
Non-authorised parts may be dangerous and will invalidate the
warranty.
3Keep the work area clean, uncluttered and ensure there is
adequate lighting.
WARNING! Use scaffold on level and solid ground and ensure
the brakes are applied and/or that the scaffold is anchored and
held firmly in place by some means.
WARNING! DO NOT erect or use the scaffolding on sloping or
unstable ground.
WARNING! Never over-reach when on the scaffolding.
3Keep children and unauthorised persons away from the working
area.
7DO NOT use the scaffolding for any purpose other than that for
which it is designed.
7DO NOT allow children to climb the scaffolding.
7DO NOT use the equipment when you are tired, under the
influence of alcohol, drugs or intoxicating medication.
3When not in use store in a safe, dry, childproof area.
7DO NOT use the equipment without side guardrails, knee rails
and toeboards fitted. Use all the components supplied.
3When used outside, mobile scaffold towers should, wherever
possible, be secured to a building or other reliable structure.
3It is good practice to tie in all scaffold towers of any height,
especially when left unattended or in exposed windy conditions.
Use only the recommended wall anchors.
3Beware of strong wind conditions. Do not erect or use a
freestanding tower if the wind is likely to exceed 7.7 m/sec
(17mph or Beaufort force 4).
3Take care when using mobile scaffold towers in hangers or
uncovered buildings as windforce may be increased due to
funnelling effects.
7DO NOT climb a tower from the outside. Never climb on the
horizontal or diagonal braces. You should only climb the tower on
the inside using the ladder end frames.
7DO NOT lean ladders against the tower. Never use ladders or
boxes to gain additional height.
3Ensure that all personnel, tools and materials are removed from
the tower prior to moving it. Only move the scaffold tower
manually on a firm level surface, which is free of any obstacles.
Only move it longitudinally or diagonally. Do not exceed normal
walking speed. Raise the stabilisers 12 mm (½”) from the ground.
After moving re-lock the castors, check that the tower is level
and ensure that the stabilisers are secure and have a firm footing.
7DO NOT exceed the safe working load of the platform. The
maximum capacity of the working platform for an evenly
distributed load is 1.5 kN/m² (according to HD1004 – scaffold
tower Class 2)
7DO NOT jump on to or off the platforms.
7DO NOT use any lifting equipment on the mobile scaffold tower.
2. INTRODUCTION
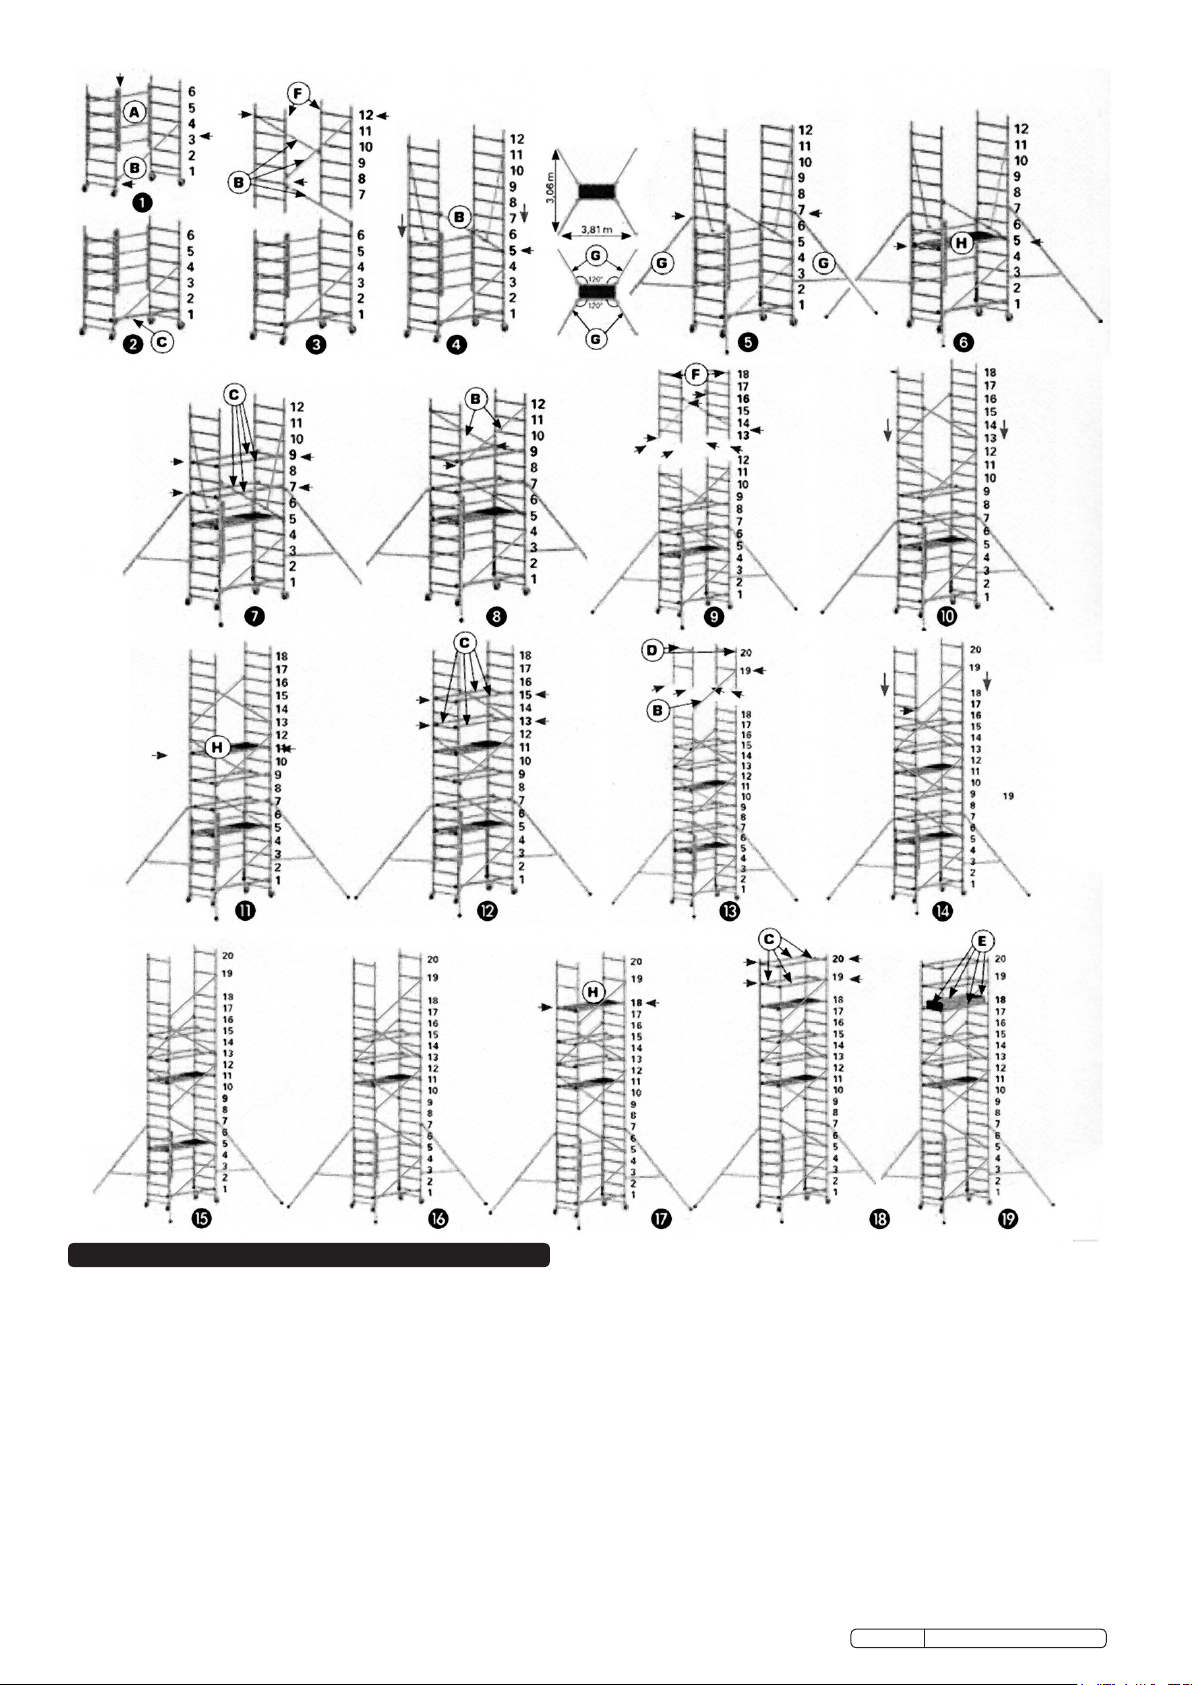
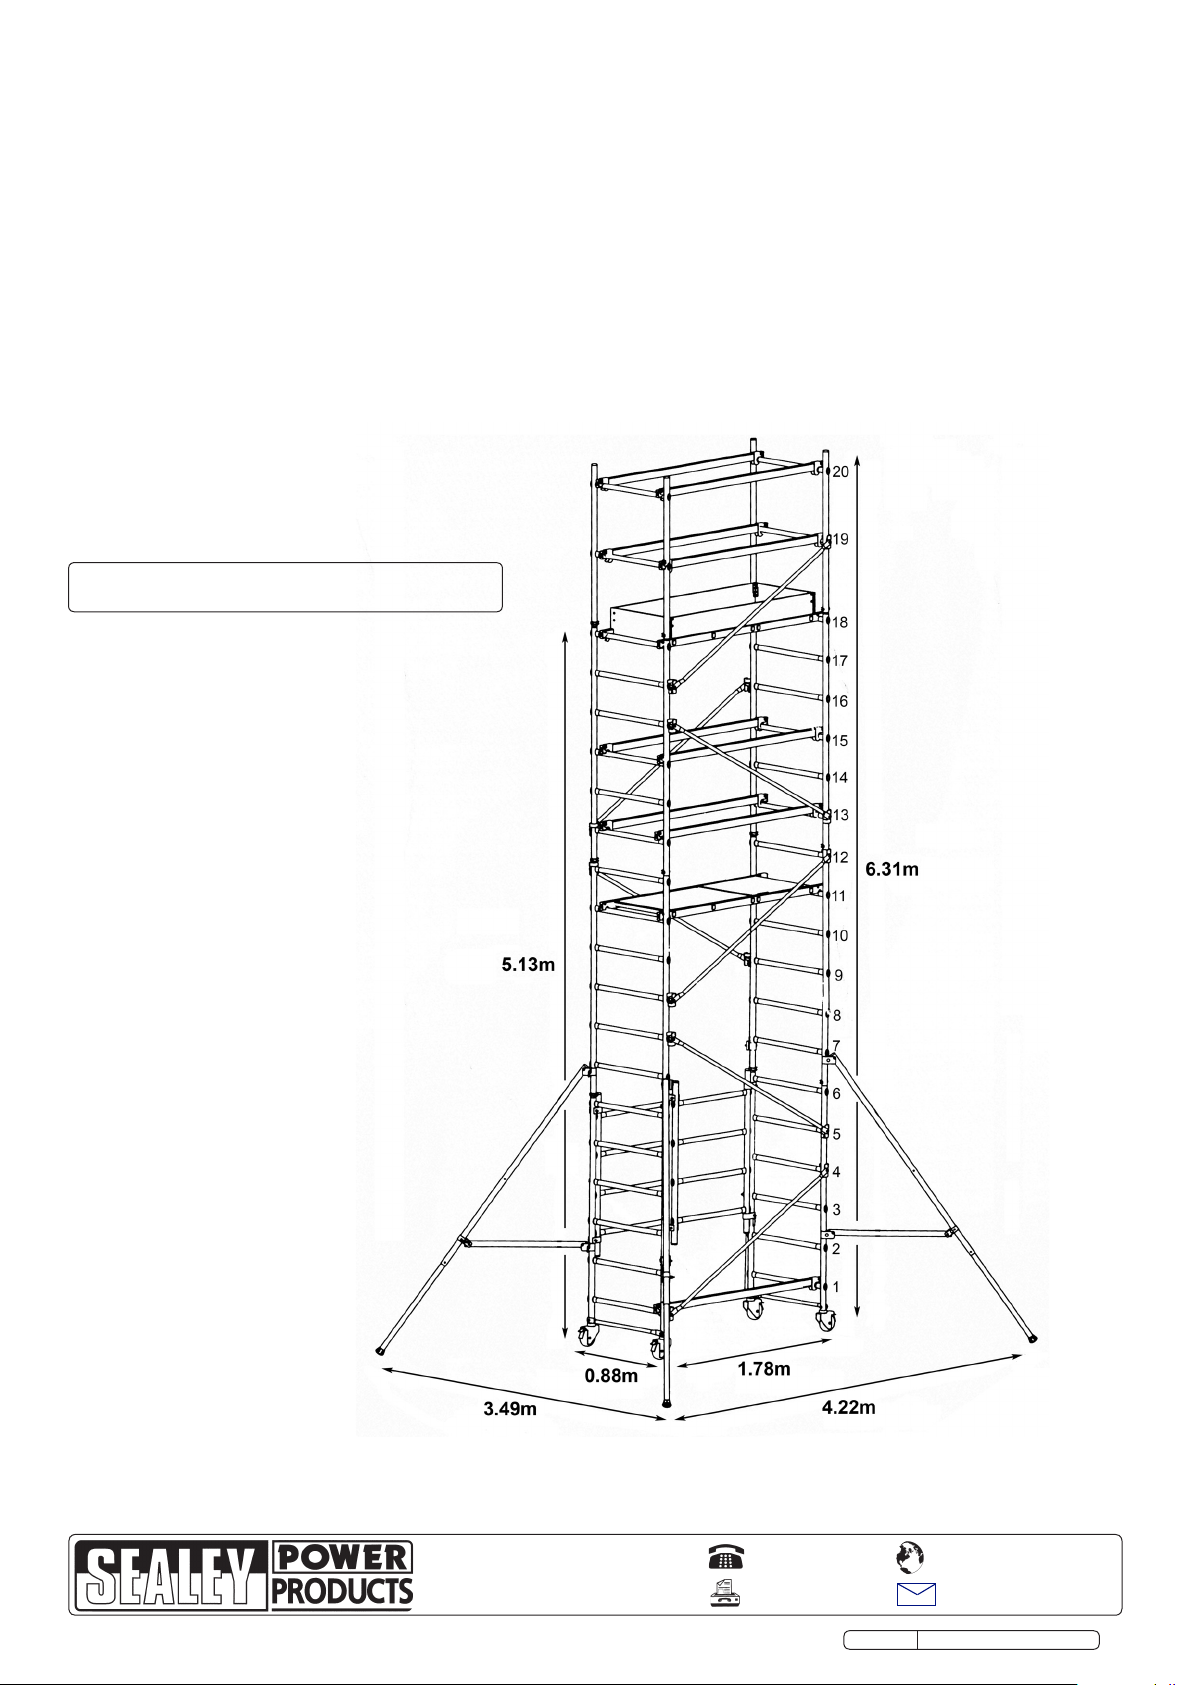
Extension Kit to be used with SSCL1 & SSCL3. Further increases the
platform height to 5.15mtr and the working height to 7.0mtr.
Manufactured from robust aluminium with anodized finish for durable
corrosion resistance.
3. SPECIFICATION
Model No: ...................................................................................... SSCL4
Width: ......................................................................................... 1780mm
Width with support legs: ............................................................. 3810mm
Depth............................................................................................ 860mm
Maximum Working Height: ............................................................7.0mtr*
Maximum Platform Height:..........................................................5.15mtr*
Maximum capacity...........................................................................200kg
Weight: ..............................................................................................10kg
*Only when used with SSCL1 & SSCL3
7DO NOT bridge between the mobile scaffold tower and buildings.
3Stabilisers and ballast weights shall always be fitted where
specified. Ballast is used at the base to stabilise towers from
overturning. Ballast must be of solid material (i.e. NOT water or
loose sand) and should be positioned so as not to overload
individual legs. Ballast should be secured from accidental removal.
3Keep equipment clean and inspect before and after use for
damage. Use serviceable equipment only. All working parts e.g.
castors, adjustable legs; stabiliser clamps should be lubricated
lightly with oil. Repairs should only be carried out by the supplier
or other competent person approved by the supplier.
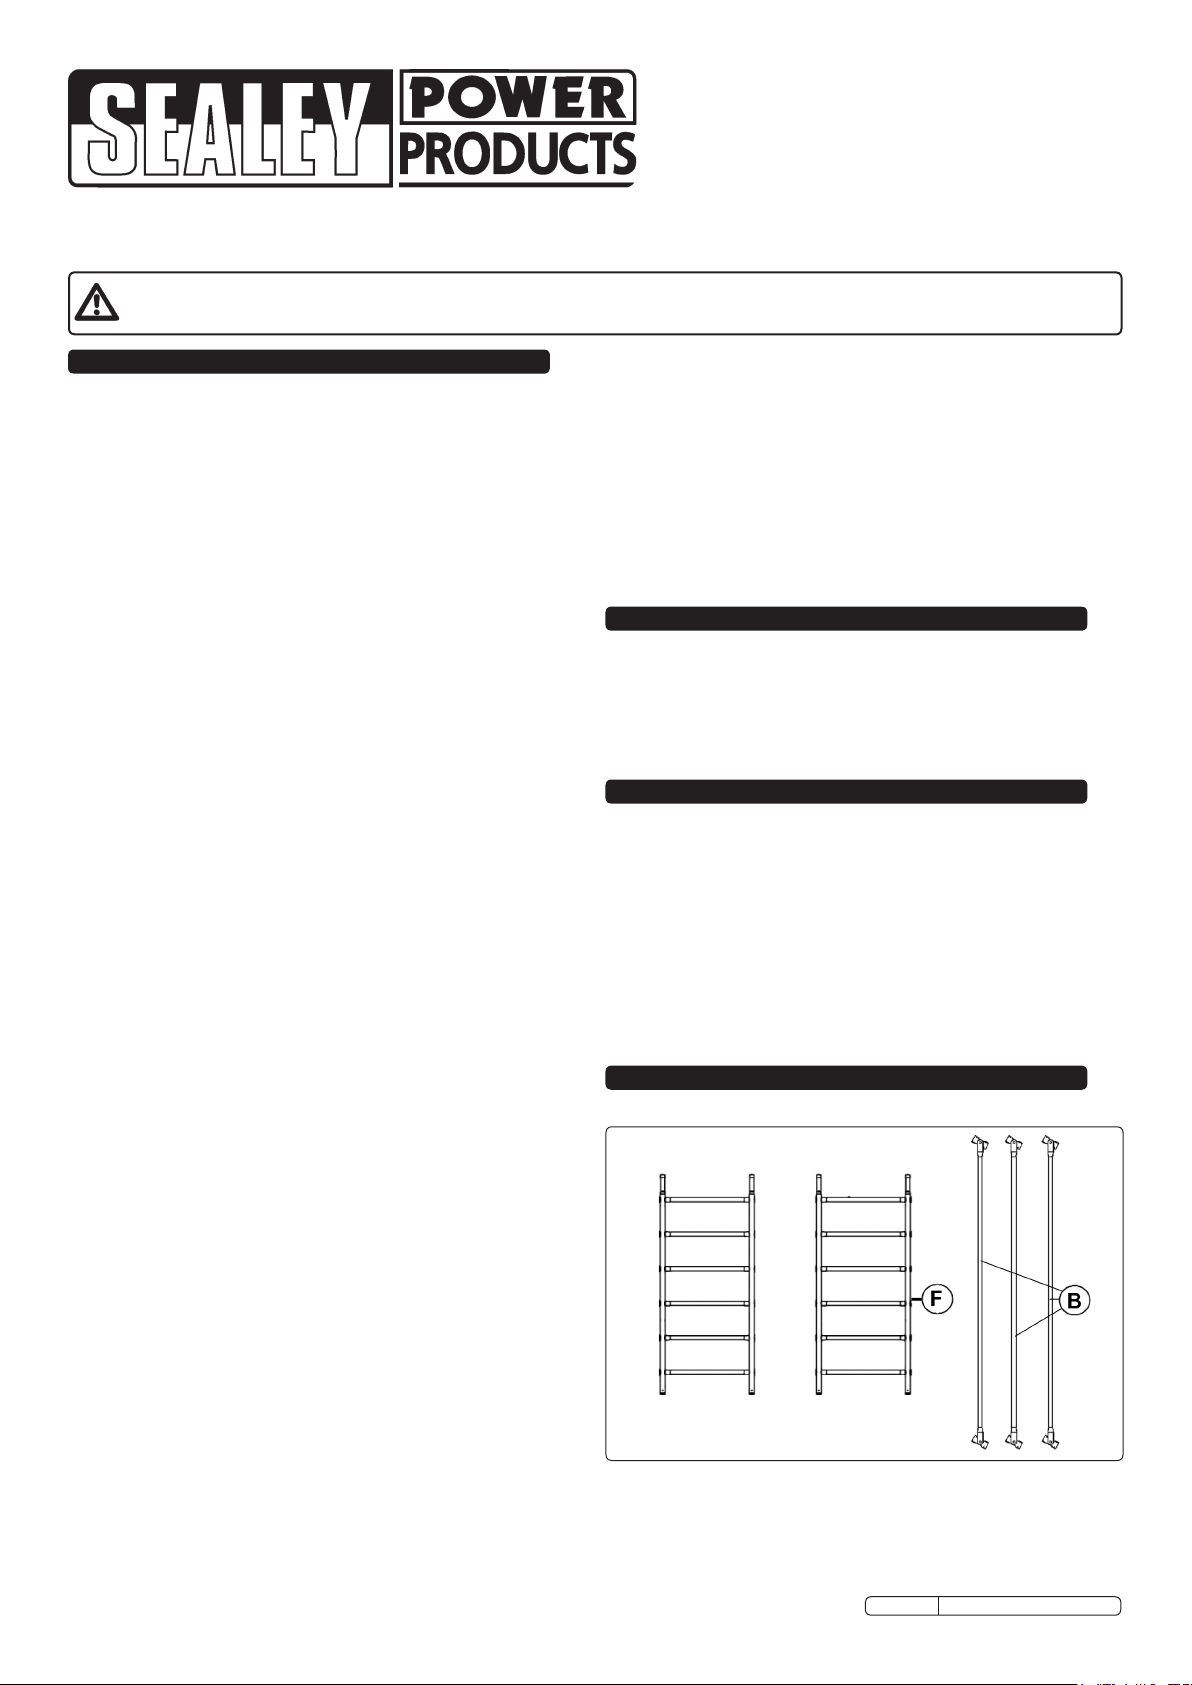
4. CONTENTS
Reference Description Quantity
BDiagonal Brace 3
F6 Rung End Frame 2
Original Language Version
SSCL4 Issue No.1 - 08/06/10
5. ASSEMBLY
NOTE: The mobile scaffold tower may only be assembled, used
and dismantled by persons familiar with these Assembly and Use
Instructions.
NOTE: These instructions show the assembly of SSCL1 +
SSCL3 + SSCL4 from scratch. If you already have SSCLI +
SSCL3 assembled it will be necessary to partly disassemble
some of the upper parts so that it resembles diagram No.8 above.
The parts removed will be reused in the assembly of the
extended tower.
5.1 Open folding base A and insert the locking pin in the centre of
the folding section. Place diagonal B on one side on the first rung
and on the 4th rung on the other side. Make sure that the
butterfly locking part is completely rotated to hold the diagonal
firmly in position.
5.2 Place horizontal brace C on the first rung and lock in position.
5.3 Take 2 of the 6 rung end frames, F and 3 diagonals B. Position a
diagonal on the topmost rung of one frame and the second
diagonal on the same frame on the second rung on the other
side. The last diagonal is to be placed on the top rung of the
second end frame (WARNING : Make sure that everything is
the right way round as per the sketch!)
5.4 Before climbing within the frame, lock the wheels. Position
the end frames on to the folding base and lock the lower diagonal
B to the 5th rung of the base frame. Make sure that the butterfly
locking part is completely rotated to hold the diagonal firmly in
position. Put the 4 locking pins in place.
5.5 Position the 4 stabiliser legs G as per the heights indicated on
the sketch. Tighten firmly at the correct angle as shown above.
Note: Not all stabiliser legs illustrated.
5.6 Position platform H on the 5th rung from the bottom.
5.7 Climb through the trapdoor, sit on the edge and position the two
horizontal braces C on the 7th rung from the bottom and the 2
braces C on the 9th rung. Lock the snaplocks firmly in position.
5.8 Stand up on the platform and fix the 2 diagonals B hanging from
the frames into position.
Original Language Version SSCL4 Issue No.1 - 08/06/10
NOTE: It is our policy to continually improve products and as such we reserve the right to alter data, specifications and component parts without prior notice.
IMPORTANT: No liability is accepted for incorrect use of this product.
WARRANTY: Guarantee is 12 months from purchase date, proof of which will be required for any claim.
INFORMATION: For a copy of our latest catalogue and promotions call us on 01284 757525 and leave your full name and address, including postcode.
01284 757500
01284 703534
sales@sealey.co.uk
Sole UK Distributor, Sealey Group,
Kempson Way, Suffolk Business Park,
Bury St. Edmunds, Suffolk,
IP32 7AR
www.sealey.co.uk
Web
email
5.9 Take 2 of the 6 rung end frames, F and 3 diagonals B. Position a
diagonal on the 4th rung of each frame but on opposite sides.
(WARNING : Make sure that everything is the right way round
as per the sketch!)
5.10 Position the end frames on to frame below and fix the 2 diagonals
B hanging from the frames into position. Make sure that the
butterfly locking part is completely rotated to hold the diagonal
firmly in position. Insert the frame locking pins.
5.11 Position a platform H on the 11th rung and lock in place.
5.12 Climb through the trapdoor, sit on the edge and position the two
horizontal braces C on the 13th rung from the bottom and the 2
braces C on the 15th rung. Lock the snaplocks firmly in position.
5.13 Attach a diagonal B onto the lower rung of one of the two-rung
guardrail end frames D.
5.14 Position the first two-rung guardrail end frame D (without the
diagonal) on the base and then put the two-rung guardrail end
frame D already equipped with the diagonal on the other side of
the base. Fix the diagonal in place on the 17th rung. Make sure
that the butterfly locking part is completely rotated to hold the
diagonal firmly in position. Insert the frame locking pins.
5.15 Climb down to the lowest platform and sitting in the access hatch
remove the 4 horizontal braces from rungs 7 and 9 and pass
them to the ground.
5.16 Climb to the ground and remove the lower platform.
5.17 Ascend to the platform on rung 11 and reposition the other
platform on the 18th rung from the bottom. Lock the windlocks
securely.
5.18 Climb through the trapdoor, sit on the edge and position the two
lower horizontal braces C on the 2nd rung from the top. Lock the
snaplocks firmly in position . Remaining seated in the same
position, put the other two rails C into position on the top-most
rungs. Lock the snaplocks firmly into position.
5.19 Lastly install the toeboards E.
Lock all wheels prior to using the scaffold; ensure that the
stabiliser legs are secure and firmly seated on the ground.
SSCL4 Issue No.1 - 08/06/10
SSCLI + SSCL3 + SSCL4

This manual suits for next models

1

Other Sealey Safety Equipment manuals

Sealey SSP1605 User manual

Sealey

Sealey SSP1605 User manual

Sealey Worksafe SSP78.V2 User manual

Sealey

Sealey Worksafe SSP78.V2 User manual

Sealey WORKSAFE SSP1.V6 User manual

Sealey

Sealey WORKSAFE SSP1.V6 User manual

Sealey TD Series User manual

Sealey

Sealey TD Series User manual

Sealey PWH1 User manual

Sealey

Sealey PWH1 User manual

Sealey TH2502 User manual

Sealey

Sealey TH2502 User manual

Sealey SSCL3 User manual

Sealey

Sealey SSCL3 User manual

Sealey WORKSAFE SSP1.V6 User manual

Sealey

Sealey WORKSAFE SSP1.V6 User manual

Sealey Worksafe SSP78.V2 User manual

Sealey

Sealey Worksafe SSP78.V2 User manual

Sealey HVG1000VL User manual

Sealey

Sealey HVG1000VL User manual

Sealey SSP18 User manual

Sealey

Sealey SSP18 User manual

Popular Safety Equipment manuals by other brands

Innova XTIRPA IN-8016 Instruction and safety manual

Innova

Innova XTIRPA IN-8016 Instruction and safety manual

SL TECH RAF075N quick start guide

SL TECH

SL TECH RAF075N quick start guide

KRATOS SAFETY TS 90 001 00 instruction manual

KRATOS SAFETY

KRATOS SAFETY TS 90 001 00 instruction manual

Petzl C69R TECHNICAL NOTICE

Petzl

Petzl C69R TECHNICAL NOTICE

Cattron Safe-D-Stop quick start guide

Cattron

Cattron Safe-D-Stop quick start guide

ABB Welcome quick guide

ABB

ABB Welcome quick guide

DSPPA MP9815E owner's manual

DSPPA

DSPPA MP9815E owner's manual

IRUDEK X4 LITE manual

IRUDEK

IRUDEK X4 LITE manual

Dorma EMDE-1000 Series quick start guide

Dorma

Dorma EMDE-1000 Series quick start guide

Safety Xpress RACKSENLT PRODUCT INFORMATION & INSTALLATION GUIDE

Safety Xpress

Safety Xpress RACKSENLT PRODUCT INFORMATION & INSTALLATION GUIDE

Petzl CARITOOL EVO TECHNICAL NOTICE

Petzl

Petzl CARITOOL EVO TECHNICAL NOTICE

3M DBI Sala Rollgliss R550 User instructions

3M

3M DBI Sala Rollgliss R550 User instructions

Fbt LIGHT Instructions for use

Fbt

Fbt LIGHT Instructions for use

Next Level BWA030N manual

Next Level

Next Level BWA030N manual

Climbing Technology FOX Instructions for use

Climbing Technology

Climbing Technology FOX Instructions for use

New lift FSTS1 manual

New lift

New lift FSTS1 manual

DELTA PLUS LV201 manual

DELTA PLUS

DELTA PLUS LV201 manual

Bluewheel PS200 instruction manual

Bluewheel

Bluewheel PS200 instruction manual

manuals.online logo
manuals.online logoBrands
  • About & Mission
  • Contact us
  • Privacy Policy
  • Terms and Conditions

Copyright 2025 Manuals.Online. All Rights Reserved.