WARNING! Ensure you follow the safety instructions. Wear approved safety gloves, goggles, mask, and suitable clothing.
WARNING! Before using the washer always touch a suitable earthing point to dissipate any electrostatic charge you may
have.
5.1. PREPARING TANK & ITEMS FOR CLEANING
5.1.1. Water based paint. Ensure tank drain valve (66) is closed and then pour water into the tank (2). A suitable detergent (if required) may
be added. Refer to the detergent makers instructions for the correct amount of detergent to be added. Ensure that the final water level
is at least 1 inch (25mm) above the pump suction strainer (59).
5.1.2. Solvent based paint. Ensure tank drain valve (66) is closed and then pour solvent into tank (2). To aid future sludge removal
approximately 2 litres of water may be added, either before or after the solvent. Ensure final level is at least 1 inch (25mm) above
pump suction strainer (59).
5.1.3. Confirm air valve (20) is closed and air supply pressure is regulated to not more than 3.5 bar (50psi). Turn on air supply.
5.1.4. Partially open air valve (20) and allow pump to run slowly for approx. 2 minutes to purge fluid used for manufacturer’s tests.
NOTE: Lid (1) must be closed for pump to operate.
5.1.5. Check the spray gun to be cleaned, empty and store any excess paint for future use. For best results clean immediately after use,
having removed as much residual paint as possible.
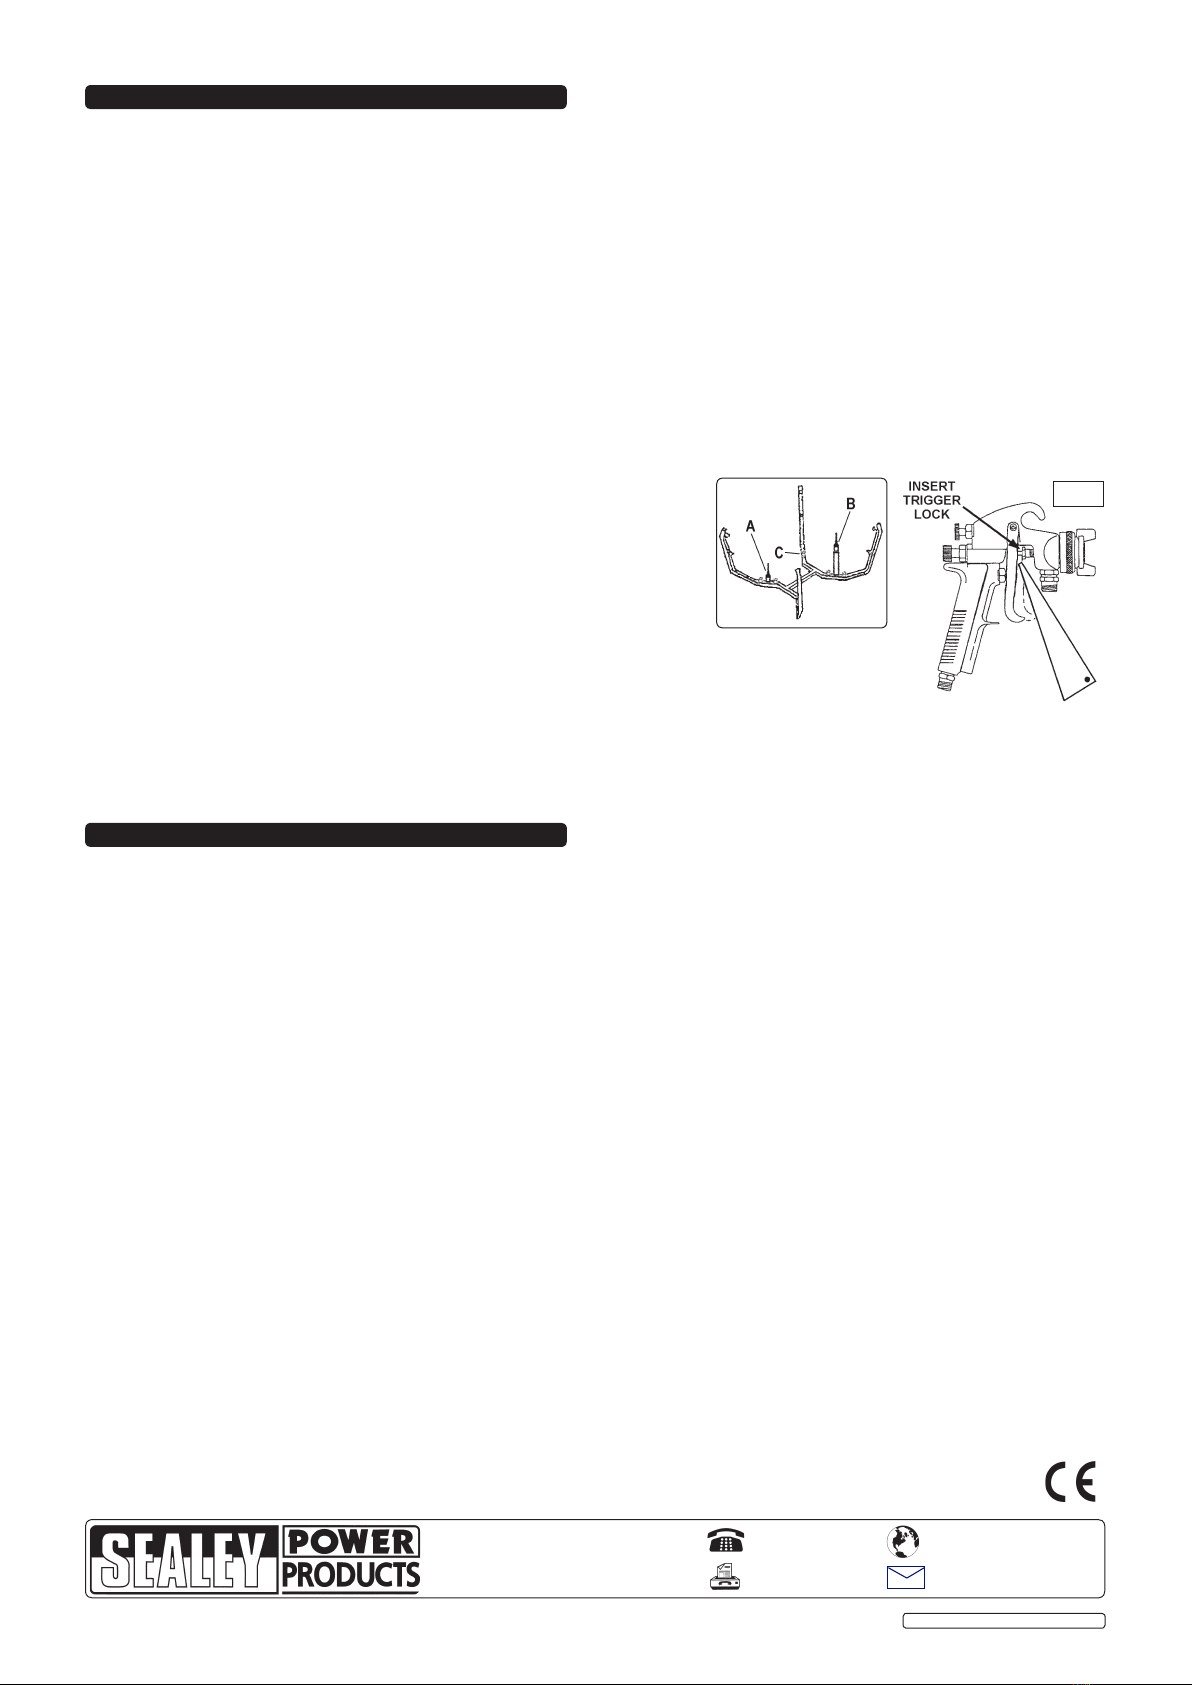
5.1.6. To open the spray gun for cleaning, squeeze trigger and fit trigger lock (56) as shown in fig.1.
5.1.7. Two gun supports are provided, one short (see fig.2A) and one long (see fig.2B). Use whichever support suits the configuration of the
gun to be cleaned. In general, guns which have top entry paint inlets (e.g gravity feed) can be put on either support provided they do
not foul on the underside of the lid. Guns which have bottom entry paint inlets (e.g
suction feed) will usually go onto the longer support.
If required gun cleaning nozzle (8) may be fitted directly to manifold (6) without
items (9) and (10) thus providing two short nozzles.
5.1.8. For pressure fed guns up to 2ltr capacity place the syphon stem of the pot
cover over the short support and position the gun and hoses on the screen
platform. Over this capacity disconnect the gun from the lines and place on the
long support.
5.1.9. Place pots over nozzles ‘C’ (fig.2 - Screen (11) omitted for clarity).
5.2. CLEANING
5.2.1. Ensure washer lid is closed and then fully open pump air valve (20).
The pump will now operate and expel an atomized spray through the nozzles in the cleaning tank.
5.2.2. Cleaning will be complete after 45 seconds, at which time pump should be turned off by closing air
valve (20).
Do not operate pump for longer than 2 minutes at any one time as this will reduce seal life.
5.2.3. Open lid and remove cleaned equipment.
NOTE: If, during cleaning, lid is opened, cleaning process will automatically stop. Close lid for cleaning to continue.
DO NOT store guns in tank.
5. OPERATING INSTRUCTIONS
fig. 1
6. CLEANING AGENT CHANGE
WARNING! It is operator’s responsibility to ensure that there is no uncontrolled discharge of any fluids used with this unit
and that appropriate arrangements have been made for correct disposal of waste in accordance with government/local
authority regulations.
WARNING! Disconnect the air supply from the unit before changing accessories, servicing or performing any maintenance.
WARNING! Wear approved safety gloves, goggles, mask and suitable clothing.
6.1. REPLACEMENT OF CLEANING WATER.
The number of guns that can be cleaned will depend upon the amount of residual paint which is left in the spray equipment. We
recommend however that the cleaning water is changed on a regular basis to provide optimum cleaning performance and that paint
sludge is removed weekly, as detailed below.
6.1.1. Sludge removal a) Drain 2 litres of water/sludge from drain valve (66). Close valve and add clean water to tank to bring the level up
to at least 25mm above strainer.
6.2.2. Water change Completely drain dirty water from drain valve (66). Clean inside of tank (2) and strainer (59) before refilling with
clean water. Dispose of contaminated water in accordance with local authority regulations.
6.2. REPLACEMENT OF SOLVENT CLEANER.
The number of guns the solvent can clean will depend upon the amount of residual paint which is left in spray equipment. We
recommend however that the solvent is changed on a regular basis to provide optimum cleaning performance and that paint sludge is
removed weekly, as detailed below.
6.2.1. Sludge removal a) No water added - Drain 2 litres of solvent/sludge from drain valve (66). Close valve and add clean solvent to tank
to bring level up to at least 25mm above strainer.
b) Water added - Drain water until it becomes discoloured, close drain valve. Change to ‘dirty solvent’ receptacle,
re-open drain valve and drain 2 litres of solvent/sludge. Close valve, replace water in tank and then add clean
solvent to bring level up to at least 25mm above strainer.
6.2.2. Solvent change Completely drain dirty solvent from drain valve (66). Clean inside of tank (2) and strainer (59) before refilling with
clean solvent. Store the used solvent in accordance with regulations. Wipe up any spillage immediately.
6.3. MAINTENANCE
6.3.1. Weekly, remove pump upper cap (45) and add grease.
6.3.2. Regularly check that opening the washer lid automatically stops the spray.
6.3.3. Regularly check and top up the oil in the air supply oiler.
6.3.4. Keep the outside of the unit clean.
fig. 2
SM23/2.V3 Issue No.1 - 20/10/09
Original Language Version
NOTE: It is our policy to continually improve products and as such we reserve the right to alter data, specifications and component parts without prior notice.
IMPORTANT: No liability is accepted for incorrect use of this product.
WARRANTY: Guarantee is 12 months from purchase date, proof of which will be required for any claim.
INFORMATION: For a copy of our latest catalogue and promotions call us on 01284 757525 and leave your full name and address, including postcode.
01284 757500
01284 703534
sales@sealey.co.uk
Sole UK Distributor, Sealey Group,
Kempson Way, Suffolk Business Park,
Bury St. Edmunds, Suffolk,
IP32 7AR
www.sealey.co.uk
Web
email


