Sears Fitness gear 821E User manual

ELLIPTICAL USER’S GUIDE
FOR MODEL :
821E


3
ASSEMBLY INTRODUCTION
IMPORTANT
PRECAUTIONS
BEFORE YOU BEGIN
ELLIPTICAL
OPERATION
LIMITED
WARRANTY
TROUBLESHOOTING
& MAINTENANCE
CONDITIONING
GUIDELINES ASSEMBLY
CONGRATULATIONS and THANK YOU for your purchase of this Fitness Gear elliptical!
Whether your goal is to win races or simply enjoy a fuller, healthier lifestyle, an Fitness Gear elliptical
can help you attain it – adding club-quality performance to your at-home workouts, with the ergonomics
and innovative features you need to get stronger and healthier, faster. Because we're committed to
designing fitness equipment from the inside out, we use only the highest quality components. It's a
commitment we back with one of the strongest frame-to-brake warranty packages in the industry.
You want exercise equipment that offers the most comfort, the best reliability and the highest quality
in its class.
Fitness Gear delivers.
INTRODUCTION
TABLE OF CONTENTS
Important Precautions
Assembly
Before You Begin
Elliptical Operation
Conditioning Guidelines
Troubleshooting & Maintenance
Limited Warranty
CONTACT INFORMATION
4
5
12
13
18
23
27
Back Panel
INTRODUCTION

4
INTRODUCTION IMPORTANT
PRECAUTIONS BEFORE YOU BEGIN ELLIPTICAL
OPERATION
LIMITED
WARRANTY
TROUBLESHOOTING
& MAINTENANCE
CONDITIONING
GUIDELINES
ASSEMBLY
IMPORTANT
PRECAUTIONS
SAVE THESE INSTRUCTIONS
Read all instructions before using this elliptical. When using an electrical product, basic precautions
should always be followed. It is the responsibility of the owner to ensure that all users of this elliptical are
adequately informed of all warnings and precautions. If you have any questions after reading this manual,
contact Sears at the number listed on the back panel of this manual.
IMPORTANT PRECAUTIONS
WARNING
It is essential that your elliptical is used only indoors, in a climate controlled room. If your elliptical has been
exposed to colder temperatures or high moisture climates, it is strongly recommended that the elliptical is
warmed up to room temperature before first time use. Failure to do so may cause premature electronic failure.
To reduce the risk of burns, fire, electrical shock or injury to persons:
• If you experience chest pains, nausea, dizziness, or shortness of breath, stop exercising immediately and
consult your physician before continuing.
• Maintain a comfortable pace. Do not sprint above 80 rpms on this machine.
• To maintain balance, it is recommended to keep a grip on the handlebars while exercising, mounting or
dismounting the machine.
• Do not wear clothes that might catch on any part of the elliptical.
• Do not turn pedal arms by hand.
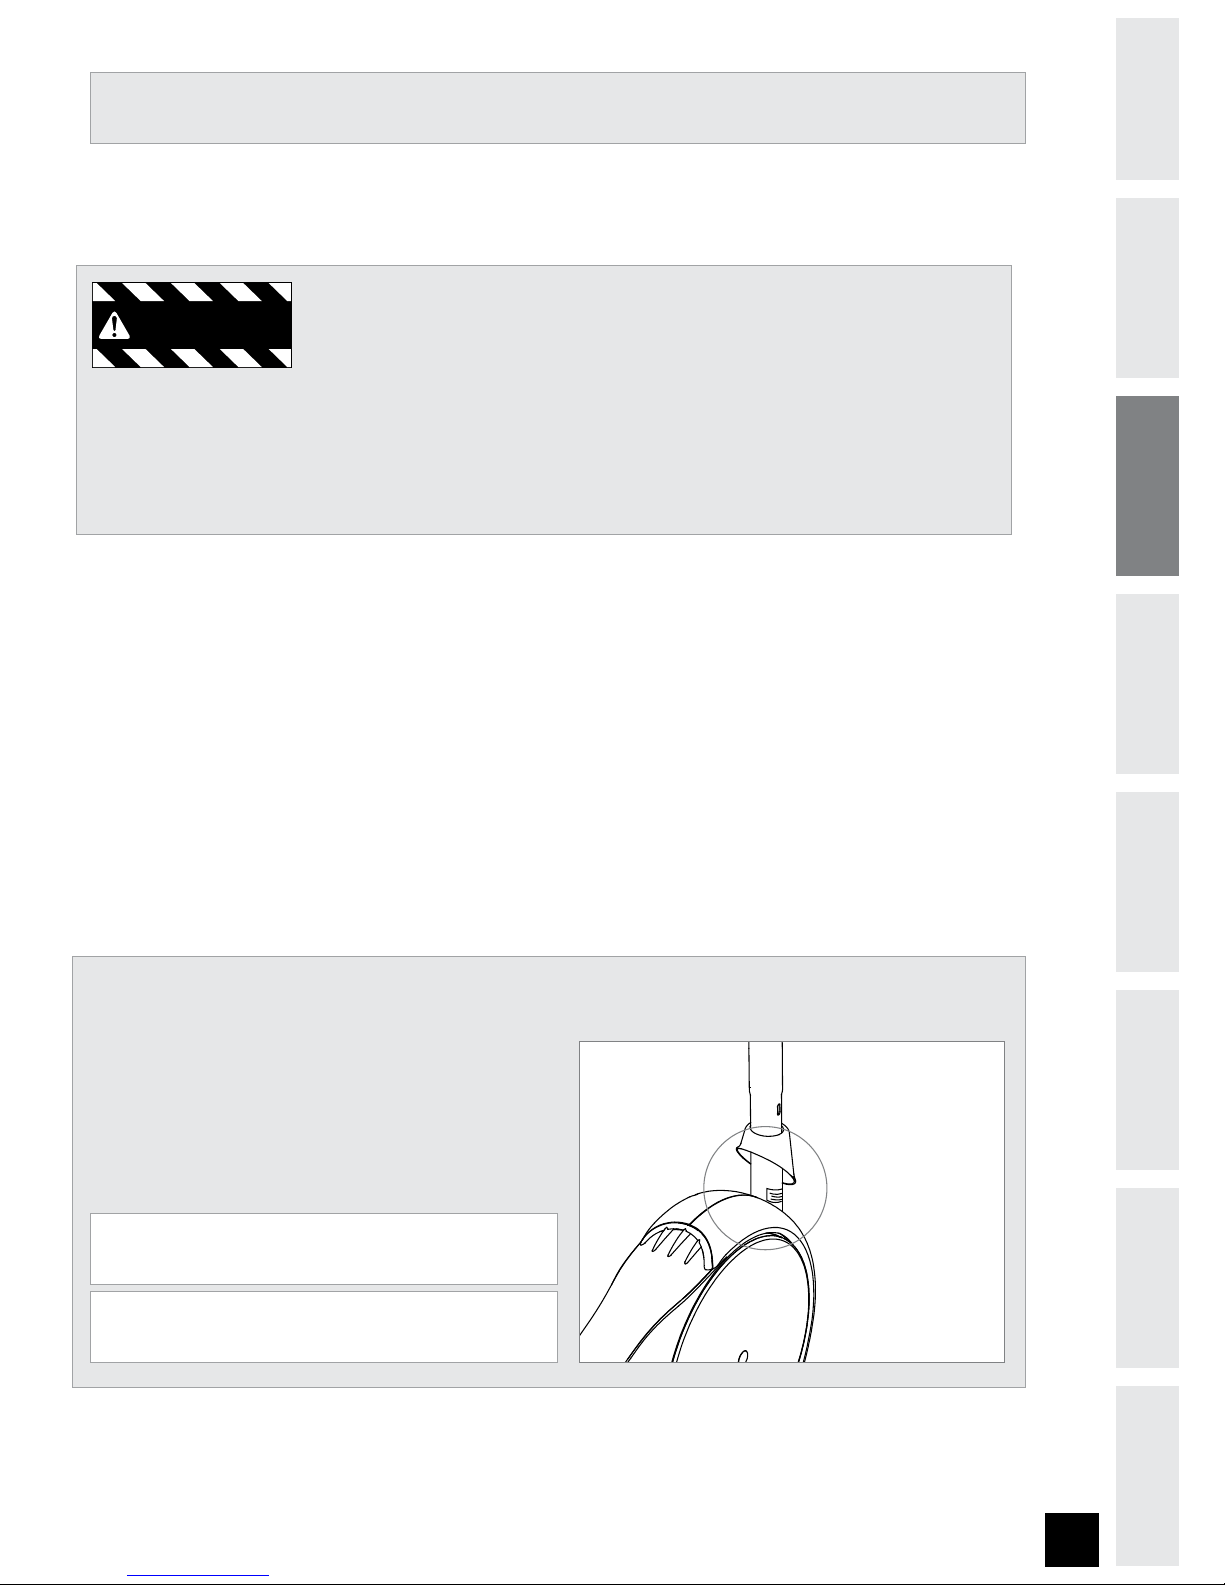
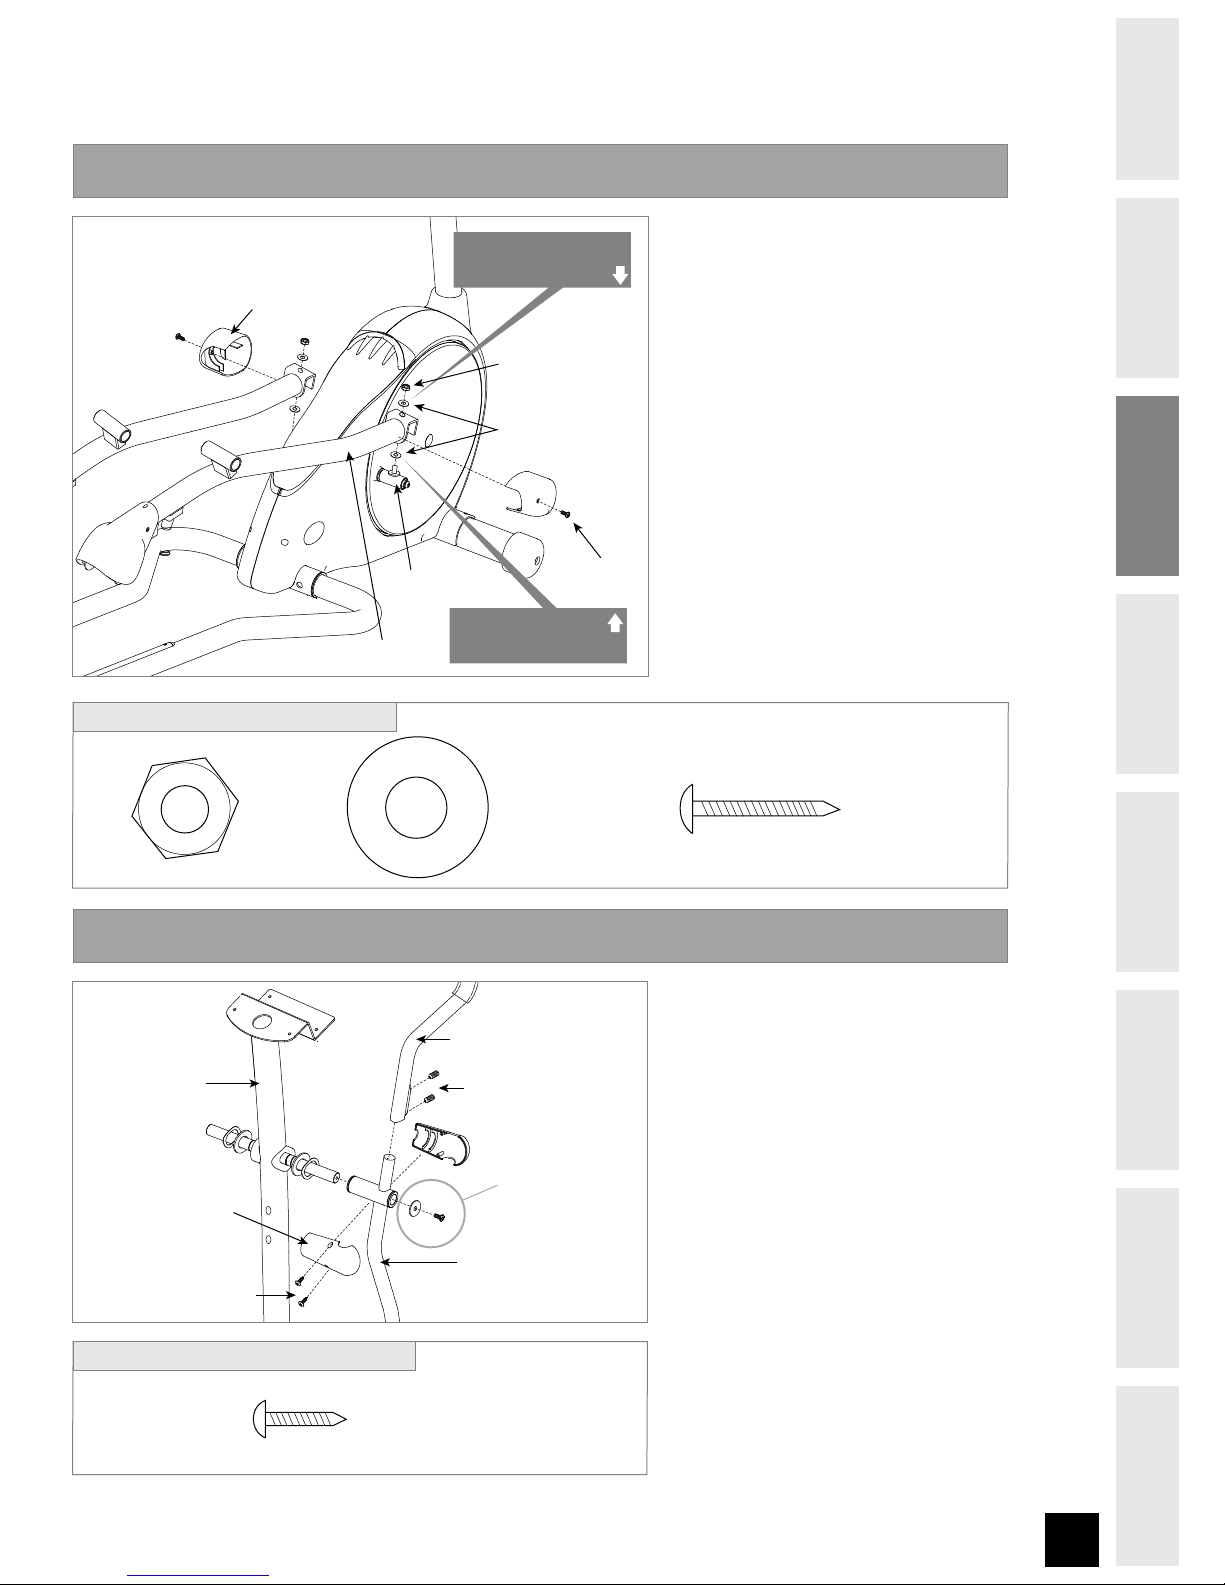
• Make sure handlebars are secure before each use.
• Do not insert or drop any object into any opening.
• Unplug elliptical before moving or cleaning it. To clean, wipe surfaces down with soap and slightly damp
cloth only; never use solvents. (See MAINTENANCE)
• This elliptical should not be used by persons weighing more than 250 pounds. Failure to comply will void
the warranty.
• This elliptical is intended for in-home use only. Do not use this elliptical in any commercial, rental, school
or institutional setting. Failure to comply will void the warranty.
• Do not use elliptical in any location that is not temperature controlled such as but not limited to: garages,
porches, pool rooms, bathrooms, car ports or outdoors. Failure to comply may void the warranty.
• Use the elliptical only as described in this manual.
• Keep the topside of the foot support clean and dry
• Care should be taken when mounting or dismounting the equipment. Before mounting or dismounting,
move the pedal on the mounting or dismounting side to its lowest position and bring the machine to a
complete stop.
• Disconnect all power before servicing the equipment.
At NO time should pets or children under the age of 12 be closer to the elliptical than 10 feet.
At NO time should children under the age of 12 use the elliptical.
Children over the age of 12 should not use the elliptical without adult supervision.

5
ASSEMBLY INTRODUCTION
IMPORTANT
PRECAUTIONS
BEFORE YOU BEGIN
ELLIPTICAL
OPERATION
LIMITED
WARRANTY
TROUBLESHOOTING
& MAINTENANCE
CONDITIONING
GUIDELINES ASSEMBLY
ASSEMBLY
ASSEMBLY
IMPORTANT: READ THESE SAFETY INSTRUCTIONS BEFORE USE!
There are several areas during the assembly process of an elliptical that special attention must be paid.
It is very important to follow the assembly instructions correctly and to make sure all parts are firmly
tightened. If the assembly instructions are not followed correctly, the elliptical could have frame parts that
are not tightened and will seem loose and may cause irritating noises. To prevent damage to the elliptical,
the assembly instructions must be reviewed and corrective actions should be taken.
UNPACKING
Unpack the product where you will be using it. Place the product on a level flat surface. It is recommended
that you place a protective covering on your floor. During each assembly step, ensure that ALL nuts and
bolts are in place and partially threaded in before completely tightening any ONE bolt.
NOTE: A light application of grease may aid in the installation of hardware. Any grease, such as lithium
bike grease is recommended.
Before proceeding, find your elliptical’s serial number
located under the console mast boot and enter it in
the space provided below. Also locate the model name
which is located on the side cover.
ENTER YOUR SERIAL NUMBER AND
MODEL NAME IN THE BOxES BELOW:
SERIAL NUMBER:
MODEL NAME:
* Refer to the SERIAL NUMBER and MODEL NAME when calling for service.
* Also enter this serial number on your Warranty Card.
SERIAL NUMBER
IS LOCATED UNDER
CONSOLE MAST BOOT
WARNING
IMPORTANT
PRECAUTIONS

6
INTRODUCTION IMPORTANT
PRECAUTIONS BEFORE YOU BEGIN ELLIPTICAL
OPERATION
LIMITED
WARRANTY
TROUBLESHOOTING
& MAINTENANCE
CONDITIONING
GUIDELINES
ASSEMBLYASSEMBLY
TRANSPORT WHEEL
LOWER HANDLEBAR
TOOLS INCLUDED
c 5mm Allen Wrench
c 4mm Allen Wrench
c 13/15mm Flat Wrench
c 17mm Flat Wrench
CONSOLE
PARTS INCLUDED
c 1 Console
c 1 Console Mast
c 1 Console Mast Boot
c 1 Stabilizer Tube
c 2 Upper Handlebars
c 2 Lower Handlebars
c 2 Link Arms
c 2 Pedal Arms
c 2 Pedal Arm Covers
c 2 Guide Rails
c 2 Pivoting Foot Pads
c 2 Front Handlebar Covers
c 2 Rear Handlebar Covers
c 1 Power Supply
c 7 Hardware Bags
HANDLEBAR COVERS
UPPER HANDLEBAR
STABILIZER TUBE
PEDAL ARM COVER
LINK ARM
PEDAL ARM
If you have questions or if there are any missing parts, Sears guarantees complete satisfaction.
Sears contact information is located on the back panel of this manual.
GUIDE RAIL
ROLLER WHEEL COVERS
PIVOTING FOOTPAD
CONSOLE MAST
CONSOLE MAST BOOT
BOTTLE HOLDER

7
ASSEMBLY INTRODUCTION
IMPORTANT
PRECAUTIONS
BEFORE YOU BEGIN
ELLIPTICAL
OPERATION
LIMITED
WARRANTY
TROUBLESHOOTING
& MAINTENANCE
CONDITIONING
GUIDELINES ASSEMBLY
ASSEMBLY
A) Open HARDWARE BAG FOR STEP 1.
B) Attach STABILIZER TUBE to the
MAIN FRAME using 2 BOLTS (A).
A) Open HARDWARE BAG FOR STEP 2.
B) Slide left and right GUIDE RAILS
into MAIN FRAME.
C) Attach GUIDE RAILS using 2
BOLTS (B).
NOTE: You may have to rotate the
guide rails back and forth to get
them to slide into the frame.
#0-5"
45"#*-*;&356#&
."*/'3".&
#0-5"
NN
2UZ
HARDWARE BAG FOR STEP 1 CONTENTS :
ASSEMBLY STEP 1
ASSEMBLY S TE P 2
#0-54#
."*/'3".&
#0-5#
NN
2UZ
HARDWARE BAG FOR STEP 2 CONTENTS :

8
INTRODUCTION IMPORTANT
PRECAUTIONS BEFORE YOU BEGIN ELLIPTICAL
OPERATION
LIMITED
WARRANTY
TROUBLESHOOTING
& MAINTENANCE
CONDITIONING
GUIDELINES
ASSEMBLYASSEMBLY
A) Open HARDWARE BAG FOR STEP 3.
B) Slide the CONSOLE MAST BOOT over the bottom of the CONSOLE MAST.
C) Carefully pull console wires through the CONSOLE MAST. Attach the CONSOLE WIRES to the pre-attached
routing wire. Discard wire when finished.
D) Slide CONSOLE MAST into MAIN FRAME.
E) Insert 3 BOLTS (C), 3 LOCK WASHERS (D) and 3 ARC WASHERS (E) into back of CONSOLE MAST.
F) Attach CONSOLE MAST to MAIN FRAME using BOLT (B) using NUT (F).
G) Slide CONSOLE MAST BOOT down to cover exposed bolts.
BOLTS (C)
BOLT (B)
MAIN FRAME
NUT (F) LOCK WASHERS (D)
ARC WASHERS (E)
CONSOLE MAST
CONSOLE MAST BOOT
CONSOLE WIRES
BOLT (B)
70 mm
Qty: 1
NUT (F)
13 mm
Qty: 1
LOCK
WASHER (D)
Qty: 3
ARC
WASHER (E)
Qty: 3
BOLT (C)
15 mm
Qty: 3
HARDWARE BAG FOR STEP 3 CONTENTS :
ASSEMBLY STEP 3

9
ASSEMBLY INTRODUCTION
IMPORTANT
PRECAUTIONS
BEFORE YOU BEGIN
ELLIPTICAL
OPERATION
LIMITED
WARRANTY
TROUBLESHOOTING
& MAINTENANCE
CONDITIONING
GUIDELINES ASSEMBLY
ASSEMBLY
A) Open HARDWARE BAG FOR STEP 5.
B) Remove PRE-ATTACHED BOLT &
WASHERS from CONSOLE MAST.
C) Slide LOWER HANDLEBARS onto
CONSOLE MAST and attach by
re-inserting PRE-ATTACHED BOLT
& WASHERS.
D) Attach UPPER HANDLEBARS to
LOWER HANDLEBARS using PRE-
ATTACHED SCREWS.
D) Attach HANDLEBAR COVERS using
4SCREWS (J).
13&"55"$)&%4$3&84
-08&3
)"/%-&#"3
611&3)"/%-&#"3
4$3&84+
)"/%-&#"3$07&3
$0/40-&
."45
13&"55"$)&%
#0-58"4)&3
A) Open HARDWARE BAG FOR STEP 4.
B) Place TEFLON WASHER (H) over
CRANK ARM followed by PEDAL
ARM.
C) Place a second TEFLON WASHER
(H) over PEDAL ARM and attach
using NUT (G).
D) Repeat on other side.
E) Attach PEDAL ARM COVERS to
PEDAL ARMS using SCREWS (I).
/05&XBTIFSPOUPQTIPVME
CFGBDJOHCMBDLTJEFEPXO
/05&XBTIFSPOCPUUPN
TIPVMECFGBDJOHCMBDLTJEFVQ
1&%"-"3.
5&'-0/8"4)&34)
/65(
1&%"-"3.$07&3
4$3&8*
$3"/,"3.
NUT (G)
17 mm
Qty: 2
SCREW (I)
25 mm
Qty: 2
TEFLON WASHER (H)
25 mm
Qty: 4
HARDWARE BAG FOR STEP 4 CONTENTS :
ASSEMBLY STEP 4
ASSEMBLY STEP 5
4$3&8+
NN
2UZ
HARDWARE BAG FOR STEP 5 CONTENTS :

10
INTRODUCTION IMPORTANT
PRECAUTIONS BEFORE YOU BEGIN ELLIPTICAL
OPERATION
LIMITED
WARRANTY
TROUBLESHOOTING
& MAINTENANCE
CONDITIONING
GUIDELINES
ASSEMBLYASSEMBLY
FOOTPAD BRACKET
FOOT PLATE
SCREW (A)
BOLTS (M)
WAVY WASHER (L)
PEDAL ARM
FOOT PAD
A) Open HARDWARE BAG FOR STEP 6.
B) 821E: Attach FOOTPAD to FOOT PLATE using 2 SCREWS (A) and 2 SCREWS (B).
C) Slide WAVY WASHER (L) and the FOOT PLATE onto the PEDAL ARM axle.
D) Attach FOOTPAD BRACKET to FOOT PLATE using 3 BOLTS (M).
E) Repeat on other side.
ASSEMBLY S TE P 6
WAVY
WASHER (L)
Qty: 2
BOLT (M)
15 mm
Qty: 6
FOOTPAD BRACKET
Qty: 2
SCREW (A)
12 mm
Qty: 8
HARDWARE BAG FOR STEP 6 CONTENTS :

11
ASSEMBLY INTRODUCTION
IMPORTANT
PRECAUTIONS
BEFORE YOU BEGIN
ELLIPTICAL
OPERATION
LIMITED
WARRANTY
TROUBLESHOOTING
& MAINTENANCE
CONDITIONING
GUIDELINES ASSEMBLY
ASSEMBLY
ASSEMBLY S TE P 8
PRE-ATTACHED
SCREWS
CONSOLE
CONSOLE MAST
CONSOLE WIRES
NOTE: There is NO hardware bag
for this step. All hardware is pre-
installed.
A) Attach the CONSOLE WIRES.
B) Carefully tuck the CONSOLE
MAST wires into the CONSOLE
MAST before attaching the
CONSOLE.
C) Attach CONSOLE to the
CONSOLE MAST using the
4 PRE-ATTACHED SCREWS
(screws will have to be removed
from the console first).
DO NOT PINCH WIRES!
A) Open HARDWARE BAG FOR STEP 7.
B) Insert SPACER (Q).
C) Insert 2 TEFLON WASHERS (P)
between LINK ARM and LOWER
HANDLEBAR BRACKET.
D) Attach UPPER HANDLEBARS to
LOWER HANDLEBARS using PRE-
ATTACHED SCREWS.
D) Attach LINK ARM to LOWER
HANDLEBAR using BOLT (N) and
NUT (O).
E) Repeat on other side.
NUT (O)
BOLT (N)
LOWER HANDLEBAR
BRACKET
LINK ARM TEFLON WASHER (P)
SPACER (Q)
TEFLON WASHER (P)
ASSEMBLY STEP 7
#0-5/
NN
2UZ
5&'-0/
8"4)&31
NN
2UZ
41"$&32
2UZ
/650
2UZ
HARDWARE BAG FOR STEP 7 CONTENTS :

12
INTRODUCTION IMPORTANT
PRECAUTIONS BEFORE YOU BEGIN ELLIPTICAL
OPERATION
LIMITED
WARRANTY
TROUBLESHOOTING
& MAINTENANCE
CONDITIONING
GUIDELINES
ASSEMBLY BEFORE YOU BEGIN
BEFORE YOU BEGIN
CONGRATULATIONS! on choosing your elliptical. You’ve taken an important step in developing and
sustaining an exercise program! Your elliptical is a tremendously effective tool for achieving your personal
fitness goals. Regular use of your elliptical can improve the quality of your life in many ways.
HERE ARE JUST A FEW OF THE HEALTH BENEFITS OF EXERCISE:
• Weight Loss
• A Healthier Heart
• Improved Muscle Tone
• Increased Daily Energy Levels
The key to reaping these benefits is to develop an exercise habit. Your new
elliptical will help you eliminate obstacles that prevent you from exercising.
Inclement weather and darkness won't interfere with your workout when you
use your elliptical in the comfort of your home. This guide provides you with
basic information for using and enjoying your new machine.
LOCATION OF THE ELLIPTICAL
Place the elliptical on a level surface. There should be 6 feet of clearance
behind the elliptical, 3 feet on each side and one foot in front for the power
cord (See diagram to the right). Do not place the elliptical in any area that
will block any vent or air openings. The elliptical should not be located in a
garage, covered patio, near water or outdoors.
GFFU
GFFU
GFFU
GPPU
YOU’RE FINISHED!
CONSOLE MAST
PRE-ATTACHED
SCREWS
BOTTLE HOLDER
AC ADAPTOR INPUT
A) Attach BOTTLE HOLDER to the
CONSOLE MAST using the
2 PRE-ATTACHED SCREWS
(screws will have to be removed
from the console mast first).
Connect AC ADAPTOR to the AC
ADAPTOR INPUT located at front of
the main frame. Connect ADAPTOR
to a power outlet.
ASSEMBLY S TE P 9

13
ASSEMBLY INTRODUCTION
IMPORTANT
PRECAUTIONS
BEFORE YOU BEGIN
ELLIPTICAL
OPERATION
LIMITED
WARRANTY
TROUBLESHOOTING
& MAINTENANCE
CONDITIONING
GUIDELINES ASSEMBLY
ELLIPTICAL
OPERATION
POWER
Your programmable elliptical is powered by a power supply. The power cord must be plugged into the power jack,
which is located in the front of the machine near the STABILIZER TUBE.
Do not operate the elliptical if the power cord or plug is damaged.
If the elliptical appears not to be working properly, do not use the elliptical.
MOVING
Your elliptical has a pair of transport wheels
built into the FRONT STABILIZER TUBE. To move,
first remove the power supply, firmly grasp the
CONSOLE MAST and carefully tilt and roll.
Our ellipticals are well built and heavy, weighing up to 200 lbs! Use care when
moving and get additional help if necessary.
FOOT POSITIONING
Your elliptical offers a variety of foot positions. Moving your foot to the forward most position of the foot pad
increases your step height, which will create a feel similar to a step machine. Placing your foot toward the back
of the foot pad decreases your step height and creates more of a gliding feel, similar to a smooth walk or run.
Your elliptical also allows you to pedal both forward and backwards to offer a variation to your workout and to
focus on other major leg muscle groups such as your hamstrings and calves.
ELLIPTICAL OPERATION
WARNING
WARNING

14
INTRODUCTION IMPORTANT
PRECAUTIONS BEFORE YOU BEGIN ELLIPTICAL
OPERATION
LIMITED
WARRANTY
TROUBLESHOOTING
& MAINTENANCE
CONDITIONING
GUIDELINES
ASSEMBLY ELLIPTICAL
OPERATION
B
CF
A
D
E
P1: MANUAL
P2: INTERVALS
P3: MOUNTAIN
P4: WEIGHT LOSS
P5: HILLS
P6: CARDIO
CHALLENGE
821E CONSOLE DISPLAY & OPERATION
Note: There is a thin protective sheet of clear plastic on the overlay of the console and should be removed.
A) MONITOR DISPLAYS: Speed, Time, Pulse, Distance, Level, Calories and Program Profiles.
B) START/STOP: Press to start/pause/stop your workout.
C) RESET: Press to reset the elliptical.
D) ENTER: Used to set your program.
E) UP/DOWN ARROW KEYS: Used to adjust resistance and select programs.
F) BOOK RACK: Holds reading material

15
ASSEMBLY INTRODUCTION
IMPORTANT
PRECAUTIONS
BEFORE YOU BEGIN
ELLIPTICAL
OPERATION
LIMITED
WARRANTY
TROUBLESHOOTING
& MAINTENANCE
CONDITIONING
GUIDELINES ASSEMBLY
ELLIPTICAL
OPERATION
Your Elliptical Trainer is powered by a power supply. The power supply must be plugged into
the power jack, which is located in the front of the machine near the front stabilizer tube
Simply press the START key and the TIME will begin counting up from 0:00.
821E CONSOLE OPERATION
QUICK START
SELECTING PROGRAMS
1) CHOOSING A PROGRAM
Use UP/DOWN arrow keys to select programs 1 - 6, then press the ENTER to select.
2) CHOOSING A TIME
Use the UP/DOWN arrow keys to select a TIME, then press ENTER to select.
3) Press START to begin your program.
Press RESET to reset the console.

16
INTRODUCTION IMPORTANT
PRECAUTIONS BEFORE YOU BEGIN ELLIPTICAL
OPERATION
LIMITED
WARRANTY
TROUBLESHOOTING
& MAINTENANCE
CONDITIONING
GUIDELINES
ASSEMBLY ELLIPTICAL
OPERATION
821E PROGRAM PROFILES
P1: MANUAL
Allows you to adjust the resistance level to your preference, without a preset program.
P2: INTERVALS
Improves your strength, speed and endurance by raising and lowering the resistance levels through-out your
workout to involve both your heart and muscles.
P3: MOUNTAIN
Simulates climbing mountains by increasing and decreasing the resistance.
P4: WEIGHT LOSS
Promotes weight loss by raising and lowering the resistance level, while keeping you in your fat burning zone.
P5: HILLS
Creates the feeling of going over multiple hills with changing intensity, while keeping you in the
fat burning zone.
P6: CARDIO CHALLENGE
High intensity program that promotes Carbohydrate burn and taxes the Cardiovascular system.

17
ASSEMBLY INTRODUCTION
IMPORTANT
PRECAUTIONS
BEFORE YOU BEGIN
ELLIPTICAL
OPERATION
LIMITED
WARRANTY
TROUBLESHOOTING
& MAINTENANCE
CONDITIONING
GUIDELINES ASSEMBLY
ELLIPTICAL
OPERATION
HANDLEBARS
Place the palm of your hands directly on the grip pulse handlebars. Both hands must grip the bars for your heart
rate to register. It takes 5 consecutive heart beats (15-20 seconds) for your heart rate to register. When gripping
the pulse handlebars, do not grip tightly. Holding the grips tightly may elevate your blood pressure. Keep a loose,
cupping hold. You may experience an erratic readout if consistently holding the grip pulse handlebars. Make sure
to clean the pulse sensors to ensure proper contact can be maintained.
HEART RATE

18
INTRODUCTION IMPORTANT
PRECAUTIONS BEFORE YOU BEGIN ELLIPTICAL
OPERATION
LIMITED
WARRANTY
TROUBLESHOOTING
& MAINTENANCE
CONDITIONING
GUIDELINES
ASSEMBLY CONDITIONING
GUIDELINES
ALWAYS CONSULT YOUR PHYSICIAN BEFORE BEGINNING AN ExERCISE PROGRAM.
HOW OFTEN? (Frequency of Workouts)
The American Heart Association recommends that you exercise at least 3 to 4 days per week to maintain
cardiovascular fitness. If you have other goals such as weight or fat loss, you will achieve your goal faster with
more frequent exercise. Whether it’s 3 days or 6 days, remember that your ultimate goal should be to make
exercise a lifetime habit. Many people are successful staying with a fitness program if they set aside a specific
time of day to exercise. It doesn’t matter whether it’s in the morning before breakfast, during lunch hour or while
watching the evening news. What’s more important is that it’s a time that allows you to keep a schedule, and a
time when you won’t be interrupted. To be successful with your fitness program, you have to make it a priority in
your life. So decide on a time, pull out your day planner and pencil in your exercise times for the next month!
HOW LONG? (Duration of Workouts)
For aerobic exercise benefits, it’s recommended that you exercise from between 24 and 60 minutes per session.
But start slowly and gradually increase your exercise times. If you’ve been sedentary during the past year, it may
be a good idea to keep your exercise times to as little as five minutes initially. Your body will need time to adjust
to the new activity. If your goal is weight loss, a longer exercise session at lower intensities has been found to
be most effective. A workout time of 48 minutes or more is recommended for best weight loss results.
HOW HARD? (Intensity of Workouts)
How hard you workout is also determined by your goals. If you use your machine to prepare for a 5K workout,
you will probably work out at a higher intensity than if your goal is general fitness. Regardless of your long
term goals, always begin an exercise program at low intensity. Aerobic exercise does not have to be painful to
be beneficial! There are two ways to measure your exercise intensity. The first is by monitoring your heart rate
(using the grip pulse handlebars or a wireless chest transmitter - may be sold separately), and the second is by
evaluating your perceived exertion level (this is simpler than it sounds!).
PERCEIVED ExERTION LEVEL
A simple way to gauge your exercise intensity is to evaluate your perceived exertion level. While exercising, if you
are too winded to maintain a conversation without gasping, you are working out too hard. A good rule of thumb
is to work to the point of exhilaration, not exhaustion. If you cannot catch your breath, it’s time to slow down.
Always be aware of these warning signs of overexertion.
CONDITIONING GUIDELINES

19
ASSEMBLY INTRODUCTION
IMPORTANT
PRECAUTIONS
BEFORE YOU BEGIN
ELLIPTICAL
OPERATION
LIMITED
WARRANTY
TROUBLESHOOTING
& MAINTENANCE
CONDITIONING
GUIDELINES ASSEMBLY
CONDITIONING
GUIDELINES
STRETCH FIRST
Before using your product, it is best to take a few minutes to do a few gentle stretching exercises. Stretching
prior to exercise will improve flexibility and reduce chances of exercise related injury. Ease into each of these
stretches with a slow gentle motion. Do not stretch to the point of pain. Make sure not to bounce while doing
these stretches.
1. STANDING CALVE MUSCLE STRETCH
Stand near a wall with the toes of your left foot about 18" from the wall, and
the right foot about 12" behind the other foot. Lean forward, pushing against
the wall with your palms. Keep your heels flat and hold this position for a
count of 15 seconds. Make sure that you do not bounce while stretching.
Repeat on the other side.
2. STANDING QUADRICEPS STRETCH
Using a wall to provide balance, grasp your left ankle
with your left hand and hold your foot against the back
of your thigh for 15 seconds. Repeat with your right
ankle and hand.
3. SITTING HAMSTRING & LOWER BACK MUSCLE STRETCH
Sit on the floor with your legs together and straight out in front of you. Do
not lock your knees. Extend your fingers towards your toes and hold for a
count of 15 seconds. Make sure that you do not bounce while stretching. Sit
upright again. Repeat one time.
STRETCHING
5*14

20
INTRODUCTION IMPORTANT
PRECAUTIONS BEFORE YOU BEGIN ELLIPTICAL
OPERATION
LIMITED
WARRANTY
TROUBLESHOOTING
& MAINTENANCE
CONDITIONING
GUIDELINES
ASSEMBLY CONDITIONING
GUIDELINES
WARM UP
The first 2 to 5 minutes of a workout should be devoted to warming up. The warm-up will limber your
muscles and prepare them for more strenuous exercise. Make sure that you warm-up on your product at a
slow pace. The warm up should gradually bring your heart rate into your Target Heart Rate Zone.
COOL DOWN
Never stop exercising suddenly! A cool-down period of 3-5 minutes allows your heart to readjust to the
decreased demand. Make sure that your cool down period consists of a very slow pace to allow your heart
rate to lower. After the cool-down, repeat the stretching exercises listed above to loosen and relax your
muscles.
An important step in developing a long term fitness program is to determine your goals. Is your primary
goal for exercising to lose weight? Improve muscle? Reduce stress? Prepare for the spring racing schedule?
Knowing what your goals are will help you develop a more successful exercise program. Below are some
common exercise goals:
• Weight Loss - lower intensity, longer duration workouts
• Improve Body Shape and Tone - interval workouts, alternate between hi and low intensities
• Increased Energy Level - more frequent daily workouts
• Improved Sports Performance - high intensity workouts
• Improved Cardiovascular Endurance - moderate intensity, longer duration workouts
If possible try to define your personal goals in precise, measurable terms, and then put your goals in writing.
The more specific you can be, the easier it will be to track your progress. If your goals are long term, divide
them up into monthly and weekly segments. Longer term goals can lose some of the immediate motivation
benefits. Short term goals are easier to achieve. Your console provides you with several readouts that can
be used to record your progress. You can track Distance, Calories and Time.
KEEPING AN ExERCISE DIARY
To make your personal exercise log book, photocopy the weekly and monthly log sheets, which are located
on the following pages, or you can print them off of your computer by going to:
As your fitness improves, you can look back and see how far you’ve come!
THE IMPORTANCE OF WARM UP & COOL DOWN
ACHIEVING YOUR FITNESS GOALS
5*14
5*14
Table of contents
Other Sears Elliptical Trainer manuals
Popular Elliptical Trainer manuals by other brands

Precor
Precor Elliptical Fitness Crosstrainer EFX 5.21 Assembly guide

Kettler
Kettler Skylon 5 Training and operating instructions

Octane Fitness
Octane Fitness Q45 Service manual

Trojan
Trojan SOLO 200 Care instructions and assembly Care and assembly manual

Kettler
Kettler 07650-000 user guide

Kettler
Kettler 07862-700 manual