SEATTLE Sailing Club Fearful Symmetry J 80 User manual

1
J 80
Fearful Symmetry
Welcome Aboard!
Quick Start Guide/Boat Manual

2
J-80
Fearful Symmetry
Boat Manual
Seattle Sailing Club
Welcome aboard Fearful Symmetry, one of our J-80 performance sailboats, is popular for
racing and complete with a small cabin for short cruises. We are doing everything possible to
make sure this boat is always ready to go. Please treat her with the care she deserves, like she
is your own boat. This manual is designed to make your journey easier and give you the extra
information underway you may be seeking. Help us out by filling out and turning in the user
reports each trip so we can continue providing the safest and best equipment possible.
Thanks and have a great sail! SSC
Fearful Symmetry is of the favorite boats in our fleet for the following reasons:
Day sailing performance
Racing performance with a well-established fleet
Asymmetrical spinnaker (for qualified charterers)
Small cabin with basic sleeping quarters in v-berth.
Fearful Symmetry
Challenges - Things to Know
Make sure to locate portable running lights.
Electronics are specific to each J-80. Fearful Symmetry has no built-in lights or instruments.
Make sure to disconnect the fuel line before tilting engine out of water to avoid damaging line
between the transom and the engine.
Always ease the boom vang, main sheet and reefing lines before raising the main sail.
Don’t use the forward hatch as it is prone to breaking if not lowered gently when opening. If you do
open it, Do Not let it slam! Please leave it locked closed.
The companionway hatch slides very easily! Be careful not to lean against and take a tumble down
into the cabin unexpectedly!

3
Table of Contents
Boat Specifications p. 4
Inventory list p. 6
Safety Equipment p. 7
Systems
The Engine-Starting/Stopping/Operating p. 8-10
Refueling p. 9
Outboard Diagram p. 10
Electrical Systems p. 11
Sails and Rigging p. 12-24
North Sails J-80 Sail Trim Guide p. 18-20
Main Sail Reefing/ Diagram p. 22-24
Securing Fearful Symmetry- Post Sail Checklist p. 25-28
J-80 Specifics p. 29-34

4
Boat Specifications
LOA: 8.0m or 26.25’ (26’3”)
LWL: 22.0’
Beam: 8.25’
Draft: 4.9’
Mast Height: 37.5’
Fuel Tank capacity: 4 gallons
Anchor: Danforth anchor w Rode: Chain is 8’/ line is 125’ twisted nylon is stowed in plastic
tub below companionway.
Engine: Mercury 4 HP 4 stroke outboard
Accommodations: Sleeps 2 in V-berth (dbl) and 2 single berths in main salon.
Instrumentation: None
Sails: Main Sail w reef, roller furling genoa/jib, asymmetrical spinnaker.

5

6
Fearful Symmetry
Inventory List
OPERATIONS EQUIPMENT Location
Danforth anchor w/8’chain and 125’ line. Below companionway
2 Winch handles Pocket on port bulkhead
Roller Furling Headsail (103-107%) w/ attached sheets. Forestay
Radar reflector Below companionway
SAFETY Location
4 Type II PFDs in bag V-berth
1 Type IV Throw cushion “ “
1 Lifesling Stern pulpit
2 Type BC: 1 - Fire Extinguishers Starboard/port bulkhead
1 Air Horn w/ replacement canister Pocket on port bulkhead
Flare kit w/ 3 handheld Safety Box
Portable running lights “ “and/or stbd. bulkhead
Portable Bilge Pump Below companionway
Bucket “ “
First Aid kit “ “

7
Safety Equipment/USCG Required items
Registration- Fearful Symmetry’s papers are taped permanently to bulkhead.
PFDs- Although each sailor should supply their own PFD to fit their body type and usage
requirements, there are extra personal floatation devices stowed in the v-berth. Know where and
how many are onboard before you leave the dock. Each member should always wear a life jacket
when the boat is underway. Fearful is equipped with a bag of four Type II PFDs in v-berth.
Type IV’s - USCG throw seat in the v-berth to stbd. and a Lifesling on the starboard stern pulpit.
Flares- There is a flare kit with current handheld flares located in the safety box port v-berth. Please
ensure these are dated properly and look usable.
Fire extinguishers- 2 Type BC: I extinguishers located on the port/starboard bulkhead in the main
salon.
Air Horn- (with 1 replacement air cartridge) located in canvas bag on the portside bulkhead.
Running lights- There are portable running lights in the safety box and in the canvas bag to
starboard. Check batteries when completing the checklist!
Portable Bilge pump- Located aft of companionway steps.
First Aid Kit- Located below the companionway with the anchor.
B-I extinguisher/ Horns/winch handles/safety box w/ flares, lights/ PFDs/Type IV in V-berth /lights/ B-I extinguisher to stbd.
Anchor Box/First Aid/Portable bilge pump /Heaters/Bailing bucket/Danforth anchor w/ 8’chain & 125’ line
below companionway

8
Fearful Symmetry’s SYSTEMS
The Engine-Starting/Stopping/Operating
Fearful Symmetry is powered by a 4 HP Mercury 4 stroke outboard engine. This is a great engine
and if cared for during your charter will serve you well. Always make sure the engine is getting
coolant, lubrication, and proper fuel by completing the checklist each day.
Pre-start Checklist:
ALWAYS check the following before starting the engine:
- Engine is lowered into the water.
- Fuel level is more than ½ full
- Fuel tank vent is open
- Connect fuel line
- Ensure fuel petcock selector is in horizontal position (AUX tank) (see diagram)
- Pump bulb
- Kill cord connected
- Engine in neutral (shift through forward, reverse, neutral)
- Choke out
- Throttle in start position keeps cold engine from running too high
(results in damage)
- Make sure water is flowing out after start
Engine and Mount:
The outboard is secured on a motor mount that positions the engine aft of the rudder. To lower the
engine, rock the engine slightly forward and pull up on the stainless steel bail on the starboard side,
then allow the engine to gently tilt down. When in use, the throttle handle will contact the stern pulpit
unless it is raised above the level of the pulpit. At operating speed, the engine will generally remain
straight and the throttle handle can be raised to a vertical so that it does not contact the pulpit. To tilt
up the engine while sailing or at the dock, make sure the gear shift lever is in Forward and pull the
engine up to the horizontal position by grasping the handle on the aft end of the engine cover.
Starting the engine:
After completing the checklist, you are ready to start the outboard. Clear the boom, and crewmates
away from swing room as you will need clearance to get a good long pull on the start cord. With each
pull, try to get the maximum length of cord utilized by a quick snapping action at the last. Wait 3
seconds before next pull. It should start in 3-5 pulls. Once running, push in the choke until the engine
is running smoothly. To achieve full-throttle range the choke typically has to be completely pushed in
once the engine is warmed up.
If the engine doesn’t start:
Go back through checklist to problem solve. Sometimes the fuel line is not fully attached, the kill switch
is not fully connected, or the vent is not open enough. Recheck everything, then retry.

9
Flooded engine:
Too soft/short of pulls can result in a flooded engine. If you smell rich fuel and engine hasn’t started
after 6 or more pulls, you have probably flooded. If so disconnect fuel, turn throttle way up and pull
several strokes to clear. Try again. If still flooded, contact the dock staff. You may have to wait 20
minutes before retrying.
Engine Operation:
Cold outboards typically like to run at a moderate pace; Once they are warmed up they should idle and
run smoothly at low RPMs. Never run an engine high before it is warmed up as you can break cold
metal pieces. Running the engine in neutral a couple minutes after start (to warm up) as well as a
couple minutes before you kill the engine (to cool down) optimizes performance and increases engine
longevity. The challenge is keeping a good RPM (without operating at high speed inside the marina),
but slow enough to keep it from cutting out. It is best to utilize neutral whenever possible to rev up
engine and coast. Anytime you are shifting gears make sure to slow throttle speed to low. Shifting too
high can sever the shear pin which protects the transmission.
To achieve a tighter turn radius, angling the engine the same direction as the tiller can be very effective
especially in reverse.
Warning: Make sure engine is well secured with clamps turned tightly to the right. (Righty
tighty
) Never loosen these underway and risk dropping engine into the water. Also, the safety
line should be connected from engine to the boat. Especially with rough seas.
Stopping the engine
To shut down the engine, throttle down, put into neutral then pull off the kill switch. Once the engine
stops, disconnect fuel line. Next, hoist the engine out of the water by first shifting to forward gear and
tilt to completely clear. (Engine will not tilt unless it is shifted into forward.) Close tank vent.
Refueling- Mercury 4 stroke engines only burn unleaded! Not diesel or pre-mix. Disconnect fuel line
from engine then close vent on tank. Carry to fuel dock downwind of boat to avoid filling cabin with
fumes. Fill tank watching closely for overflow. Fuel dock pumps do not have auto shut-off valves.
Once full, reconnect to engine, open valve, then go through start procedures. Only refuel if you had the
boat for an overnight. SSC will refuel day-sail charters.
Safety precautions:
Anytime you smell gas fumes in the cabin, do not start engine until you have completely ventilated the
boat by opening all compartments.
Never leave the fuel tank up high in the cockpit when you are motoring outside of the marina. A falling
fuel tank could cause a fire!

10
11
Electrical Systems
Shore Power: Shore power is currently disconnected. Use the 110v extension cord on Fearful
Symmetry to run heaters during the winter months. To disconnect the extension cord safely, turn off the
dock breaker, unplug the cord, and bring cord and adapter onboard. Coil cord into cabin.
Be careful not
to drop the cord into the water. Never extend a live cord across the water.
When finished sailing,
run the cord first and connect to heater. Next, the shore power cord plugs into the 30v adapter then plugs
into the outlet on the dock. Turn on the breaker to activate. Finally, turn on the heater. The power cord
should be run through the notch at the base of the companionway hatch board to allow the hatch to close
properly.
Instruments:
Currently,
Fearful Symmetry has no Shore Power so is not equipped with a depth
sounder and/or running lights.
Running Lights: Fearful Symmetry
does not have built in running lights. Use the portable lights in the
safety box and/or the canvas bag on the starboard bulkhead. Always operate after dark, when in fog, or
anytime there is limited visibility. Make sure batteries are charged before you leave the dock.
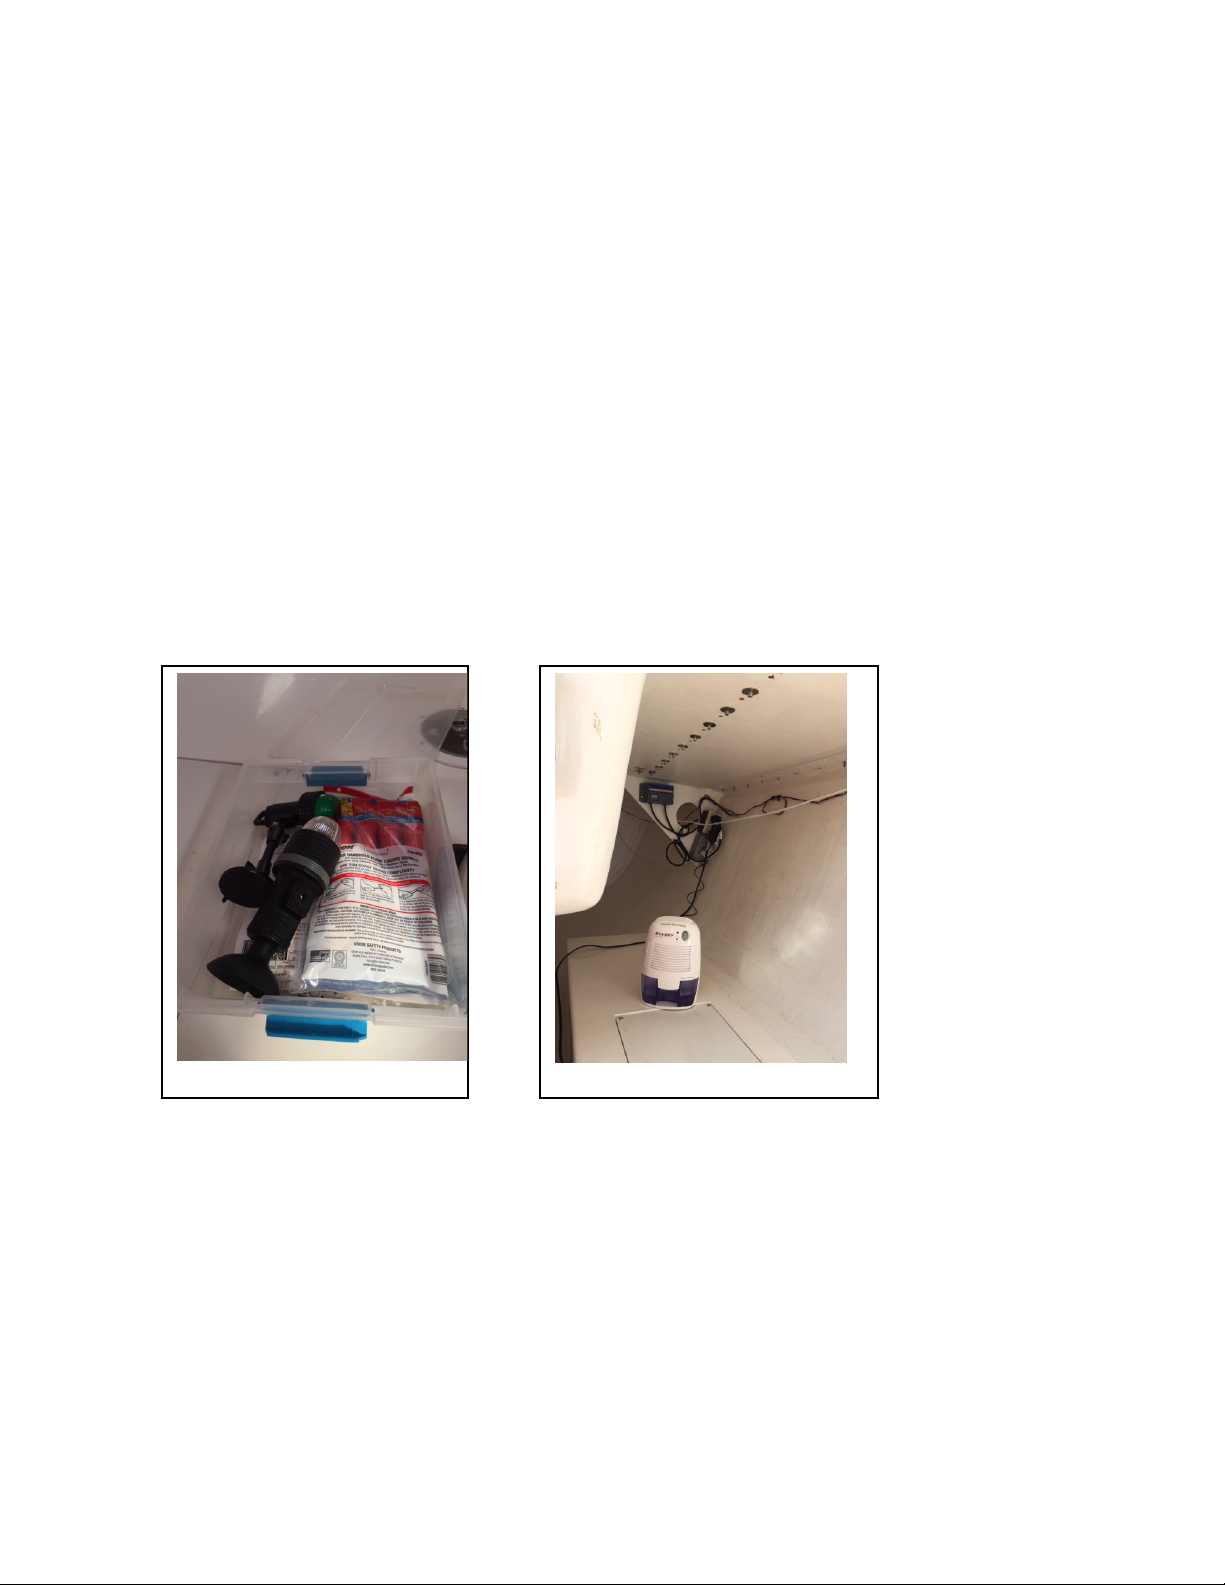
Heater and Dehumidifier: During fall, winter, and spring months, a heater and dehumidifier keep the
boat dry inside. Prior to sailing, empty any accumulated water in the dehumidifier by sliding out the
clear plastic drawer and pouring outside. While sailing, stow heater and dehumidifier in spaces below
the removable panels next to the mast. After sailing, return them to the v-berth or below companionway
steps, and make sure they are plugged-in, upright and pointing in a safe direction.
Ensure heaters are
not pointing too close to any bulkheads or towards any combustible material!
Safety Box w/ Portable lights
De-humidifier aft of companionway
12
Sails and Rigging
Fearful’s Sail Configuration
The J/80 has a lot of sail area for its size and therefore can become very over pressed in strong winds.
Fearful Symmetry has a full main with a single slab reefing point and a 103-7% roller furling Genoa. Be
prepared to reef the main early and set up the reef at the dock before you go. The saying "twist is fast" is always
true and the telltales on the main should always be flying free. In strong winds a J/80 is more like a dinghy and
needs much flatter sails. This means that the mainsail must be deep and powerful in its form to power the boat in
light winds, but at the same time able to be completely flattened in strong. In winds between 6 and 12 knots our
design is at its maximum power. In lighter winds the leech has to be open to help flow around the sail. In harder
winds the leech has to be opened again but now because crew weight no longer will hold the boat upright so
power must be drained off. -North Sails Sail Trim Guide

13
Roller Furling Jib/Genoa-
This sail remains hoisted
so
the jib halyard should not be
removed from the cleat.
Fearful’s jib halyard is a
blue/white line cleated and
coiled on the port side of the
mast.
If you accidentally release the
jib halyard, make sure to re-
tension before furling or
unfurling the sail. It can get
jammed up top if there is
slack in the halyard while
furling.

14
Roller Furling
To unfurl, first head onto a broad reach to reduce
apparent wind. Uncoil and uncleat furling line which runs
from the bow roller to a cleat adjacent the companionway
to port. Prepare to control the speed of the furl with this
line by taking a single wrap around a winch or cleat as a
leverage point. To unfurl, pull on the working jib sheet.
Ease lazy sheet as needed. Ease furling line slowly to
avoid an override in the spool at the bow.
To furl the headsail, again head onto a broad reach to
reduce apparent wind and allow the sail to furl quietly
and smoothly. Ease sheets enough to allow furling line
to start the roll. Keep gentle pressure on both sheets as
the furling line is being hauled in to create an even
wrap. Wrap sheets a minimum of three times around the
furl to well secure for winds at the dock. Secure all
lines.
Reefing the roller furling headsail
J-80 headsails are designed as a 103-107% genoa. This
allows the option of furling the sail to any number of sail
sizes based on wind requirements. Some sails have black
tape lines at desired reef points. Most do not so it is best
to look at the sail and furl to a point where the sail is
smooth and does not have creases which can stress the sail fabric. To furl a sail, ease working jib sheet
first, haul in furling line to desired sail size, then re-tension jib sheet. Fairleads typically will
have to be adjusted to accommodate new size.
Jib sheet winches
Roller Furling line (black) w/cam
15
Main Sail
Rigging the Mainsail
To rig the main, first detach halyard from the end of the boom. Fearful is rigged to hold up the boom
with a spring-loaded boom vang. Attach halyard shackle to the head of the main sail making sure
halyard is free and clear to the top. Next, ease boom vang, untie sail ties, and uncoil mainsheet for
preparation of hoisting. Make sure reefing lines are eased as well unless you pre-reefed at the dock. On a
windy day, pre-rig the reefing line through reefing cringle to simplify the reefing process on the water.
If wind speed is over 18 knots, make sure to reef before you leave the dock (see section on reefing the
main).

16
Main Halyard Winch &Cam Main Halyard(red) Jib (blue/white)
Flaked Main
Mainsail (cont.)
The main halyard on Fearful is the white/red line that runs from the port side of the mast along the
port side of the cabin top next to the companionway. When not in use, the halyard is shackled to the
end of the boom. Don’t let go of the halyard before attached unless you feel like taking a climb!
Hoisting the main:
Typically done outside the marina, J-80
mainsails do not require feeding the bolt
rope into the mast like the J24s. It can be
helpful to have a crewmember jump the
halyard at the mast and a second person
take up the slack in the cockpit aft of the
halyard clutch. Sail should go up easily.
Do Not use a winch to raise the sail as the
lines do not lead directly into the winch
drum and you will end up with an
overrides the sail is raised, look up to
make sure sail is going up free of
obstacles. Once sail is raised, coil halyard
for safety.
Only raise the main halyard if the boat is
head to wind so there is no load on the
halyard and no winch is required
(although it may be necessary to help the
sail slides up so they don’t jam in the sail
track above the gooseneck.) Be careful not
to over-hoist the sail (above the black
band at the top of the mast)or the leech of
the sail will hang up on the backstay.
Secure halyard on cam cleat on the mast
as the one leading into cockpit is just a
keeper.
Lowering the main:
With the traveler centered and boat into
the wind, lower the sail and flake as you
go. This is a typically a two-person operation with a person fore and aft. If it is too choppy, bring the
sail down best you can and throw some ties around it to stabilize planning to fold properly when you
reach the dock. Once flaked, reconnect the halyard to the boom, ease vang, and raise boom to a desired
horizontal position.

17
Main sail Adjustments
Stowed main halyard/Outhaul/Furler/ Main halyard/Jib halyard Jib Furler/Outhaul cams
Boom Vang (spring-loaded system)Main sheet & traveler
Cunningham (Doubles as reef hook) Backstay

18
Main sail Controls and Sail Trim explained by J-80 Tuning Guide:
Back stay
Trimming of the backstay is the key to boat speed in all winds. In light winds a light pull in the
backstay lets the draft in the mainsail sit at around 50%, in medium winds the forestay is
straightened with the help of a medium pull on the backstay and in hard wind a flat mainsail is
achieved by fully trimming the backstay hard. Make reference marks on one of the backstay
split wires so that trim is repeatable over different wind strengths.
Mainsheet
The most dynamic and important trim function on a J/80. (See below)
Outhaul
With the outhaul eased the lower sections of the mainsail are very full. The outhaul is used to
flatten these lower sections when beating. Like all boats in full power conditions the outhaul
should be eased slightly and with increasing breeze the lower sections should be continuously
flattened.
Cunningham
The cunningham is used in winds over 12 knots to move the draft on the mainsail forward at
the same time flattening out the sail. The foredeck crew adjusts the cunningham with the use
of a 3:1 purchase.
Kicker (Boom vang)
The kicker is used to adjust the mainsails twist on runs.
Jib Sheet
A window in the luff of the mainsail enables the jib trimmer to see the leach of the jib in relation
to the lower spreader.
Halyard tension
Just like the mainsail the jibs depth and draft position is controlled by the jib halyard.
Mainsail Trim
In really light winds, between 0 and 2 knots, the mainsail should be trimmed so that the
leech is as open as possible. The traveler should be trimmed 30 centimeters to windward of
the centerline and the mainsheet should be eased so that the end of the boom sits 20
centimeters to lee of centerline. The outhaul is eased 4-5 centimeters from the black line.
Backstay, Cunningham and kicker are completely loose.
When the wind increases to 6 knots, sheet the mainsail harder so that the boom nears the
centerline of the boat. The top telltale should just start to flick back behind the leech, the mid
telltale should be free flying. The backstay should be tightened slightly so that draft is placed at
around 50%. With 8 knots the mainsheet is tightened even more and the traveler is eased
down to about 20 centimeters to windward of the centerline. The mainsheet can now be
tightened slightly more but not so much as for the top telltale to stand behind the sale for more
than 20 % of the time. The boom should now be on the boats centerline. The outhaul is now 20
millimeters from the black band. The cunningham should still be loose.
Bend with light backstay @ 8 knots20 knots

19
J-80 Tuning Guide (cont.)
With 10 to 12 knots of breeze the mainsail is flattened slightly by bending the mast through
main sheet and backstay. Mainsheet is tightened so that the top telltale stands behind the sail
for 20% of the time. Harder sheet enables the boat to take more height. The boom should still
be in the middle of the boat but the outhaul should now be all the way out to the black band
and the Cunningham should be adjusted so that most of the wrinkles in the luff, but not all,
should disappear. This is maximum power trim, if your crew is light you will be over powered
soon, if you are heavy you will be able to hold this trim longer. Depending on the weight of the
crew full power situation should be met at around 12-14 knots of wind. To minimize the healing
moment and to increase speed with this wind strength more back stay is needed, and the
traveler should be lowered to the center line.
The mainsheet should be used so that the mains top telltale is not stalled. This will reduce
speed in these wind strengths. The mainsheet is the most dynamic trim function and should be
trimmed continuously with every puff and lull. The backstay is also a very important trim
function in medium to heavy breezes. Through the fact that in the gusts the back stay flattens
both the mainsail and the jib so that the boat stays flat and fast. But for example in a situation
where extra height is needed (say for instance rounding the leeward mark with a boat to lee)
easing the backstay will close the leach and the boat will sail high without loosing drive.
Through playing the backstay mainsail trim can be prioritized between extra speed or extra
height. With about 16 knots the Cunningham can be tightened so hard that all the wrinkles
disappear in the luff of the main. Draft is moved forwards and the leach is opened even more.
In winds over 20 knots the main should be completely flat and the sails lower third should do
all the work. Out hall, Cunningham and kicker should be on all the way. The kicker makes the
mast bend in the lower third making the mainsail even flatter. The traveler should be 15
centimeters below the center line. How much power the mainsail gives is regulated by the
backstay. Don't be afraid to put a little bit of extra on. In gusty winds the playing of the back
stay is not quick enough to keep the boat on it's feet without the traveler being dumped at the
same time. The traveler should be eased so that the boat finds it's balance, especially in big
waves (which are often found at these wind strengths). With the right trim the boat should be
leaping over the waves. If the boat feels heavy or wants to gripe to weather it is a sign that the
mainsail has too much power´.
When the mainsail is properly trimmed, i.e. flat and with an open leach the boat should feel
well balanced and easy to steer.
Jib Trim
Three functions control the jib; sheet, lead position and halyard tension. The sheet works on
twist and how flat the sail should be sheeted. The jib should have the same angle attack up the
entire height of the luff and the leach should match the mainsails shape. The lead position
dictates the depth of the jib in the lower third and the amount of power the leach produces.
Fast trim - flat water: The lead position should be aft so that the lower part of the jib is flat and
the middle batten is parallel with the center line. Power trim - waves: Lead position moved
forwards to give a deeper bottom third and close the leach slightly. Halyard tension controls
draft position, mainly in the top. Slight amount of halyard tension in light and medium winds
gives the sail it's designed form. In stronger winds it helps with more halyard tension to twist
the jib open, and helps the draft from slipping backwards.

20
J-80 Tuning Guide (cont.)
In winds between 0-10 knots the lead position should be adjusted so that the luff of the jib
brakes or backs evenly when the boat luffs up. If it backs in the top first the lead position is to
far aft and vice versa. Halyard\tension should be lightly applied. In really light winds small
wrinkles should be seen running away from the forestay.
In over 10 knots the head of the sail should back slightly before the lower 2/3's of the sail.
This enables the helmsman to steer a much wider and varied angle to the wind. Sheeting
should be adjusted so that the leach telltale above the top batten flies straight aft. This is
good reference for the jib sheet trimmer to look at through the mainsails spreader window.
Just like the mainsail the jib should be flattened and twisted in hard winds. Forestay tension
is increased using the backstay. Halyard tension is tensioned very hard, and the lead position
is moved about two holes back. The upper half of the luff now backs slightly earlier than the
lower half when luffing. In very hard and gusty winds it's probably easier to ease the sheet
slightly to open up the slot between the main and the jib to give a slightly more easily
controlled boat. This also applies in a sloppy sea when twist and drive are an important factor.
J-80 North Sails -Tuning Guide
This manual suits for next models
1
Table of contents
Other SEATTLE Sailing Club Boat manuals


