Secabo FC50 User manual

OPERATING MANUAL
for flatbed vinyl cutters
Secabo FC50 and FC100
Congratulations on the purchase of your Secabo flatbed vinyl cutter!
Please read this operating manual carefully to ensure a smooth production launch with your new
device.
Any type of reproduction of this operating manual requires the written permission of Secabo
GmbH. Modifications to and errors in the technical data and/or product characteristics are
reserved.
Secabo GmbH accepts no liability for any direct or indirect damages resulting from the use of this
product.
Version 1.0 (09/27/2017)
Secabo GmbH | Hochstatt 6-8 | 85283 Wolnzach | Germany | [email protected] | www.secabo.com
1

Safety Precautions
Please read the information and safety precautions carefully prior to first commissioning of the
device!
● Do not place any magnetic objects in the vicinity of the cutting head; otherwise a uniform
contact pressure is not ensured.
● Do not remove the connection cable to the computer while plotting is in progress.
● Do not reach into the unit when it is connected to an electric supply.
● Never open the casing and do not make any modifications to the unit yourself.
● Ensure that neither liquids nor metal objects are put inside the flatbed vinyl cutter.
● Ensure that the wall socket used is grounded and protected with a ground fault switch.
● Ensure that the connected voltage (230V) does not deviate by more than ±10%. Otherwise,
a voltage stabilizer needs to be used.
● Pull the power plug if the unit will not be in use for a longer period of time.
● Never reach into the unit in the vicinity of the blade holder during the cutting operation!
● Discontinue any printing jobs in progress before readjusting the blade holder!
● Always ensure that the flatbed vinyl cutter is out of reach of children during operation and
never leave the unit or individual parts of it switched on without supervision.
● Do not touch the tip of the sliding blade as to avoid injury.
● Always place the unit on a stable base to prevent it from falling down.
● Do not operate the unit during thunderstorms; it can be damaged or destroyed by lightning.
Secabo GmbH | Hochstatt 6-8 | 85283 Wolnzach | Germany | [email protected] | www.secabo.com
2
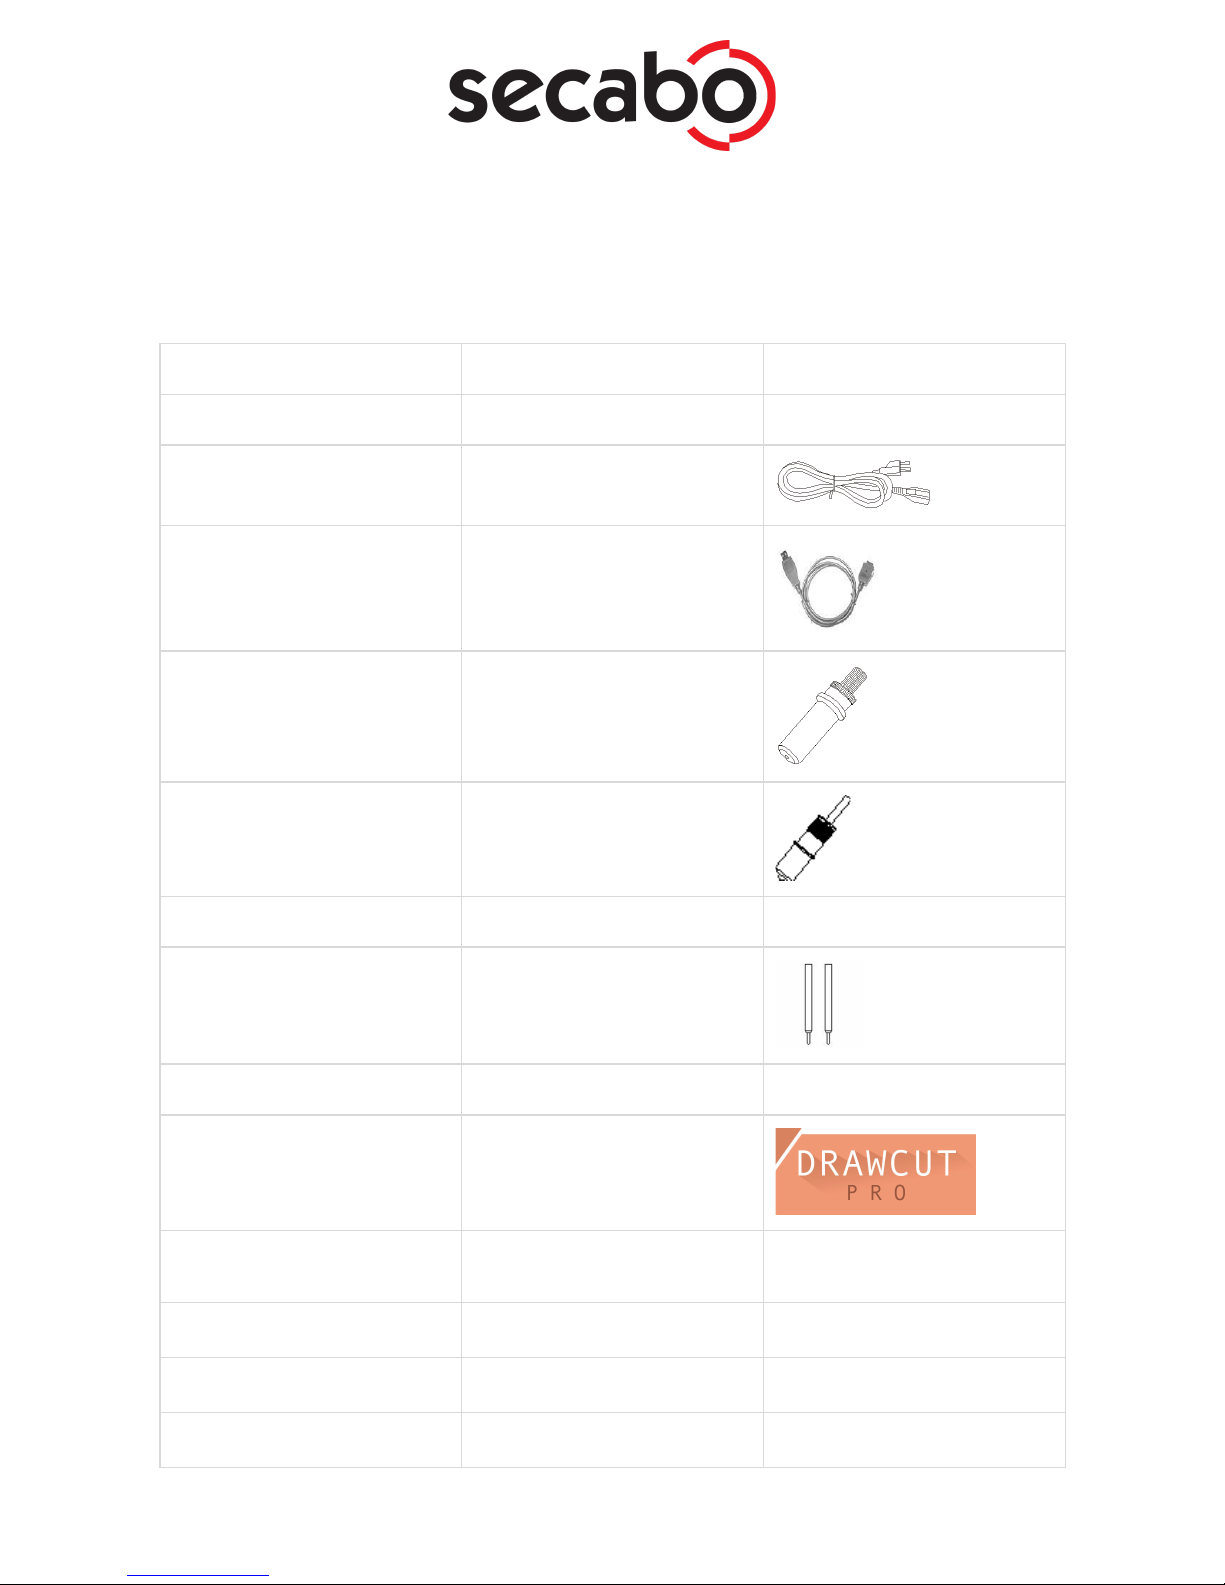
Items included
Before starting work, please check whether the following items are all present:
Item
Quantity
Flatbed Vinyl Cutter
1
Power cable
1
USB connection cable
1
Blade holder
1
Pen holder
1
Creasing tool
1
45° Drag knife
1
Pen head
1
DrawCut PRO license
certificate
1
Vacuum pump (FC100 with
acoustic enclosure)
1
Pedestal (not FC50)
1
Felt mat
1
Silicone mat
1

Device parts and their function
a) Cutting head with LAPOS Q sensor and one holder for each knife holder and the
creasing tool
b) Work surface
c) Control panel
d) Stand (FC100 only)
e) Vacuum pump with acoustic housing
Secabo GmbH | Hochstatt 6-8 | 85283 Wolnzach | Germany | [email protected] | www.secabo.com
4

Connections
f) Power switch
g) Power connection
h) USB connection
i) Connection for vacuum pump
Control panel
F1
Switching the vacuum pump on and off
F2
Return to main screen
F3
Switching the sensor on and off

Reset
Return to mechanical origin
Set
Navigate through the main menu
Test
Test cut
Off/Line
Switch online/offline
arrow keys
Positioning/setting of individual settings
Enter
Confirming the origin

Initial operation of machine and software
Caution! Please note that the smooth installation and complete configuration requires
DrawCut PRO to be installed first.
Installation DrawCut PRO
Your Secabo flatbed vinyl cutter is delivered with the cutting software DrawCut PRO. This software
needs to be activated over the Internet. You do not necessarily need internet access on the
computer, on which DrawCut will be installed. The activation can also be done on another
computer.
In order to control your flatbed vinyl cutter via your computer, install the software as follows:
● Disable the Windows Firewall and your anti-virus software for the time of installation.
● Download the current version of DrawCut PRO at http://www.draw-cut.com/#downloads
and follow the installation wizard.
● Find your 26-digit DrawCut serial number on the printout that was delivered with your
flatbed vinyl cutter. Enter it when you are prompted to do so.
● Now you can use DrawCut PRO.
Installation of your Secabo flatbed vinyl cutter in DrawCut
Please keep in mind that your Secabo flatbed vinyl cutter can only be operated under Windows 7,
8, 8.1 and 10. Operation with an older version of Windows is not possible.
● First, make sure that your PC is connected to the internet.
● Connect the flatbed vinyl cutter to your computer using the supplied USB cable.
● Switch on the device.
● Your Secabo flatbed vinyl cutter will now be recognized. Windows will search for the
appropriate drivers and automatically install them. This can take some time. After that, the
device is ready for operation.
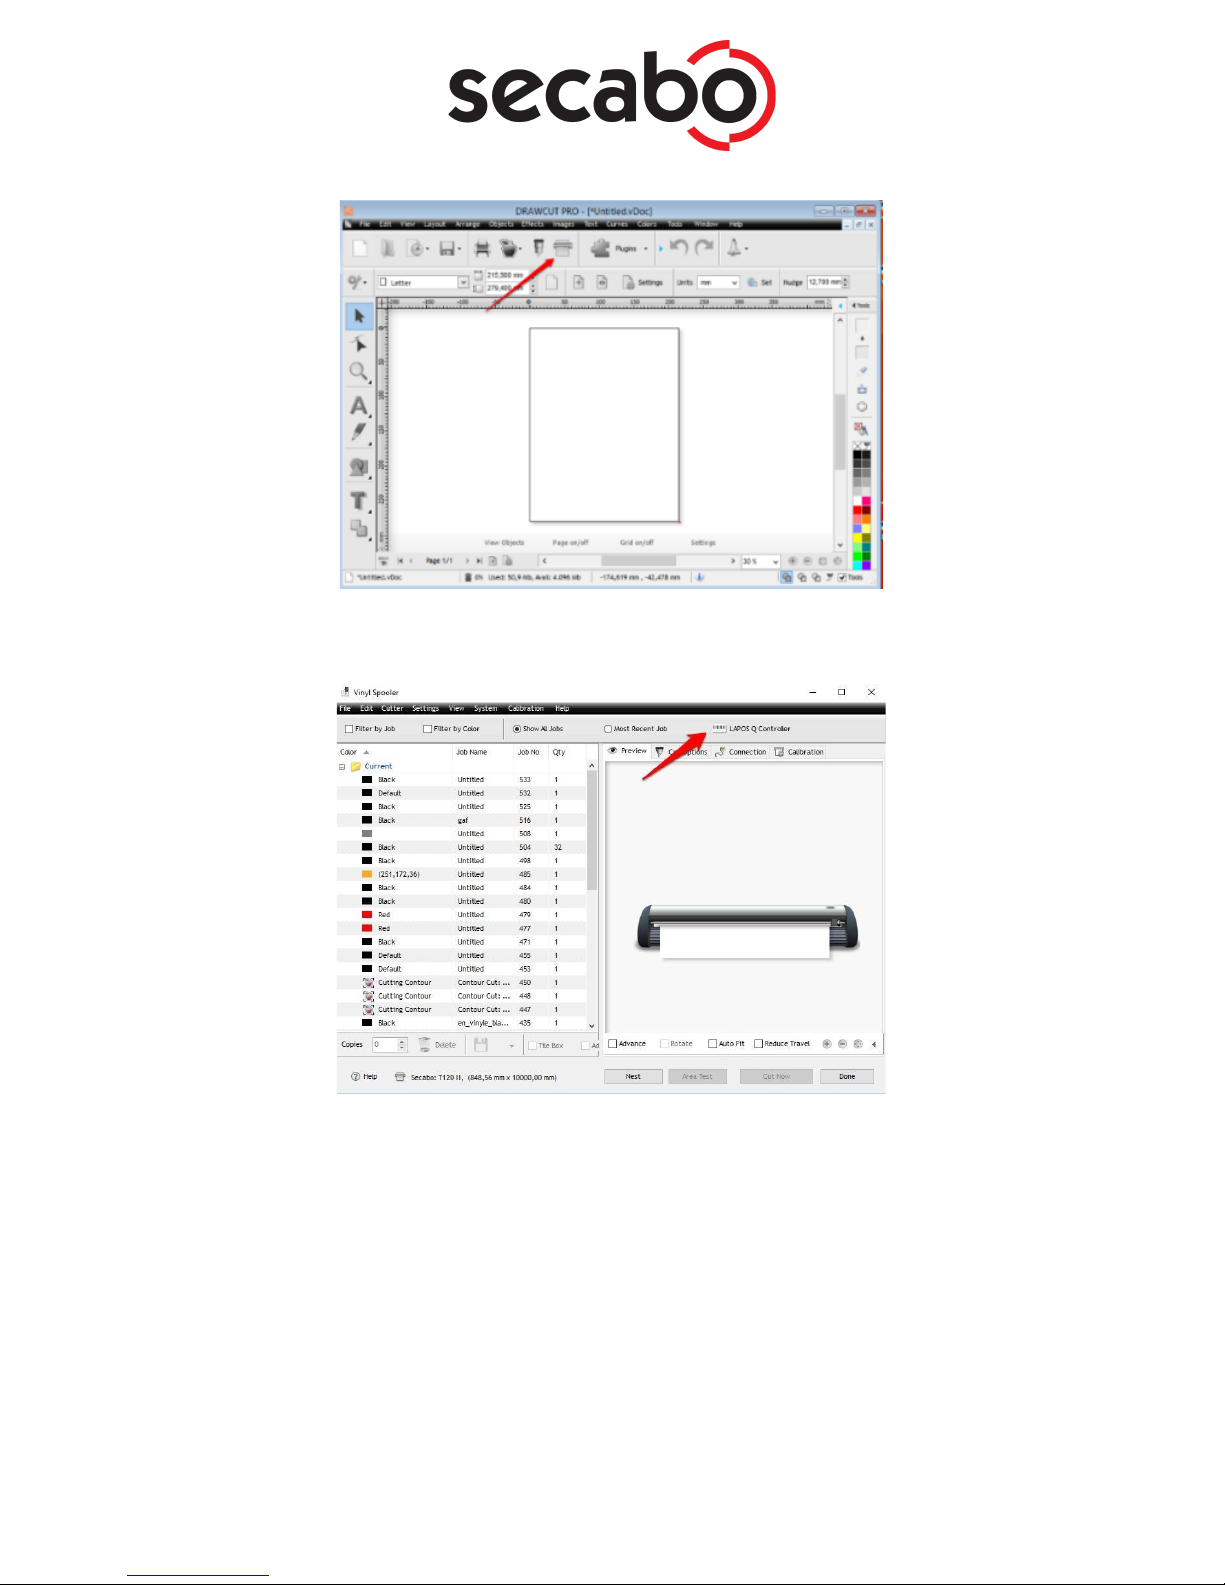
● Start DrawCut.
● First, open the "Vinyl Spooler" in Drawcut.
Secabo GmbH | Hochstatt 6-8 | 85283 Wolnzach | Germany | [email protected] | www.secabo.com
7

● Now click on the "Connections" tab.
● Next, add your flatbed vinyl cutter by pressing the "Add" button (a Secabo FC50 is used in
the example), select your model and click "Install".
Secabo GmbH | Hochstatt 6-8 | 85283 Wolnzach | Germany | [email protected] | www.secabo.com
8

● Click on the button labeled "Search device" and follow the instructions in the installation
wizard. Confirm the message regarding successful installation by simply clicking on button
labeled "Done". Now you can control your Secabo flatbed vinyl cutter using DrawCut.
Secabo GmbH | Hochstatt 6-8 | 85283 Wolnzach | Germany | [email protected] | www.secabo.com
9

Initial operation of the device
The flatbed vinyl cutter may only be operated in a clean and dry environment. Place the flatbed
vinyl cutter on a safe, stable surface
● Connect the flatbed vinyl cutter to a 230 V socket using the supplied power cable.
● Connect the vacuum pump to the flatbed vinyl cutter via the three-pin connector.
Furthermore, the vacuum pump needs to be connected to the flatbed vinyl cutter via the
hose.
● Turn the flatbed vinyl cutter on.
Main menu
Press the Set key to enter any of the individual menu items. You can exit the defined rotation of
individual menu items at any time by pressing the F2 key, which will automatically return you to the
first menu item, which also represents the online mode.
SPEED/FORCE
Modification of parameters for speed and
contact pressure by means of the arrow keys
for the creasing tool
SPEED1/FORCE1
Modification of parameters for speed and
contact pressure by means of the arrow keys
for the cutting tool
CAR X/Y
Distance/offset between knife holder and tool
holder. Only to be modified by trained staff!
Work mode
● Cut Plotter: Usage of knife and
creasing tool
● Draw Cutter: Usage of the knife
Selectable from within the softwares when
using Drawcut Pro
Baud rate
Standard:38400. Only to be modified by
trained staff!
XP/YP
Standard 1000: Only to be modified by
trained staff!
Clear para
Restoring of factory settings
Ver
Firmware version

Installing and adjusting the knife and creasing tool
● Take the supplied cutting knife, open the knife holder by turning the silver knurled screw
and insert the blade into the knife holder. Close the knife holder in the reverse order
● Now adjust the cutting depth by turning the silver knurled screw at the top of the knife
holder.
● Initially, the depth is set correctly if you can carefully move your fingertip across the blade
and merely feel a light scratching. Since the depth adjustment for the blade depends on the
material, it may be necessary to adjust it later.
● Secure the blade setting by tightening the gold lock nut.
● Press the pin on the rear end of the knife holder to clean the inserted knife of deposits and
residue. Caution - risk of injury!
● The various material thicknesses require different blade settings or even special blades; it
may therefore be necessary to repeat the adjustment described above.
● The length of the two creasing tools, on both sides of the creasing tool, can be adjusted
using the supplied hexagon socket wrench!
Inserting the blade holder
● First, sufficiently loosen the clamping screw for the blade holder (on the right side when
viewed from the front) at the cutting head.
● Next, press down the blade holder from above into the hole on the right side until there is
contact and pull the lock nut tight. When doing so, please ensure that the blade holder is
also secured correctly from above by means of the fixture provided for this purpose.
● Next, sufficiently loosen the clamping screw for the creasing tool holder on the cutting head.
● Proceed by pressing down the blade holder into the hole on the right side from above, until
there is contact, and tighten the clamping screw. When doing so, please ensure that the
creasing tool holder is also secured correctly from above by means of the fixture provided
for this purpose.
Inserting media
● First, move the cutter head to a position that ensures easy insertion of the material to be
cut. One shall avoid that the material to be cut gets pulled through beneath the cutter head.
● Activate the vacuum pump by pressing F1, so that the material to be cut adheres to the
work surface. Should the suction force be insufficient, it is advisable to cover the uncovered
areas of the working surface, for example, with paper or another type of medium.
● When inserting, make sure that the film is straight, especially when using crop marks.
Moving the cutter head
To move the cutter head, first press the Off/Line key to switch to the offline mode, then use the
arrow keys to move the cutter head along the individual axes.
Secabo GmbH | Hochstatt 6-8 | 85283 Wolnzach | Germany | [email protected] | www.secabo.com
11

Setting the zero point
To set the correct starting point for cutting, use the arrow keys to move the cutter head to the
desired position and confirm the origin by pressing the Enter key.,
Cutting test
● First, move the cutter head to a suitable position for the test cut while in offline mode.
● Confirm the zero point by pressing the Enter key
● To execute the cutting test, press the Test key. The flatbed vinyl cutter will start off by
grooving a diamond with its creasing tool, around which a rectangle will be cut in the
second working step.
● This cutting test allows you to check the knife holder setting and length setting of the
creasing tool as well as the respective contact pressures.
● Press the left and right arrow keys to modify the contact pressure of the knife holder while
in online mode
● To modify the creasing tool's contact pressure, press the set button and Speed1 as well as
Force1 will appear on the display. Here, too, press the left and right arrow keys to modify
the contact pressure. Press the F2 key to immediately return to the online mode.
Processing of non-printed media
With one tool
● Start the cutting software DrawCut PRO.
● Make sure the device is in the online mode.
● Also ensure that the parameters for contact pressure, speed and knife offset are set
correctly.
● Position the media on the work surface.
● Activate the vacuum pump by using the F1 key.
● Position the knife at the desired location and use the Enter key to define the origin.
● Create a logo or a graphic using the text tool and click on the knife holder icon in the menu
bar above.
● The menu "Send to vinyl cutter" appears, click on "Cut" in the lower right section of the
window.
● Now, the "Vinyl spooler" opens and displays a preview of the cut job on the right side. Now
click on "Cut" and confirm the question with "Yes".
● Start the cutting process!
With two tools
● Start the cutting software DrawCut PRO.
● Make sure the device is in the online mode.
● Also ensure that the parameters for contact pressure, speed and knife offset are set
correctly.
● Position the media on the work surface.
● Activate the vacuum pump by using the F1 key.
Secabo GmbH | Hochstatt 6-8 | 85283 Wolnzach | Germany | [email protected] | www.secabo.com
12

● Position the knife at the desired location and use the Enter key to define the origin.
● In Drawcut Pro, set the part of the graphic you wish to cut to a different color than that of
the part that you wish to crease.
● Click on the knife holder icon in the menu bar at the top.
● The menu "Send to vinyl cuter" appears
● Here, click on "Assign Tools by color"
Secabo GmbH | Hochstatt 6-8 | 85283 Wolnzach | Germany | [email protected] | www.secabo.com
13

● Here, each color can be assigned to the desired tool, knife (blade tool) or creasing tool (pen
tool). To do so, simply click on the color and use the menu to define which tool should be
used for the selected color as shown below. The knife offset can also be adjusted via Edit.
Secabo GmbH | Hochstatt 6-8 | 85283 Wolnzach | Germany | [email protected] | www.secabo.com
14

● Now click on "Cut" and confirm the question with "Yes". Now the process starts.
Processing of printed media with Lapos Q
LAPOS Q is a system for automatic positioning of printed media in your FC50 and FC100, allowing
you to cut printed elements with absolute contour accuracy, and without misalignment or distortion,
by using any desired number of crop marks. The use of LAPOS Q with DrawCut Pro is explained in
the following steps.
Calibration
Before the first use of LAPOS Q, the flatbed vinyl cutter requires an initial calibration to determine
the correct laser offset.
● The first step is to open the "Vinyl Spooler".
Secabo GmbH | Hochstatt 6-8 | 85283 Wolnzach | Germany | [email protected] | www.secabo.com
15
● Now click on "Lapos Q Controller"
● Next, click on "Cutter" and then click "Auto Calibrate Laser Offset" from the dropdown menu
that appears.
Secabo GmbH | Hochstatt 6-8 | 85283 Wolnzach | Germany | [email protected] | www.secabo.com
16
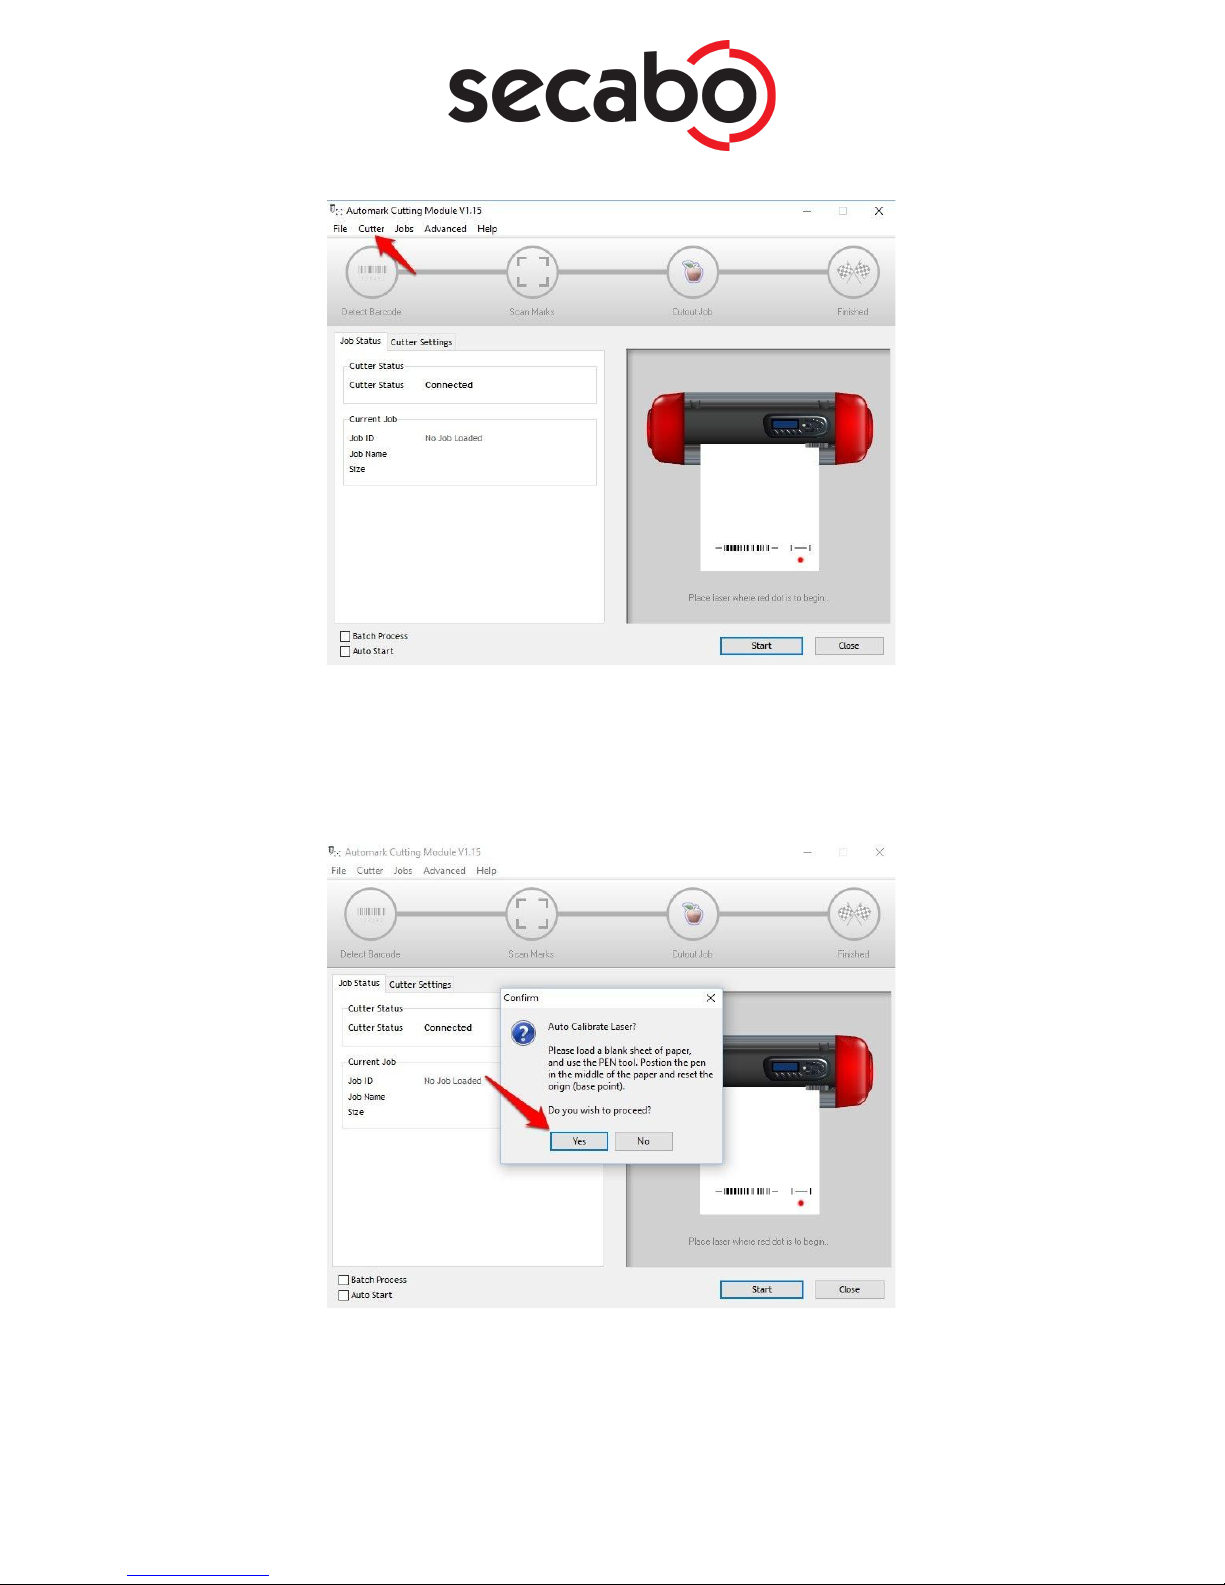
● Insert a blank sheet of paper into the vinyl cutter, as requested by DrawCut Pro. Also, the
cutter head must be equipped with the plot pen included in the scope of delivery. Roughly
position the plot pen in the middle of the paper and set the zero point on the device. Once
you've completed these steps, please confirm by clicking the "Yes" button.
● The cutter will immediately start the calibration. After a brief orientation, you must initiate
the process by clicking "Yes" once more.
Secabo GmbH | Hochstatt 6-8 | 85283 Wolnzach | Germany | [email protected] | www.secabo.com
17
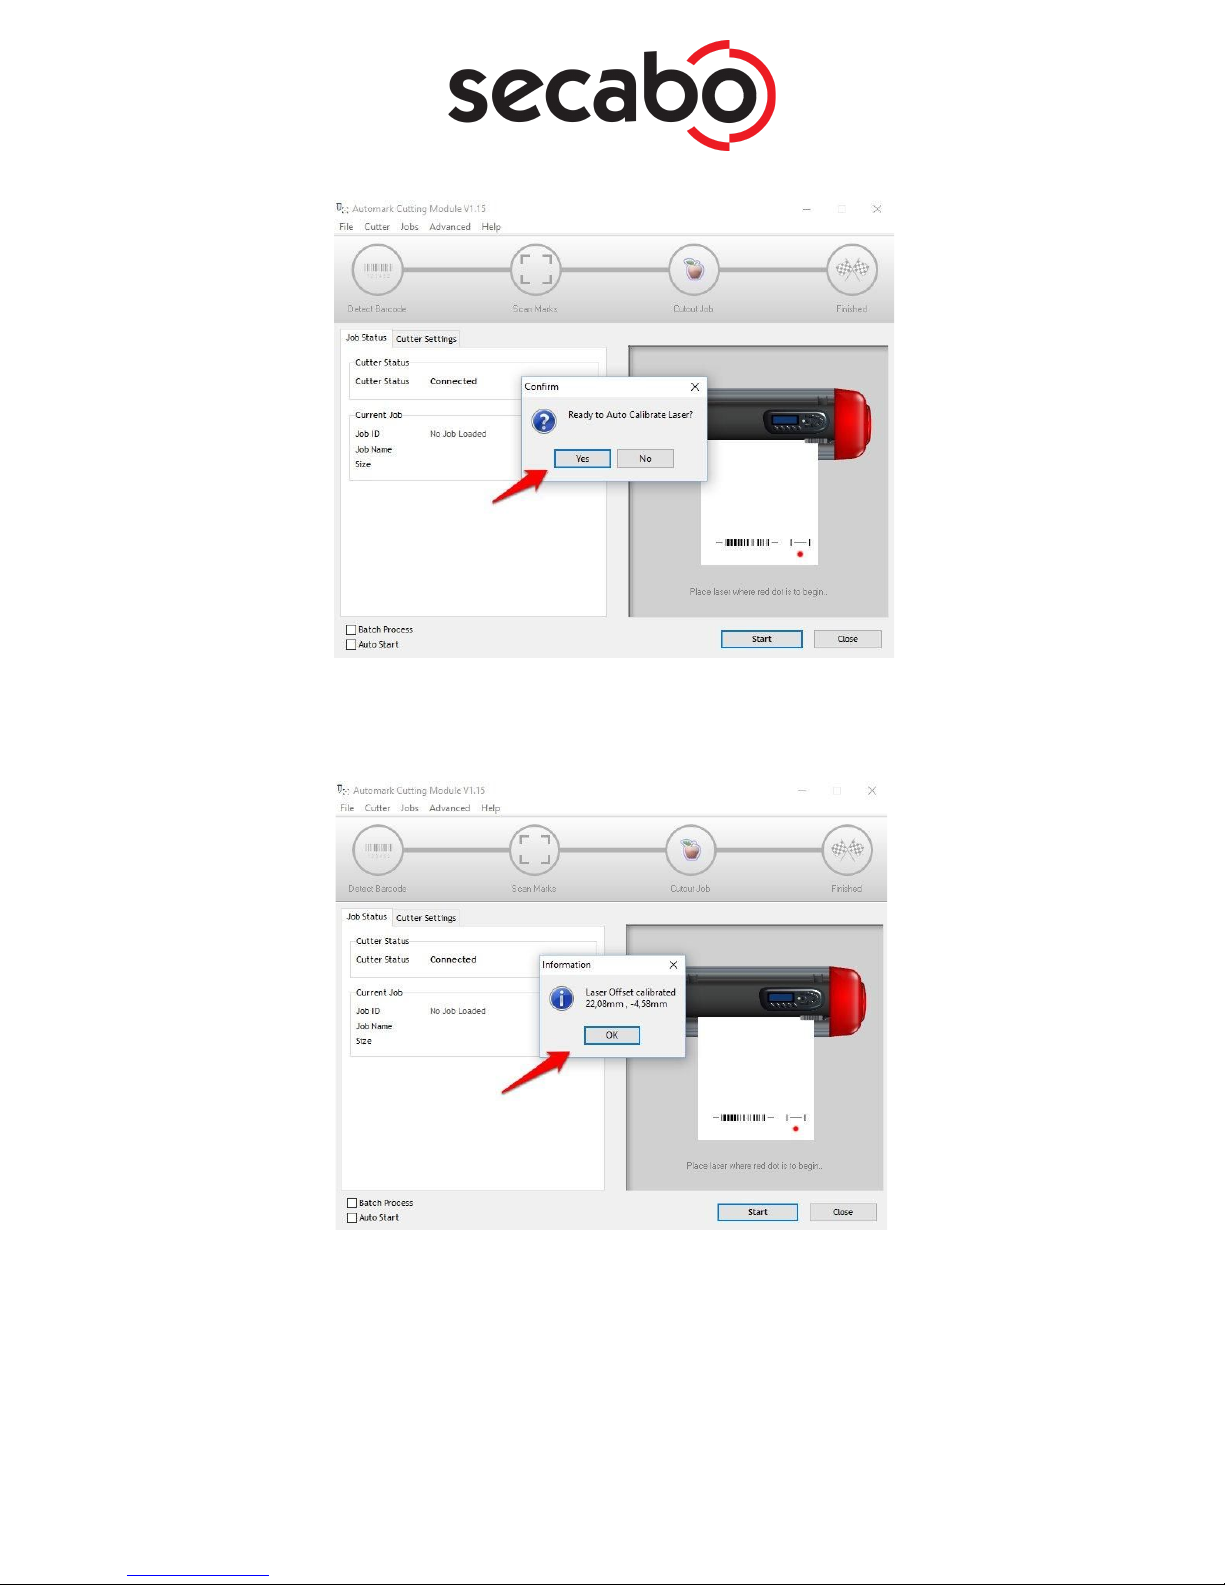
● The cutter will now automatically perform the calibration and report the correct laser offset
for your device, which you need to confirm by clicking on "OK".
With one tool
Once the calibration is complete, you can proceed with the actual contour cut.
● You may for example begin by creating a logo with the text tool or importing any vector
graphics.
● Open the Contour Cut Wizard from the DrawCut PRO header.
Secabo GmbH | Hochstatt 6-8 | 85283 Wolnzach | Germany | [email protected] | www.secabo.com
18

● Create an outline using the desired parameters under "Create a cutting contour". Confirm it
by clicking "Accept".
● Now open the Contour Cut Wizard Make sure that "LAPOS Q" is selected. Now you can
print or save the graphics you've created. Ensure that the printer is configured to print it
using the actual size and doesn't scale it.
● In the next step, the saved cut job must be added. To do this, simply click "Add Cut Job".
DrawCut PRO will now automatically assign a job ID, which is stored in the software and
can be called at any time, either by reading the bar code or by manually loading the job ID.
Secabo GmbH | Hochstatt 6-8 | 85283 Wolnzach | Germany | [email protected] | www.secabo.com
19

● Open the "Lapos Q controller" in the vinyl spooler.
Secabo GmbH | Hochstatt 6-8 | 85283 Wolnzach | Germany | [email protected] | www.secabo.com
20
This manual suits for next models
1
Table of contents
Other Secabo Cutter manuals


Popular Cutter manuals by other brands
 operating instructions")
Office Zone
Office Zone IDEAL 4810 (18-3/4'') operating instructions

FlorCraft
FlorCraft 709-6711 owner's manual

Full Spectrum Laser
Full Spectrum Laser MUSE TITAM Operation manual

EASTMAN
EASTMAN Falcon FAL-A Instruction manual and parts list
ASI
ASI Arrow DUOBLADE SX Training

Clipper
Clipper cutter Installation


Max
Max PJRC160 Operating and maintenance manual

Lynx
Lynx S-60 user guide

Husqvarna
Husqvarna K 3000 Cut-n-Break Operator's manual

Hitachi
Hitachi CL 10D2 Technical data and service manual

Hurst Jaws Of Life
Hurst Jaws Of Life eDRAULIC S 700 E2 instruction manual

Sunrise Electronic Technology
Sunrise Electronic Technology Skycut Series manual