SecureAire Platinum Series User manual

www.secureaire.com | Proudly made in the U.S.A. | MN900-500
Whole-Home Air Purication System
Installation and
User Manual
Congratulations on selecting SecureAire’s most advanced
Whole-Home Air Purication System! SecureAire’s patented
design utilizes ACTIVE Particle Control technology, proven to
capture and remove airborne contaminants from your home
while INACTIVATING™ (killing) viable airborne pathogens
including bacteria, viruses, and mold.
Safe,
Healthy,
and Clean
Indoor Air!

www.secureaire.com | Proudly made in the U.S.A. | MN900-5002
About your new SecureAire Whole-Home Air Purication System
The Whole-Home Air Purication System easily mounts into the return air
ductwork of any gas, oil, or electric forced air furnace or central air conditioning
system with design airow up to 2000 cfm.
ACTIVE Particle Control™
The SecureAire Whole-Home Air Purication System is based upon ACTIVE
Particle Control™ technology that is continuously working to remove airborne
contaminants in the living space, including particulates, pathogens, and VOCs.
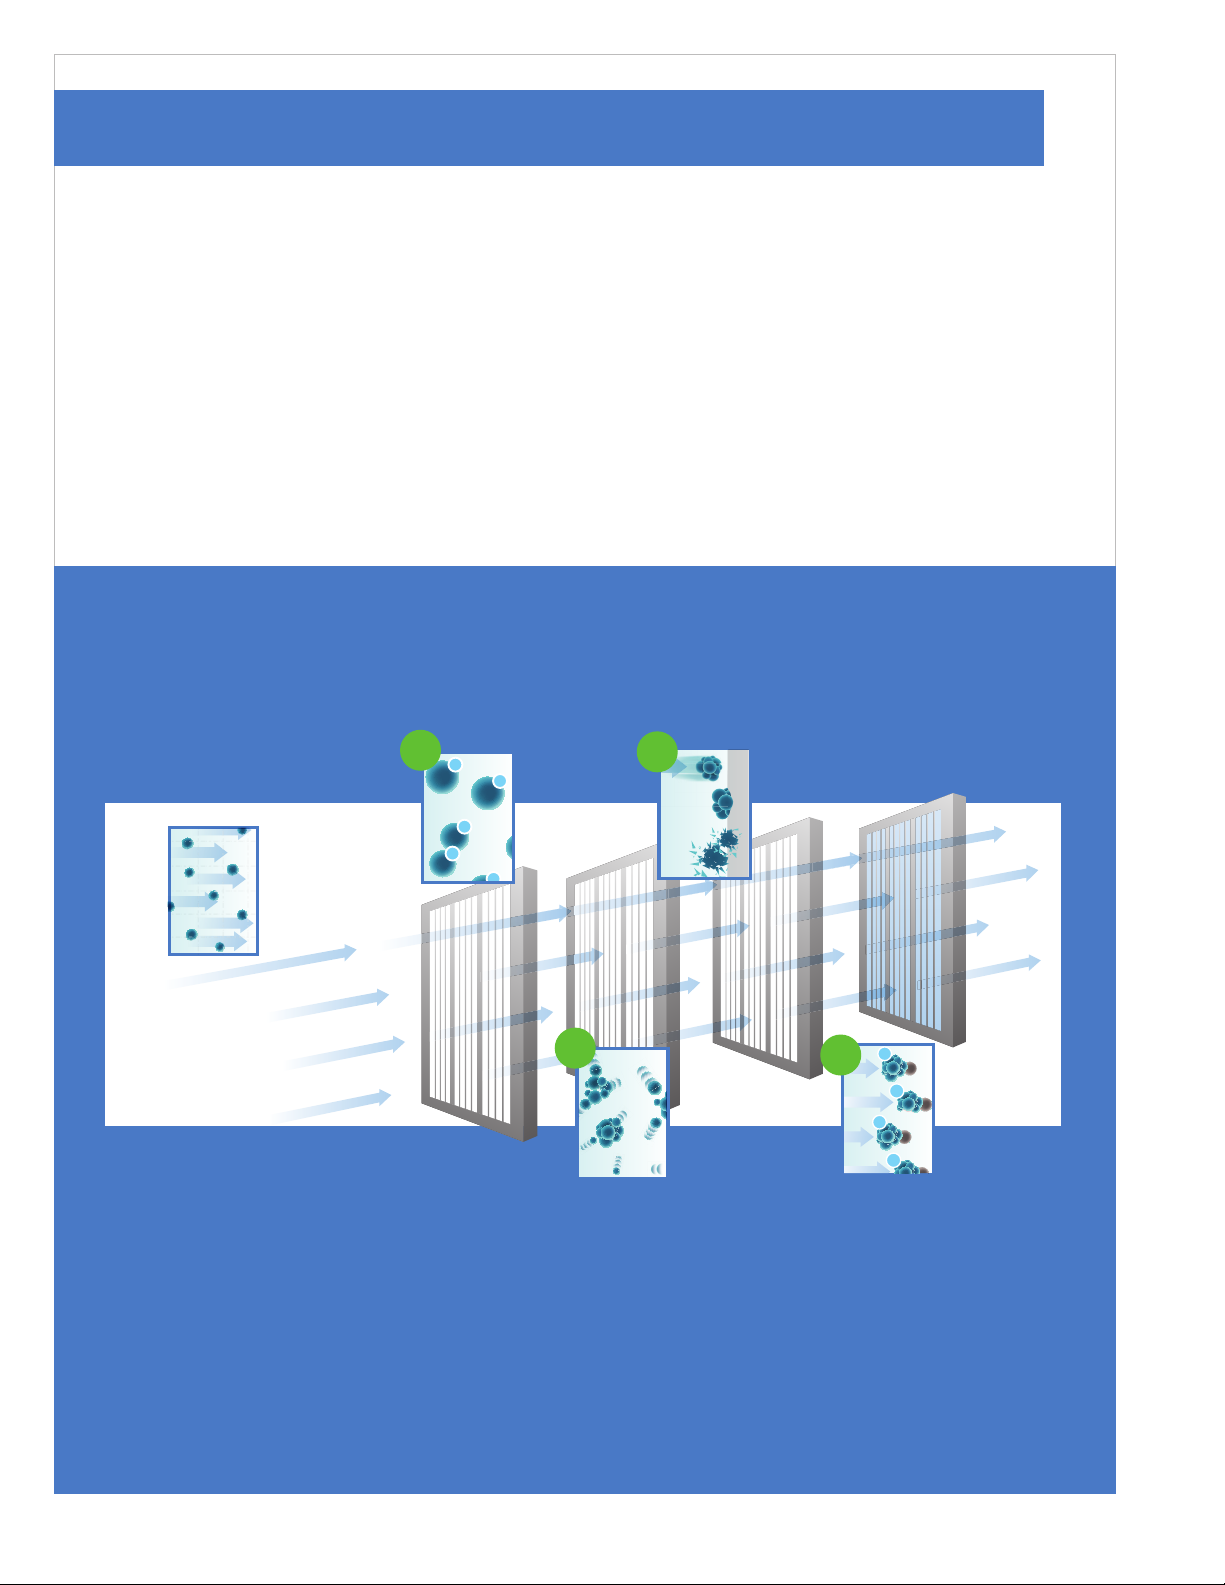
STEP 1: CONDITION
Particles entering the SecureAire System become
electrically CONDITIONED.
STEP 2: COLLISION
Conditioned Particles are forced to COLLIDE, gaining
mass in the process.
STEP 3: CAPTURE & INACTIVATE
Collisions make particles easier to CAPTURE within the lter
media. Once CAPTURED, any viable pathogens will be
INACTIVATED or killed.
STEP 4: TRANSPORT
Particles escaping CAPTURE, are CONDITIONED and are thereby
used to TRANSPORT contaminants from the treated space to the
SecureAire lter.
ACTIVE Particle Control: How it works
The Advanced and Patented 4-Step process
–
+
+
+
+
+
+
+
–
–
–
–
–
–
–
Most particles
are too small to be
transported because
of their lack of weight.
1
2
+
–
+
–
–
4
3

www.secureaire.com | Proudly made in the U.S.A. | MN900-500 3
Before installation
When Installing this Product:
1. This document provides instructions for the installation and electrical wiring of SecureAire’s Whole-
Home Air Purication System.
2. Read these instructions carefully as failure to comply can damage the product or cause a hazardous
condition.
3. Review the specications provided to ensure that it is suitable for your application.
4. The installer must be a trained, experienced mechanical and electrical technician.
5. After the installation is complete, please complete the system start-up procedures to ensure correct
installation and operation of the product.
What’s Inside the Box:
• SecureAire Platinum Air Purier
•8-foot electrical plug-in cord
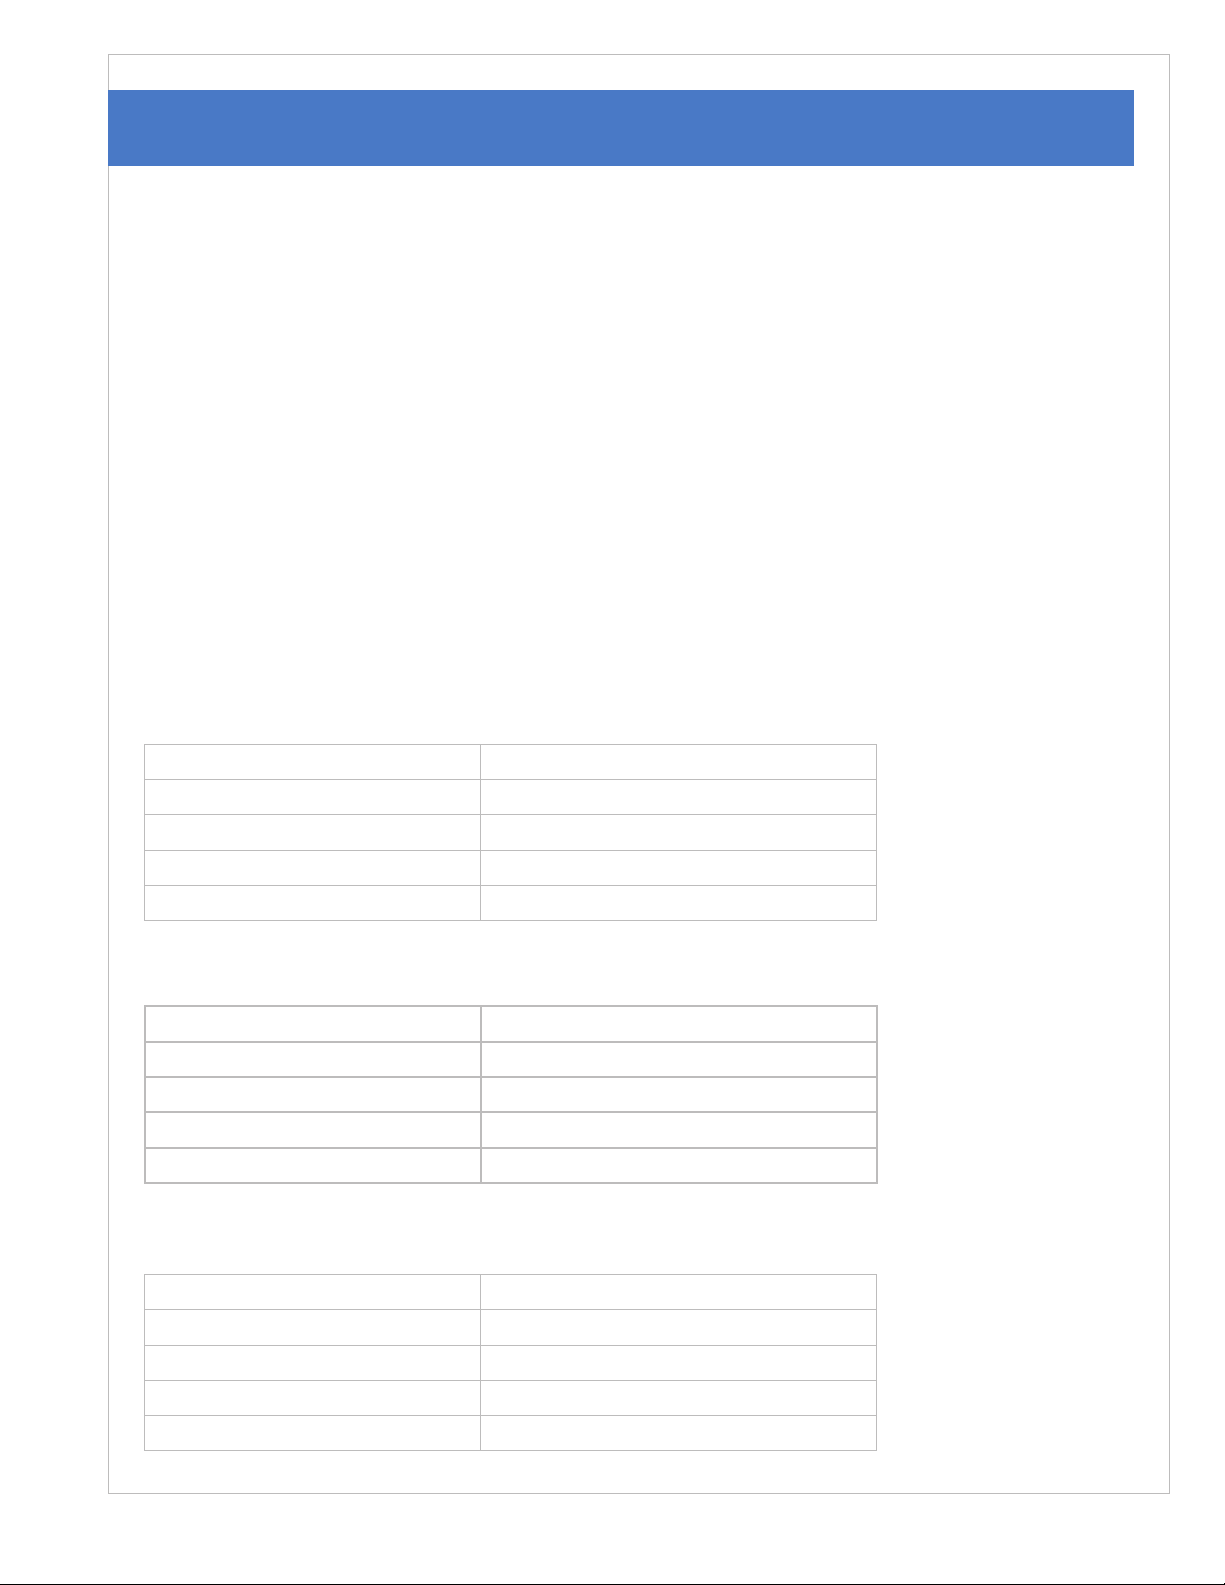
Installation Tools Needed:
Phillips screwdriver Custom sheet metal ttings
Wire cutter Sheet metal cutting tools
Wire stripper Locking pliers or clamps
Wire crimper Sheet metal screws
Drill Silicone sealant
SecureAire Product Model Numbers and Airow Rating:
Model Numbers Maximum Airow (cfm)
ACS1620-PLT 1200
ACS2020-PLT 1400
ACS1625-PLT 1400
ACS2025-PLT 2000
Replacement Filter Part Numbers:
Filter Size (HxWxD in inches) Platinum Series Filter Part Number
16x20x2 R1620-PLT
20x20x2 R2020-PLT
16x25x2 R1625-PLT
20x25x2 R2025-PLT

www.secureaire.com | Proudly made in the U.S.A. | MN900-5004
Application Considerations:
(For additional information see the SecureAire Residential Air Purication System Application Guidelines
Addendum)
The SecureAire Air Purier is designed to work with gas, oil, and electric forced air furnaces and central air
conditioning systems.
Before Installation (continued)
Airow considerations are vital to the heating and cooling
system’s performance, longevity, and safety, as well as the
performance of the SecureAire Air Purier. Industry standards
are established to ensure proper design and installation of this
product and the associated ductwork. Please see the Appendix
for additional detailed application guidelines.

www.secureaire.com | Proudly made in the U.S.A. | MN900-500 5
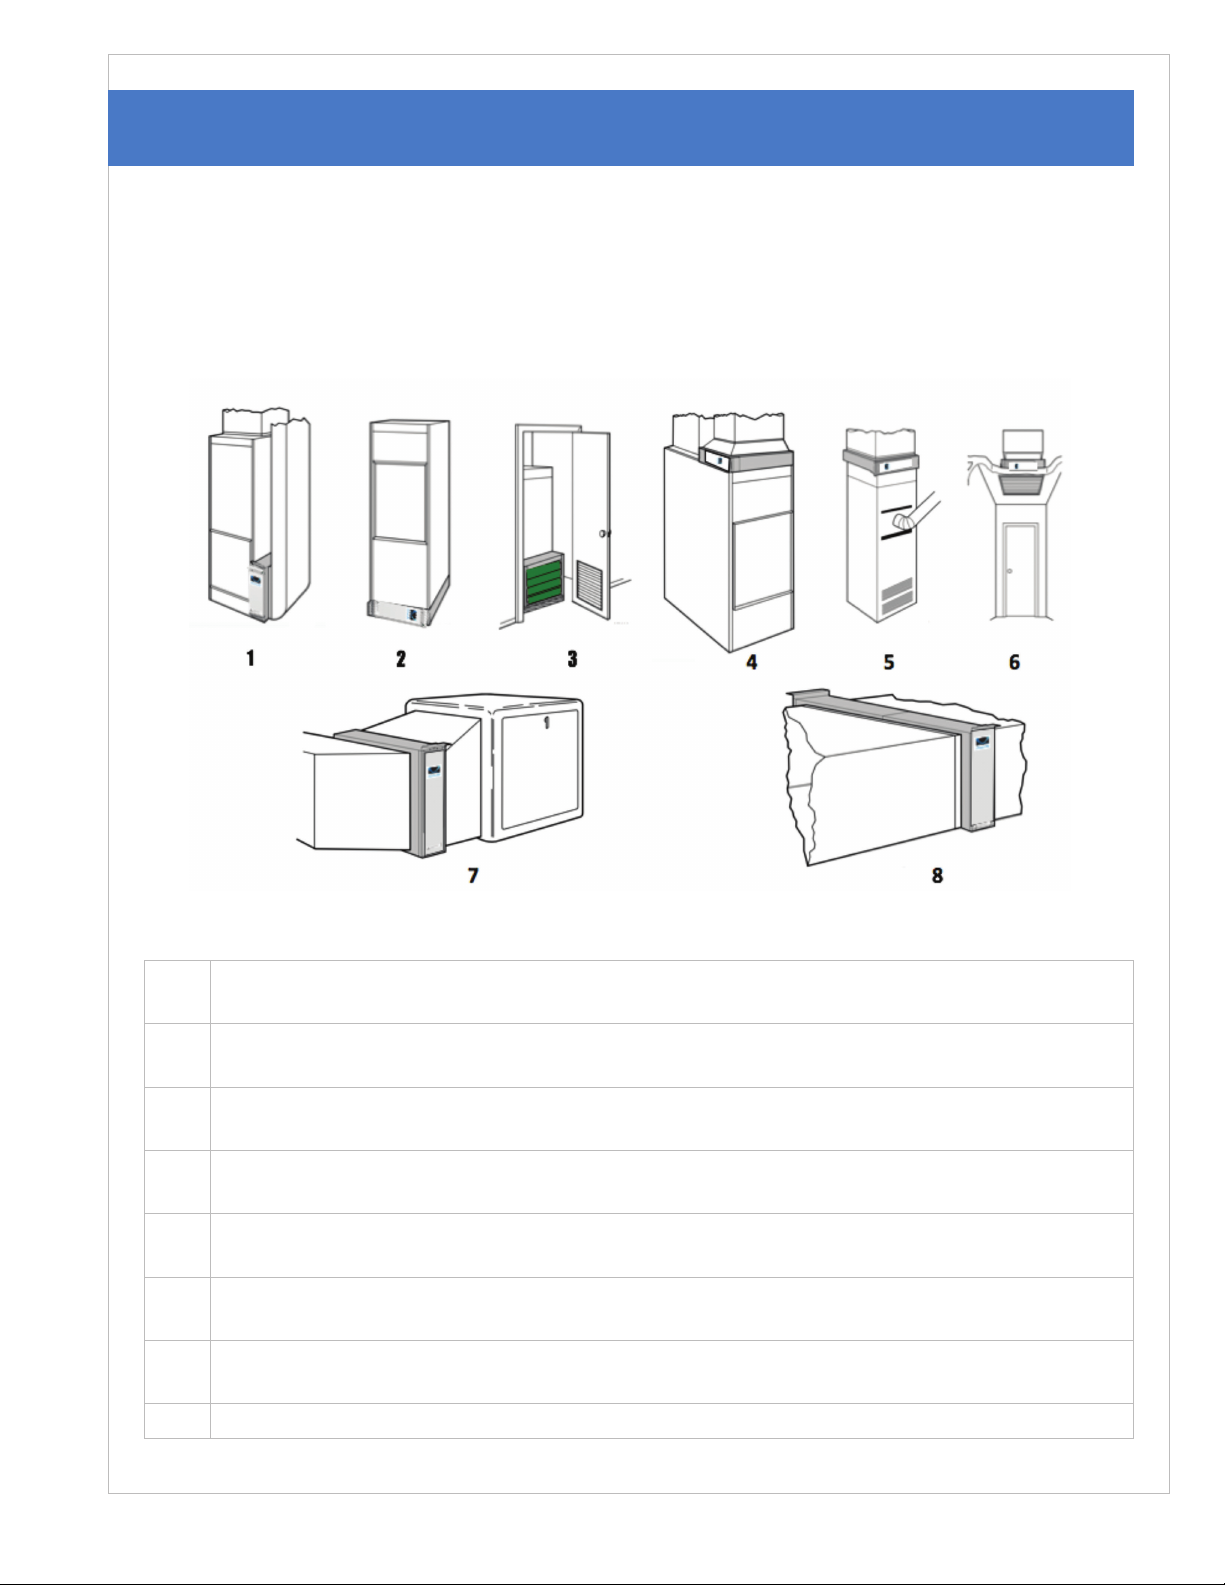
Choosing a Mounting Position:
The SecureAire Air Purier mounts in any position within the return air duct, usually next to the furnace
blower compartment. There are directional arrows on the lter to conrm proper cabinet location. See
below for proper locations for the SecureAire Air Purier in a variety of furnace and air handler installations.
Before Installation (continued)
Type Description
1Upow with side install. The SecureAire Air Purier is mounted vertically where return enters
side inlet of furnace.
2Upow with install beneath furnace. The SecureAire Air Purier is mounted horizontally where
return enters from below.
3Upow with closet install. The SecureAire Air Purier is mounted vertically on furnace between
furnace and louvered return air opening in closet door.
4Counterow with the SecureAire Air Purier is mounted horizontally in return plenum just
above furnace and opposite heating plenum.
5Counterow furnace with the SecureAire Air Purier mounted horizontally in return duct or
plenum just above furnace.
6Central fan installation, with the SecureAire Air Purier mounted horizontally in central
return duct.
7Horizontal furnace, with the SecureAire Air Purier mounted vertically in return duct near
furnace.
8Two or more SecureAire Air Puriers used in a high capacity system.

www.secureaire.com | Proudly made in the U.S.A. | MN900-5006
The following procedure describes a typical installation on an existing upow furnace with a side return.
(Figure 1-1). Other changes in installation procedures may be necessary to complete your installation.
NOTE: Prior to beginning your installation, remove and discard the existing furnace lter
(if used). Thoroughly clean the blower compartment. EPA recommends a professional duct
cleaning whenever the system’s normal airow will stir up and circulate dust or debris into the
home. https://www.epa.gov/indoor-air-quality-iaq/should-you-have-air-ducts-your-home-cleaned
The Step-by-Step Installation Process
Step One: Review the installation plan and airow direction
Temporarily place the SecureAire Air Purier on the oor, orienting as it will be when installed.
Temporarily insert and remove the SecureAire Air Purier to make sure there is adequate clearance for
easy removal if that is ever necessary.
If the installation of the unit requires the airow direction to be reversed, this is easily
accomplished by removing the grid access panel (Step 3) and rotating it 180 degrees when
reinstalling it (Step 7).
Installing the SecureAire Air Purier: Upow Furnace Example
WARNING
Electric Shock Hazard!
Can cause personal injury!
Do not, under any circumstances, use an electrical extension cord
other than the 8-foot cord provided with the unit.
Before installing or servicing this system, always make sure that the
main power to the system is turned o. There may be more than one
electrical disconnect switch.

www.secureaire.com | Proudly made in the U.S.A. | MN900-500 7
Step Two: Remove the door and lter
A. Unlatch the front door. B. Remove the main lter.
Step Three: Remove the grid access panel and (3) wire grids
A. Remove the front plastic panel via the four (4) Philips head screws on the top of the panel and the (4)
Phillips head screws on the bottom of the panel. Gently slide out the three (3) wire grid assemblies and
set them aside. The cabinet is now ready to be connected to the heating or cooling equipment and the
return ductwork.
Installing the SecureAire Air Purier: Upow Furnace Example

www.secureaire.com | Proudly made in the U.S.A. | MN900-5008
Step Four: Pre-wire the power supply
(PRE-WIRE ONLY DO NOT CONNECT TO POWER)
Installation of the SecureAire Air Purier should be performed by a licensed electrician or a certied HVAC
technician. Electrical wiring must comply with applicable local codes and standards.
These are pre-wire instructions only. Power is not connected to the unit at this point.
Wire ring lugs must be used when connecting input line voltage to the terminal block. These are
supplied on the plug-in power cord supplied with the SecureAire unit.
If connecting directly from another source, the technician must install wire ring lugs on the power
wires that connect to the SecureAire terminal block.
The supply line voltage power source is 120V/60 Hz.
A. Remove the 2 (two) Phillips head lock screws
from the cabinet’s top access panel.
B. If the existing wiring connection out of the back of
the power supply will be obstructed when the unit
is installed, additional knockouts are provided on
both sides of the power supply. Remove the existing
wiring strain relief and relocate it if needed.
Installing the SecureAire Air Purier (continued)
PLACEHOLDER
New image of
knockouts will
go here

www.secureaire.com | Proudly made in the U.S.A. | MN900-500 9
E. Tighten the wiring strain relief on the outside of the power supply box.
F. Re-install the access panel with the 2 (two) lock screws.
Step Five: Connect the cabinet to the furnace or air handler
A. If needed, cut an opening in the equipment cabinet to match the SecureAire Air Purier’s cabinet or
provide a proper sheet metal transition from the cabinet to the equipment.
B. If necessary, place blocks under the SecureAire Air Purier to make sure the unit sits securely.
C. Connect the SecureAire Air Purier securely to the furnace. Fasten with sheet metal screws or use S-cleat
type slip joints. If you are drilling holes, use locking pliers to help hold the cabinet in place during drilling.
Step Six: Connect the cabinet to the return air plenum
A. If needed, install turning vanes to help distribute air equally over the full surface of the upstream side
of the SecureAire Air Purier. See the Appendix: Application Recommendations, for details.
B. Connect the SecureAire Air Purier securely to the return air ductwork. Fasten with sheet metal screws
or use S-cleat type slip joints. If you are drilling holes, use locking pliers to help hold the cabinet in place
during drilling.
C. Inspect the SecureAire Air Purier to make sure that no metal lings are lodged in the unit and free
of any debris.
C. Connect unpowered wire ring lugs as shown. D. When using the supplied plug-in cord, match the
cord wiring color to the same color wires on the
wiring terminal block.
Installing the SecureAire Air Purier (continued)

www.secureaire.com | Proudly made in the U.S.A. | MN900-50010
Step Seven: Reinstall the (3) wire grids and grid access panel
A. Insert each of the wire grid assemblies back into their slots. Any grid can be inserted into any slot.
B. Replace the grid access panel and secure it with the four (4) Philips head screws on both the top and
bottom of the panel.
Step Eight: Seal all sheet metal joints
Seal all joints in the sheet metal connections you made to prevent ambient air from entering or leaving
the ductwork. May use silicone sealant, mastic, or UL-approved sealant tape. MOUNTING
Step Nine: Connect power to the power supply
Installation of the SecureAire Air Purier should be performed by a licensed electrician or a certied HVAC
technician. Electrical wiring must comply with applicable local codes and standards.
Wire ring lugs must be used when connecting input line voltage to the terminal block.
The supply-line voltage power source is 120V/60 Hz. When using the supplied plug-in power
cord, plug the cord into an accessible outlet. When connecting power through another source,
such as the equipment manufacturer’s provided EAC terminals, follow the equipment
manufacturer’s directions on how to make that connection.
Installing the SecureAire Air Purier: Upow Furnace Example
Ground
Neutral
Hot
SecureAire Wiring Terminal Block
Line Voltage: 120V/60 Hz

www.secureaire.com | Proudly made in the U.S.A. | MN900-500 11
Note: The SecureAire Air Purier may be wired to be on continuously, even without the system
fan being on, as there are no harmful byproducts, such as ozone, produced by this device.
Step Ten: System Operation Check
A. Turn on the SecureAire Air Purier with the ON/OFF switch. The switch illuminates a green light
indicating that the power supply is on. An audible clicking noise (4 times loud followed by 4 times soft)
indicates that the system’s self-test procedure has conrmed proper operation and the high voltage
power supply is working correctly.
Under normal operation, the SecureAire Air Purier may create a slight hissing sound indicating that
the high voltage grids are activated. Note: Unlike other electronic air ltration or air cleaning
products, this “hissing sound” does not indicate that ozone or any other potentially unsafe
byproduct is being created. The SecureAire Air Purier creates no harmful byproducts.
B. Turn o the SecureAire Air Purier and the ON/OFF switch light turns o, indicating the entire
SecureAire power supply is powered o. The SecureAire Air Purier is now safe to access. Open the
front door and insert the lter (and pre-lter, if included), close and latch the door and press the ON/
OFF switch to the ON position. The self-test procedure will start again and conrm the power supply
is working correctly.
Built-in User Safety — Opening the front door before turning o the SecureAire Air Purier will disable
the high voltage circuit and de-energize the entire device.
Congratulations! The SecureAire Air Purier installation is complete.
Installing the SecureAire Air Purier: Upow Furnace Example

www.secureaire.com | Proudly made in the U.S.A. | MN900-50012
Installing the SecureAire Air Purier: Upow Furnace Example
Please check the installation for the following:
System Airow is in the direction of the arrows on the SecureAire lter.
Turning vanes and transitions, if used, are properly installed.
Joints in all sheet metal connections are sealed.
All sheet metal connections are complete.
Original furnace lter has been removed and blower compartment is cleaned.
Replace any equipment access doors removed during the installation.
Run the furnace or cooling system through one complete cycle to ensure system
is operating.
Consider asking the homeowner if they would like to program the thermostat’s fan
control for intermittent, circulate, or constant fan control.

www.secureaire.com | Proudly made in the U.S.A. | MN900-500 13
The SecureAire Whole Home Air Purication System is designed to require minimal
maintenance. System maintenance is limited to the replacement of the system’s lter, which is
easily accomplished using the following steps.
Step One: Turn o the system power button.
Step Two: Unlatch and remove the front door.
Step Three: Carefully remove the used lter.
Gently pull out the used lter without disturbing the accumulated dirt on the lter and place the lter
in a large plastic bag for disposal.
Installing the SecureAire Air Purier: Upow Furnace Example

www.secureaire.com | Proudly made in the U.S.A. | MN900-50014
Installing the SecureAire Air Purier: Upow Furnace Example
Step Four: Insert the new replacement lter.
Insert the new lter making sure that the replacement lter seats against back of the SecureAire cabinet
and the airow arrows on the lter are pointing in the direction of the airow.
Step Five: Re-attach the front door and turn system power on.
The SecureAire Air Purier lter replacement is now complete!

www.secureaire.com | Proudly made in the U.S.A. | MN900-500 15
Specications, Dimensions, and Approvals
SecureAire Specications
System Specication ACS1620-PLT ACS2020-PLT ACS1625-PLT ACS2025-PLT
Color Alpine White
Cabinet Material Aluminum/Galvanized Steel
Electrical 120/240 VAC at 60 Hz, Single Phase, 0.5A max
Operating Temperature Range -40 to 165 F (-40 to 74 C)
Operating Humidity Range 0 to 95% RH (non-condensing)
Maximum Airow (CFM) 1200 1400 1400 2000
Unit Weight (lbs.) 20 21 21 22
Initial Pressure Drop (in WC.) 0.14 0.13 0.13 0.14
SecureAire Air Purier Dimensions
Part Numbers Height Width Depth
ACS1620-PLT 18” 20” 6.75”
ACS2020-PLT 22” 21” 6.75”
ACS1625-PLT 18” 26” 6.75”
ACS2025-PLT 22” 26” 6.75”
SecureAire Filter Dimensions – Nominal
Part Number Height Width Depth
R1620-PLT 16” 20” 2”
R2020-PLT 20” 20” 2”
R1625-PLT 16” 25” 2”
R2025-PLT 20” 25” 2”
Model Width Height Depth
ACS1620-PLT 20” 18” 6.75”
ACS1625-PLT 26” 18” 6.75”
Model Width Height Depth
ACS2020-PLT 21” 22” 6.75”
ACS2025-PLT 26” 22” 6.75”
Dimensional drawings of the SecureAire Whole Home Residential System
1 ½
1 ¼
1¼
18 ¼
6 ¾
16
17
17
20
3 ¼
5 ¼5¼
13 ¼
6 5/86 5/8
16x20
2.06
5
/
8
6
5
/
8
17 ¼
22 ¼
6 ¾
20
21 ¾
8 ¼8¼
22
25
4 ¼
1 ½
1 ¼
20x25
5 ¼5¼
13 ¼
18 ¼
6 ¾
16
17 ¾
8 ¼
8 ¼
22
25
4 ¼
1 ½
1 ¼
1¼
16x25
6 5/86 5/8
17 1
/4
22 ¼
6 ¾
20
21 ¾
6 5/86 5/8
17
20
3 ¼
17
/8
1 ¼
1 ½
20x20

16 www.secureaire.com | Proudly made in the U.S.A. | MN900-500-Rev B
Specications, Dimensions, and Approvals (continued)
Platinum Series Pressure Drop Curves
0.16
0.14
0.12
0.10
0.08
0.06
0.04
0.02
0
200400 600800 1000 1200 1400 1600 1800 2000
Pressure Drop (in wg)
Airflow (CFM)
Filter
size key:
16 x20
20x2
0/
16 x25
25x20
Platinum Series Pressure Drop Curves
Standards and Approvals
The SecureAire Whole-Home Air Purication System has been tested and veried
to meet or exceed the following:
•UL 867 Electrical Standard
•CSA C22.2 No. 187-09 Electrical Standard
Revision Table
Rev Description ECO# Date Approval
B Second Release 7/8/2019 JC
Safe, Healthy, and Clean Indoor Air!
To Learn More
Visit our website at: www.secureaire.com/residential
SecureAire, LLC
1968 Bayshore Boulevard
Dunedin, FL 34698
813.300.6077
www.secureaire.com
© 2019 SecureAire, LLC. All rights reserved.
Made in the USA.
This manual suits for next models
4
Table of contents
Other SecureAire Air Cleaner manuals