SEELEY INTERNATIONAL Braemar XE73-44E User manual

1
SEELEY INTERNATIONAL -OWNER’S MANUAL
OWNER’S MANUAL
WIRED CONTROLLER XE73-44E
(English)(NDHV SERIES)

2NDHV Series Bulkhead Unit
IMPORTANT
As with any product that has moving parts or is subject to wear and tear, it is VERY
IMPORTANT that you maintain your air conditioner and have it regularly serviced.
Accordingly, it is a condition of warranty cover for your air conditioner that you
comply with all of the maintenance and service requirements set out in this manual.
Compliance with these requirements will prolong the life of your air conditioner.
Furthermore, it is also a condition of warranty cover that the Maintenance Schedule
in the manual is lled out (by signing and dating it in the places indicated) when the
item is completed.
ANY FAILURE TO CARRY OUT THE REQUIRED MAINTENANCE AND
SERVICING, AND ANY FAILURE TO FILL OUT THE MAINTENANCE
SCHEDULE, WILL VERY LIKELY VOID YOUR WARRANTY.
(For complete warranty terms, refer to the separate Warranty Booklet sold with
the product. Alternatively, visit https://www.seeleyinternational.com/warranty/ to
download the terms. Warranty terms are subject to property access and industry
safety standards.)

Table of contents
INTRODUCTION AND SAFETY 4
CONTROLLER LAYOUT 6
SYMBOLS ON LCD 6
BUTTONS ON THE WIRED CONTROLLER 8
OPERATION 10
ON/OFF 10
MODE SETTING 10
TEMPERATURE SETTING 11
FAN SETTING 12
TIMER SETTING 12
UP & DOWN SWING SETTING 14
LEFT & RIGHT SWING SETTING 14
FRESH AIR VALVE FUNCTION SETTING 16
SLEEP SETTING 18
TURBO SETTING 19
ENERGY SAVING FUNCTION SETTING 20
E-HEATER SETTING 22
X-FAN SETTING 23
QUIET FUNCTION SETTING 24
HEALTH SETTING 25
ABSENT SETTING 26
I-DEMAND SETTING 27
WIFI FUNCTION SETTING 29
DRED FUNCTION SETTING 30
OTHER FUNCTIONS 31
ERRORS DISPLAY 33
MAINTENANCE SCHEDULE 36
OPERATION TIPS 38

4NDHV Series Bulkhead Unit
INTRODUCTION AND SAFETY
Congratulations on purchasing a new Braemar Air Conditioner!
Please keep this Manual and the Warranty Booklet in a safe place, along with the original purchase
documents, plus all relevant certicates of compliance relating to the installation work performed. Please
register the Warranty straight away, by following the steps set out in the Warranty Booklet.
The installer must read the Installation Manual before installing the Braemar Air Conditioning Unit. The
home owner/user should read the Owner’s Manual before operating the Unit.
To ensure the warranty on the Unit is continued and valid, the Unit must be checked and serviced by the
home owner/user as per the requirements in the Maintenance & Service section and the Maintenance
Schedule. This will also prolong the life of your air conditioner.
The home owner/user should regularly check the Air Inlet side of the Outdoor unit to ensure grass, leaf
and other matter are not drawn into or onto the inlet side of the Outdoor unit. Restriction to the airow
across the coil will reduce the system’s capacity, and result in high operation pressures and excessive
operating costs.
A return air lter MUST be installed by the installer at the return air grille. The air lter should be
inspected and cleaned at least every two weeks when the Braemar Air Conditioning Unit is used.
NOTE: The manufacturer recommends that low level return air grilles are installed.

5
SEELEY INTERNATIONAL -OWNER’S MANUAL
IMPORTANT!
THE AUSTRALIAN GREENHOUSE OFFICE HAS ISSUED VARIOUS REGULATIONS ON THE USE
AND DISPOSAL OF REFRIGERANTS IN THE UNIT. FAILURE TO FOLLOW THESE REGULATIONS
MAY HARM THE ENVIRONMENT AND COULD LEAD TO THE IMPOSITION OF SUBSTANTIAL FINES.
WHERE SPECIFIED, ONLY QUALIFIED AND LICENSED TECHNICIANS SHOULD PERFORM WORK
ON THIS UNIT, FAILING WHICH THE WARRANTY ON THE UNIT WILL BE VOID.
WARNING! This appliance is not intended for use by persons (including children) with reduced physical,
sensory or mental capabilities, or lack of experience and knowledge, unless they have been given
supervision or instruction concerning use of the appliance by a person responsible for their safety.
Children should be supervised to ensure that they do not play with the appliance.
If the supply cord is damaged, it must be replaced by the manufacturer, its service agent or similarly
qualied persons in order to avoid a hazard.

6NDHV Series Bulkhead Unit
CONTROLLER LAYOUT
Your Braemar Air Conditioner has been designed and built with reliable, quality components. To ensure
many years of trouble free, dependable service please read the following pages very carefully, and
please ensure that you follow all of the instructions.
WIRED CONTROLLER
Please follow the below cautionary notes when using the wired controller:-
1. Do not install the wired controller in a damp place or under direct sunlight.
2. Do not abuse, toss, or frequently assemble/disassemble the wired controller.
3. Do not operate the wired controller with wet hands and never let any liquid ow into it.
4. Do not install or remove the wired controller by yourself. If necessary, please contact a service
agent.
5. This wired controller is applicable to various kinds of air conditioners - some specic functions
unavailable to the duct type air conditioners will be covered in this manual.
6. Before operating the air conditioner, please read this manual carefully and keep it in a safe place for
future reference.
SYMBOLS ON LCD
Fig. 01: LCD of the wired controller

7
SEELEY INTERNATIONAL -OWNER’S MANUAL
Table 01: Description of symbols
Secondary wired
controller
Icon of secondary wired controller, it will display when secondary
wired controller is set (this function is unavailable for this unit.)

8NDHV Series Bulkhead Unit
BUTTONS ON THE WIRED CONTROLLER
“°C”
CONTROLLER LAYOUT cont.
Fig. 02
Table 02.1
9
SEELEY INTERNATIONAL -OWNER’S MANUAL
“°C”
Table 02.2

10 NDHV Series Bulkhead Unit
ON/OFF
MODE SETTING
OPERATION
Press ON/OFF to turn on the unit and turn it o by another press.
Note: The state shown in Fig. 03 indicates the “OFF” state of the unit after power on. The state shown in
Fig. 04 indicates the “ON” state of the unit after power on.
Under the “ON” state of the unit, press MODE to switch the operation modes as the following sequence:
Auto-Cooling-Dry-Fan-Heating.
Fig. 03: “OFF” State
Fig. 05
Fig. 04: “ON” State

11
SEELEY INTERNATIONAL -OWNER’S MANUAL
TEMPERATURE SETTING
OPERATION cont.
Press ▲or ▼ to increase/decrease the preset temperature. If either of them are pressed continuously,
the temperature will be increased or decreased by 1°C (1°F) every 0.5s, as shown in Fig.06.
In the Cooling, Dry, Fan or Heating mode, the temperature setting range is 16°C~30°C (61°F~86°F).
In the Auto mode, the setting temperature is not adjustable.
Fig. 06

12 NDHV Series Bulkhead Unit
FAN SETTING
TIMER SETTING
Under the “ON” state of the unit, press the “Fan” button to vary the speeds as shown in the sequence
below.
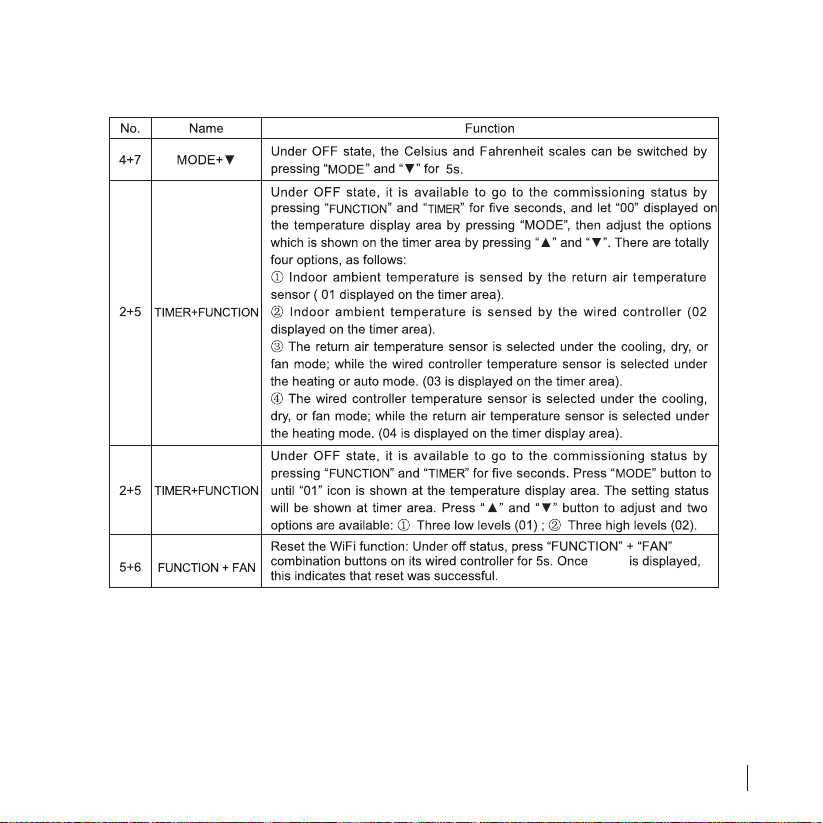
Under the “ON”/”OFF” state of the unit, press Timer to set timer o/on.
Timer “ON” setting: Use to set when to start the unit. When the unit is OFF, press the Timer button.
xx.x HOUR is displayed with HOUR blinking. Press ▲/▼ to adjust the timer, then press SWING/ENTER
to conrm.
Timer “OFF” setting: Use to set when to stop the unit. When the unit is ON, press the Timer button.
xx.x HOUR is displayed with HOUR blinking. Press ▲/▼ to adjust the timer, then press SWING/ENTER
to conrm.
Timer range is 0.5-24hr, holding down the ▲/▼ will change the setting continuously.
Pressing the Timer button when the Timer ON/OFF has already been set will cancel the Timer setting.
Fig. 07
OPERATION cont.

13
SEELEY INTERNATIONAL -OWNER’S MANUAL
Fig. 08: Timer o setting under the “ON” State of the unit
14 NDHV Series Bulkhead Unit
LEFT & RIGHT SWING SETTING
UP & DOWN SWING SETTING
There are two ways for up and down swing mode: Simple swing and Fixed swing.
Simple Swing: if selected, the vanes will oscillate up and down continuously.
Fixed Swing: if selected, you can set a range of dierent swing settings.
Under o status, press “SWING/ENTER” button and “▲” button simultaneously for 5 seconds, then
switch for simple swing and xed swing is done.
When it is set to be simple swing, under on status, press “SWING/ENTER” button and the mode is
activated. Pressing the button again will cause the mode to be turned o.
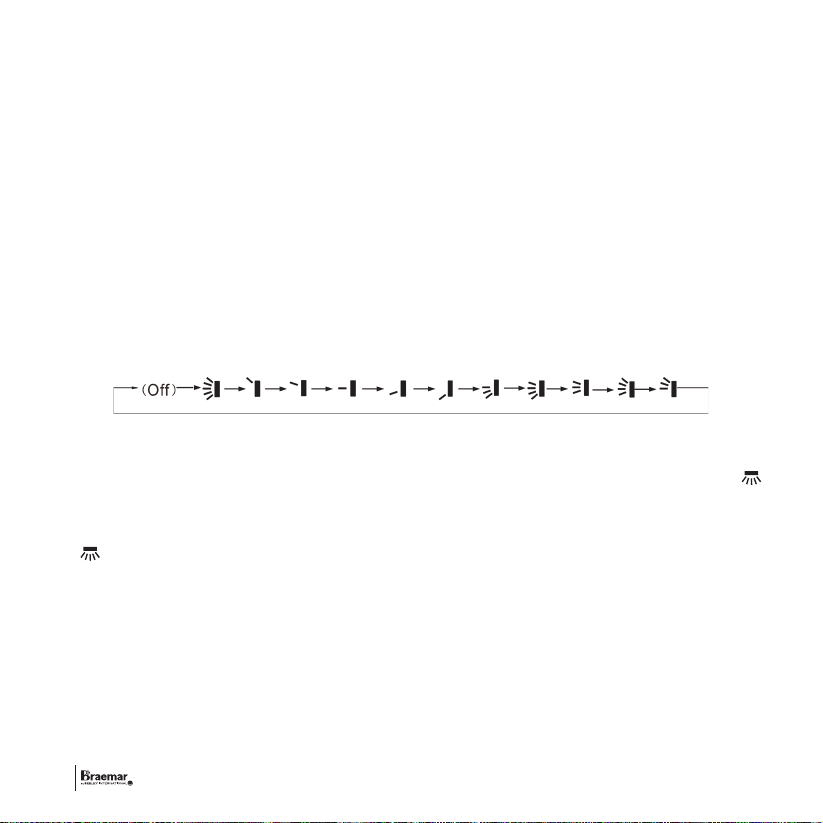
When it is set to be xed swing, press “SWING/ENTER” button, the unit will circularly switch the swing
mode according to the order shown below:
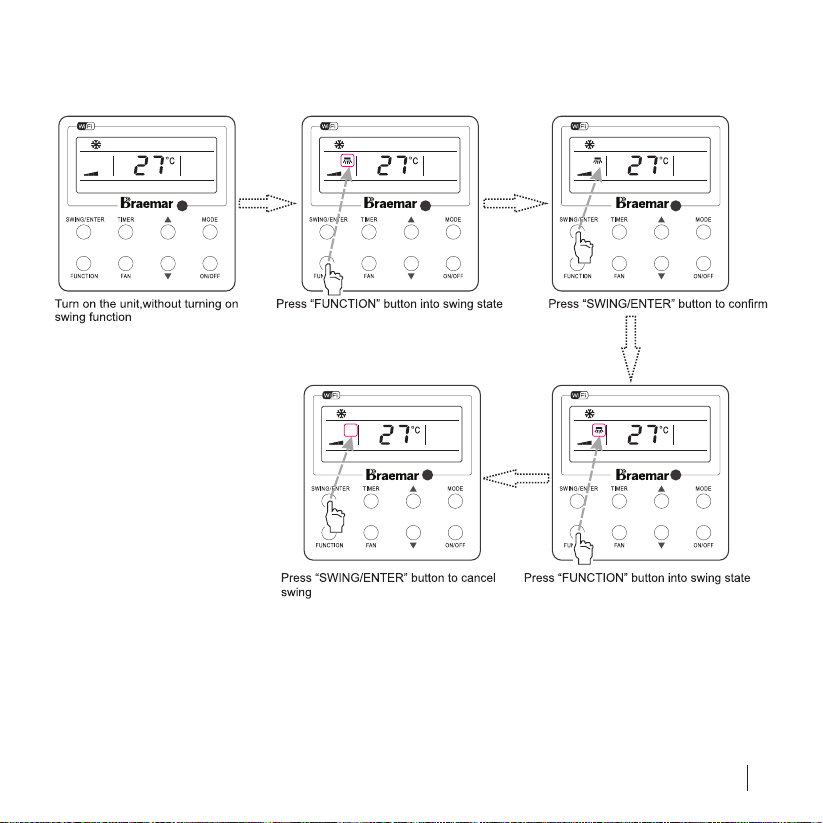
Swing On: Press FUNCTION under on state of the unit to activate the swing function. In this case,
will blink. Next, press SWING/ENTER to make a conrmation.
Swing O: When the Swing function is on, press FUNCTION to enter the Swing setting interface,
with blinking. Next, press SWING/ENTER to cancel this function.
Swing setting is as shown in Fig.09.
OPERATION cont.
15
SEELEY INTERNATIONAL -OWNER’S MANUAL
Note:
1. Sleep, Turbo or X-fan setting is the same as the Swing setting.
2. After the setting has been done, it has to press the key “SWING/ENTER” to back to the setting
status or quit automatically ve seconds later.
Fig. 09: Swing setting

16 NDHV Series Bulkhead Unit
FRESH AIR VALVE FUNCTION SETTING
Turn on fresh air valve function:
Under unit on status, press FUNCTION button on the panel to select “Fresh air valve” function option.
When icon ashes, it enters fresh air valve setting mode. Previous temperature display position will
display the level of fresh air valve. Press ▲ or ▼ button to adjust the level of fresh air valve within the
range from 1 to 10. Then press SWING/ENTER button to activate this function.
Turn o fresh air valve function:
If fresh air valve function has been set, press FUNCTION button on the panel to select “Fresh air valve”
function option. When icon ashes, if you press SWING/ENTER button without pressing ▲ or ▼
button, fresh air valve function will be cancelled; if you press SWING/ENTER button after pressing
▲ or ▼ button, fresh air valve function will be activated.
Note: if you press panel button to set fresh air valve function on, ventilation (ventilation 1) function will
be activated too; if you press panel button to set fresh air valve function o, ventilation function will be
cancelled too.
OPERATION cont.

17
SEELEY INTERNATIONAL -OWNER’S MANUAL
Fig. 10: Fresh Air Function Setting
18 NDHV Series Bulkhead Unit
SLEEP SETTING
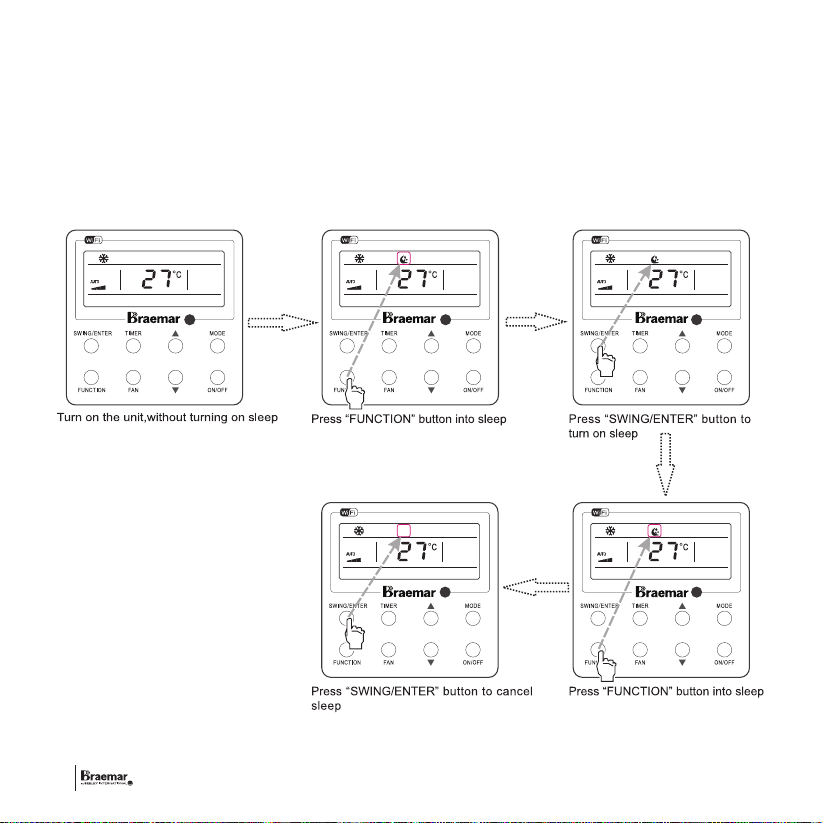
Sleep on: Press FUNCTION under on state of the unit till the unit enters the Sleep setting interface.
Press SWING/ENTER to conrm the setting.
Sleep o: When the Sleep function is activated, press FUNCTION to enter the Sleep setting interface.
Next, press SWING/ENTER to can this function.
Sleep setting is shown as Fig.11.
Fig. 11: Sleep setting
OPERATION cont.
19
SEELEY INTERNATIONAL -OWNER’S MANUAL
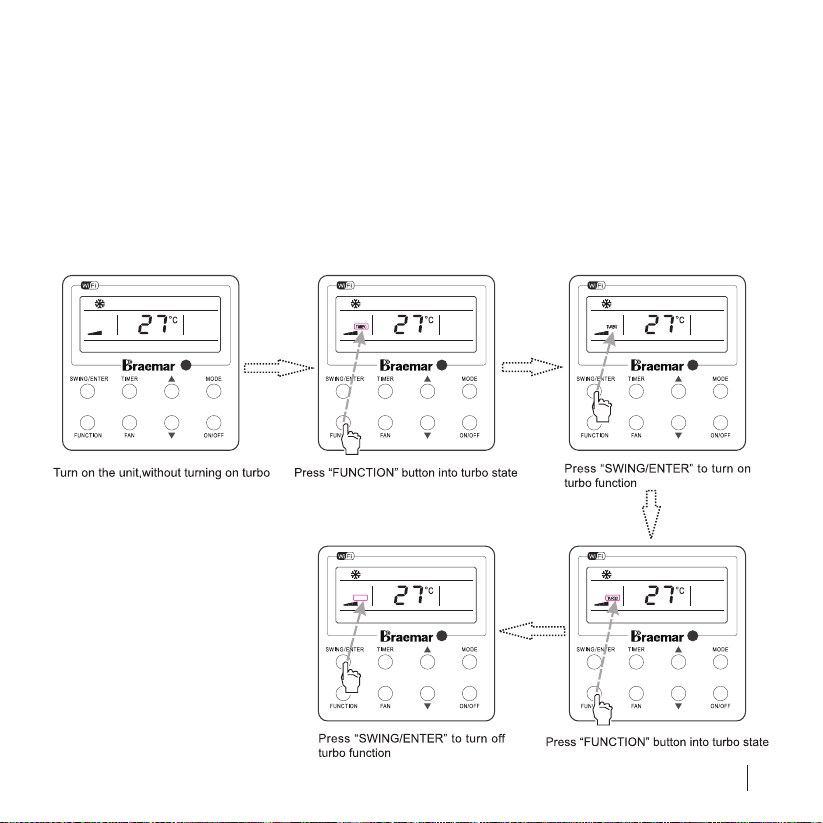
TURBO SETTING
Turbo function: The unit at the high fan speed can realize quick cooling or heating so that the room
temperature can quickly approach the setting value.
In the Cooling or Heating mode, press FUNCTION till the unit enters the Turbo setting interface and then
press SWING/ENTER to conrm the setting.
When the Turbo function is activated, press FUNCTION to enter the Turbo setting interface and then
press SWING/ENTER to cancel this function.
Turbo function setting is as shown in Fig.12.
Fig. 12: Turbo setting

20 NDHV Series Bulkhead Unit
ENERGY SAVING FUNCTION SETTING
Turn on energy saving function:
1. Energy Saving Setting for Cooling
When the unit runs under the COOL or DRY mode, press FUNCTION button to select “SAVE”
function option, with “SAVE” ashing, and then press ▲ or ▼ to adjust the lower limit, next, press
the SWING/ENTER button to activate this function.
2. Energy Saving Setting for Heating
When the unit runs under the HEAT mode, press FUNCTION button to select “SAVE” function
option, with “SAVE” ashing, and then press ▲ or ▼ to adjust the upper limit, next, press SWING/
ENTER button to activate this function.
Note: Under energy saving setting mode, press “MODE” button to switch the energy saving setting for
COOL or HEAT mode.
Cancel energy saving function:
If energy saving function has been set, press FUNCTION button on the panel to select “SAVE” function
option. When icon ashes, if you press SWING/ENTER button without pressing ▲ or ▼ button,
energy saving function will be cancelled; if you press SWING/ENTER button after pressing ▲ or ▼
button, energy saving function will be activated.
OPERATION cont.
Table of contents
Other SEELEY INTERNATIONAL Controllers manuals


Popular Controllers manuals by other brands

JLCooper Electronics
JLCooper Electronics FaderMaster Professional user manual

Hydromatic
Hydromatic Novus 1000 Series Installation and service manual

Panasonic
Panasonic FP7 Series user manual

GENLED
GENLED Acolyte DiGidot C4 LIVE manual

Vimar
Vimar ESM4/ESM4.120 Installation and operation manual

Siemens
Siemens Flowrite 599 Series installation instructions


YASKAWA
YASKAWA iQpump1000 user manual

Gardner Denver
Gardner Denver DELCOS 3100 user manual

STIEBEL ELTRON
STIEBEL ELTRON SOM 6 plus Operation and installation

Toshiba
Toshiba TOSVERT VF-S15 series instruction manual

Colortran
Colortran 200-171 Operation and maintenance manual

Intel
Intel Stratix 10 MX HBM2 IP user guide