Seiko Epson BP-003 Series User manual


BP-003 User's Manual
- i -
Declare
About Trademark
Corporation names and product names are the registered trademarks or commodity
names of the corporation.
*EPSON and ESC/POS are the registered trademarks of Seiko Epson Corporation.
*Windows is a registered trademark of Microsoft Corporation.

BP-003 User's Manual
- ii -
Important Safety Instructions
Read all of these instructions carefully and thoroughly and save them for later reference. The unauthorized
operation may lead to error or accident. Manufacturers have no responsibilities for the problems which are
lead by unauthorized operations.
1. Follow all warnings and instructions in the manual as well as marked on the product.
2. Don’t touch the thermal print head with your hand and other solid object at any moment to avoid your
body burned or the thermal head damaged.
3. Be careful the dentate cutter when you are installing the paper.
4. Unplug this product from the power outlet before cleaning. Do not use liquid or aerosol cleaners. Use a
damp cloth for cleaning.
5. Please don’t use the printer near the water.
6. Slots and opening on the cabinet and the back or bottom are provided for ventilation. To ensure reliable
operation of the product and to protect it from overheating, do not block or cover these openings. The
openings should never be blocked by placing the product on a bed, sofa, rug or other similar surface.
This product should not be placed in a built-in installation unless proper ventilation is provided.
7. Make sure the printer is put on a stable surface and the surrounding is wide enough for paper load and
eject.
8. Be sure to use the specified power source. Connection to an improper power source may cause fire or
shock.
9. The device should far away from the interference received, for example radio or TV interference.
10. Do not locate this product where the cord will be walked on. When the cord or the plug is mangled,
please stop using and get a new one replaced. Make sure the old one is far away from the printer, so it
can avoid someone who does not know the inside story getting damaged.
11. This product should never be placed near or over a radiator or heat origin, and should avoid of direct
sunshine.
12. Never push objects of any kind into this product though cabinet slots as they may touch dangerous
voltage dots or short out parts.
13. Don’t remove the printer’s out-cover and repair the printer. When needed, call or take it to the
professional.
14. Make sure the power is off before connecting or unplugging the power cord and the cables.
15. To ensure safety, please unplug this product prior to leave it unused for an extended period. The wall
outlet you plan to connect to should be nearby and unobstructed.
16. This device complies with Part 15 of the FCC Rules.
Operation is subject to the following two conditions:
(1) This device may not cause harmful interference.
(2) This device must accept any interference received, including interference that may cause undesired
operation.
The manufacturer is not responsible for any radio or TV interference caused by unauthorized
modifications to this equipment. Such modifications could void the user's authority to operate the
equipment.
17. Unplug this product from the power outlet and leave servicing to qualified service personnel under the
following conditions:
A. When the power cord or plug is damaged or frayed.
B. If liquid has been spilled into the product.
C. If the product has been exposed to rain or water.

BP-003 User's Manual
- iii -
D. If the product does not operate normally when the operating instructions are followed.
E. If the product has been dropped or the cabinet has been damaged.
F. If the product exhibits a distinct change in performance, it indicates a need for service.
Warning: In order to ensure the printer life, strictly prohibit printing full line and full black
exceeding 2CM.
Notice: The contents of this manual are subject to change without notice.
*All the parts of the printer can be recycled. When it is abandoned, we can call it back
freely. Please contact us when you abandon it.

BP-003 User's Manual
- iv -
Table of Contents
Declare..........................................................................................................................................................i
Important Safety Instructions ....................................................................................................................ii
Chapter 1 Overview ....................................................................................................................................1
1.1 Features..............................................................................................................................................1
1.2 Product Model Description ..................................................................................................................1
1.3 Main Parts of the Printer......................................................................................................................1
Chapter 2 Installing the Printer..................................................................................................................3
2.1 Unpacking & Checking........................................................................................................................3
2.2 Removing the Protective Materials......................................................................................................3
2.3 Connecting to Your Computer or Other Equipment .............................................................................3
2.3.1 Connecting the Cash Drawer Cable .............................................................................................3
2.3.2 Connecting the Parallel Interface Cable.......................................................................................4
2.3.3 Connecting the USB Interface Cable............................................................................................4
2.3.4 Connecting the Serial Interface Cable ..........................................................................................5
2.3.5 Connecting the Ethernet Interface Cable......................................................................................5
2.4 Connecting the Power Cord ................................................................................................................6
2.5 Installing the Driver and Selecting the Cutter ......................................................................................6
2.6 Installing Bluetooth Interface Driver ....................................................................................................9
2.7 Ethernet Settings...............................................................................................................................12
2.7.1 Connecting Printer......................................................................................................................12
2.7.2 Setting IP Address ......................................................................................................................12
2.8 Wi-Fi Setting......................................................................................................................................15
2.8.1 Connecting the Printer, Using WiFiConfig Software....................................................................15
2.8.2 Detailed Settings ........................................................................................................................15
2.8.3 Checking Wi-Fi Parameters........................................................................................................24
2.9 Installing Printer Network Driver........................................................................................................25
Chapter 3 Control Panel...........................................................................................................................32
3.1 Control Panel ....................................................................................................................................32
3.1.1 LED Indicator..............................................................................................................................32
3.1.2 Button .........................................................................................................................................32
3.2 Self-testPrinting................................................................................................................................32
3.3 Hex Dump Printing ............................................................................................................................33
3.4 Restoring FactoryDefault Settings....................................................................................................33
3.5 Setting Slip Stitch ..............................................................................................................................33
3.6 Online-aptitude Parameter Settings ..................................................................................................33
Chapter 4 Loading Roll Paper..................................................................................................................35
4.1 Installing Steps of Thermal Roll Paper ..............................................................................................35
Chapter 5 Specification............................................................................................................................37
5.1 General Specification ........................................................................................................................37
5.2 Interface Specifications .....................................................................................................................39

BP-003 User's Manual
- v -
5.2.1 Cash Drawer Interface................................................................................................................39
5.2.2 Parallel Interface.........................................................................................................................39
5.2.3 USB Interface .............................................................................................................................40
5.2.4 Serial Interface ...........................................................................................................................40
5.2.5 Ethernet Interface .......................................................................................................................42
5.2.6 Power Supply Inlet......................................................................................................................42
Chapter6 Printer Maintenance.................................................................................................................43
6.1 Cleaning the Printer ..........................................................................................................................43
6.2 Error Message on the Control Panel .................................................................................................43
6.3 Auto-Cutter Jammed or Error ............................................................................................................43
6.4 Contact the Technical Service Center ...............................................................................................44
Chapter 7 Control Commands.................................................................................................................45
7.1 General .............................................................................................................................................45
7.2 Explanation of Terms.........................................................................................................................45
Appendix Commands List .......................................................................................................................58
BP-003 User's Manual
- 1 -
Chapter 1 Overview
1.1 Features
BP-003 printer is a high-speed mini thermal printer. It is a high-quality, high-reliability and low-noise
POS printer without ribbon. It’s small, easily-operated and can be widely used in ECR, PC-POS and
BANK POS for printing a variety of receipt.
1.2 Product Model Description
In order to fulfill different requirements and operating circumstance, manufacturer develops BP-003
series products which are high-speed thermal mini-printers.
According to different data ports (interfaces), BP-003 series can be classified into different models:
BP-003BP, BP-003BR, BP-003BU, BP-003BN, BP-003BT, BP-003BF, BP-003WP, BP-003WU,
BP-003WR, BP-003WN, BP-003WT, and BP-003WF
BP-003 series printer is equipped with an auto cutter which has two options for the consumer to select:
partial cutter can only cut the paper with one point left while full cutter cuts the paper fully.
Interface:
BP-003 series products are configured with a cash drawer interface, you can choose one of the
following data interfaces when purchasing this product:
Model Interface Cable Color
BP-003BP Parallel interface Parallel interface cable Black
BP-003BU USB interface + Serial interface USB interface cable Black
BP-003BR USB interface + Serial interface Serial interface cable Black
BP-003BN USB interface + Ethernet interface Ethernet interface cable Black
BP-003BT USB interface + Bluetooth USB interface cable Black
BP-003BF USB interface + Wi-Fi USB interface cable Black
BP-003WP Parallel interface Parallel interface cable White
BP-003WU USB interface + Serial interface USB interface cable White
BP-003WR USB interface + Serial interface Serial interface cable White
BP-003WN USB interface + Ethernet interface Ethernet interface cable White
BP-003WT USB interface + Bluetooth USB interface cable White
BP-003WF USB interface + Wi-Fi USB interface cable White
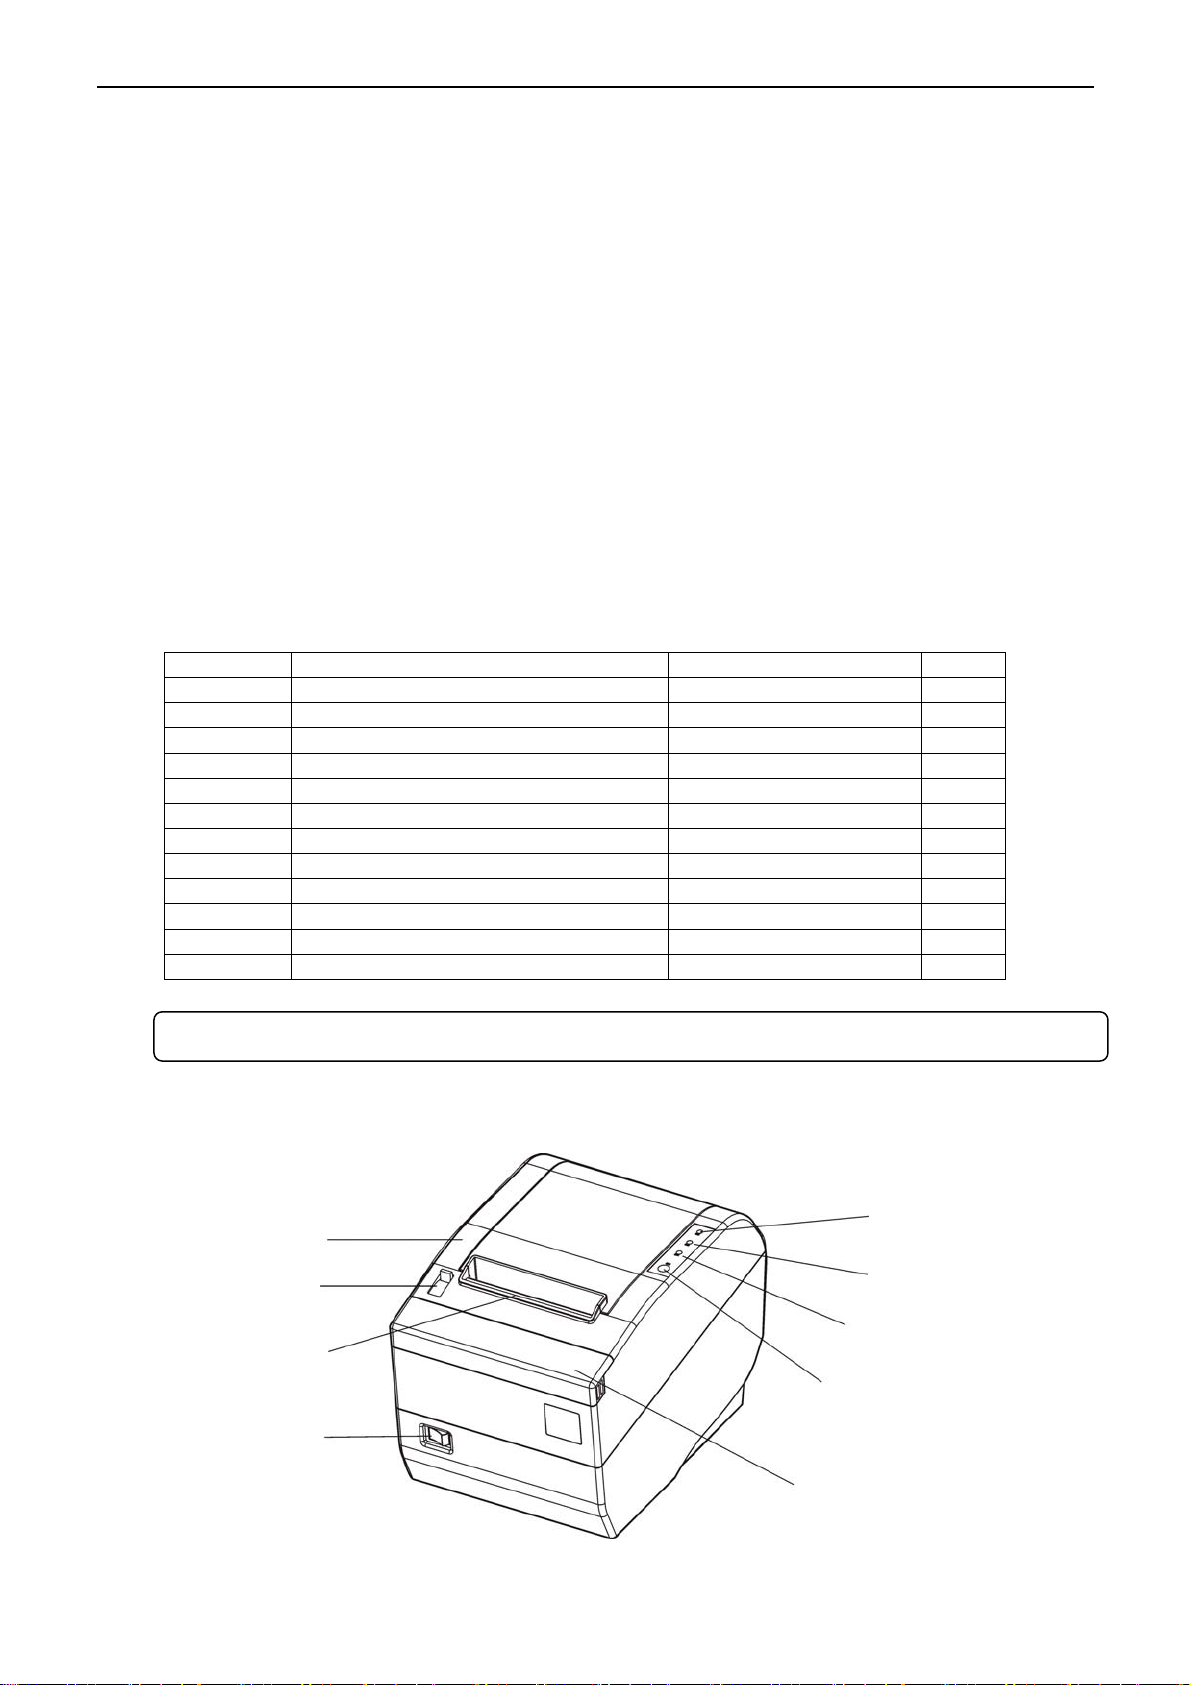
1.3 Main Parts of the Printer
Figure 1-1 Main parts of the printer
Cover-open Button
Power Switch
Power LED
Error LED
Paper out LED
FEED Button
Manual Cutter
Fr
o
n
t
Co
v
er
Upper Cover
Note: Please contact the local dealer to change the interface if needed with added expense.
BP-003 User's Manual
- 2 -
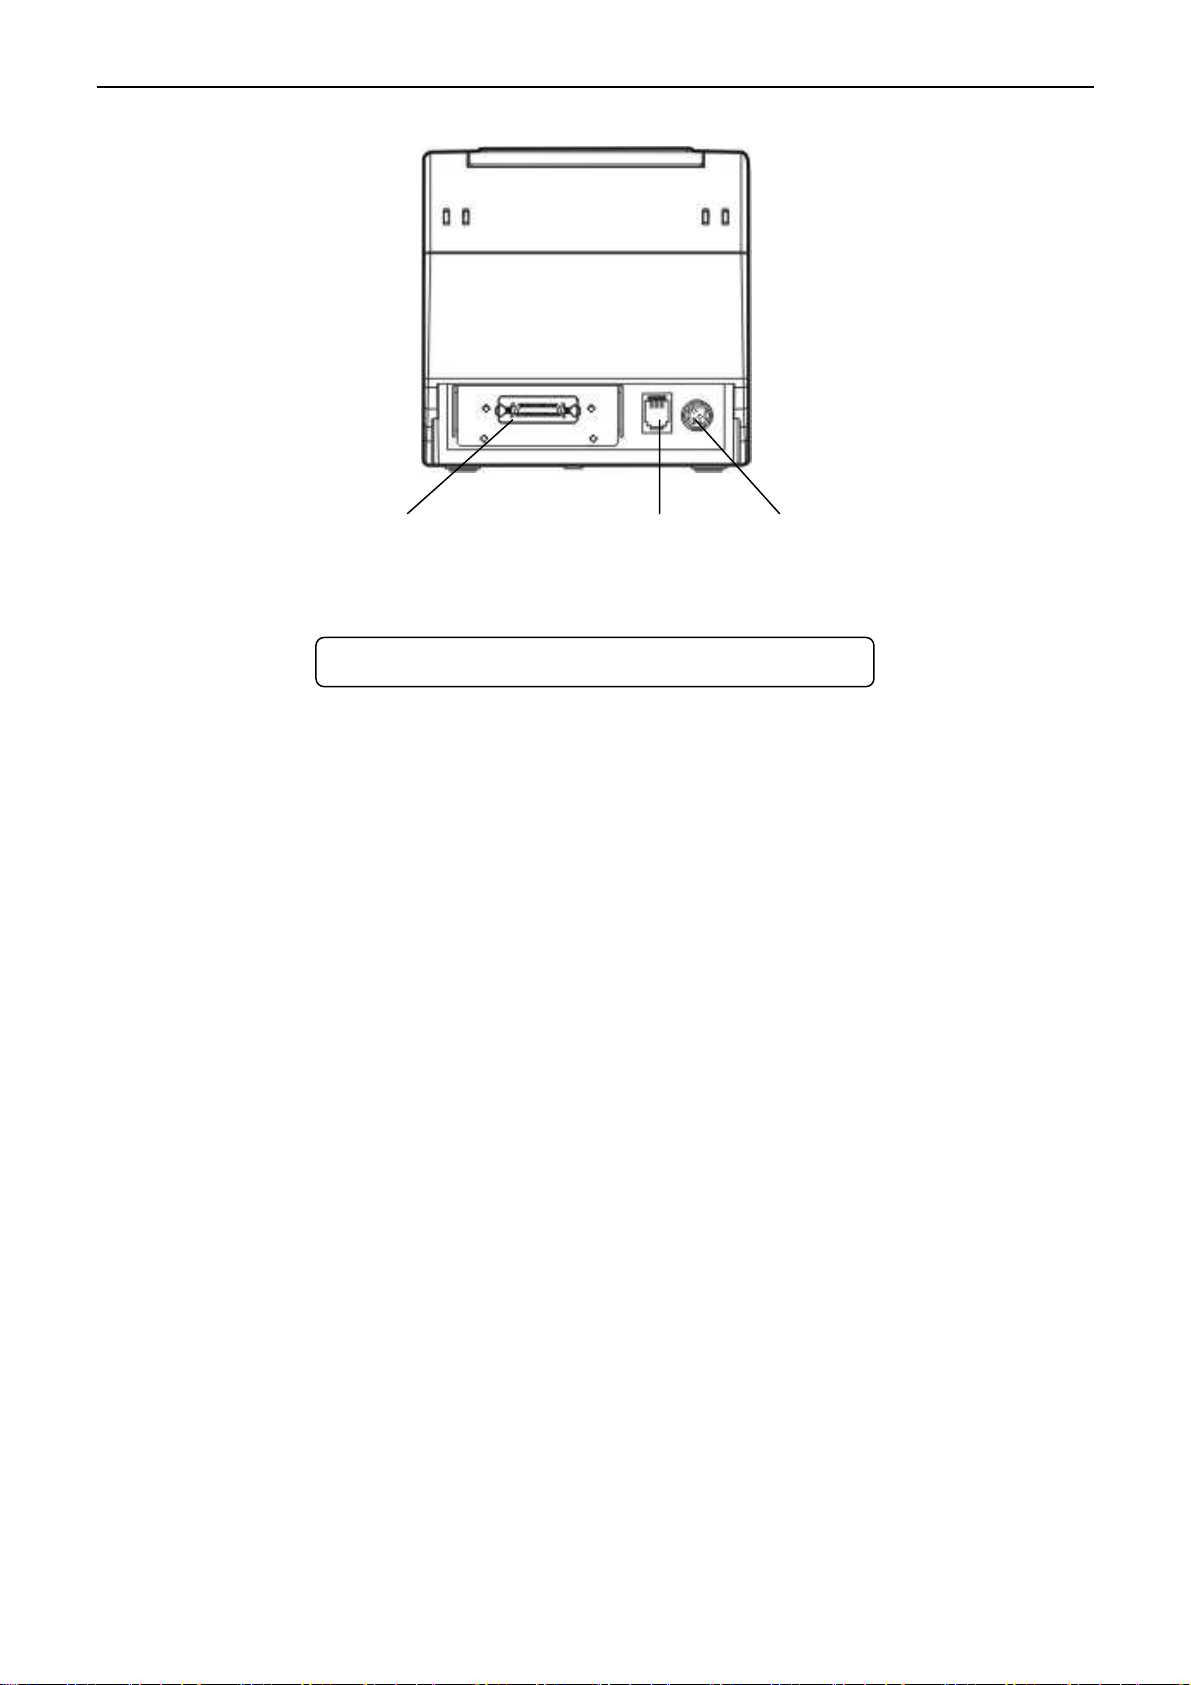
Figure 1-2 Main parts of the printer (Rear)
Data Interface Cash Drawer Interface Power Supply Inlet
Note: Please take the specific interface as standard.

BP-003 User's Manual
- 3 -
Chapter 2 Installing the Printer
2.1 Unpacking & Checking
Check the following items in the package, if any of these items is missing, please contact your dealer.
2.2 Removing the Protective Materials
1. Open the packing box, take out the printer.
2. Save all the original packing materials so that they can be used when transporting the printer.
2.3 Connecting to Your Computer or Other Equipment
The printer is configured with a cash drawer interface and one data interface (parallel interface, USB
interface, serial interface + USB interface, Ethernet interface + USB interface, USB interface + Bluetooth
or USB interface + Wi-Fi). (Please take the specific interface as standard) Connect the printer to your
computer with the correct cable.
2.3.1 Connecting the Cash Drawer Cable
Turn off the printer and plug the cash drawer cable into the cash drawer interface on the back of the
printer and the other end to the cash drawer, as shown in Figure 2-2.
Figure 2-1 Packing items
Driver CD
(Including User's Manual and Driver)
Printer
A
C Adapte
r
Power Cord Interface Cable (Optional)
Note: Before connecting or disconnecting the cash drawer cable, parallel interface cable or
serial interface cable, make sure that the power of the printer is turned off. Also make
sure the power cable plug is disconnected from the AC outlet. Or else it may damage
the printer.
Note: 1. Models with Bluetooth and Wi-Fi are not equipped with interface cable.
2. The interface cable is optional, which will be equipped by the customer’s request.

BP-003 User's Manual
- 4 -
2.3.2 Connecting the Parallel Interface Cable
1. Make sure the computer and the printer are both turned off, connect the parallel interface cable to
the connector of the printer, Squeeze the wire clips on both sides and make the cable fixed. As
shown in Figure 2-3.
2. Connect the other end of the cable to the computer. Tighten the screws on both sides and make the
cable fixed.
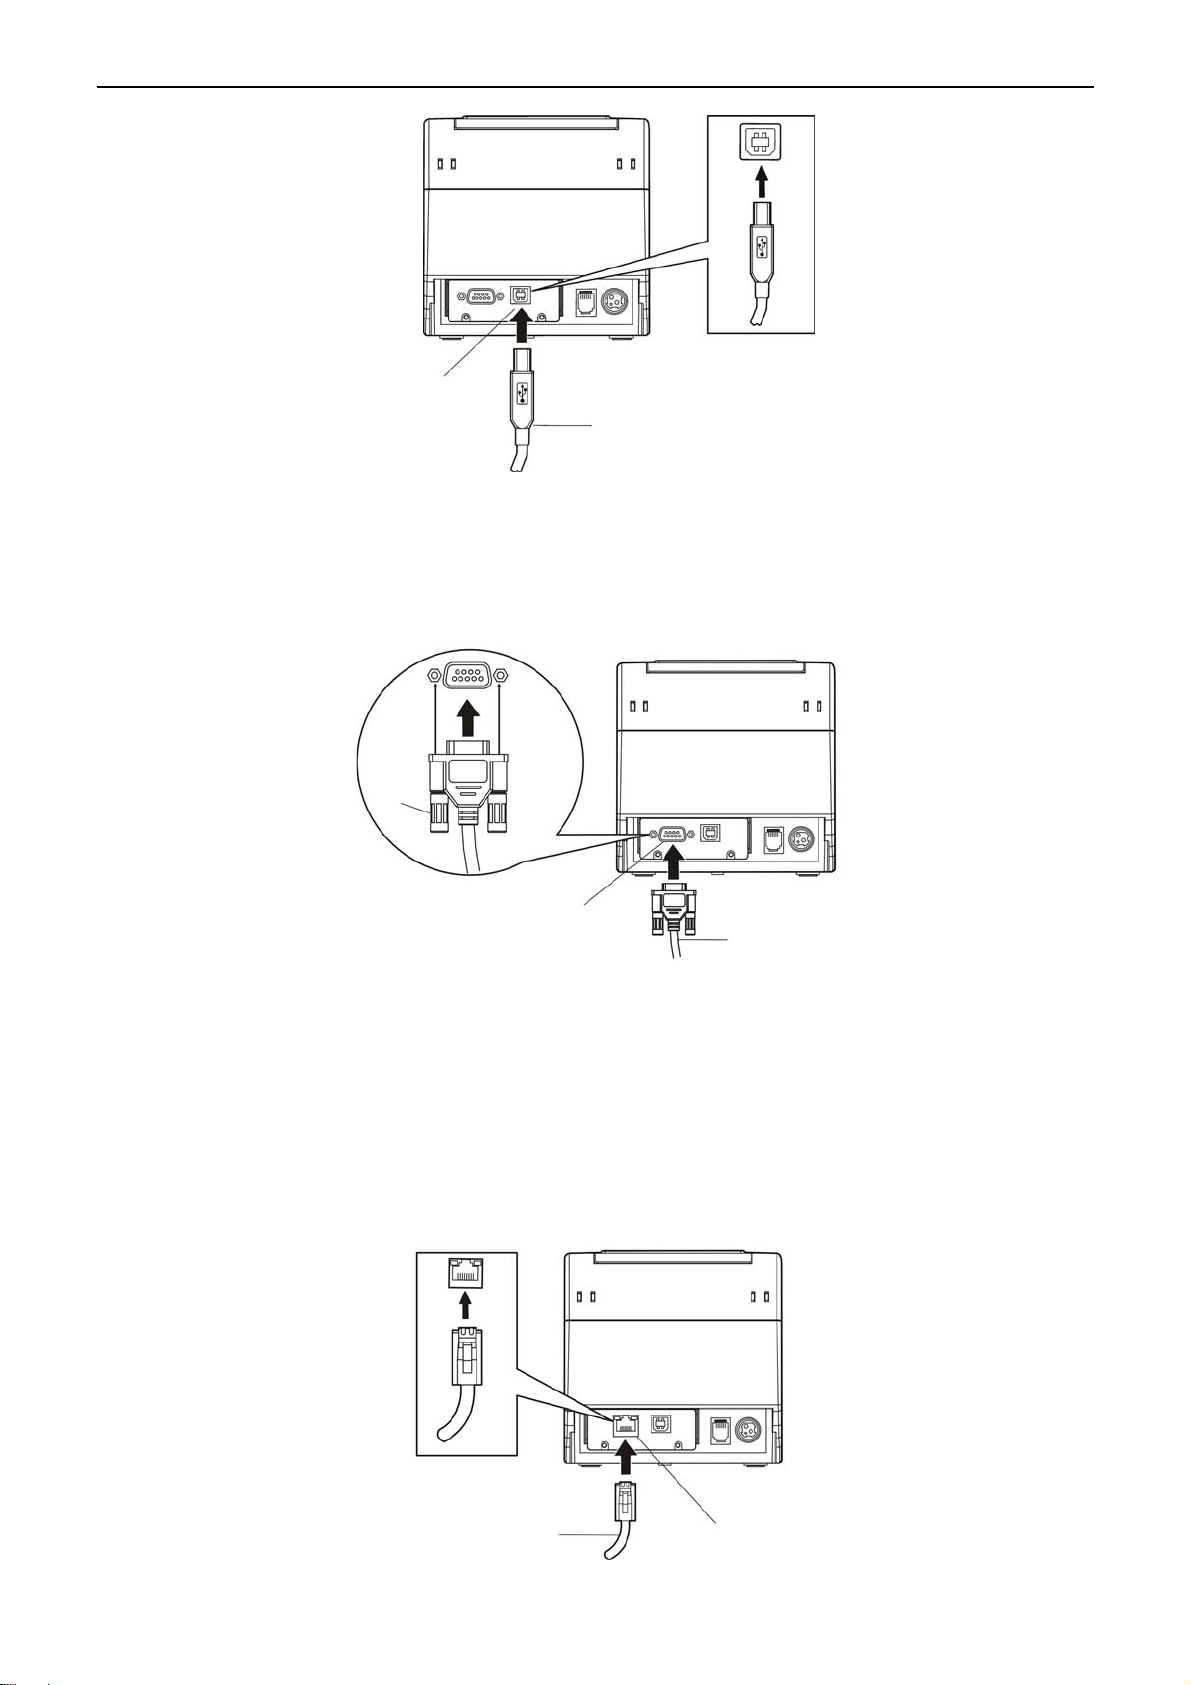
2.3.3 Connecting the USB Interface Cable
1. Plug the USB cable A end (flat shape) into the computer's USB interface.
2. Plug the USB cable B end (square shape) into the printer's USB interface as shown in Figure 2-4.
Figure 2-3 Connecting the parallel interface cable
Parallel Interface Parallel Interface Cable
Wire Clips
Figure 2-2 Connecting the cash drawer cable
Cash Drawer Cable
Cash Drawer Interface
Caution: Please use the appropriate cash drawer. Manufacturer will not honor warranty
when usin
g
unauthorized cash drawer.
Note: Please don't impact the plug after connecting USB interface cable.
BP-003 User's Manual
- 5 -
2.3.4 Connecting the Serial Interface Cable
1. Make sure the computer and the printer are both turned off, connect the serial interface cable to the
connector of the printer. Tighten the screws and make the cable fixed. As shown in Figure 2-5.
2. Connect the other end of the cable to the host's serial interface. Tighten the screws on both sides
and make the cable fixed.
2.3.5 Connecting the Ethernet Interface Cable
1. Plug the crystal end of the Ethernet interface cable (RJ-45) into the printer's Ethernet interface as
shown in Figure 2-6.
2. Plug the other end of the Ethernet interface cable into the LAN’s entrance.
Figure 2-5 Connecting the serial interface cable
Figure 2-4 Connecting the USB interface cable
Figure 2-6 Connecting the Ethernet interface cable
USB Interface
USB Interface Cable
Serial Interface Serial Interface Cable
Screws
Ethernet Interface Cable Ethernet Interface
BP-003 User's Manual
- 6 -
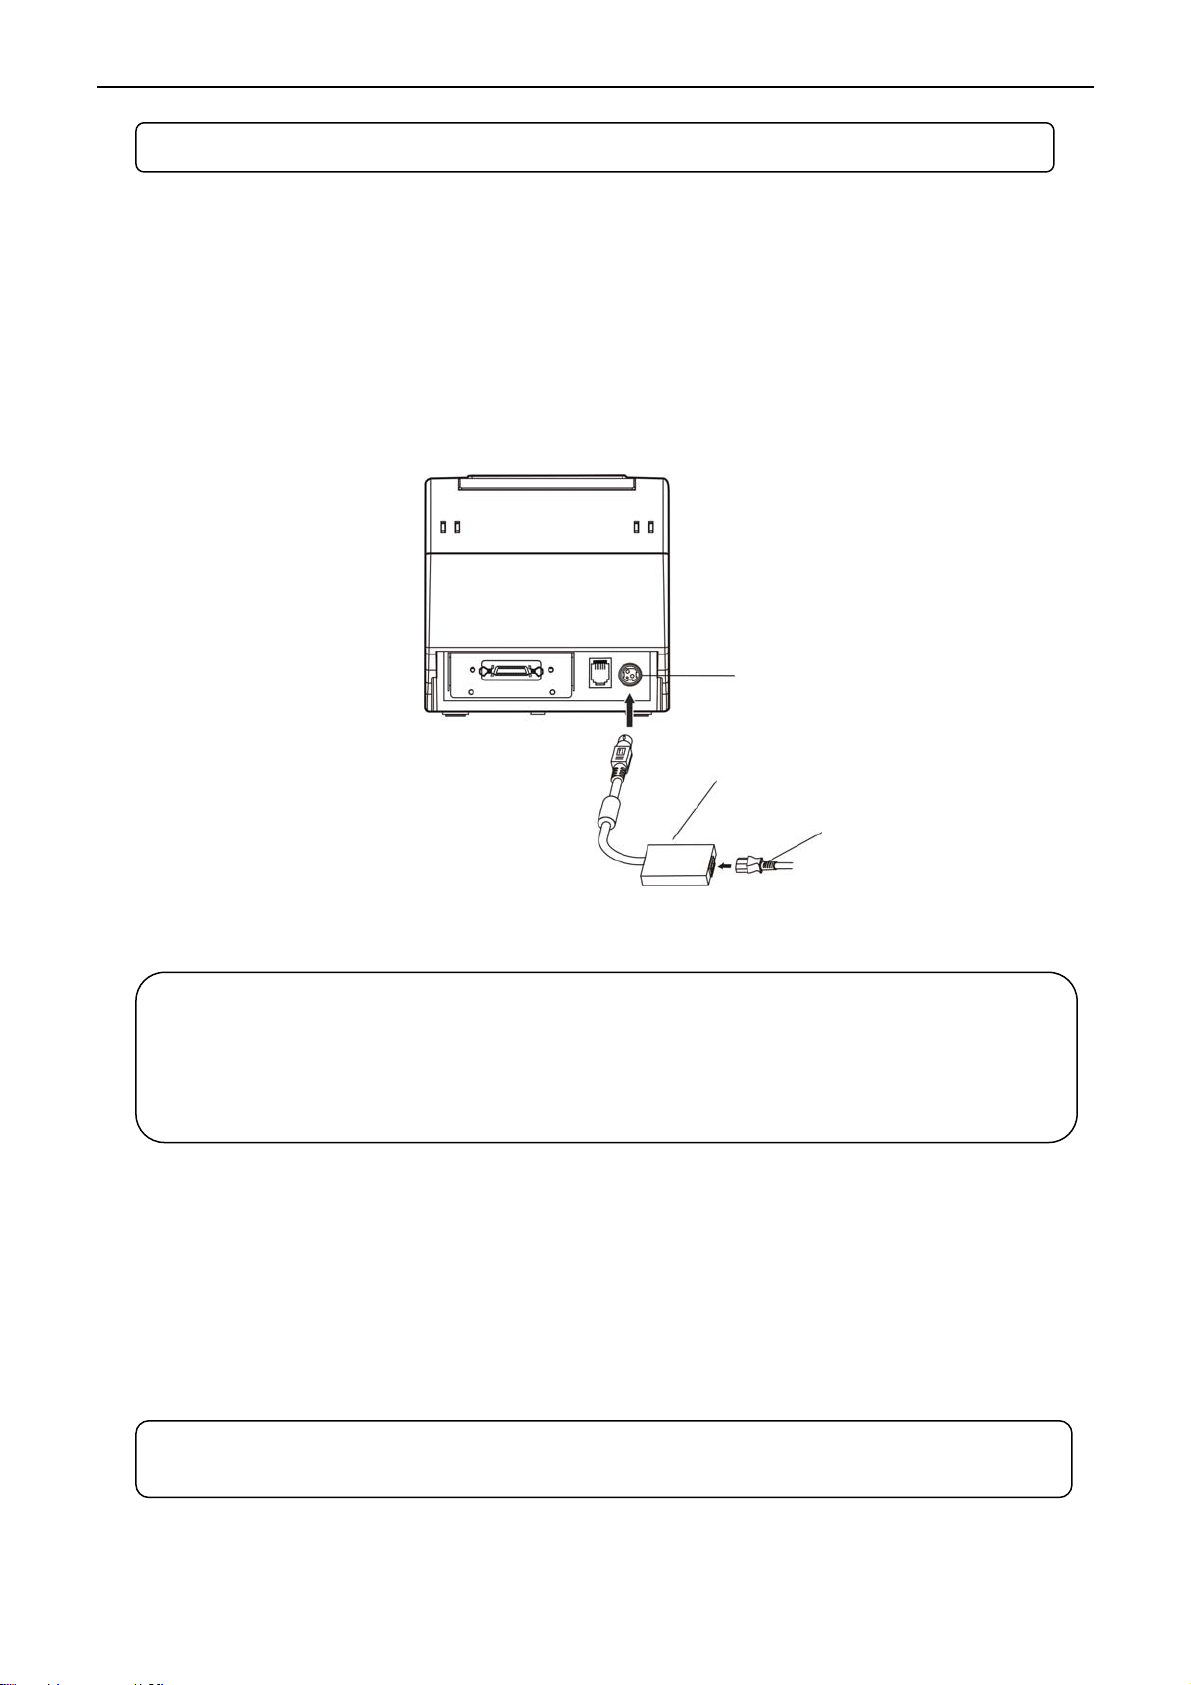
Power Supply Inlet
AC Adapter
Power Cord
2.4 Connecting the Power Cord
1. Make sure the printer’s power is turned off. (The pressed down side on the switch with “O” mark
denotes the printer is off).
2. Make sure the voltage of the electrical outlet matches that of the AC adapter.
3. Plug the AC adapter into the printer’s power supply inlet.
4. Plug one end of power cord into the AC adapter, and then plug the other end into the grounded
electrical outlet.
2.5 Installing the Driver and Selecting the Cutter
You should setup the printer driver in Windows before using the BP-003 printer.
Please use the cable to connect computer with printer, then turn on the computer and the printer, put
the driver CD into the CD-ROM. Install driver by the following ways:
Auto-installing way
Double click the file “Setup.exe” in the driver disc, install driver by the following direct.
Hand operated installing way
Figure 2-7 Connecting the AC adapter
Note: Please refer to the user's manual for the detailed instructions of network settings.
Caution: 1. If the rated voltage doesn't match the outlet voltage, contact your dealer for
assistance. Do not plug in the power cord.
2. Please use the electrical outlet connecting the ground properly.
3. Please use original AC adapter only. Manufacturer will not honor warranty
when using unauthorized AC adapter.
Note: Auto-install way needs the operation systems of Windows 2000 and above and the
operation systems of Window 98/ME and below are not supported.

BP-003 User's Manual
- 7 -
1) The installing steps of parallel interface for Windows 2000/XP/Vista are as follows:
1. Click “Start” →“Settings” →“Select Printers”.
2. Click “Add Printer”, then a window of “Add Printer Wizard” pops up, click “Next”, then please read
the select guide carefully, such as, select “Local printer” in the “Local or Network Printer” window,
then click “Next”.
3. A window of “Select a Printer Port” pops up, select “LPT1: (Recommended Printer Port)”, (If you
need to use other ports, please select the respective port), click “Next”.
4. A window of “Install Printer Software" pops up, click “Have Disk...”, click “Next”.
5. A window of “Install From Disk” pops up. Please according to the operating system environment,
you should select the path as follow: CD-ROM →“Drivers” →“WIN2000 (XP-Vista-Win7)”, click
“Open”, then click “OK” to return to the window of “Install Printer Software”, click “Next”.
6. Follow the guide click “Next” gradually till the installation is finished.
2) The installing steps of parallel interface for Windows 7 are as follows:
1. Click “Start” →“Device and Printers”.
2. Click “Add Printer”, then it pops up a window of “Add Printer Wizard”, click “Next”, then please read
the select guide carefully, such as, select “Local printer” in the “Local or Network Printer” window,
then click “Next”.
3. A window of “Select a Printer Port” pops up, select a usable port. Such as, select “LPT1:
(Recommended Printer Port)”, (If you need to use other ports, please select the respective port),
click “Next”.
4. A window of “Install Printer Driver” pops up, click “Have Disk...”, click “Next”.
5. A window of “Install From Disk” pops up. Please select the path as follow: CD-ROM →“Drivers”
→“WIN2000 (XP-Vista-Win7)”, click “Open”, then click “OK” to return to the window of “Install
Printer Driver”, click “Next”.
6. Follow the guide click “Next” gradually till the installation is finished.
The USB interface installing steps for Windows 2000/XP/Vista/Win7 are as follows:
The following steps are used Windows XP as an example. There are slight differences among different
operating systems.
1. Connect the printer to computer with the USB cable and turn on the printer. After the computer find
out new hardware, a window of “Found New Hardware” pops up—“Welcome to Found New
Hardware Wizard”
2. Choose “Install from a list or specific location (Advanced)”, click “Next”.
3. A window of “Please choose your search and installation options” pops up, choose “Don't search, I
will choose the driver to install”, click “Next”.
4. A window of “Add Printer Wizard” pops up, click “Have Disk...”.
5. A window of “Install From Disk” pops up. Please according to the operating system environment, you
should select the path as follow: CD-ROM →“Drivers” →“WIN2000 (XP-Vista-Win7)”, click “Open”,
then click “OK” to return to the window of “Add Printer Wizard", click “Next”.
6. Follow the guide click “Next” gradually till the installation is finished.
The installing steps for Windows 98 are as follows:
(1) The installing steps with a parallel interface cable or a serial interface cable:
1. Click “Start” →“Settings” →“Printers”.
Note: The hand-operated installing ways of serial interface and parallel interface are the
same.

BP-003 User's Manual
- 8 -
2. Double click “Add Printer”, then a window of “Add Printer Wizard” pops up, select “Local printer” in
the “Local or Network Printer” window, then click “Next”.
3. A window of “Click the manufacturer and model of your printer” pops up, click “Have Disk...”, please
click “Browse”, select the path as follow: CD-ROM →“Drivers” →“WIN98 (WINME)”, then click
“OK”.
4. A window of “Install From Disk” pops up, click "OK, return to a window of “Add Printer Wizard”, then
click "Next".
5. A window of “Printer port” pops up, select “Available ports”, such as, select “LPT1: Printer Port”, click
“Next”, and then show the printer’s name. If you do not have any other printer driver installed, then
this printer driver will be set as the default one by the system, click “Finish”. Otherwise according to
prompt, choose the printer is default: “Yes”, click “Next”, choose “Yes-(recommended)”, click
“Finish”. A window of “Printer test page completed” pops up, click “Yes”.
6. The printer driver process is installed successfully.
(2) The installing steps with the USB interface cable:
USB driver installing steps:
1. Connect the USB cable and turn on the printer.
2. After the computer find out new hardware and finish searching, a window of “Add New Hardware
Wizard” pops up, click “Next”.
3. A window of “Add New Hardware Wizard” — “Windows operation” pops up, choose “Search the best
driver for the device (recommended)”, and click “Next”.
4. A window of “Search for new drivers” pops up, check “Specify a location”, click “Browse”, select the
path as follows: CD →ROM →“Drivers”-“[WIN98 (WINME) \ USBdriver[”, then click “OK”.
5. Return to a window of “Add New Hardware Wizard”, click “Next”; a window of “Windows driver file
search for the device” pops up, click “Next”.
6. After the system finishing installing the file automatically, a window of “USB Print Supported” pops up,
click "Finish".
7. The printer USB driver process is installed successfully.
USB printer driver installing steps:
1. Click “Start” →“Settings” →“Printers”.
2. Click “Add Printer”, then a window of “Add Printer Wizard” pops up, click “Next”.
3. A window of “Click the manufacturer and model of your printer” pops up, click “Have Disk...”, please
click “Browse”, select the path as follow CD-ROM →“Drivers” →“WIN98 (WINME)”, and then click
“OK”.
4. A window of “Install From Disk” pops up, click “OK”, return to a window of “Add Printer Wizard”, then
click "Next".
5. A window of “Printer port” pops up, select “Available ports”, select “JMUSB”, click "Next", and then
show the printer’s name. If you do not have any other printer driver installed, then this printer driver
will be set as the default one by the system, click “Finish”. Otherwise according to prompt, choose the
printer is default: "Yes", click "Next" choose “Yes-(recommended)”, click “Finish”. A window of “Printer
test page completed” pops up, click “Yes”.
6. The printer driver process is installed successfully.
Note: 1. As the system of Windows 98/ME doesn’t have integrated USB driver control,
please install USB driver before using USB interface printing. Then install USB
printer driver.
2. If it has installed the USB driver, please install the USB printer driver directly as
the following steps.

BP-003 User's Manual
- 9 -
Please setup the driver following the setup description in the CD going along with the printer. What’s
more, you can use the TM-T88II, TM-T88III series driver from EPSON.
If you want to cut the paper after printing, please select the “Full cut” or “Partial cut” in the
Paper/Quality page after clicking the “Printing Preferences” button, which lies in the “General” page of
the driver properties. Referring figure is shown below.
It is noted that if paper cut effect is the same whichever you select “full cut” or “partial cut” in the driver
properties, which means that the cutter (the printer equipped with) can only carry out one kind of
cut-methods.
2.6 Installing Bluetooth Interface Driver
1. Choose the appropriate Bluetooth adapter, the operation system is Window XP or above which with
Bluetooth adapter driver.
2. Turn on the printer, search Bluetooth device in Window XP system, and click “Add”.
Note: Select to install this driver according to the chosen model.

BP-003 User's Manual
- 10 -
3. Tick off the option of “My device is set up and ready to be found.” Click “Next” to continue.

BP-003 User's Manual
- 11 -
4. Select the “BP-003”, and then click “Next”.
5. Tick off the option of “Let me choose my own passkey” and enter “1234” as shown, then click “Next”.
6. Record the Outgoing COM port and click “Finish”, then reboot the computer.
BP-003

BP-003 User's Manual
- 12 -
7. Set the printer driver print port as the outgoing port and the installation is finished.
2.7 Ethernet Settings
2.7.1 Connecting Printer
Power on the printer, connect with the Ethernet interface cable which has been connected to LAN, and
look into the information of Ethernet LED indicator to ensure the printer has entered the normal
connection.
2.7.2 Setting IP Address
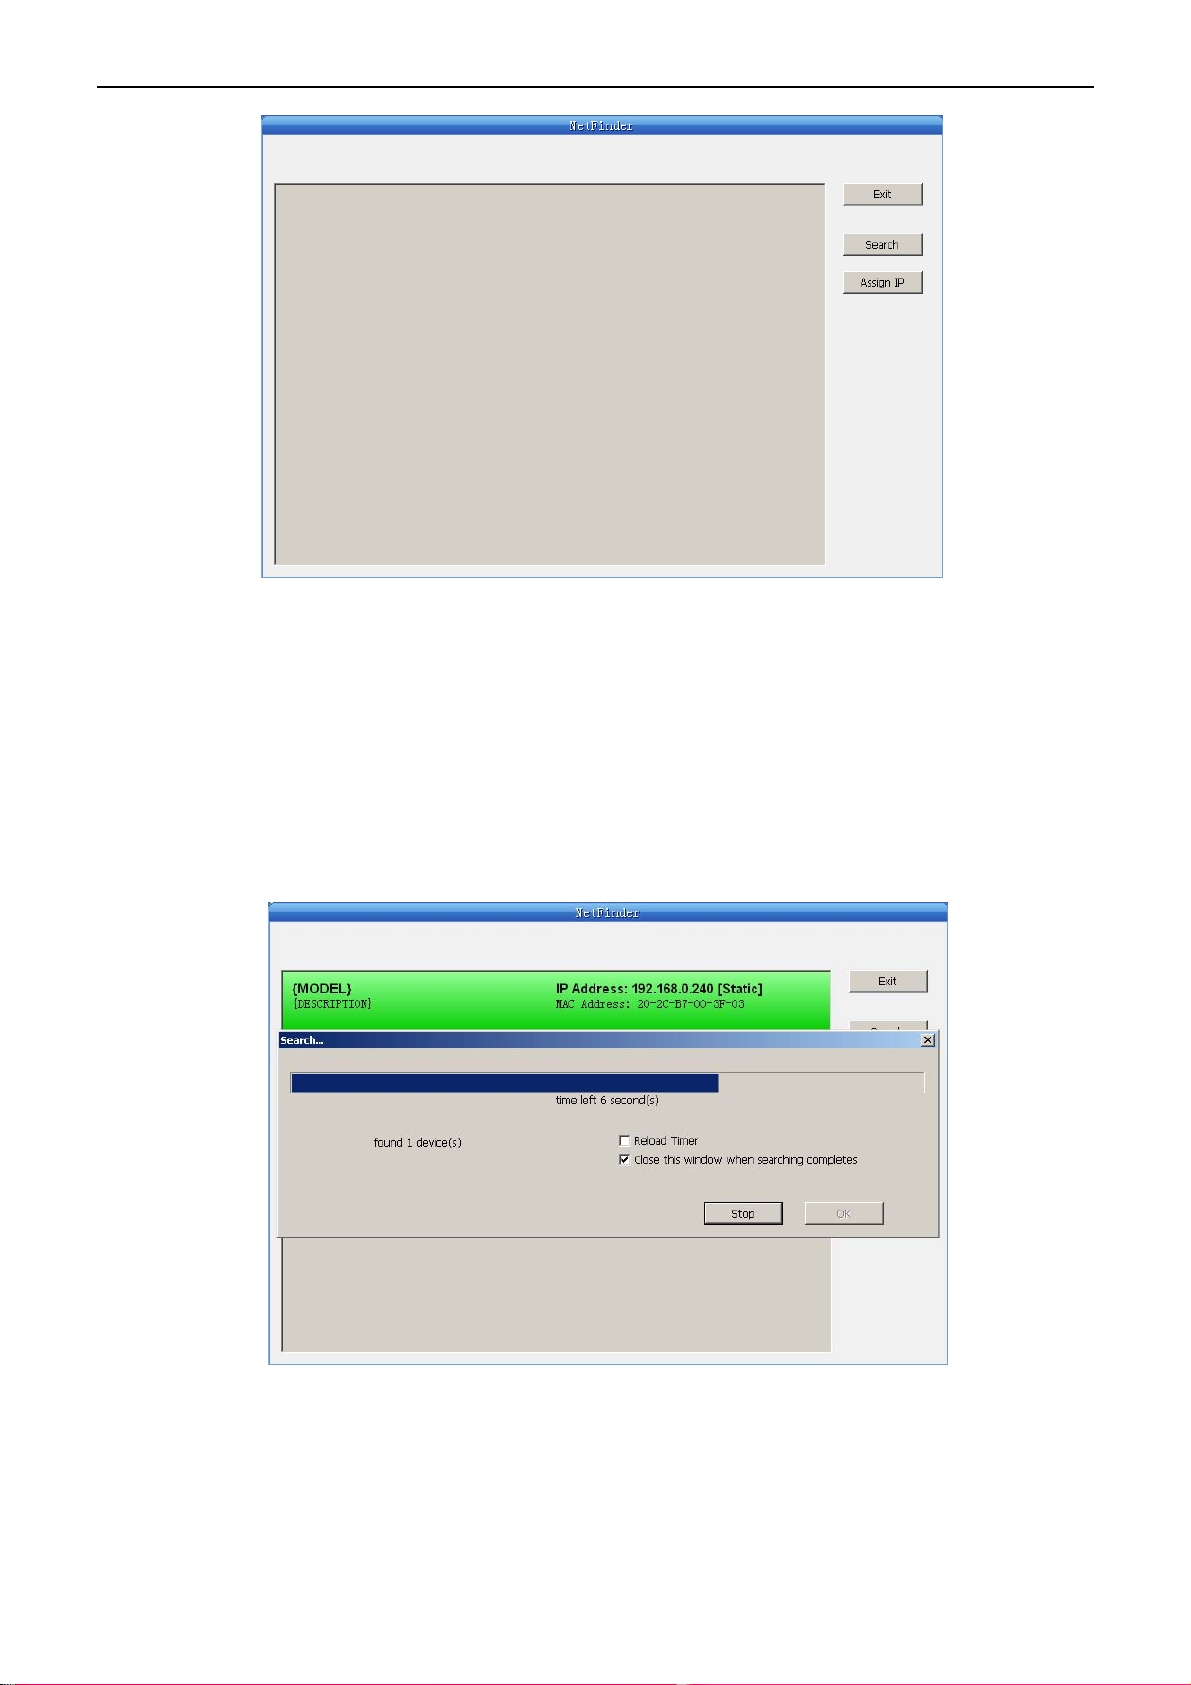
1. Run NetFinder Software
Double click NetFinder.exe in the PC which connects the printer in the same LAN. The figure of the
software is shown as follows:
Yellow LED Green LED Description
ON Blink Online
OFF OFF Offline
Note: Every Bluetooth device has its own address. Please reinstall it when replacing the
Bluetooth device.
Caution: The network printing function needs the operating systems of Windows2000 or
above and the o
p
eratin
g
s
y
stems of Window 98/ME and below are not su
pp
orted.
BP-003 User's Manual
- 13 -
Button description:
Exit — Exit from the software
Search — Search printers in the same LAN
Assign IP — Modify the IP address and other settings for the specified printer.
2. Search Printer
Click “Search” button in the main interface, the dialogue box appearing will begin searching
automatically and displays the status, listing a printer in the main interface if found. The time is
counting down in the progress bar (10s in total) and the search will finish as soon as the time is over.
If you need to go on searching, press “Search” button again.
If the printer still can not be found out when the network connection is correct in the same network,
Please check whether the network fire wall on the PC is open or not. If there is fire wall, please close it
temporarily; open it again after finishing searching and setting a printer completely.
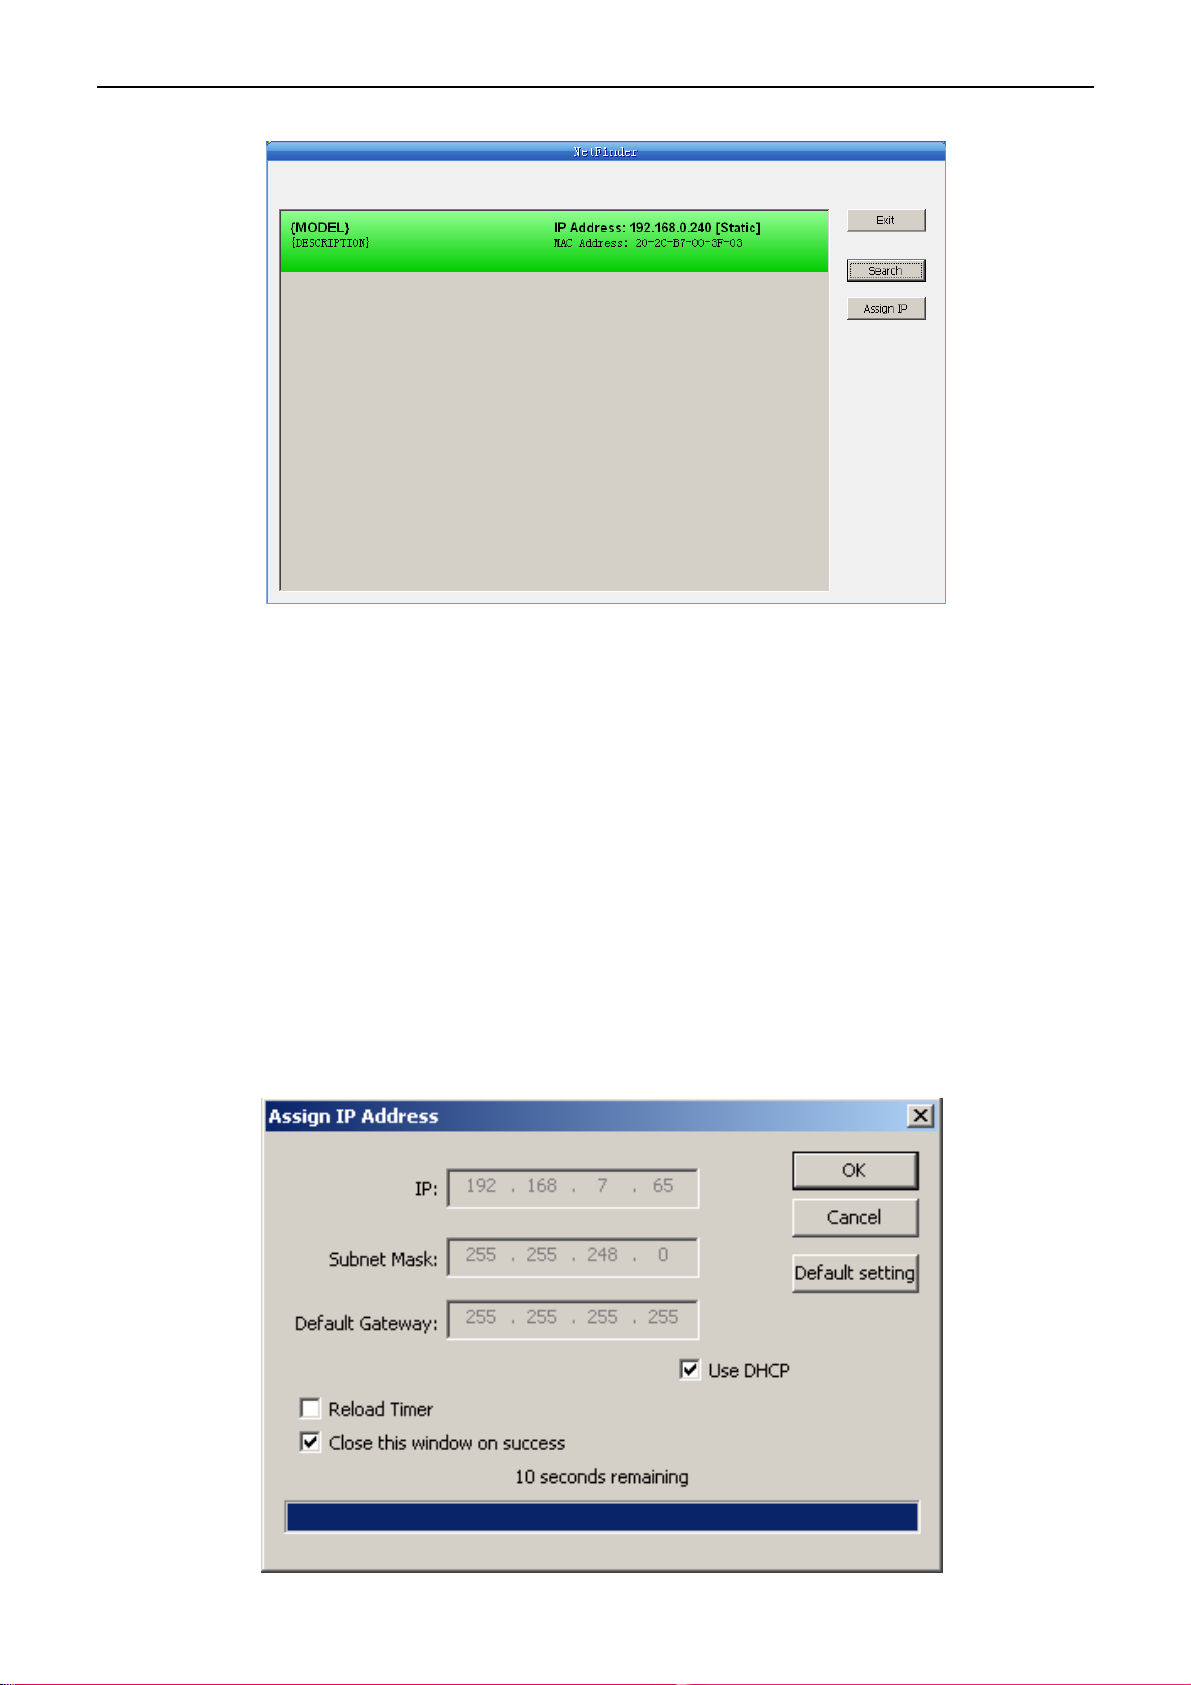
3. Setting printer's IP address
The printer’s information is listed in the main interface, the left side of which is the model and
description and the right is the IP and MAC address. What’s more, the assign mode (dynamic/static)
BP-003 User's Manual
- 14 -
is noted behind the IP address.
1) Correlative description for IP address settings
In order to search and set printer’s IP address conveniently for the first time, the factory default
setting is DHCP mode which assigns IP address dynamically. If there is no DHCP server in the
connected LAN and printer is set to DHCP mode as well, then it will use the internal pre-set address
(IP: 10.0.0.1, Subnet Mask: 255.255.255.0) automatically.
It is suggested that printer’s IP set to static in actual usage, which can cut down the time when
initializing the Ethernet interface as the printer is turned on and prevent IP conflicts (The dynamic
address used in printer may conflict with another one). The network segment part of the IP address
and Subnet Mask must be the same as those of PC connecting with a printer. For example, the
address of working PC is 192.168.0.1/255.255.255.0 (IP/Subnet Mask), then which of printer
should be set to 192.168.0.x/255.255.255.0(x=2~254 and should avoid the IP in used. It is not
restricted for NetFinder to search printers in the same network but different segment parts (can not
stride gateway). Relative glossary of IP address may refer to corresponding information.
2) Setting printer’s IP address
Select the printer information to be modified (black frame appears), click “Assign IP” button. Set the
IP in the dialogue box appearing.
This manual suits for next models
12
Table of contents
Other Seiko Epson Printer manuals


