Selva FP User manual

0514 466-527-7 DEF
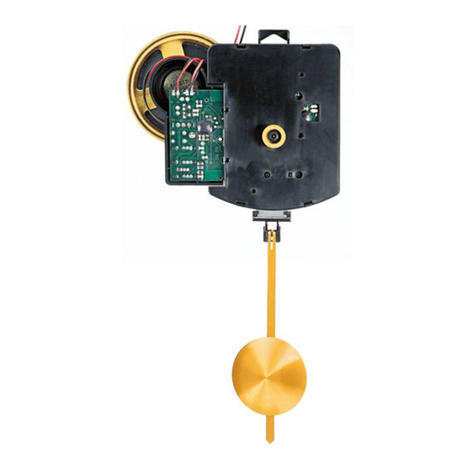
D SELVA Funkpendelwerk »FP«
Das Uhrwerk einbauen
1 – Das Uhrwerk (1) – Zeigerwerk nach oben – flach auf den Werk-
tisch legen. Den Sicherungsstift noch nicht entfernen!
2 – Die Zentralschraube (4) von vorne durch das vorgesehene
Zifferblatt/Uhrgehäuse (3) stecken. Die Einschraubtiefe der Zentral-
schraube (4) sollte ca. 2–3 mm betragen. Eine oder evtl. mehrere
Gummi-Unterlegscheiben (2) beilegen.
3 – Das Zifferblatt/Uhrgehäuse (3) mit Zentralschraube (4) auf das
Uhrwerk (1) setzen. Die Zentralschraube (4) in die Gewindebohrung
des Uhrwerks (1) drehen.
4 – Das Zifferblatt/Uhrgehäuse (3) so ausrichten,
dass die »12«-Position mit den Kanten des Uhrwerks (1) fluchtet.
Die Zentralschraube (4) endgültig festziehen.
5 – Die drei Zeiger (5/6/7) nun jeweils so auf ihre Wellen stecken,
dass sie genau auf die »12« zeigen.
6 – Sicherstellen, dass die Zeiger weder auf dem Zifferblatt streifen
noch sich gegenseitig berühren können.
7 – Den Sicherungsstift entfernen.
8 – Zwei 1,5-V-Alkali-Manganzellen (LR 6) seitenrichtig einlegen,
um die Uhr zu starten. Die Zeiger bewegen sich vollautomatisch erst
auf die 4-Uhr-Position (Stillstand 2 min) und dann – nach Empfang
eines »Zeittelegramms« und dessen interner Verarbeitung innerhalb
von 2 bis max. 10 Minuten – auf die aktuelle Tageszeit. Sollte die Uhr
keinen erfolgreichen Empfang haben, bitte nach ca. 2 Stunden einen
erneuten Versuch starten. Dazu die rechte Batterie (von hinten gesehen)
für ca. 1 Minute entfernen und anschließend wieder einlegen.
9 – Das Uhrwerk unternimmt jede volle Stunde einen Empfangs-
versuch bzw. Zeitvergleich mit dem Sender. Eventuell notwendige
Zeigerstandskorrekturen finden einmal täglich zwischen 3.00 und
4.00 Uhr morgens statt.
Batteriewechsel
1 – Das Uhrwerk zeigt an, wenn die Batterien erneuert werden
sollten: der Sekundenzeiger bewegt sich dann im Doppelschritt.
2 – Die Batterien umgehend durch frische 1,5-V-Alkali-Mangan-
Mignonzellen (LR 6) ersetzen. Dabei die rechte Batterie (s. a.
Pkt. 8) erst kurz seitenverkehrt, dann seitenrichtig einsetzen.
3 – Die Zeiger bewegen sich nun auf die 4-, 8- oder 12-Stellung,
das Uhrwerk geht auf Empfang und nach 2 bis max. 10 Minuten wird
die korrekte Tageszeit angezeigt.
Störfall und Maßnahmen
Die folgenden Störquellen können Empfangsprobleme verursachen:
– nicht funkentstörte Haushaltsgeräte.
– Fernsehgeräte im Abstand von weniger als 2 m.
– Maschinen mit HF-Streufeldern.
– Topografische und meteorologische Verhältnisse, wenn die
Entfernung zum Senderort Mainflingen bei Frankfurt mehr
als ca. 1.000 km beträgt.
Fehler: Die Zeiger bewegen sich nach Einlegen der Batterien nicht
und stellen sich nicht auf die aktuelle Zeit ein, weil die Uhr inner-
halb von 10 Minuten nach Einlegen der Batterien kein Zeittelegramm
empfangen konnte.
GB SELVA Radio-Controlled
Movement »FP«
Installing The Movement
1 – Place the movement (1) – handshaft up – onto the work surface.
Do not yet remove the safety pin!
2 – Push the center mounting screw (4) through the dial/case front (3).
The screw depth of the center mounting screw (4) should be approx.
2–3 mm. Add one or two rubber washer (2).
3 – Set the dial/case front (3) with center mounting screw (4) onto
the movement (1). Screw the mounting screw (4) into the threaded
sleeve of movement (1).
4 – Adjust the dial/case front (3) so that the 12 o’clock position is in
line with the movement’s edges. Tighten the center mounting screw (4).
5 – Set the three hands (5/6/7) onto their shafts so that they all point
exactly to the »12«.
6 – Make sure that the hands will neither interfere with the dial nor
with each other.
7 – Remove the safety pin.
8 – Insert two 1.5V alkaline batteries (AA) to start the movement.
The hands will automatically move to the 4 o’clock position, pause
for 2 min and then – after receipt of a »time telegram« and its
internal processing within 2 to max. 10 min – will set themselves to
the exact time of day. If the time signal reception is not successful,
please try again after a time interval of approx. two hours.
To restart, remove the right-hand battery (viewed from the rear) for
approx. 1 min, then re-insert.
9 – Every full hour, the movement receives and compares time
signals from the transmitter. Any necessary corrections are made
between 3 and 4 AM.
Battery Change
1 – The movement indicates when the batteries should be renewed:
The second hand moves in double-steps.
2 – Replace the batteries immediately with fresh 1.5V alkaline
cells (AA). Insert the right-hand battery upside down for a second
(see Pos. 8 above), then install it correctly.
3 – The hands now move to the 4-, 8- or 12-position, the movement
goes into the reception mode and, within 2 to 10 min, the correct
time of day is shown.
Problems and Solutions
The following sources of interference can cause poor signal reception:
– Unshielded household appliances.
– TV sets within 2 meters of the clock.
– Machines or appliances with high-frequency leakage.
– Topographical and meteorological conditions if the distance
from Frankfurt, Germany, is greater than 1,000 kms.
Problem: After fitting the batteries, the clock hands do not move
to the correct time since the movement did not receive a time tele-
gram within 10 minutes after inserting the batteries.
1 – Check battery current, contacts and polarity.
2 – Relocate the clock – perhaps closer to a window.
F Mouvement de balancier radio-piloté
« FP » SELVA
Insérer le mouvement
1 – Poser le mouvement (1) à plat – minuterie vers le haut – sur la
surface de travail. Ne pas encore enlever la goupille de maintien !
2 – Insérer la vis centrale (4) depuis le devant dans le cadran / boîtier
(3) prévu. Le filetage de la vis centrale (4) devrait être d’env. 2–3 mm.
Mettre éventuellement une ou plusieurs rondelle(s) en caoutchouc (2).
3 – Poser le cadran / boîtier (3) avec la vis centrale (4) sur le
mouvement (1). Visser la vis centrale dans le trou fileté du mouve-
ment (1).
4–Centrer le cadran / boîtier (3) de sorte que le « 12 » s’aligne
avec le bord du mouvement (1). Serrer définitivement la vis
centrale (4).
5 – Mettre les trois aiguilles (5/6/7) sur leur arbre de sorte qu’elles
indiquent exactement sur le « 12 ».
6 – Vérifier que les aiguilles ne butent contre aucun obstacle ou ne
se touchent pas entre elles.
7 – Enlever la goupille de maintien.
8 – Insérer correctement deux piles alcali-manganèse 1,5 volts
(LR 6) pour mettre le mouvement en marche. Les aiguilles se
déplacent d’abord automatiquement vers la position « 04 h 00 » (arrêt
2 minutes), puis – après réception d’un « télégramme horaire » et de
son traitement interne – elles se positionnent sur l’heure exacte
(après environ 2 à 10 minutes). S’il n’y a pas eu de réception,
réessayer après environ 2 heures. Pour ce faire, enlever la pile de
droite (vue de derrière) pendant environ 1 minute, puis l’insérer à
nouveau.
9 – Le mouvement fait des essais toutes les heures pleines et / ou
compare l’heure avec celle de l’émetteur. Si l’heure est déréglée,
elle sera automatiquement corrigée une fois par jour entre 03 h 00
et 04 h 00.
Changer les piles
1 – Le mouvement indique lorsque les piles sont déchargées :
l’aiguille des secondes avance en deux temps.
2 – Remplacer immédiatement les deux piles 1,5 volts alcali-
manganèse en insérant d’abord brièvement la pile de droite (voir
aussi sous point 8) à l’envers, puis l’insérer à nouveau correctement.
3 – Maintenant, les aiguilles se déplacent sur la position « 4 », « 8 »
ou « 12 », puis le mouvement se met en position « réception », après
2–10 minutes l’heure exacte sera affichée.
Dysfonctionnement et comment y remédier
Certains facteurs peuvent éventuellement perturber la réception :
– Appareils ménagers antiparasités
– Télévisions placées à une distance de moins de 2 mètres.
– Instruments à haute fréquence
– Conditions topographiques et météorologiques lorsque la
distance entre l’émetteur (à Mainflingen près Francfort) et le
lieu de réception est supérieure à mille kilomètres.
Défaut : Les aiguilles ne se déplacent pas une fois les piles in-
sérées et ne se positionnent donc pas sur l’heure exacte parce que
Nach dem Abziehen des Sicherungsstifts, die Zeiger keinesfalls
mehr von Hand bewegen!
Do not manually adjust the clock hands after removing
the safety pin! « Après avoir retiré la goupille de sécurité, les aiguilles ne doivent
absolument plus être déplacées manuellement ! »

1 – Batteriespannung, -kontakt und -polung überprüfen.
2 – Die Uhr in eine andere Lage bringen, z. B. um 45 oder 90° drehen
oder in Fensternähe plazieren.
3 – Prüfen, ob sich in der Nähe eine Hochfrequenz-Störquelle oder
ein Fernseher befindet.
4 – Die Batterien erneut einlegen.
5 – Bleiben wiederholte Startversuche erfolglos, kann u.U. auch
eine Senderstörung vorliegen. Bitte einige Stunden abwarten, dann
einen neuen Versuch starten.
Fehler: Die Zeigerstellung stimmt nicht mit der tatsächlichen
Uhrzeit überein.
1 – Alle 3 Zeiger (5/6/7) vom Uhrwerk entfernen.
2 – Vor dem erneuten Aufsetzen der Zeiger (5/6/7), das Zeigerwerk
wie folgt auf die »12«-Position stellen:
a) Die rechte Batterie (von hinten gesehen) seitenrichtig einlegen.
b) Die beiden Kontaktstifte in der Uhrwerkrückwand links unten neben
der Batterie durch gleichzeitiges Berühren mit einem metallischen
Gegenstand (z.B. Schraubendreher, Pinzette usw.) kurzschließen –
das Uhrwerk stellt sich von selbst im Schnellgang auf die »12«-
Position. Danach bleibt es dauerhaft stehen.
3 – Den Sicherungsstift einstecken.
4 – Die Zeiger – wie unter »Uhrwerk einbauen« (Pos. 5–6) beschrie-
ben – aufsetzen.
5 – Den Sicherungsstift wieder entfernen.
6 – Die rechte Batterie entnehmen, kurz seitenverkehrt, dann wieder
seitenrichtig einsetzen, um die Uhr zu starten. Die Zeiger bewegen
sich vollautomatisch erst auf die 4-Uhr-Position (Stillstand 2 min)
und dann – nach Empfang eines »Zeittelegramms« und dessen
interner Verarbeitung innerhalb von 2 bis max. 10 Minuten – auf die
aktuelle Tageszeit.
Das Pendel
1 – Den Pendelaufhänger aus seiner Rastung am Uhrwerk heben.
2 – Das Pendel am Pendelaufhänger einhaken und etwas auslenken,
um es in Bewegung zu setzen.
Bitte beachten: Das Pendel hat keinerlei Einfluss auf die Gang-
genauigkeit dieses Funkuhrwerks.
3 – Check if there is high-frequency interference, e. g., a TV set nearby.
4 – Re-fit the batteries.
5 – If repeated start-ups are without success, the signal transmitter
could be out of order. Please wait a few hours before trying again.
Problem: The position of the clock hands does not match the
actual time.
1 – Remove all 3 clock hands (5/6/7) from the movement.
2 – Follow this procedure to set the movement to the »12« position
before re-fitting the hands (5/6/7):
a) Insert two 1.5V AA batteries (watch polarity).
b) Simultaneously touch both contact pins in back of the movement
with a metallic object (screwdriver, tweezers, etc.) – the movement
will now set itself to »12« and will remain there until Pt. 8 of these
instructions is carried out.
3 – Insert the safety pin.
4 – Install the hands as described under »Installing the Movement«
(Pts. 5–6).
5 – Remove the safety pin.
6 – Remove the right-hand battery. Set the latter into its box upside
down, then install it correct side up to start the movement. The hands
now automatically move to the 4 o’clock position, remain there for
2 min, then – after reception of a valid »time telegram« and its internal
processing within 2 to max. 10 min – move on to the exact time of day.
The Pendulum
1 – Lift the pendulum leader from its safety catch.
2 – Hook the pendulum to the pendulum leader and tap it lightly to
start its vibrations.
PLEASE NOTE: The pendulum has no influence upon the time-
keeping accuracy of the movement.
la pendule n’a pas reçu le télégramme horaire dans les 10 minutes
qui suivaient l’insertion des piles.
1 – Vérifier le voltage, le contact et la polarisation de la pile.
2 – Mettre la pendule dans une autre position, p. ex. la tourner de
45 à 90 degrés ou la placer près d’une fenêtre.
3 – Vérifier qu’il n’ait pas d’appareil à haute fréquence ou de
télé-vision près de la pendule.
4 – Insérer à nouveau les piles.
5 – Si après plusieurs essais de démarrage rien ne se passe, il se
peut que l’émetteur soit en dérangement. Dans ce cas, attendre
quelques heures et faire un nouvel essai.
Défaut : La position des aiguilles ne correspond pas à l’heure exacte.
1 – Enlever les trois aiguilles (5/6/7) du mouvement.
2 – Avant de remettre les aiguilles (5/6/7), positionner la minuterie
sur le « 12 » comme suit :
a) Insérer correctement la pile droite (vue de derrière).
b) Court-circuiter les deux tiges de contact au dos du mouvement,
à côté de la pile à gauche, en les touchant simultanément avec un
instrument métallique (p. ex. tournevis, pincette, etc.) – ainsi, le
mouvement se mettra automatiquement par commande rapide sur
la position « 12 ». Puis, il restera arrêté de façon permanente.
3 – Insérer la goupille de maintien.
4 – Mettre les aiguilles (comme décrit sous « Insérer le mouvement »
points 5–6).
5 – Enlever la goupille de maintien.
6 – Enlever la pile de droite, puis pour démarrer le mouvement,
insérer brièvement la pile à l’envers, puis l’insérer correctement.
Dans un premier temps, les aiguilles se déplacent automatiquement
sur la position 04 h 00 (arrêt 2 minutes), puis, après réception du
télégramme horaire et de son traitement interne, sur l’heure exacte
(après 2 à 10 minutes).
Le balancier
1 – Décrocher le crochet du balancier.
2 – Accrocher le balancier au support de balancier, puis balancer
légèrement le balancier pour le mettre en marche.
A savoir : Le balancier n’influence aucunement la précision de
marche de la pendule.
12
3
4
5
6
7
2 Mignonzellen/
2 AA batteries/
2 piles mignon
Zeigerwerk/
hand shaft/
minuterie
•
Sicherungsstift/
Safety pin/
Goupille
de maintien
Other Selva Clock manuals
Popular Clock manuals by other brands

American Time
American Time Global Series Quick start installation guide

Sapling
Sapling SBT 3000 Series Installation and programming manual
Ambient Weather
Ambient Weather Fischer 1588U-22 user manual

Thermo
Thermo SH-TM-247 instruction manual
Velleman
Velleman WT302 manual
American Time
American Time SiteSync IQ Quick start installation guide
