Senix GTC4QL-L User manual

8458-9021015-011
4-Cycle 1.62 cu in. (26.5 cc) Engine
Gasoline Powered Trimmer
Operator’s manual
Model: GTC4QL-L
GTS4QL-L
For customer support, please call 1-800-261-3981 or send email to:
SAVE THIS MANUAL FOR FUTURE REFERENCE.
2WWW.SENIXTOOLS.COM
TABLE OF CONTENTS
SAFETY...........................................................................................2
KNOW YOUR UNIT........................................................................5
SPECIFICATIONS* ........................................................................5
ASSEMBLY......................................................................................6
OPERATION....................................................................................8
MAINTENANCE.............................................................................11
TROUBLESHOOTING..................................................................14
WARRANTY...................................................................................15
Signals an EXTREME hazard.
Failure to obey a safety DANGER symbol WILL result
in serious injury or death to yourself or to others.
Signals a SERIOUS hazard.
Failure to obey a safety WARNING symbol CAN result
in serious injury to yourself or to others.
Signals a MODERATE hazard.
Failure to obey a safety CAUTION symbol MAY result in
property damage or injury to yourself or to others.
CALIFORNIA PROPOSITION 65
This product contains a chemical known to the state
of California to cause cancer, birth defects or other
reproductive harm.
NOTE: Advises you of information or instructions vital to
the operation or maintenance of the equipment.
Read the operator’s manual and follow all warnings
and safety instructions. Failure to do so can result
in serious injury to the operator and/or bystanders.
SAFETY & INTERNATIONAL SYMBOLS
Crude oil, gasoline, diesel fuel and other petroleum
products can expose you to chemicals including toluene
and benzene, which are known to the State of California
to cause cancer and birth defects or other reproductive
harm. These exposures can occur in and around oil
elds, reneries, chemical plants, transport and storage
operations such as pipelines, marine terminals, tank
trucks and other facilities and equipment. For more
information go to: www.P65Warnings.ca.gov/petroleum.
This operator’s manual describes safety and
international symbols and pictographs that may appear
on this product. Read the operator’s manual for
complete safety, assembly, operating and maintenance
and repair information.
DANGER:
WARNING:
CAUTION:
WARNING:
WARNING:
SAFETY
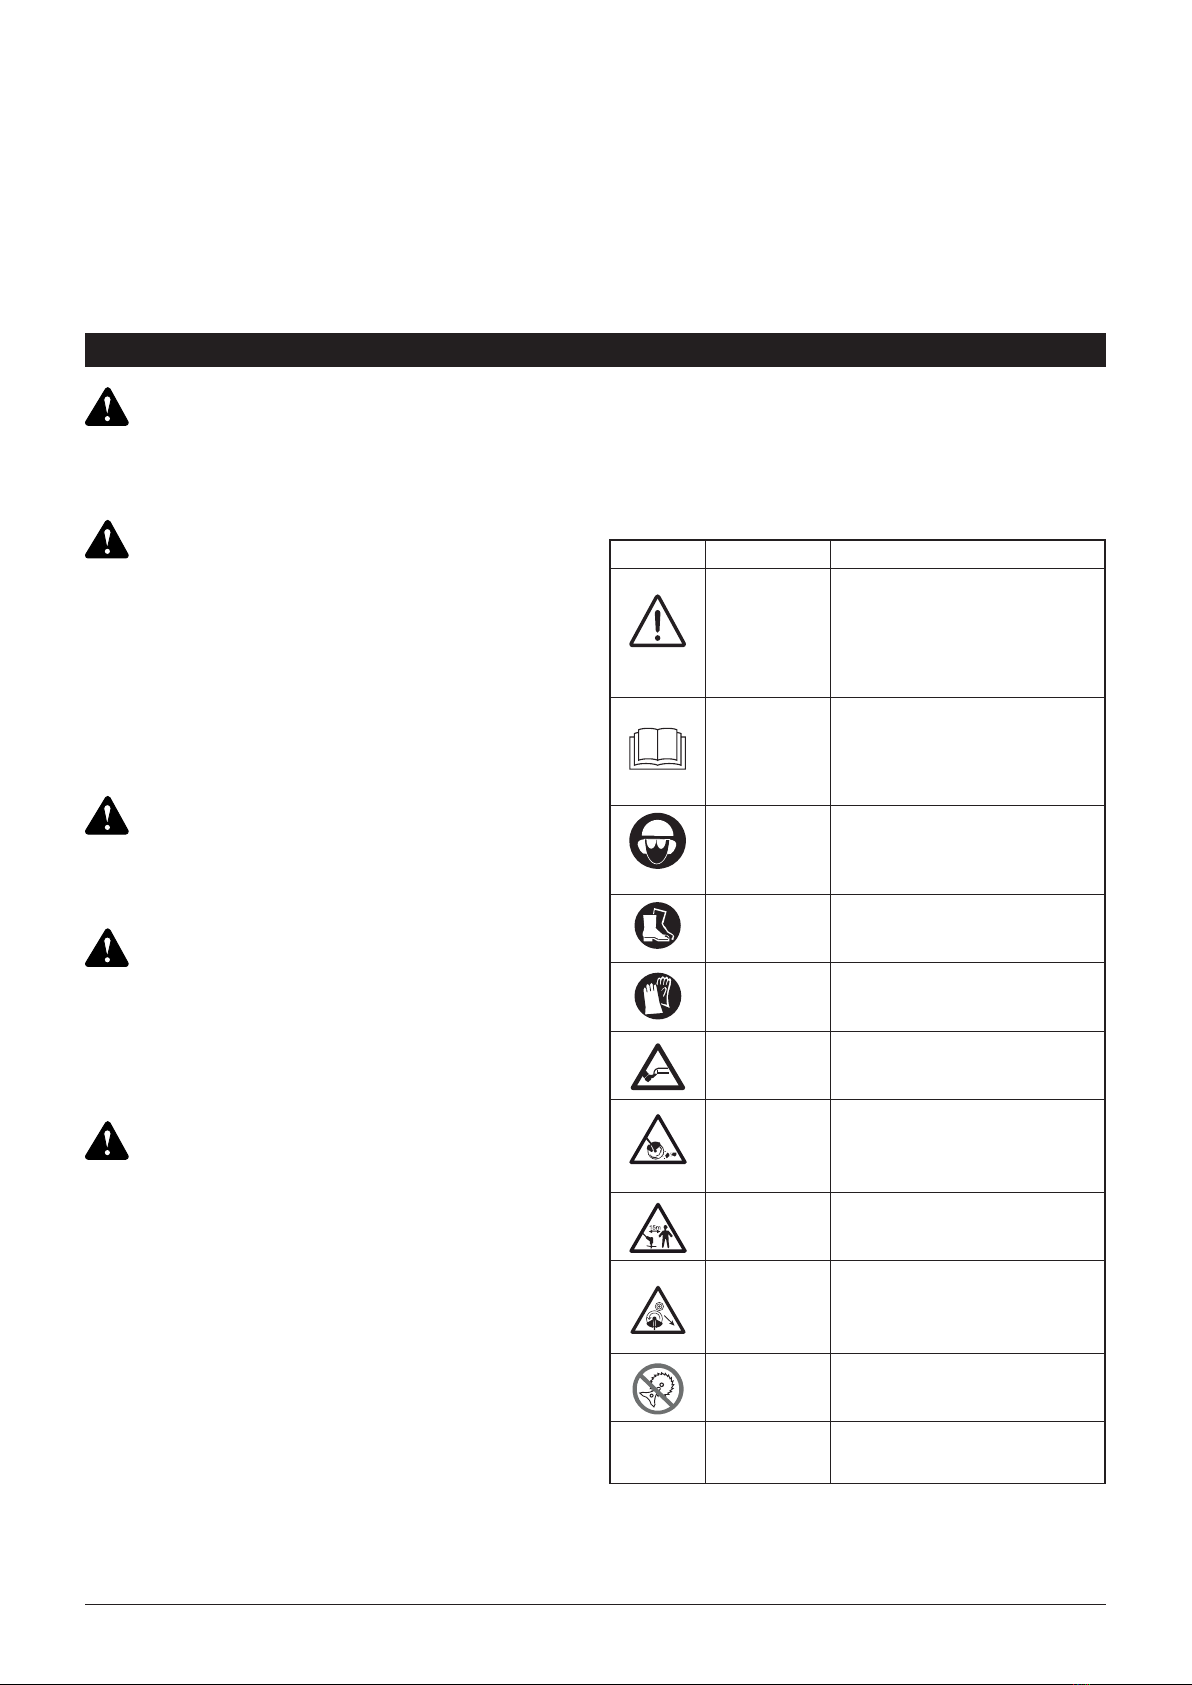
SYMBOL NAME MEANING
Safety Alert This graphic accompanied
by the words WARNING,
DANGER OR CAUTION calls
attention to an act of a
condition which can
lead to SERIOUS INJURY.
Read
Operator’s
Manual
Read the operator’s manual(s)
and follow all warnings and
safety instructions. Failure to do
so can result in serious injury to
the operator and/or bystanders.
Wear eye
and hearing
protection
Always wear eye protection,
ear protection and head
protection meeting ANSI Z87.1
standards.
Wear foot
protection Wear foot protection
Wear gloves Wear gloves
Beware of foot injury by cutting
attachment
Beware of objects ung by
cutting attachments.
Never use without properly
mounted protection guard
Keep 15 meters away from any
other person
Beware of objects ung by
cutting attachments.
Never use without properly
mounted protection guard.
Don’t install or use any type of
blade on the unit displaying this
symbol.
72dB(A)
MEASURED AT 50FT. (15M)
PER ANSI B175.3
Bystander sound pressure
level: 72dB(A)

3WWW.SENIXTOOLS.COM
1. Proper safety precautions must be observed. Like all
power equipment this unit must be handled carefully.
DO NOT EXPOSE YOURSELF OR OTHERS TO
DANGER. Follow these general rules. Do not permit
others to use this unit unless they are thoroughly
responsible and have read, and understood the string
trimmer manual and are trained in its operation.
2. Always wear safety goggles for eye protection. Dress
properly. Do not wear loose clothing or jewelry that
could become caught in moving parts of the unit.
Safe, sturdy, nonskid footwear should always be
worn. Always wear heavy, long pants, boots, gloves,
and a long-sleeve shirt. Do not wear loose clothing,
jewelry, short pants, sandals, or go barefoot. Secure
hair so it is above shoulder level. Long hair should
be tied back. It is recommended that legs and feet be
covered to protect from ying debris during operation.
3. Inspect the entire unit for loose parts (nuts, bolts,
screws, etc.) and any damage before start and
operation. Repair or replace as necessary before
using the machine.
4. Modifying your trimmer or installing non-Senix
attachments can make your trimmer unsafe. Non-
Senix attachments are usually designed for universal
applications. Although aftermarket attachments
may t on your trimmer, they may not meet factory
specications and could make your trimmer unsafe.
Do not remove the cutting head shield or modify
your trimmer in any way that would alter its design
or operation. This could make your trimmer unsafe.
Serious injury to the operator or bystanders could
result as well as damage to the machine.
5. Keep the handles free from oil and fuel.
6. Do not operate the unit in insufcient lighting
conditions.
7. Do not operate the unit when you are tired, when
your concentration is impaired and/or under the
inuence of drugs, medication, or alcohol.
8. Always use proper handles when trimming.
9. Do not smoke while lling tank.
10. Do not ll fuel in an enclosed room or near open
ames. Ensure adequte ventilation.
11. Always store fuel in a properly marked container
that is approved by local codes and ordinances for
such usage.
12. Never remove the fuel tank cap while the engine is
running.
13. Never start or run the product inside a closed
room or building. Fumes from the exhaust contain
dangerous carbon monoxide.
14. Never attempt to make engine adjustments
while the unit is running. Always make engine
adjustments with the unit resting on a at, clear
surface.
15. Do not use the unit if it is damaged or poorly
adjusted. Never remove the unit’s guard. Serious
injury to the operator or bystanders could result as
well as damage to the machine.
16.Inspect the area to be cut and remove all debris that
could become entangled in the nylon cutting head.
Also remove any objects that the unit may throw
SAFETY WARNINGS during cutting.
17. Keep children away. Onlookers should be kept
at a safe distance from the work area, at least 15
METERS (50 FEET) away.
18. Never leave the unit unattended while the engine is
running.
19. The trimmer is designed to cut grass, weeds, and
brush. Other uses can result in injury to the operator
or damage to the trimmer and other property.
20. Do not overreach. Keep proper footing and balance
at all times. Do not use the unit while standing on a
ladder or on any other unstable footing location.
21. Keep hands and feet a safe distance from the nylon
cutting line while unit is in use.
22. Do not use this type of unit for sweeping away
debris.
23. Use nylon cutting head which is free of damage. If
a stone or any other obstacle is hit, stop the engine
and check the nylon cutting head. A broken or
unbalanced nylon cutting head must never be used.
24. FOLLOW INSTRUCTIONS for assembling and
operation.
25. Do not store the unit in a closed area where fuel
vapors can reach an open ame from hot water
heaters, furnaces, etc. Store in a locked, well
ventilated area only.
26. Ensure safe and proper performance of your unit.
Please only use original accessories. The use of
any other accessories or attachments may cause a
potential hazard or injury to the user, damage to the
unit, and void the warranty.
27. If the unit will not be used for a long time, clean
the unit completely, especially the fuel/oil tank, its
surroundings, and the air lter.
28. When refueling, stop the engine and conrm that
it is cooled down. Never refuel when the engine
is running or hot. When gasoline spills, be sure to
wipe it up completely and dispose of those materials
before starting the engine.
29. Stay clear of other workers or bystanders by at least
15 meters/50 feet.
30. Whenever approaching an operator of the unit,
carefully call their attention and conrm that the
operator stops the engine. Be careful not to startle
or distract the operator which can cause an unsafe
situation.
31. Never touch the nylon cutting head whenever the
engine is running. If it is necessary to adjust the
protector or nylon cutting head, make sure to stop
the engine and conrm that the nylon cutting head
has stopped running.
32. The engine should be turned off when the unit is
moved between work areas.
33. Be careful not to hit the nylon cutting head against
stones, or the ground. Unreasonable rough
operation will shorten the life of the unit as well as
create an unsafe environment for yourself and those
around you.
34. Pay attention to loosening and overheating
parts. If there is any abnormality of the unit, stop
operation immediately and check the unit carefully.
If necessary, have the unit serviced by customer
support. Never continue to operate a unit which

4WWW.SENIXTOOLS.COM
may be malfunctioning.
35. In start-up or during operation of the engine, never
touch hot parts such as the mufer, the high voltage
wire, or the spark plug.
36. After the engine has stopped, the mufer is still hot.
Never place the unit in any places where there are
ammable materials (dry grass, etc.), combustible
gasses, or combustible liquids.
37. Pay special attention to operation in the rain or just
after the rain as the ground may be slippery.
38. If you slip or fall to the ground, release the throttle
lever immediately.
39. Be careful not to drop the unit or hit it against
obstacles.
40. Before proceeding to adjust or repair the unit, be
sure to stop the engine and detach the spark plug.
41. When the machine is placed in storage for a
long time, drain fuel/oil from the fuel/oil tank and
carburetor, clean the parts, and move the machine
to a safe place.
42. Make periodic inspections to ensure safe and
efcient operation. For a thorough inspection of
your unit, contact customer support.
43. Keep the unit away from re or sparks.
44. Keep your body warm, especially the head, neck,
feet, ankles, hands, and wrists.
45. Maintain good blood circulation by performing
vigorous arm exercises during frequent work breaks
and also by not smoking.
46. Limit the hours of operation.
47. If you experience discomfort, redness and swelling
of the ngers followed by whitening and loss of
feeling, consult your physician before further
exposing yourself to cold and vibration.
48. Always wear ear protection. Loud noises for long
periods can cause hearing loss, even permanent
deafness.
49. Wear no-slip heavy duty work gloves to improve
your grip on the handle. Gloves also reduce the
transmission of machine vibration to your hands.
50. Do not lay the machine on the side; otherwise the
fuel could.
51. Fuel evaporation during refueling and exhaust
gases are harmful to the operator and people
around the unit.
52. Make sure that the fuel evaporation and exhaust
gases will not drift to the face of operator and keep
other people away from your working area.
53. Do not allow children or untrained individuals to use
this unit.
• Damage to lungs if an effective dust mask is not worn.
• Damage to hearing if effective hearing protection is
not worn.
• Health defects resulting from vibration emission if the
unit is being used over long periods of time or not
adequately managed and properly maintained.
The string head is still dangerous while the machine is
coasting to a stop.
Even when the unit is used as prescribed it is not
possible to eliminate all residual risk factors. The
following hazards may arise in connection with the unit’s
construction and design:
This unit produces an electromagnetic eld during
operation. This eld may, under some circumstances,
interfere with active or passive medical implants. To
reduce the risk of serious or fatal injury, we recommend
persons with medical implants to consult their physician
and the medical implant manufacturer before operating
this unit.
Inspect unit before each use. Replace damaged parts.
Check for fuel leaks. Make sure all fasteners are in
place and secure. Replace cutting attachment parts that
are cracked, chipped, or damaged in any way. Make
sure the cutting attachment is properly installed and
securely fastened. Be sure the cutting attachment shield
is properly attached and in the position recommended
by the manufacturer. Use only exible, nonmetallic line
recommended by the manufacturer. Never use, for
example, wire or wire-rope, which can break off and
become a dangerous projectile.
Do not operate the unit inside a closed environment,
such as a room or building; breathing carbon monoxide
from exhaust fumes can kill.
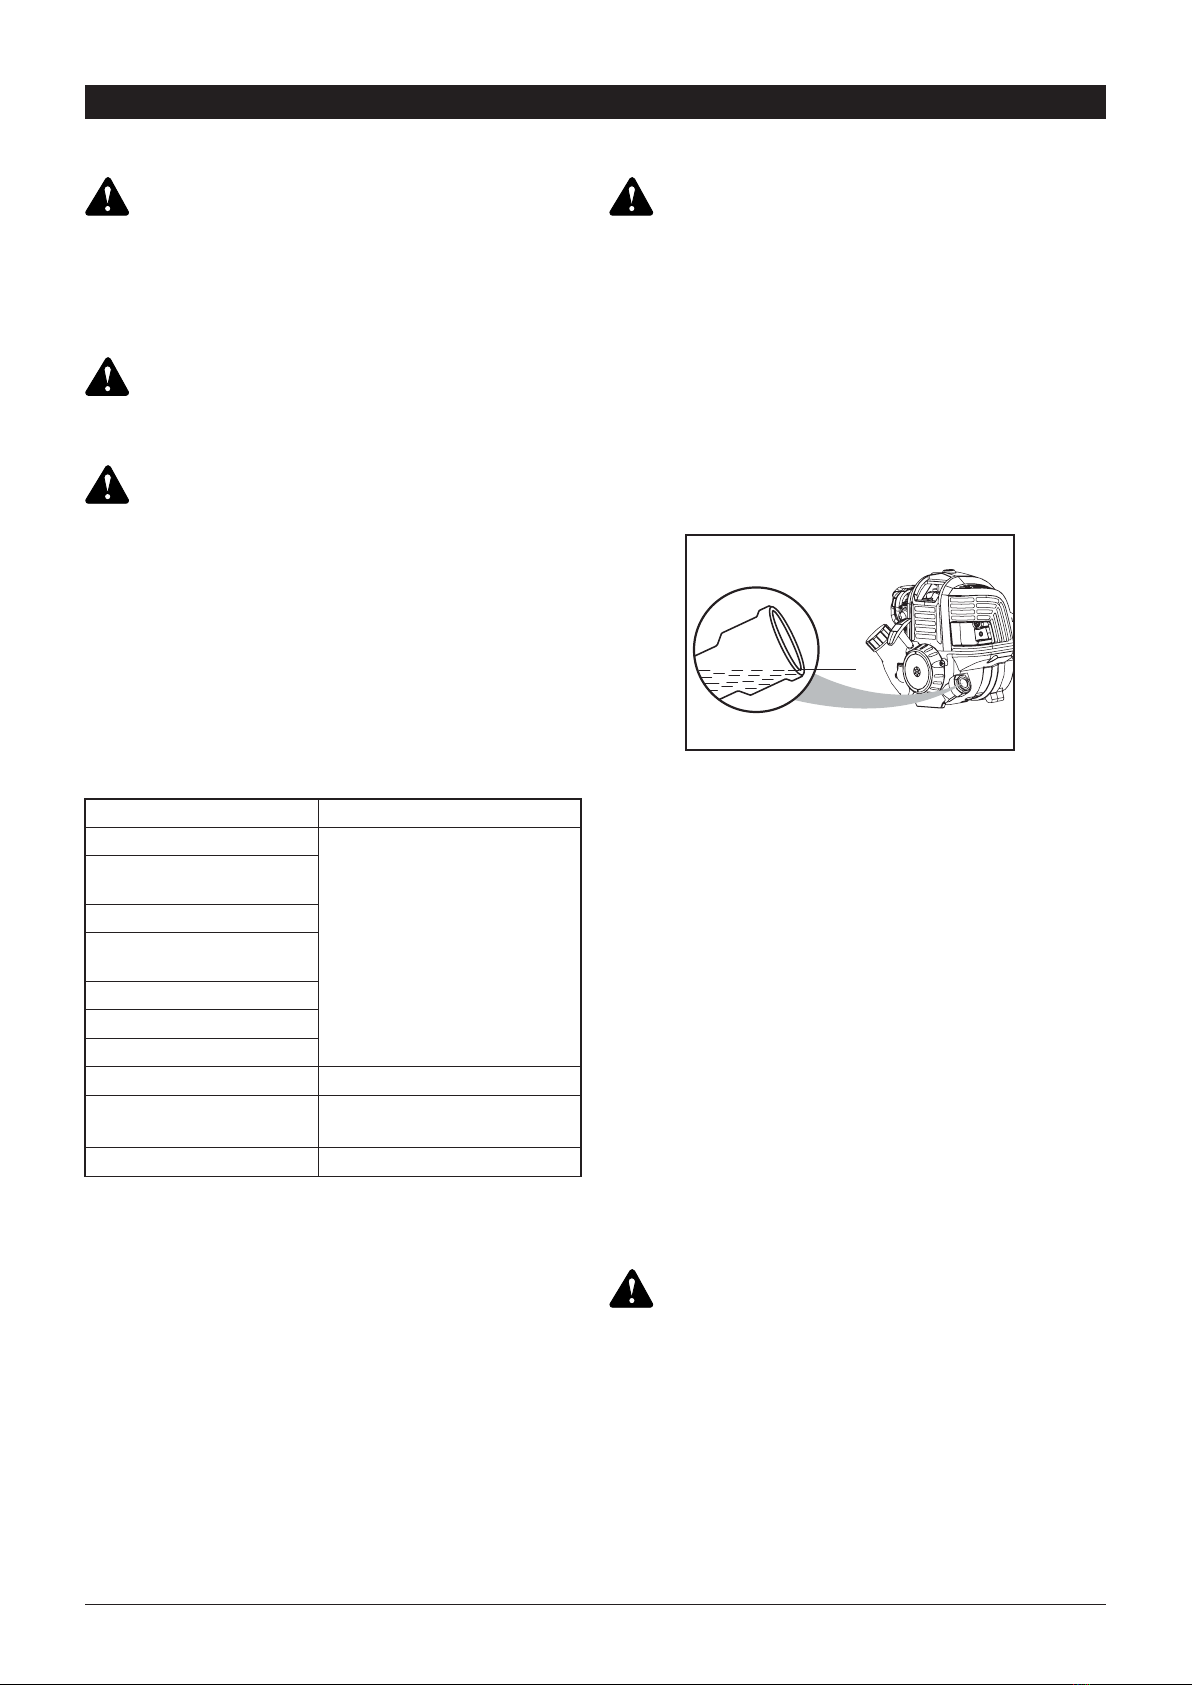
Mix and pour fuel outdoors where there are no sparks
and ames. Slowly remove the fuel cap only after
stopping the engine. Do not smoke while fueling or
mixing fuel. Wipe spilled fuel from the unit. Move at
least 3 m (10 ft) away from the fueling source and site
before starting engine.
WARNING:
WARNING:
WARNING:
WARNING:
WARNING:
WARNING:
RESIDUAL RISKS
5WWW.SENIXTOOLS.COM
Engine type .................................................................................................................................... Air-Cooled, 4-Cycle
Displacement...................................................................................................................................1.62 cu in. (26.5 cc)
Spark plug gap ......................................................................................................... 0.025 in. - 0.31 in. (0.6 - 0.8 mm)
Lubrication .................................................................................................................................................SAE 10W-30
Crankcase lubrication capacity............................................................................................................. 2.01 oz. (60 ml)
Fuel type................................................................................................................................... Unleaded gasoline only
Fuel tank capacity............................................................................................................................... 9.46 oz. (280 ml)
Approximate unit weight (no fuel) ......................................................................................11.02-11.24 lbs. (5.0-5.1 kg)
Trimmer mechanism ................................................................................................................................... Bump head
Trimming line ..........................................................................................................................................Spiral trimming
line Trimming line diameter (GTC4QL-L / GTS4QL-L)............................ 0.095 in. (2.4 mm), non-metallic exible line
Cutting path diameter (GTC4QL-L) ................................................................................................. .16.9 in. (430 mm)
Cutting path diameter (GLS4QL-L)................................................................................................... .17.7 in. (450 mm)
* All specications are based on the latest product information available at the time of printing. We reserve the right
to make changes at any time without notice.
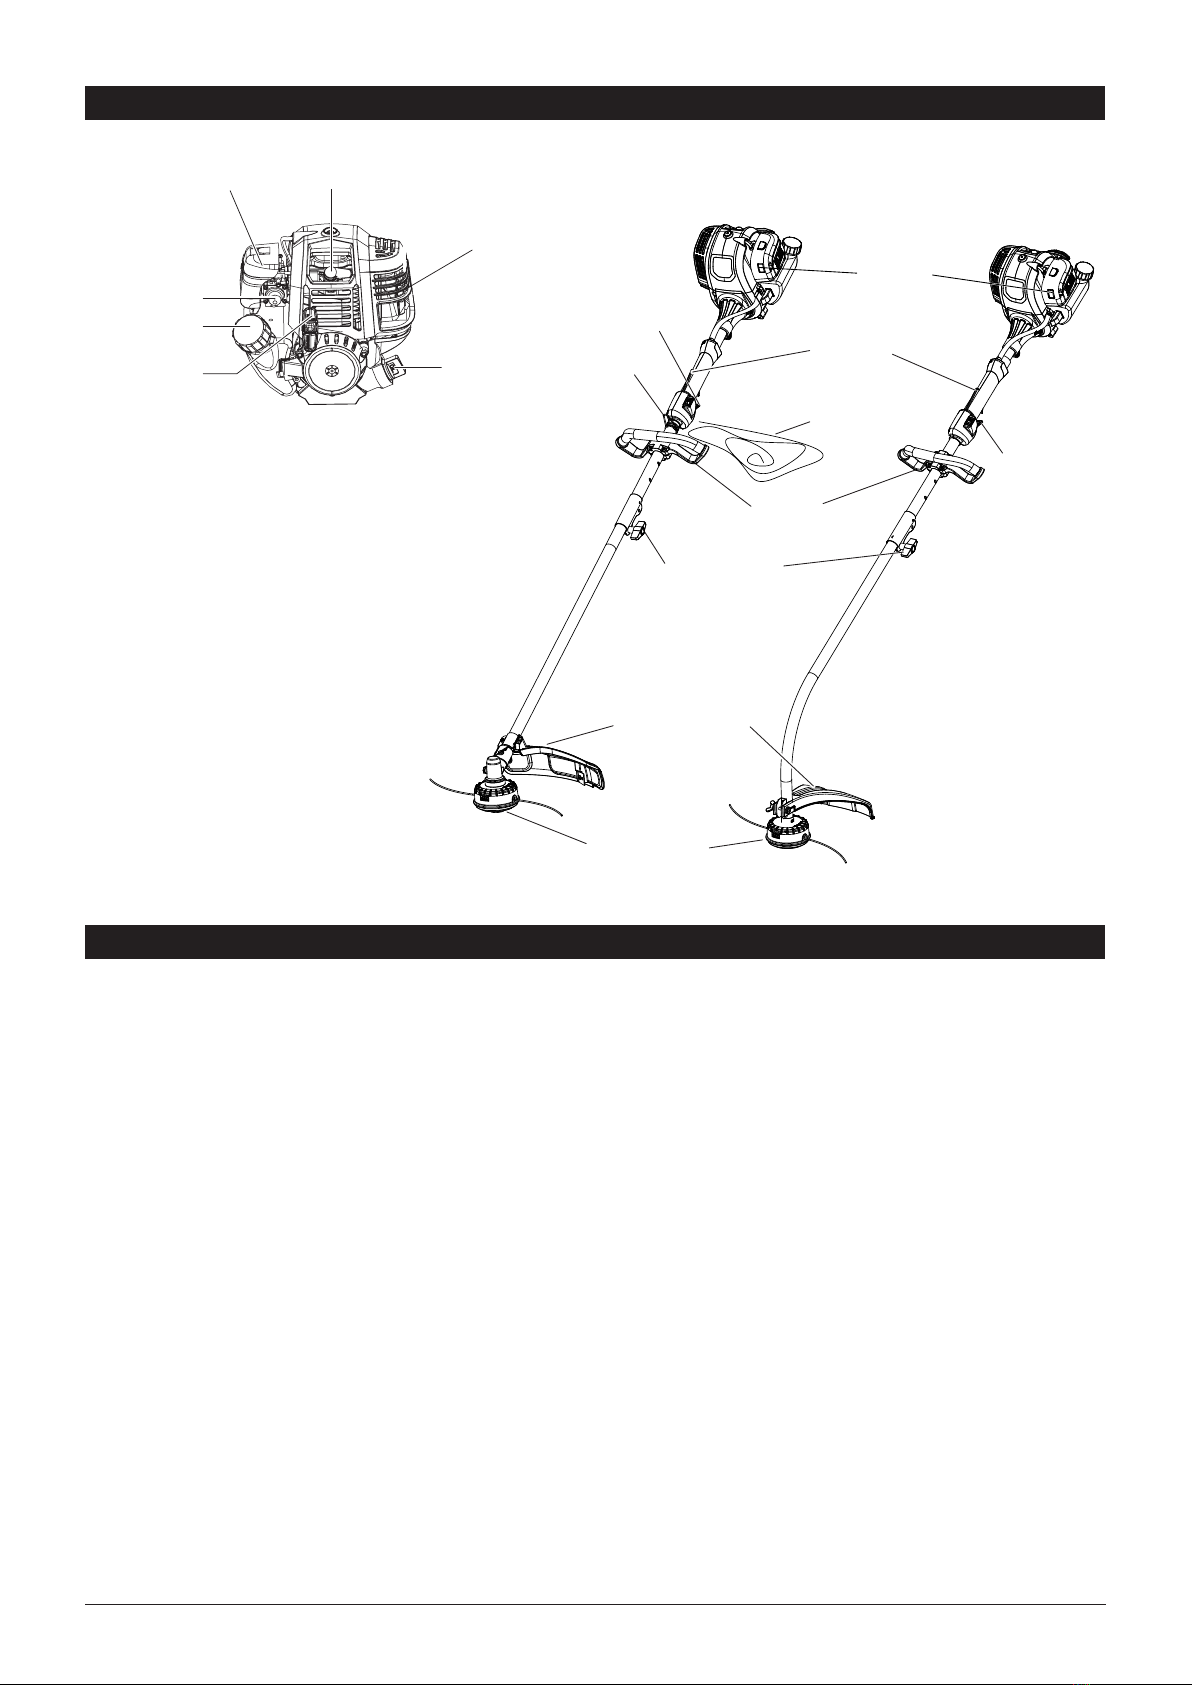
KNOW YOUR UNIT
SPECIFICATIONS*
Air Filter Spark Plug
Muffler
Choke
Fuel Cap
Starter Grip Oil Tank
Cap
Drive Shaft
Connect Knob
Lockout
Cutting Head
Shield
Cutting Line
Spool
Front
Handle
Harness
Hook
Harness
GTS4QL-L GTC4QL-L
Throttle
Throttle
Throttle
Choke
Button
6WWW.SENIXTOOLS.COM
ASSEMBLY
INCLUDED PARTS
1. Remove the screw from cutting head guard.
2. Insert the left tab into the slot on the cutting head
guard.
3. Align the screw hole in the mounting bracket with the
screw hole into the cutting head guard.
4. Tighten the screw through the mounting bracket and
into the cutting head guard with the provided screw
driver.
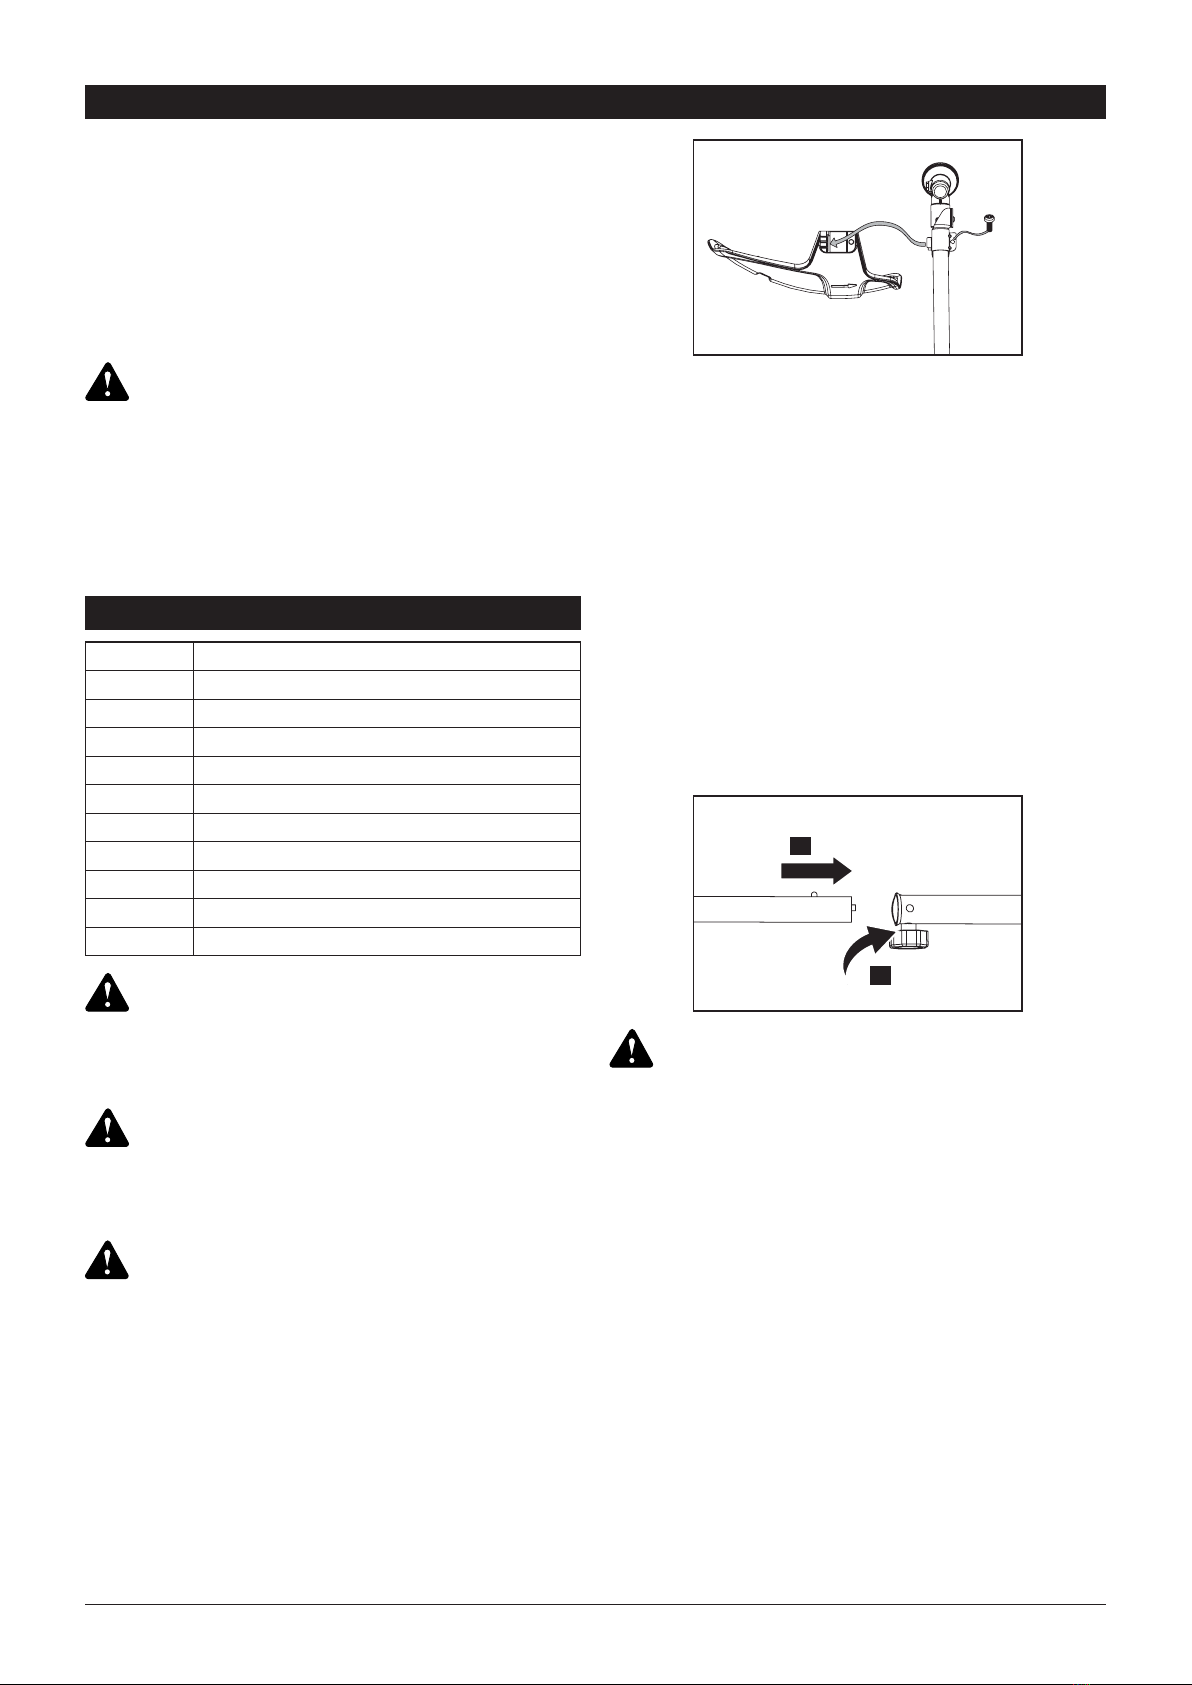
1. Turn the knob counter clockwise to loosen the
coupler.
2. Press and hold the release button.
3. Pull the attachment straight out of the coupler.
The attachment connects to the power head by means
of a coupler device.
1.Stop the engine and disconnect the spark plug wire.
2.Turn the knob counterclockwise to loosen the coupler
of the power head shaft and remove the end cap
from the attachment (1).
3.Insert while rotating the lower shaft into the coupler
until the button locks into the positioning hole (the
xing hole is opposite the knob).
NOTE: If the button does not release completely in the
positioning hole, the shafts are not locked into place.
Slightly rotate from side to side until the button is locked
into place.
4.Turn the knob (2) clockwise to tighten the coupler.
This product requires assembly. Carefully remove the
product and any accessories from the box. Make sure
that all items listed in the packing list are included.
Inspect the product carefully to make sure no breakage
or damage occurred during shipping.
Do not discard the packing material until you have
carefully inspected and satisfactorily operated the
product. If any parts are damaged or missing, please
call 1-800-261-3981 for assistance.
Do not use this product if any parts on the packing
list are already assembled to your product when you
unpack it. Parts on this list are not assembled to the
product by the manufacturer and require customer
installation. Use of a product that may have been
improperly assembled could result in serious personal
injury.
To prevent an accidental start that could cause serious
personal injury, always disconnect the engine spark
plug wire from the spark plug when assembling parts.
The cutting line spool must be xed rmly with the hub.
Failure to x the cutting line spool with the hub can
result in serious personal injury.
Make sure the knob is fully tightened before operating
the unit, check it periodically for tightness during use to
avoid serious personal injury.
Unless specied otherwise, the release button should
be snaped into the positioning hole only. Using the
wrong hole could lead to personal injury or damage to
the unit.
Never install, remove, or adjust any attachments while
power head is running. Failure to stop the engine can
cause serious personal injury.
WARNING:
WARNING:
WARNING:
WARNING:
WARNING:
Quantity Item
1Fast Start Guide
1Operator’s Manual
1Handle and mounting hardware
1Cutting line spool
1Fixed line head
1Cutting head shield and mounting screw
1
Screw driver
1Spark plug wrench
1
60 ml bottle (empty)
1Warranty statement
INSTALL CUTTING HEAD GUARD
REMOVING ATTACHMENT
CONNECT THE UPPER AND LOWER
SHAFT
1.
2.

7WWW.SENIXTOOLS.COM
1. There are 3 positions where the front handle can be
xed with 4 screws as shown in the image above.
Select the suitable position according to the body
height of operator.
2. Screw the handle and holder (1) using the screw
driver provided. The screws and holder are pre-
attached to the front handle.
3.Tighten the 4 screws until the handle is secure.
NOTE: The front handle could be only xed in the 3
positions. Failure to x the front handle can cause
serious personal injury.
Do not allow familiarity with this product to make you
careless. Remember that a careless fraction of a
second is sufcient to inict serious injury.
Always wear eye protection with side shields marked to
comply with ANSI Z87.1, along with hearing protection.
Failure to do so could result in objects being thrown into
your eyes and other possible serious injuries.
The straight-shaft trimmer harness with quick release
function can be hooked behind the rear hand if needed.
NOTE: Harness use is optional.
WARNING:
WARNING:
INSTALL THE FRONT HANDLE
INSTALL THE HARNESS
1. 2.

8WWW.SENIXTOOLS.COM
OPERATION
Do not use any attachments or accessories not
recommended by the manufacturer of this product. The
use of attachments or accessories not recommended
can result in serious personal injury.
Operation of this equipment could create sparks that
can start res around dry vegetation. A spark arrestor
may be required. The operator should contact local
re agencies for laws or regulations relating to re
prevention requirements.
Gasoline and its vapors are highly ammable and
explosive. To prevent serious personal injury and
property damage, handle it with care. Keep away from
ignition sources and open ames, handle outdoors only,
do not smoke and wipe up spills immediately. Always
shut off engine before fueling. Never add fuel to a
machine with a running or hot engine. Move at least
30 ft. from refueling site before starting engine. Do not
smoke and stay away from open ames and sparks.
Never operate the unit without the fuel cap securely.
Failure to safely handle fuel could result in serious
personal injury.
Do not overll. Overlling the crankcase may cause
excessive smoke, oil loss, and engine damage.
Attempting to start the engine before it has been
properly lled with lubricant will result in equipment
failure not covered by the warranty.
WARNING:
WARNING:
WARNING:
CAUTION:
CAUTION:
Engine lubricant has a major inuence on engine
performance and service life. This unit is shipped
without engine lubricant.
Always use a 4-cycle engine lubricant that meets or
exceeds the requirements for API service classication
SJ. SAE 30, 10W30, or 10W40 are all acceptable
lubricants to use in this product. Non- detergent or
2-stroke engine lubricants will damage the engine and
should not be used. Check lubricant level before
each use.
ADDING/CHECKING ENGINE OIL
ADD ENGINE OIL: INITIAL USE
FUELING AND REFUELING
STARTING AND STOPPING
CHECK ENGINE OIL: BEFORE EACH
USE
MAX
1. Remove the cap from the empty lubricant bottle
provided.
2. Pour 60 ml of 4-cycle engine lubricant oil into
lubricant bottle with a funnel.
3. Unscrew the oil cap from the engine and remove.
4. Pour 60 ml of oil into the oil ll hole. Replace and
tighten the oil cap.
1. Remove the fuel tank cap by turning
counterclockwise. Rest the cap on a clean surface.
2. Carefully pour fuel into the tank. Avoid spillage.
3. Immediately replace fuel cap and hand tighten by
turning it clockwise. Wipe up any spilled fuel.
NOTE: Visually inspect to see if fuel level is low. If
fuel is low, rell with unleaded fuel carefully without
overlling and tighten the fuel tank cap immediately.
• This unit has a 4-cycle engine. Do not mix oil with
gasoline.
• The use of old fuel is the most common cause
of performance problems. Use only fresh, clean
unleaded gasoline (less than 30 days old). Dispose
of old fuel according to federal, state and local
regulations.
• Drain the tank and run the engine dry before storing
the unit.
• Do not use E15 or E85 fuel (or fuel containing greater
than 10% ethanol) in this product. It will damage the
unit and void the warranty.
To start a cold engine:
1. Slowly press the primer bulb 5-10 times.
NOTE: After the 7th press, fuel should be visible in the
primer bulb. If it is not, continue to press the primer until
you see fuel in the bulb.
2. Push the choke button in to set the choke to FULL
CHOKE position.
NOTE: Do not squeeze the throttle trigger because the
choke will be pop out automatically.
1. Separate the attachment from the power head.
2. Set power head on a at level surface with shaft
parallel to surface.
3. Unscrew the oil cap and remove.
4. Lubricant level should fall within the top of the oil ll
hole (the top of screw thread).
5. If level is low, add engine lubricant until the uid
level rises to the top of oil ll hole (the top of screw
thread).
NOTE: Do not overll.
6.Replace and tighten the oil cap.

9WWW.SENIXTOOLS.COM
Gasoline and its vapors are highly ammable and
explosive. To prevent serious personal injury and
property damage, handle it with care. Keep away from
ignition sources and open ames, handle outdoors
only, do not smoke and wipe up spills immediately.
Always shut off engine before fueling. Never add fuel to
a machine with a running or hot engine. Move at least
30 ft. from refueling site before starting engine. Do not
smoke and stay away from open ames and sparks.
Never operate the unit without the fuel cap securely.
Failure to safely handle fuel could result in serious
personal injury.
Always wear eye, hearing, hand, foot and body
protection to reduce the risk of injury when operating
this unit. Keep all parts of your body away from the
rotating cutting attachment and hot surfaces.
To prevent serious personal injury, avoid arm contact
with the engine while operating the unit. The engine
may be extremely hot.
WARNING:
WARNING:
WARNING:
STOP THE ENGINE:
OPERATING THE TRIMMER
ENGAGE CUTTING HEAD SPOOL/
ENGINE STOP
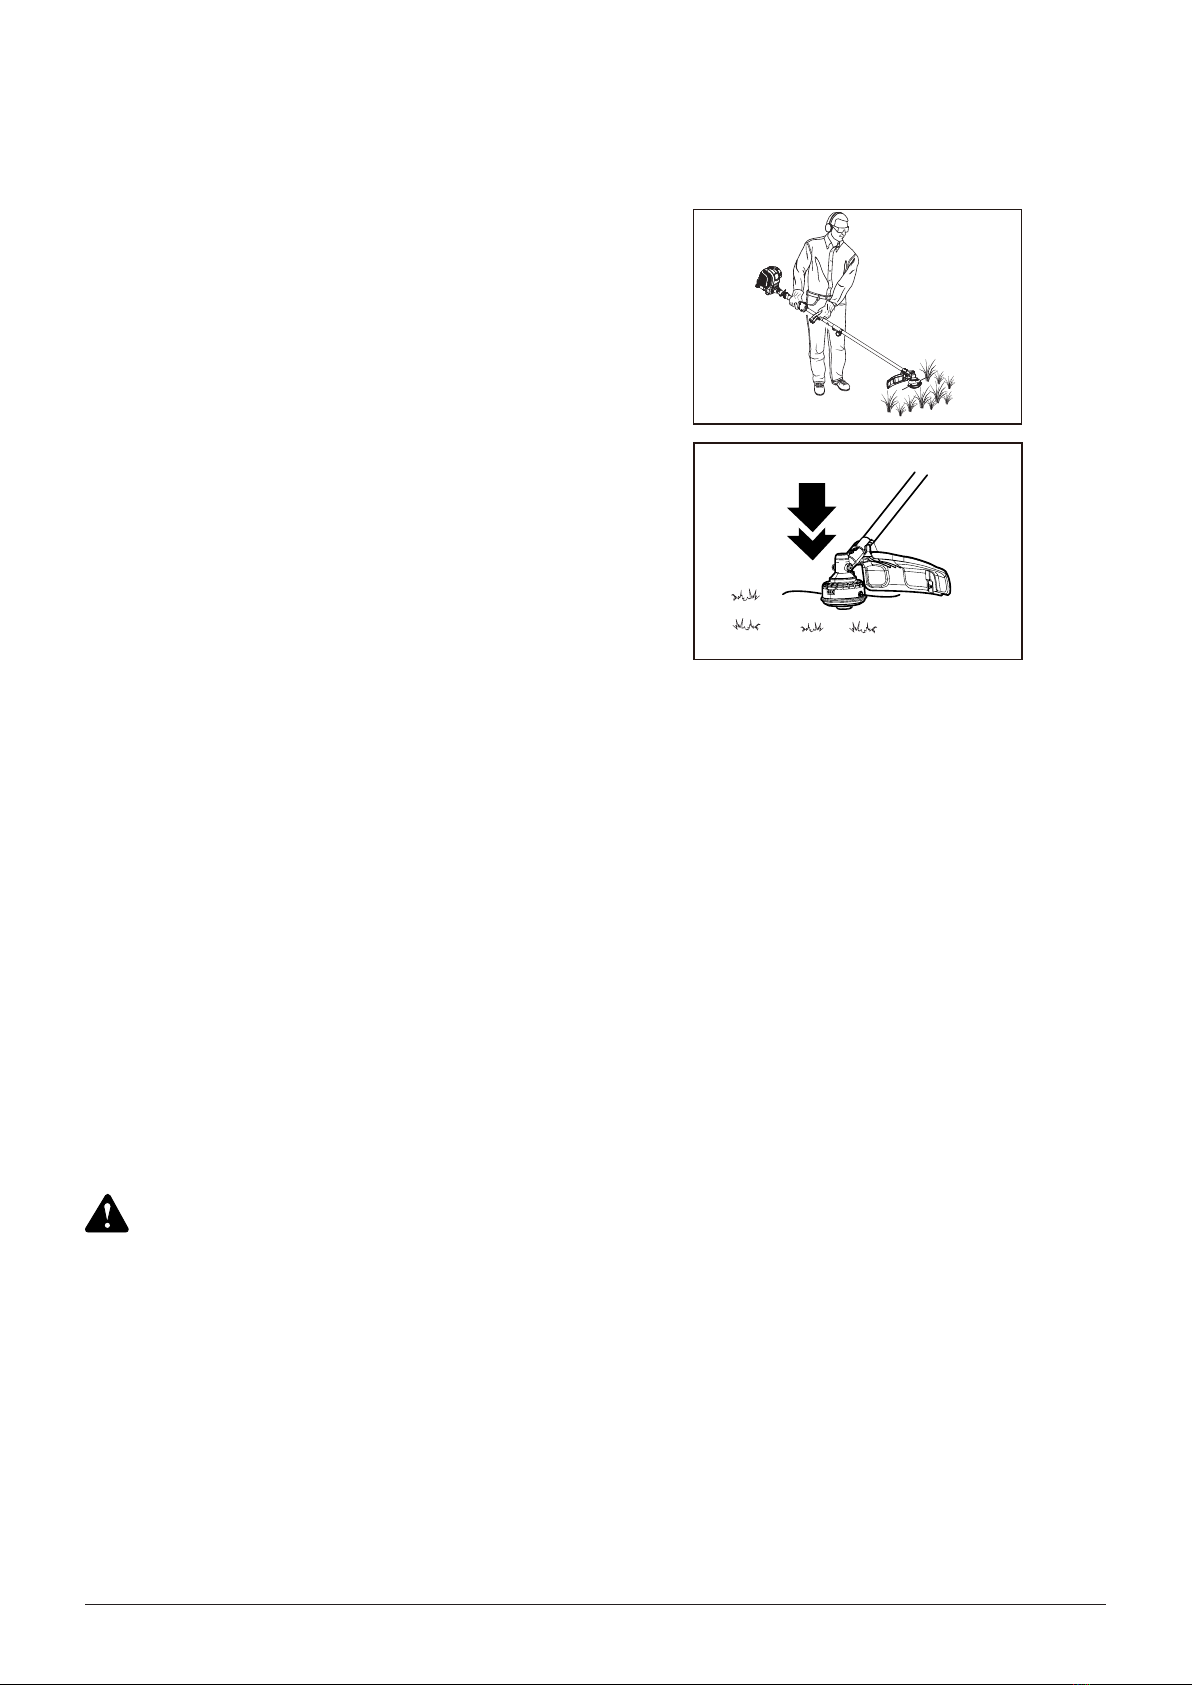
HOLDING THE UNIT
• Engine housing can become hot during trimmer
operation. Do not rest or place your arm, hand, or
any body part against the engine housing. Extended
contact with the engine housing can result in burns or
other injuries.
• Always position the unit on the operator’s right side.
The use of the unit on the operator’s left side will
expose the user to hot surfaces and can result in
possible burn injury.
• To avoid burns from hot surfaces, never operate unit
with the bottom of the engine above waist level.
• Stand in the operating position (Fig. 11). Stand up
straight. Do not bend over.
• Keep feet apart and rmly planted.
• Hold the shaft grip with the right hand. Keep the right
arm slightly bent.
• Hold the handle with the left hand. Keep the left arm
straight.
• Hold the unit at waist level.
• Position the cutting head a few inches above the
ground.
• Do not over-reach; Keep all parts of your body away
from the rotating cutting attachment and hot surfaces.
• To direct clippings away from you, whenever possible
swing the trimmer in a left to right cutting motion.
There is an embossed arrow on the top of the safety
guard indicating the preferred left to right direction of
trimmer operation.
3. Pull the starter grip /cord until resistance is detected.
Rapidly pull 3 to 5 times or until you hear engine turn
over or begin to start.
4. If engine does not start, release choke by squeezing
throttle trigger and green choke button pops out.
a. Engine is now in the run position.
b. Rapidly pull starter grip/cord until engine starts.
5. Allow the engine to run for 10 seconds,then squeeze
throttle to provide fuel to engine and use for intended
task.
NOTE: The choke button is only used when starting
a cold engine. Never push the choke button in once
the engine has been turned over or run. Otherwise the
engine could be damaged.
Restart a warm engine:
NOTE: DO NOT push choke button in.
1. Make sure the primer bulb has fuel inside.
2. Rapidly pull starter/grip until engine starts.
3. Squeeze throttle to provide fuel to engine.
The cutting head spool will be engaged if the operator
squeezes the throttle lever and then squeezes the
throttle lever release to increase the engine speed.
The engine will stop when depressing the Stop switch in
the “STOP” position.
1. Hold the trimmer with your right hand on the rear
handle and your left hand on the front handle. Keep a
rm grip with both hands while in operation. Trimmer
should be held at a comfortable position with the rear
handle about hip height.
2. Keep your body and feet a safe distance to cutting
head.
3. Squeeze the throttle lever to full speed before cutting.
4. The cutting line should run parallel to the ground
surface.
To stop the engine, depress the STOP switch to the
stop position “STOP”.
NOTE: This Stop switch will come back to the ON
position automatically.
IF ASSISTANCE IS REQUIRED FOR THIS PRODUCT:
Do not return this product to the retail store where it
was purchased. Please call our Customer Service
Department for any issues you may have. For Help
Call: 1-800-261-3981
Stop switch
Throttle lever release
Throttle lever
10 WWW.SENIXTOOLS.COM
When trimming around trees, posts, fences, etc., rotate
the whole unit so that the cutting head is at a 30° angle
to the ground (Fig. 12).
Maintaining the Trimming Line
Hard surfaces, such as sidewalks, can cause the
trimming line to wear down quickly or break.
Do not remove or alter the line cutting blade assembly.
Excessive line length will make the unit overheat. This
may lead to serious personal injury or damage to the
unit.
CAUTION:
DECORATIVE TRIMMING
TRIMMING TIPS
TIPS FOR BEST RESULTS
ADJUSTING THE TRIMMING LINE
• Frequently check the trimming line length. Replace
the trimming line as needed. Refer to Replacing the
Trimming Line.
• DO NOT force the unit. Make shallow cuts in as many
passes as are necessary to achieve the desired
depth. Cut at a slow, even pace.
• Avoid hot surfaces by always keeping the tool away
from your body.
• Cut all grass from top to down. This will prevent grass
from wrapping around the shaft housing and string
head which could cause damage from overheating.
• If grass becomes wrapped around the string head,
STOP THE ENGINE, disconnect the spark plug wire,
and remove the grass.
• Use the tip of line to trim grass; do not force string
head into uncut grass.
• Avoid trees, owers, stones, walls and other objects
which can cause the line to break.
• Check and feed the line regularly to maintain full
cutting width and performance.
• To direct clippings away from the operator, tilt the
cutting head slightly down to the right; whenever
possible swing the trimmer in a left to right cutting
motion. There is an embossed arrow on the top of
the safety guard indicating the preferred left to right
direction of trimmer operation.
• Do not trim wet grass or weeds.
NOTE: Some line breakage will occur from:
This unit is equipped with a bump head. Trimming line
can be released from the cutting head without stopping
the engine. To release more line, lightly tap the bump
knob on the ground (Fig. 13) while operating the unit
at high speed. For best results, tap the bump knob on
bare ground or hard soil. Attempting to release line in
tall grass may stall the engine.
NOTE: Do not rest the cutting head on the ground while
the unit is running. Each time the bump knob is tapped,
about 1 inch (25.4 mm) of trimming line is released.
NOTE: Always keep the trimming line fully extended.
Line release becomes more difcult when the cutting
line gets shorter.
• Entanglement with foreign matter
• Normal line fatigue
• Attempting to cut thick vegetation
• Forcing the line into objects such as walls or fence
posts
11WWW.SENIXTOOLS.COM
Do not remove the spark plug when the engine is hot.
CAUTION:
• The maintenance interval is only a recommendation
for machines in ordinary operating condition.
• If there are any abnormal signs from the machine,
please do the proper inspection and maintenance
immediately.
• The tightening torque should follow the general screw
specication of different size, class and material.
• If anything is unclear to you, contact our service team
for help.
• All other repairs or maintenance which are not
mentioned here should only be done by our service
team or authorized personnel.
MAINTENANCE
To avoid serious personal injury, always stop the engine
and allow it to cool before cleaning or maintaining the
unit. Never perform cleaning or maintenance while
the unit is running. Disconnect the spark plug wire to
prevent the unit from starting accidentally..
Old engine oil is considered special waste and has
to be disposed according to your local environment
protection regulation. Do not pour the oil into a garbage
can, sewer, soil etc.
Wear protective clothing and observe all safety
instructions to prevent serious personal injury.
Never use metal-reinforced line, wire, chain or rope.
These can break off and become dangerous projectiles.
When servicing, use only identical replacement parts.
Use of any other parts could create a hazard or cause
product damage.
Always wear eye protection with side shields marked to
comply with ANSI Z87.1, along with hearing protection.
Failure to do so could result in objects being thrown into
your eyes and other possible serious injuries.
WARNING: WARNING:
WARNING:
WARNING:
CLEANING AND CARE REPLACE ENGINE OIL
CLEAN AIR FILTER
SPARK PLUG INSPECTION
REMARKS
MAINTENANCE SCHEDULE
Item Hours of Operation
Check engine oil level
Every time before use
Check for loose/lost
fasteners
Check for damage
Verify function of control
elements
Check fuel level
Check for fuel/oil leaks
Check cutting line
Engine oil replacement Every 20 hours
Clean air cleaner
Every 20 hours. Every 10
hours in dusty conditions
Check spark plug Every 20 hours
The engine oil replacement is easier if engine is warm
(NOT HOT!).
1. Open the oil tank cap and drain the old oil to an
approved container.
2. Return the engine to an upright position and rell with
lubricant following the instructions in the ADDING/
CHECKING ENGINE OIL section in this manual.
3. Clean the oil dropped on the unit if necessary.
The air lter element should be cleaned to provide the
engine abundant clear air which aids in starting, power,
and life time of the engine.
1. Remove the air lter cover. To remove, press the
green button on the top of the cover with thumb and
gently push up the cover with index nger.
2. Remove the air lter.
3. If only cleaning of the air lter is necessary, take the
air lter pad out and clean it with dry compressed air
until all dust is removed. Wear protective goggles and
mask to protect your health during this procedure.
Reinstall the air lter cover by closing the air lter cover
over the button on the housing, then push the cover
until it locks securely in the place.
NOTE: Make sure the lter is seated properly inside the
cover. Incorrect installation will allow dirt to enter the
engine, causing rapid engine wear.
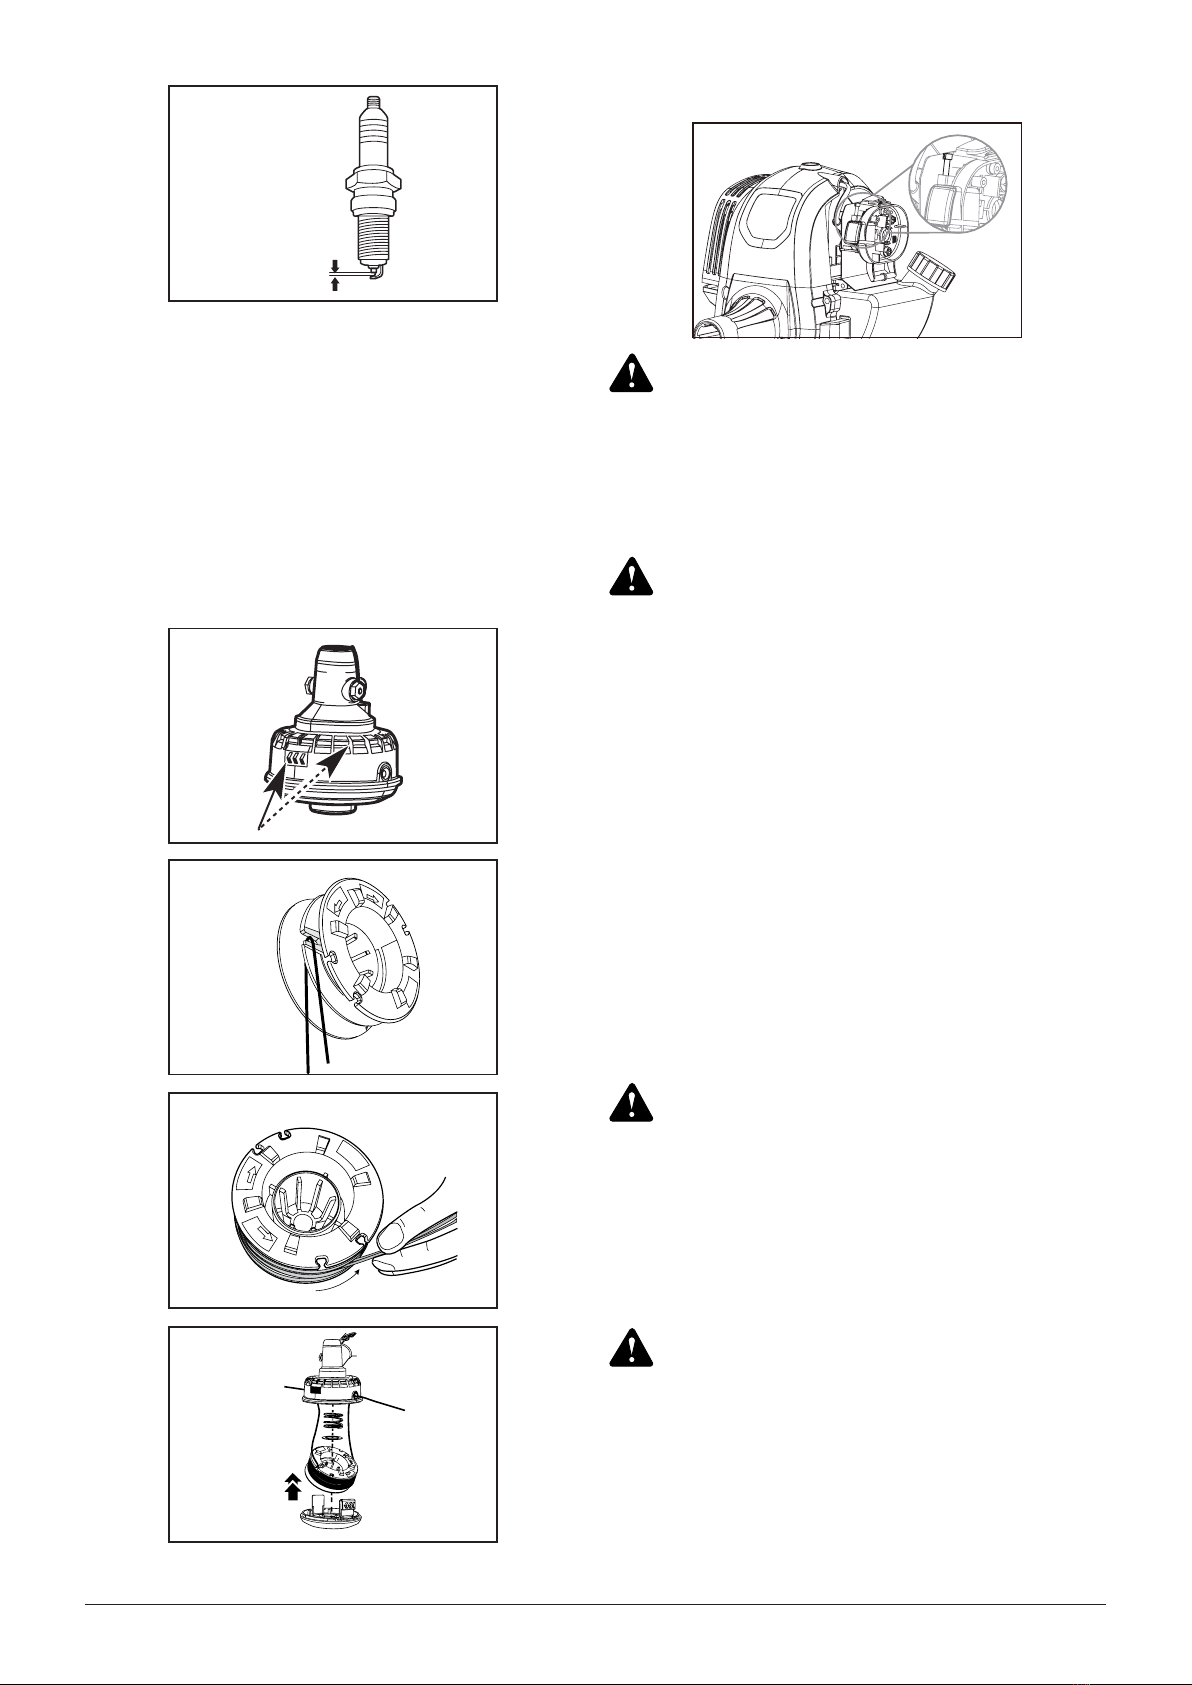
1. Pull off the spark plug cap and clean the dust in the
spark plug area.
2. Remove the spark plug with the provided socket
wrench.
3. Check the ceramic isolation. Replace the spark plug
if damaged.
4. Clean the electrodes (metal tip) to refresh the
surfaces.
5. Reinstall the spark plug or replace it if necessary.
Reinstall the spark plug cap.
MAX
12 WWW.SENIXTOOLS.COM
REPLACE CUTTING LINE
ADJUST IDLE SPEED
1. Open the cutting line spool by pressing the two
release buttons on the side. Take out the winding
core (Fig. A+B).
2. Divide a cutting line in 2 equal halves, x it in the
winding core and start to wind the cutting line in two
separated rails (Fig. B). Follow the indicated winding
direction.
3. Fix the 2 line ends (ca. 15 cm) at the opening to keep
the line winded tightly (Fig. C).
4. Guide the 2 line ends into the holes on the spool
housing and restore the spool cover (Fig. D).
0.6-0.8 mm
CLEANING
If the engine will not idle properly:
1. Start the engine. Refer to Starting and Stopping.
2. Release the throttle control and let the engine idle.
• If the engine stops, increase the idle speed. Use a
small Phillips screwdriver to turn the idle speed screw
clockwise, 1/8 of a turn at a time, until the engine idles
smoothly.
• If the cutting head spins when the engine idles,
reduce the idle speed. Turn the idle speed screw
counterclockwise, 1/8 of a turn at a time, until the
cutting head stops moving.
The cutting attachment should never turn at idle. Turn
the idle speed screw counterclockwise to reduce the
idle RPM and stop the cutting attachment, or contact
customer support for adjustment and discontinue use
until the repair is made. Serious personal injury could
result from the cutting attachment turning at idle.
To avoid serious personal injury, always stop the engine
and allow it to cool before cleaning or maintaining the
unit.
The cutting head will move when adjusting the idle
speed. Wear all protective clothing and keep all
bystanders, children, and pets at least 50 ft. away. Make
adjustments with the unit supported by hand so that the
cutting head does not contact the ground or any object.
Keep all parts of your body away from the cutting head
and mufer. Failure to follow these instructions could
result in serious personal injury.
The cutting attachment should never turn at idle. Turn
the idle speed screw counterclockwise to reduce the
idle RPM and stop the cutting attachment, or contact
customer support for adjustment and discontinue use
until the repair is made. Serious personal injury could
result from the cutting attachment turning at idle.
Use a small brush to clean the outside of the unit. Do
not use strong detergents. Household cleaners that
contain aromatic oils such as pine and lemon, and
solvents such as kerosene, can damage plastic. Wipe
off any moisture with a soft cloth.
WARNING:
WARNING:
WARNING:
WARNING:
B
C
D
A

13WWW.SENIXTOOLS.COM
TRANSPORTATION
STORAGE
• Never store a fueled unit where fumes may reach an
open ame or spark.
• Allow the engine to cool before storing.
• Lock up the unit to prevent unauthorized use or
damage.
• Store the unit in a dry, well-ventilated area.
• Store the unit out of the reach of children.
Short-term Storage (1-2 weeks)
Store the unit in a horizontal position. If not possible,
store the unit vertically with the engine at the top.
Long-term Storage
1. Remove the fuel cap, tip the unit and drain the fuel
into an approved container. Reinstall the fuel cap.
2. Start the engine and allow it to run until it stalls.
This ensures that all fuel has been drained from the
carburetor.
3. Allow the engine to cool. Remove the spark plug
and put 5 drops of any high quality motor oil into the
cylinder. Pull the starter rope slowly to distribute the
oil. Reinstall the spark plug.
4. Thoroughly clean the unit and inspect it for any loose
or damaged parts. Repair or replace damaged parts
and tighten loose screws, nuts or bolts.
5. Store the unit in a horizontal position. If horizontal
storage is not possible, store unit vertically with
engine at top.
Preparing the Unit for Use after Long-term
Storage
1.Remove the spark plug. Tip the unit and drain all of
the oil from the cylinder into an approved container.
Reinstall the spark plug.
2.Change the oil. Refer to Changing the Oil.
NOTE: Do not use fuel that has been stored for more
than 30 days. Dispose of old fuel and oil according to
federal, state and local regulations.
Transport the unit in a horizontal position. If not
possible, transport the unit vertically with the engine at
the top. Secure the trimmer shaft to prevent damage
during transport.
Correct and regular cleaning is not only important for
the safe use of this product, but also extends its life
span.

14 WWW.SENIXTOOLS.COM
TROUBLESHOOTING
THE ENGINE WILL NOT START
The fuel tank is empty Fill the fuel tank with fresh fuel
The primer bulb was not pressed enough Press the primer bulb 10 times
The fuel is old (over 30 days) Drain the fuel tank and add fresh fuel
The spark plug is fouled Replace the spark plug
THE ENGINE WILL NOT IDLE
The air lter is dirty Clean or replace the air lter
The fuel is old (over 30 days) Drain the fuel tank and add fresh fuel
Idle speed screw needs adjustment Turn idle speed screw clockwise to increase idle speed
THE ENGINE EMITS TOO MUCH SMOKE
Too much oil in crankcase Drain engine oil and rell with correct amount of engine lubricant
THE ENGINE WILL NOT ACCELERATE
The fuel is old (over 30 days) Drain the fuel tank and add fresh fuel
The cutting head is bound with grass Stop the engine and clean the cutting head
The air lter is dirty Clean or replace the air lter
THE ENGINE LACKS POWER OR STALLS
The fuel is old (over 30 days) Drain the fuel tank and add fresh fuel
The air lter is dirty Clean or replace the air lter
The spark plug is fouled Replace the spark plug
LINE WILL NOT ADVANCE
Line is welded to itself Replace line
Not enough line on spool Install more line
Line is worn too short Pull lines while alternately pushing down and releasing spooll
retainer
Line is tangled on spool Remove line and rewind
Engine speed too slow Advance line at full throttle
SPOOL RETAINER HARD TO TURN
Screw threads are dirty or damaged Clean threads and lubricate with grease. If no improvement,
replace spool retainer
GRASS WRAPS AROUND DRIVESHAFT
Cutting tall grass at ground level/Operating
trimmer at part throttle Cut tall grass from the top down to prevent wrapping/ Operate
trimmer at full throttle
If further assistance is required, take the unit to a qualied service dealer.
PROBLEM SOLUTION

15WWW.SENIXTOOLS.COM
WARRANTY
LIMITED THREE-YEAR WARRANTY
Additional Limitations
3-year limited warranty on all Senix 4QL series gasoline powered equipment. FOR THREE YEARS from the
original date of retail purchase this Senix product is warranted against defects in materials or workmanship on
power tools. Defective product will receive free repair.*
This warranty does not cover normal wear of parts and components such as cutting chain, line or blades nor does
this warranty cover product transportation cost for warranty or service.
Any implied warranty granted under state law, including warranties of merchantability or tness for a particular
purpose, are limited to three years from the date of purchase on power tools and chargers and seven years on
batteries. The manufacturer is not responsible for direct, indirect, incidental or consequential damages. Some
states and provinces do not allow limitations on how long an implied warranty lasts and/or do not allow the
exclusion or limitation of incidental damages, so the above limitations and exclusions may not apply to you. This
warranty gives you specic legal rights, and you may also have other rights which vary from state to state or
province to province.
The YAT USA declines any responsibility in regard to civil liability arising from abusive use or not in conformity with
proper use and maintenance of the machine as described in the operator’s manual.
YAT USA is not responsible for direct, indirect, incidental or consequential damages.
After the purchase, the manufacturer recommends proper maintenance of the machine and to read the operator’s
manual before using the machine.
*Original purchase receipt may be required for proof of purchase
For customer service contact us toll free at 1-800-261-3981 or Senixtools.com.
YAT USA, Inc. 9048 E Bahia Dr, suite 105, Scottsdale, AZ 85260
Warranty is subject to the following conditions:
• Warranty applies to the original purchaser at retail and is not transferrable*
• Warranty Registration at www.senixtools.com
• The tool has not been misused, abused, neglected, altered, modied or repaired by anyone other than an
authorized service center
• Only genuine Senix accessories have been used with or on this product
• The tool has been subjected to normal wear and tear
• The tool has not been used for trade or professional purposes
• The tool has not been used for rental purposes
• This warranty only covers defects arising under normal usage and does not cover any malfunction, failure or
defect resulting from misuse, abuse (including overloading the product, exposure to water or rain) accidents,
neglect or lack of proper installation and improper maintenance or storage.
To locate your nearest Senix service provider call toll free at 800-261-3981 or email us at [email protected].

Cortador a gasolina con motor de 4
ciclos de 1.62 pulg. cúb. (26.5 cc)
Manual del operador
Modelo: GTC4QL-L
GTS4QL-L
Para el servicio de asistencia al cliente, llame al 1-800-261-3981 o envíe un correo electrónico a:
CONSERVE ESTE MANUAL PARA REFERENCIA EN EL FUTURO.
17WWW.SENIXTOOLS.COM
ÍNDICE
SEGURIDAD.................................................................................17
CONOZCA SU UNIDAD...............................................................21
ESPECIFICACIONES*.................................................................21
ENSAMBLAJE...............................................................................22
OPERACIÓN.................................................................................24
MANTENIMIENTO........................................................................27
DETECCIÓN Y SOLUCIÓN DE PROBLEMAS.............................30
GARANTÍA....................................................................................31
Indica un peligro EXTREMO.
Si no sigue el símbolo de seguridad de PELIGRO, se
producirá una lesión grave o la muerte, tanto para usted
como para los demás.
Indica un peligro GRAVE. Si no sigue el símbolo de
seguridad de ADVERTENCIA, se puede producir una
lesión grave, tanto para usted como para los demás.
Indica un peligro MODERADO. Si no sigue el símbolo
de seguridad de PRECAUCIÓN, se podría producir
un daño a la propiedad o una lesión, tanto para usted
como para los demás.
PROPUESTA 65 DE CALIFORNIA
Este producto contiene un químico, cuyos efectos
son reconocidos por el Estado de California por
causar cáncer, defectos de nacimiento u otros daños
reproductivos.
NOTA: Le avisa que hay información o instrucciones
vitales para la operación o el mantenimiento de los
equipos.
Lea el manual del operador y siga todas las
advertencias e instrucciones de seguridad. Si no lo
hace, puede producirse una lesión grave que afecte
al operador y/o a los transeúntes.
• SÍMBOLOS DE SEGURIDAD E INTERNACIONALES •
El petróleo crudo, la gasolina, el combustible diésel
y otros derivados del petróleo pueden exponerlo a
sustancias químicas, incluyendo tolueno y benceno,
cuyos efectos son reconocidos por el Estado de
California por causar cáncer y defectos de nacimiento u
otros daños reproductivos. Estas exposiciones pueden
ocurrir cerca de campos petrolíferos, renerías, plantas
químicas, operaciones de transporte y almacenamiento,
como tuberías, terminales marítimos, camiones
cisterna y otras instalaciones y equipos. Para mayor
información, visite:
www.P65Warnings.ca.gov/petroleum.
El presente manual del operador describe los
símbolos de seguridad e internacionales, así como
los pictogramas que pueden aparecer en este
producto. Lea el manual del operador para consultar
la información completa sobre seguridad, ensamblaje,
operación, mantenimiento y reparación.
PELIGRO:
ADVERTENCIA:
PRECAUCIÓN:
ADVERTENCIA:
ADVERTENCIA:
SEGURIDAD
SÍMBOL NOMBRE SIGNIFICADO
Manténgase
alerta Este gráco acompañado por
las palabras ADVERTENCIA,
PELIGRO O PRECAUCIÓN
llama la atención hacia un acción
de una condición que puede
conllevar a una LESIÓN GRAVE.
Lea el
Manual del
operador
Lea el manual del operador y
siga todas las advertencias e
instrucciones de seguridad. Si
no lo hace, puede producirse
una lesión grave que afecte al
operador y/o a los transeúntes.
Use
protección
para la vista
y la audición.
Siempre use protección para la
vista, protección para la audición
y protección para la cabeza que
cumpla con las normas ANSI
Z87.1.
Use
protección
para los pies
Use protección para los pies
Use guantes Use guantes
Tenga cuidado de las lesiones
a los pies causadas por los
aditamentos de corte.
Tenga cuidado de los
objetos proyectados por los
aditamentos de corte. Nunca
use la unidad sin una protección
correctamente montada.
Manténgase a 15 metros de
distancia de cualquier otra
persona.
Tenga cuidado de los
objetos proyectados por los
aditamentos de corte. Nunca
use la unidad sin una protección
correctamente montada.
No instale ningún tipo de cuchilla
en la unidad que muestre este
símbolo.
72dB(A)
MEASURED AT 50FT. (15M)
PER ANSI B175.3
Nivel de presión acústica para los
transeúntes: 72dB(A)

18 WWW.SENIXTOOLS.COM
1. Se deben observar las precauciones de seguridad
adecuadas. Como con todos los equipos eléctricos,
esta unidad se debe manipular cuidadosamente.
NO SE EXPONGA NI USTED MISMO NI A LOS
DEMÁS AL PELIGRO. Siga estas reglas generales.
No permita que otra personas usen esta unidad a
menos que sean muy responsables y que hayan
leído y comprendido el manual del cortador de hilo
que estén capacitados en su operación.
2. Siempre use gafas de seguridad para la protección
a la vista. Vístase correctamente. No vista ropa
suelta ni use joyas que pudieran enredarse en las
partes móviles de la unidad. Siempre debe usarse
un calzado seguro, sólido y antideslizante. Siempre
use pantalones pesados y largos, botas, guantes
y una camisa de manga larga. No use ropa suelta,
joyas, pantalones cortos, sandalias ni esté descalzo.
Átese el cabello para que esté por encima del nivel
del hombro. El cabello largo debe estar atado hacia
atrás. Se recomienda cubrir las patas y piernas para
protegerse de los escombros que vuelen durante la
operación.
3. Inspeccione toda la unidad en busca de piezas
sueltas (tuercas, pernos, tornillos, etc.) y cualquier
daño antes de comenzar y de operar. Repare o
reemplace según sea necesario antes de usar la
máquina.
4. Modicar su cortador o instalar aditamentos que no
son marca Senix puede hacer que su cortador sea
inseguro. Los aditamentos que no son marca Senix
han sido generalmente diseñados para aplicaciones
universales. Aunque los aditamentos posventa
pueden caber en su cortador, podrían no cumplir con
las especicaciones da fábrica y podrían hacer que
su cortador sea inseguro. No retire el protector del
cabezal de corte no modique su cortador de manera
que altere su diseño u operación. Esto podría hacer
que su cortador sea inseguro. Como resultado, se
podría producir una lesión grave al operador o a los
transeúntes, así como un daño a la máquina.
5. Mantenga las asas sin aceite ni combustible.
6. No opere la unidad bajo condiciones de iluminación
decientes.
7. No opere la unidad cuando esté cansado, cuando
su concentración se hay deteriorado y/o esté bajo la
inuencia de drogas, medicamentos o alcohol.
8. Siempre use las asas adecuadas cuando corte.
9. No fume mientras llene el tanque.
10. No llene el combustible en una habitación cerrada
o cerca de llamas abiertas. Asegúrese que haya
ventilación adecuada.
11. Siempre guarde en un contenedor correctamente
marcado que sea aprobado por códigos y
ordenanzas locales para dicho uso.
12. Nunca retire el tapón del tanque de combustible
cuando el motor esté encendido.
13. Nunca arranque u opere el producto dentro de
una habitación o edicio cerrado. Los vapores
del escape contienen el peligroso monóxido de
carbono.
14. Nunca intente hacer ajustes al motor mientras la
ADVERTENCIAS DE SEGURIDAD unidad esté encendida. Siempre realice ajustes
al motor con la unidad descansando sobre una
supercie plana y despejada.
15. No use la unidad si está dañada o mal ajustada.
Nunca retire la protección de la unidad. Como
resultado, se podría producir una lesión grave al
operador o a los transeúntes, así como un daño a
la máquina.
16. Inspeccione el área a cortar y retire todos los
escombros que pudieran atascarse en el cabezal
de corte de nylon. También retire cualquier objeto
que la unidad pueda arrojar durante el corte.
17. Mantenga a los niños alejados. Los observadores
deben estar a una distancia segura del área de
trabajo, al menos a 15 METROS (50 PIES) de
distancia.
18. Nunca deje la unidad desatendida mientras el motor
esté encendido.
19. El cortador ha sido diseñado para cortar césped,
mala hierba y maleza . Otros usos podrían dar
como resultado una lesión al operador o daños al
cortador y a la propiedad.
20. No se estire demasiado. Mantenga su posición
de pie y su equilibrio en todo momento. No use la
unidad mientras esté parado sobre una escalera de
tijera o sobre cualquier otro lugar inestable.
21. Mantenga las manos y pies a una distancia segura
de la línea de corte de nylon mientras la unidad
esté en uso.
22. No use este tipo de unidad para limpiar los
escombros.
23. Use un cabezal de corte de nylon que no presente
daños. Si se golpea una piedra o algún otro
obstáculo, detenga el motor y verique el cabezal
de corte de nylon. Nunca debe usarse un cabezal
de corte de nylon roto o desequilibrado.
24. SIGA LAS INSTRUCCIONES para el ensamblaje y
la operación.
25. No guarde la unidad en un área cerrada donde los
vapores del combustible puedan alcanzar una llama
abierta de calderos de agua, hornos, etc. Guárdela
solamente en un área bien ventilada y asegurada.
26. Asegure el rendimiento seguro y adecuado de su
unidad. Solo use accesorios originales. El uso de
otros accesorios o aditamentos puede causar un
peligro o lesión potencial al usuario, daños a la
unidad e invalidar la garantía.
27. Si la unidad no va a ser utilizada por largo tiempo,
limpie la unidad completamente, especialmente el
tanque de combustible/aceite, sus alrededores y el
ltro de aire.
28. Cuando reabastezca de combustible, detenga el
motor y conrme que se haya enfriado. Nunca
reabastezca de combustible cuando el motor esté
encendido o caliente. Cuando haya una fuga de
gasolina, asegúrese de limpiarla completamente
y deseche esos materiales antes de arrancar el
motor.
29. Permanezca alejado de los demás trabajadores
o transeúntes al menos a una distancia de 15
metros/50 pies.
30. Cuando usted se acerque a un operador de
la unidad, llame su atención cuidadosamente

19WWW.SENIXTOOLS.COM
y conrme que haya detenido el motor. Tenga
cuidado de no sorprender o distraer al operador, lo
que podría causar una situación insegura.
31. Nunca toque el cabezal de corte de nylon cuando
el motor esté en marcha. Si es necesario ajustar el
protector o el cabezal de corte de nylon, asegúrese
de detener el motor y conrme que el cabezal de
corte de nylon se ha detenido.
32. El motor tiene que apagarse cuando se mueve la
unidad a distintas áreas de trabajo.
33. Tenga cuidado de no golpear el cabezal de corte de
nylon contra las piedras o el suelo. Una operación
irrazonable y descuidada acortará la vida de la
unidad, además de crear un entorno inseguro para
usted o para quienes se encuentran a su alrededor.
34. Preste atención a las piezas sueltas o
sobrecalentadas. Si se produce alguna anormalidad
de la unidad, detenga la operación inmediatamente
y verique la unidad cuidadosamente. De ser
necesario, que la unidad sea revisada por el
servicio de asistencia al cliente. Nunca siga
operando una unidad que pudiera estar defectuosa.
35. Al momento del arranque o durante la operación del
motor, nunca toque las piezas calientes, como el
amortiguador, al alambre de alta tensión o la bujía.
36. Luego que el motor se ha detenido, el amortiguador
sigue caliente. Nunca coloque la unidad en lugares
donde haya materiales inamables (césped seco,
etc.), gases combustibles o líquidos combustibles.
37. Preste particular atención a la operación en la lluvia
o justo después de la lluvia, ya que el suelo podría
estar resbaloso.
38. Si se resbala o cae al suelo, suelte la palanca del
acelerador inmediatamente.
39. Tenga cuidado de no dejar caer la unidad o de
golpearla contra los obstáculos.
40. Antes de proceder a ajustar o reparar la unidad,
asegúrese de detener el motor y desenganchar la
bujía.
41. Cuando la máquina se coloca en el
almacenamiento durante un largo tiempo, drene
el combustible/aceite del tanque de combustible/
aceite y del carburador, limpie las piezas y mueva
la máquina a un lugar seguro.
42. Realice inspecciones periódicas para garantizar
una operación segura y eciente. Para una
inspección minuciosa de su unidad, contacte el
servicio de asistencia al cliente.
43. Mantenga la unidad lejos del fuego o de las
chispas.
44. Mantenga su cuerpo caliente, especialmente la
cabeza, el cuello, los pies, los tobillos, las manos y
las muñecas.
45. Mantenga una buena circulación de la sangre
realizando ejercicios vigorosos con los brazos
durante los descansos frecuentes en el trabajo y
también no fumando.
46. Limite las horas de operación.
47. Si sufre molestias, enrojecimiento e hinchazón
de los dedos, seguido de decoloración y pérdida
de sensibilidad, consulte a su médico antes de
exponerse aún más al frío y a las vibraciones.
48. Siempre use protección para la audición. Los ruidos
50. No coloque la máquina de costado; de lo contrario
el combustible puede derramarse.
51. La evaporación del combustible durante el
reabastecimiento de combustible y los gases de
escape son perjudiciales para el operador y la
gente alrededor de la unidad.
52. Asegúrese que la evaporación del combustible y
los gases de escape no se desplacen a la cara del
operador y mantenga a otras personas fuera de su
área de trabajo.
53. No permita que niños o personas no capacitadas
usen esta unidad.
• Los pulmones pueden dañarse si no se usa una
mascarilla antipolvo efectiva.
• La audición puede dañarse si no se usa una
protección contra los oídos efectiva.
• Los defectos de salud que sean resultado de la
emisión de vibraciones si la unidad se usa por largos
períodos de tiempo o si no se maneja o mantiene
adecuadamente.
El cabezal de hilo es todavía peligroso mientras la
máquina avanza sin esfuerzo hasta detenerse.
Incluso cuando la unidad sea utilizada como se indica,
no es posible eliminar todos los factores de riesgo
residuales. Los siguientes peligros pueden surgir en
conexión con la construcción y el diseño de la unidad.
Esta unidad produce un campo electromagnético
durante su operación. Este campo puede interferir, bajo
ciertas circunstancias, con implantes médicos activos
o pasivos. Para reducir el riesgo de lesión seria o
mortal, recomendamos que las personas con implantes
médicos consulten primero con su doctor y el fabricante
del implante antes de operar esta unidad.
Inspeccione la unidad antes de cada uso.
Reemplace las piezas dañadas. Verique para ver si
hay fugas de combustible.
Asegúrese que todos los sujetadores estén en su lugar
y asegurados. Reemplazar las piezas de aditamentos
de corte que estén suradas, rotas o dañadas de
alguna manera. Asegúrese que el aditamento de
corte esté correctamente instalado y bien asegurado.
Asegúrese que el protector del aditamento de corte esté
correctamente jado y en la posición recomendada por
el fabricante. Utilice solo una línea exible y no metálica
ADVERTENCIA:
ADVERTENCIA:
ADVERTENCIA:
ADVERTENCIA:
RIESGOS RESIDUALES
fuertes durante períodos prolongados pueden
causar pérdida de la audición, incluso sordera
permanente.
49. Use guantes de trabajo resistentes y antideslizantes
para mejorar su agarre en el asa. Los guantes
también reducen la transmisión de las vibraciones
de la máquina a sus manos.

20 WWW.SENIXTOOLS.COM
recomendada por el fabricante. Nunca utilice, por
ejemplo, alambre o cable metálico, los cuales pueden
romperse y convertirse en un proyectil peligroso.
No opere la unidad dentro de un entorno cerrado,
como una habitación o edicio; respirar el monóxido de
carbono de los gases de escape puede matarlo.
Mezcle y vierta el combustible al aire libre, donde no
haya chispas ni llamas. Retire lentamente el tapón
de combustible sólo después de detener el motor. No
fume mientras se carga o mezcla combustible. Limpie
el combustible que se haya derramado de la unidad.
Aléjese al menos 3 m (10 pies) del lugar y fuente de
carga de combustible antes de arrancar el motor.
ADVERTENCIA:
ADVERTENCIA:
This manual suits for next models
1
Table of contents
Languages:
Other Senix Trimmer manuals

Senix
Senix GTBCU4QL-M User manual

Senix
Senix HTE3.8-L User manual

Senix
Senix HTX5-M User manual

Senix
Senix HTX2-M User manual

Senix
Senix HTPX2-M User manual

Senix
Senix GTE2.5-L-EU User manual

Senix
Senix GTX2-M User manual

Senix
Senix GTSX5-M-0 User manual

Senix
Senix GTS4QL-M2 User manual

Senix
Senix HT4QL-L User manual


