Sensorex UVT-LED-SW User manual

QUICK START GUIDE

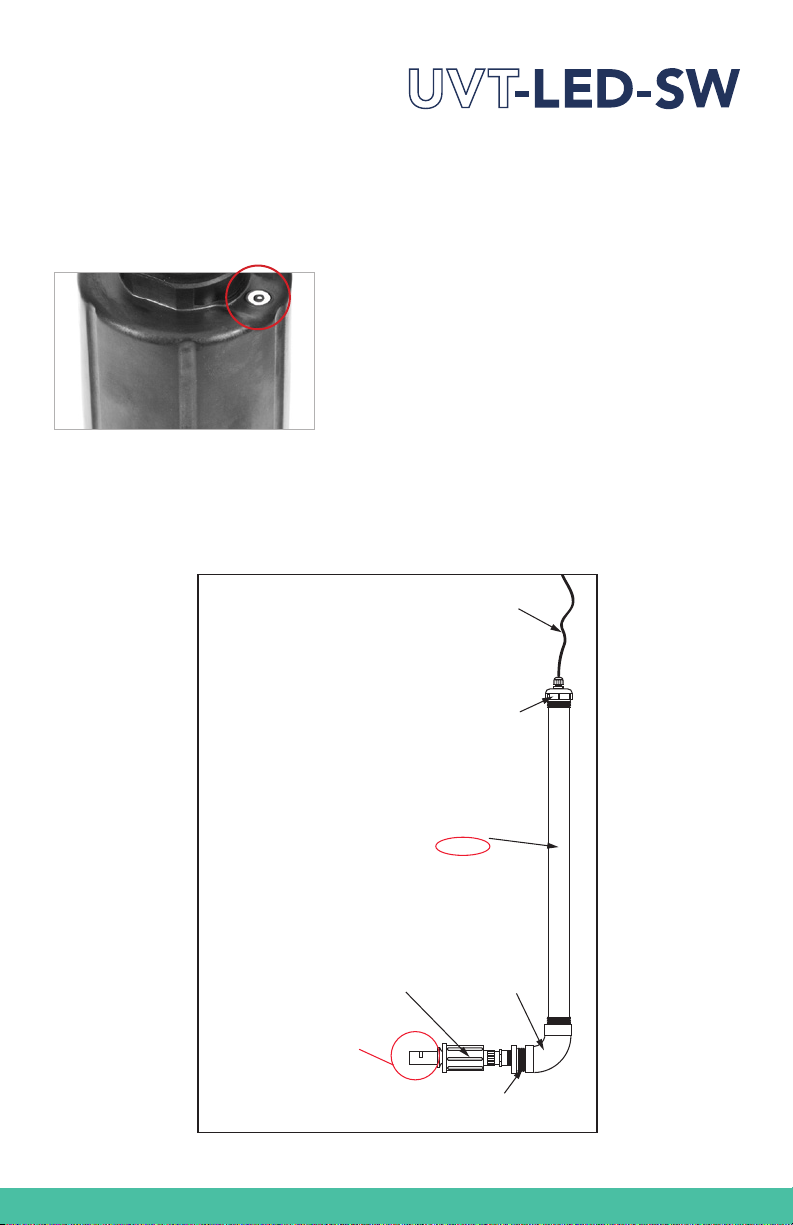
UVT-SW
cable assembly
Wiring Diagram
Wiper Assembly & Optics
Touch magnet to this point
to activate and calibrate
1” NPT. Attach to
UVT-SW-004 or -005
THANK YOU FOR CHOOSING THIS UVT-LED-SW
UV-TRANSMITTANCE SENSOR.
For over forty years, Sensorex has been the preeminent supplier of leading edge technology
and innovative products to measure and monitor the quality of water. Today, we remain
focused on the continual advancement of water quality monitoring products and technology.
The UVT-LED is the latest Sensorex innovation and our rst optical-based measurement
system designed specically for simple, reliable UV-transmittance monitoring.
UVT-LED-SW
+24V
0V/GND
Signal (4-20mA)
STEP 1 – UNPACKING THE UVT-LED
Make sure you have all the proper components. Refer to the packing list for the components
you received based upon your order. You will receive: 1 each UVT-LED-SW sensor, 1 each
UVT-SW-001 (10mtr cable), 1 cleaning swab. Mounting hardware is sold separately.
STEP 3 – INSTALLING THE UVT-LED
The UVT-LED-SW sensor is designed for submersion mounting in open channels. Hardware
is ordered to install sensor onto 6 ft. length pipe assembly that bolts to channel or attaches
to existing hardware from other suppliers.
See UVT-LED manual for cleaning and maintenance information:
http://bit.ly/UVTLEDManual (OVER)
STEP 2 – CALIBRATING THE UNIT
Insert the UVT-LED-SW sensor into de-ionized water
to calibrate. Make sure the water level is above the
opening for the wiper. Place magnet over white loca-
tor on top of sensor for at least 3 seconds. The wiper
will activate. When calibration is complete, the sensor
will BEEP 7 times. The output for calibration should be
close to 20mA (100% UV-T).
SS 90 deg
Elbow
1.25“
SS 1.25” to
1” reducer
UVT-LED-SW sensor
(attached to UVT-SW cable)
Threaded plastic
top cap with 3/8”
NPT cord grip
UVT-SW cable
6ft L SS
1.25”
threaded
pipe
Note: Suggested sensor
orientation is parallel to
ow with wiper oriented
upward
UVT-SW-004
Hardware to install into other
supplier’s clamp that accepts
1 1/4” pipe.

Parts covered by this product data sheet include: UVT-LED-SW
Rev: 2016-11-07
© 2016 Sensorex Corporation
SS 90 deg
Elbow 1.5 “
threaded
SS 1.5” to 1”
reducer
UVT-SW-001 cable
Suggested orientation is with
wiper opening
facing upward and perpendicular
to ow
1.5” threaded
plastic top cap
with 3/8” NPT
cord grip
UVT-SW cable
pipe clamp x 2
6ft L SS 1.5”
threaded
pipe
FLOW
Wall of open channel
UVT-LED-SW sensor
Wall Mounting
Bracket x 2 (installed on
wall clamp with anchor bolt
and washer)
STEP 3 – INSTALLING THE UVT-LED (CONTINUED)
The UVT-LED-SW sensor is designed for submersion mounting in open channels. Hardware
is ordered to install sensor onto 6 ft. length pipe assembly that bolts to channel or attaches
to existing hardware from other suppliers.
UVT-SW-005
Complete hardware to install UVT-LED-SW to wall of channel.
Other Sensorex Accessories manuals


Popular Accessories manuals by other brands

Technoline
Technoline WL 1020 Quick start manual

P.AP. Team
P.AP. Team THOR80 user manual

Baby Jogger
Baby Jogger Glider Board Assembly instructions

Silvercrest
Silvercrest Z32138 Assembly, operating and safety instructions

Master cool
Master cool ADA51 Installation & operation manual

Lake Shore
Lake Shore DT-470 instructions


