Sensorex 8000 Series User manual

Page 1 of 12
Congratulations on your purchase of your Sensorex S8000
series electrode platform. The platform is designed in a modu-
lar fashion with the flexibility to use only the parts needed, or
to add or modify installation and interface requirements with
little or minimal cost impact. All mounting adapters and cables
are designed to be reuseable. Replace only the electrode car-
tridge as needed.
Introduction
Electrode Care and Use Tips
1. The S8000 pH and ORP electrodes are shipped with a cap
containing a solution of pH 4 buffer and potassium chloride.
The cap should remain on the electrode until it is used. If the
electrode is used infrequently the cap and its solution should
be saved and the electrode stored in it. Store pH and ORP
electrodes in pH 4 buffer if soaking solution is discarded.
Before using the pH electrode remove the tape around the
top of the black cap then slide the black cap off of the
electrode. Next, remove small o-ring under black cap and keep
with black cap or discard (SEE FIG 1A).
2. Electrodes are a form of battery and have limited shelf lives.
Electrodes in inventory should be rotated so that the older
electrodes are used first. The date code is stamped on each
electrode by fiscal week and year (Example: 4608 = week 2 of
November 2008). See FIG 2.
3. After exposure to a sample, buffer or rinse solution, carryover
can be minimized by blotting—never by wiping—the elec-
trode with a clean non-abrasive paper or a clean cloth towel.
Do not use a brush on pH glass.
4. As a rinse solution, measure and use a portion of the next
sample or buffer. This action will minimize carryover
contamination.
5. When calibrating pH electrodes, use a buffer close in value to
that expected from the sample for one-point calibrations or as
the second buffer for two-point calibrations (See below). This
action will minimize span errors. ORP electrodes are typically
not calibrated. However, a solution to verify electrode perfor-
mance should be used periodically. 225mV solution, Zobell's
solution (Part no. B225), is a good choice for single point
verification.
PRODUCT INSTRUCTION SHEET
Parts covered by this product data sheet include:
S8000CD, S8000CD-ORP, S8000-HF, S8000CD-LC, S8000CD-ORP-LC,
EA890, EA891, EA899, EA899TC, EM800, EM801, EM802, S853, S855,
FC800, FC801, FC804, FC805, FC806
8000 Series pH/ORP Electrode Platform
Product Instructions
FIG. 1
FIG. 2
Form: InstrS8000-Rev B [Rev: 2015-11-09]
©2011 Sensorex Corporation
FIG. 1A

PRODUCT INSTRUCTION SHEET
Page 2 of 12
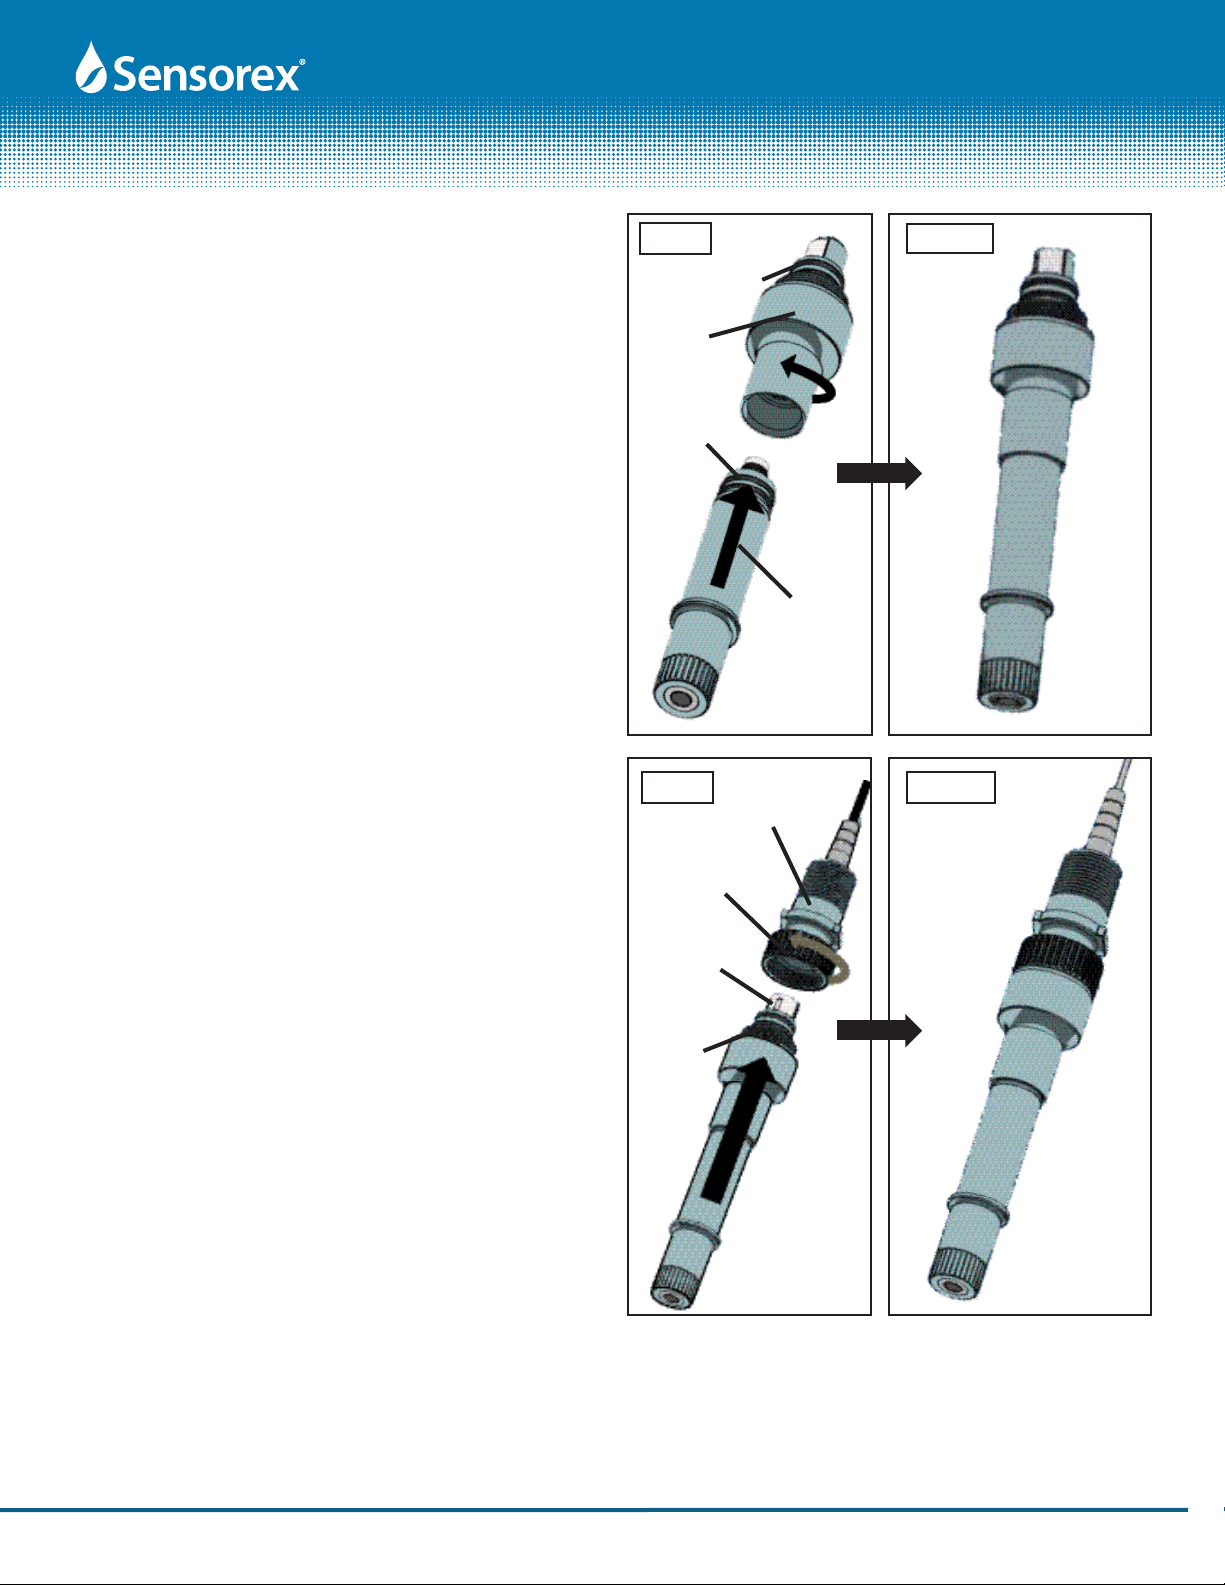
Mechanical Installation
FIG. 3
Submersion Installation With ATC
A) Apply silicone or other waterproof o-ring grease to all three
o-rings of the electrode cartridge (S8000CD, S8000CD-LC).
Install electrode cartridge into housing (EA899TC) by pushing
it up into the housing until you feel resistance at the connec-
tor. Next, rotate the cartridge clockwise until it stops turning.
The electrode should only be installed hand-tight. FIG 3 and
FIG 3A show before and after images of this operation.
B) Grease EA899TC o-rings then install the cable assembly
(S855/10 or S855/25) onto the top of the pH sensor and hous-
ing assembly from step A, by aligning the eight-pin connector
receptacle in the cable assembly with the eight-pin mating
connector on the housing. Hand-tighten knurled nut onto
threads of sensor housing until it stops turning. Before and
after images are shown in FIG 4 and FIG 4A.
GREASE ALL
O-RINGS PRIOR
TO INSTALLATION
Electrode
Cartridge
(S8000CD,
S8000CD-LC)
Housing
(EA899TC)
FIG. 3A
FIG. 4A
FIG. 4
6. Readings stabilize faster in some solutions than in others; allow
time for the readings to stabilize. In general, new pH electrodes
stable readings in buffer are obtained in 10-15 seconds. ORP
stability in samples can take much longer.
7. All pH electrodes age with time. Aging is characterized by
shortened span and slower speed of response. Aging is best
detected by the two-point calibration method. If the pH meter
has manual or microprocessor slope (span) controls, the
controls can be adjusted to compensate for electrode span
errors (but will not affect the speed of response).
8. Electrodes should be replaced when their readings cannot be
corrected by the meter's controls and/or when their speed of
response is too slow for the application for which they are
being used. The frequency of electrode replacement is a func-
tion of the application; electrodes operating in hot liquids at
very high or very low pH values will have shorter lives than
those operating at neutral pH and ambient temperature.
9. Coatings on an electrode's surface prevent new liquids from
contacting an electrode's measuring surface and can mimic the
effects of electrode aging. Before concluding that an electrode
needs replacing, check its surface for coatings by removing the
pH electrode cartridge and looking at the pH glass.
10. Temperature affects electrode readings in two ways. First, the
output of an electrode varies with temperature. For pH elec-
trodes this effect can be corrected by manual or automatic
temperature compensation (ORP/Redox readings are not
corrected for temperature effects). Secondly, the real pH or ORP
value, independent of the electrode measuring the value or use
of the temperature compensation, is temperature dependent.
S855 Cable
assembly)
Knurled
Nut
8-pin connector
Threads mate
with knurled
nut
Form: InstrS8000-Rev B [Rev: 2015-11-09]
©2011 Sensorex Corporation

PRODUCT INSTRUCTION SHEET
Page 3 of 12
Submersion Installation With ATC and Signal
Conditioner
A) Follow steps in FIG 3.
B) Install the signal conditioner assembly onto the top of the
pH sensor and housing assembly by aligning the eight-pin
connector receptacle in the cable assembly with the eight-
pin mating connector on the housing. Hand-tighten knurled
nut onto threads of sensor housing until it stops turning.
See FIG 5 and FIG 5A.
C) Install the S855 cable assembly onto the top of the pH
sensor and housing assembly by aligning the eight-pin
connector receptacle in the cable assembly with the eight-
pin mating connector on the housing. Hand-tighten knurled
nut onto threads of sensor housing until it stops turning.
Before and after images are shown in FIG 6 and FIG 6A.
Grease these
o-rings
FIG. 5
Signal
Conditioner
Grease these
o-rings
8-pin
Connector
8-pin
Connector
Knurled
nut
Knurled
nut
FIG. 6
FIG. 5A
FIG. 6A
Housing
(EA899TC)
EM800 or
EM801 or EM802
S855 Cable
assembly
Form: InstrS8000-Rev B [Rev: 2015-11-09]
©2011 Sensorex Corporation
PRODUCT INSTRUCTION SHEET
Page 4 of 12
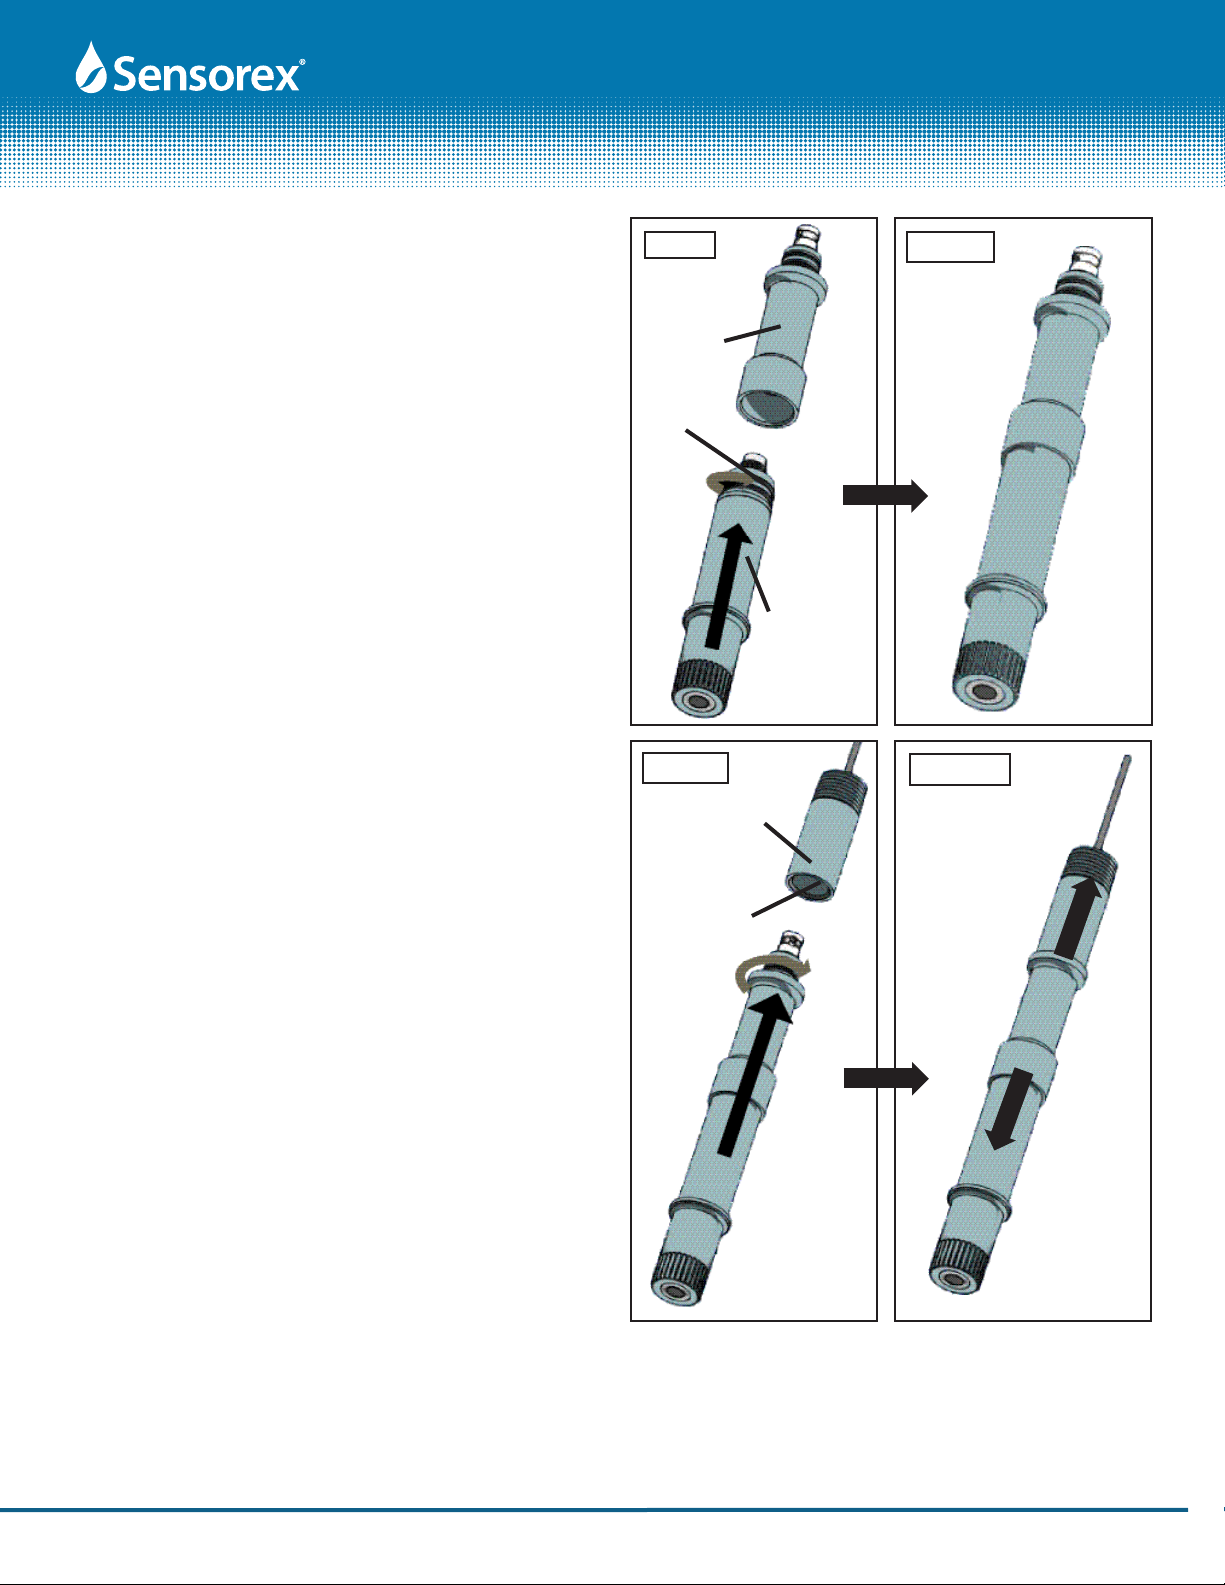
Submersion Installation Without ATC
A) Apply o-ring grease to the two o-rings of the electrode
cartridge closest to its electrical connector. Install electrode
into cable adapter by pushing up and rotating cartridge
clockwise until it stops. The electrode should only be in-
stalled hand-tight. FIG 7 and FIG 7A show before and after
images of this operation.
B) Install the S853 cable assembly onto the top of the pH
sensor and housing assembly by aligning the eight-pin
connector receptacle in the cable assembly with the eight-
pin mating connector on the housing. Hand-tighten knurled
nut onto threads of sensor housing until it stops turning.
Before and after images are shown in FIG 8 and FIG 8A.
FIG. 7
Knurled
nut
8-pin
Connector
Adapter
threads
FIG. 7A
S853
cap cable
Grease these
o-rings
Cable
Adapter
EA891
Electrode
Cartridge
Grease these
o-rings
FIG. 8AFIG. 8
Form: InstrS8000-Rev B [Rev: 2015-11-09]
©2011 Sensorex Corporation
PRODUCT INSTRUCTION SHEET
Page 5 of 12
Submersion Installation Adapting to Old Sensorex
Cap Cable model S653 or S653W
Customers using Sensorex 600 Series electrodes and cap cable
assemblies may easily upgrade to the new and improved S8000
Series pH and ORP electrodes. Use your existing cap cable.
Order the electrode adapter EA890 and the S8000 Series elec-
trode of your choice.
A) Apply o-ring grease to the two o-rings of the electrode
cartridge closest to its electrical connector. Install elec-
trode into cable adapter (EA890) by pushing up and rotating
cartridge clockwise until it stops. The electrode should only
be installed hand-tight. FIG 9 and FIG 9A show before and
after images of this operation.
B) Install the electrode and adapter assembly into the S653,
S653W or S653TC cable assembly by pushing assembly
into S653, S653W or S653TC and rotating until the connec-
tors align. When aligned, press a little more then rotate 1/4
turn clockwise to engage BNC connectors (SEE FIG 10). Be
sure to check that electrode is properly installed by pulling
S653, S653W or S653TC cable assembly away from electrode
and adapter as shown in FIG 10A. The electrode and
adapter assembly cannot be separated from the cable if
connectors are mated properly.
Grease these
o-rings
Electrode
Cartridge
EA890 Cable
Adapter
FIG. 9
Internal BNC
(inside S653)
1/4
turn
FIG. 10
FIG. 9A
FIG. 10A
S653,
S653W or
S653TC
Form: InstrS8000-Rev B [Rev: 2015-11-09]
©2011 Sensorex Corporation

PRODUCT INSTRUCTION SHEET
Page 6 of 12
In-line Installation Without ATC
A) Apply o-ring grease to all three o-rings of the electrode
cartridge. Install electrode cartridge into housing by
pushing it up into the housing until you feel resistance at
the connector. Next rotate the cartridge clockwise until it
stops turning. The electrode should only be installed hand-
tight. FIG 3 shows before and after images of this operation.
B) Install electrode and housing assembly into flow cell. Flow
cell choices include: FC800 (1.5" slip inlet and outlet, FC801
glued into FC800 (see pag 15), FC804 (preinstalled 3/4" NPT
inlet and outlet), FC805 (preinstalled 1" NPT inlet and outlet)
or FC806 (preinstalled 1" slip fitting). Use alignment tabs on
housing and slots on top of tee to ensure parts mate to-
gether. Grease o-rings on housing before installing into tee
to ensure proper sealing and ease of installation. Next, slide
hex nut over top of housing and down until it mates with
threads of tee. Hand-tighten nut only (SEE FIG 11 and 11A).
C) Install the S853 cable assembly onto the top of the pH
sensor and housing assembly by aligning the eight-pin con-
nector receptacle in the cable assembly with the eight-pin
mating connector on the housing. Thread knurled nut onto
threads of sensor housing until it stops turning. Before and
after images are shown in FIG 12 and FIG 12A.
FIG. 11
Grease
this
o-ring
Grease
these
o-rings
FIG. 12
EA899
FIG. 12A
FIG. 11A
FC800
ow cell
Knurled
Nut
S853
cap cable
Form: InstrS8000-Rev B [Rev: 2015-11-09]
©2011 Sensorex Corporation

PRODUCT INSTRUCTION SHEET
Page 7 of 12
In-line Installation With ATC and Signal Converter
A) Apply o-ring grease to all three o-rings of the electrode
cartridge. Install electrode cartridge into housing by push-
ing it up into the housing until you feel resistance at the
connector. Next rotate the cartridge clockwise until it stops
turning. The electrode should only be installed hand-tight.
FIG 3 shows before and after images of this operation.
B) Install electrode and housing assembly from step A into
tee. Use alignment tabs on housing and slots on top of tee
to ensure parts mate together. Grease o-rings on housing
before installing into tee to ensure proper sealing and ease
of installaion. Next, slide hex nut over top of housing and
down until it mates with threads of tee. Hand-tighten nut
only (SEE FIG 11 & 11A).
C) Take housing and tee assembly from FIG 11A and install
signal converter as shown in FIG 13 and FIG 13A.
D) Install the cable assembly onto the top of the signal con-
verter by aligning the eight-pin connector receptacle in the
cable assembly with the eight-pin mating connector on
the housing. Hand-tighten knurled nut onto threads of
sensor housing until it stops turning. Before and after
images are shown in FIG 14 and FIG 14A.
FIG. 13
FIG. 14
EM800 or
EM801 or
EM802
S855
FIG.14A
FIG. 13A
Grease
these
o-rings
Grease
these
o-rings
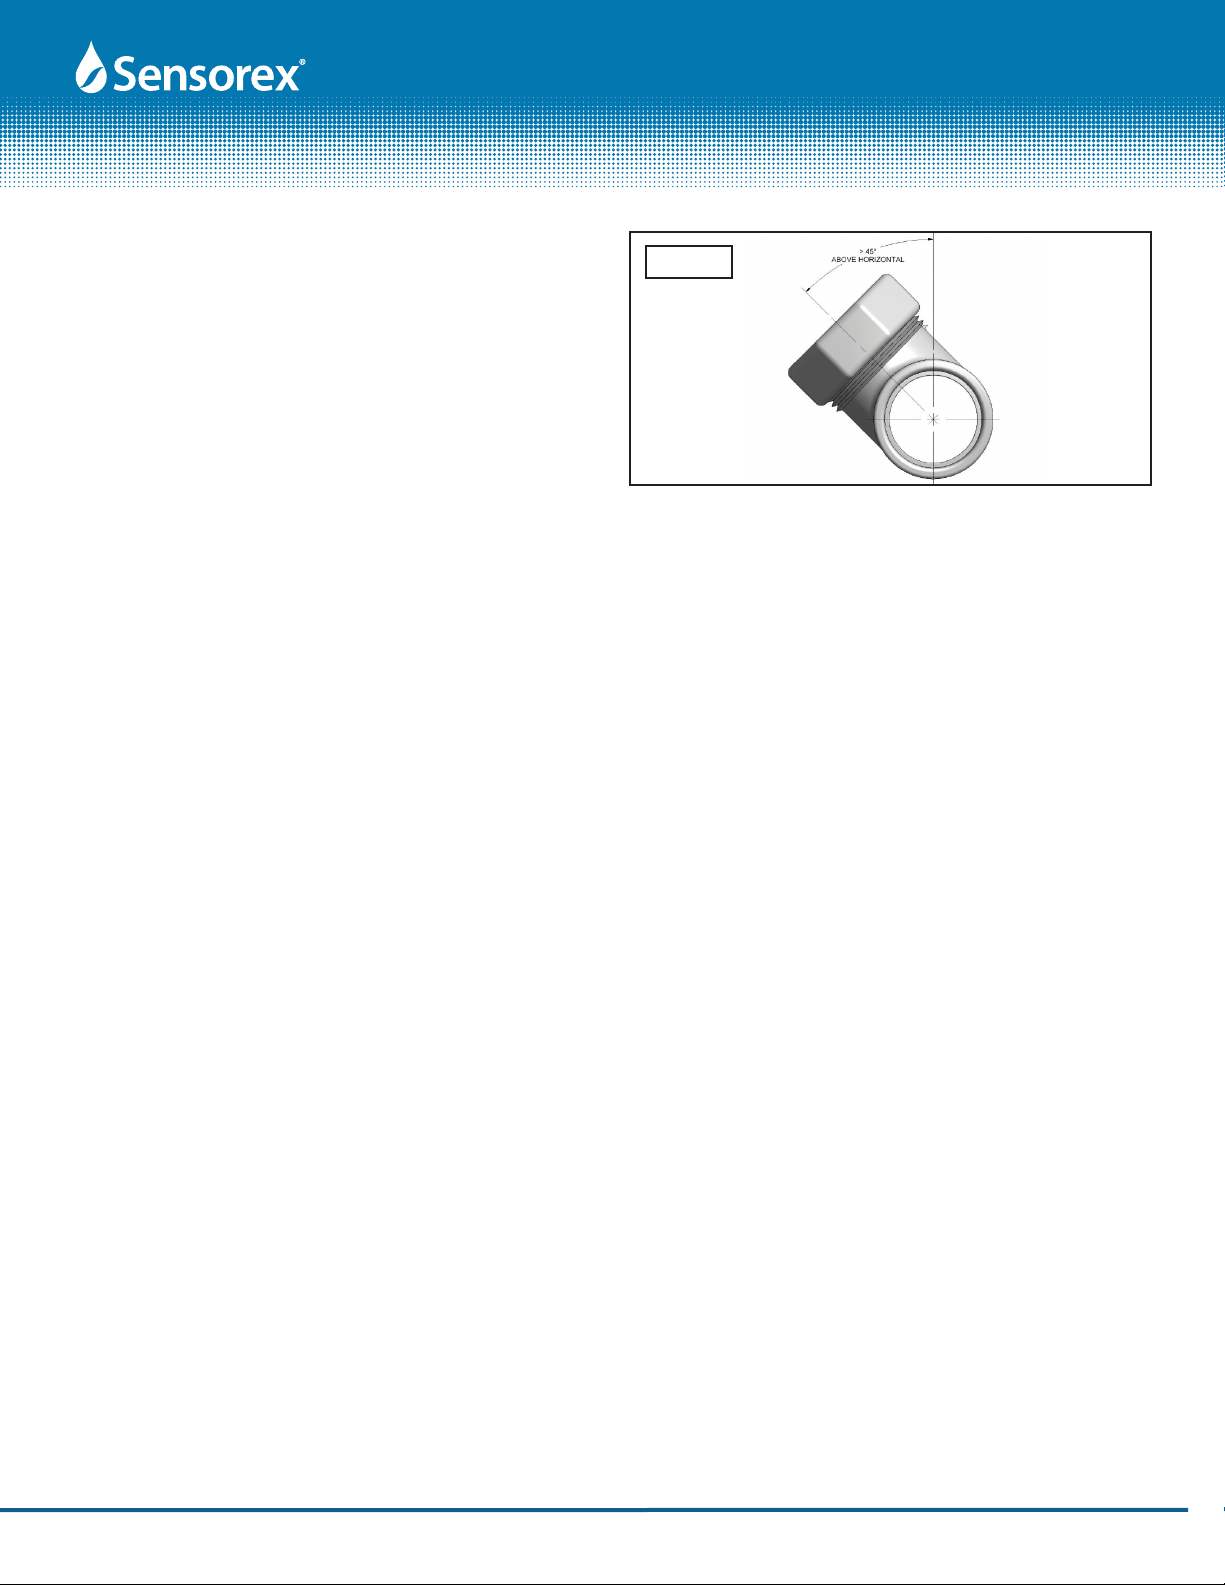
In-line Installation Notes: Make sure to install tee at least 45
degerees above horizontal position. Do not install horizontally.
See FIG 15.
Form: InstrS8000-Rev B [Rev: 2015-11-09]
©2011 Sensorex Corporation
PRODUCT INSTRUCTION SHEET
Page 8 of 12
Installation of FC801 Pipe Adapter
A) Find adapter size marking on part prior to gluing into FC800
tee (SEE FIG 16).
B)Insert and glue opposite side of adapter into FC800 tee as
shown in FIG 17 and 17A. Use standard recommended pipe
gluing practices. Use CPVC primer and adhesive only.
Product Specications
Electrode Specications:
S8000CD
pH Range: 0-14 (sodium ion error above pH 12.3)
Temp Range: 0-100C (derated based on pressure)
0-80C (in FC800)
0-70C with EM modules
Pressure Range: 0-100psig (derated based on temp)
Speed of Response: 95% in 5 seconds
Wetted Materials: PPS (Body), HDPE(junction), pH glass,
Viton o-rings
S8000CD-HF
pH Range: 0-12
Temp Range: 0-50C (derated based on pressure)
Pressure Range: 0-100psig (derated based on temp)
Speed of Response: 95% in 5 seconds
Wetted Materials: PPS (Body), HDPE(junction), HF-resis-
tant pH glass, Viton o-rings
S8000CD-ORP
Range: +/- 1000mV
Temp Range: 0-100C (de-rated based on pressure)
0-80C (in FC800 or with EM modules)
Pressure Range: 0-100psig (derated based on temp)
Wetted Materials: PPS (Body), HDPE(junction), Platinum,
Viton o-rings
Cable Connections:
S853
Coaxial: Center = pH or ORP *
Braid = Reference **
S855
Coaxial: Center = pH or ORP *
Braid = Reference **
(Note: * = 4-20mA (+) with EM802
** = 4-20mA (-) with EM802
Red: Temperature
Black: Temperature
Green: Solution Ground
Mounting Hardware Electronic Module Specications:
FC800, FC801, EM800, EM801, EM802
Temp Range: 0-80C in Tee, 0-70C with module
(derated based on pressure)
Pressure Range: 0-100psig (derated based on temp)
FIG. 15
make sure tee is mounted
at least
45 degrees
above horizontal
Form: InstrS8000-Rev B [Rev: 2015-11-09]
©2011 Sensorex Corporation
PRODUCT INSTRUCTION SHEET
Page 9 of 12
Electrode Calibration Guidlines:
As a rule, follow the procedures shown in the pH Meter's
Instruction Manual. These procedures will vary depending on
whether the meter is a simple type with manual adjustments,
a micro-processor type or a pH transmitter.
The frequency of calibration is a function of many factors.
These factors include:
1) The accuracy required by the application.
2) The value of the off-specification product versus the cost
of calibration.
3) The coating or abrasive nature of the application.
4) The stability of the pH Electrode and pH Meter as a system.
The frequency of calibration is really determined by experi-
ence. At a new installation, calibration might initially be
checked every few hours or shift with the calibration changes
noted in a log. As a pattern of longer stability is found, the
time between calibration checks can be increased to once a
day or once a week.
System Calibration Concepts
The pH Electrode and the pH Meter should always be calibrat-
ed as a system. Electronic calibration of a pH Meter with a pH
signal simulator checks the meter only and does not correct
for imperfections of the pH electrode. Even if perfect when
new, the performance of pH electrodes varies with time, usu-
ally in an unpredictable way. When changing electrodes or
connecting an electrode to a different pH meter re-calibration
must be performed.
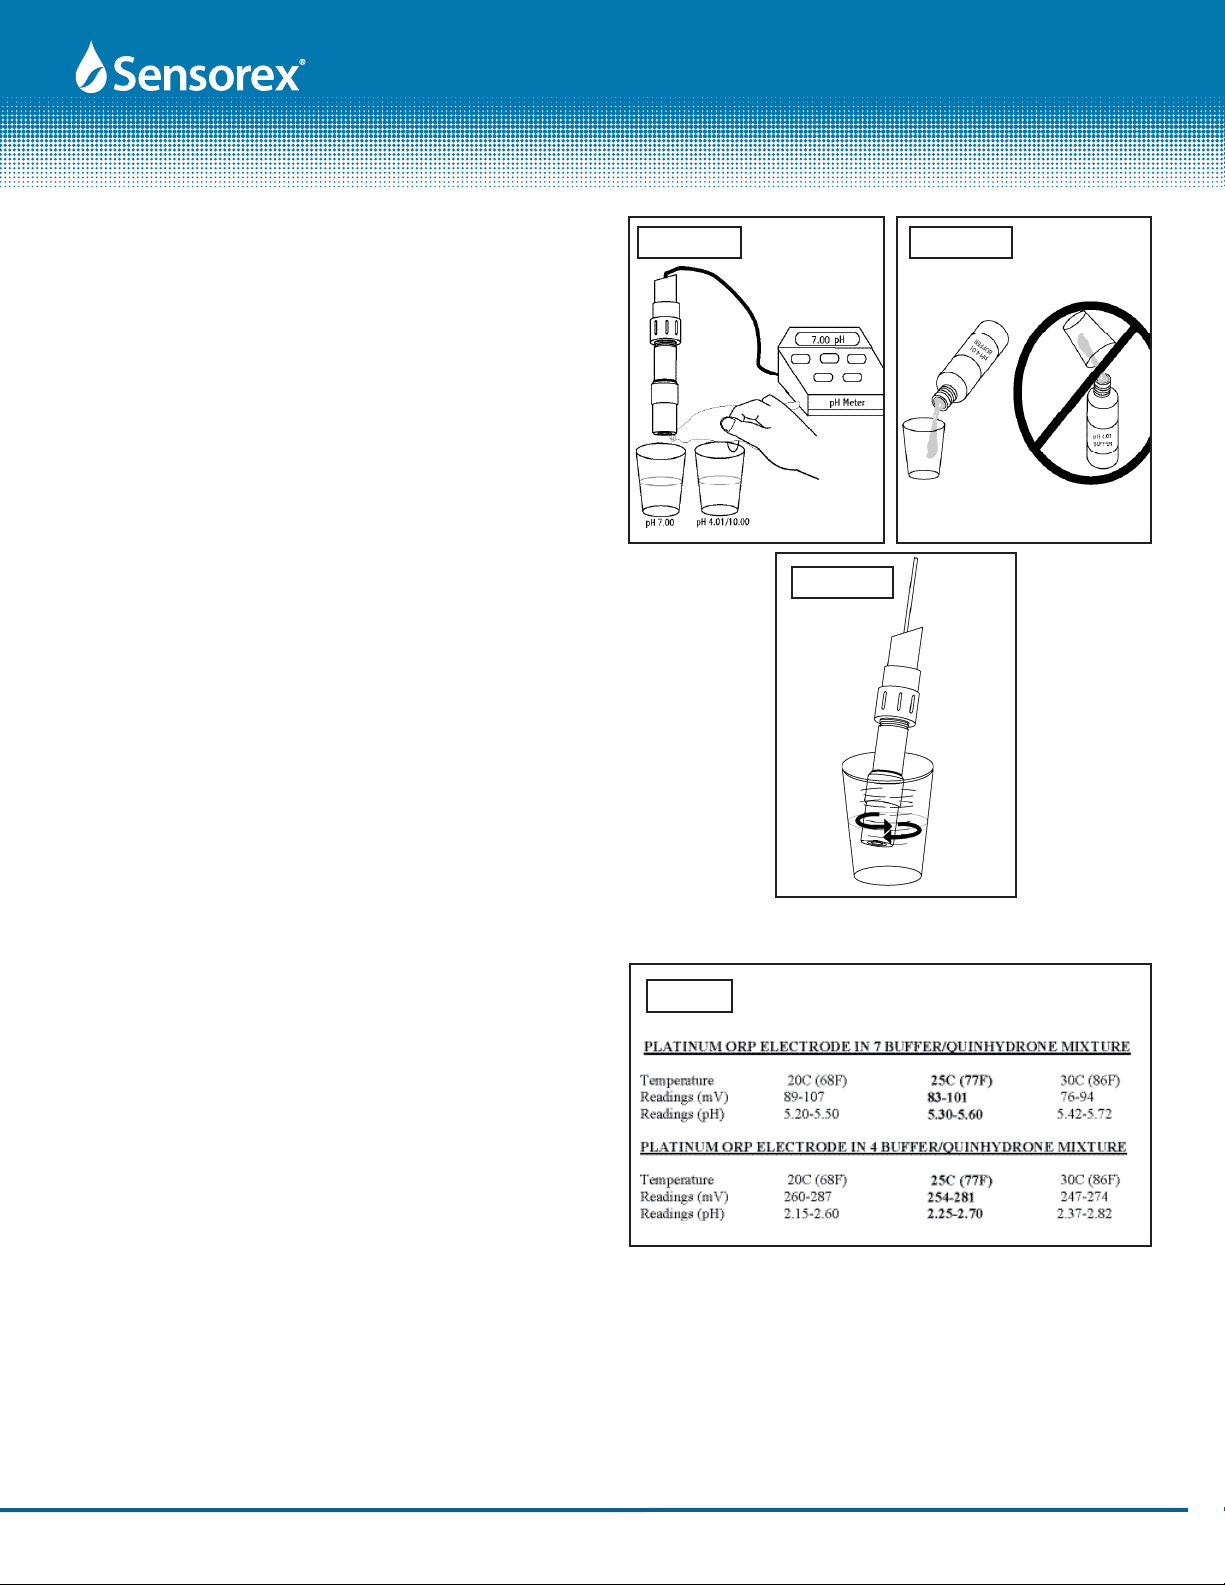
Two-Point Calibrations
Two-point calibrations correct for both the pH electrode's
offset and span errors. Since both the offset and span vary
with time the two-point method is the onr preferred. Choose
buffer pH 7 for zero-point and a second buffer close to your
normal operating range (usually pH4.01 or pH 10.00). See FIG
16 A-C.
Grab Sample Calibrations
The Grab Sample Calibration method is used when it is dif-
ficult or undesirable to remove an electrode from a system.
This method involves obtaining a sample of the liquid being
measured and noting the meter's reading at that time. The
sample's reading is obtained by use of a calibrated lab or
portable meter and that reading is compared to that of the
on-line meter. The on-line meter is adjusted by the difference
between the readings. It is important to use the difference
between the readings because the system's reading may
have changed in the intervening time. It is important that the
sample being measured by the lab meter be at the process
temperature or erroneous results may occur.
FIG. 16A FIG. 16B
FIG. 16C
FIG. 17
Form: InstrS8000-Rev B [Rev: 2015-11-09]
©2011 Sensorex Corporation
PRODUCT INSTRUCTION SHEET
Page 10 of 12
Intermittent Operation
Some facilities are only operated part of the time. When out
of operation, electrodes must not be allowed to be exposed
to air and become dry. Electrodes should be removed from
such systems and stored in their bottles or caps or in a bea-
ker filled, preferably, with pH 4.0 Buffer (SEE FIG 10). In some
instances, power to the meter is shut off; this condition can
be harmful to electrodes. Electrodes should be disconnected
from un-powered meters.
ORP Calibration - Some instruments permit ORP calibration
while others do not. Please refer to your meter's instruc-
tion manual for details. There are many types of ORP/mV
standards available. See FIG 19 for quinhydrone + pH buffer
standards. For all other standards, please refer to label on
standard solution for acceptable measurement range.
Electrode Cleaning Tips:
Coating of an electrode’s measuring surface can lead to er-
roneous readings including shortened span and slow response
times. The type of coating determines the type of cleaning
technique.
Soft Coatings can be removed by vigorous stirring, by use of
a squirt bottle or very carefully, by gently wiping with a soft,
clean non-abrasive paper or cloth. Do not use any brush or
abrasive cleaner on pH glass (SEE FIG 18).
Hard Coatings should be chemically removed. The chemical
used to remove the coating should be the least harsh chemical
that dissolves the coating in one or two minutes and does not
attack the electrode’s materials of construction. For example,
a calcium carbonate coating might be removed with 5% HCl
(muriatic acid).
Oily or Organic Coatings are best removed with detergents or
an appropriate solvent that does not attack the electrode’s ma-
terials of construction. For example, isopropyl alcohol might
be used but acetone should be avoided if the electrode’s body
is made of CPVC.
NOTE: When using chemicals or solvents, care should be taken
and appropriate eye, face, hand, body and/or respiratory pro-
tection should be used.
Protein-based coatings are best removed with an enzyme-
based cleaner such as TERG-A-ZYME (www.alconox.com).
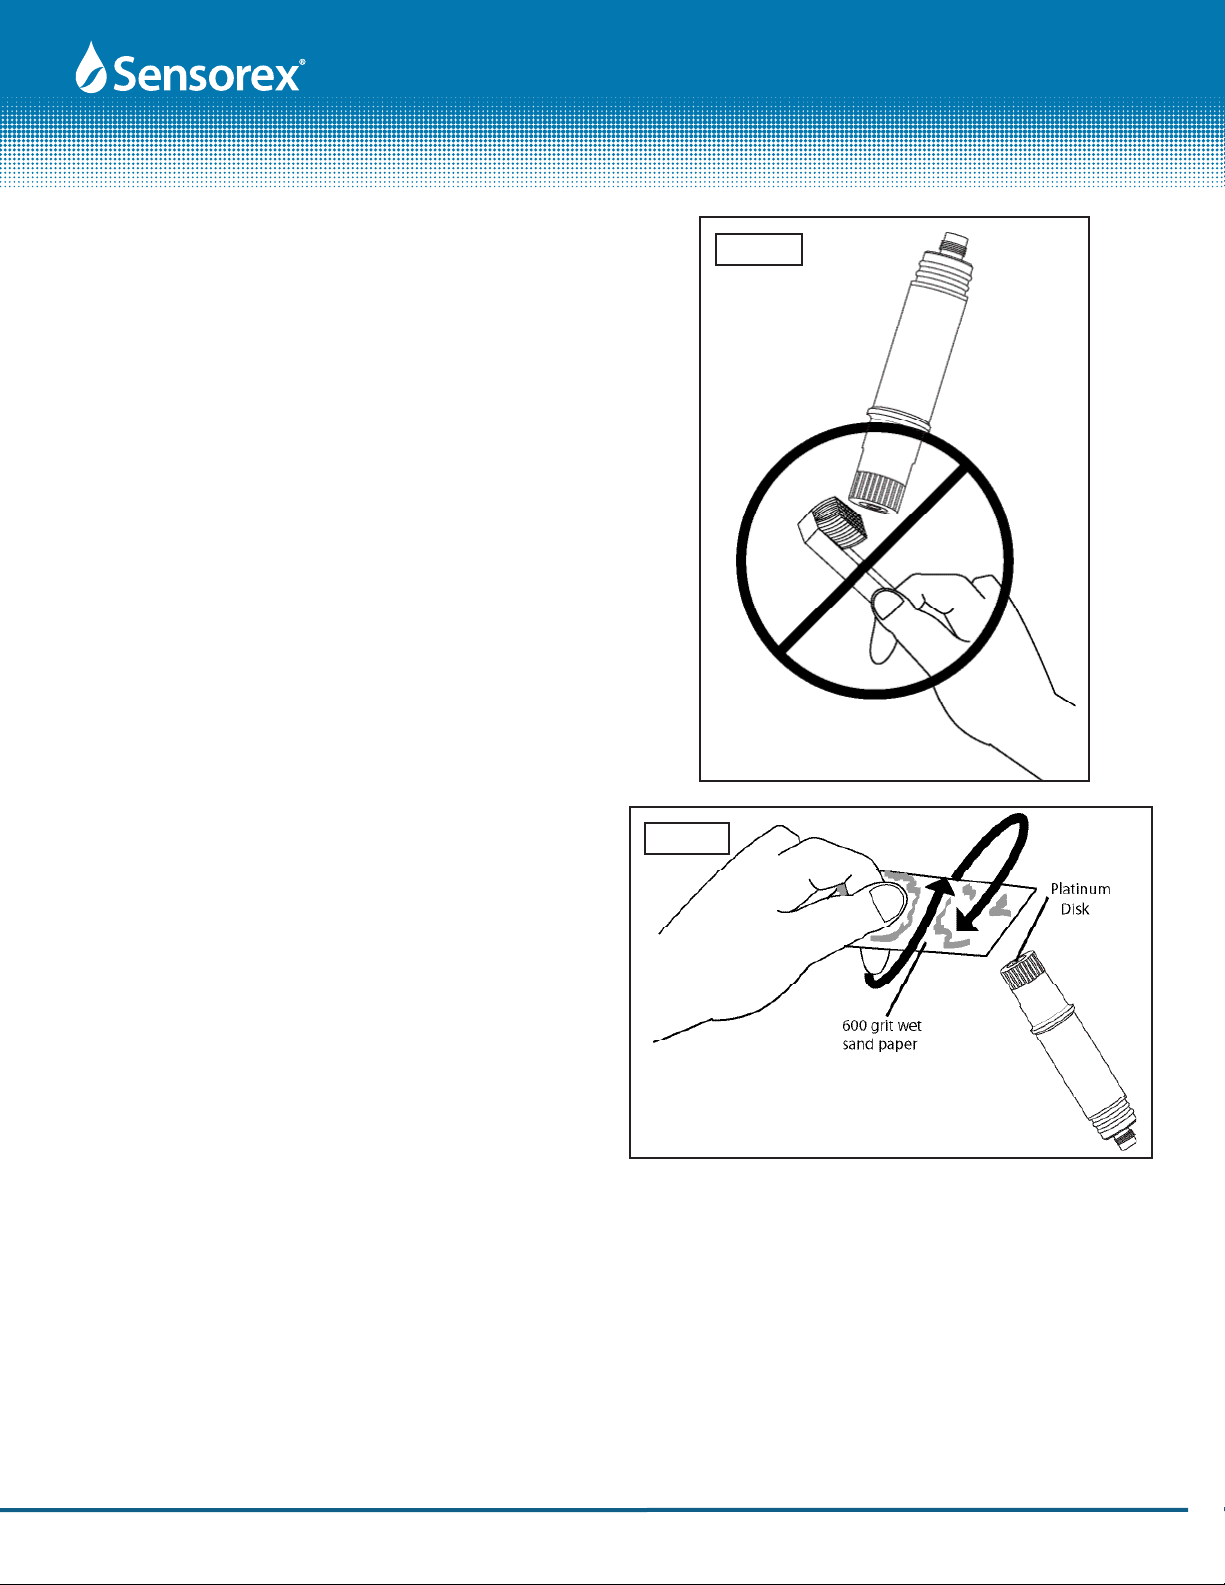
Abrading or sanding a pH electrode’s surface should never
be done. However, the measuring surface of an ORP/REDOX
electrode may be gently abraded by use of 600 grade wet
silicon carbide paper (SEE FIG 19), jeweler’s rouge or very fine
steel wool, but try to clean chemically before abrading with
600 paper.
FIG. 18
FIG. 19
Form: InstrS8000-Rev B [Rev: 2015-11-09]
©2011 Sensorex Corporation

PRODUCT INSTRUCTION SHEET
Page 11 of 12
Electronic Modules
Three types of electronic modules are offered within the
S8000 Series product line. See FIG 20 for choices. Model
EM800, a unity gain amplifier module, allows users to send
a signal up to 1000 feet remotely from the electrode to the
transmitter or controller.
You can choose cable S853 or S855 to use with EM800. The
S853 cable will transmit the electrode output only (no tem-
perature compensation). Cap cable model S855 will send
the signal via the coaxial cable and will also transmit the
temperature signal. Model EM801 is a differential amplifier
that requires the use of electrode adapter EA899TC, which
incorporates a stainless steel solution ground that feeds
into the EM801. This module (EM801) is useful for applica-
tion in which the ground potential of the liquid is elevated
(ground loop). Like the EM800, you can use either S853 or
S855 cap cable with the EM801. Model EM802pH is a blind
4-20mA loop-powered transmitter module that is factory
calibrated and is not adjustable. An external power supply
is required (user supplied). The EM802pH module should be
used with electrode adapter EA899TC. The 4-20mA output
from the EM802pH will already be temperature compensated
via the Pt1000 RTD that will be in the EA899TC-P1k mod-
ule. Module EM802ORP can be used with electrode adapter
EA891(submersion without temperature sensor) or EA899 (in-
line without temperature sensor).
NOTE: When using EA899TC with either EM800 or EM801,
please note that the temperature sensor passes by the elec-
tronic module's circuit board (is not conditioned) and is then
directly connected to the temperature input connections of
the pH transmitter or controller.
Electronic Module Electrode Adapter Cable Assembly
EM800 EA891, EA899 S853
EA899TC S855
EM801 EA899 S853
EA899TC S855
EM802pH EA899TC-P1k S853
EM802ORP EA891 or EA899 S853
TC
7
6
13
8
TC 4
pH 2
Ref
5
TC
7
6
13
8
4
(+) 2
(-)
5
EM800 & EM801 CONNECTOR DIAGRAM TO
S853 AND S855 CABLE ASSEMBLIES
EM802 CONNECTOR DIAGRAM TO
S853 CABLE ASSEMBLY
TC's are for S855 cable only
MODULE, ADAPTER AND CABLE CHOICES
FIG. 20
FIG. 21
FIG. 22
Cap Cable Assemblies
See page 8 "Cale Connections" for wire designations.
Form: InstrS8000-Rev B [Rev: 2015-11-09]
©2011 Sensorex Corporation
PRODUCT INSTRUCTION SHEET
Page 12 of 12
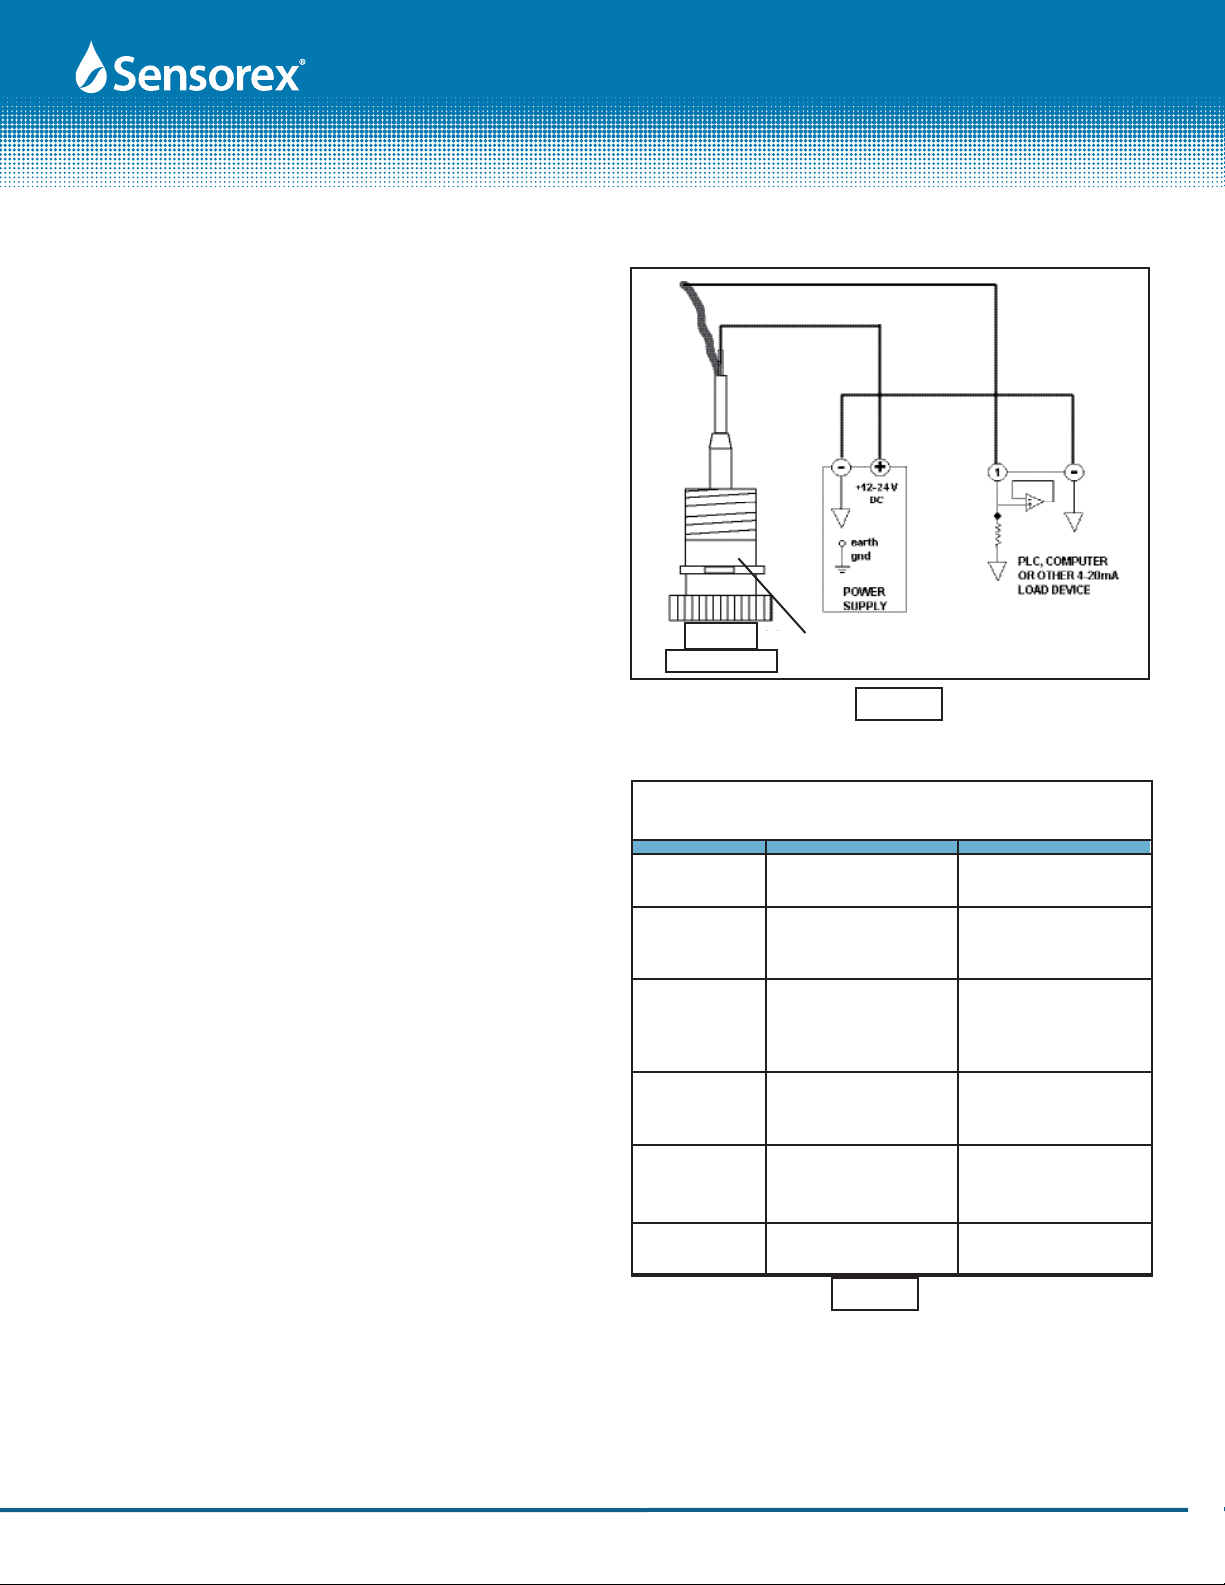
EM802 LOOP-POWERED pH AND ORP
TRANSMITTER WIRING
EM802pH and EM802ORP Wiring
See FIG 23 for wiring. Please note that EM802's 4-20mA output
is not adjustable.
Troubleshooting Your S8000 System
General Troubleshooting
Always check all electrical connections. Make sure all parts are
assembled correctly and o-rings are well greased.
Electrode Module Troubleshooting
EM800 - This module is battery-powered and sealed. The
battery cannot be replaced. If the module fails (reads 7pH
always or 0mV for ORP), then replace with a new one. Typical
life is about three years from the date stamped on the module
(MMYY).
EM801- This module is battery-powered and sealed. The
battery cannot be replaced. This module must be paired with
electrode adapter EA899TC (has solution ground input, neces-
sary for correct function of the dierential amplier circuit).
If the module fails (reads 7pH always or 0mV for ORP), then
replace with a new one. Typical life is about three years from
the date stamped on the module (MMYY).
EM802 - This module is line-powered and does not have a
limited service life. Wire the EM802 + S853 cable as shown in
FIG 25. A 12-24V DC power supply is suggested
Electrode Adapter Troubleshooting
To verify that the electrode adapter is functioning properly you
can:
1) Remove the electrode from the adapter and use a paper-
clip to short out the internal internal connector. For pH,
the value should read pH7. ForORP it shold read 0mV.
2) Use C110 simulator + CX3 adapter (from Sensorex) to
simulate pH4, 7 &10 inputs or +700 & -700mV for ORP.
If the adapter fails the tests, please contact the factory. Check
electrode to make sure o-rings are installed. Make sure
electrode is installed in adapter before installation. If the adapter
passes the test, then the electrode is the source of the
problem.
Electrode Troubleshooting
See FIG 24 table for typical electrode symptoms, causes and
corrective actions.
Buer reading Possible Cause Corrective Action
6.2-6.8 in all buers a) Cracked pH glass a) Replace electrode
b) Stress crack b) Contact Sensorex for
Return Authorization
7.00 in all buers a) Bad connection a) Check/x connection
b) Internal short circuit b) Contact Sensorex for
Return Authorization
Buers read close to a) Dirty electrode pH glass a) Clean electrode
expected value but and/or reference junction b) Flat pH glass pH
speed of response* is b) Temperature too low electrodes should be
slow (>30 seconds) used at Temp >10C/50F
Large oset in buers a) Ground loop**** a) Ground solution for tank
or line to known earth
ground or buy EM899TC
Short span*** a) Dirty pH glass or reference a) Clean electrode
(Less than 70%) junction
b) Aged electrode b) Replace electrode (too old)
Unstable or
drifting reading Reference dirty or plugged Clean electrode
pH ELECTRODE TROUBLESHOOTING
S853 CAP CABLE + EM802
FIG.23
FIG. 24
Form: InstrS8000-Rev B [Rev: 2015-11-09]
©2011 Sensorex Corporation
This manual suits for next models
19
Table of contents
Popular Laboratory Equipment manuals by other brands


Varian
Varian PROSTAR 210 Reference manual

Reverberi
Reverberi SERENA 9046 manual

NEW BRUNSWICK SCIENTIFIC
NEW BRUNSWICK SCIENTIFIC innova 4900 Guide to operations

tefen
tefen MixRite TF10 user manual

Endress+Hauser
Endress+Hauser Analytik Jena CyBio FeliX operating manual

Gram
Gram bioline BioCompact II 210 Instructions for use