Sorvall WX 100 Ultra User manual

50105750-4 October 2010
Thermo Fisher Scientific
WX Ultra Series
WX 100, WX 90, WX 80
Instruction Manual

© 2010 Thermo Fisher Scientific Inc. All rights reserved.
WX is either a registered trademark or a trademark of Thermo Fisher Scientific.
Microsoft, Microsoft Excel, Windows, Windows XP, and Windows Vista are registered trademarks of
Microsoft Corporation in the United States and/or other countries.
All other trademarks are the property of Thermo Fisher Scientific Inc. and its subsidiaries.
Thermo Fisher Scientific
Robert-Bosch-Straße 1
D - 63505 Langenselbold
Germany
Thermo Fisher Scientific Inc. provides this document to its customers with a product purchase to use in the
product operation. This document is copyright protected and any reproduction of the whole or any part of this
document is strictly prohibited, except with the written authorization of Thermo Fisher Scientific Inc.
The contents of this document are subject to change without notice. All technical information in this
document is for reference purposes only. System configurations and specifications in this document supersede
all previous information received by the purchaser.
Thermo Fisher Scientific Inc. makes no representations that this document is complete, accurate or error-
free and assumes no responsibility and will not be liable for any errors, omissions, damage or loss that might
result from any use of this document, even if the information in the document is followed properly.
This document is not part of any sales contract between Thermo Fisher Scientific Inc. and a purchaser. This
document shall in no way govern or modify any Terms and Conditions of Sale, which Terms and Conditions of
Sale shall govern all conflicting information between the two documents.
Release history: 50105750-4 printed in October 2010.
For Research Use Only. Not for use in diagnostic procedures.

Thermo Scientific WX Ultra Series i
C
Chapter 0 Preface - Intended use and safety definitions ............................................................................................... iii
Safety Definitions..................................................................................................................................iii
Important safety reminder .....................................................................................................................iv
Chapter 1 Description...........................................................................................................................................................1-1
General description............................................................................................................................. 1-1
External view of ultracentrifuge ...................................................................................................... 1-2
Design................................................................................................................................................ 1-3
Control panel ................................................................................................................................. 1-3
Rotor chamber................................................................................................................................ 1-6
Safety devices.................................................................................................................................. 1-7
Rotor adapter ................................................................................................................................. 1-8
Chapter 2 Operation..............................................................................................................................................................2-1
Run preparation ................................................................................................................................. 2-2
Starting up the ultracentrifuge ........................................................................................................ 2-3
Preparing tubes/bottles and rotor.................................................................................................... 2-4
Basic operation ................................................................................................................................... 2-4
Setting run conditions .................................................................................................................... 2-4
Setting user ID code ....................................................................................................................... 2-9
Using Rotor Life Management .....................................................................................................2-10
Basic operating procedure................................................................................................................. 2-11
Normal operation......................................................................................................................... 2-13
Zonal operation............................................................................................................................ 2-15
Acceleration and deceleration rates ................................................................................................... 2-17
How to use the FUNCTION field...................................................................................................2-19
Programmed operation ................................................................................................................. 2-21
Step-mode operation .................................................................................................................... 2-32
RTC (real-time control) feature.................................................................................................... 2-40
Displaying and setting RCF.......................................................................................................... 2-48
Setting w2T.................................................................................................................................. 2-56
Defrost function ........................................................................................................................... 2-58
Setting and resetting zonal operation ............................................................................................ 2-59
Rotor management........................................................................................................................... 2-60
Rotor life management ................................................................................................................. 2-60
Automatic rotor deration.............................................................................................................. 2-61
Automatic rotor exclusion............................................................................................................. 2-61
Registering a rotor ........................................................................................................................ 2-61
Deleting a registered rotor ............................................................................................................ 2-64
Updating the existing data for a rotor ........................................................................................... 2-65
When power failure occurs ............................................................................................................... 2-66
Features of the menu screen.............................................................................................................. 2-69
Contents

Contents
ii WX Ultra Series Thermo Scientific
Centrifuge scheduler..................................................................................................................... 2-69
User list ........................................................................................................................................ 2-71
Alarm information........................................................................................................................ 2-76
Rotor catalog ................................................................................................................................ 2-77
User Customizations..................................................................................................................... 2-77
Print utilities (option)....................................................................................................................... 2-81
Operating procedure..................................................................................................................... 2-82
Contents of print utilities ............................................................................................................. 2-84
Automatic run result printing....................................................................................................... 2-86
Printer fault handling ................................................................................................................... 2-87
Lockout (optional)............................................................................................................................ 2-88
Chapter 3 Maintenance........................................................................................................................................................3-1
Rotor chamber.................................................................................................................................... 3-1
Drive spindle ...................................................................................................................................... 3-2
Cabinet............................................................................................................................................... 3-2
Replacement parts .............................................................................................................................. 3-2
Service decontamination policy .......................................................................................................... 3-2
Chapter 4 Troubleshooting ..................................................................................................................................................4-1
Alarm indicators ................................................................................................................................ 4-1
Diagnosed problems - requiring maintenance..................................................................................... 4-3
Non-diagnosed problems ................................................................................................................... 4-3
Chapter 5 Preinstallation.....................................................................................................................................................5-1
Location Requirements....................................................................................................................... 5-1
Electrical requirements ....................................................................................................................... 5-2
Leveling.............................................................................................................................................. 5-2
Moving the ultracentrifuge ................................................................................................................. 5-3
Chapter 6 Specifications .....................................................................................................................................................6-1
Chapter 7 Supply list.............................................................................................................................................................7-1
Appendix A Service Decontamination Policy ....................................................................................................................A-1
Appendix B Condensed operating instructions .................................................................................................................B-1
Appendix C Chemical Compatibility Chart .........................................................................................................................C-1
Appendix D WARRANTY.........................................................................................................................................................D-1
Appendix E Contact Information........................................................................................................................................... E-1
Thermo Scientific WX Ultra Series iii
P
Preface - Intended use and safety definitions
This manual is a guide to the use of the Sorvall WX Ultra series ultracentrifuge.
Information herein has been verified and is believed adequate for the intended use of the centrifuge.
Because failure to follow the recommendations set forth in this manual could produce personal injury
or property damage, always follow the recommendations set forth herein. Thermo does not guarantee
results and assumes no obligation for the performance of centrifuges or other products that are not
used in accordance with the instructions provided. This publication is not a license to operate under,
nor a recommendation to infringe upon, any process patents.
Safety Definitions
DANGER, WARNING, CAUTION, and NOTE within the text of this manual are used to
emphasize important and critical instructions.
DANGER, WARNING and CAUTION information is accompanied by a hazard symbol and appears
throughout the manual, both on the Important Safety Reminder pages and near the information it
corresponds to.
Before you operate the centrifuge, we recommend that you read this instruction manual thoroughly,
particularly all DANGERS, WARNINGS and CAUTIONS.
Never operate the centrifuge without first considering all items on the Important Safety Reminder
pages, and never operate the centrifuge in any manner not described in this instruction manual.
DANGER Informs the operator of an extreme hazard or an unsafe practice that will result
in death or serious injury.
WARNING Informs the operator of a hazard or an unsafe practice that could result in
serious injury or death, affect the operator's health, or contaminate the environment.
CAUTION Informs the operator of a hazard or an unsafe practice that could cause minor
injury, or result in damage of equipment or property.
Note Highlights essential information that is not hazard-related.

Preface - Intended use and safety definitions
Important safety reminder
iv WX Ultra Series Thermo Scientific
Important safety reminder
Certain potentially dangerous conditions are inherent to the use of all centrifuges. To ensure safe
operation of this centrifuge, anyone using it should be aware of all safe practices and take all
precautions described below and throughout these operating instructions.
DANGER
• Before removing any cabinet panel (such as for maintenance or repair), always turn
the main Power Switch OFF and unplug the centrifuge, then wait at least three
minutes to eliminate the potential for severe electric shock.
WARNING
• Never exceed the maximum rated speed of the installed rotor; to do so can cause rotor
failure.
• Always reduce (derate) rotor speed whenever:
1. The rotor speed/temperature combination exceeds the solubility of the gradient
material and causes it to precipitate.
2. The compartment load exceeds the maximum allowable compartment load (or design
mass) specified for your rotor.
Failure to reduce speed under these conditions can cause rotor failure.
• Always inspect the rotor as specified in your rotor manual. Do not use a rotor that
shows signs of damage or corrosion.
• Centrifuges routinely deal with high energy levels and could move suddenly in the
unlikely event of rotor failure. During centrifuge operation, never lean on or move the
centrifuge, keep the surrounding area clear of objects (including all hazardous and
flammable materials), and do not work on top of or next to the centrifuge (as a rule,
keep people and objects at least 300 mm [12 inch] away).
• Never unlock the chamber door, attempt to open the door, or otherwise attempt to
touch the rotor while it is rotating. In the event of a power outage, it can take more
than three hours for the rotor to stop - be sure to wait at least three hours before
opening the door.
• Never attempt to override or otherwise disable any safety features.
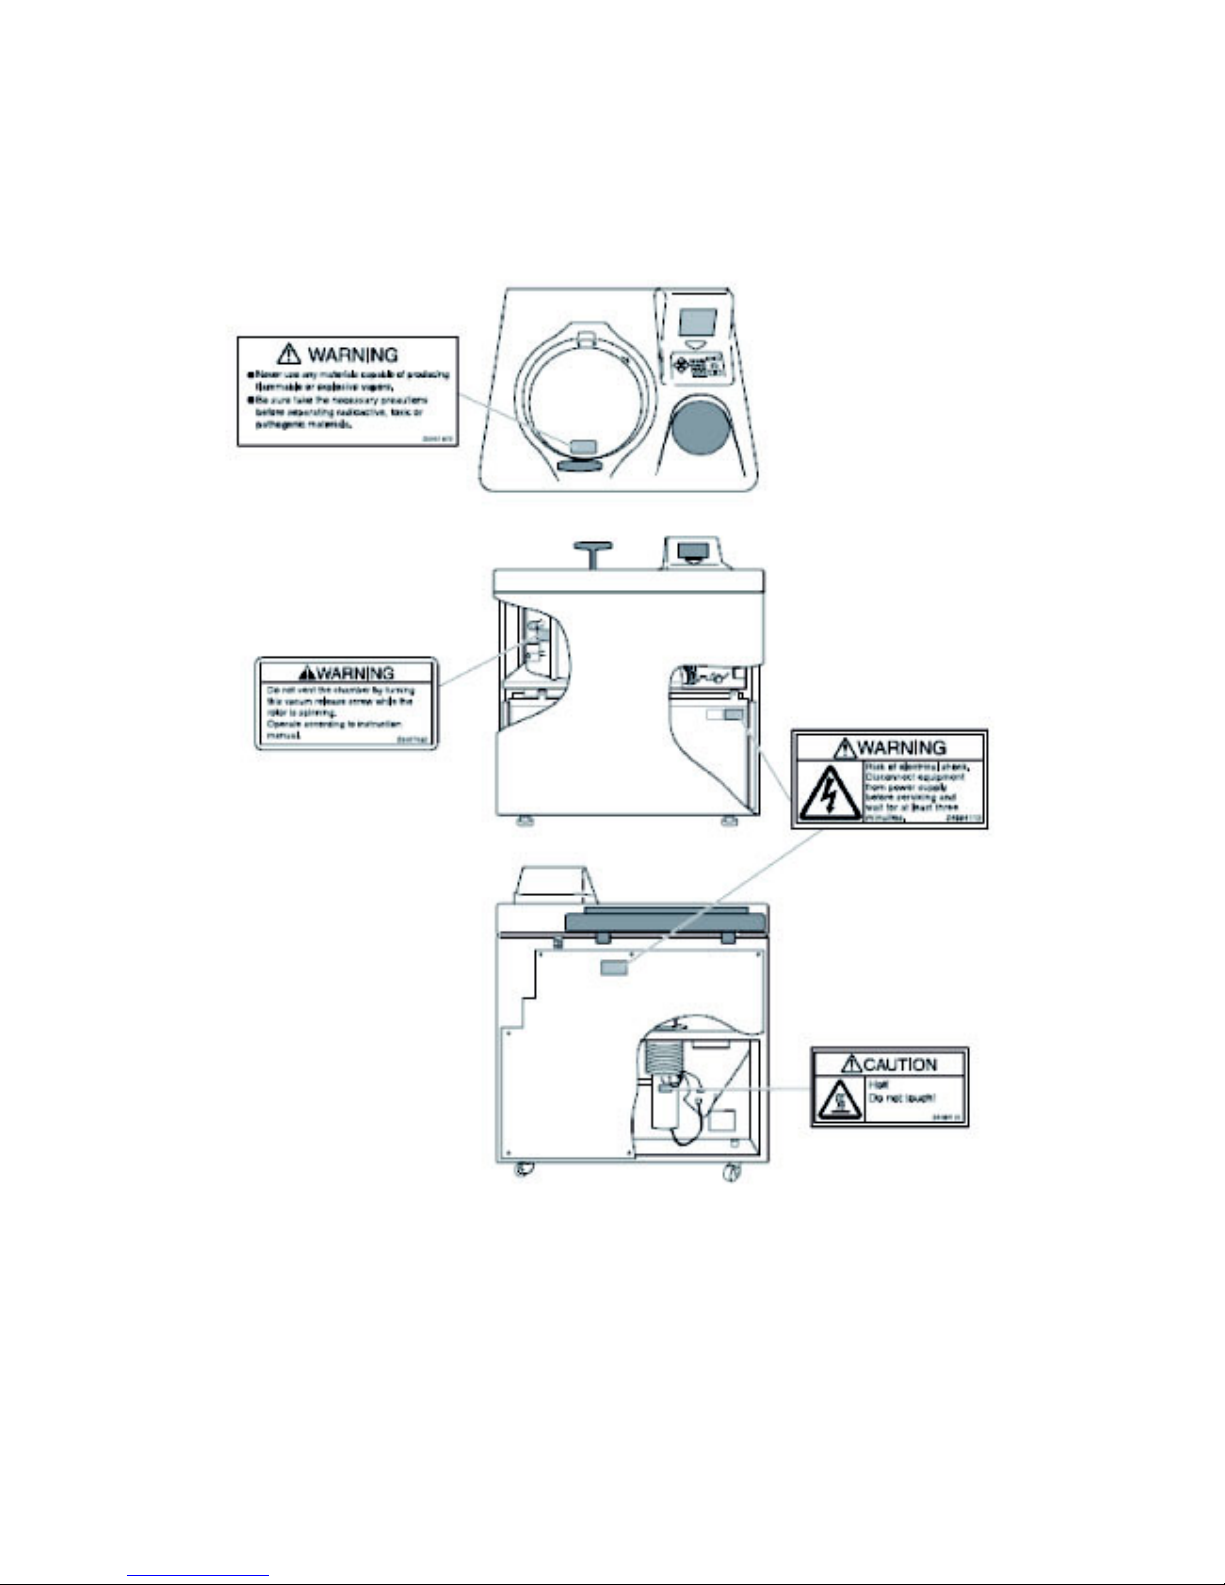
• When using radioactive, toxic, or pathogenic materials, be aware of all characteristics
of the materials and the hazards associated with them in the event leakage occurs
during centrifugation. If leakage does occur, neither the centrifuge nor the rotor can
protect you from particles dispersed in the air. To protect yourself, we recommend
additional precautions be taken to prevent exposure to these materials, for example,
use of controlled ventilation or isolation areas.
• Always be aware of the possibility of contamination when using radioactive, toxic, or
pathogenic materials. Take all necessary precautions and use appropriate
decontamination procedures if exposure occurs.

Preface - Intended use and safety definitions
Important safety reminder
Thermo Scientific WX Ultra Series v
WARNING
• The use of sealed rotors, buckets and/or sample containers will provide increased
protection from contamination during routine operation. However, these items will
not guarantee contamination protection from accidents resulting in damage to the
rotor or buckets. Do not run hazardous materials in the centrifuge unless placed in a
biohazard enclosure and operated using all appropriate safety precautions.
• Never use any materials capable of producing flammable or explosive vapors, or
extreme exothermic reactions.
• The centrifuge is equipped with a three-wire power cord that has one wire for
connection to ground. The centrifuge must be correctly grounded to guard against
shock hazards.
CAUTION
• Do not operate the control keys using a ball-point pen or a sharp object.
• Do not run or precool the rotor at the critical speed as this will have a detrimental
effect on centrifuge component life (see rotor manual).
• Do not operate the centrifuge with a rotor that is not balanced within specification.
To do so can cause damage to the centrifuge drive assembly.
• Always make sure the rotor is correctly assembled and properly seated on the
centrifuge drive spindle before operation. If using a swinging-bucket rotor, always
make sure that a bucket is installed at each position and that each is properly seated
and can swing freely after installing the rotor on the centrifuge drive spindle (see rotor
manual).
• Do not exceed the maximum speed of the tubes, bottles, or adapters being used.
Check manufacturer's published specifications or see Sorvall Product Guide; if unsure,
to avoid loss of valuable sample, we recommend performing a test run.
• Do not continue to operate the centrifuge if abnormal sounds occur during operation.
Immediately discontinue use of the centrifuge and contact Thermo Service.
• Supply power must be checked before the centrifuge is connected to power because
the centrifuge can be damaged if connected to the wrong voltage. Thermo is not
responsible for incorrect installation and warranty is void if an initial installation or
electrical modification of the centrifuge is not performed by Thermo or a Thermo
representative.
• Before moving the centrifuge, always remove the rotor from the rotor chamber to
avoid damage to the drive assembly.
• Do not place fluids inside, on top of, or close to the centrifuge --- spillage can result in
electrical or mechanical failure.
• Always operate and maintain the centrifuge and all rotors as instructed in this manual
and in the rotor manual(s).
Preface - Intended use and safety definitions
Important safety reminder
vi WX Ultra Series Thermo Scientific

Thermo Scientific WX Ultra Series 1-1
1
Description
General description
The Sorvall WX Ultra series ultracentrifuges are designed and manufactured based on our long
experience in the development of centrifuges; they are easy to use and highly reliable. Features include
the following:
1. Maximum speed of 100,000 rpm (802,006 x g)
2. Control panel is simple with easy key operation and easy-to-see liquid crystal screen.
3. The displayed language can be switched over between English and Japanese.
4. The real-time control (RTC) feature enables setting a start time or a finish time, thus letting you
run your machine at a desired date and time.
5. Centrifugal force (RCFmax and RCFavg) can be displayed and set.
6. Twenty varieties of nine stepped modes can be programmed for a wide range of applications.
7. Various alarms notify users of causes and necessary actions when fault conditions are detected
allowing easier and quicker troubleshooting.
8. Space saving design. The installation area required is 0.81 m2 (90 x 90 cm) pr 9.0 ft2 (3.0 x 3.0 ft). Lower
top deck makes it easy to install and remove the rotor.
9. Low noise level makes the ultracentrifuge suitable for use in any laboratory.
10. Samples can be easily balanced visually.
11. CFC-free thermoelectric cooling system with greater cooling capacity.
Advanced features (options)
The options of the Sorvall WX Ultra series ultracentrifuges are: Compass Software, Lockout Kit, and a
Printer.
The Compass Software is a calculation/simulation system for centrifuge support that is compatible with
Windows R 2000 / XP Professional. Compass Centrifugation software helps determine appropriate run
conditions prior to starting centrifugal separation, and calculates optimum centrifuge and rotor run
conditions for materials in which proper run conditions are unknown. For more information on this
please consult the Compass Operator's Manual.
The Lockout Kit limits centrifuge access to a group of registered users (up to 40) which is controlled by
lab managers/supervisors (up to 3). For more information on this see page 2-95, Lockout.
The printer provides hard copy reports of information maintained in the centrifuge including: Set and
actual run conditions, rotor use, programmed memory contents, and others. For more information on
this see page 2 - 89, Print Utilities.
Description
General description
1-2 WX Ultra Series Thermo Scientific
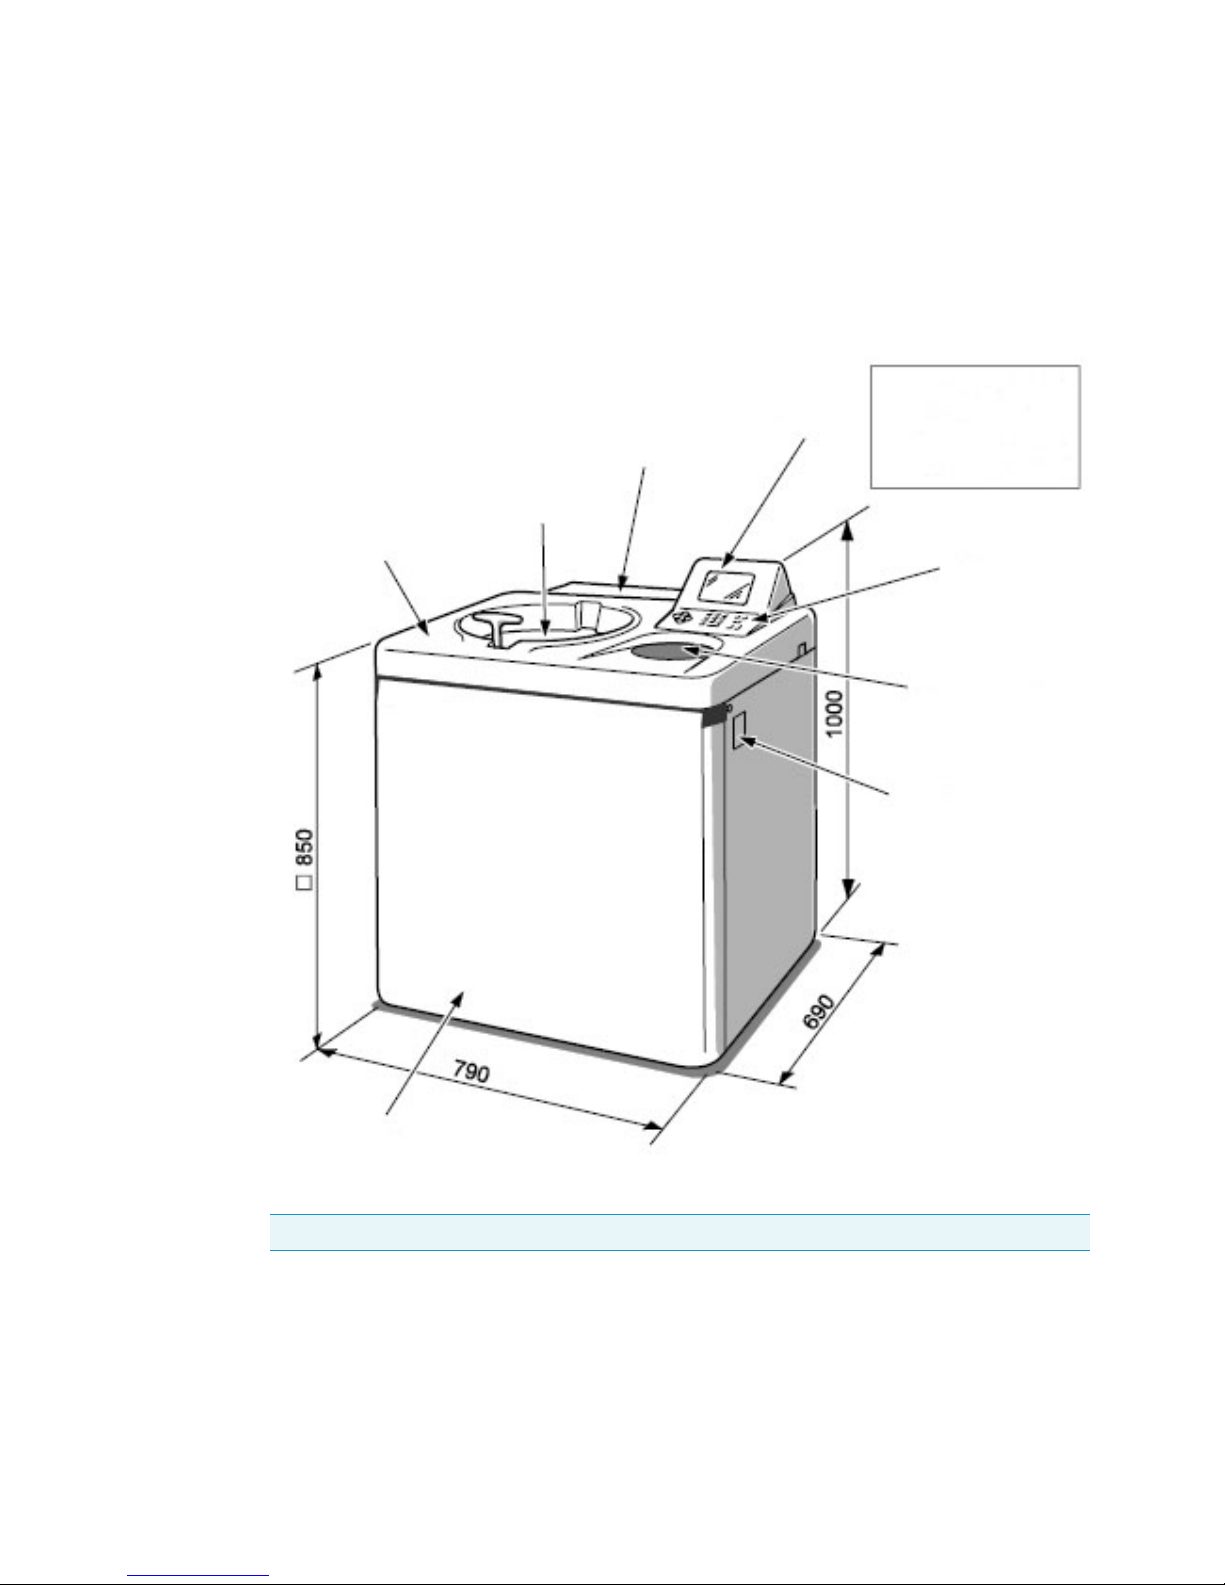
External view of ultracentrifuge
The WX Series ultracentrifuge have the same external view, except for the model name printed on front
cover. The following is the external view of the WX ultracentrifuge.
External view of ultracentrifuge
Figure 1-1 External view of the Sorvall WX Ultra series
Note * This height is measured from level floor surface.
Top deck
Door
Safety cover
Display panel
690 mm (27.2 in)
790 mm (31.1in)
850 mm (33.5 in)
1000 mm (39.4 in)
Operation key
Rotor rubber mat
Power switch
Front cover

Description
Design
Thermo Scientific WX Ultra Series 1-3
Design
Control panel
The control panel for the Sorvall WX Ultra series consists of a color screen, a touch sensitive display
panel and a keyboard.
The display panel incorporates an easy-to-read liquid crystal display. The display panel (field display)
displays running conditions and running status (this screen is called the Run Screen), along with
features such as Programmed Run, Rotors List, and User Customization Screens. Fig. 1-2 shows the
display panel, and Fig.1-3 represents the keyboard.
Figure 1-2 Display panel
Figure 1-3 Keyboard
(3) Message indicator
{
(1) Field display
(5) Vacuum indicator
(4) RUN mode indicator
(2) FUNCTION field
}
}
Operation state display field
Setting value display field
(12) Key pad
(11) Cursor key
(6) START key
(7) STOP key
(8) VACUUM key
(10) MENU key
(9) ESC key

Description
Design
1-4 WX Ultra Series Thermo Scientific
Table 1-1 [Functions of the display panel-keyed by item no. to fig. 1-2]
No. Name and Symbol Functions and actions
(1) Field display
SPEED
TIME
TEMP
Displays various fields.
The SPEED, TIME, and TEMP fields give the current status indicator in the top row and the
setting indicator in the bottom row. (For setting, see Section “Setting run conditions”.)
• SPEED (Speed indicator)
(Top row) Displays speeds in increments of 10 rpm at lower than 5,000 rpm, and in steps of 100
rpm at 5,000 rpm or more.
(Bottom row) Sets speeds from 1,000 to maximum speed in increments of 100 rpm. The lower two
digits (one, ten positions) display zeros.
• TIME (running time indicator)
(Top row) Displays the remaining operation time or the time elapsed during operation if settings
are performed on the User Customization screen. If the running time is set to HOLD, this field
displays time elapsed.
(Bottom row) Specifies a setting in the range from 1 minute to 99 hours 59 minutes in steps of
minutes and hours.
• TEMP (temperature indicator)
(Top row) Displays in steps of 0.1 °C.
(Bottom row) Sets a setting in the range from 0 °C to 40 °C in increments of 0.1 °C
• ACCEL (acceleration mode indicator). Displays acceleration modes 1 through 9.
• DECEL (deceleration mode indicator). Displays deceleration modes 1 through 9, along
with free coast (F).
(2) Function field • ID CODE Sets an ID code.
• RLM Switches to the Rotor Management screen.
• PROG • RTC Sets, recalls programmed runs or sets the time and the end time for a
programmed run.
• RCF • ω2T Sets and displays the centrifugal force or sets an ω2T
• DEF Sets and resets the defrost function.
• ZONAL Sets the zonal operation mode.
(3) Message indicator Displays an alarm message and various suggestions for operation.
(4) Run mode indicator The following terms are displayed:
STOP, ACCEL, RUN (running at the set speed)
DECEL, WAIT (waiting for vacuum during acceleration)
ZONAL (for zonal operation)
DELAY (until the start time in an RTC run)
(5) VACUUM indicator Displays the following four stages according to the vacuum of the rotor chamber.
(1) Atmospheric state. The vacuum pump is not activated.
(2) Low vacuum. The rotor waits at 4,000 rpm until the vacuum reaches an inter-
mediate level
(3) Intermediate vacuum.
(4) High vacuum.
Note If the sample is sensitive to a temperature rise, do not press the START key until the
chamber is at high vacuum level.

Description
Design
Thermo Scientific WX Ultra Series 1-5
Table 1-2 [Functions of keyboard-keyed by item no. to fig. 1-3]
No. Name and Symbol Functions and actions
(6) START key Starts rotor rotation. If VACUUM is off, this key activates the vacuum pump and starts
temperature control.
(7) STOP key Stops rotor rotation.
(8) VACUUM key Starts up the vacuum pump and activates air vent (As soon as vacuum pump is on, tem-
perature control starts.) Air vent for vacuum chamber after a run cannot be opened as
long as the rotor is spinning.
(9) ESC key Moves the display back to the screen at the preceding level (for example, to switch
back from the Menu Screen to the Run Screen).
(10) MENU key Displays the Menu Screen.
The Menu Screen offers the choice of Centrifuge Scheduler, User List, Alarm Informa-
tion, Rotor Catalog, and User Customization Routines.
(11) Cursor key a. Displays the cursor on the Run Screen, putting the display into input wait status.
b. Move the cursor on the screen.
1. Moves the cursor up
2. Moves the cursor down
3. Moves the cursor to the right
4. Moves the cursor to the left
(12) Numeric key Used to type numbers for setting run conditions.
During time and temperature entry: Moves cursor from hours to minutes.
Acts as decimal point for data entry.
a. During operation time entry: sets continuous run.
b. When entering deceleration conditions: sets a free coast.
Use this when you have entered the wrong value while entering an
operating condition or entering a number or when the alarm device is
activated.
Functions of this key
a. This key clears the cursor-carrying input field and returns you to the
preinput state.
b. Use this key to clear an alarm signal. If more than one alarm signal is
on, this key will clear them one by one.
Registers the entered value.

Description
Design
1-6 WX Ultra Series Thermo Scientific
Rotor chamber
The structure of the rotor chamber (vacuum chamber) is shown in Fig. 1-4.
Figure 1-4 Rotor chamber
Note If sample or water drops to the window of the temperature sensor, it may cause an incorrect
detection. Whenever the sensor is wet, wipe it with a clean, dry cloth. Take care not to scratch the
surface of the sensor.
Drive spindle
Speed sensor
Chamber door seal
Handle Chamber door
Temperature sensor (measuring
the temperature of the rotor)
Door lock system
Vacuum chamber
Bowl (Rotor Chamber)
Thermoelectric cooling element
(cooling the rotor)
Guard
Overspeed detector
(detecting any instance
exceeding the maximum
allowable speed of the
rotor)

Description
Design
Thermo Scientific WX Ultra Series 1-7
Safety devices
(1) Containment
Should a rotor failure occur, the guard ring will contain the contents of the rotor inside the centrifuge
(Fig. 1-4).
(2) Imbalance detector
If during operation the vibration of the rotor becomes excessive due to serious imbalance or improper
bucket setting, the imbalance detector detects the situation and decelerates the rotor immediately.
However, the ultracentrifuge is designed to tolerate imbalance associated with visual balancing-it is
equipped with an imbalance tolerant drive. (For more information on the balancing of rotors, see
Section 2-1-2, “Preparing tubes/bottles and rotor”.)
(3) Door lock system
The chamber door automatically locks for safety while the rotor is spinning. When the power supply is
off, the door remains locked. The door can only be opened and closed when the rotor is at rest and the
rotor chamber is vented. Unless the door is closed, the rotor will not start rotating except in zonal
mode. To open the door in the event of a power failure, see Section 2-7, “When power failure occurs”.
(4) Speed sensor and overspeed detector
For protection in the event of entry errors the ultracentrifuge is provided with an automatic system to
stop the rotor when its speed exceeds the maximum allowable speed. If a speed higher than the
maximum permitted speed is set, the ultracentrifuge will detect the mistake before the speed reaches
3000 rpm, and then will display an alert message and decelerate the rotor to a stop.

Description
Design
1-8 WX Ultra Series Thermo Scientific
Rotor adapter
Overspeed Decal
The overspeed decal located on the rotor base has alternating black and white bands. The number of
bands corresponds to the maximum permitted speed of the rotor. (See Fig. 1-5.)
Figure 1-5 Standard rotor
To protect the overspeed decal, be sure to store the rotor on the rotor stand provided. (See Fig. 1-6.)
Figure 1-6 Rotor stand
Overspeed decal
Standard rotor with
overspeed decal

Thermo Scientific WX Ultra Series 2-1
2
Operation
The Sorvall WX Ultra series ultracentrifuges are capable of operation in more than one mode to meet a
wide range of applications. The outline of each available mode is given below:
Outline Reference
Normal operation Section Normal opera-
tion
Optional features
Programmed opera-
tion
You can store set run conditions in memory for later use in
repeated operation. Section How to use the
FUNCTION field
Section Programmed
operation
Step-mode operation
More than one normal operation can be combined into a
sequence of operations or step for successive centrifuga-
tion. Section Step-mode
operation
RTC (real-time con-
trol) operation
Run starts or completes at a required date and time.
Section RTC (real-time
control) feature
RCF (centrifugal
force)
value display setting
This feature calculates centrifugal force (RCF) values from
set speed. It can also calculate reversely, i.e., finding
speed from such values. Section Displaying and
setting RCF
Speed
Time
Speed
Speed
Time Time
Store Recall
Speed
Time
Speed
Time
A finish date
and time re-
quired
START
key ON
Speed
Time
RCF
value setting

Operation
Run preparation
2-2 WX Ultra Series Thermo Scientific
Run preparation
Optional features
ω2T setting
Calculates and displays the running time from the set val-
ues of speed and ω2T.
Section Setting w2T.
Zonal operation
Zonal operation is a mode of operation using a zonal
rotor.
Section Zonal opera-
tion.
Speed
Time
Speed
Time
Zonal speed
WARNING
1. Never use any materials capable of producing flammable or explosive vapors, or extreme
exothermic reactions.
2. When using radioactive, toxic, or pathogenic materials, be aware of all characteristics
of the materials and hazards associated with them in the event leakage occurs during
centrifugation. If leakage does occur, neither the centrifuge nor the rotor can protect
you from particles dispersed in the air. To protect yourself, we recommend additional
precautions be taken to prevent exposure to these materials, for example, use of
controlled ventilation or isolation areas.
CAUTION Do not place fluids inside, on top of, or close to the centrifuge---spillage can result
in electrical or mechanical failure.
Operation
Run preparation
Thermo Scientific WX Ultra Series 2-3
Starting up the ultracentrifuge
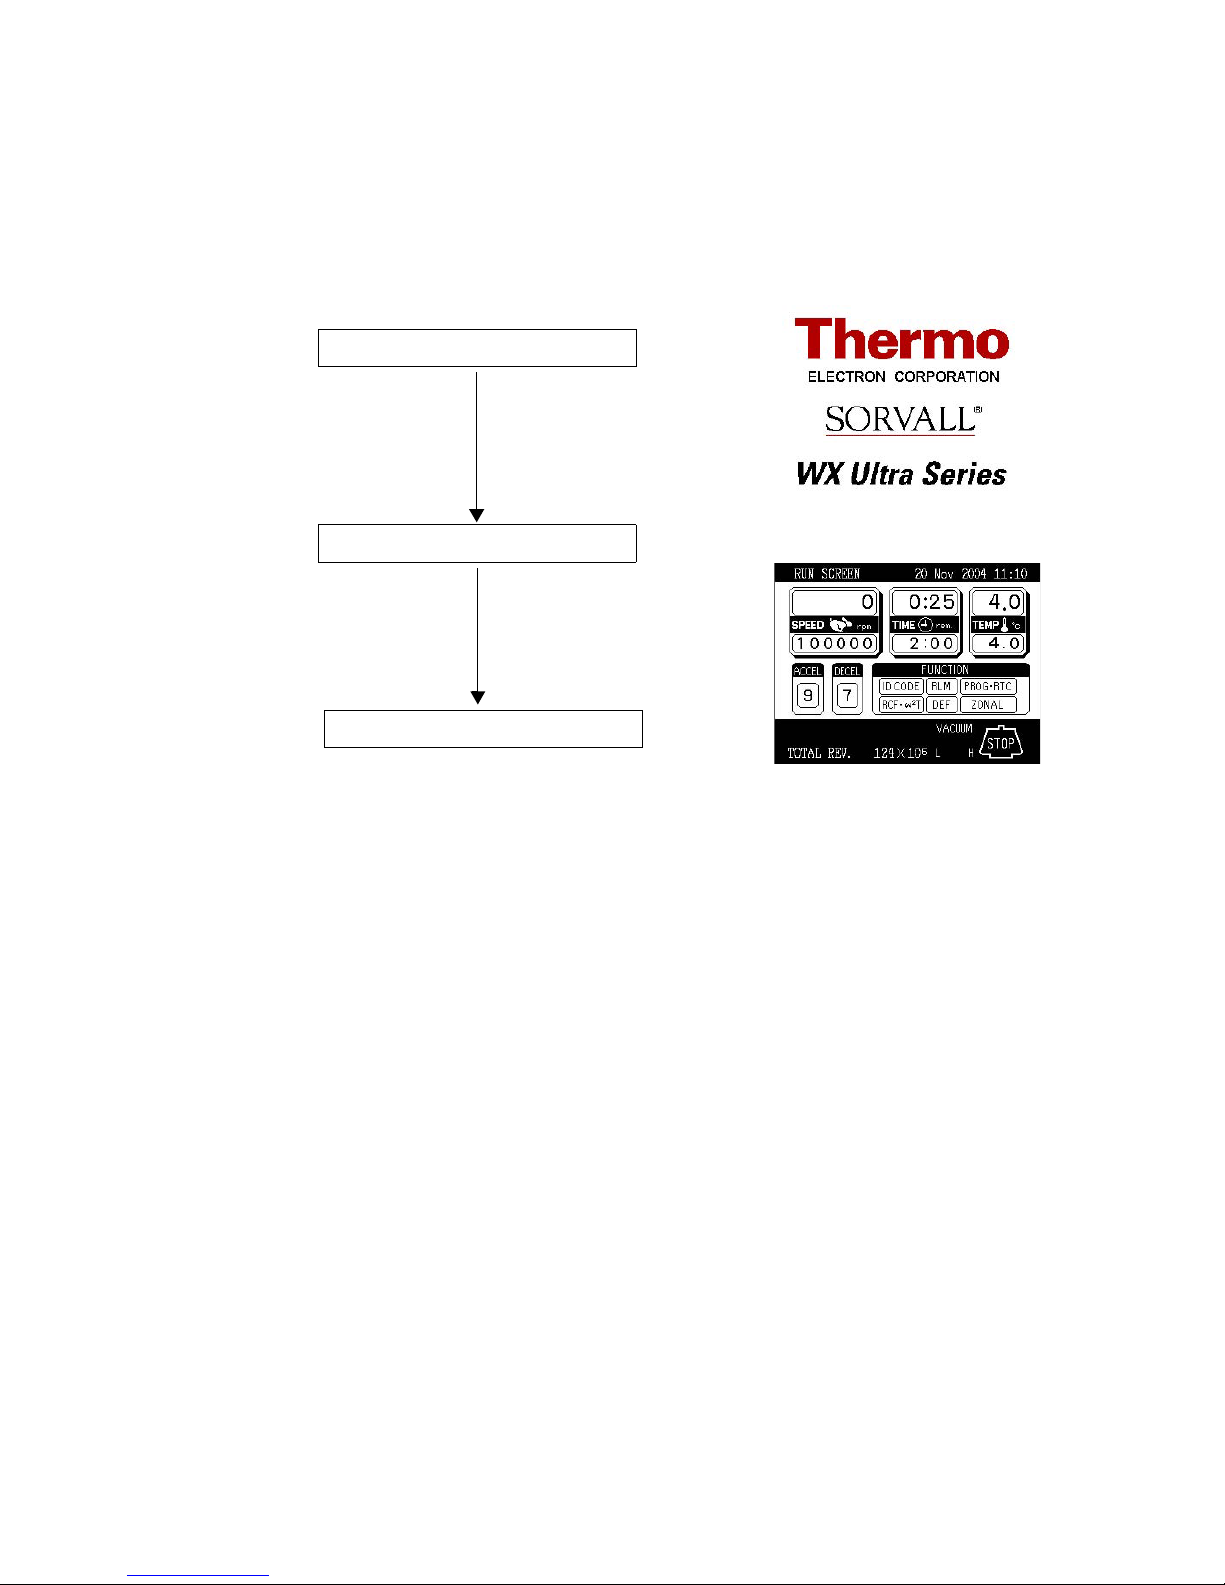
Before setting run conditions, display the run screen (screen for setting run conditions)
(1) Displaying the Run Screen (screen for setting run conditions)
Figure 2-1 Initial screen, and run screen
Initial screen
1. Turn on the POWER switch.
2. The initial screen appears.
3. The Run Screen appears.
Operation
Basic operation
2-4 WX Ultra Series Thermo Scientific
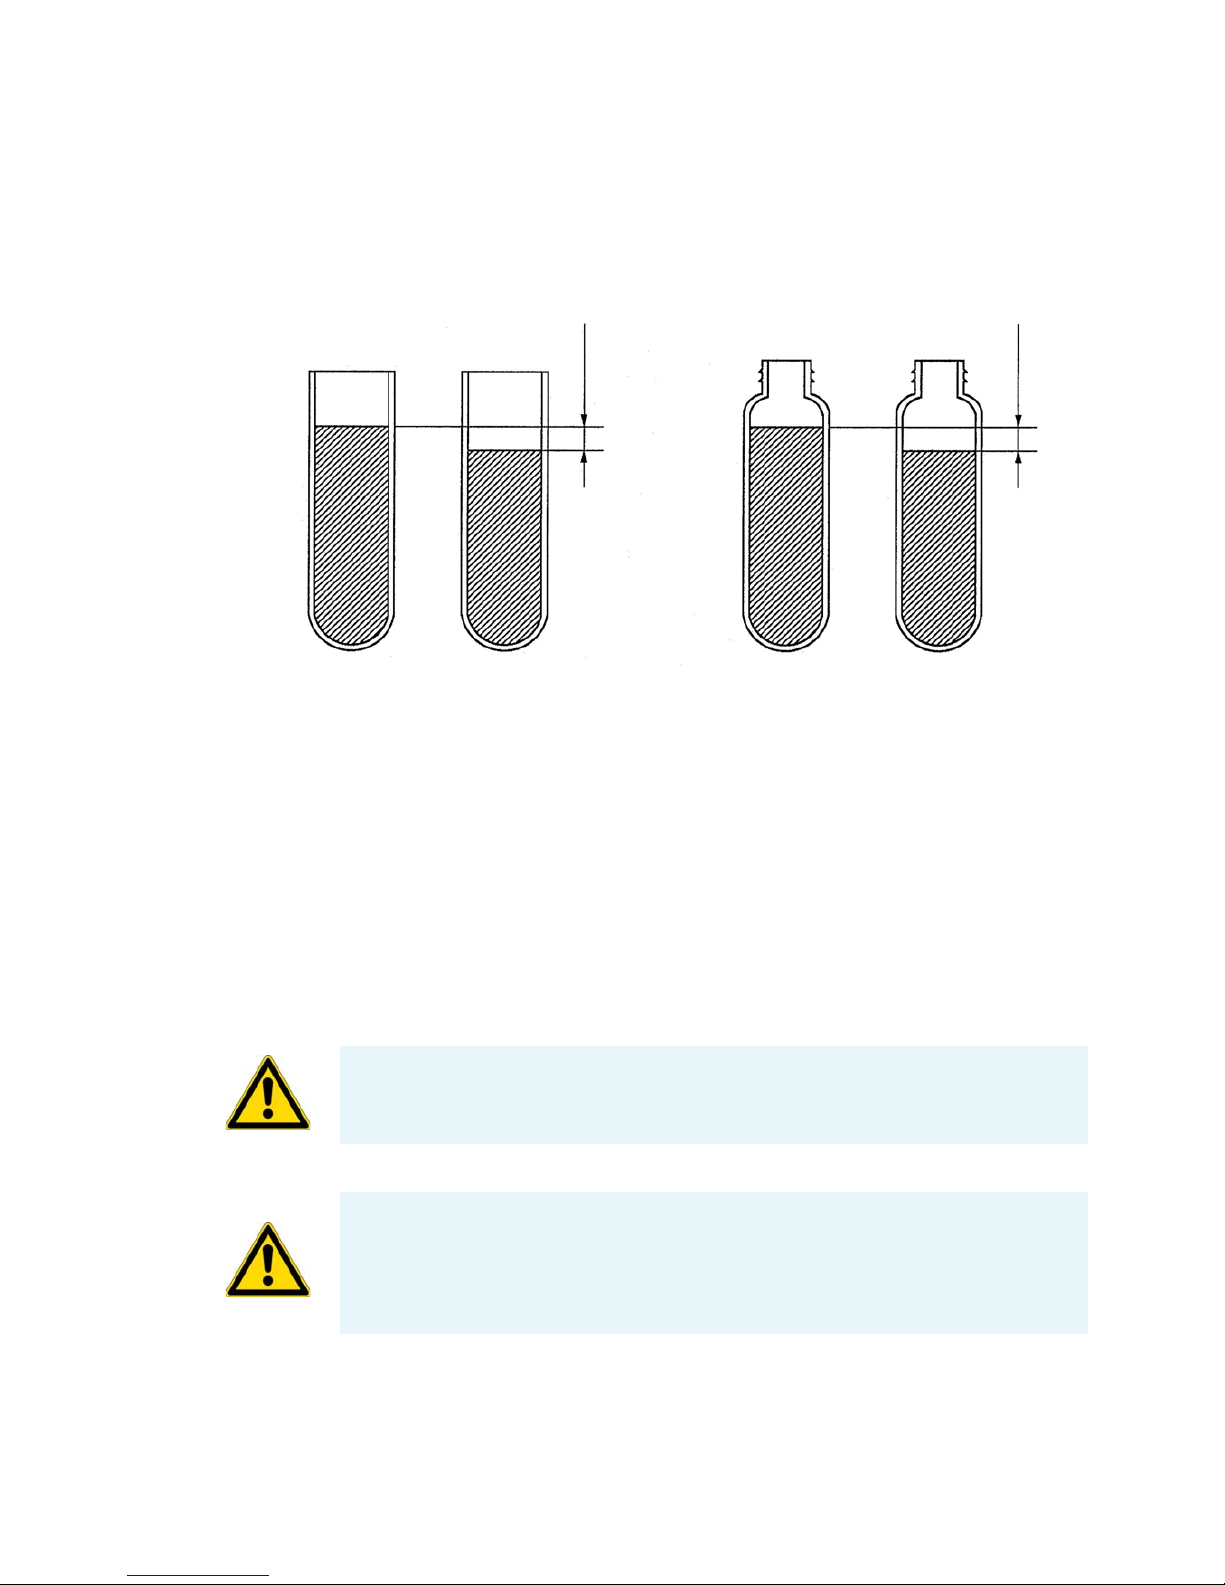
Preparing tubes/bottles and rotor
The Sorvall WX Ultra series ultracentrifuges allow you to balance, by eye, tubes or bottles containing a
sample solution and then centrifuge them. Make sure that the difference between meniscus levels of
sample solution in tubes or bottles in within 5 mm (0.197 in) (See fig. 2-2).
Figure 2-2 Balancing tubes/bottles containing a sample solution
To prevent tube or bottle failure, some tube and rotor combinations cannot be run to the maximum
speed of the rotor when partially filled. The tube or bottle must be full in the following cases:
1. When a thin tube or seal tube is used.
2. When a thick tube is used for swinging rotor.
3. When a bottle is used 100,000 x g or more.
Basic operation
Setting run conditions
This section will first describe the screen for basic operation (the run screen) and the cursor keys.
Within 5 mm
(0.197 in)
Within 5 mm
(0.197 in)
(1) Tubes (2) Bottles
WARNING Do not lean on, tilt or place anything on the centrifuge while in operation.
CAUTION
1. Do not operate the keyboard with a ball-point pen or a sharp object.
2. Do not continue to operate the centrifuge if abnormal sounds occur during operation.
Immediately discontinue use of the centrifuge and contact Thermo Service.
This manual suits for next models
2
Table of contents
Other Sorvall Laboratory Equipment manuals


Popular Laboratory Equipment manuals by other brands


Julabo
Julabo CORIO CP Original operating manual

Planer
Planer 370 Series Original instructions

BIO RAD
BIO RAD Gel Doc XR 170-8170 instruction manual

Shodex
Shodex SUGAR EP SC1011-7F Operation manual

BRONKHORST
BRONKHORST IN-FLOW instruction manual

Thermo Scientific
Thermo Scientific NPD Tandem Upgrade Kit installation guide