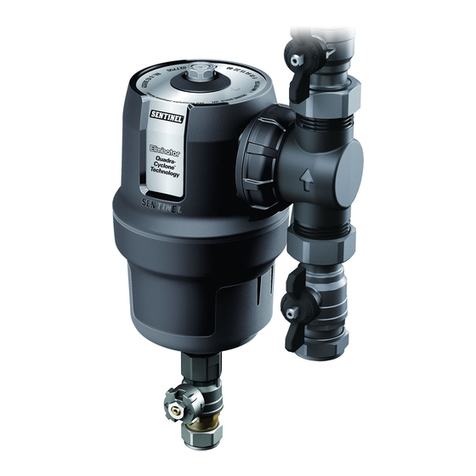
Sentinel JetFlush Filter User manual

1
JetFlush™Filter
EN Operating Instructions 3
FR Mode d’emploi 11
IT Istruzioni per l’uso 19
V1-07-16

2JetFlush Filter V1- 07-16

EN
3JetFlush Filter V1- 07-16
JETFLUSH FILTER – OPERATING INSTRUCTIONS
To be used in conjunction with the Sentinel JetFlush Rapid® power flushing
machine and Sentinel X800 Fast Acting Cleaner. After the clean is complete
dose with Sentinel X100 Inhibitor or Sentinel X500 Antifreeze to ensure
ongoing protection.
CONTENTS
• Filter
• 1.5 meter tubing with 3/4" BSP connections

EN
4JetFlush Filter V1- 07-16
TECHNICAL SPECIFICATION
Sentinel JetFlush Filter
Strength of magnet 11,000gauss
Length of magnet 400mm
Magnet surface area 201cm2
Weight of unit 4.95kg
Overall height 475mm
Overall width 215 mm
Overall depth 245mm
CAUTION
The JetFlush Filter contains a strong magnet and generates a very
powerful magnetic field. When removed from the cylinder, keep away
from electronic equipment, watches, mobile phones, credit cards etc.

EN
5JetFlush Filter V1- 07-16
CONNECTING THE FILTER
The power flushing pump can circulate the system water in either direction by
operation of the flow reversing lever. However we suggest that the initial set-up
is such that the JetFlush Filter is installed before the boiler to offer the boiler a
higher level of protection in the early stages of the power flush.
Flow to boiler
Return from radiators
Standard flow and return hoses
Additional 1.5 metre hose
JetFlush Rapid
RETURN
JetFlush Filter
Boiler
OUT

EN
6JetFlush FilterV1-07-16
CONNECTING THE FILTER (CONTINUED)
1. Place the JetFlush Filter adjacent to the power flushing pump on a suitable
drip tray.
2. Select the required direction of flow and position the pump flow reverser
lever in that direction.
3. Install the filter on the flow from the flushing pump using the short
(1.5 metre) hose supplied. Connect the flow to the bottom connection on
the filter.
4. Using the power flushing pump standard flow and return hoses connect
both the pump and the top connection on the JetFlush Filter to the heating
system.
5. Both JetFlush Rapid three-port valves should be in the CIRCULATE position.
CIRCULATE
mode
BY PASS
mode

EN
7JetFlush FilterV1-07-16
OPERATING INSTRUCTIONS
1. Turn on the power flushing pump and immediately check all connections,
and the top of the JetFlush Filter cylinder for leaks.
2. After initial circulation for approximately ten minutes, turn both three-port
valves 180° into the BYPASS position.
3. Remove the securing ring from the top of the cylinder and, gripping the
handle firmly, carefully lift out the magnet.
NOTE: the magnet is very powerful and is strongly attracted to steel
surfaces. Take care not to trap fingers and avoid contact with sensitive
equipment.
4. Inspect the magnet for collected deposits and, if necessary, clean as
follows:
5. Grip the cylinder lid and handle with one hand. Whilst wearing disposable
gloves, grip and slide the magnetite sludge down and off the magnet.
NOTE: It is advisable to only remove a proportion of the deposits with each
stroke, starting at the lower end of the magnet, rather than all at the same
time. Clean the end of the magnet.
6. Collect the sludge in a suitable container for later disposal.
7. Re-assemble the JetFlush Filter ensuring that the magnet locates within the
circular recess at the base of the cylinder, and turn both three-port valves
back into the CIRCULATE position.
8. Repeat the inspection and cleaning procedure as required during the
flushing process.

EN
8JetFlush FilterV1-07-16
CLEANING THE MAGNET
It is not necessary to remove all deposits during the intermediate cleans whilst
power flushing. However, to ensure a long life the magnet should be thoroughly
cleaned and dried at the end of each job.
GUARANTEE REGISTRATION
Please complete and return to Sentinel to register for your 2 year guarantee.
Alternatively, you can register online at
http://www.sentinelprotects.com/uk/guarantee-registration
and select JetFlush Filter. Full Terms and Conditions can also be found
on the website.
Sentinel Performance Solutions Ltd and its sister companies may wish to send you information on
products, services and promotions in the future. If you would like to receive communications please tick
here – via Post Email Telephone
Company
Address
Postcode Telephone
Email
Place of purchase
Date of purchase
RETURN COMPLETED FORM TO:
JetFlush Filter
Sentinel Performance Solutions Ltd, 7650 Daresbury Park, Warrington, Cheshire, WA4 4BS

EN
GUARANTEE REGISTRATION
Please complete and return to Sentinel to register for your 2 year guarantee.
Alternatively, you can register online at
http://www.sentinelprotects.com/uk/guarantee-registration
and select JetFlush Filter. Full Terms and Conditions can also be found
on the website.
Sentinel Performance Solutions Ltd and its sister companies may wish to send you information on
products, services and promotions in the future. If you would like to receive communications please tick
here – via Post Email Telephone
Company
Address
Postcode Telephone
Email
Place of purchase
Date of purchase
RETURN COMPLETED FORM TO:
JetFlush Filter
Sentinel Performance Solutions Ltd, 7650 Daresbury Park, Warrington, Cheshire, WA4 4BS

10
JetFlush Filter V1- 07-16

FR
11JetFlush Filter V1-07-16
JETFLUSH FILTER – MODE D’EMPLOI
À utiliser avec la pompe à désembouer JetFlush Rapid® et le Désembouant
Rapide Sentinel X800. Une fois le nettoyage effectué, injecter l’Inhibiteur
Sentinel X100 ou l’Antigel avec inhibiteurs Sentinel X500 afin d’assurer une
protection durable de l’installation.
CONTENU DU KIT
• Filtre
• Tuyau de 1,5 m avec raccords 3/4"

FR
12 JetFlush Filter V1- 07-16
CARACTÉRISTIQUES TECHNIQUES
Sentinel JetFlush Filter
Puissance de l’aimant 11 000gauss
Longueur de l’aimant 400mm
Surface de l’aimant 201cm2
Poids de l’unité 4,95kg
Hauteur totale 475mm
Largeur totale 215 mm
Profondeur totale 245mm
ATTENTION
Le JetFlush Filter contient un aimant puissant qui génère un champ
magnétique très important. Tout filtre retiré du cylindre doit être tenu
à l’écart des appareils électroniques, montres, téléphones portables,
cartes bancaires, pacemaker …

FR
13JetFlush Filter V1-07-16
RACCORDEMENT DU FILTRE
La pompe à désembouer permet de faire circuler l’eau de l’installation
dans les deux sens, en actionnant l’inverseur de flux. Néanmoins, avant
tout désembouage avec la pompe et le JetFlush Filter, il est recommandé
d’installer le filtre JetFlush Filter en amont de la chaudière afin d’en assurer une
protection optimale lors des premières phases du désembouage.
Départ chaudière
Retour réseau chauffage
Tuyaux départ et retour
Tuyau supplémentaire de 1,5 m
JetFlush Rapid
RETOUR
JetFlush Filter
Chaudière
DÉPART

FR
14 JetFlush FilterV1-07-16
RACCORDEMENT DU FILTRE
1. Placer le JetFlush Filter à côté de la pompe à désembouer, dans un bac de
rétention approprié.
2. Sélectionner le sens de circulation avec les poignées de vannes et faire
pointer l’inverseur de flux dans la direction correspondante.
3. Raccorder le filtre sur le départ de la pompe à l’aide du tuyau fourni et le
connecter au raccord inférieur du filtre.
4. À l’aide des tuyaux de départ et retour de la pompe à désembouer,
raccorder la pompe et le raccord supérieur du JetFlush Filter au circuit de
chauffage.
5. Les deux vannes trois-voies du JetFlush Rapid doivent être dans la position
CIRCULATION.
Mode
“CIRCULATION”
Mode
“BYPASS”

FR
15JetFlush FilterV1- 07-16
MODE D’EMPLOI
1. Mettre en marche la pompe à désembouer et vérifier immédiatement la
parfaite étanchéité de tous les raccords et de la partie haute du JetFlush
Filter.
2. Après une circulation initiale d’environ dix minutes, tourner les deux vannes
trois-voies de 180° pour les mettre en position BYPASS.
3. Dévisser la bague (en haut du cylindre) du JetFlush Filter et, en saisissant
fermement la poignée, retirer l’aimant avec précaution.
REMARQUE : l’aimant est très puissant et fortement attiré par les surfaces
en acier. Veillez à ne pas vous pincer les doigts et évitez tout contact avec
les équipements sensibles.
4. Examiner l’aimant pour déceler la présence de dépôts et, si nécessaire, le
nettoyer comme indiqué ci-dessous :
5. Mettre des gants jetables. Puis, d’une main tenir la poignée du cylindre et de
l’autre retirer les dépôts magnétiques de l’aimant en les faisant glisser vers
le bas.
REMARQUE : il est recommandé de n’ôter qu’une partie des dépôts à
la fois, en commençant par la partie inférieure de l’aimant plutôt que
de tenter d’enlever le tout en une seule fois. Commencer par nettoyer
l’extrémité de l’aimant.
6. Recueillir les dépôts dans un récipient approprié en vue de leur mise au
rebut ultérieure.
7. Remonter le JetFlush Filter en veillant à ce que l’aimant soit inséré dans
la cavité circulaire située à la base du cylindre et replacer les deux vannes
trois-voies en position CIRCULATION.
8. Si nécessaire, répéter le nettoyage de l’aimant pendant l’opération de
désembouage.

FR
16 JetFlush FilterV1-07-16
NETTOYAGE DE L’AIMANT
Il n’est pas nécessaire de retirer tous les dépôts lors des nettoyages
intermédiaires, pendant le désembouage. Cependant, afin d’assurer une
longue durée de vie de l’équipement, l’aimant doit être nettoyé et séché avec
soin à l’issue de chaque intervention.
Si vous souhaitez recevoir des informations sur les produits, les services ou les promotions Sentinel.
Veuillez sélectionner votre mode de correspondance préféré – Courrier Email Téléphone
VilleCP
Société
Adresse
Téléphone
Email
Lieu d’achat/Distributeur
Date d’achat
ENVOYER LE BON DE GARANTIE COMPLÉTÉ À :
Sentinel Performance Solutions Ltd
Cité Descartes - 16 rue Albert Einstein – 77420 Champs sur Marne
BON DE GARANTIE
Veuillez compléter et retourner le bon de garantie à Sentinel Performance
Solutions Ltd pour activer la garantie, valable 2 ans.
Vous pouvez également activer la garantie en vous connectant
http://www.sentinelprotects.com/fr/activation-de-garantie
puis sélectionnez votre produit JetFlush Filter. Retrouvez les termes et
conditions de cette garantie sur le site web Sentinel.
JetFlush Filter

FR
Si vous souhaitez recevoir des informations sur les produits, les services ou les promotions Sentinel.
Veuillez sélectionner votre mode de correspondance préféré – Courrier Email Téléphone
VilleCP
Société
Adresse
Téléphone
Email
Lieu d’achat/Distributeur
Date d’achat
ENVOYER LE BON DE GARANTIE COMPLÉTÉ À :
Sentinel Performance Solutions Ltd
Cité Descartes - 16 rue Albert Einstein – 77420 Champs sur Marne
BON DE GARANTIE
Veuillez compléter et retourner le bon de garantie à Sentinel Performance
Solutions Ltd pour activer la garantie, valable 2 ans.
Vous pouvez également activer la garantie en vous connectant
http://www.sentinelprotects.com/fr/activation-de-garantie
puis sélectionnez votre produit JetFlush Filter. Retrouvez les termes et
conditions de cette garantie sur le site web Sentinel.
JetFlush Filter

18
JetFlush Filter V1- 07-16

IT
19JetFlush Filter V1-07-16
JETFLUSH FILTER – ISTRUZIONI PER L’USO
Da utilizzare insieme alla macchina per il lavaggio ad alta circolazione JetFlush
Rapid® e al Pulitore Sentinel X800. Dopo aver completato la pulizia, applicare
l’Inibitore Sentinel X100 o l’Antigelo con Inibitore Sentinel X500 per assicurare
una protezione continua.
CONTENUTO
• Filtro
• Tubo da 1,5 metri con attacchi da 3/4"

IT
20 JetFlush Filter V1- 07-16
SPECIFICHE TECNICHE
Sentinel JetFlush Filter
Intensità del magnete 11.000gauss
Lunghezza del magnete 400mm
Superficie del magnete 201cm2
Peso dell’unità 4,95kg
Altezza totale 475mm
Larghezza totale 215 mm
Profondità totale 245mm
ATTENZIONE
Il JetFlush Filter contiene un forte magnete e genera un campo
magnetico molto intenso. Se rimosso dal cilindro, va tenuto separato
da apparecchiature elettroniche, orologi, telefoni cellulari, carte di
credito, ecc.
Table of contents
Languages:
Other Sentinel Water Filtration System manuals
Popular Water Filtration System manuals by other brands

Propur
Propur PP500 - IC Installation and operating instructions

FM Mattsson
FM Mattsson Purify Flex Installation and maintenance instruction

Growonix
Growonix EX600T owner's manual

Zip
Zip HydroTap G5 Touch-Free Wave Quick start installation guide

Aqua Flo
Aqua Flo AQUV AQUV-12R22 owner's manual

Beko
Beko OWAMAT 10 Instructions for installation and operation