Sentiotec 160 User manual

145, 160, 180, 190
145E, 160E, 180E, 190E
245E, 260E, 280E, 290E
145E-190E
245E-290E
145-190
21082018/Y05-0459
EN Instructions for Installation and Use of Electric Sauna Heater
DE Gebrauchs- und Montageanleitung des Elektrosaunaofens
HU Elektromos kályha használati és telepítési útmutató
SV Monterings- och bruksanvisning för bastuaggregat
FR Instructions d’installation et mode d’emploi du poêle électrique
NL Instructies voor installatie en gebruik van de elektrische saunaoven
PL Instrukcja instalacji i eksploatacji elektrycznego pieca do sauny
CS Pokyny k montáži a použití elektrického topného tělesa do sauny
ES Instrucciones de instalación y uso del calentador eléctrico para sauna
IT Istruzioni per l’installazione e l’uso della stufa elettrica
PT Instruções de instalação e de utilização do aquecedor elétrico
SK Návodnainštaláciuapoužívanieelektrickéhosaunovéhoohrievača
EN DE
2
These instructions for installation and use are
intended for the owner or the person in charge of
the sauna, as well as for the electrician in charge
of the electrical installation of the heater. After
completing the installation, the person in charge
of the installation should give these instructions to
the owner of the sauna or to the person in charge
of its operation. Please read the instructions for use
carefully before using the heater.
The heater is designed for the heating of a sauna
room to bathing temperature. It is not to be used
for any other purpose.
Congratulations on your choice!
Guarantee:
• The guarantee period for heaters and control
equipment used in saunas by families is two (2)
years.
• The guarantee period for heaters and control
equipment used in saunas by building residents
is one (1) year.
• The guarantee does not cover any faults
resulting from failure to comply with
installation, use or maintenance instructions.
• The guarantee does not cover any faults
resulting from the use of stones not
recommended by the heater manufacturer.
Diese Montage- und Gebrauchsanleitung richtet
sich an den Besitzer der Sauna oder an die für die
Pflege der Sauna verantwortliche Person, sowie an
den für die Montage des Saunaofens zuständigen
Elektromonteur. Wenn der Saunaofen montiert ist,
wird diese Montage- und Gebrauchsanleitung an den
Besitzer der Sauna oder die für die Pflege der Sauna
verantwortliche Person übergeben. Lesen Sie vor
Inbetriebnahme des Ofens die Bedienungsanleitung
sorgfältig durch.
Der Ofen dient zum Erwärmen von Saunakabinen
auf Saunatemperatur. Die Verwendung zu anderen
Zwecken ist verboten.
Wir beglückwünschen Sie zu Ihrer guten Wahl!
Garantie:
• Die Garantiezeit für in Familiensaunen
verwendete Saunaöfen und Steuergeräte
beträgt zwei (2) Jahre.
• Die Garantiezeit für Saunaöfen und
Steuergeräte, die in öffentlichen Saunen in
Privatgebäuden verwendet werden, beträgt ein
(1) Jahr.
• Die Garantie deckt keine Defekte ab, die
durch fehlerhafte Installation und Verwendung
oder Missachtung der Wartungsanweisungen
entstanden sind.
• Die Garantie kommt nicht für Schäden auf,
die durch Verwendung anderer als vom Werk
empfohlener Saunaofensteine entstehen.
CONTENTS
1. INSTRUCTIONS FOR USE..............................................8
1.1. Piling of the Sauna Stones.....................................8
1.1.1. Maintenance ...............................................8
1.2. Heating of the Sauna............................................9
1.3. Using the Heater ..................................................9
1.3.1. Heater On ...................................................9
1.3.2. Pre-setting Time (timed switch-on) .................9
1.3.3. Heater Off................................................. 10
1.3.4. Setting the Temperature ............................. 10
1.4. Throwing Water on Heated Stones ....................... 10
1.5. Instructions for Bathing ...................................... 11
1.6. Warnings .......................................................... 11
1.6.1. Symbols descriptions.................................. 11
1.7. Troubleshooting ................................................. 11
2. SAUNA ROOM........................................................... 13
2.1. Sauna Room Structure........................................ 13
2.1.1. Blackening of the sauna walls......................13
2.2. Sauna Room Ventilation...................................... 14
2.3. Heater Output.................................................... 14
2.4. Sauna Room Hygiene.......................................... 14
3. INSTRUCTIONS FOR INSTALLATION ............................ 15
3.1. Before Installation .............................................. 15
3.1.1. Change from right-handed to left-handed
or vice versa (1).................................................. 16
3.1.2. Connecting the connecting cable
to the heater....................................................... 16
3.2. Fastening the Heater on a Wall ............................ 17
3.3. Electrical Connections.........................................17
3.3.1. Electric Heater Insulation Resistance.............18
3.4. Installation of the Control Unit and Sensors
(1-E, 2-E) ................................................................. 18
3.5. Resetting the Overheat Protector.......................... 18
4. SPARE PARTS ........................................................... 21
INHALT
1. BEDIENUNGSANLEITUNG..............................................8
1.1. Aufschichten der Saunaofensteine..........................8
1.1.1. Wartung .....................................................8
1.2. Erhitzen der Saunakabine ......................................9
1.3. Benutzung des Ofens............................................9
1.3.1. Ofen ein .....................................................9
1.3.2. Vorwahlzeit (zeitgesteuertes Einschalten)........9
1.3.3. Ofen aus................................................... 10
1.3.4. Einstellen der Temperatur............................10
1.4. Aufguss............................................................ 10
1.5. Anleitungen zum Saunen.....................................11
1.6. Warnungen........................................................ 11
1.6.1. Symbol Beschreibung ................................. 11
1.7. Störungen ......................................................... 11
2. SAUNAKABINE .......................................................... 13
2.1. Struktur der Saunakabine .................................... 13
2.1.1. Schwärzung der Saunawände...................... 13
2.2. Belüftung der Saunakabine .................................. 14
2.3. Leistungsabgabe des Ofens ................................ 14
2.4. Hygiene der Saunakabine .................................... 14
3. INSTALLATIONSANLEITUNG........................................ 15
3.1. Vor der Montage................................................ 15
3.1.1. Wechsel der Anschlußrichtung (1)................ 16
3.1.2. Befestigung des Anschlußkabels
am Saunaofen..................................................... 16
3.2. Befestigung des Saunaofens an der Wand ............. 17
3.3. Elektroanschlüsse............................................... 17
3.3.1. Isolationswiderstand des Elektrosaunaofens...18
3.4. Anschluß des Steuergerätes und der Fühler
(1-E, 2-E) ................................................................. 18
3.5. Zurückstellen der Überhitzungsschutzes ................ 18
4. ERSATZTEILE ............................................................ 21

HU SV
3
INNEHÅLL
1. BRUKSANVISNING ..................................................... 22
1.1. Stapling av bastustenar .......................................22
1.1.1. Underhåll .................................................. 22
1.2. Uppvärmning av bastu ........................................ 23
1.3. Användning av aggregatet................................... 23
1.3.1. Bastuaggregatet på genast.......................... 23
1.3.2. Förinställd tid (tidsbestämd uppvärmning)......23
1.3.3. Bastuaggregatet av .................................... 24
1.3.4. Justering av temperatur.............................. 24
1.4. Kastning av bad ................................................. 24
1.5. Badanvisningar .................................................. 25
1.6. Varningar .......................................................... 25
1.6.1. Symbolernas betydelse ...............................25
1.7. Felsökning......................................................... 25
2. BASTU...................................................................... 27
2.1. Bastuns konstruktion .......................................... 27
2.1.1. Mörknande av bastuns väggar .....................27
2.2. Ventilation i bastun ............................................ 28
2.3. Aggregateffekt................................................... 28
2.4. Bastuhygien ...................................................... 28
3. MONTERINGSANVISNING ........................................... 29
3.1. Före montering .................................................. 29
3.1.1. Placering av styrreglage: vänster/höger (1) .... 30
3.1.2. Inkoppling av anslutningskabel.....................31
3.2. Montering på vägg ............................................. 31
3.3. Elinstallation ...................................................... 32
3.3.1. Elaggregatets isoleringsresistans .................32
3.4. Montering av styrenhet och givare (1-E,2-E) .......... 32
3.5. Återställning av överhettningsskydd ..................... 33
4. RESERVDELAR........................................................... 35
Monterings- och bruksanvisningarna är avsedda för
bastuns ägare eller den som ansvarar för skötseln
av bastun samt för den elmontör som ansvarar för
elinstallationerna. När bastuaggregatet monterats,
skall montören överlåta dessa anvisningar till bastuns
ägare eller till den som ansvarar för skötseln av
bastun. Studera bruksanvisningarna noggrant innan
aggregatet tas i bruk.
Aggregatet är avsedd för att värma upp bastun till
lämplig bastubadstemperatur. Annan användning av
aggregatet är förbjuden.
Våra bästa gratulationer till ett gott val av
bastuaggregat!
Garanti:
• Garantitiden för de bastuaggregat och den
kontrollutrustning som används i familjebastur
är två (2) år.
• Garantitiden för de bastuaggregat och den
kontrollutrustning som används i bastur i
flerfamiljshus är ett (1) år.
• Garantin täcker inte fel som uppstått på grund
av installation, användning eller underhåll som
strider mot anvisningarna.
• Garantin täcker inte fel som förorsakas
av att andra bastustenar än sådana som
rekommenderats av tillverkaren använts.
A használati utasítás a szauna tulajdonosának
vagy üzemeltetőjének, illetve a kályhát telepítő
villanyszerelőnek szól. A telepítést végző
személynek a telepítés után át kell adnia a
használati utasítást a szauna tulajdonosának
vagy üzemeltetőjének. Kérjük, a kályha
használata előtt alaposan olvassa el a használati
utasítást.
A kályhát szaunahelyiségek fürdőhőmérsékletre
való felfűtésére szolgál. A készülék semmilyen
egyéb felhasználásra nem alkalmas.
Gratulálunk a vásárlásához!
• Garancia:
• A családi szaunák kályháinak és
vezérlőrendszereinek jótállási ideje két (2)
év.
• A közösségi szaunák kályháinak és
vezérlőrendszereinek jótállási ideje egy (1)
év.
• A jótállás nem terjed ki a nem megfelelő
telepítésből vagy karbantartásból, illetve
nem rendeltetésszerű használatból adódó
károkra.
• A jótállás nem terjed ki a gyártó
utasításainak nem megfelelő kövek
használatából adódó károkra.
TARTALOMJEGYZÉK
1. HASZNÁLATI UTASÍTÁS............................................22
1.1. A szaunakövek elhelyezése ......................................... 22
1.1.1. Karbantartás....................................................... 22
1.2. A szauna felfűtése ....................................................... 23
1.3. A kályha használata..................................................... 23
1.3.1. A kályha bekapcsolása ....................................... 23
1.3.2. Az időzítő használata (időzített bekapcsolás)..... 23
1.3.3. A kályha kikapcsolása ........................................ 24
1.3.4. A hőmérséklet beállítása .................................... 24
1.4. A forró kövek lelocsolása............................................. 24
1.5. Utasítások a szauna használatához ............................ 25
1.6. Figyelmeztetések......................................................... 25
1.6.1. Szimbólumok leírása .......................................... 25
1.7. Hibaelhárítás ............................................................... 25
2. SZAUNAHELYISÉG ...................................................27
2.1. A szauna kialakítása .................................................... 27
2.1.1. A fallemezek feketedése .................................... 27
2.2. A szauna szellőzése..................................................... 28
2.3. A kályha kimeneti teljesítménye.................................. 28
2.4. Higiénia ....................................................................... 28
3. TELEPÍTÉSI UTASÍTÁSOK ..........................................29
3.1. Telepítés előtt.............................................................. 29
3.1.1. Vezérlés jobb vagy bal kezes elhelyezése (1) .... 30
3.1.2. A kábel csatlakoztatása a kályhához.................. 31
3.2. A kályha rögzítése a falhoz.......................................... 31
3.3. Elektromos vezetékek ................................................. 32
3.3.1. Az elektromos kályha szigetelési ellenállása...... 32
3.4. A vezérlőegység és az érzékelők telepítése (1-E,2-E).. 32
3.5. A túlmelegedésgátló újraindítása ................................ 33
4. PÓTALKATRÉSZEK ...................................................35

FR NL
4
Ces consignes d’installation et d’utilisation sont
destinées au propriétaire du sauna ou à la personne
chargée de l’entretien, ainsi qu’à l’électricien
responsable de l’installation électrique du poêle.
Après l’installation du poêle, ces consignes seront
remises au propriétaire du sauna ou à la personne
chargée de son entretien. Lire attentivement les
consignes d’utilisation avant la mise en service de
l’appareil.
Ce poêle est prévu pour chauffer la cabine de sauna
à la température adéquate. Il est interdit d’utiliser le
poêle à d’autres fins.
Félicitations pour cet excellent choix !
Garantie :
• La période de garantie des poêles et de
l’équipement de contrôle utilisés dans les
saunas par des familles est de deux (2) ans.
• La période de garantie des poêles et de
l’équipement de contrôle utilisés dans les
saunas par les résidents d’appartements est
d’un (1) an.
• La garantie ne couvre aucun défaut résultant
du non-respect des instructions d’installation,
d’utilisation ou de maintenance.
• La garantie ne couvre aucun défaut résultant
de l’utilisation de pierres non recommandées
par le fabricant du poêle.
TABLE DES MATIÉRES
1. MODE D’UTILISATION................................................ 36
1.1. Mise en place des pierres du poêle ....................... 36
1.1.1. Maintenance ............................................. 36
1.2. Chauffage du sauna............................................ 37
1.3. Utilisation du poêle............................................. 37
1.3.1. Poêle allumé.............................................. 37
1.3.2. Durée de pré-programmation (mise en route
programmée).......................................................37
1.3.3. Poêle arrêté............................................... 38
1.3.4. Réglage de la température........................... 38
1.4. Projection de l’eau de vapeur sur les pierres...........38
1.5. Conseils pour la séance de sauna ......................... 39
1.6. Avertissements.................................................. 39
1.6.1. Description des symboles............................ 39
1.7. Dépannage........................................................ 39
2. CABINE DU SAUNA.................................................... 41
2.1. Structure de la cabine de sauna ........................... 41
2.1.1. Noircissement des murs du sauna ................ 41
2.2. Ventilation de la cabine de sauna ......................... 42
2.3. Puissance des poêles.......................................... 42
2.4. Hygiène de la cabine de sauna .............................42
3. INSTRUCTIONS D’INSTALLATION................................ 43
3.1. Avant l’installation ............................................. 43
3.1.1. Déplacement des commandes (1).................44
3.1.2. Connexion du câble de raccordement
au poêle ............................................................. 45
3.2. Fixation du poêle au mur ..................................... 45
3.3. Raccordement électrique ..................................... 46
3.3.1. Résistance d’isolation du poêle électrique......46
3.4. Installation du centre de contrôle et du capteur
(1-E, 2-E) ................................................................ 47
3.5. Réinitialisation de la sécurité surchauffe ................ 47
4. PIÈCES DÉTACHÉES................................................... 49
Deze instructies voor gebruik en installatie
zijn bedoeld voor de eigenaar of de persoon die
verantwoordelijk is voor de sauna, alsook voor de
elektrische installateur die de elektrische aansluiting
moet uitvoeren. Nadat de installatie voltooid werd
moet de persoon die verantwoordelijk is voor de
installatie deze instructies doorgeven aan de eigenaar
van de sauna of aan de persoon die verantwoordelijk
is voor het gebruik van de sauna. Lees aub deze
instructies zorgvuldig door vooraleer u de oven gaat
gebruiken.
De oven is geschikt om een sauna op te warmen
voor het gebruik van een sauna. Hij mag niet gebruikt
worden voor andere doeleinden.
Proficiat met uw keuze!
• De garantie termijn voor ovens en
regelapparatuur is twee (2) jaar.
• De garantie termijn voor ovens en
regelapparatuur die in sauna’s door bewoners
van gemeenschappelijke gebouwen wordt
gebruikt, bedraagt een (1) jaar.
• De garantie geldt niet voor eventuele gebreken
die het gevolg zijn van het niet opvolgen van de
installatie-, gebruiks- en onderhoudsinstructies.
• De garantie geldt niet voor eventuele gebreken
die het gevolg zijn van het gebruik van stenen
die niet door de fabrikant van de oven zijn
aanbevolen.
INHOUD
1. INSTRUCTIES VOOR GEBRUIK..................................... 36
1.1. Saunastenen opstapelen...................................... 36
1.1.1. Onderhoud ................................................ 36
1.2. Verwarming van de sauna ...................................37
1.3. Gebruik van de oven...........................................37
1.3.1. Oven inschakelen....................................... 37
1.3.2. Vooraf ingestelde tijd (getimed inschakelen) ..37
1.3.3. Oven uitschakelen...................................... 38
1.3.4. Temperatuur instellen .................................38
1.4. Water op de verwarmde stenen gooien .................38
1.5. Instructies voor het baden...................................39
1.6. Waarschuwingen................................................ 39
1.6.1. Verklaring symbolen ...................................39
1.7. Probleemoplossing.............................................. 39
2. DE SAUNARUIMTE..................................................... 41
2.1. Constructie van saunaruimte ...............................41
2.1.1. Blakeren van de saunawanden..................... 41
2.2. Ventilatie van saunaruimte .................................. 42
2.3. Vermogen van de saunaoven ............................... 42
2.4. Hygiëne saunaruimte ..........................................42
3. INSTRUCTIES VOOR INSTALLATIE............................... 43
3.1. Voorafgaand aan installatie.................................. 43
3.1.1. Wijzigen van rechtshandig naar
linkshandig of vice versa (1).................................. 44
3.1.2. De verbindingskabel met de bovenkant
van de kachel verbinden ....................................... 45
3.2. De kachel aan de muur vastmaken ....................... 45
3.3. Elektrische verbindingen......................................46
3.3.1. Isolatieweerstand elektrische saunaoven ....... 46
3.4. Installatie van de besturingsunit en sensors
(1-E, 2-E) ................................................................. 47
3.5. Oververhittingsbeveiliging resetten ....................... 47
4. RESERVEONDERDELEN............................................... 49

PL CS
5
Niniejsza instrukcja instalacji i eksploatacji jest
przeznaczona dla właścicieli sauny lub osób
odpowiedzialnych za saunę, jak również dla
elektryków odpowiedzialnych za podłączenie
elektryczne pieca. Po zakończeniu instalacji
osoba odpowiedzialna powinna przekazać
niniejszą instrukcję właścicielowi sauny lub
osobie odpowiedzialnej za jej eksploatację. Przed
rozpoczęciem eksploatacji pieca należy dokładnie
zapoznać się z niniejszą instrukcją.
Piec służy do ogrzewania kabiny sauny do
odpowiedniej temperatury kąpieli. Pieców nie
wolno używać do żadnych innych celów.
Gratulujemy Państwu dobrego wyboru!
Gwarancja:
• Okres gwarancji na piece i urządzenia
sterujące stosowane w saunach
przeznaczonych do użytku w domach
jednorodzinnych wynosi dwa (2) lata.
• Okres gwarancji na piece i urządzenia
sterujące stosowane w saunach
przeznaczonych do użytku w mieszkaniach
znajdujących się w domach wielorodzinnych
wynosi jeden (1) rok.
• Gwarancja nie obejmuje usterek wynikłych
znie przestrzegania instrukcji montażu,
użytkowania lub prac konserwacyjnych.
• Gwarancja nie obejmuje uszkodzeń
powstałych na skutek użycia innych kamieni
niż zalecane przez producenta pieca.
Tyto pokyny k montáži a použití jsou určeny jak
pro majitele nebo osobu zodpovědnou za provoz
sauny, tak i pro elektrotechnika zodpovědného
za montáž topného tělesa. Po dokončení montáže
předá osoba zodpovídající za montáž tyto pokyny
majiteli sauny nebo osobě, která je za její provoz
zodpovědná. Před použitím topného tělesa si
důkladně přečtěte návod k použití.
Topné těleso je určeno k vytápění domácich
saun na provozní teplotu. Topné těleso se nesmí
používat k žádnému jinému účelu.
Blahopřejeme Vám k vaší volbě!
Záruka:
• Záruční doba, poskytovaná na topná tělesa
a ovládací zařízení používaná v saunách a
využívaných rodinami, je dva (2) roky.
• Záručni doba, poskytovaná na topná tělesa
a ovládací zařízení používaná v saunách
využívaných hromadně více obyvateli domu je
jeden (1) rok.
• Záruka se nevztahuje na závady zpusobené
nesprávnou instalací, nesprávným
používáním nebo nesprávnou údržbou.
• Záruka se nevztahuje na závady zpusobené
používáním kamenu, které nejsou doporucené
výrobcem saunových kamen.
SPIS TRE¦CI
1. EKSPLOATACJA PIECA............................................................ 50
1.1. Uk³adanie kamieni u¿ywanych w saunie...................... 50
1.1.1. Konserwacja......................................................... 50
1.2. Nagrzewanie sauny....................................................... 51
1.3. Eksploatacja pieca......................................................... 51
1.3.1. W³±czanie pieca ................................................... 51
1.3.2. Ustawianie czasu (wy³±cznik czasowy)................ 51
1.3.3. Wy³±czanie pieca ................................................. 51
1.3.4. Ustawianie temperatury...................................... 52
1.4. Polewanie wod± rozgrzanych kamieni ........................ 52
1.5. Wskazówki korzystania z sauny ................................... 52
1.6. Ostrze¿enia.................................................................... 53
1.6.1. Opis symboli......................................................... 53
1.7. Wyszukiwanie usterek .................................................. 53
2. KABINA SAUNY ...................................................................... 55
2.1. Konstrukcja kabiny sauny ............................................. 55
2.1.1. Ciemnienie ¶cian sauny........................................ 55
2.2. Wentylacja kabiny sauny .............................................. 56
2.3. Moc pieca....................................................................... 56
2.4. Higiena kabiny .............................................................. 56
3. INSTRUKCJA INSTALACJI........................................................ 57
3.1. Czynno¶ci wstêpne........................................................ 57
3.1.1. Zmiana usytuowania czê¶ci steruj±cej piecem
z “prawej” na “lew±” b±d¼ odwrotnie (1)..................... 58
3.1.2. Pod³±czanie kabla przy³±czeniowego do pieca.. 59
3.2. Mocowanie pieca na ¶cianie ......................................... 59
3.3. Pod³±czenie elektryczne ............................................... 60
3.3.1. Rezystancja izolacji pieca elektrycznego ............ 61
3.4. Instalowanie modu³u steruj±cego i czujników
(1-E, 2-E)................................................................................ 61
3.5. Resetowanie wy³±cznika termicznego......................... 61
4. CZĘŚCI ZAMIENNE.................................................................. 63
OBSAH
1. POKYNY K POUŽITÍ ..................................................50
1.1. Skládání topných kamenů ........................................... 50
1.1.1. Údržba................................................................ 50
1.2. Vyhřívání sauny ........................................................... 51
1.3. Provoz kamen.............................................................. 51
1.3.1. Zapnutí kamen ................................................... 51
1.3.2. Nastavení prodlevy (časové zapnutí) ................. 51
1.3.3. Vypnutí kamen ................................................... 51
1.3.4. Nastavení teploty ............................................... 52
1.4. Polévání horkých kamenů vodou................................. 52
1.5. Pokyny k použití sauny ................................................ 52
1.6. Upozornění .................................................................. 53
1.6.1. Význam symbolů. ............................................... 53
1.7. Řešení potíží ................................................................ 53
2. Místnost sauny .......................................................55
2.1. Uspořádání saunovací místnosti .................................. 55
2.1.1. Černání saunových stěn ..................................... 55
2.2. Větrání sauny .............................................................. 56
2.3. Výkon topného tělesa.................................................. 56
2.4. Hygiena v sauně.......................................................... 56
3. POKYNY K MONTÁŽI ................................................57
3.1. Před montáží................................................................ 57
3.1.1. Změna z pravostranného provedení na
levostranné a opačně (1).............................................. 58
3.1.2. Připojení připojovacího kabelu ke kamnům........ 59
3.2. Upevnění kamen na stěnu........................................... 59
3.3. Připojení k elektrické síti.............................................. 60
3.3.1. Odpor izolace elektrického topného tělesa......... 61
3.4. Montáž řídící jednotky a čidel (1-E, 2-E) ...................... 61
3.5. Resetování ochrany proti přehřátí ............................... 61
4. NÁHRADNÍ DÍLY .......................................................63

ES IT
6
Le presenti istruzioni per l’installazione e l’uso
sono dirette al proprietario o alla persona
responsabile della sauna, nonché all’elettricista
responsabile dell’installazione elettrica della stufa.
Al termine dell’installazione, la persona responsabile
dell’installazione deve fornire queste istruzioni al
proprietario della sauna o alla persona responsabile
del suo funzionamento. Leggere attentamente le
istruzioni per l’uso prima di utilizzare la stufa.
La stufa è progettata per il riscaldamento di una
stanza di sauna ad una temperatura adeguata. Non
deve essere utilizzata per alcun altro scopo.
Complimenti per la scelta.
Garanzia:
• Il periodo di garanzia delle stufe e
dell’apparecchiatura di comando utilizzati dalle
famiglie è di due (2) anni.
• Il periodo di garanzia delle stufe e
dell’apparecchiatura di comando utilizzati in
saune dai residenti di un edificio un (1) anno.
• La garanzia non copre i guasti provocati
dall’inosservanza delle istruzioni di installazione,
utilizzo o manutenzione.
• La garanzia non copre i guasti provocati
dall’uso di pietre non consigliate dal produttore
della stufa.
Estas instrucciones de instalación y uso están
destinadas al propietario o a la persona a cargo
de la sauna, así como al electricista encargado de
la instalación eléctrica del calentador. Después
de completar la instalación, la persona a cargo
de la misma debe entregar estas instrucciones al
propietario de la sauna o a la persona encargada
de su funcionamiento. Estudie detenidamente las
instrucciones de uso antes de usar el calentador
para sauna.
El calentador está diseñado para el calentamiento
de una sauna a temperaturas de baño. No debe
utilizarse con ningún otro fin.
¡Felicidades por su elección!
Garantía:
• El periodo de garantía para calentadores de
sauna y equipos de control utilizados en saunas
familiares es de dos (2) años.
• El periodo de garantía para calentadores de
sauna y equipos de control utilizados en saunas
de edificios residenciales es de un (1) año.
• La garantía no cubre ningún fallo ocasionado a
raíz del incumplimiento de las instrucciones de
instalación, uso o mantenimiento.
• La garantía no cubre ningún fallo ocasionado
por el uso de piedras no recomendadas por el
fabricante del calentador.
CONTENIDO
1. INSTRUCCIONES DE USO ........................................... 64
1.1. Colocacion de las piedras ....................................64
1.1.1. Mantenimiento........................................... 64
1.2. Calentamiento de la sauna................................... 65
1.3. Cómo usar el calentador...................................... 65
1.3.1. Encendido del calentador ............................65
1.3.2. Tiempo pre-programado
(programado encendido) ....................................... 65
1.3.3. Apagado del calentador .............................. 66
1.3.4. Selección de la temperatura.........................66
1.4. Echar agua sobre las piedras calentadas................66
1.5. Instrucciones para el baño................................... 67
1.6. Advertencias ..................................................... 67
1.6.1. Descripción de símbolos.............................. 67
1.7. Solución de problemas........................................ 67
2. LA SAUNA ................................................................ 69
2.1. Estructura de la sauna ........................................ 69
2.1.1. Ennegrecimiento de las paredes de la sauna ..69
2.2. Ventilación de la sauna .......................................69
2.3. Potencia calorífica .............................................. 70
2.4. Higiene de la sauna ............................................ 70
3. INSTRUCCIONES PARA LA INSTALACIÓN .................... 71
3.1. Antes de la instalación........................................71
3.1.1. Cambio de derecha a izquierda o
viceversa (1)....................................................... 72
3.1.2. Unión del cable de conexión al calentador .....73
3.2. Fijación del calentador a una pared ....................... 73
3.3. Conexiones eléctricas ......................................... 74
3.4. Cómo instalar el sensor de temperatura (1-E, 2-E) ..74
3.5. Restablecimiento del seguro de
sobrecalentamiento ................................................... 75
4. PIEZAS DE REPUESTO ................................................ 77
INDICE
1. ISTRUZIONI PER L’USO............................................... 64
1.1. Pila di pietre da sauna......................................... 64
1.1.1. Manutenzione............................................ 64
1.2. Riscaldamento della sauna...................................65
1.3. Uso della stufa................................................... 65
1.3.1. Accensione della stufa................................65
1.3.2. Tempo di preimpostazione (accensione
programmata) ..................................................... 65
1.3.3. Spegnimento della stufa.............................. 65
1.3.4. Impostazione della temperatura....................66
1.4. Come gettare acqua sulle pietre riscaldate............. 66
1.5. Istruzioni per il bagno .........................................66
1.6. Avvertenze........................................................ 67
1.6.1. Descrizione dei simboli................................67
1.7. Risoluzione dei problemi...................................... 67
2. STANZA DELLA SAUNA ............................................. 69
2.1. Struttura della stanza della sauna .........................69
2.1.1. Annerimento delle pareti della sauna............. 69
2.2. Ventilazione della stanza della sauna..................... 69
2.3. Potenza di uscita stufa........................................70
2.4. Condizioni igieniche della stanza della sauna ............... 70
3. ISTRUZIONI DI INSTALLAZIONE................................... 71
3.1. Prima dell’installazione........................................71
3.1.1. Cambio da destrorso a mancino o
viceversa (1)....................................................... 72
3.1.2. Collegamento del cavo di connessione
sulla stufa........................................................... 73
3.2. Fissaggio della stufa a parete............................... 73
3.3. Collegamenti elettrici .......................................... 74
3.4. Installazione della centralina e dei sensori (1-E, 2-E) 74
3.5. Reimpostazione della protezione da
surriscaldamento....................................................... 75
4. PEZZI DI RICAMBIO.................................................... 77
SK
PT
7
Estas instruções de instalação e utilização desti-
nam-se ao proprietário ou à pessoa encarregue
da sauna e também ao eletricista encarregue
da instalação elétrica do aquecedor. Uma vez
concluída a instalação, a pessoa encarregue da
instalação deverá entregar estas instruções ao
proprietário da sauna ou à pessoa que tem a seu
cargo o seu funcionamento. Antes de utilizar o
aquecedor, leia cuidadosamente as instruções de
utilização.
O aquecedor foi concebido para aquecer até uma
temperatura de banho uma sala de sauna. Não
deve ser usado para mais nenhum m.
Parabéns pela sua escolha!
Garantia:
• O período de garantia para aquecedores e
equipamento de controlo utilizados em sau-
nas por famílias é de dois (2) anos.
• O período de garantia para aquecedores e
equipamento de controlo utilizados em sau-
nas por residentes de um edifício é de um (1)
ano.
• A garantia não cobre avarias resultantes
do não cumprimento das instruções de
instalação, utilização ou manutenção.
• A garantia não cobre avarias resultares do
uso de pedras não recomendadas pelo fabri-
cante do aquecedor.
Sisältö
1. INSTRUÇÕES DE UTILIZAÇÃO ...................................78
1.1. Empilhamento das pedras da sauna............................ 78
1.1.1. Manutenção........................................................ 78
1.2. Aquecimento da sauna ................................................ 79
1.3. Utilizar o aquecedor..................................................... 79
1.3.1. Ligar o aquecedor............................................... 79
1.3.2. Predefinir a hora (ligação com hora marcada) ... 79
1.3.3. Desligar o aquecedor ......................................... 80
1.3.4. Definir a temperatura......................................... 80
1.4. Deitar água nas pedras quentes.................................. 80
1.5. Instruções para o banho ............................................. 81
1.6. Avisos .......................................................................... 81
1.6.1. Descrição dos símbolos......................................................81
1.7. Deteção de avarias...................................................... 81
2. SALA DA SAUNA ......................................................83
2.1. Estrutura da sala da sauna. ......................................... 83
2.1.1. Enegrecimento das paredes da sauna ............... 83
2.2. Ventilação da sala da sauna ........................................ 84
2.3. Débito do aquecedor ................................................... 85
2.4. Higiene da sala da sauna............................................. 85
3. INSTRUÇÕES PARA INSTALAÇÃO ..............................86
3.1. Antes da instalação ..................................................... 86
3.1.1. Mudar do lado direito para o esquerdo
ou vice-versa (1)........................................................... 87
3.1.2. Ligar o cabo de ligação ao aquecedor................ 88
3.2. Fixar o aquecedor a uma parede................................. 89
3.3. Ligações elétricas ........................................................ 89
3.4. Instalação da unidade de controlo
e dos sensores (1-E, 2-E) ................................................... 90
3.5. Reposição da proteção de sobreaquecimento............. 91
4. PEÇAS DE RESERVA .................................................92
Tento návod na inštaláciu a používanie
je určený pre majiteľa sauny alebo osobu
zodpovednú za prevádzkovanie sauny, a
taktiež pre elektroinštalatéra zodpovedného
za elektrickú inštaláciu ohrievača. Po
dokončení inštalácie by osoba zodpovedná
za inštaláciu mala predať tento návod
majiteľovi sauny alebo osobe zodpovednej
za jej prevádzku. Pred použitím ohrievača si
pozorne prečítajte návod na použitie.
Ohrievač je určený na vykúrenie saunovacej
miestnosti na saunovaciu teplotu. Nesmie
sa používať na žiadne iné účely.
Blahoželáme k vašej voľbe!
Záruka:
• Záručná doba na ohrievače a ovládacie
zariadenie používané v samostatných
rodinných saunách je dva (2) roky.
• Záručná doba na ohrievače a ovládacie
zariadenie používané v spoločných
saunách pre obyvateľov bytových
jednotiek je jeden (1) rok.
• Záruka sa nevzťahuje na poruchy
spôsobené nedodržaním pokynov k
inštalácii, používaniu alebo údržbe.
• Záruka sa nevzťahuje na poruchy
spôsobené používaním kameňov, ktoré
neboli odporučené výrobcom ohrievača.
OBSAH
1. NÁVOD NA POUŽITIE ...................................... 78
1.1. Ukladanie saunových kameňov.........................78
1.1.1. Údržba ......................................................78
1.2. Vykurovanie sauny ............................................79
1.3. Použitie kachlí....................................................79
1.3.1. Zapnutie kachlí .........................................79
1.3.2. Prednastavenie času
(načasované zapnutie) .......................................79
1.3.3. Vypnutie kachlí .........................................80
1.3.4. Nastavenie teploty....................................80
1.4. Liatie vody na zohriate kamene ........................80
1.5. Pokyny na saunovanie ......................................81
1.6. Varovania ..........................................................81
1.6.1. Popis symbolov .........................................81
1.7. Riešenie problémov...........................................81
2. MIESTNOSŤ SAUNY ........................................ 83
2.1. Konštrukcia miestnosti sauny............................83
2.1.1. Černenie stien sauny ................................83
2.2. Vetranie sauny ..................................................84
2.3. Výkon kachlí ......................................................85
2.4. Hygiena v saune................................................85
3. POKYNY NA INŠTALÁCIU ................................ 86
3.1. Pred inštaláciou.................................................86
3.1.1. Zmena z ovládania pravou rukou na
ovládanie ľavou rukou alebo naopak (1).............87
3.1.2. Pripojenie pripojovacieho
kábla k ohrievaču................................................88
3.2. Pripevnenie ohrievača k stene ..........................89
3.3. Elektrické pripojenia..........................................89
3.4. Inštalácia ovládacej jednotky
a snímačov (1-E, 2-E) ..............................................90
3.5. Obnovenie ochrany pred prehriatím..................91
4. NÁHRADNÉ DIELY .......................................... 92

EN DE
8
1. INSTRUCTIONS FOR USE 1. BEDIENUNGSANLEITUNG
1.1. Piling of the Sauna Stones
The piling of the sauna stones has a great effect on
the functioning of the heater (figure 1).
Important information on sauna stones:
• The stones should be 5–10 cm in diameter.
• Use solely angular split-face sauna stones that
are intended for use in a heater. Peridotite,
olivine-dolerite and olivine are suitable stone
types.
• Neither light, porous ceramic “stones“ nor soft
soapstones should be used in the heater. They
do not absorb enough heat when warmed up.
This can result in damage in heating elements.
• Wash off dust from the stones before piling
them into the heater.
Please note when placing the stones:
• Do not drop stones into the heater.
• Do not wedge stones between the heating
elements.
• Place the stones sparsely to ensure that air can
circulate between them.
• Pile the stones so that they support each other
instead of lying their weight on the heating
elements.
• Do not form a high pile of stones on top of the
heater.
• No such objects or devices should be placed
inside the heater stone space or near the heater
that could change the amount or direction of
the air flowing through the heater.
1.1. Aufschichten der Saunaofensteine
Die Schichtung der Ofensteine hat eine große Aus-
wirkung auf die Effizienz des Ofens (Abb. 1).
Wichtige Informationen zu Saunaofensteinen:
• Die Steine sollten einen Durchmesser von
5–10 cm haben.
• Verwenden Sie nur spitze Saunasteine mit rau-
er Oberfläche, die für die Verwendung in Sau-
naöfen vorgesehen sind. Geeignete Gesteinsar-
ten sind Peridodit, Olivin-Dolerit und Olivin.
• Im Saunaofen sollten weder leichte poröse
„Steine“ aus Keramik noch weiche Speckstei-
ne verwendet werden. Sie absorbieren beim
Erhitzen nicht genügend Wärme, was zu einer
Beschädigung der Heizelemente führen kann.
• Die Steine sollten vor dem Aufschichten von
Steinstaub befreit werden.
Beachten Sie beim Platzieren der Steine Folgendes:
• Lassen Sie die Steine nicht einfach in den Ofen
fallen.
• Vermeiden Sie ein Verkeilen von Steinen zwi-
schen den Heizelementen.
• Schichten Sie die Steine in lockerer Anordnung, so
dass Luft zwischen ihnen hindurchströmen kann.
• Schichten Sie die Steine so aufeinander, dass
sie nicht gegen die Heizelemente drücken.
• Schichten Sie die Steine oben auf dem Ofen
nicht zu einem hohen Stapel auf.
• In der Steinkammer oder in der Nähe des
Saunaofens dürfen sich keine Gegenstände
oder Geräte befinden, die die Menge oder die
Richtung des durch den Saunaofen führenden
Luftstroms ändern.
1.1.1. Maintenance
Due to large variation in temperature, the sauna
stones disintegrate in use. Rearrange the stones at
least once a year or even more often if the sauna
is in frequent use. At the same time, remove any
pieces of stones from the bottom of the heater and
replace any disintegrated stones with new ones. By
doing this, the heating capability of the heater stays
optimal and the risk of overheating is avoided.
Figure 1. Piling of the sauna stones
Abbildung 1. Aufschichtung der Saunaofensteine
1.1.1. Wartung
Aufgrund der großen Wärmeänderungen werden die
Saunasteine spröde und brüchig. Die Steine sollten
mindestens einmal jährlich neu aufgeschichtet wer-
den, bei regelmäßigem Gebrauch öfter. Bei dieser
Gelegenheit entfernen Sie bitte auch Staub und Ge-
steinssplitter aus dem unteren Teil des Saunaofens
und ersetzen beschädigte Steine. Hierdurch bleibt
die Heizleistung des Ofens optimal, und das Risiko
der Überhitzung wird vermieden.

EN DE
9
1.2. Erhitzen der Saunakabine
Beim ersten Erwärmen sondern sich von Saunaofen
und Steinen Gerüche ab. Um diese zu beseitigen,
muss die Saunakabine gründlich gelüftet werden.
Bei einer für die Saunakabine angemessenen Ofen-
leistung ist eine isolierte Sauna innerhalb von einer
Stunde auf die erforderliche Saunatemperatur aufge-
heizt ( 2.3.). Die Saunaofensteine erwärmen sich ge-
wöhnlicherweise in derselben Zeit auf Aufgusstempe-
ratur wie die Saunakabine. Die passende Temperatur
in der Saunakabine beträgt etwa 65 bis 80 °C.
1.3. Benutzung des Ofens
Bitte überprüfen Sie, bevor Sie den Ofen anschal-
ten, dass keine Gegenstände auf dem Ofen oder in
unmittelbarer Nähe des Ofens liegen. 1.6.
• Die Ofenmodelle 145-190 sind mit einer Zeit-
schaltuhr und einem Thermostat ausgestattet.
Die Zeitschaltuhr regelt die Einschaltzeit des
Ofens und das Thermostat die Temperatur.
1.3.1.–1.3.4.
• Die Ofenmodelle 145E-190E und 245E-290E
werden mit einem separaten Steuergerät
bedient. Beachten Sie die mitgelieferte Bedie-
nungsanleitung der Steuerung.
1.2. Heating of the Sauna
When operating the heater for the first time, both the
heater and the stones emit smell. To remove the smell,
the sauna room needs to be efficiently ventilated.
If the heater output is suitable for the sauna room,
it will take about an hour for a properly insulated
sauna to reach the required bathing temperature (
2.3.). The sauna stones normally reach the bathing
temperature at the same time as the sauna room.
A suitable temperature for the sauna room is about
65–80 °C.
1.3. Using the Heater
Before switching the heater on always check that
there isn’t anything on top of the heater or inside
the given safety distance. 1.6.
• Heater models 145-190 are equipped with a
timer and a thermostat. The timer is for setting
the on-time for the heater and the thermostat
is for setting a suitable temperature. 1.3.1.–
1.3.4.
• Heater models 145E-190E and 245E-290E are
controlled from a separate control unit. See the
instructions for use of the selected control unit
model.
1.3.1. Heater On
Turn the timer switch to the ”on” section
(section A in figure 3, 0–4 hours). The
heater starts heating immediately.
1.3.2. Pre-setting Time (timed switch-on)
Turn the timer switch to the ”pre-setting”
section (section B in figure 3, 0–8 hours).
The heater starts heating when the timer
has turned the switch back to the ”on”
section. After this, the heater will be on for about
four hours.
Example: You want to go walking for three hours
and have a sauna bath after that. Turn the timer
switch to the "pre-setting" section at number 2.
The timer starts. After two hours, the heater
starts heating. Because it takes about one hour for
the sauna to be heated, it will be ready for bathing
after about three hours, that is, when you come
back from your walk.
Figure 3. Timer switch
Abbildung 3. Schalter der Zeitschaltuhr
Figure 2. Thermostat switch
Abbildung 2. Thermostatschalter
1.3.1. Ofen ein
Stellen Sie den Schalter der Zeitschaltuhr
in den Abschnitt ”ein” (Abschnitt A in
Abb. 3, 0–4 Stunden). Der Ofen beginnt
sofort zu heizen.
1.3.2. Vorwahlzeit (zeitgesteuertes Einschalten)
Stellen Sie den Schalter der Zeitschaltuhr
in den Abschnitt ”Vorwahl” (Abschnitt B in
Abb. 3, 0–8 Stunden). Der Ofen beginnt
zu heizen, wenn die Zeitschaltuhr den
Schalter zurück in den Abschnitt “ein“ gedreht hat.
Danach bleibt der Ofen etwa vier Stunden lang an.
Beispiel: Sie möchten drei Stunden lang spazieren
gehen und danach ein Saunabad nehmen. Stellen
Sie den Schalter der Zeitschaltuhr in den Abschnitt
”Vorwahl” auf Nummer 2.
Die Zeitschaltuhr beginnt zu laufen. Nach zwei Stun-
den beginnt der Ofen zu heizen. Da es etwa eine Stun-
de dauert, bis die Sauna erhitzt ist, wird sie nach etwa
drei Stunden für das Saunabad bereit sein, also dann,
wenn Sie von Ihrem Spaziergang zurückkehren.
EN DE
10
1.3.3. Heater Off
The heater switches off, when the timer
turns the switch back to zero. You can
switch the heater off at any time by turn-
ing the timer switch to zero yourself.
Switch the heater off after bathing. Sometimes it
may be advisable to leave the heater on for a while
to let the wooden parts of the sauna dry properly.
NOTE! Always check that the heater has switched
off and stopped heating after the timer has turned
the switch to zero.
1.3.4. Setting the Temperature
The purpose of the thermostat (figure 2) is to keep
the temperature in the sauna room on a desired
level. By experimenting, you can find the setting
that suits you best.
Begin experimenting at the maximum position. If,
during bathing, the temperature rises too high, turn
the switch counter-clockwise a little. Note that even
a small difference within the maximum section will
change the temperature of the sauna considerably.
1.4. Throwing Water on Heated Stones
The air in the sauna room becomes dry when warmed
up. Therefore, it is necessary to throw water on the
heated stones to reach a suitable level of humidity in
the sauna. The effect of heat and steam on people
varies – by experimenting, you can find the levels of
temperature and humidity that suit you best.
NOTE! The maximum volume of the ladle is 0.2
litres. If an excessive amount of water is poured on
the stones, only part of it will evaporate and the rest
may splash as boiling hot water on the bathers. Never
throw water on the stones when there are people near
the heater, because hot steam may burn their skin.
NOTE! The water to be thrown on the heated
stones should meet the requirements of clean
household water (table 1). Only special aromas
designed for sauna water may be used. Follow the
instructions given on the package.
1.3.3. Ofen aus
Der Ofen wird ausgeschaltet, wenn die
Zeitschaltuhr den Schalter zurück auf null
gedreht hat. Sie können den Ofen jeder-
zeit selbst ausschalten, indem Sie den
Schalter der Zeitschaltuhr auf null stellen.
Schalten Sie den Ofen nach dem Saunabad aus.
Manchmal ist es ratsam, den Ofen noch eine Weile
weiter laufen zu lassen, um die Holzteile der Sauna
richtig trocknen zu lassen.
ACHTUNG! Vergewissern Sie sich stets, dass der
Ofen ausgeschaltet ist und nicht mehr heizt, wenn
die Zeitschaltuhr den Schalter zurück auf null ge-
dreht hat.
1.3.4. Einstellen der Temperatur
Zweck des Thermostats (Abb. 2) ist es, die Tempe-
ratur in der Saunakabine auf der gewünschten Höhe
zu halten. Durch Ausprobieren können Sie ermitteln,
welche Einstellung für Sie am besten geeignet ist.
Beginnen Sie mit der höchsten Einstellung. Wenn
die Temperatur während des Saunabades zu hoch
ansteigt, drehen Sie den Schalter ein Stück gegen
den Uhrzeigersinn. Beachten Sie, dass im oberen
Temperaturbereich auch kleine Änderungen die
Temperatur in der Sauna beträchtlich beeinflussen.
1.4. Aufguss
Die Saunaluft trocknet bei Erwärmung aus, daher
sollte zur Erlangung einer angenehmen Luftfeuchtig-
keit auf die heißen Steine des Saunaofens Wasser
gegossen werden. Die Auswirkungen von Hitze und
Dampf sind von Mensch zu Mensch unterschiedlich
– durch Ausprobieren finden Sie die Temperatur-
und Luftfeuchtigkeitswerte, die für Sie am besten
geeignet sind.
ACHTUNG! Die Kapazität der Saunakelle sollte
höchstens 0,2 l betragen. Auf die Steine sollten kei-
ne größeren Wassermengen auf einmal gegossen
werden, da beim Verdampfen sonst kochend heißes
Wasser auf die Badenden spritzen könnte. Achten
Sie auch darauf, daß Sie kein Wasser auf die Steine
gießen, wenn sich jemand in deren Nähe befindet.
Der heiße Dampf könnte Brandwunden verursachen.
ACHTUNG! Als Aufgusswasser sollte nur Wasser
verwendet werden, das die Qualitätsvorschriften für
Haushaltswasser erfüllt (Tabelle 1). Im Aufgusswas-
ser dürfen nur für diesen Zweck ausgewiesene Duft-
stoffe verwendet werden. Befolgen Sie die Anwei-
sungen auf der Packung.
Water property
Wassereigenschaft Effect
Wirkung Recommendation
Empfehlung
Humus concentration
Humusgehalt Colour, taste, precipitates
Farbe, Geschmack, Ablagerungen <12 mg/l
Iron concentration
Eisengehalt Colour, odour, taste, precipitates
Farbe, Geruch, Geschmack, Ablagerungen <0,2 mg/l
Hardness: most important substances are
manganese (Mn) and lime, i.e. calcium (Ca).
Wasserhärte: Die wichtigsten Stoffe sind
Mangan (Mn) und Kalk, d.h. Kalzium (Ca).
Precipitates
Ablagerungen Mn: <0,05 mg/l
Ca: <100 mg/l
Chlorinated water
Gechlortes Wasser Health risk
Gesundheitsschädlich Forbidden to use
Darf nicht verwendet werden
Seawater
Salzwasser Rapid corrosion
Rasche Korrosion Forbidden to use
Darf nicht verwendet werden
Table 1. Water quality requirements
Tabelle 1. Anforderungen an die Wasserqualität

EN DE
11
1.5. Instructions for Bathing
• Begin by washing yourself.
• Stay in the sauna for as long as you feel com-
fortable.
• Forget all your troubles and relax.
• According to established sauna conventions,
you must not disturb other bathers by speaking
in a loud voice.
• Do not force other bathers from the sauna by
throwing excessive amounts of water on the
stones.
• Cool your skin down as necessary. If you are in
good health, you can have a swim if a swim-
ming place or pool is available.
• Wash yourself after bathing.
• Rest for a while and let your pulse go back to
normal. Have a drink of fresh water or a soft
drink to bring your fluid balance back to normal.
1.6. Warnings
• Staying in the hot sauna for long periods of
time makes the body temperature rise, which
may be dangerous.
• Keep away from the heater when it is hot. The
stones and outer surface of the heater may
burn your skin.
• Keep children away from the heater.
• Do not let young, handicapped or ill people
bathe in the sauna on their own.
• Consult your doctor about any health-related
limitations to bathing.
• Consult your child welfare clinic about taking
little babies to the sauna.
• Be very careful when moving in the sauna, as
the platform and floors may be slippery.
• Never go to a hot sauna if you have taken alco-
hol, strong medicines or narcotics.
• Never sleep in a hot sauna.
• Sea air and a humid climate may corrode the
metal surfaces of the heater.
• Do not hang clothes to dry in the sauna, as this
may cause a risk of fire. Excessive moisture
content may also cause damage to the electri-
cal equipment.
1.6.1. Symbols descriptions
Read operators manual.
Do not cover.
1.7. Troubleshooting
Note! All service operations must be done by profes-
sional maintenance personnel.
The heater does not heat.
• Check that the fuses to the heater are in good
condition.
• Check that the connection cable is connected
(3.3.).
• Turn the timer switch to the “on” section
(1.3.1.).
• Turn the thermostat to a higher setting
(1.3.4.).
1.5. Anleitungen zum Saunen
• Waschen Sie sich vor dem Saunen.
• Bleiben Sie in der Sauna, solange Sie es als
angenehm empfinden.
• Vergessen Sie jeglichen Stress, und entspan-
nen Sie sich.
• Zu guten Saunamanieren gehört, daß Sie Rück-
sicht auf die anderen Badenden nehmen, indem
Sie diese nicht mit unnötig lärmigem Benehmen
stören.
• Verjagen Sie die anderen auch nicht mit zu
vielen Aufgüssen.
• Lassen Sie Ihre erhitzte Haut zwischendurch ab-
kühlen. Falls Sie gesund sind, und die Möglich-
keit dazu besteht, gehen Sie auch schwimmen.
• Waschen Sie sich nach dem Saunen.
• Ruhen Sie sich aus, bis Sie sich ausgeglichen
fühlen. Trinken Sie klares Wasser oder einen
Softdrink, um Ihren Flüssigkeitshaushalt zu
stabilisieren.
1.6. Warnungen
• Ein langer Aufenthalt in einer heißen Sauna
führt zum Ansteigen der Körpertemperatur,
was gefährlich sein kann.
• Achtung vor dem heißen Saunaofen. Die Steine
sowie das Gehäuse werden sehr heiß und kön-
nen die Haut verbrennen.
• Halten Sie Kinder vom Ofen fern.
• Kinder, Gehbehinderte, Kranke und Schwache
dürfen in der Sauna nicht alleingelassen werden.
• Gesundheitliche Einschränkungen bezogen auf
das Saunen müssen mit dem Arzt besprochen
werden.
• Über das Saunen von Kleinkindern sollten Sie
sich in der Mütterberatungsstelle beraten lassen.
• Gehen Sie nicht in die Sauna, wenn Sie unter
dem Einfluß von Narkotika (Alkohol, Medika-
menten, Drogen usw.) stehen.
• Schlafen Sie nie in einer erhitzten Sauna.
• Meer- und feuchtes Klima können die Metall-
oberflächen des Saunaofens rosten lassen.
• Benutzen Sie die Sauna wegen der Brandge-
fahr nicht zum Kleider- oder Wäschetrocknen,
außerdem können die Elektrogeräte durch die
hohe Feuchtigkeit beschädigt werden.
1.6.1. Symbol Beschreibung
Benutzerhandbuch lesen.
Nicht bedecken.
1.7. Störungen
Achtung! Alle Wartungsmaßnahmen müssen von
qualifiziertem technischem Personal durchgeführt
werden.
Der Ofen wärmt nicht.
• Vergewissern Sie sich, dass die Sicherungen
des Ofens in gutem Zustand sind.
• Überprüfen Sie, ob das Anschlusskabel einge-
steckt ist ( 3.3.).
• Stellen Sie den Schalter der Zeitschaltuhr in
den Abschnitt ”ein” ( 1.3.1.).
• Stellen Sie das Thermostat auf eine höhere
Einstellung ( 1.3.4.).
EN DE
12
• Check that the overheat protector has not gone
off. The timer works but the heater does not
heat. ( 3.5.)
The sauna room heats slowly. The water thrown
on the sauna stones cools down the stones
quickly.
• Check that the fuses to the heater are in good
condition.
• Check that all heating elements glow when the
heater is on.
• Turn the thermostat to a higher setting
(1.3.4.).
• Check that the heater output is sufficient
(2.3.).
• Check the sauna stones ( 1.1.). Too tightly
piled stones, the settling of stones with time
or wrong stone type can hinder the air flow
through the heater, which results in reduced
heating efficiency.
• Check that the sauna room ventilation has been
arranged correctly ( 2.2.).
The sauna room heats quickly, but the
temperature of the stones remain insufficient.
Water thrown on the stones runs through.
• Turn the thermostat to a lower setting
(1.3.4.).
• Check that the heater output is not too high
(2.3.).
• Check that the sauna room ventilation has been
arranged correctly ( 2.2.).
Panel or other material near the heater blackens
quickly.
• Check that the requirements for safety
distances are fulfilled ( 3.1.).
• Check the sauna stones ( 1.1.). Too tightly
piled stones, the settling of stones with
time or wrong stone type can hinder the air
flow through the heater, which may result in
overheating of surrounding materials.
• Also see section 2.1.1.
The heater emits smell.
• See section 1.2.
• The hot heater may emphasize odours mixed
in the air that are not, however, caused by the
sauna or the heater. Examples: paint, glue, oil,
seasoning.
The heater makes noise.
• 1: The timer is a mechanical device and it
makes a ticking sound when it is functioning
normally. If the timer ticks even when the
heater is switched off, check the timer’s
wiring.
• Occasional bangs are most likely caused by
stones cracking due to heat.
• The thermal expansion of heater parts can
cause noises when the heater warms up.
• Überprüfen Sie, ob der Überhitzungsschutz aus-
gelöst wurde. Die Zeitschaltuhr läuft, aber der
Ofen wärmt nicht. ( 3.5.)
Die Saunakabine erhitzt sich zu langsam. Das auf
die Saunaofensteine geworfene Wasser kühlt die
Steine schnell ab.
• Vergewissern Sie sich, dass die Sicherungen
des Ofens in gutem Zustand sind.
• Vergewissern Sie sich, dass bei eingeschalte-
tem Ofen alle Heizelemente glühen.
• Stellen Sie das Thermostat auf eine höhere
Einstellung ( 1.3.4.).
• Überprüfen Sie, ob die Ofenleistung ausrei-
chend ist ( 2.3.).
• Überprüfen Sie die Saunaofensteine ( 1.1.).
Eine zu feste Stapelung der Steine, das Abset-
zen der Steine mit der Zeit und falsche Stein-
sorten können den Luftstrom durch den Ofen
behindern, was zu einer verminderten Heizlei-
stung führt.
• Vergewissern Sie sich, dass die Belüftung der
Saunakabine korrekt eingerichtet wurde ( 2.2.).
Die Saunakabine erwärmt sich schnell, aber die
Temperatur der Steine ist unzureichend. Das auf
die Steine geworfene Wasser läuft durch.
• Stellen Sie das Thermostat auf eine niedrigere
Einstellung ( 1.3.4.).
• Überprüfen Sie, ob die Ofenleistung nicht zu
hoch ist ( 2.3.).
• Vergewissern Sie sich, dass die Belüftung der
Saunakabine korrekt eingerichtet wurde ( 2.2.).
Panele und andere Materialien neben dem Ofen
werden schnell schwarz.
• Überprüfen Sie, ob die Anforderungen für Si-
cherheitsabstände eingehalten werden ( 3.1.).
• Überprüfen Sie die Saunaofensteine ( 1.1.).
Eine zu feste Stapelung der Steine, das Abset-
zen der Steine mit der Zeit und falsche Stein-
sorten können den Luftstrom durch den Ofen
behindern, was zu einer Überhitzung der umlie-
genden Materialien führen kann.
• Siehe auch Abschnitt 2.1.1.
Der Ofen gibt Gerüche ab.
• Siehe Abschnitt 1.2.
• Ein heißer Ofen kann Gerüche in der Luft ver-
stärken, die jedoch nicht durch die Sauna oder
den Ofen selbst verursacht wurden. Beispiele:
Farbe, Klebstoff, Öl, Würzmittel.
Der Ofen verursacht Geräusche.
• 1: Die Zeitschaltuhr ist ein mechanisches Gerät
und verursacht daher ein tickendes Geräusch,
wenn sie normal funktioniert. Ertönt das Tik-
ken, obwohl der Ofen nicht eingeschaltet ist,
untersuchen Sie die Anschlüsse der Zeitschalt-
uhr.
• Plötzliche Knall-Geräusche entstehen manchmal
durch Steine, die aufgrund der Hitze platzen.
• Die Ausdehnung der Ofenteile wegen der Hitze
kann bei der Erwärmung des Ofens Geräusche
verursachen.

EN DE
13
2. SAUNA ROOM 2. SAUNAKABINE
2.1. Sauna Room Structure 2.1. Struktur der Saunakabine
A
GC
E
F
D
A
B
A. Insulation wool, thickness 50–100 mm. The
sauna room must be insulated carefully so that
the heater output can be kept moderately low.
B. Moisture protection, e.g. aluminium paper.
Place the glossy side of the paper towards the
sauna. Tape the seams with aluminium tape.
C. Vent gap of about 10 mm between the mois-
ture protection and panel (recommendation).
D. Low mass 12–16 mm thick panel board. Before
starting the panelling, check the electric wiring
and the reinforcements in the walls required by
the heater and benches.
E. Vent gap of about 3 mm between the wall and
ceiling panel.
F. The height of the sauna is usually 2100–2300 mm.
The minimum height depends on the heater (see
table 2). The space between the upper bench
and ceiling should not exceed 1200 mm.
G. Use floor coverings made of ceramic materials
and dark joint grouts. Particles disintegrating
from the sauna stones and impurities in the
sauna water may stain and/or damage sensitive
floor coverings.
NOTE! Check from the fire authorities which parts
of the firewall can be insulated. Flues which are in
use must not be insulated.
NOTE! Light protective covers which are installed
directly to the wall or ceiling may be a fire risk.
2.1.1. Blackening of the sauna walls
It is perfectly normal for the wooden surfaces of the
sauna room to blacken in time. The blackening may
be accelerated by
• sunlight
• heat from the heater
• protective agents on the walls (protective
agents have a poor heat resistance level)
• fine particles disintegrating from the sauna
stones which rise with the air flow.
A. Isolierwolle, Stärke 50–100 mm. Die Saunaka-
bine muss sorgfältig isoliert werden, damit der
Ofen nicht zu viel Leistung erbringen muss.
B. Feuchtigkeitsschutz, z.B. Aluminiumpapier. Die
glänzende Seite des Papiers muss zur Sauna
zeigen. Nähte mit Aluminiumband abdichten.
C. Etwa 10 mm Luft zwischen Feuchtigkeits-
schutz und Täfelung (Empfehlung).
D. Leichtes, 12–16 mm starkes Täfelbrett. Vor
Beginn der Täfelung elektrische Verkabelung
und für Ofen und Bänke benötigte Verstärkun-
gen in den Wänden überprüfen.
E. Etwa 3 mm Luft zwischen Wand und Deckentäfelung.
F. Die Höhe der Sauna ist normalerweise 2100–
2300 mm. Die Mindesthöhe hängt vom Ofen
ab (siehe Tabelle 2). Der Abstand zwischen
oberer Bank und Decke sollte höchstens
1200 mm betragen.
G. Bodenabdeckungen aus Keramik und dunkle
Zementschlämme verwenden. Aus den Sau-
nasteinen entweichende Partikel und Verun-
reinigungen im Wasser können sensible Böden
verfärben oder beschädigen.
ACHTUNG! Fragen Sie die Behörden, welcher Teil
der feuerfesten Wand isoliert werden kann. Rauchfän-
ge, die benutzt werden, dürfen nicht isoliert werden.
ACHTUNG! Leichte, direkt an Wand oder Decke an-
gebrachte Schutzabdeckungen sind ein Brandrisiko.
2.1.1. Schwärzung der Saunawände
Es ist ganz normal, wenn sich die Holzoberflächen
einer Sauna mit der Zeit verfärben. Die Schwärzung
wird beschleunigt durch
• Sonnenlicht
• Hitze des Ofens
• Täfelungsschutz an den Wänden (mit geringem
Hitzewiderstand)
• Feinpartikel, die aus den zerfallenden Sauna-
steinen in die Luft entweichen.
Figure 4.
Abbildung 4.

EN DE
14
2.2. Sauna Room Ventilation
The air in the sauna room should change six times
per hour. Figure 5 illustrates different sauna room
ventilation options.
2.2. Belüftung der Saunakabine
Die Saunaluft sollte sechsmal pro Stunde ausge-
tauscht werden. Abb. 5 zeigt verschiedene Optio-
nen der Saunabelüftung.
Figure 5.
Abbildung 5.
A. Supply air vent location. If mechanical exhaust
ventilation is used, place the supply air vent
above the heater. If gravity exhaust ventila-
tion is used, place the supply air vent below or
next to the heater. The diameter of the supply
air pipe must be 50–100 mm. 1-E, 2-E: Do not
place the supply air vent so that the air flow
cools the temperature sensor (see the tem-
perature sensor installation instructions in the
control unit installation instructions)!
B. Exhaust air vent. Place the exhaust air vent
near the floor, as far away from the heater as
possible. The diameter of the exhaust air pipe
should be twice the diameter of the supply air
pipe.
C. Optional vent for drying (closed during heating
and bathing). The sauna can also be dried by
leaving the door open after bathing.
D. If the exhaust air vent is in the washroom, the
gap underneath the sauna door must be at
least 100 mm. Mechanical exhaust ventilation
is mandatory.
2.3. Heater Output
When the walls and ceiling are covered with panels
and insulation behind the panels is adequate, the
heater output is defined according to the volume of
the sauna. Non-insulated walls (brick, glass block,
glass, concrete, tile, etc.) increase the need for heater
output. Add 1,2 m³ to the volume of the sauna for
each non-insulated wall square meter. For example, a
10 m³ sauna room with a glass door equals the output
requirement of about a 12 m³ sauna room. If the sau-
na room has log walls, multiply the sauna's volume by
1,5. Choose the correct heater output from table 2.
2.4. Sauna Room Hygiene
Bench towels should be used during bathing to pre-
vent sweat from getting onto the benches.
The benches, walls and floor of the sauna should
be washed thoroughly at least every six months.
Use a scrubbing brush and sauna detergent.
Wipe dust and dirt from the heater with a damp
cloth. Remove lime stains from the heater using a
10% citric acid solution and rinse.
A. Luftzufuhr. Bei mechanischer Entlüftung Luft-
zufuhr über dem Ofen anbringen. Bei Schwer-
kraftentlüftung Luftzufuhr unter oder neben
dem Ofen anbringen. Der Durchmesser des
Luftzufuhrrohres muss 50–100 mm betragen.
1-E, 2-E: Luftzufuhr nicht so anbringen, dass
sie den Temperaturfühler abkühlt (zur Anbrin-
gung des Temperaturfühlers siehe Installations-
anweisungen des Steuergeräts)!
B. Entlüftung. Entlüftung in Bodennähe anbringen,
so weit weg vom Ofen wie möglich. Der Durch-
messer des Entlüftungsrohres sollte doppelt so
groß sein wie bei der Luftzufuhr.
C. Optionale Lüftung zum Trocknen (während
Heizung und Bad geschlossen). Die Sauna kann
auch durch die offene Tür getrocknet werden.
D. Wenn die Entlüftung im Waschraum liegt,
muss die Lücke unter der Saunatür mindestens
100 mm betragen. Mechanische Entlüftung ist
Pflicht.
2.3. Leistungsabgabe des Ofens
Wenn Wand und Decke vertäfelt und ausreichend
isoliert sind, richtet sich die Leistungsabgabe des
Ofens nach dem Volumen der Sauna. Nicht isolierte
Wände (Stein, Glasbausteine, Glas, Beton, Kacheln)
erhöhen die benötigte Ofenleistung. Jeder Quadrat-
meter nicht isolierter Wand entspricht 1,2 m³ mehr
Saunavolumen. Eine 10 m³ große Saunakabine mit
Glastür z.B. entspricht in der Leistungsabgabe einer
12 m³ großen Sauna. Bei Balkenwänden Saunavo-
lumen mit 1,5 multiplizieren. Korrekte Leistungsab-
gabe des Ofens aus Tabelle 2 wählen.
2.4. Hygiene der Saunakabine
Liegetücher benutzen, um die Bänke vor Schweiß
zu schützen.
Bänke, Wände und Boden der Sauna mindestens
alle sechs Monate waschen. Bürste und Saunarei-
nigungsmittel verwenden.
Staub und Schmutz vom Ofen mit feuchtem Tuch
abwischen. Kalkablagerungen am Ofen mit 10 %
Zitronensäure entfernen und spülen.
D
B
min.
500 mm
min.
500 mm
min. 1000 mm
360°
180°

EN DE
15
3. INSTALLATIONSANLEITUNG3. INSTRUCTIONS FOR INSTALLATION
3.1. Before Installation
Before installing the heater, study the instructions
for installation. Check the following points:
• Is the output and type of the heater suitable for
the sauna room? The cubic volumes given in
table 2 should be followed.
• Is the supply voltage suitable for the heater?
• The location of the heater fulfils the minimum
requirements concerning safety distances given
in fig. 6 and table 2.
It is absolutely necessary to install the heater ac-
cording to these values. Neglecting them causes
a risk of fire. Only one electrical heater may be
installed in the sauna room.
3.1. Vor der Montage
Bevor Sie den Saunaofen installieren, lesen Sie die
Montageanleitung und überprüfen Sie folgende Din-
ge:
• Ist der zu montierende Saunaofen in Leistung
und Typ passend für die Saunakabine? Die
Rauminhaltswerte in Tabelle 2 dürfen weder
über noch unterschritten werden.
• Ist die Netzspannung für den Saunaofen geeig-
net?
• Der Montageort des Ofens erfüllt die in Abbil-
dung 6 und Tabelle 2 angegebenen Sicherheits-
mindestabstände.
Diese Abstände müssen unbedingt eingehalten wer-
den, da ein Abweichen Brandgefahr verursacht. In
einer Sauna darf nur ein Saunaofen installiert werden.
Table 2. Installation details
Tabelle 2. Montageinformationen
Figure 6. Safety distances (all dimensions in millimeters)
Abbildung 6. Sicherheitsmindestabstände (alle Abmessungen in Millimetern)
C
B
A
min. 20
min. 1100
min. 150
min. 150
A
max. 500
A min. B min. C min.
145/145E/245E 35 20 35
160/160E/260E 50 30 50
180/180E/280E 100 30 80
190/190E/290E 120 40 100
O aquecedor pode ser montado num nicho com
uma altura mínima de 1900 milímetros.
Ohrievač je možné namontovať do výklenku s
minimálnou výškou 1900 milimetrov.
Do lado à parede, plataforma superior ou calha
Zo strany k stene, hornej plošine alebo koľajnici
Da superfície frontal à plataforma superior ou calha
Z prednej plochy k hornej plošine alebo koľajnici
(Recomendação:
100
)
Heater
Ofen
Model and
dimensions/
Modell und Maße
Out-
put
Leis-
tung
Sauna room
Saunakabine Electrical connections
Elektroanschlüsse
Cubic vol.
Rauminhalt Height
Höhe
400 V 3N~ 230 V 3~ 230 V 1N~
Connecting cable
Anschlusskabel
Fuse
Sicherung
Connecting cable
Anschlusskabel
Fuse
Sicherung
Connecting cable
Anschlusskabel
Fuse
Sicherung
Width/Breite 41 cm
Depth/Tiefe 29 cm
Height/Höhe 65 cm
Weight/Gewicht 16 kg
Stones/Steine
max 20 kg
kW
2.3.
min.
mm
See fig. 8. The measurements apply to the connecting cable only!
Siehe Abbildung 8. Die Messungen beziehen sich ausschließlich auf das
Anschlusskabel!
min.
m³ max.
m³ mm² A mm² A mm² A
145/145E/245E 4,5 3 6 1900 5 x 1,5 3 x 10 4 x 2,5 3 x 16 3 x 2,5 1 x 20
160/160E/260E 6,0 5 8 1900 5 x 1,5 3 x 10 4 x 2,5 3 x 16 3 x 4,0 1 x 35
180/180E/280E 8,0 7 12 1900 5 x 2,5 3 x 16 4 x 6 3 x 25 3 x 6 1 x 35
190/190E/290E 9,0 8 14 1900 5 x 2,5 3 x 16 4 x 6 3 x 25 3 x 10 1 x 40

EN DE
16
3.1.1. Change from right-handed to left-handed or
vice versa (1)
The controls of the heater (timer and thermostat)
can be installed at either end of the connection
box. If the controls have to be moved to the other
end of the connection box, the end-pieces of the
connection box must be exchanged with each other.
It is simplest
to exchange
the end-pieces
before fastening
the heater to
the wall.
1. Turn the
heater up-
side down
so that the
bottom is
upwards.
Be careful
not to cause
damage to
the steam
distributor.
Remove the
end-piece fastening screws (1 per end) from
the bottom of the connection box (see fig. 7).
2. Then, detach the end-piece with no switches.
After this, pull the end-piece with the timer
and thermostat carefully out of the connection
box. Special care must be taken when pulling
out the end-piece containing the timer and ther-
mostat, because the thermostat sensors and
wires linked with resistances are fastened to
the end-piece to be detached.
3. When both end-pieces have been detached, the
bottom of the connection box will open at its
joining point. Widen the opening with one hand
and carefully move the end-piece with its wires
to the other end of the connection box. Take
care not to hit the wires against the edges
of the connection box. Leave the end-piece
hanging from the wires and fasten the other
end-piece first. Press the joining seam at the
bottom of the electrical box together so that
the long holes match together, and the edge
of the back part of the box is on top. Turn the
fixing screw to its position. Prior to tightening
the screw, make sure that the edge of the con-
nection box is against the bottom of the groove
on the end-piece.
4. Place the end-piece with the timer and ther-
mostat into the box and fasten it loosely by a
screw (about 10–12 mm of the thread of the
screw should be visible). After connecting the
connecting cable ( 3.1.2.), push the end-piece
into the electrical box and tighten the fixing
screw.
3.1.2. Connecting the connecting cable to the
heater
It is simplest to connect the heater connecting cable
while the heater is loose.
1. Turn the heater on its side so that the end with
the controls is upwards.
2. Open the fixing screw at the control end about
10–12 mm out of the bottom of the electrical
box and carefully pull the end-piece from the
3.1.1. Wechsel der Anschlußrichtung (1)
Die Steuergeräte der Sauna (Uhr und Thermostat)
können an einem der beiden Enden der Anschlußge-
häuse angebracht werden. Wenn die Steuergeräte
an das andere Ende der Elektrobuchse verlegt wer-
den müssen, werden die Stirnstücke der Elektro-
buchse untereinander vertauscht.
Am leichtesten ist es, den
Wechsel der Stirnstücke
vor der Wandmontage
durchzuführen.
1. Der Saunaofen wird
umgedreht, so daß der
Boden nach oben zeigt.
Beschädigen Sie nicht
den Aufgußleiter. Die
Befestigungsschrauben
der Stirnstücke an der
Unterseite der Anschluß-
gehäuse (1 Stk./Stirnsei-
te) werden entfernt (siehe
Abb. 7).
2. Danach wird zu-
erst das Stirnstück
ohne Steuerfunktionen
entfernt. Dann wird das Stirnstück mit dem
Uhrschalter und dem Thermostat vorsichtig von
der Anschlußgehäuse abgezogen. Das Abziehen
des Stirnstücks mit dem Uhrschalter und dem
Thermostat muß mit besonderer Vorsicht erfol-
gen, da der Thermostatfühler und die Leitungen
zu den Widerständen an dem abzuziehenden
Stirnstück befestigt sind.
3. Nach Entfemen der Stirnstücke läßt sich der
Boden der Anschlußgehäuse an der Fuge öff-
nen. Erweitern Sie die Öffnung mit der einen
Hand und ziehen Sie das Stirnstück mit den
Leitungen vorsichtig an das andere Ende der
Anschlußgehäuse. Achten Sie beim Verlegen
darauf, daß die Leitungen nicht durch die Ränder
der Öffnung in der Anschlußgehäuse beschädigt
werden. Das Stirnstück wird von den Leitungen
gehalten, während Sie zunächst das andere
Stirnstück befestigen. Drücken Sie den Verbin-
dungssaum am Boden der Anschlußgehäuse
fest, so daß die langen Öffnungen gegenüber
zu liegen kommen und der Rand der Buchsen-
rückseite zuoberst bleibt. Setzen Sie die Befe-
stigungsschraube ein. Stellen Sie vor Festziehen
der Schraube sicher, daß der Rand der Elektro-
buchse in der Nut des Stirnstücks liegt.
4. Das Stirnstück mit dem Uhrschalter und dem
Thermostat wird locker mit Schrauben (der Ge-
windeteil der Schraube bleibt zu ca. 10–12 mm
sichtbar) an der Buchse befestigt. Nach Befe-
stigung des Anschlußkabels ( 3.1.2.) wird das
Stirnstück auf die Anschlußgehäuse geschoben
und die Befestigungsschraube angezogen.
3.1.2. Befestigung des Anschlußkabels am Saunaofen
Die Befestigung des Anschlußkabels geschieht am leich-
testen, wenn der Saunaofen nicht fest montiert ist.
1. Der Saunaofen wird auf die Seite gelegt, so daß
das Ende mit den Steuergeräten nach oben zeigt.
2. Die Befestigungsschraube des Steuergeräte-
seite wird ca. 10–12 mm aus dem Boden der
Elektrobuchse heraus geschraubt und das Stirn-
stück wird vorsichtig von der Elektrobuchse
Figure 7. Removal of the end-piece fastening screws
Abbildung 7. Lösen der Befestigungsschrauben der Stirnstücke

EN DE
17
electrical box.
3. Burst the pre-
machined hole
on the end-piece,
and push the
connecting cable
to the cable
clamp and con-
nector batten
through this hole.
4. After the con-
necting cable has
been connected,
carefully push the
end-piece with the
controls into the electrical box. See fig. 8. Prior
to tightening the fixing screw of the end-piece,
make sure that the edge of the electrical box is
against the bottom of the groove on the end-
piece.
3.2. Fastening the Heater on a Wall
See figure 9.
1. The installation rack of the heater has been
fastened to the heater. Unscrew the locking
screw of the rack and detach the installation
support from the heater.
2. Fasten the wall-mounting rack on the wall by
using the screws which come with the rack.
NOTE! There must be a support, e.g. a board,
behind the panel, so that the fastening screws
can be screwed into a thicker wooden material
than the panel. If there are no boards behind
the panel, the boards can also be fastened on
the panel.
3. Lift the heater to the rack on the wall so that
the fastening hooks of the lower part of the
rack go behind the edge of the heater body and
the upper part of the heater is pressed against
the installation rack.
4. Lock the edge of the heater onto the fastening
rack by a screw.
3.3. Electrical Connections
The heater may only be connected to the electri-
cal network in accord-
ance with the current
regulations by an au-
thorised, professional
electrician.
• The heater is
semi-stationarily
connected to
the junction box
(figure 10: 3) on
the sauna wall.
The junction box
must be splash-
proof, and its
maximum height
from the floor
must not exceed
500 mm.
• The connecting
abgezogen.
3. Für das
Anschlußkabel wird
das vorgestanzte
Loch im Stirnstück
durchstoßen, durch
welches das An-
schlußkabel zur
Zugentlastungs-
klemme und zum
Schaltstreifen
geführt wird.
4. Wenn das
Anschlußkabel be-
fesfigt ist, wird das
Ende mit den Steuergeräten vorsichtig auf die
Elektrobuchse geschoben. Siehe Abb. 8. Stel-
len Sie vor Festziehen der Schraube am Stirn-
stück sicher, daß der Rand der Elektrobuchse in
der Nut des Stirnstücks liegt.
3.2. Befestigung des Saunaofens an der Wand
Siehe Abb. 9.
1. Das Montagegestell des Saunaofens ist am
Saunaofen befestigt. Entfernen Sie die Ver-
riegelungsschraube des Montagegestells und
nehmen das Gestell vom Saunaofen ab.
2. Befestigen Sie das Montagegestell mit den
dazu gelieferten Schrauben an der Wand. ACH-
TUNG! An den Stellen, an denen die Befesti-
gungsschrauben angebracht werden, muss sich
hinter den Paneelen als Stütze z.B. ein Brett
befinden, in dem die Schrauben fest sitzen.
Falls sich hinter den Paneelen keine Bretter
befinden, können diese auch vor den Paneelen
angebracht werden.
3. Heben Sie den Saunaofen so auf das Gestell
an der Wand, daß die Befestigungshaken unten
am Gestell hinter den Rand des Saunaofen-
rumpfes kommen und die Nut im oberen Teil
des Ofens gegen das Montagegestell gedrückt
wird.
4. Schrauben Sie den oberen Rand des Sauna-
ofens am Montagegestell fest.
3.3. Elektroanschlüsse
Der Anschluss des Saunaofens an das Stromnetz darf
nur von einem zugelasse-
nen Elektromonteur unter
Beachtung der gültigen
Vorschriften ausgeführt
werden.
• Der Saunaofen wird
halbfest an die Klemm-
dose (Abb. 10: 3) an der
Saunawand befestigt.
Die Klemmdose muß
spritzwasserfest sein und
darf höchstens 500 mm
über dem Fußboden an-
gebracht werden.
• Als Anschlusska-
bel (Abb. 10: 4) wird
ein Gummikabel vom
Typ H07RN-F oder ein
Figure 8. Connecting the connection cable
Abbildung 8. Befestigung des Anschlußkabels
D
120
250
240min. 335
min. 265
kW D min. mm
4,5
115
6,0
130
8,0
180
9,0
200
Figure 9. Location of the mounting rack of the heater (all dimensions in millimeters)
Abbildung 9. Platz des Montagegestells des Saunaofens (alle Abmessungen in Millimetern)
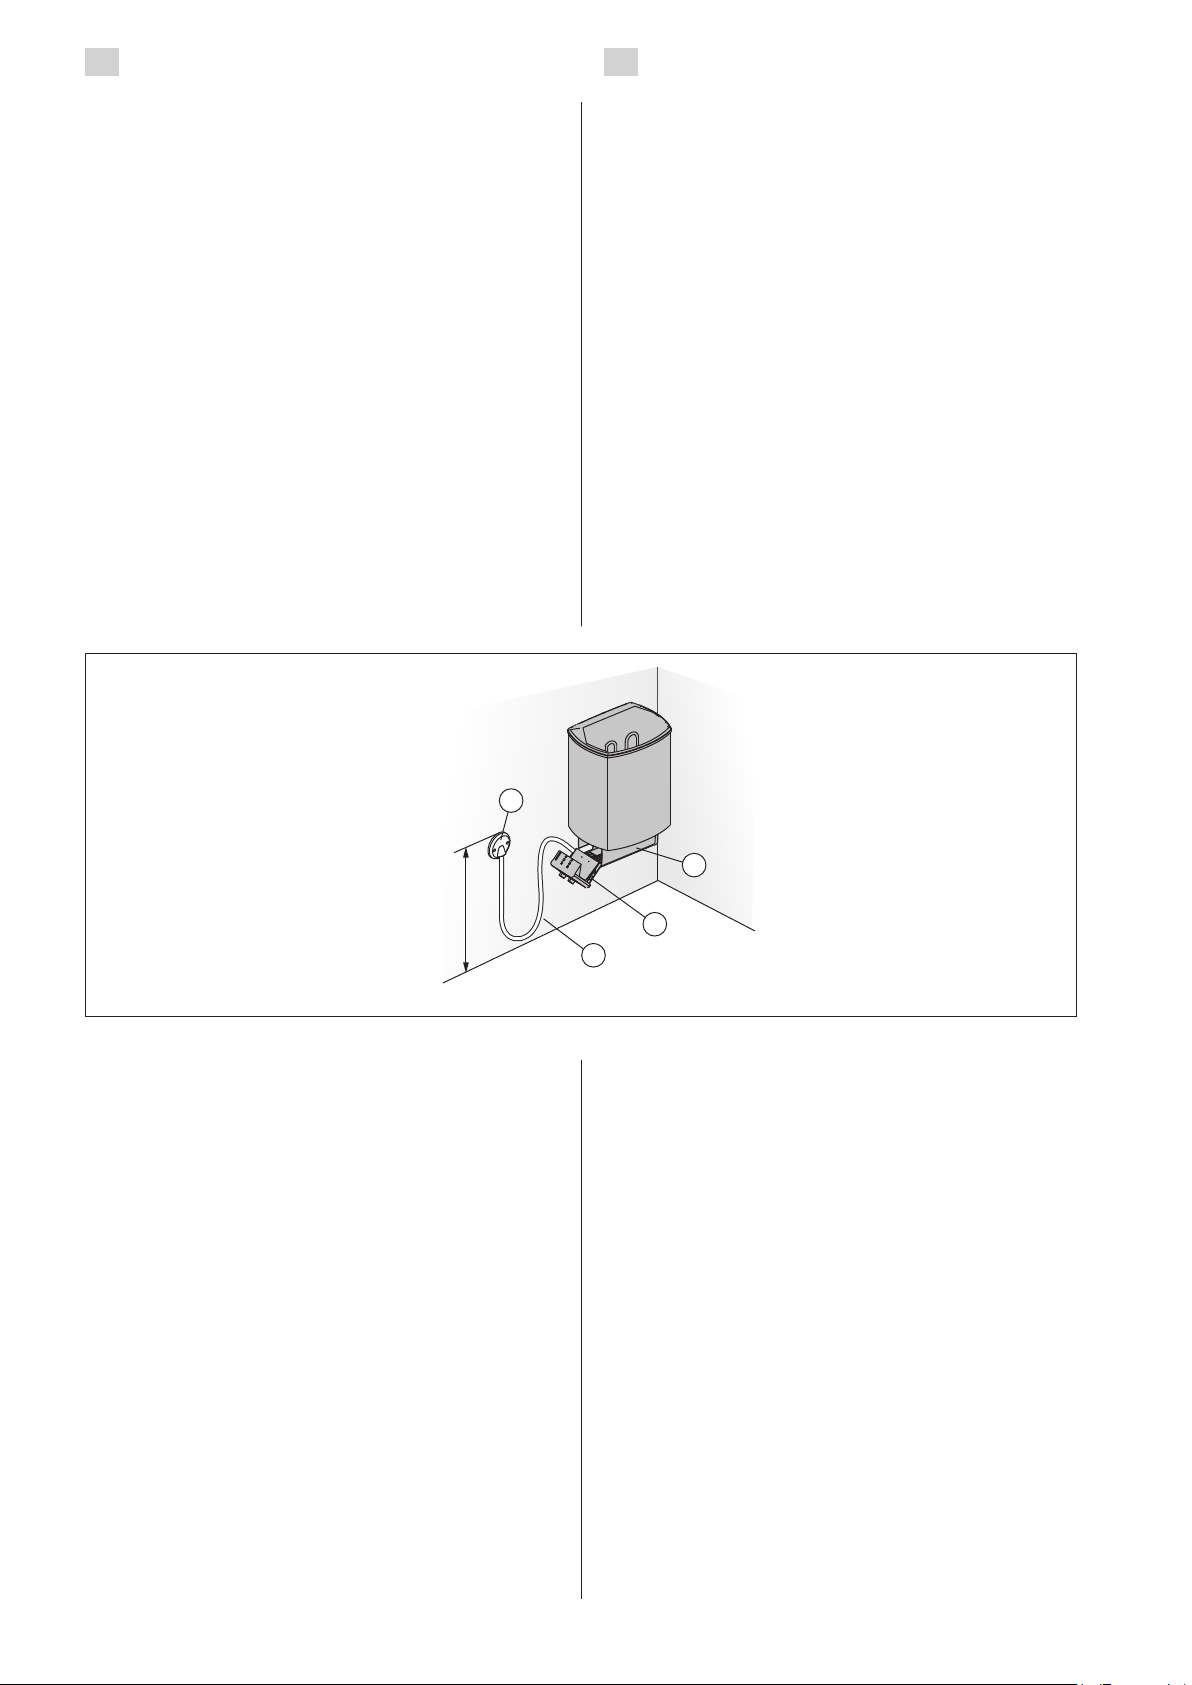
EN DE
18
cable (figure 10: 4) must be of rubber cable
type H07RN-F or its equivalent.NOTE! Due
to thermal embrittlement, the use of PVC-
insulated wire as the connecting cable of the
heater is forbidden.
• If the connecting and installation cables are
higher than 1 000 mm from the floor in the
sauna or inside the sauna room walls, they
must be able to endure a minimum temperature
of 170 °C when loaded (for example, SSJ).
Electrical equipment installed higher than
1 000 mm from the sauna floor must be
approved for use in a temperature of 125 °C
(marking T125).
• In addition to supply connectors, the 1 heaters
are equipped with a connector (P), which makes
the control of the electric heating possible
(figure 13). Voltage control is transmitted from
the heater when it is switched on. The control
cable for electrical heating is brought directly
into the junction box of the heater, and from
there to the terminal block of the heater along
a rubber cable with the same cross-section
area as that of the connecting cable.
entsprechendes Kabel verwendet. ACHTUNG!
PVC-isolierte Kabel dürfen wegen ihrer schlech-
ten Hitzebeständigkeit nicht als Anschlusskabel
des Saunaofens verwendet werden.
• Falls der Anschluss oder die Montagekabel höher
als in 1 000 mm Höhe über dem Boden in die
Sauna oder die Saunawände münden, müssen sie
belastet mindestens eine Temperatur von 170 °C
aushalten (z.B. SSJ). Elektrogeräte, die höher als
1 000 mm vom Saunaboden angebracht werden,
müssen für den Gebrauch bei 125 °C Umge-
bungstemperatur zugelassen sein (Vermerk T125).
• Die 1 -Saunaöfen sind zusätzlich zum Netzan-
schluss mit einer Klemme (P) ausgestattet, wel-
che die Möglichkeit zur Steuerung der Elektro-
heizung bietet (Abb. 13). Der Ofen übernimmt
mit dem Einschalten die Spannungsregelung.
Das Steuerungskabel für die Elektroheizung
wird direkt zur Klemmdose des Saunaofens
gelegt und von dort aus durch ein Gummikabel
der gleichen Stärke weiter zur Reihenklemme
des Saunaofens geleitet.
3.3.1. Electric Heater Insulation Resistance
When performing the final inspection of the electri-
cal installations, a “leakage” may be detected when
measuring the heater’s insulation resistance. The
reason for this is that the insulating material of the
heating elements has absorbed moisture from the
air (storage, transport). After operating the heater
for a few times, the moisture will be removed from
the heating elements.
Do not connect the power feed for the heater
through the RCD (residual current device)!
3.4. Installation of the Control Unit and
Sensors (1-E, 2-E)
The control unit includes detailed instructions for
fastening the unit on the wall. Install the temperature
sensor on the wall of the sauna room above the
heater. It should be installed on the lateral centre
line of the heater, 100 mm downwards from the
ceiling. Figure 11.
Do not place the supply air vent so that the air
flow cools the temperature sensor. Figure 5.
3.5. Resetting the Overheat Protector
If the temperature of the sauna room becomes dan-
3.3.1. Isolationswiderstand des Elektrosaunaofens
Bei der Endkontrolle der Elektroinstallationen kann
bei der Messung des Isolationswiderstandes ein
“Leck” auftreten, was darauf zurückzuführen ist,
daß Feuchtigkeit aus der Luft in das Isolationsmateri-
al der Heizwiderstände eingetreten ist (bei Lagerung
und Transport). Die Feuchtigkeit entweicht aus den
Widerständen nach zwei Erwärmungen.
Schalten Sie den Netzstrom des Elektrosaunaofens
nicht über den Fehlerstromschutzschalter ein!
3.4. Anschluß des Steuergerätes und der Füh-
ler (1-E, 2-E)
In Verbindung mit dem Steuergerät werden genaue-
re Anweisungen zu dessen Befestigung an der Wand
gegeben. Der Temperaturfühler wird an der Sauna-
wand oberhalb des Saunaofens, 100 mm unterhalb
der Decke auf der Achse in Breitenrichtung des Sau-
naofens angefracht. Abbildung 11.
Luftzufuhr nicht so anbringen, dass sie den Tem-
peraturfühler abkühlt. Abbildung 5.
3.5. Zurückstellen der Überhitzungsschutzes
Wenn die Temperatur in der Saunakabine gefährlich
max. 500
1
2
4
3
1. Connection box
2. Control Unit
3. Junction box
4. Connecting cable
1. Anschlußgehäuse
2. Schaltmechanismus
3. Klemmdose
4. Anschlußkabel
Figure 10. Connections of the heater
Abbildung 10.Anschluß des Saunaofens

EN DE
19
gerously high, the overheat protector will perma-
nently cut off the supply of the heater. The overheat
protector can be reset after the heater has cooled
down.
145-190
The reset button is located on the thermostat frame
on the electrical box (see fig. 12), and consequently,
the fuses of the heater on the electrical panel must
be removed before commencing the work. Only per-
sons authorised to carry out electrical installations
can reset the overheat protector.
Prior to pressing the button, the cause of the fault
must be found.
• Are the stones crumbled and pressed together?
• Has the heater been on for a long time while
unused?
• Is the sensor of the thermostat out of place or
broken?
• Has the heater been banged or shaken?
1. Open the fixing screw of the control end from
the bottom of the electrical box so that about
10–12 mm of the thread of the screw can be
seen.
2. Pull the end-piece carefully out of the box.
Detach the adjusting wheel of the thermostat
and the thermostat frame from their supports
(4 locking cams), carefully pressing the
adjusting shaft at the same time. The
thermostat frame will move backwards about
40 mm, and the reset button of the limit stop
is revealed.
3. Reset the limit stop by pressing (with 7 kg
force if necessary) so that a clicking sound is
heard.
4. After pressing the reset button, replace the
thermostat frame and press the adjusting wheel
onto the shaft.
5. Prior to tightening the fixing screw of the end-
piece, make sure that the edge of the electrical
box is against the bottom of the groove on the
end-piece.
145E-190E, 245E-290E
See the installation instructions for control unit.
stark ansteigt, unterbricht der Überhitzungsschutz
die Stromzufuhr zum Ofen permanent. Der Überhit-
zungsschutz kann nach Abkühlen des Ofens zurück-
gesetzt werden.
145-190
Der Rücksetzknopf befindet sich in der Elektro-
buchse im Rahmenteil des Thermostats (siehe Abb.
12), daher müssen die Saunaofensicherungen an
der Elektrotafel zunächst gelöst werden. Nur eine
zu Elektroinstallationen befugte Person darf diese
Arbeit ausführen.
Vor Betätigung des Knopfes muß die Ursache der
Fehlfunktion festgestellt werden:
• Sind die Steine im Saunaofen verkeilt oder spröde?
• War der Saunaofen lange angeschaltet und
wurde nicht benutzt?
• Ist der Thermostatfühler an einem falschen
Platz oder defekt?
• War der Saunaofen starken Stößen ausgesetzt?
1. Die Befestigungsschraube des Stirnstücks mit
den Steuergeräten wird aus dem Boden der
Elektrobuchse herausgeschraubt, so daß der
Gewindeteil zu ca. 10–12 mm sichtbar wird.
2. Das Stirnstück wird vorsichtig von der Buchse
abgezogen. Das Stellrad des Thermostats wird
gelöst und der Thermostatrahmen von sei-
nen Halterungen (4 Stk. Sperrnocken) befreit,
wobei gleichzeitig die Steuerungswelle vor-
sichtig heruntergedrückt wird. Das Rahmenteil
des Thermostats bewegt sich ca. 40 mm nach
hinten, wobei an dessen Vorderseite der Rück-
setzknopf des Begrenzers erscheint.
3. Der Begrenzer wird durch Druck in seine Funkti-
onsstellung zurückgesetzt (bei Bedarf mit einer
Kraft, die 7 kg entspricht), im Begrenzer ist
dann ein Knacken zu hören.
4. Setzen Sie nach Drücken des Rücksetzknopfes
das Rahmenteil des Thermostats an seinen Platz
und schieben Sie das Stellrad auf die Welle.
5. Stellen Sie vor Festziehen der Schraube am
Stirnstück sicher, daß der Rand der Elektro-
buchse in der Nut des Stirnstücks liegt.
145E-190E, 245E-290E
Siehen Sie Gebrauchs- und Montageanleitung des
Steuergeräts.
Figure 12. Reset button for overheat protector (1)
Abbildung 12. Rücksetzknopf des Überhitzungsschutzes (1)
100
1-E
2-E
Figure 11. Installing the sensor (all dimensions in millimeters)
Abbildung 11.Installation der Fühler (alle Abmessungen in Millimetern)

EN DE
20
Figure 14. Electrical connections of 1-E and 2-E heaters
Abbildung 14. Elektroanschlüsse des Saunaofens 1-E und 2-E
Figure 13. Electrical connections of 1 heaters
Abbildung 13. Elektroanschlüsse des Saunaofens 1
400 V
3N~ ZCU-882
N L1 L2 L3
12345
12345
12345
230 V
3~
L1 L2 L3
230 V
1N~
N L1
STEURUNG DER STROMHEIZUNG
SÄHKÖLÄMMITYKSEN OHJAUS
STYRNING AV ELUPPVÄRMNING
CONTROL OF ELECTRIC HEATING
a1
GRD
a
a1
a
a1
a
b0
b
b0
b
b0
M
b
N
1 2 3
12
L1 L2
3
L3
45
1234
L2
5
L1 L3
543
L1
2
N
1
GRD
GRD
This manual suits for next models
11
Table of contents
Other Sentiotec Electric Heater manuals

Sentiotec
Sentiotec Home Premium STL704 User manual

Sentiotec
Sentiotec 360 User manual

Sentiotec
Sentiotec QUBE-360 User manual

Sentiotec
Sentiotec 136E User manual

Sentiotec
Sentiotec 360C User manual

Sentiotec
Sentiotec Home Premium Combi STL704S User manual

Sentiotec
Sentiotec 145 User manual

Sentiotec
Sentiotec 345 User manual
Popular Electric Heater manuals by other brands

Harvia
Harvia HL70S Instructions for installation and use

Orbegozo
Orbegozo BP 5003 A instruction manual

Chromalox
Chromalox PTHT-101 Installation, operating and maintenance instructions

Frico
Frico Infraswift INS12 Original instructions

Sylvania
Sylvania HUDSON SR989-BK instruction manual

Bestherm
Bestherm Hanae HJ5EDB instruction manual


