Sentronix MGMPDW240 User manual

DE Schmalle Motorbetriebene Wandhalterung
『Bedienungsanleitung』
ES
Montaje en pared delgado motorizado
『Manual de Instrucciones』
IT Supporto a muro Slim motorizzato
『Istruzione Manuale』
FR Support mural fin motorisé
『Mode d’emploi』
NL Elektrische dunne muursteun
『Handleiding』
Motorized Slim Wall Mount
『Instruction Manual』
Model: MGMPDW240**

Motorized Slim Wall Mount Instruction Manual
2
DE
ES
FR
NL
IT
Inhalt Contenu Contenuti
ÍndiceInhoudsopgave
Table of contents
Important Safety Instructions ….…………………
2Contents ………………………………................…
3
Parts and Accessories …………………………… 6
Required Tools………………………………………… 7
Installation …………………………………………… 8
10
Installation per Model …………...................……
Initial set-up ………………………………………37
Wall Limit Right and Leftt…………….……………38
Using the Memory(Optional) ……………………41
Product Specifications……………………………43
Dimensions ………………………………………44
EN
Sicherheitshinweise…………………………………
2Inhalt ……………………………......................……
3
Teile und Zubehör …………………………............ 6
Benötigte Werkzeuge ……………………………… 7
Montage……………………………………………… 8
10
Montage pro Modell ……..……....…………………
Anfangseinstellungen ……………………………37
Wandbegrenzung rechts und links…..……………38
Verwendung der Speicherfunktion(Optional) … 41
Produktspezifikationen……………………………43
Abmessungen ……………………………………44
Instructions de sécurité ……………………………
2Contenu ……………………………….................…
3
Parties et accessoires ……………………….…… 6
Outils nécessaires ……………....………………… 7
Installation …………………………………………… 8
10
Installation par Modèle …………....................……
Configuration initiale ………………………………37
Limites droite et gauche du mûr …………………38
Utilisation de la mémoire (facultatif) ……..………41
Caractéristiques du produit ………………………43
Dimensions ……………………………………...…44
2
3
6
7
8
10
37
38
41
43
44
Istruzione di sicurezza …………………….………
2Contenuti ……………………………...............……
3
Parti e accessori …………………………............... 6
Strumenti necessari …………………………...…… 7
Installazione ………………………………………… 8
10
Installazione per modello ……..……...……………
Setup iniziale …………………………................…37
Limite muro destra e sinistra …..………........……38
Usare le memorie(opzionale) ….......................... 41
Specificazioni dei prodotti …………...……………43
Dimensioni ………………………………........……44
2
3
6
7
8
10
37
38
41
43
44
Normas de seguridad ………………...……………
Contenido ……………………………..................…
Partes y Accesorios ………………………......……
Herramientas Necesarias …………………………
Instalación …………………………………...………
Instalación por Modelo …………....................……
Configuración Inicial ………………………………
Límite Derecho e Izquierdo de la pared …..……
Utilización de la Memoria (Opcional) ……..….…
Especificaciones del Producto …………..………
Dimensiones ………………………………..…...…
Veiligheidsinstructies …………………….……..…
Inhoudsopgave ……………………….............……
Onderdelen en accessoires ……………...............
Benodigd gereedschap …………………….....……
Installatie ……………………………………......……
Installatie per model ……..……...……….........……
Eerste instelling ………………………...............…
Bereik rechts en links …..………........……..........
Gebruik van het geheugen (naar keuze) …........
Productspecificaties …………...………….........…
Afmetingen ………………………………........……
DE
FR IT
ES NL
3
Motorized Slim Wall Mount Instruction Manual
• If you install the product by using an improper method, it may cause a severe personal injury or product damage.
• If you do not understand the installation method, contact with a professional installer.
• Do not install the product if any parts or components of the product are damaged or missing.
• This product has been designed for use on a vertical wall constructed of solid concrete, solid blocks or bricks.
• Do not use this product for other purposes.
• For safe installation, the wall must maintain four times of the total load (including the wall mount and TV itself).
• Do not exceed the maximum weight load for this product.
• The maximum load of TV is 50kg (110lbs) and the VESA Standard 200×200mm or 300×300mm or 400×400mm .
• If you do not observe the maximum weight, please do not try to install the wall mount.
• Remove unnecessary attachments on the wall where you will install the wall mount.
EN
1) Read these instructions.
2) Keep theseinstructions.
3) Heed all warnings.
4) Follow all instructions.
5) Do not use thisapparatus near water.
6)Clean only with dry cloth.
7) Do not block any ventilationopenings. Install in accordance with themanufacturer’s instructions.
8) Do not install near any heat sources suchas radiators, heatregisters, stoves, or other apparatus(including amplifiers) thatproduceheat.
9) Do not defeatthesafety purpose of thepolarizedorgrounding-typeplug. A polarizedplug has twobladeswith one wider thanthe other.
Agrounding typeplug hastwoblades andathird grounding prong. Thewideblade or thethirdprong are providedforyoursafety.
If theprovided plug does not fit into your outlet,consult an electrician forreplacement of the obsoleteoutlet.
10) Protect thepower cord frombeing walkedonorpinchedparticularly at plugs, convenience receptacles, and thepoint wherethey exit
fromtheapparatus.
11) Onlyuse attachments/accessoriesspecifiedby themanufacturer.
12) Use only with the cart,stand, tripod, bracket, or tablespecifiedby themanufacturer, or sold with theapparatus.
Whenacart is used,use caution whenmoving thecart/apparatus combination to avoidinjury fromtip-over.
13) Unplug thisapparatus during lightning storms or when unused for long periods of time.
14) Refer all servicing to qualifiedservicepersonnel. Servicing is required whentheapparatus hasbeendamaged in any way, suchas
power-supply cord or plug is damaged, liquid hasbeen spilledorobjectshavefallen into the apparatus, theapparatushasbeen
exposed to rain or moisture,does not operatenormally, or hasbeendropped.
WARNING: TO REDUCE THE RISK OF FIRE OR ELECTRIC SHOCK, DO NOT EXPOSE THIS APPLIANCE TO RAIN OR MOISTURE.
Apparatus shall not be exposed to dripping or splashing and no objects filled with liquids, such as vases, shall be placed on the apparatus.
1) Lesen Sie diese Hinweise.
2) Bewahren Sie diese Anweisungen.
3) Beachten Sie alle Warnungen.
4) Befolgen Sie alle Anweisungen.
5) Gebrauchen Sie das Gerät nicht in Wassernähe.
6) Reinigung nur mit einem trockenen Tuch.
7) Blockieren Sie keine Ventilationsöffnungen. Nehmen Sie die Installation nur gemäß den Herstellerangaben vor.
8) Nicht in der Nähe von Hitzequellen wie Heizkörpern, Öfen oder anderen Geräten, die Hitze abstrahlen (einschließlich Verstärkern), einsetzen.
9) Beeinträchtigen Sie nicht den Sicherungszweck des gepolten Steckers oder des Erdungssteckers. Ein gepolter Stecker hat zwei Stifte,
von denen der eine breiter ist als der andere. Ein Erdungsstecker hat zwei Stifte und eine zusätzliche Erdung. Der breite Stift und die Erdung dienen
Ihrer Sicherheit. Wenn der zur Verfügung gestellte Stecker nicht in Ihre Steckdose passt, wenden Sie sich an einen Elektriker, um die Steckdose
entsprechend auszutauschen.
10) Schützen Sie das Stromkabel davor, dass jemand darauf tritt oder dass es geknickt wird, insbesondere am Stecker, an der Steckdose und an der
Verbindungsstelle zum Gerät.
11) Gebrauchen Sie Zusatzgeräte und Zubehör nur gemäß der Herstellerangaben.
12) Nur mit dem Einschub, Ständer, Stativ, Tisch und den Klammern gebrauchen, die vom Hersteller angegeben oder mit dem Gerät
zusammen verkauft wurden. Vorsicht beim Gebrauch eines Einschubs am Gerät, um Verletzungen durch das Umkippen des Geräts zu vermeiden.
13) Bei einem Gewitter oder bei längerem Nichtgebrauch ziehen Sie den Stecker aus der Steckdose.
14) Überlassen Sie alle Servicearbeiten qualifiziertem Servicepersonal. Service wird benötigt, wenn das Gerät derart beschädigt wurde,
dass es nicht mehr ordnungsgemäß funktioniert, sei es durch Beschädigung des Stromkabels oder des Steckers oder dadurch, das Flüssigkeit
oder Objekte in das Gerät gelangt sind, das Gerät Regen oder Feuchtigkeit ausgesetzt war oder fallen gelassen wurde.
WARNUNG: UM DAS RISIKO EINES FEUERS ODER EINES STROMSCHLAGS ZU MINIMIEREN, SETZEN SIE DAS GERÄT KEINEM REGEN
UND KEINER FEUCHTIGKEIT AUS.
Das Gerät vor Tropfen und Spritzern schützen, keine mit Flüssigkeit gefüllten Objekte wie Vasen auf dem Gerät platzieren.
DE
DE FR
Sicherheitshinweise Instructions de sécurité
IT
Istruzioni di sicurezza
ESNL
Normas de seguridadVeiligheidsinstructies
Important Safety Instruction
•Wenn Sie das Produkt nicht ordnungsgemäß montieren, besteht das Risiko von Verletzungen oder einer Beschädigung des Produktes.
•Wenn Sie dieses Montageverfahren nicht verstehen, ziehen Sie bitte einen ausgebildeten Fachmann zu Rate.
•Das Produkt darf auf keinen Fall installiert werden, falls Teile oder Komponenten beschädigt oder nicht beigepackt sind.
•Dieses Produkt wurde zur Anbringung an einer vertikalen Wand konstruiert, die entweder aus Massivbeton, massiven Blöcken oder
Ziegelsteinen besteht.
•Verwenden Sie dieses Produkt nicht zu anderen Zwecken.
•Für eine sichere Montage muss die Wand der vierfachen Gesamtlast standhalten können (einschließlich der Wandbefestigung und
dem Fernsehgerät selbst.).
•Überschreiten Sie bei diesem Produkt auf keinen Fall das angegebene maximale Gewicht.
•Das maximale Gewicht des Fernsehgeräts beträgt 50kg(110lbs) und die VESA-Norm ist 200×200mm oder 300×300mm oder 400 x 400 mm.
•Falls das maximale Gewicht überschritten wird, versuchen Sie bitte nicht, die Wandhalterung zu montieren.
• Entfernen Sie unnötige Aufhängungen von der Wand, dort wo Sie die Wandhalterung montieren möchten.
Motorized Slim Wall Mount Instruction Manual
4
1) Lire ces instructions.
2) Conserver ces instructions.
3) Faire attention à tous les conseils d’utilisation.
4) Suivre toutes les instructions.
5) Ne pas utiliser cet appareil près de l’eau.
6) Nettoyer uniquement avec chiffon sec.
7) Ne pas bloquer aucun ventilateur - aération. Installer en conformant avec les instructions du fabricant.
8) Ne pas installer près d’aucune source chaude comme des radiateurs, des fourneaux, des séchoirs, ou d’autres appareils
(y compris des amplificateurs) qui produisent de la chaleur.
9) Ne pas faire échouer le but de sécurité de la fiche polarisée ou mise à la terre. Une fiche polarisée se compose de deux lames, dont une est plus
large que l’autre. Une fiche mise à la terre se compose de deux lames et une troisième broche sur terre. La lame large ou la troisième broche est
fournie pour votre sécurité. Si la fiche fournie n’est pas adaptée à votre prise de courant, consulter un électricien pour remplacer la prise au courant
obsolète.
10) Protéger le cordon d’alimentation pour qu’il ne soit pas piétiné ou écrasé particulièrement au niveau de la fiche, des récipients convenables,
et les points qui sortent de l’appareil.
11) Utiliser uniquement des attachés et des accessoires recommandés par le fabricant.
12) Utiliser uniquement avec le chariot, le stand, le trépied, le support, ou table spécificités par le fabricant, ou vents avec l’appareil.
Quand un chariot est utilisé, utiliser la précaution en déplaçant la combinaison de chariot/appareil pour éviter les préjudices du renversement.
13) Ne pas brancher cet appareil en cas d’orage accompagné d’éclairs. Le débrancher en cas de non utilisation pour une longue période.
14) S’adresser à tous les services d’entretien pour le service personnel de qualité. Le service est exigé si l’appareil a subi des dommages,
si le cordon d’alimentation ou la fiche a été endommagé, si un liquide a été renversé sur l’appareil ou bien si un objet est tombé dans l’appareil.
ATTENTION : POUR REDUIRE LE RISQUE DE FEU OU DE CHOC ELECTRIQUE, NE PAS EXPOSER CET APPAREIL DANS LA PLUIE OU
DANS L’ENVIRONNEMENT LIQUIDE.
Ne pas exposer cet appareil à l’égouttage ou aux éclaboussures, et aucun objet rempli de liquide; tels que des vases, ne devrait pas être placé
sur cet appareil
1) Leggere queste istruzioni.
2) Conservare queste istruzioni.
3) Prestare attenzione a tutte le avvertenze.
4) Seguire tutte le istruzioni.
5) Non usare questo apparecchio vicino ad acqua.
6) Pulire solo con panni asciuti.
7) Non bloccare mai ventilazione aperta. Installare secondo la istruzione del produttore.
8) Non installare vicino qualsiasi fonte di calore come termosifone, registratore di calore, stufa o altri apparecchi(incluso amplificatori) che produce calore.
9) Non respingere la proposta di sicurezza della presa polarizzata o spina con contatto di terra. Una presa polarizzata ha due contatti con uno più grande
dell’altro. Una presa di contatto di terra ha due contatti piatti e un terzo per contatto di terra. Il piatto più grosso o il terzo contatto sono forniti per la
sicurezza. Se la presa fornita non entra nella tua presa, consultare un elettricista per rimettere nella presa completamente.
10) Proteggere il filo di presa dell’alimentatore dal camminare su o dal schiacciare particolarmente sulle prese, recipiente conveniente, e il punto dove
loro escono dall’apparecchio.
11) Usare solo attacchi/accesori specificati dal produttore.
12) Usare solo con il carrello, stand, treppiedi, mensola o tavolo specificati dal produttore, o venduto con apparecchio.
Quando un carrello è usato,fare attenzione quando fa muovere il carrello/apparecchio in combinazione per evitare infortunio dal cadere.
13) Staccare la presa di questo apparecchio durante il fulmine o quando non usa lungo periodo.
14) Riferire tutto il servizio al personale di servizio qualificato. Il servizio è richiesto quando l’apparecchio era danneggiato comunque,
come la presa o il filo di alimentatore è danneggiato, liquido era perduto o oggetti sono caduti nell’apparecchio, l’apparecchio era esposto alla pioggia
o all’umidità, non opera normalmente, o aveva cascato.
AVVERTENZA: PER RIDURRE IL RISCHIO DI INCENDIO O SCOSSA ELETTRICA, NON ESPORRE QUESTO APPRECCHIO ALLA PIOGGIA
O ALL’UMINIDTA’.
Apparecchio non deve essere esposto all’acqua o al schizzare e nessun oggetto pieno di liquidi come vasi, sarà messo sull’apparecchio.
FR
IT
Important Safety Instructions
•
Si vous installez le produit en utilisant une méthode incorrecte, ceci peut entraîner des blessures graves ou gravement endommager le produit.
•Si vous ne comprenez pas la méthode d’installation, contactez un installateur professionnel.
•N’installez pas le produit si certaines parties ou certains composants du produit sont endommagé(e)s ou manquant(e)s.
•Ce produit a été conçu pour utiliser sur un mûrvertical en béton plein, en blocs pleins ou en briques pleines.
•N’utilisez pas ce produit à d’autres fins.
•
Pour assurer la sécurité de l’installation, le mûrdoit supporter 4 fois la charge totale (incluant le support mural et le téléviseur lui-même).
•N’excédez pas la charge maximale pour ce produit.
•La charge totale du téléviseur est de 50 kg (110lbs) et la norme VESA est de 200*200mm ou 300*300mm ou 400*400mm.
•Si vous ne respectez pas la charge maximale, n'essayez pas d’installer le support mural.
•Retirez les fixations inutiles sur le mûr ou vous allez installer le support mural.
•Se il prodotto viene installato in modo scorretto, può causare gravi lesioni personali o danni al prodotto.
•In caso di dubbi sul metodo di installazione, contattare un installatore professionista.
•Non installare il prodotto in caso di parti mancanti o danneggiate.
•Il prodotto è stato progettato per l’uso su una parete verticale in cemento armato o mattoni.
•Non utilizzare il prodotto per altri scopi.
•
Per una installazione sicura, la parete deve essere in grado di sostenere quattro volte il carico totale (incluso il supporto a muro e TV stesso)
•Non superare il carico massimo per questo prodotto.
•Il peso massimo per la TV è 50kg e VESA Standard 200×200mm o 300×300mm o 400×400mm.
•Nel caso il limite massimo di peso venga superato, non installare il supporto a parete.
•Rimuovere elementi superflui dal muro dove si intende installare il supporto a parete.

Motorized Slim Wall Mount Instruction Manual
5
Important Safety Instructions
1) Lea estas instrucciones.
2) Mantenga estas instrucciones.
3) Preste atención a todas las advertencias.
4) Siga todas las instrucciones.
5) No utilice este aparato cerca del agua.
6) Limpie solamente con telas secas.
7) No bloquee ninguna apertura de ventilación. Instale acorde a las instrucciones de los fabricantes.
8) No instale cerca de ninguna fuente del calor como radiadores, acumuladores del calor, estufas u otros aparatos (incluyendo amplificadores)
que produzcan calor.
9) No anule el propósito de seguridad del enchufe polarizado o enterrado. Un enchufe polarizado tiene dos palas y otro más ancho.
Un enchufe enterrado tiene dos palas y una tercera terminal enterrada. La pala ancha o la tercera terminal existen para su seguridad.
Si el enchufe suministrado no se ajusta a su toma de corriente, consulte con un electricista para reemplazar con una obsoleta.
10) Proteja el cable de electricidad de ser pisado o pinchado particularmente en los enchufes, recipientes convenientes, y el punto donde salen
del aparato.
11) Utilice solamente adjuntos/accesorios especificados por los fabricantes.
12) Utilice solamente con el carrito, estante, trípode, o mesa especificados por los fabricantes, o suelde con el aparato.
Cuando utilice el carrito, tenga cuidado cuando mueva el conjunto del carrito/aparato para evitar daños por la caída.
13) Desenchufe este aparato durante la tormenta eléctrica o cuando no será utilizado por largo periodo de tiempo.
14) Tenga en cuenta todos los servicios de personales cualificados. Los servicios son requeridos cuando el aparato fue dañado de cualquier manera,
tal como daño del cable de electricidad o enchufe, líquido derramado o objetos caídos dentro del aparato, si el aparato fue expuesto a la lluvia
o a la humedad, cuando no opere normalmente o fue caído.
ATENCIÓN: PARA REDUCIR EL RIESGO DE INCENDIO O SHOCK ELÉCTRICO, NO EXPONGA EL APARATO A LA LLUVIA O A LA
HUMEDAD.
El aparato no debe ser expuesto al derramamiento o salpicaduras y ningun objeto que contengan líquidos, tal como vasos,
deben ser colocados sobre el aparato.
1) Lees deze instructies.
2) Bewaar deze instructies.
3) Neem alle waarschuwingen in acht.
4) Volg alle instructies.
5) Gebruik dit apparaat niet in de buurt van water.
6) Maak alleen schoon met een droge doek.
7) Dek geen ventilatie openingen af. Installeer conform de instructies van de fabrikant.
8) Niet installeren in de buurt van warmtebronnen zoals radiatoren, warme luchtroosters, ovens of andere apparaten (zoals versterkers)
die warmte produceren.
9) Omzijl het veiligheidsprincipe van de stekker met polariteit of geaarde stekker niet. Een stekker met polariteit heeft twee contactpennen waarvan
een breder is dan de ander. Een geaarde stekker heeft twee contactpennen en een derde punt voor de aarde. De brede contactpen of de derde
punt is er voor uw veiligheid. Als de geleverde stekker niet in uw stopcontact past, raadpleeg dan een electricien voor vervanging van het oude
stopcontact.
10) Bescherm het elektriciteitssnoer tegen het erover heen lopen of erin prikken, vooral bij de stekkers, wandcontactdozen,
en het punt waar het uit het apparaat komt.
11) Gebruik alleen door de fabrikant gespecificeerde hulpstukken/accessoires.
12) Alleen gebruiken met de door de fabrikant gespecificeerde kar, standaard, statief, beugel of tafel, of die met het apparaat samen verkocht werd.
Wees, als de kar gebruikt wordt, voorzichtig bij het verplaatsen van de kar/apparaat combinatie om verwonding door omkantelen te voorkomen.
13) Haal de stekker van het apparaat uit het stopcontact tijdens onweer of als het apparaat voor lange tijd niet gebruikt wordt.
14) Neem voor al het onderhoud contact op met gekwalificeerd onderhoudspersoneel. Onderhoud is nodig als het apparaat op enige wijze is
beschadigd, zoals wanneer het elektriciteitssnoer of de stekker beschadigd is, water is geknoeid of voorwerpen in het apparaat zijn gevallen,
het apparaat is blootgesteld aan regen of vocht, niet normaal werkt, of is gevallen.
WAARSCHUWING: STEL DIT APPARAAT NIET BLOOT AAN REGEN OF VOCHT, OM HET RISICO OP BRAND OF EEN ELEKTRISCHE
SCHOK TE VERKLEINEN.
Het apparaat mag niet blootgesteld worden aan druppels of spetters. Voorwerpen gevuld met vloeistoffen, zoals vazen, mogen niet op het
apparaat geplaatst worden.
ES
NL
•Si instala el producto siguiendo un método inadecuado, podrían producirse graves daños personales o en el producto.
•Si no comprende el método de instalación, póngase en contacto con un instalador profesional.
•No instale el producto si alguna de las piezas o componentes de dicho producto presentan daños o faltan.
•Este producto se ha diseñado para ser utilizado en una pared vertical construida con hormigón macizo, bloques macizos o ladrillos.
•No utilice este producto para otros fines.
•Para que la instalación sea segura, la pared debe poder sostener una carga equivalente a cuatro veces el peso total del equipo
(incluido el soporte para montaje en pared y el propio TV).
•No debe superarse el peso máximo que soporta este producto.
•El peso máximo del TV es de 50kg (110lbs) y el estándar VESA es de 200 x 200 mm ó de 300 x 300mm ó de 400 × 400 mm.
•Si se supera el peso máximo, no intente instalar el soporte para montaje en pared.
•Retire todos los accesorios innecesarios de la pared en la que va a instalar el soporte para montaje en pared.
•Als u het product op onjuiste wijze plaatst, kan dit ernstig persoonlijk letsel of schade aan het product veroorzaken.
•Als u de installatie niet begrijpt, neem dan contact op met een professionele installateur.
•Installeer het product niet als onderdelen van het product beschadigd zijn of ontbreken.
•Dit product is ontworpen voor gebruik met een verticale muur van beton, stenen of bakstenen.
•Gebruik dit product niet voor andere doeleinden.
•Voor veilige installatie moet de muur tenminste vier keer de totale last kunnen dragen (inclusief de muursteun en de TV zelf).
•Overschrijd het maximale gewicht voor dit product niet.
•Het maximale gewicht van de TV is 50kg en de VESA-standaard 200x200mm of 300x300mm of 400x400mm.
•Als u niet let op het maximale gewicht, probeer dan niet de muursteun te installeren.
•Verwijder onnodige zaken aan de muur waar u de muursteun wilt plaatsen.

Parts and Accessories
6
Motorized Slim Wall Mount Instruction Manual
DE
ES
FR
NL
IT
Teile und Zubehör Parties et Accessoires Le parti e gli Accessori
Parts and Accessories Onderdelen en accessoires
SetUP
Mem1
Home
Mem2
W-A
M6X50mm
9EA
W-B
M6
9EA 1EA 1EA
W-D
1EA
W-C
Φ3(1/18˝)
1EA
N-BN-A
4EA
N-C N-D
M4×15mm
4EA
M4×45mm
4EA
M-AM-B
M5×45mm
4EA
M-D
M6×15mm
4EA
M-E
M6×20mm
4EA
M-F
M6×45mm
4EA
M-G
M8×15mm
4EA
M-H
M8×29mm
4EA
M-I
M8×45mm
4EA
M-J
M5×15mm
4EA
M-C
M5×6mm
6EA
M-K
A-A A-DA-BA-C
Remote Controller
EN
Fernbedienung
DE
Télécommande
FR
Telecomando
IT
Mando a distancia
ES
Afstandsbediening
NL
Wall Mount
EN
Wandhalterung
DE
Fixation murale
FR
Supporto a muro
IT
Montaje para la pared
ES
Wandsteun
NL
Screw
EN
Schrauben
DE
Vis
FR
Vite
IT
Destornillador
ES
Schroef
NL
Anchor
EN
Dübel
DE
Ancre
FR
Fermo
IT
Anclaje
ES
Plug
NL
Leveler
EN
Wasserwaage
DE
Niveau
FR
Livella
IT
Nivelador
ES
Waterpas
NL
Power Adaptor
EN
Strom-Adapter
DE
Adaptateur secteur
FR
Alimentatore
IT
Adaptador de potencia
ES
Stroomadapter
NL
Wood Drill Bit
EN
Holzbohrspitze
DE
Mèche de percement du bois
FR
Punta di trapano per legno
IT
Barrena para Madera del taladro
ES
Houtboor
NL
Wing Plate
EN
Tragflache
DE
Plaque d’aile
FR
Ala Laminata
IT
Aletas de placa
ES
Vleugel plaat
NL
Installation Supplement Manual
EN
Montage Ergänzung - Anleitung
DE
Installation manuelle supplémentaire
FR
Manuale Supplementodi installazione
IT
Suplemento de Manual de Instalación
ES
Aanvullend installatie sjabloon
NL
IR Receiver
EN
IR-Empfänger
DE
IR Récepteur
FR
Ricevitore IR
IT
Receptor de IR
ES
IR-ontvanger
NL
1EA
Communication Cable
(for Samsung TV only)
EN
Verbindungskabel
(nur für Samsung TV)
DE
Câble de communication
(seulement pour Samsung TV)
FR
Cavo di comunicazione
(per TV Samsung solo)
IT
Cable de comunicación
(únicamente para TV Samsung)
ES
Communicatie Kabel
(Alleen voor Samsung TV’s)
NL
Square Washer
EN
Vierkantscheibe
DE
Rondella quadrata
IT
Arandela cuadrada
ES
Vierkante ring
NL
Rondelle à section carrée
FR
Plate Washer M4&M5
EN
TellerfederM4&M5
DE
Rondella tondaM4&M5
IT
Arandela de placa M4&M5
ES
PlaatringM4&M5
NL
Rondelle plate M4&M5
FR
Cable Tie
EN
Kabelhalter
DE
Fermacavo
IT
Abrazadera
ES
Kabelbinder
NL
Fixation du câble
FR
Spacer
EN
Abstandsstück
DE
Distanziatore
IT
Separador
ES
Opvulring
NL
Espaceur
FR
Instruction Manual
EN
Bedienungsanleitung
DE
Mode d'emploi
FR
Manuale d’uso
IT
Manual de Instrucciones
ES
Handleiding
NL
7
Motorized Slim Wall Mount Instruction Manual
Φ9 (3/8˝)
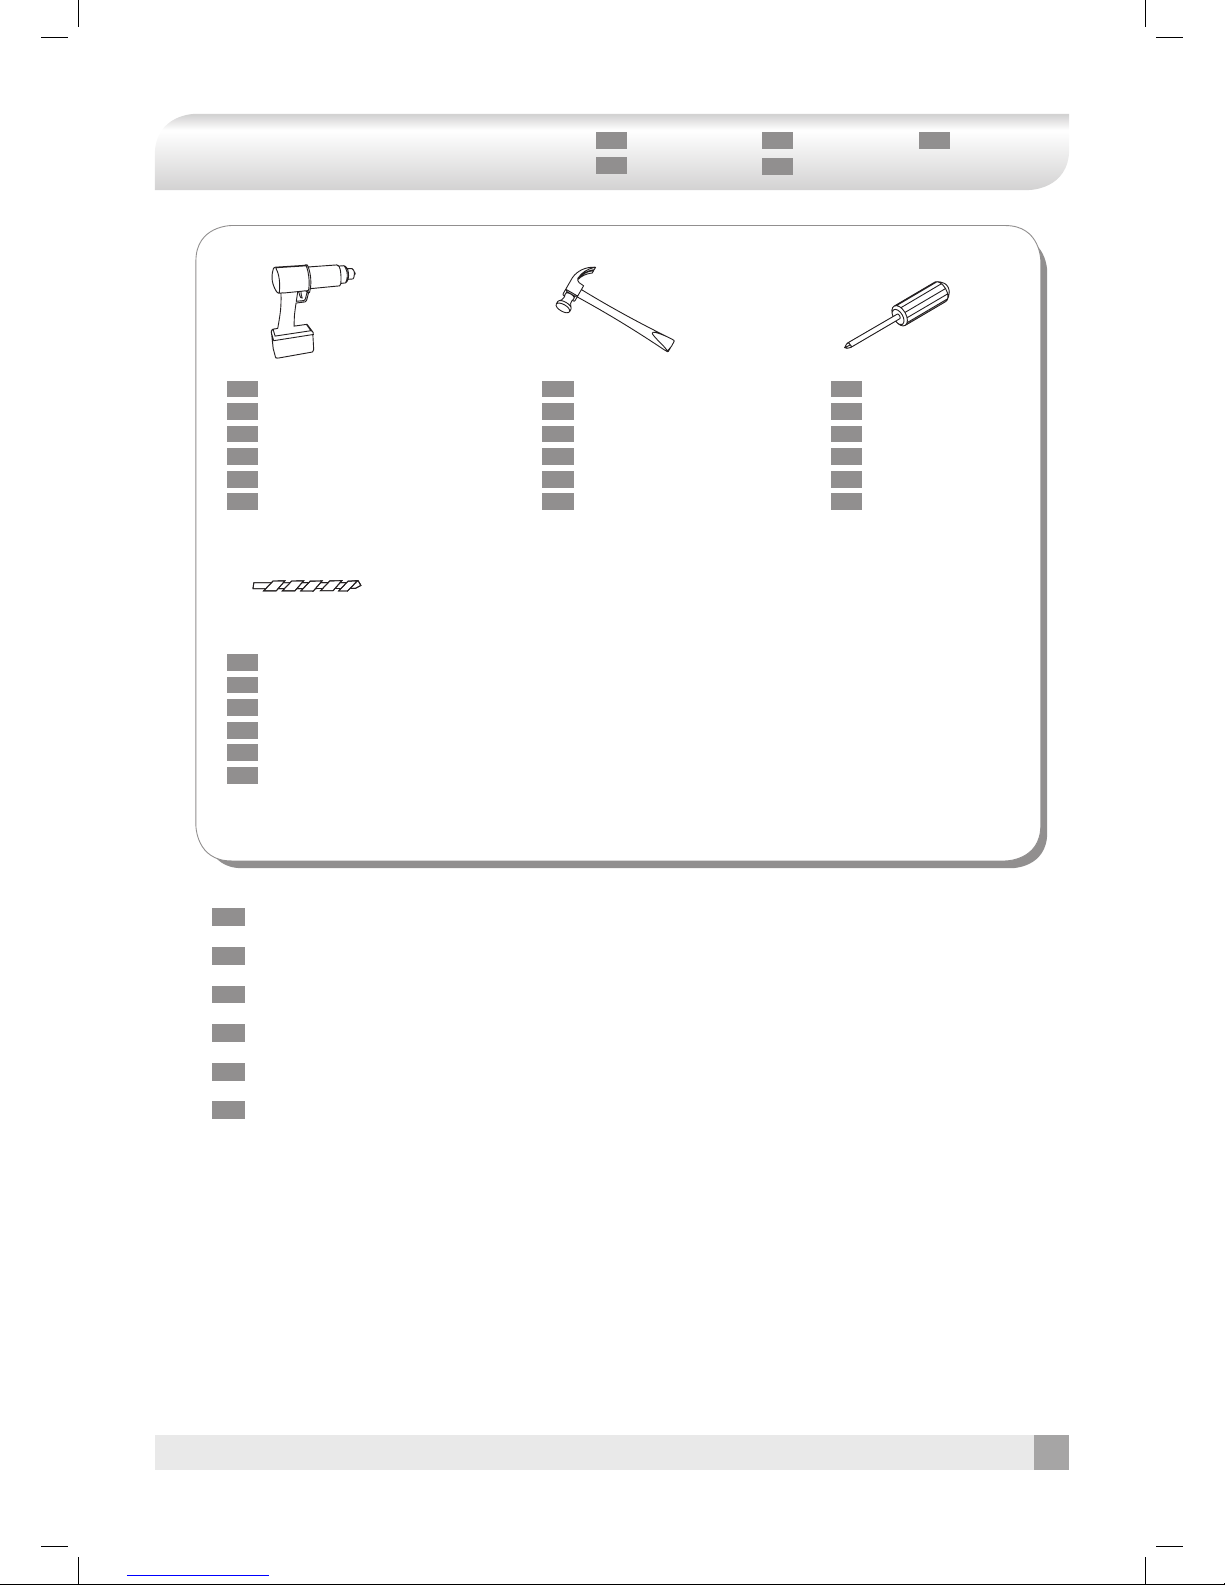
Required Tools
DE
ES
FR
NL
IT
Benötigte Werkzeuge Outils nécessaires Attrezzi richiesti
Herramientas necesarias Benodigd gereedschap
EN The tools shown are not included
DE Die gezeigten Werkzeuge sind nicht im Lieferumfang enthalten
FR Des outils montrés ne sont pas inclus
IT Gli attrezzi dimostrati non sono inclusi
ES Las herramientas a continuación no están incluidas
NL Het afgebeelde gereedschap is niet meegeleverd
Power drill
EN
Bohrmaschine
DE
Perceuse
FR
Trapano
IT
Taladro eléctrico
ES
Boormachine
NL
Hammer
EN
Hammer
DE
Marteau
FR
Martello
IT
Martillo
ES
Hamer
NL
Screwdriver (+)
EN
Schraubenzieher (+)
DE
Tournevis (+)
FR
Cacciavite (+)
IT
Destornillador (+)
ES
Schroevendraaier (+)
NL
Steenboor bit
NL
Barrena de albañilería del taladro
ES
Punta per muro
IT
Mèche de percement de la maçonnerie
FR
Mauer-Bohrspitze
DE
Masonry Drill Bit
EN

8
Motorized Slim Wall Mount Instruction Manual
90°
1
Leveler (W-D)
EN Attach the separately enclosed installation supplement manual (A-C) on the wall where the product will be installed.
Use the leveler (W-D) to ensure the product is horizontal.
(Be sure to check the center of the installation supplement manual, because the centers of Automatic Wall Mount
and TV are different.)
DE Befestigen Sie die separat beigelte Montage Schablone (A-C) an der Wand, dort wo das Produkt installiert werden soll.
Verwenden Sie die Wasserwaage (W-D) um sicherzustellen, dass das Produkt horizontal hängt.
(Vergewissern Sie sich, dass Sie das Zentrum der Montage-Vorrichtung manuell nachgeprüft haben,
weil die Zentren der automatischen Wandhalterung und des TV-Geräts unterschiedlich liegen.)
FR Attachez le supplément d’installation manuelle séparément entouré (A-C) sur le mûr où le produit sera installé.
Utiliser le niveau (W-D) pour assurer qu’il est horizontal.
(Soyez assuré de vérifier le centre du supplément d’installation manuelle, car les centres de la fixation électrique
et du TV sont différents.)
IT Fissare il manuale d’installazione supplemento separatamente allegato(A-C) sul muro dove il prodotto sarà installato.
Usare la livella(W-D) per assicurare che il prodotto sia orizzontale.
(Controllare bene il centro del manuale d’installazione supplemento perché i centri di Supporto a Muro automatico
e TV sono diversi.)
ES Fijar el manual de suplemento de instalación adjunto (A-C) en la pared donde será instalado el producto.
Utilice el nivelador (W-D) para asegurar que el producto esté horizontal.
(Verifique el centro del manual del suplemento de instalación, ya que los centros del soporte automático y del TV
son diferentes)
NL Bevestig het apart meegeleverde installatie sjabloon (A-C) aan de muur waar u het product wilt plaatsen.
Zorg dat het product horizontaal is geplaatst met behulp van de waterpas (W-D).
(Controleer het midden van het aanvullende installatie sjabloon, omdat het midden van de automatische muursteun
en TV verschillend zijn.)
DE
ES
FR
NL
IT
Montage InstallationInstallazione
Instalación Installatie
Installation

9
Motorized Slim Wall Mount Instruction Manual
2
55mm
Quick Manual Installation
EN After attaching the installation supplement manual on the wall, drill 4 holes or, if necessary, 8 holes at required
places using the wood drill bit (3Φ/W-C) or concrete drill (9Φ drill bit).
DE
Nach der Anbringung der Montage Schablone an der Wand, bohren Sie 4 Löcher oder falls es notwendig ist,
8 Löcher an den benötigen Stellen mit dem Holz-Bohrer (3Φ/W-C) oder mit dem Beton-Bohrer(9Φ Bohrer).
FR
Après avoir attaché le supplément d’installation manuelle sur le mûr, percez 4 trous ou s’il est nécessaire,
8 trous aux endroits exigés en utilisant la mèche de percement du bois (3Φ/W-C) ou le percement en béton (9Φ drill bit).
IT Dopo aver fissato il manuale d’installazione supplemento sul muro, forare 4 buchi o se necessario, 8 buchi ai
posti richiesti usando la punta per legno(3Φ/W-C) o per cemento(9Φ punta).
ES Luego de haber fijado el manual de suplemento de instalación en la pared, realice 4 ó si es necesario
8 perforaciones en la ubicación requerida utilizando la barrena de taladro para madera (3Φ/W-C) o el taladro
para hormigón (9Φ drill bit).
NL Boor nadat het aanvullende installatie sjabloon aan de muur bevestigd is 4 of, indien nodig, 8 gaten in de muur
op de vereiste plaatsen met de houtboor (3Φ/W-C) of steenboor (9Φ boor).
The hole sizes and drilling methods may differ depending on the wall types:
EN
Die Bohr-Löcher und –Methode können unterschiedlich sein und hängen von der Wand-Beschaffenheit ab:
DE
La taille des trous et la méthode de forage peuvent être différentes en fonction du type de mûr comme les suivants :
FR
La misura del buco e il metodo di forare è diverso secondo il tipo di muro come seguente:
IT
El tamaño del orificio y el método de perforación difieren dependiendo al tipo de la pared, como a continuación:
ES
De grootte van de gaten en de manier van boren kunnen verschillen, afhankelijk van het soort muur:
NL
a)
b)
c)
55mm
Φ9(3/8")
Geval 1) Stenen muur
NL
Caso 1) Pared de mampostería
(albañilería)
ES
Caso 1) Muro in muratura
IT
Cas 1) Mûr en maçonnerie
FR
Fall 1) Mauerwerk
DE
Case 1) Masonry Wall
EN
a) Boor de gaten
b) Maak de gaten schoon
c) Plaats de pluggen (W-B)
NL
a) Realizar las perforaciones
b) Limpiar los orificios
c) Plaats de pluggen (W-B)
ES
a) Fare dei buchi
b) Pulire i buchi
c) Inserire i fermi(W-B)
IT
a) Forer des trous
b) Vider des trous
c) Introduire des ancres (W-B)
FR
a) Löcher Bohren
b) Bohrlöcher Säubern
c) Dübel einführen(W-B)
DE
a) Drill the holes
b) Clean the holes
c) Insert the anchors(W-B)
EN
Remove the wall template after the drilling.
EN
Entfernen Sie nach dem Bohren die Wandschablone von der Wand
DE
Retirez le modèle du mûr après le percement.
FR
Rimuovere la sagoma del muro dopo aver effettuato i fori.
IT
Remover la plantilla de la pared luego de perforarla.
ES Verwijder het muur sjabloon na het boren.
NL
Φ3(1/8")
55mm
a)
b)
Geval 2) Houten muur
NL
Caso 2) Pared de madera
ES
Caso 2) Muro in legno
IT
Cas 2) Mûr en bois
FR
Fall 2) Holzwand
DE
Case 2) Wooden Wall
EN
a) Boor de gaten
b) Maak de gaten schoon
NL
a) Realizar las perforaciones
b) Limpiar los orificios
ES
a) Fare i buchi
b) Pulire i buchi
IT
a) Forez des trous
b) Vider des trous
FR
a) Löcher Bohren
b) Bohrlöcher Säubern
DE
a) Drill the holes
b) Clean the holes
EN
Installation
10
Motorized Slim Wall Mount Instruction Manual
Installation
Installation per Model
3
A=20Cm >
A=30Cm >
A=40Cm >
vesa 200x200 A Installation Method
vesa 300x300 B Installation Method
vesa 400x400 C Installation Method
A=20Cm >
A=30Cm >
A=40Cm >
vesa 200x200 A Montageverfahren
vesa 300x300 B Montageverfahren
vesa 400x400 C Montageverfahren
A=20Cm >
A=30Cm >
A=40Cm >
vesa 200x200 Instructions d’installation A
vesa 300x300 Instructions d’installation B
vesa 400x400 Instructions d’installation C
A=20Cm >
A=30Cm >
A=40Cm >
vesa 200x200 A Metodo d’Installazione
vesa 300x300 B Metodo d’Installazione
vesa 400x400 C Metodo d’Installazione
A=20Cm >
A=30Cm >
A=40Cm >
vesa 200x200 A Instrucciones de instalación
vesa 300x300 B Instrucciones de instalación
vesa 400x400 C Instrucciones de instalación
A=20Cm >
A=30Cm >
A=40Cm >
vesa 200x200 A Installatie instructies
vesa 300x300 B Installatie instructies
vesa 400x400 C Installatie instructies
20Cm=Installation A
30Cm=Installation B
40Cm=Installation C
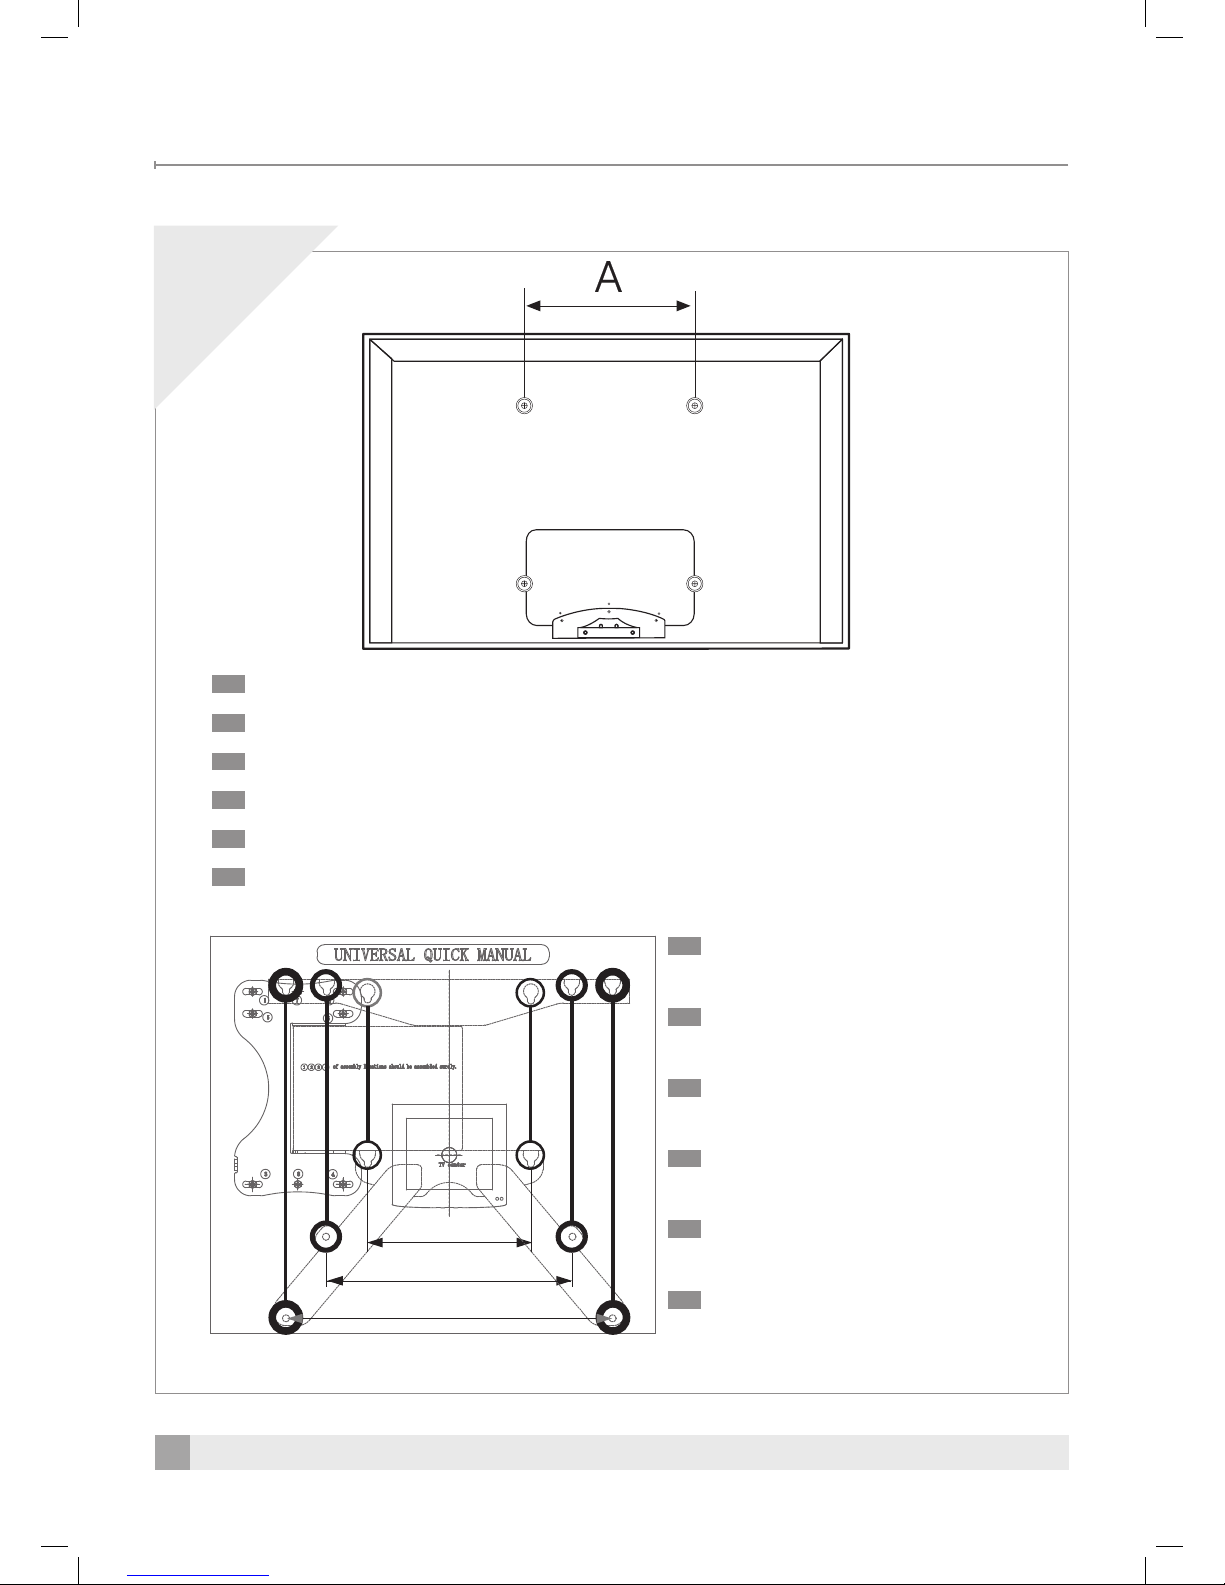
EN Note the VESA standard for the TV and follow proper installation instruction.
DE Beachten Sie bitte die Vesa-Standarts für TV-Geräte und folgen Sie die entsprechenden Montage-Anleitungengen.
FR Notez le standard de VESA pour le TV et suivez l’instruction d’installation appropriée.
IT
IT
Notare il VESA standard per la TV e seguire istruzione d’installazione appropriata.
ES Verifique el estándar VESA para el TV y siga la instrucción de instalación correspondiente.
NL
EN
DE
FR
ES
NL
Controleer de VESA standaard voor de TV en volg de bijbehorende installatie instructies.

11
Motorized Slim Wall Mount Instruction Manual
4
A-1
A=20
Cm
How to assemble 200mm×200mm TV
Leveler (W-D)
W-A
M6Х50mm
Installation
EN After inserting the anchors (W-B) into the drilled holes, tighten the screws (W-A) in the 4 required positions.
Ensure to maintain horizontal, when tightening the screws.
This step requires more than two persons. The product may fall and cause product damage and/or serious injury.
NL Draai na het plaatsen van de pluggen (W-B) in de geboorde gaten de schroeven (W-A) aan op de 4 vereiste
plaatsen. Zorg dat de automatische muursteun horizontaal is bij het aandraaien van de schroeven.
Deze stap dient door meer dan twee personen uitgevoerd te worden. Het product kan vallen en beschadigd raken
en/of een verwonding veroorzaken.
ES Luego de insertar los anclajes (W-B) dentro de los orificios de la pared, fije los tornillos (W-A) en las 4 posiciones
requeridas. Verifique si el soporte automático está horizontal mientras fije el tornillo.
Este paso requiere de más de 2 personas. De otra manera, el producto puede caer o sufrir serios daños.
IT Dopo aver inseriti dei fermi(W-B) nei buchi forati, fissare bene le viti(W-A) nei 4 posizioni richieste.
Assicurare che supporto a muro automatico sia orizzontale, mentre fissa le viti.
Per questo processo richiedono più di due persone. Altrimenti, il prodotto può cadere e può causare danno al prodotto e/o
seri danni.
FR Après avoir inséré les ancres (W - B) dans les trous foré, resserrez les vis (W-A) aux 4 positions exigées.
Soyez assuré que le support mural automatique est horizontal lors du resserrement des vis.
Cette étape exige plus de deux personnes. L’appareil peut tomber et causer des dommages et/ou de sérieux préjudices.
DE Nach dem Einführen der Düben (W-B) in die Löcher, ziehen Sie die Schrauben (W-A) an den 4 benötigten
Stellen an. Während des Anziehens vergissern Sie sich, dass die automatische Wandhalterung horizontal hängt.
Dieser Montageschritt erfordert mehr als zwei Personen. Das Gerät könnte herabfallen und beschaedigt werden und/oder
schwere Verletzungen könnten hervogerufen werden..

12
Motorized Slim Wall Mount Instruction Manual
4
A-2
A=20
Cm
From M-A to M-J
Washer(N-A)
Installation
How to assemble 200mm×200mm TV
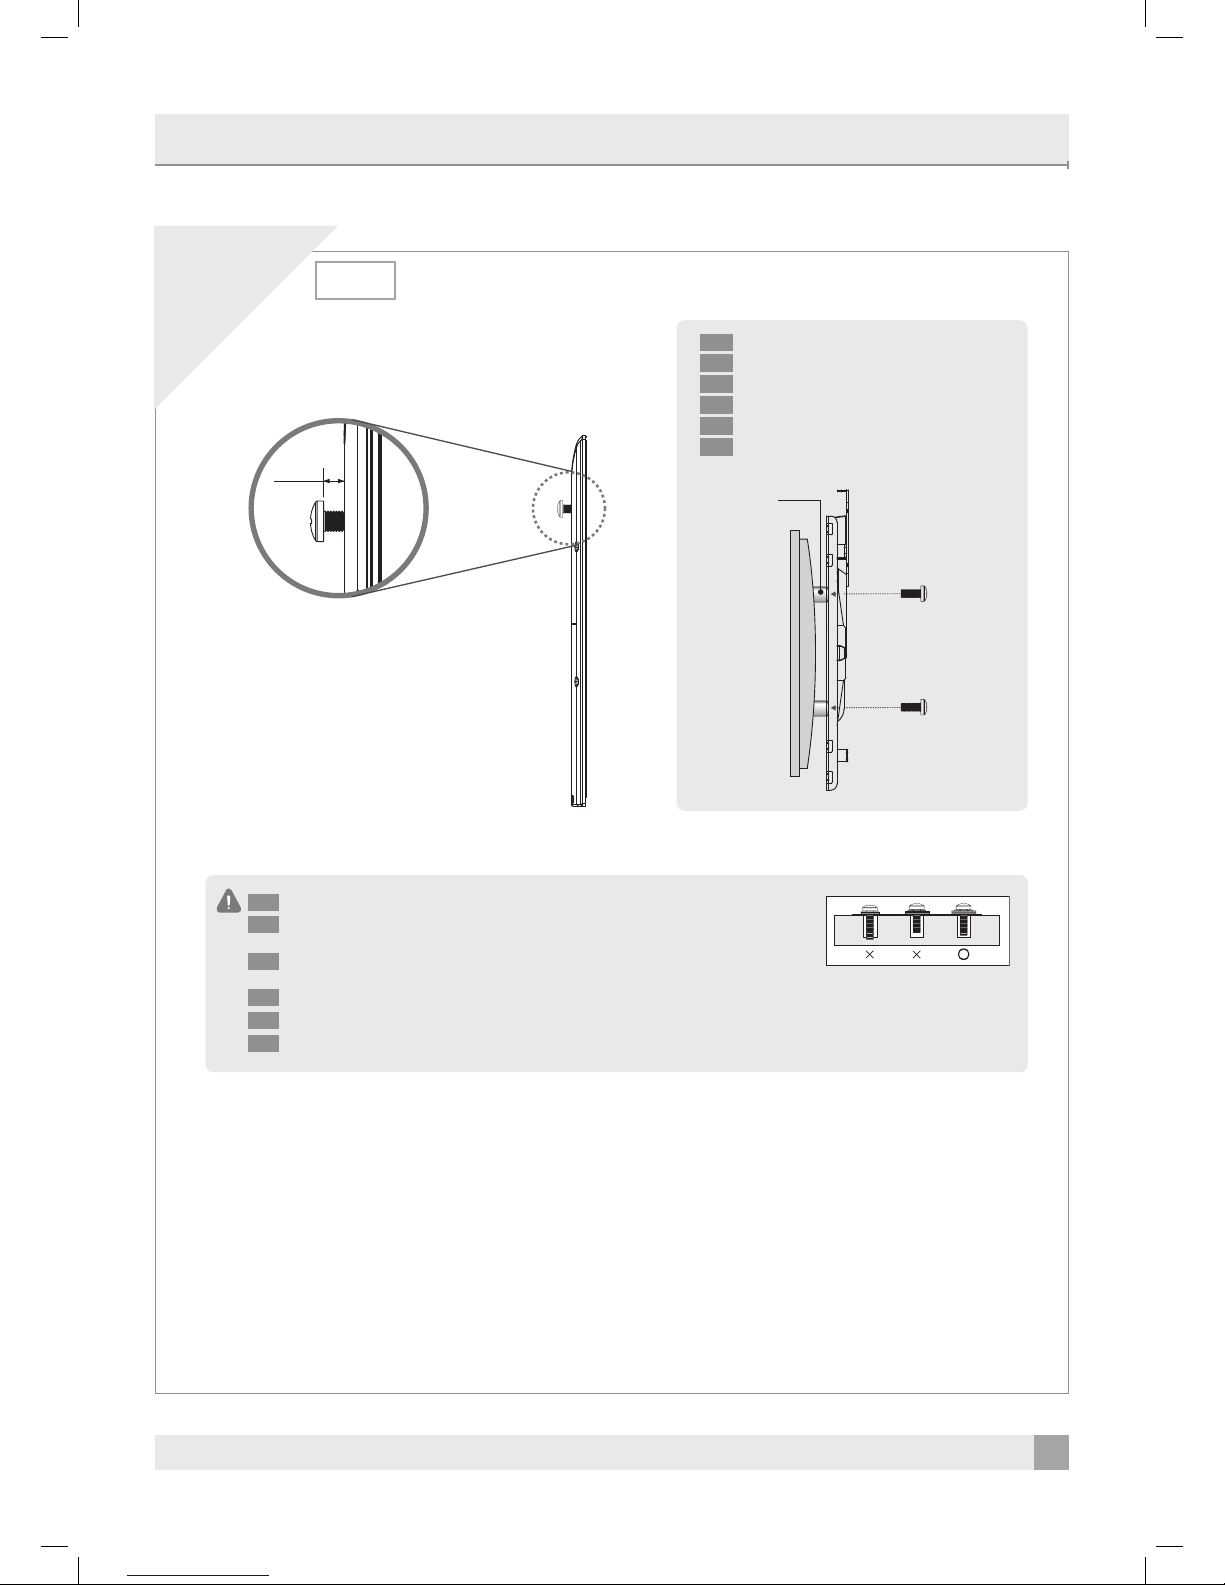
EN When tightening the screws on the TV panel, the corresponding screws must be selected because the size and
the length of the screws differ for each TV specification (From M-A to M-J)
Insert washers under each screw and tighten the screws at 2 places in the upper area. When tightening the screws,
leave a space of 5mm.
DE Beim Anziehen der Schrauben an der TV-Fläche, müssen die entsprechendenSchrauben gewählt werden, weil Größe
und Länge der Schrauben unterschiedlich sind, abhängig von der jeweiligen TV-Spezifikation.(Von M-A zu M-J).
Legen Sie jeweils eine Scheibe unter jede Schraube und ziehen Sie die zwei Schrauben im oberen Bereich an.
Beim Anziehen der Schrauben, lassen Sie einen Abstand von 5 mm.
FR Lors du resserrement des vis sur le panneau du téléviseur, des vis correspondants doivent être sélectionnées parce que
les tailles et les tailles et les longueurs des vis sont différentes en fonction des spécifications de téléviseur.(De M-A à M-J).
Insérez une rondelle dans la vis ayant la taille correspondante au téléviseur et resserrez la vis au 2 endroits au-dessus
et 2 endroits au-dessous. Laisser une distance de 5mm, lors du resserrement des vis.
IT Quando è ben fissato le viti sul pannello TV, le viti corripondenti devono essere selezionate perché le misure
e le lunghezze delle viti sono differenti per ogni TV specificato(Da M-A a M-J).
Inserire una rondella per ogni vite che è la misura giusta per la TV e fissare bene le viti ai 2 posti nell’area sopra e
2 luoghi nell’area sotto. Quando ben fissate le viti, lasciare uno spazio di 5mm.
ES Cuando fije los tornillos en el panel del TV, deben ser seleccionados los tornillos correspondientes al patrón correcto
ya que los tamaños y los largos de los tornillos difieren para cada especificación del TV (desde M-A hasta M-J)
Inserte la arandela debajo de cada tornillo, la que sea del tamaño correcto para el TV y fije el tornillo en 2 lugares
del área superior y otros 2 del área inferior. Mientras fije el tornillo, deje un espacio de 5mm.
NL Bij het aandraaien van de schroeven op het TV paneel moet de corresponderende schroef gekozen worden,
omdat de afmeting en lengte van de schroeven verschillen afhankelijk van de TV specificaties (M-A tot M-J).
Plaats een ring met de juiste afmeting voor de TV onder elke schroef en draai de schroef aan op 2 plaatsen in het
bovenste gedeelte en 2 plaatsen in het onderste gedeelte.
Laat een speling van 5mm over bij het aandraaien van de schroeven.
13
Motorized Slim Wall Mount Instruction Manual
4
A-2
A=20
Cm
5mm
Installation
If the screw is too long or short when tightening it on the TV, it may cause safety risks.
EN
Si la vis est trop longue ou trop courte, il peut causer des dommages et/ou de serieux
préjudices.
FR
Wenn die Schraube beim Anziehen am TV zu lang oder zu kurz ist, könnte das
Produkt beschädigt werden und/oder schwere Verletzungen hervorgerufen werden.
DE
Se levitisono troppo lunghe o troppo cortepuò causare danno e/o seri rischi.
IT
Si el tornillo es muy largo o muy corto cuando se fije en el TV, el producto puede sufrir serios daños.
ES
Als de schroef te lang of te kort is, kan dit het product beschadigen en/of een verwonding veroorzaken.
NL
N-D
Hoe een TV met ronde achterkant te monteren
NL
Cómo ensamblar el TV tipo esférico
ES
Come assemblare un TV, tipo rotondo
IT
Comment assembler un TV de type ronde
FR
Wie ein Runder TV-Typ installiert wird
DE
How to assemble a Round type TV
EN
How to assemble 200mm×200mm TV

14
Motorized Slim Wall Mount Instruction Manual
4
A-3
A=20
Cm
90°
Installation
How to assemble 200mm×200mm TV
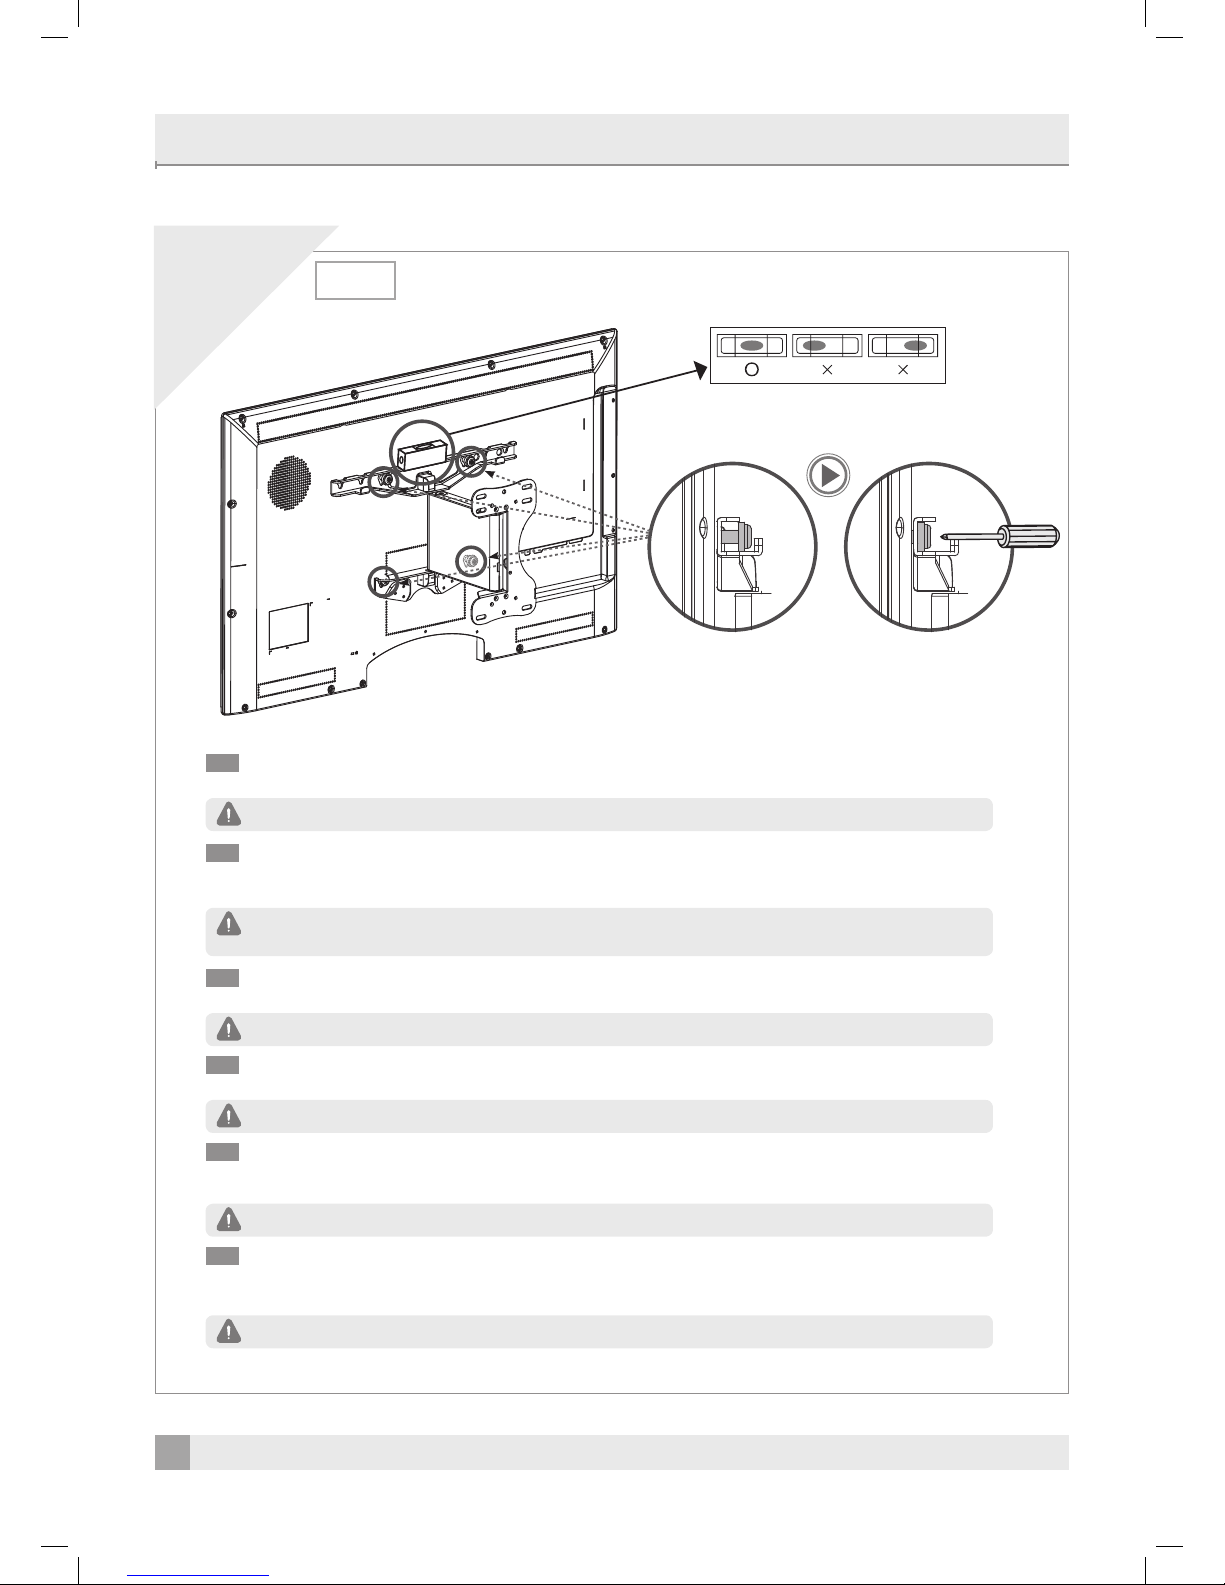
EN To assemble the TV on the automatic wall mount that is fastened on the wall, you must pull the arm horizontally
so that it draws 90 degrees as shown on the picture. (Pull the top two corners as you turn it.)
DE Zur Anbringung des TV- Gerätes an der automatischen Wandhalterung, die an der Wand befestigt ist, sollten
Sie den Arm der Vorrichtung in horizontaler Stellung bringen und um 90 Grad drehen, so wie es im Bild gezeigt wird.
( "Ziehen" Sie, während der Drehung, die zwei oberen Ecken heraus.)
FR Pour assembler le téléviseur sur la fixation électrique murale, vous devez tirer le bras de ce support horizontalement
et il tourne à plus de 90 degrés comme le montre le tableau. (Tirez les deux coins au-dessus quand vous le tournez)
IT Per assemblare la TV su un supporto a muro automatico che è fissato sul muro, deve tirare il braccio del supporto a
muro automatico orizzontalmente così che quello gira 90° come dimostra nella figura.
(Tirare sopra due angoli come ligira)
ES Para ensamblar el TV en el soporte automático, lo cual está fijado en la pared, usted debe estirar el brazo del
soporte automático horizontalmente de modo que el producto gire 90 grados como se muestra en la imagen.
(Tome las 2 esquinas superiores cuando lo estire.)
NL Om de TV op de aan de muur bevestigde automatische muursteun te monteren moet u de arm van de automatische
muursteun horizontaal trekken zodat deze in een 90 graden stand staat, zoals aangegeven in het figuur.
(Trek bij het draaien aan de twee bovenste hoeken.)
15
Motorized Slim Wall Mount Instruction Manual
A-4
A=20
Cm
4
Installation
How to assemble 200mm×200mm TV
EN The screws that have been fastened on the back of the main frame of the TV must be inserted into the bracket
found on the automatic wall mount (The inner hole on the VESA 200x200-TV plate).
This step requires more than two persons.
NL Hang de TV op aan de beugel door de schroeven die aan de achterkant van het hoofdframe van de TV zijn
vastgeschroefd in de gaten van de beugel te plaatsen. (Het binnenste gat van de VESA 200x200-TV plaat).
Deze stap dient door meer dan twee personen te worden uitgevoerd.
ES Cuelgue el TV dentro del bracket insertando los tornillos que han sido fijados en la parte trasera de la estructura
principal del TV dentro de los orificios en el bracket. (El orificio más interno de la placa VESA TV 200x200)
Este paso requiere de más de 2 personas.
IT Montare la TV sulla mensola inserendo le viti che erano fissate sul retro del quadro principale della TV nei
buchi della mensola. (il buco interno della VESA 200x200-TV piatto)
Per questa procedura richiedono più di due persone.
FR Suspendre le TV sur l’étagère en intégrant les vis déjà resserrées sur le dos du cadre principal du TV dans les
trous de l’étagère. (Le trou intérieur du TV plate VESA 200x200)
Cette procédure exige plus de 2 personnes.
DE Hängen Sie das TV-Gerät an die Halterung in dem Sie die Schrauben die auf der Rückseite des
Haupt-Rahmens der TV befestigt worden sind, in die Halterunglöcher einhängen.
(Das innenseitig liegende Loch auf der VESA 200x200-TV-Platte).
Dieser Verfahrensschritt erfordert mehr als zwei Personen.
16
Motorized Slim Wall Mount Instruction Manual
4
A-5
A=20
Cm
Leveler (W-D)
Installation
How to assemble 200mm×200mm TV
EN Assemble the TV and the auto wall mount together with 2 screws in the upper area and 2 screws in the lower
area, using +driver. Use the leveler to check again that it is horizontal.
If the automatic wall mount is not horizontally installed, the TV may tilt.
NL Monteer de TV en de automatische muursteun in zijn geheel aan elkaar met 2 schroeven in het bovenste gedeelte
en 2 schroeven in het onderste gedeelte, met de + schroevendraaier. Gebruik de waterpas om te controleren of de
TV horizontaal is.
Indien de automatische muursteun niet horizontaal is geinstalleerd, kan de TV kantelen.
ES Favor, ensamble completamente el TV y el soporte automático juntos con 2 tornillos en el área superior y
2 tornillos en el área inferior, utilizando el destornillador + . Luego, utilice el nivelador para verificar que el TV
esté horizontal.
Si el soporte automático no está instalado en forma horizontal, el TV puede inclinarse para un lado.
IT Assemblare completamente la TV e il supporto a muro auto insieme con le due viti nell’area sopra e 2 viti
nell’area sotto usando la cacciavite a croce. Usare la livella per assicurare che la TV sia orizzontale.
Se il supporto a muro automatico non è installato orizzontalmente, la TV può inclinare.
FR Veuillez assembler totalement le téléviseur et le support électrique ensemble avec les 2 vis dans le secteur
au-dessus et 2 vis dans le secteur au-dessous, utilisez +driver. Utilisez le niveau pour assurer qu’il est horizontal.
Si la fixation automatique murale n’est pas horizontalement installée, le téléviseur peut être penché.
DE Bitte befestigen Sie das TV-Gerät an der automatischen Wandhalterung mit 2 Schrauben im oberen Bereich
und 2 Schrauben im unteren Bereich. Verwenden Sie bitte die Wasserwaage um sich zu vergewissern,
dass das TV-Gerät horizontal hängt.
Falls die automatische Wandhalterung nicht horizontal angebracht ist, es kann vorkommen,
dass sich das TV-Gerät seitlich neigt.

17
Motorized Slim Wall Mount Instruction Manual
4
B-1
A=30
Cm
M-K
M5Х6mm
Installation
How to assemble 300mm×300mm TV
EN Firmly attach the separately purchased wing plates, both left and right, (A-D) onto the automatic wall mount with
3 screws (M-K) on each wing, total of 6 screws, as shown in picture above.
DE Wie auf der Abbildung zu sehen ist, befestigen Sie die separat erworbenen zusätzlichen Tragplatten
links und rechts (A-D) an die automatische Wandhalterung mit jeweils 3 Schrauben (M-K) an jeder Platte,
insgesamt 6 Schrauben.
FR Attachez sûrement la plaque d’ailes séparément achetée, à la fois à droite et à gauche (A-D) sur la fixation
automatique mural avec 3 vis (M-K) sur chaque aile, total de 6 vis comme le montre dans le tableau au-dessus.
IT Attaccare bene ala laminata acquistata separatamente, sinistra e destra(A-D) sul supporto a muro automatico
con 3 viti(M-K) su ogni ala, in totale di 6 viti come dimostra nella figura sottostante.
ES Fije firmemente las dos alas, derechas e izquierdas (A-D), compradas aparte, dentro del soporte automático
con 3 tornillos (M-K) en cada ala, en total de 6 alas, como se muestra en la imagen.
NL Bevestig de apart te kopen vleugel platen, zowel links als rechts (A-D), stevig aan de automatische muursteun
met 3 schroeven (M-K) aan elke plaat, dus in totaal 6 schroeven, zoals in bovenstaand figuur aangegeven.

18
Motorized Slim Wall Mount Instruction Manual
4
B-2
A=30
Cm
W-A
M6Х50mm
Installation
How to assemble 300mm×300mm TV
Leveler (W-D)
EN After inserting the anchors (W-B) into the drilled holes, tighten the screws (W-A) in the 4 required positions.
Ensure to maintain horizontal, when tightening the screws.
This step requires more than 2 persons. The product may fall and cause product damage and/or serious injury.
NL Draai na het plaatsen van de pluggen (W-B) in de geboorde gaten de schroeven (W-A) aan op de 4 vereiste
plaatsen. Zorg dat de automatische muursteun horizontaal is bij het aandraaien van de schroeven.
Deze stap dient door meer dan twee personen uitgevoerd te worden. Het product kan vallen en beschadigd raken en/of
een verwonding veroorzaken.
ES Luego de insertar los anclajes (W-B) dentro de los orificios perforados, fije el tornillo (W-A) en 4 posiciones
requeridas. Favor, verifique que el soporte automático esté horizontal mientras fije el tornillo.
Este paso requiere de más de 2 personas. De otra manera, el aparato puede caer o sufrir serios daños.
IT Dopo aver inserito dei fermi(W-B) nei buchi forati, fissare bene le viti(W-A) nelle 4 posizioni richieste.
Assicurare che il supporto a muro automatico sia orizzontale mentre fissa le viti.
Per questo processo richiedono più di 2 persone. Altrimenti, il prodotto può cadere o può danneggiare il prodotto e\o seri danni.
FR Après avoir inséré des ancres (W - B) dans les trous forés, resserrez les vis (W-A) dans les 4 positions définies.
Soyez assuré que la fixation automatique murale est horizontale lors du resserrement des vis.
Cette étape exige plus de 2 personnes. Le produit peut tomber ou causer des dommages et/ou de sérieux préjudices.
DE Nach dem Einführen der Dübel (W-B) in den Löchern ziehen Sie die Schrauben (W-A) in den 4 erforderlichen
Stellen an. Vergewissern Sie sich, während Sie die Schrauben anziehen, dass die automatische Wandhalterung
horizontal hängt.
Dieser Verfahrensschritt erfordert mehr als zwei Personen. Das Gerät könnte herabfallen und beschädigt werden
und/oder schwere Verletzungen könnten hervogerufen werden.

19
Motorized Slim Wall Mount Instruction Manual
4
B-3
A=30
Cm
Installation
How to assemble 300mm×300mm TV
From M-A to M-J
Washer(N-A)
EN When tightening the screws on the TV panel, the corresponding screws must be selected because the size and
the length of the screws differ for each TV specification (From M-A to M-J)
Insert washers under each screw and tighten the screws at 2 places in the upper area. When tightening the screws,
leave a space of 5mm.
DE Beim Anziehen der Schrauben an der TV-Fläche, müssen die entsprechendenSchrauben gewählt werden, weil Größe
und Länge der Schrauben unterschiedlich sind, abhängig von der jeweiligen TV-Spezifikation.(Von M-A zu M-J).
Legen Sie jeweils eine Scheibe unter jede Schraube und ziehen Sie die zwei Schrauben im oberen Bereich an.
Beim Anziehen der Schrauben, lassen Sie einen Abstand von 5 mm.
FR Lors du serrement des vis sur le panneau du téléviseur, les vis correspondants doivent être sélectionnées parce
que les tailles et les longueurs des vis sont différentes en fonction des spécifications du TV (De M-A à M-J).
Insérez une rondelle sous chaque vis et resserrez les 2 vis à l’endroit au-dessus du TV.
Laissez un espace de 5mm lors du forage des vis.
IT Quando fissa le viti sul pannello TV, le viti corrispondenti devono essere selezionate perché le misure e le
lunghezze delle viti sono diverse per ogni TV specificata(Da M-A a M-J).
Inserire una rondella sotto ogni vite e fissare le 2 viti all’area sopra della TV.
Lasciare uno spazio di 5mm, quando fissa le viti.
ES Cuando fije los tornillos en el panel del TV, deben ser seleccionados los tornillos correspondientes al patrón correcto
ya que los tamaños y los largos de los tornillos difieren para cada especificación del TV (desde M-A hasta M-J)
Inserte la arandela debajo de cada tornillo, la que sea del tamaño correcto para el TV y fije el tornillo en 2 lugares del
área superior y otros 2 del área inferior. Mientras fije el tornillo, deje un espacio de 5mm.
NL Bij het aandraaien van de schroeven op het TV paneel moet de corresponderende schroef gekozen worden,
omdat de afmeting en lengte van de schroeven verschillen afhankelijk van de TV specificaties (M-A tot M-J).
Plaats een ring met de juiste afmeting voor de TV onder elke schroef en draai de schroef aan op 2 plaatsen in het
bovenste gedeelte en 2 plaatsen in het onderste gedeelte.
Laat een speling van 5mm over bij het aandraaien van de schroeven.

20
Motorized Slim Wall Mount Instruction Manual
4
B-3
A=20
Cm
5mm
Installation
If the screw is too long or short when tightening it on the TV, it may cause safety risks.
EN
Si lavis est trop longuesou trop courte, il peut causer des dommage et/ou de sérieux
préjudices.
FR
Wenn die Schraube beim Anziehen am TV zu lang oder zu kurz ist, könnte das
Produkt beschädigt werden und/oder schwere Verletzungen hervorgerufen werden.
DE
Se la vite è troppo lunga o troppo corta, questo può causare danno del prodotto e/o seri danni.
IT
Si el tornillo es muy largo o muy corto cuando se fije en el TV, esto puede sufrir serios daños.
ES
Als de schroef te lang of te kort is, kan dit het product beschadigen en/of een verwonding veroorzaken.
NL
N-D
Hoe een TV met ronde achterkant te monteren
NL
Cómo ensamblar el TV tipo esférico
ES
Come assemblare un TV, tipo rotondo
IT
Comment assembler un TV de type ronde
FR
Wie ein Runder TV-Typ installiert wird
DE
How to assemble a Round type TV
EN
How to assemble 300mm×300mm TV
Table of contents


