Sepura SC21 Series User manual

User Guide
SC21 Series hand-portable radio

Original Instructions: ENGLISH
Document Number: MOD-17-2158
Issue 7.0
Copyright
© Sepura Limited 2002–2019 All rights reserved.
No part of the information contained herein and the other referred documents may be copied,
distributed or transmitted by any means to any other party without prior written permission of Sepura
Limited. The distribution of this document may require a Non-Disclosure Agreement (NDA) between
Sepura Limited and their agents or customers.
This document, the referred documents and the described product are considered protected by
copyright according to the applicable laws.
Disclaimer
Although every reasonable effort has been made to ensure the accuracy of the information contained
herein and any other referred document, this should not be construed as a commitment on the part of
Sepura Limited and the liability of Sepura Limited for any errors and omissions shall be limited to the
correction of such errors and omissions. Sepura Limited welcomes any comment and feedback as a
way to improve any delivered documentation. The information contained herein has been prepared
for the use of appropriately trained personnel, and it is intended for the purpose of the agreement
under which the information is submitted. Any party using or relying upon this information assumes full
responsibility for such use and in no event shall Sepura Limited be liable to anyone for especial,
collateral, incidental, or consequential damages in connection with or arising out of the use of this
information. The information or statements given in these documents regarding the suitability, capacity
or performance of the mentioned hardware or software products cannot be considered binding but
shall be defined in the agreement made between Sepura Limited and the customer. Sepura Limited
reserves the right to revise these documents and to make changes to its content at any time, without
prior notification.
Trademarks
The Sepura logo and some product branding logos and names are registered trademarks of Sepura
Limited.
All other trademarks appearing in this document are the property of their respective owners.
Software license agreement
CAREFULLY READ THE LEGAL AGREEMENT CORRESPONDING TO THE LICENSE YOU
PURCHASED, WHICH DESCRIBES THE GENERAL TERMS AND CONDITIONS FOR THE USE OF
THE LICENSED SOFTWARE.
Contact Details
Sepura Limited
9000 Cambridge Research Park
Beach Drive
Waterbeach
Cambridge
CB25 9TL
United Kingdom
sepura.com

General information
This user guide describes the default operation and features of the SC21 Series radio. Your service
provider or organisation may have customised your radio to optimise its performance to suit your
individual needs. There may be differences between this guide and the way your product operates.
Contact your service provider or organisation for information about the customisation of your radio.
Safety
Before operating the SC21 Series hand-portable radio, read the safety instructions contained in the
Product Safety Guide (SPR-DOC-00170) supplied with the product.
Regulatory
European regulations
Sepura declares that its TETRA radio products are compliant with the essential requirements and
other relevant provisions of the European Radio Equipment Directive 2014/53/EU on the
harmonisation of the laws of the Member States relating to the making available on the market of
radio equipment and repealing Directive 1999/5/EC. These products are also compliant with directive
2011/65/EU having been designed and manufactured to the RoHS requirements.
Simplified EU declaration of conformity
Sepura declares that the radio equipment types SC21, SC20 and STP9000 series hand-portable
radios and SRG3900 mobile radio are in compliance with Directive 2014/53/EU. The full text of the
EU declaration of conformity is available at the following internet address:
www.sepura.com/support/compliance-documents.
Waste Electrical and Electronic Equipment disposal information
This symbol on the product or its packaging indicates that this product must not be disposed of as
household or commercial waste. Some countries have set up collection and recycling systems for
waste electrical and electronic products. By ensuring that this product is disposed of correctly, you
will help prevent potentially negative consequences for the environment and human health, and help
conserve natural resources. Please dispose of your waste product according to your national and
local regulations. Contact your service provider or Sepura for information on how to return this product for
waste disposal.
Disposing of waste batteries
Sepura radios are supplied with a rechargeable battery. This symbol on the battery and its
packaging indicates that it must not be disposed of with household or commercial waste. Please
dispose of your waste batteries according to your national and local regulations. Contact your
service provider or Sepura for advice on disposing batteries in your area of the world.
User Guide i

Federal Communication Commission (FCC) Regulations
Sepura TETRA radios generate, use and radiate RF energy. Radios that comply with the limits for
a Class A digital device, pursuant of part 15 of the FCC rules are identified by an FCC certification
ID label (located under the battery). Changes or modifications not expressly approved by the party
responsible for compliance could void the user’s authority to operate the equipment (rule part
15.21). This device complies with Part 15 of the FCC rules. Operation is subject to the following two
conditions: (1) This device may not cause harmful interference, and (2) this device must accept any
interference received, including interference that may cause undesired operation.
US and Canada Markets
FCC radiation exposure statement
This radio is intended for use in occupational/controlled applications where users have been made
aware of the potential risks for exposure and can exercise control over their exposure. This product
is not authorised for general population, consumer or similar use. This transmitter must not be co-
located or operated in conjunction with any other antenna or transmitter.
IC RSS warning
The term “IC:” before the certification/registration number only signifies that the ISEDC technical
specifications were met.
IC radiation exposure statement
This radio is intended for use in occupational/controlled applications where users have been made
aware of the potential risks for exposure and can exercise control over their exposure. This product
is not authorised for general population, consumer or similar use. This transmitter must not be co-
located or operating in conjunction with any other antenna or transmitter.
ii SC21 Series hand-portable radio

CONTENTS
Safety i
Regulatory i
Your radio at a glance 1
Battery 3
Charging the battery 4
Charging a 'flat' battery 5
Fitting the battery 5
Removing the battery 5
Using Sepura approved batteries 6
Controls & indicators 8
Navi-knob 8
Navigation Keys 8
Soft keys 9
Context keys 9
Status icons 10
LED indicators 14
Emergency button 14
Getting Started 15
Antenna 15
Fitting a Smartcard 16
Power on 18
Power off 18
Locking and unlocking the keypad 19
Home screen 20
Shortcut Bar 21
Notifications 21
Menu 22
SmartMenus 23
Help 23
Emergency operation 25
Making an Alarm call 26
Receiving an Alarm call 26
Clearing an Alarm call 26
Power on Alarm call 27
Sound 28
Adjusting the volume 28
Loudspeaker on/off 28
Loudspeaker high/low audio mode 28
Whisper mode 29
Audible tone alerts 29
User Guide iii

Vibration alerts (Haptics) 29
Personalising your radio 31
Invert the display 31
Adjusting the backlight 31
Day/Night mode 32
Adjusting text and icon size 32
Setting the display language 33
Menu style 33
Time and Date 35
Talkgroups and folders 36
Special folders 37
Talkgroup Selection Mode 38
Typical folder arrangement 39
Selecting a talkgroup 39
Folder Selection Mode 44
Contacts 52
Searching and filtering contacts 52
View contact details 53
Creating contacts 53
Editing contacts 54
Delete all contacts 55
Calls 56
Call types 56
Call History 57
Group calls 58
Individual calls 59
Broadcast calls 62
Quick Calls 62
Smart Calls 62
Modifying your call setup 63
Changing the behaviour of the PTTduring TMO group calls 64
Text entry 66
Cursor movement 66
Character sets 67
Chinese character sets 67
Messages 68
Message Inbox 68
Opening messages 69
View message details 69
Reply to a message 70
Saved messages 71
SDS report request 74
Picture messages 75
iv SC21 Series hand-portable radio

Paging alerts 75
Networks 76
Authentication 76
Change Network 76
Transmit Inhibit 77
Adjusting the DMO power transmission level 78
Fallback Mode 78
Operating Modes 79
DMO Mode 79
Repeater Mode 81
Callout alerts 85
Responding to Callouts 85
Callout display 89
Group calls to Callout group 91
Information Phase 91
Features 93
Privacy Screen 93
Connector Protector 93
User profiles 94
Man Down 95
Lone Worker 96
WAP 97
Using WAP 97
Browser menu 97
Navigation menu 98
Settings 99
History menu 100
Using bookmarks 101
Call handling 102
Location Services 104
Position 104
Direction 105
Reporting options 105
GNSS selection 105
Bluetooth® 106
Bluetooth® on/off 106
Audio devices 107
Data devices 109
Modify connected devices 110
Security 112
PIN entry 112
Change PIN 112
User Guide v

Unlocking the radio after incorrect PIN entry 112
End-to-End Encryption 113
Zeroising 114
Asset management 115
Labelling 115
RFID tag 116
Customising your radio 116
Revert radio settings to customisation settings 117
Accessories 119
Accessory profiles 119
Belt Clip 121
Shirt/Pocket clip 122
Uniform stud 123
Fitting an accessory 124
vi SC21 Series hand-portable radio

Your radio at a glance
1
2
3
4
5
7
6
8
9
10
11
12
13
14
15
16
20
19
18
17
21
22
23
24
25
Item Description
1Emergency Button. Press and hold (2 seconds) to initiate an Alarm call.
2Antenna.
3Rugged Accessory Connector (sRAC). Provides connection for accessories.
4Centre context key (Groups, Status, Profiles). Press to activate the feature or option that
appears directly above the key.
5Right context key. Press to activate the feature or option that appears directly above the key.
6Red (Cancel/Home) key. Press and hold (2 seconds) to power on your radio. From the Home
screen, press and hold (4 seconds) to power off. Press and hold (2 seconds) to return to the Home
screen from any other screen.
7Alphanumeric keypad with backlight and Loudspeaker behind used for half-duplex calls.Keys 0–
9, # and * are programmable soft keys.
8Microphone used for full-duplex calls.
9Navigation keys. Press to scroll through lists and move the cursor when writing text.
10 Green (Select/Send) key. Press to initiate a half-duplex individual call or a full-duplex call. Press to
select a menu item or action a function, or send a status or text (SDS) message.
User Guide 1

Item Description
11 Left context key. Press to activate the feature or option that appears directly above the key.
12 Colour display with backlight.
13 Earpiece and microphone. Earpiece is active during full-duplex calls when the radio is held like a
mobile phone against the ear. Speak into the microphone during half-duplex calls when the radio is
not attached to an audio accessory and held in the hand.
14 Blue LED (indicator). Indicates a missed event such as a call, Callout or message. Also indicates
Bluetooth® status.
15 Tri-colour LED (indicator). Indicates various operational states.
16 Navi-knob. Rotate to adjust the speaker volume.
17 Side Button (A/B) (soft keys). Press to activate a programmed feature.
18 PTT (Press-to-talk) button. Press and hold to talk during half-duplex calls such as a group call.
Release to listen to other radio users.
19 Side Button (C)(soft key). Press to activate a programmed feature.
20 Digital Accessory Connector (sDAC) used to charge the battery, program the radio and attach
digital accessories.
21 Battery.
22 External Antenna Connector used with a car kit to attach an external antenna to the radio.
23 RFID tag for monitoring and auditing purposes.
24 Accessory attachment mounting points used to connect Klickfast accessories designed for
securing the radio during use.
25 Loudspeaker used during half-duplex calls when an audio accessory is not connected and the
radio is held in the hand.
2 SC21 Series hand-portable radio
Battery
For your safety, inspect the battery regularly for any signs of damage, such as cracks or surface
damage caused by an impact or the battery being dropped. Fit a new battery if there are any signs of
damage.
Warning! Risk to personal safety. Sepura TETRA radios have been tested and
certified using Sepura approved batteries. The use of non-approved batteries may
damage the product, will result in non-compliance with regulatory requirements,
compromise the product safety ratings including SARS, reduce the length of operating
time and will invalidate the product warranty.
Checking the battery charge
Always check the amount of battery charge before lengthy periods of operation. A fully charged
battery should provide continuous operation for a full shift, depending on a number of operational
factors such as how the radio is operated, the operating environment (temperature and network
signal strength) and the condition of the battery. When the radio is powered on, the amount of charge
remaining may be displayed as a percentage (%) on the screen.
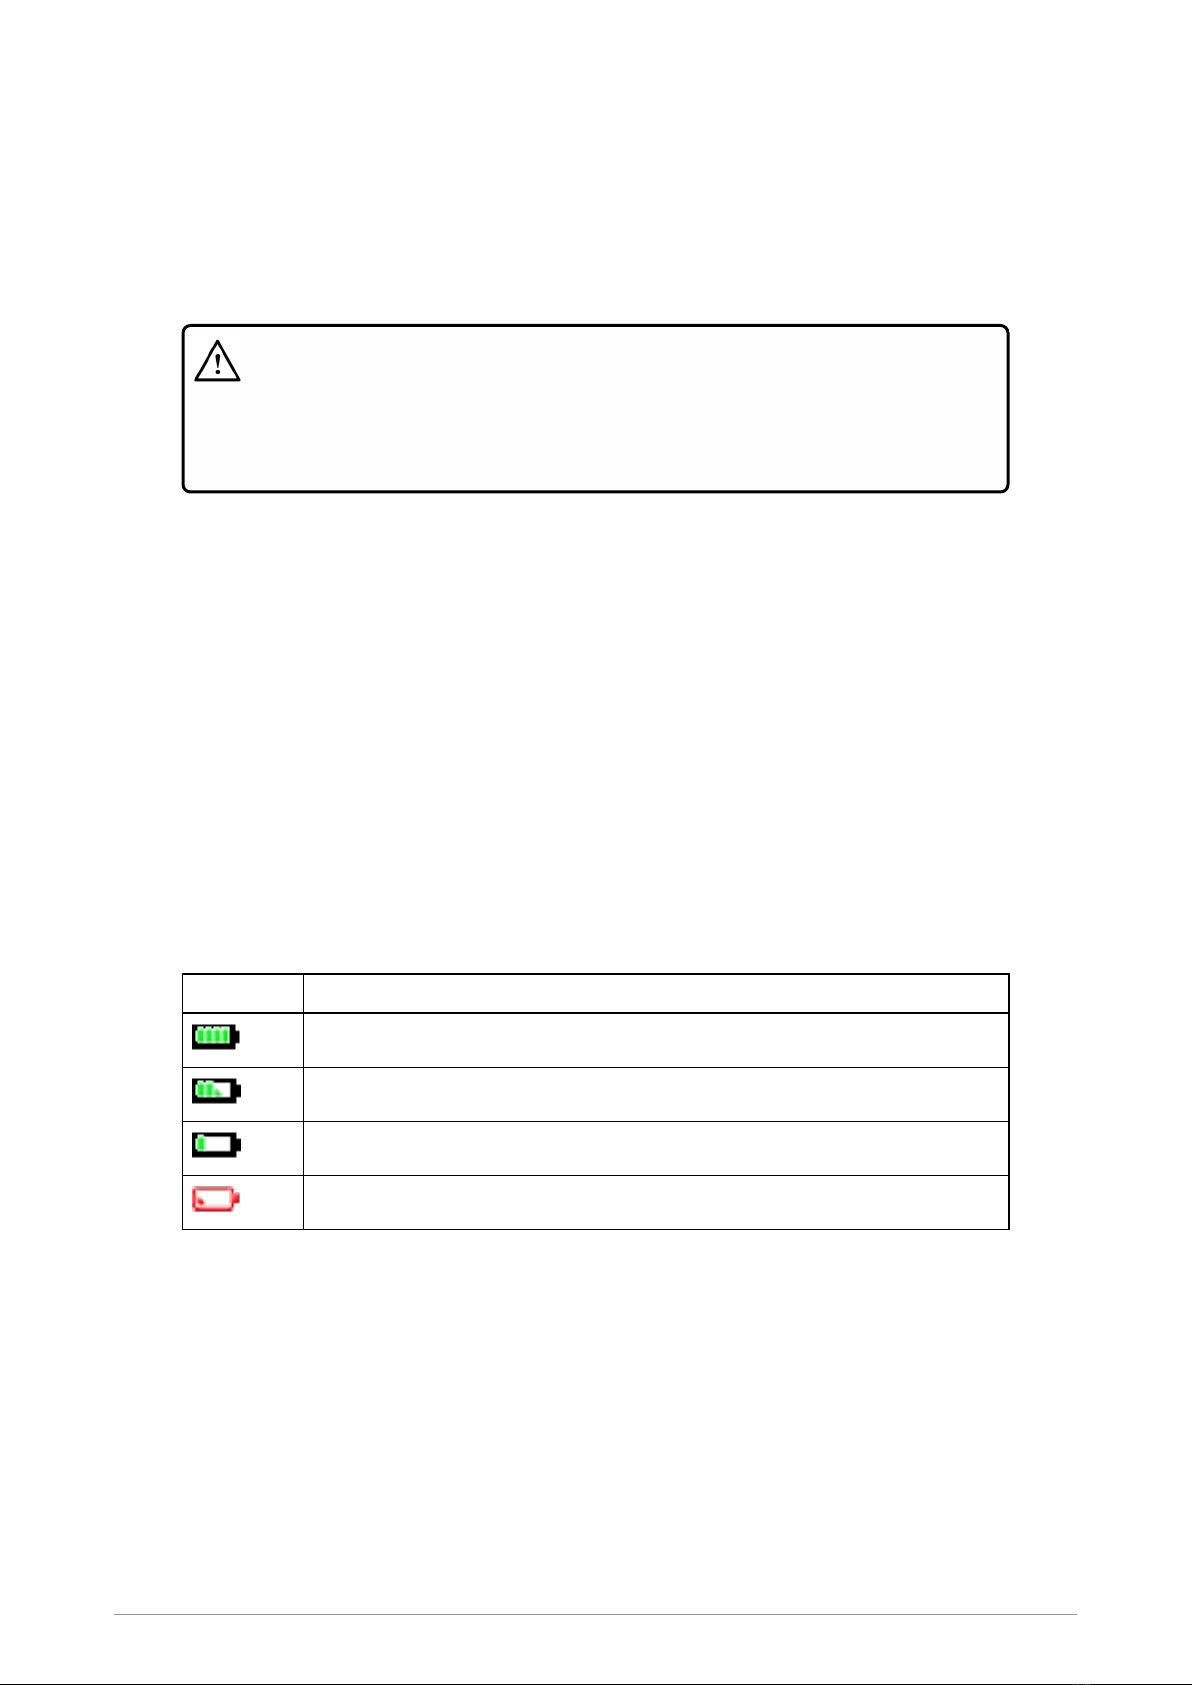
Battery charge indicators
A battery meter appears on the status line at the top of the radio display. The meter consists of 4 bars
comprising 8 segments that fill and empty corresponding to the estimated amount of charge
remaining.
Icon Description
Battery is fully charged.
Battery is 50% charge capacity.
Battery has >12% charge remaining.
Battery charge less than 12% charge remaining.
Optimising battery life
A fully charged battery should last a full shift (approximately 12 hours) but this depends on a number
of operational factors, such as how the radio is operated, the operating environment (temperature
and network signal strength) and the condition of the battery.
Try the following to help you optimise battery life on a daily basis:
User Guide 3

Ensure that batteries are fully charged at the start of a shift.
Decrease the amount of time the backlight stays lit between key presses (see Adjusting the
backlight on page31).
Keep your speaker audio volume to a minimum (see Adjusting the volume on page28).
Reduce the length of time the radio is transmitting and keep DMOor telephone type calls to a
minimum because they cause higher current consumption.
Shorten the GPS reporting intervals if enabled (see Reporting options on page105).
Charging the battery
Your radio is powered by a rechargeable battery. The battery may be recharged many times but it
will eventually need replacing to ensure continuous maximum performance from your radio.
First time battery charging
New batteries (Standard battery part no. 300-01852 and High Capacity battery part no. 300-01853)
are supplied in 'storage mode' which means they have a minimum amount of charge for storage
purposes. Before using a new battery for the first time it must be fully charged to reactivate it. If the
battery is used before it is reactivated (fully charged) the radio may not power on, or may indicate a
low battery status icon or low level of charge.
Battery chargers
Only use Sepura approved battery chargers. Use of non-approved chargers may not fully charge the
battery or damage it. Always read the user documentation supplied with the charger for additional
safety instructions and how to use it.
Charging methods
The radio may be powered on or off during charging.
Attach the Charger cable to the connector at the base of the radio or place the radio with battery
attached into a charging dock. During charging, the tri-coloured LED on the radio indicates the
charging progress and the charging icon appears on the status line, providing there is sufficient
charge in the battery to support this function.
Status LED Description
Flashing Orange Battery temperature is either too hot or cold to commence charging.
Solid Orange Charging in progress.
Solid Green Charging complete.
Solid Red Battery has failed to charge and may be not be chargeable. Contact your
service provider or Sepura.
The battery may be charged separately from the radio using a battery-only charger.
4 SC21 Series hand-portable radio

Charging a 'flat' battery
If the battery is completely 'flat' (without charge) during storage or after a long period of non-activity, it
may fail to recharge or stop charging after 20 minutes. If this happens, disconnect and then
reconnect the charger (or power off the charger, then power on) to reset the battery.
NOTE: Do not charge a flat battery attached to the radio. During charging, the radio
will attempt to power on when the battery charge reaches a certain capacity, which
will continually drain the battery of its charge. Always charge a flat battery with the
radio powered off or using a battery charger.
Fitting the battery
To fit the battery, insert the battery into the battery compartment as shown. Press the battery
downwards until it clicks into position.
Fitting the battery when a belt clip is attached
If a Belt clip or Shirt/Pocket clip is fitted to the radio, lift the Belt clip or Shirt/Pocket clip before
attempting to fit the battery. Do not attempt to insert the battery into the battery compartment
sideways under the clip. This may result in damage to the radio and the belt clip.
Removing the battery
Power off before removing the battery.
User Guide 5

Caution! Risk of damage to the radio. If a Belt clip or Shirt/Pocket clip is fitted to the
radio, lift the Belt clip or Shirt/Pocket clip before attempting to remove the battery. Do not
attempt to remove the battery from the battery compartment sideways under the clip. This
may result in damage to the radio and the belt clip.
Push the safety latch on the bottom of the battery. Lift the battery upwards and remove.
Using Sepura approved batteries
When the radio is powered on, it checks the authenticity of the battery. There are a number of battery
management features that only work when a genuine Sepura battery is fitted to the radio, including:
the remaining battery charge appears as a percentage when your radio is powered on
[customisable];
battery meter icons, showing the remaining battery charge;
a low battery warning appears when charge is low; and
allowing the user to check the battery information, such as its authenticity, remaining charge
and serial number [customisable].
If a non-approved battery is used, the radio displays a warning message when powered on. Press
any key to clear the message.
Caution! Risk of damage to the radio. Non-approved batteries may not have inbuilt safety
protection features, and could potentially damage the radio (invalidating any product
warranty) and affect the radio's safety and IP compliance ratings.
Getting information about your battery
You can view information about the battery attached to the radio, such as the remaining battery
charge, whether the battery is authenticated (a genuine Sepura battery) and the battery serial
number [customisable].
Select Menu > Options > Battery Information.
The display shows:
Charge—the current remaining charge given as a percentage
Authenticated/Unauthenticated—a Sepura/non-Sepura battery is fitted
serial number—the serial number of the battery
6 SC21 Series hand-portable radio

If a non-Sepura battery is fitted, the Charge is reported as 0%, the battery is marked as
Unauthenticated and the serial number is not shown.
User Guide 7

Controls & indicators
Your radio has a number of controls and indicators.
Navi-knob
The Navi-knob is a continuous rotating knob that in its normal mode is used to adjust the volume. The
Navi-knob can also be used to perform various other functions.
To do this… Do this…
Adjust loud speaker volume (or
enable/disable Whisper Mode
[customisable])
Rotate Navi-knob
Move cursor and select characters (in text
entry mode)
Rotate Navi-knob in Text Entry Mode
or Editing Mode
Scroll through available talkgroups From the Home screen, press
Groups + rotate the Navi-knob
Scroll through available Status Messages From the Home screen, press
Groups 2 times + rotate the Navi-
knob
Scroll through available User Profiles From the Home screen, press
Groups 3 times + rotate the Navi-
knob
Navigation Keys
Your radio has four navigation keys (left/right/up/down).
Key Action
Up/Down Use to move the scroll bar up and down to see more information.
Scroll a list of options.
To independently adjust the volume of accessories. See Independent
volume control feature on page1.
Down Open the top level menu from the Home screen.
Up Repeated presses moves upwards through the options and menu levels until
the top level menu is reached.
Left/Right Moves between options on the top level menu.
Moves through the text characters for selection when writing.
8 SC21 Series hand-portable radio

NOTE: When the display is inverted (flipped upside down) the left and right navigation
keys work in opposite directions.
Soft keys
Some keys on your radio may be customised to provide one-touch access to regularly used features.
These programmable keys are referred to as soft keys.
To activate the soft key function:
assigned to a programmable soft key, press and release
assigned to other keys (such as the Cancel/Home and Select/Send keys), press and hold for
one second
The following keys can be customised as soft keys:
the Select/Send key
the Cancel/Home key
the Emergency Button (if not assigned to Emergency operation)
the programmable side buttons
all radio keypad keys (1–9, *, 0, #,)
NOTE: During full-duplex PSTN/PBX calls, take care when trying to activate soft
keys (designated as 0–9,* and # keys) because they also generate DTMF tones.
There are many functions that can be assigned to a Soft key. Some functions are activated
immediately, such as the keypad lock/unlock or loudspeaker on/off. There are some special functions
that use a ‘navigate to screen’ function. This means that on activation, a screen displays and you
need to take some additional action, such as activating a SmartMenu where you have to select an
option.
Context keys
Your radio has a left, centre and right context key which you use to select options displayed adjacent
to them.
Context labels appear at the bottom of the screen, directly above each context key. These labels
show the action of the key when it is pressed; either activating a feature or performing a function such
as clearing a call (Clear) or selecting an option (Select).
The labels and actions of the context keys in the Home screen are:
Context
key Label Action
Left Menu Press to enter the main menu.
User Guide 9
Context
key Label Action
Centre Groups Press to change the talkgroup. See Selecting a talkgroup on
page39
Status Press 2 times to send a status message. See Messages on
page68.
Profiles Press 3 times to select a user profile. See User profiles on
page94
Right Shortcut Press to open the Shortcut Bar to quickly access regularly used
features or clear a notification. See Notifications on page21 and
Shortcut Bar on page21
Set context key shortcut
The shortcuts available for selection as shortcuts are set during the customisation of your radio.
NOTE: You can only use the left and right context keys and soft keys on the top level
screen (Home Screen).
To set a context key Home Screen shortcut
1. Open the Home screen.
2. Press and hold the context key until the Context Key Selection box appears.
3. Navigate to the shortcut in the list and press Select.
The key is reconfigured and the new shortcut label appears in the Home screen.
Status icons
Icons appear on the status line (at the top of the display) when the radio is engaged in certain
activities or when certain functions are active.
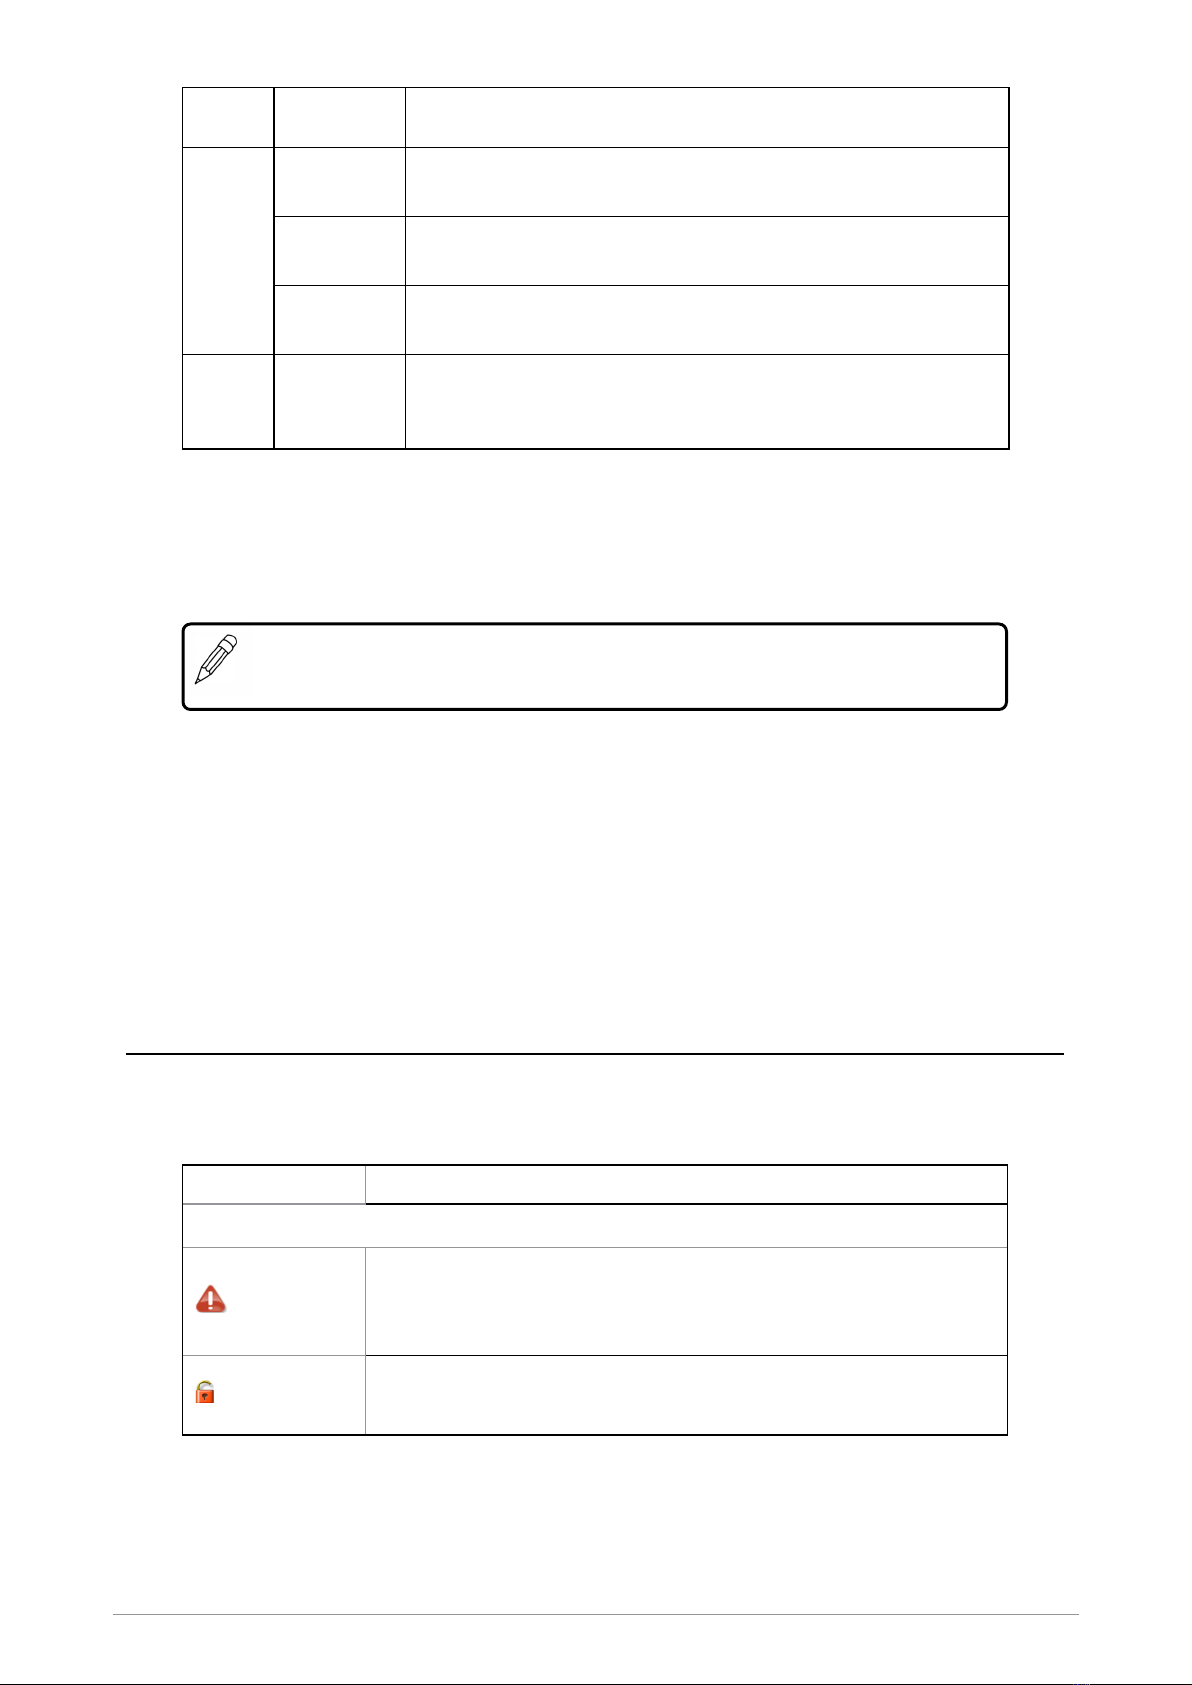
Icon Description
Security and Emergency
Emergency
Appears when emergency operation mode is active on your radio
and an Alarm call is in progress.
Air Interface Encryption disabled
Calls and Callouts will not be encrypted.
10 SC21 Series hand-portable radio

Icon Description
E2E Encryption enabled
The Secure Communications icon indicates that the selected
talkgroup is customised for End-to-End Encryption. In other
words, calls you make by pressing the PTT button are End-to-End
Encrypted.
E2E Encryption disabled
Indicates that the call is not encrypted.
Key agreement
Indicates that a cryptographic key agreement is in progress
between the radio and the Key Management Centre (KMC) on the
network. (See End-to-End Encryption on page113.).
Trunked Mode Operation (TMO)
Outgoing TMOcall in progress
You are in a call that you initiated.
Incoming TMO call in progress
You are in a call that was initiated by another person or your
dispatcher on the TMO network.
Missed incoming TMO call
You have missed an incoming TMO call. The blue LEDflashes.
Scanning enabled
You radio is scanning (listening) to all available talkgroups within
your scan list for activity.
Broadcast Call
A high-priority group call (point-to-multi-point) initiated by your
Dispatcher to all network radio users. You cannot reply to the
caller.
Direct Mode Operation (DMO)
Incoming DMO call
You are in a DMO call that was initiated by another radio user.
Outgoing DMO call in progress
You are in a call to another radio user.
DMOGateway detected
Appears when the radio has detected a DMO gateway. The icon
disappears when the radio moves out of range of the gateway.
DMO Gateway off
DMO Repeater detected
Appears when a DMO repeater is detected and the radio can
communicate with any other radios in the selected DMO talkgroup
which are also in range of the repeater.
User Guide 11

Icon Description
Repeater ignored
Repeater mode off
DMO transmission power. The radio has been set to a higher
transmission power than the normal transmission power level.
DMO transmission power. The radio has been set to a lower
transmission power than the normal transmission power level.
General icons
Migrated
Your radio is registered on a Visited Network.
Signal Strength
Shows the current signal strength. More bars indicate a stronger
signal.
Battery Strength
Indicates the level of charge in your battery. More bars indicates
more charge.
Low battery warning
Appears when there is less than 12% charge remaining in the
battery.
Keypad locked
Transmit Inhibit
Indicates that you have activated transmit inhibit and the radio is
unable to transmit (overridden when Emergency mode is
activated).
Privacy mode active during a call
Appears for the duration of a call when Privacy mode has been
activated to prevent any other calls interrupting an important
individual call.
Pre-emptive Call
If pre-emptive priority calls have been customised on the radio.
The icon is displayed if you or another user has initiated a pre-
emptive call on the network.
Covert operation mode enabled
The radio turns off any visual and sound alerts, and displays this
icon when covert operation mode is enabled.
Group Focus
Appears when Group Focus is enabled, preventing any calls from
other talkgroups (other than the selected talkgroup) connecting to
the radio.
12 SC21 Series hand-portable radio
Other manuals for SC21 Series
4
This manual suits for next models
1
Table of contents
Other Sepura Portable Radio manuals

Sepura
Sepura TETRA STP9000 Series User manual

Sepura
Sepura STP8000 Series Operation manual

Sepura
Sepura SC2024W User manual

Sepura
Sepura TETRA SC2128W User manual

Sepura
Sepura SC21 Series User manual

Sepura
Sepura SBP8000 User manual

Sepura
Sepura SC20 series User manual

Sepura
Sepura TETRA STP8 Series User manual

Sepura
Sepura STP8000 Series User manual

Sepura
Sepura SC21 Series User manual


