Sepura SC21 Series User manual

Level 1 Service Guide
SC21 Series hand-portable radio
Models:
SC2120 (380 - 430MHz)
SC2124 (403 - 470MHz)
SC2128 (806 - 870MHz)

Original Instructions: ENGLISH
Document Number: MOD-18-2216
Document Issue: 1.2
Copyright
© Sepura Limited 2002–2019 All rights reserved.
No part of the information contained herein and the other referred documents may be copied,
distributed or transmitted by any means to any other party without prior written permission of Sepura
Limited. The distribution of this document may require a Non-Disclosure Agreement (NDA) between
Sepura Limited and their agents or customers.
This document, the referred documents and the described product are considered protected by
copyright according to the applicable laws.
Disclaimer
Although every reasonable effort has been made to ensure the accuracy of the information contained
herein and any other referred document, this should not be construed as a commitment on the part of
Sepura Limited and the liability of Sepura Limited for any errors and omissions shall be limited to the
correction of such errors and omissions. Sepura Limited welcomes any comment and feedback as a
way to improve any delivered documentation. The information contained herein has been prepared
for the use of appropriately trained personnel, and it is intended for the purpose of the agreement
under which the information is submitted. Any party using or relying upon this information assumes full
responsibility for such use and in no event shall Sepura Limited be liable to anyone for especial,
collateral, incidental, or consequential damages in connection with or arising out of the use of this
information. The information or statements given in these documents regarding the suitability, capacity
or performance of the mentioned hardware or software products cannot be considered binding but
shall be defined in the agreement made between Sepura Limited and the customer. Sepura Limited
reserves the right to revise these documents and to make changes to its content at any time, without
prior notification.
Trademarks
The Sepura logo and some product branding logos and names are registered trademarks of Sepura
Limited.
All other trademarks appearing in this document are the property of their respective owners.
Contact Details
Sepura Limited
9000 Cambridge Research Park
Beach Drive
Waterbeach
Cambridge
CB25 9TL
United Kingdom
sepura.com
Foreword
This manual covers all models of the SC21 Series hand-portable radio and is provided exclusively to
Sepura customers that have been authorised to maintain and repair the product.
This guide contains all the necessary information to maintain the radio in good working condition and
replace external parts. All servicing should be performed by a competent, trained and qualified
person who has obtained suitable training provided by Sepura.
Do not attempt to dismantle this product beyond the instructions described in this Service Guide. Any
product requiring repairs beyond those listed in this Service Guide must be retuned to an approved
Sepura service centre for repair. Contact your service provider or Sepura for information about
returning this product for repair.
The person performing maintenance and repairs on the radio should have a basic understanding of
how to operate the product. For information on how to operate the radio, refer to the related
documents for the product.
Document history
Printed copies may not be the latest version of this document. Always check that you have the latest
version of this document before attempting any repairs.
The following major changes have been implemented in this document.
Edition Description of Change Date
1.0 First release 03/2018
1.1 Minor updates to parts list. Updated document template. 06/2018
1.2 UV band model radio added (SC2124). Updated and additional parts for IP67 rating. 02/2019
Related documents
The following documents are related to this product and may be of use during the servicing of the
product. Contact Sepura Customer Support (Customer.Support@sepura.com) for the latest
versions of these documents.
Document title Document Number
SC21 Hand-Portable Radio User Guide MOD-17-2158
SC21 Hand-Portable Radio Quick Start Guide MOD-17-2176
SC21 Hand-Portable Radio Quick Reference Guide SPR-DOC-03312
Sepura TETRAProduct Safety Guide SPR-DOC-00170
Sepura Product Care Guide PD-T201405
Battery Care & Management MOD-13-1654
Level 1 Service Guide I

Contents
General information 1
Safety 1
Safe working practices 1
Product handling precautions 1
Model information 2
QC numbering system 2
Hardware modifications 2
Software compatibility 3
Product warranty 4
Validity of the Warranty 4
Returns 6
Special notes about returning the product to a Service Centre 6
Disassembly/Assembly 7
Antenna 7
Large belt clip 8
Shirt/Pocket clip 9
Uniform Stud 10
Battery 11
Smartcard 12
Accessories 15
Cleaning 17
Regular cleaning 17
Specialist cleaning 18
Routine maintenance 20
External surfaces 20
Antenna 21
Battery 21
Encoder knob (Navi-knob) 22
Keypad 22
Smartcard 23
Illustrated parts list 24
External components 25
Optional Accessories 26
Repairs 27
Rugged Accessory Connector (sRAC) cover assembly 27
Encoder knob (Navi-knob) 28
II SC21 Series hand-portable radio


IV SC21 Series hand-portable radio

General information
Safety
Before operating, servicing or repairing the SC21 Series hand-portable radio, read the safety
instructions contained in the Product Safety Guide (SPR-DOC-00170) supplied with this product.
Safe working practices
Observe all safety precautions and warnings in this manual.
Every effort has been made to identify possible circumstances that might involve a potential hazard.
Sepura recommends the use of tools, procedures and instructions in this service guide and those
demonstrated during service training; however if alternatives are used, Sepura is not responsible for
any damage to the product or personal injury that may result.
Always wear appropriate Personal Protective Equipment (PPE) provided by your employer.
Product handling precautions
Handle fragile components with care. Some components are fragile, such as the keypad and keypad
bezel. Do not use any form of 'force' during the process of disassembly and assembly.
Do not touch the gold-coloured contacts on the Rugged Accessory Connector (sRAC) and the
Digital Accessory Connector (sDAC). Contamination of contacts can cause operational failures, for
example, failure to program to due intermittent contact.
It is recommended to wear gloves when handling the product and its components to prevent any
marks being made on the front cover window.
Level 1 Service Guide 1

Model information
This document applies to the following SC21 Series hand-portable radio models:
SC2120 (380 - 430MHz)
SC2124 (403 - 470MHz)
SC2128 (806 - 870MHz)
The radio has a product label located in the battery compartment. The label contains important
information such as the product serial number, TEInumber and the country of manufacture.
There are two boxes on the left-hand side that may display an update to the hardware (Mod State)
and software compatibility number since the product was manufactured.
Serial No. 1PR011710GWF100
SC2120
TEI: 00036965739000
Variant: TH01STW
QC: 000000000
Made in the EU
Rework mod state
Rework software
compatibility no.
QC number
QC numbering system
The 9 QC number on the label includes the hardware modification state and software compatibility
number.
Character no.
QC:
48
Mod State no.
Software compatibility no.
X X X 6 X X X 0 1
Hardware modifications
The hardware modifications are included in the QC number. The product has had the following
modifications since the start of manufacture:
Mod State Description Date
0 Initial Mod State 03/2017
1 sDAC connection stability 10/2017
2 SC21 Series hand-portable radio

Mod State Description Date
2 Baseline security update 02/2018
3 Improved Sealing 04/2018
4 Address variety of component obsolescences 07/2018
5 Enhanced battery connector robustness 10/2018
6 IP67 with SIM bung (smartcard cover) 11/2018
Later revisions may not be listed. Contact the Sepura Service Centre Manager for information about
any later revisions.
Software compatibility
The software compatibility number is included in the product serial number, two characters (8 and 9)
which is a number from 00 to 99. The product has had the following updates since the start of
manufacture:
Software
Compatibility
No.
Description Date
1 Initial Compatibility Number 03/2017
Later revisions may not be listed. Contact the Sepura Service Centre Manager for information about
any later revisions.
Level 1 Service Guide 3

Product warranty
Sepura radios are manufactured to meet strict international design standards and guidelines for
environmental and operational compliance. To meet these standards, the product undergoes
rigorous testing, including drop, bump, shock, vibration and other environmental tests, ensuring
Sepuraradios are fit for purpose.
Fair wear and tear occurs during normal usage and it is not to be confused with damage which
occurs as a result of a specific event or series of events such as impact, inappropriate use of non
approved Sepura accessories, harsh-treatment, or negligent acts. Fair wear and tear is not damage
caused by:
use outside of a product’s normal operational limits
continued use of a product that is showing signs that it is in need of repair
contamination, submergence, ingress, drop, impact, humidity, temperature or vibration
outside the product’s stated parameters
storage outside the product’s specified parameters
Solar or particle radiation
Electrostatic, electrical and magnetic stress
incorrect fitting of accessories or spare parts
unauthorised or improper repair, configuration, programming of the product
continued use of a product requiring an essential hardware or software update
failure to regularly maintain and clean the product as appropriate for the environment in which
it is used
use in abnormal working conditions
When a product is received for repair, it is inspected and its general condition assessed before any
servicing work is undertaken. Where the condition of the product is deemed to be non-fair wear and
tear, and not covered by the standard warranty, repairs to the product will be charged to the
customer. Not covered by the standard warranty are products that have been tampered with or
show signs of unauthorised repair or damage caused by misuse, abuse or accidental dropping.
If the product develops a fault during the warranty period, contact your service provider or Sepura
Customer Returns Administrator (customer.returns@sepura.com) for information about warranty
repairs.
For information on how to return the product to Sepura for repair, see Returns on page6.
Refer to the Radio & Accessories Warranty (document no. MOD-15-1827) for more information
about Sepura's product warranty.
Validity of the Warranty
The radio is supplied with a warranty label that is placed over one of the screws securing the rear
casing to the front cover assembly.
IF THIS STICKER HAS BEEN REMOVED OR TAMPERED WITH, THE WARRANTY WILL BE
RENDERED INVALID.
4 SC21 Series hand-portable radio

Any radio that has been tampered (warranty label damaged or removed) must be returned to
Sepura. Customers returning a tampered product will be charged (fees payable) for the re-
inspection of the product and application of a new warranty label.
Only Sepura approved Service Centres can repair internal parts of the radio.
Level 1 Service Guide 5

Returns
Anyone intending to return a product for repair or disposal must contact Sepura before returning the
product. Information on the process of returning the product for repair or disposal can be obtained
Sepura Customer Returns (customer.returns@sepura.com).
Sepura provide the facilities for customers to return products for the following reasons:
Repairs beyond those listed in this guide
This guide provides instructions for repairs to external parts of the radio.
Faulty products requiring repairs beyond these instructions must be returned to Sepura or an
approved service centre.
Tampered products
If the warranty seal on the radio is broken, the product is referred to as a ‘tampered product’. The
radio must be returned to Sepura or an approved service centre for investigation to determine if the
tampering has resulted in any damage to the product.
Disposal (electrical waste)
As an environmentally responsible supplier and in accordance with the European regulations
directive for Waste Electrical and Electronic Equipment (WEEE), Sepura has processes in place to
safely dispose of all the equipment it supplies.
Special notes about returning the product to a Service Centre
The following notes relate to products that are being returned to Sepura or an approved service
centre for repair.
Contaminated products
If the product is contaminated, for example with blood or other body waste, it must be
decontaminated by an external company specialising in decontamination . A Certificate of
Decontamination is issued when the product is cleaned.
Sepura does not have the facilities to decontaminate products received for repair or disposal. Any
contaminated product being returned for repair or disposal must be accompanied by a Certificate of
Decontamination. The product must be placed into a clear plastic bag and clearly labelled “
Contaminated Product Bio Hazard”.
Products returned with missing parts
The radio must be returned to Sepura with all parts fitted, with exception of the battery, antenna and
associated accessories. When servicing the product, Sepura will replace any missing parts to ensure
that the product is returned to the customer ready for operational use. Any missing parts replaced
during the repair and servicing of the product will be chargeable to the customer.
6 SC21 Series hand-portable radio

Disassembly/Assembly
Before cleaning or servicing the radio, it is recommended to remove external parts such as any
carrying aids (belt clips) and accessories connected to the radio. If you remove an accessory or
carrying aid, always refit them on completion of cleaning, servicing or repairing the radio.
This section contains the procedures for removing and attaching the following parts:
Antenna
Belt Clip
Shirt/Pocket Clip
Uniform Stud
Battery
SmartCard
Audio accessories
Antenna
Power off the radio before attempting to fit or remove the antenna.
Do not touch the antenna when the radio is powered on.
Remove the antenna
1. Rotate the antenna in a counter-clockwise direction until it can be removed from the radio.
Fit the antenna
Caution! Risk of damage to the radio. Ensure the antenna is fitted
correctly. Cross threading damages the antenna boss which will then require a
rear cover replacement.
1. Insert the base of the antenna into the radio's antenna connector.
2. Rotate the antenna in a clockwise direction until it is finger tight. Then apply another 1/4 turn in
a clockwise direction. Do not over tighten.
Level 1 Service Guide 7
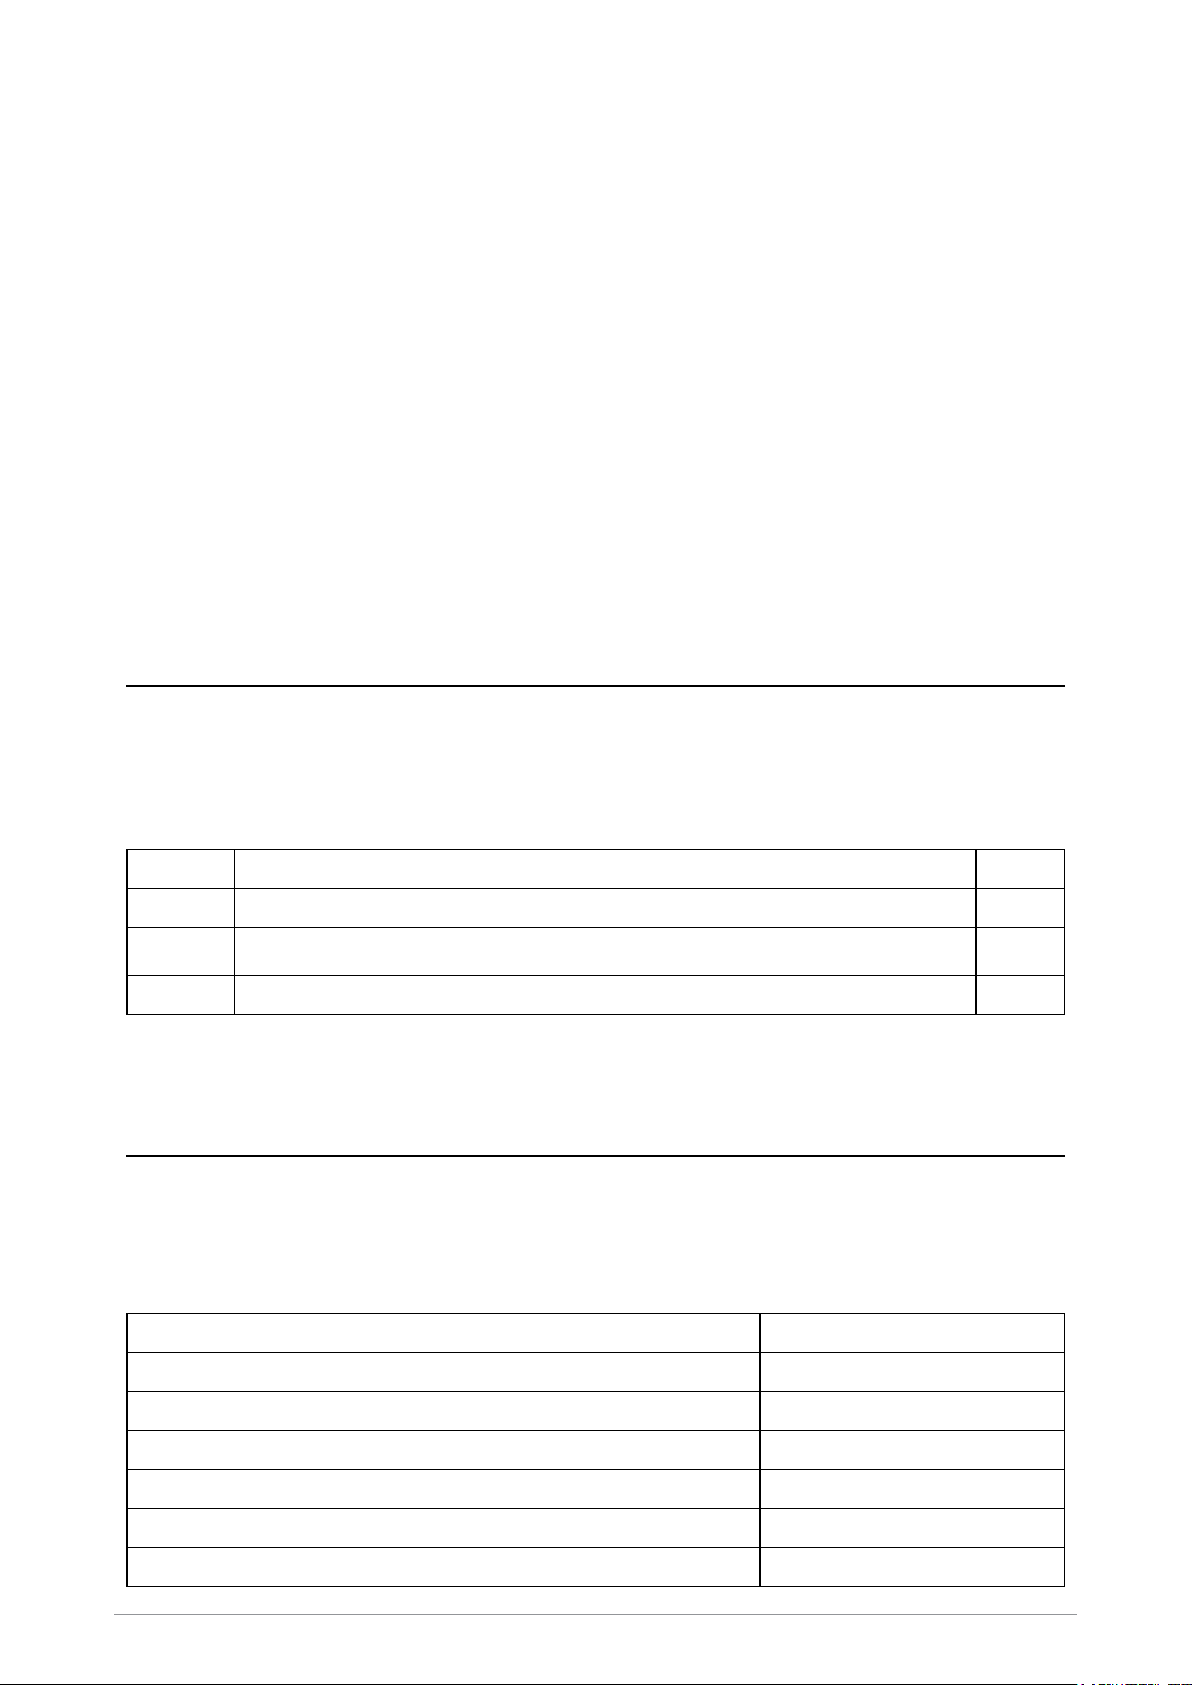
Large belt clip
The large belt clip (part no. 300-01923) is used to attach the radio to a trouser belt. The belt clip is
attached to the radio using the carrying aid attachment points on the back of the radio.
The belt clip does not need to be removed to charge the battery; however for cleaning and servicing
the radio, it is recommended that the belt clip be removed and cleaned separately.
Removing the belt clip
1. Use a PZ1 screwdriver to remove the two screws securing the belt clip to the radio. Lift the belt
clip from the radio.
PZ1 x 2
Attaching the belt clip
Caution! Risk of damage to the radio. Ensure the belt clip screws are
secure, but do not over tighten as this can cause damage to the cover. If using
a torque screwdriver, apply a maximum torque of 45 Ncm or equivalent.
1. Place the belt clip onto the back of the radio, aligning the two attachment points on the back of
the radio with the mounting holes on the belt clip.
2. Use a PZ1 screwdriver, secure the belt clip into position using the screws provided.
MAX 45 Ncm PZ1 x 2
Do not over tighten
8 SC21 Series hand-portable radio

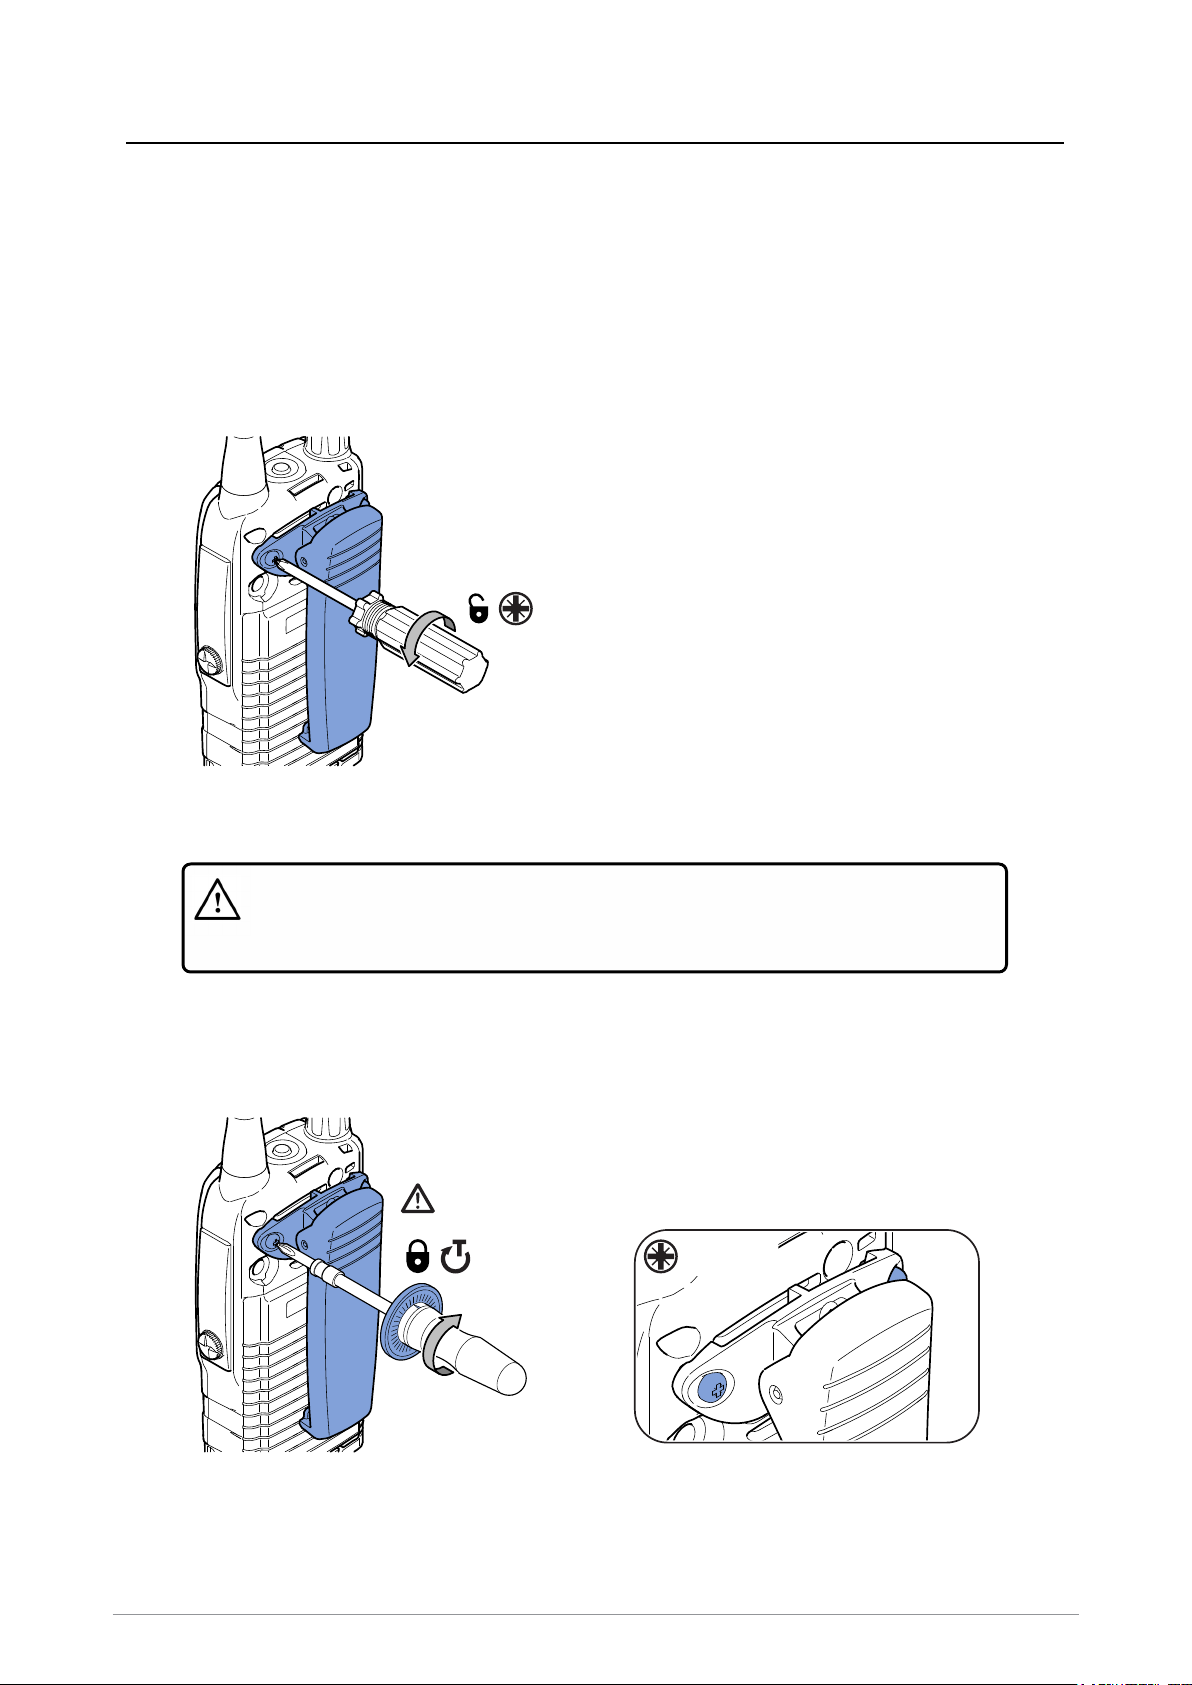
Shirt/Pocket clip
The shirt/pocket clip (part no. 300-01922) is used to attach the radio to clothing, such as a shirt or
trouser pocket. The shirt/pocket clip is attached to the radio using the carrying aid attachment points
on the back of the radio
Removing the shirt/pocket clip
1. Use a PZ1 screwdriver to remove the two screws securing the shirt/pocket clip to the
attachment points on the back of the radio. Remove the shirt/pocket clip from the radio.
PZ1 x 2
Attaching the shirt/pocket clip
Caution! Risk of damage to the radio. Ensure the shirt/pocket clip screws are
secure, but do not over tighten as this can cause damage to the cover. If using
a torque screwdriver, apply a maximum torque of 45 Ncm or equivalent.
1. Place the shirt/pocket clip onto the back of the radio, aligning the two attachment points on the
back of the radio with the mounting holes on the shirt/pocket clip.
2. Use a PZ1 screwdriver, secure the shirt/pocket clip into position using the screws provided.
MAX 45 Ncm PZ1 x 2
Do not over tighten
Level 1 Service Guide 9
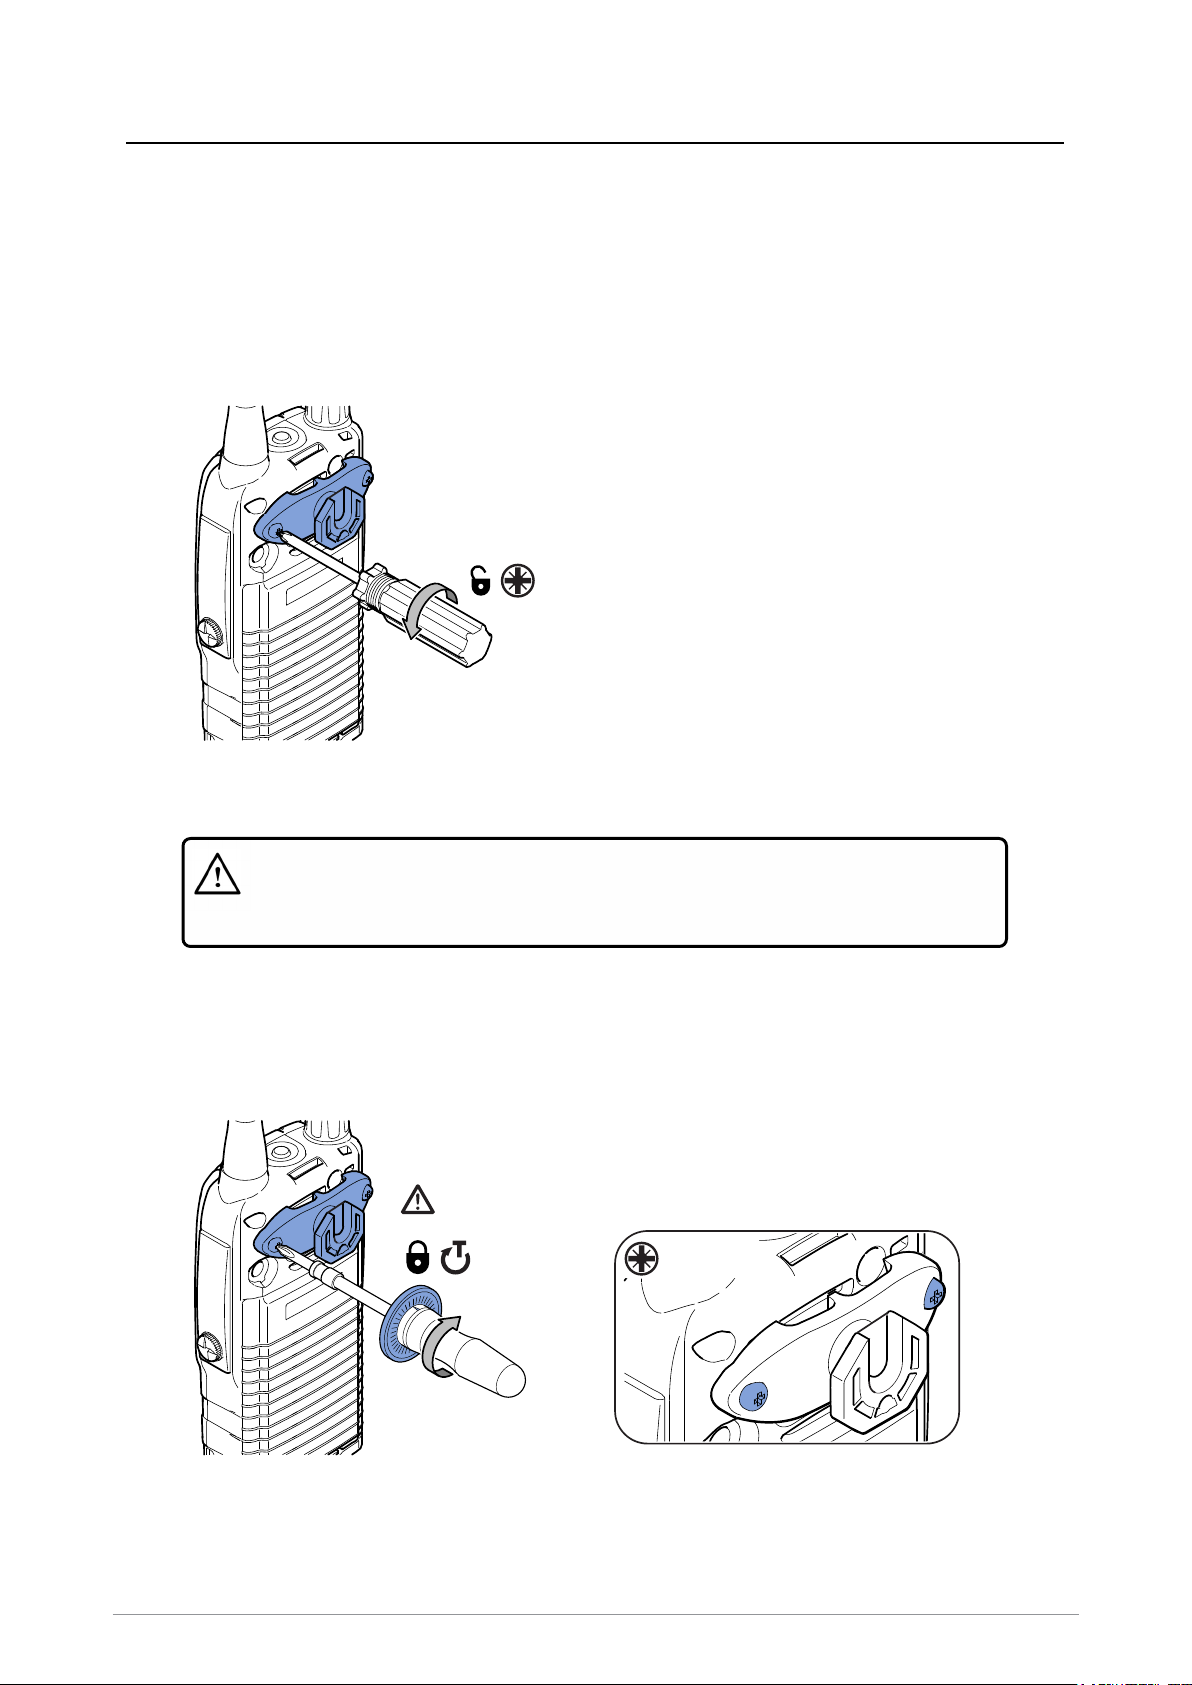
Uniform Stud
The uniform stud (part no. 300-01832) is used together with the available dock kit that provides
attachments for various types of belts (clothing) and locker or car dashboard mountings.
The stud is attached to the radio using the carrying aid attachment points on the back of the radio.
Removing the stud
1. Use a PZ1 screwdriver to remove the two screws securing the stud to the radio. Lift the stud
from the radio.
PZ1 x 2
Attaching the stud
Caution! Risk of damage to the radio. Ensure the uniform stud screws are
secure, but do not over tighten as this can cause damage to the cover. If using
a torque screwdriver, apply a maximum torque of 45 Ncm or equivalent.
1. Place the stud onto the back of the radio, aligning the two attachment points on the back of the
radio with the mounting holes on the stud.
2. Fit the stud into position and correct orientation as indicated on the stud. Using a PZ1
screwdriver, secure using the screws provided.
MAX 45 Ncm PZ1 x 2
Do not over tighten
10 SC21 Series hand-portable radio

Battery
Power off the radio before removing the battery.
Caution! If a belt clip is fitted to the radio, lift the belt clip before attempting to
remove or fit the battery. Do not attempt to slide the battery into the battery
compartment sideways under the belt clip. This may result in damage to the
radio and the battery contacts.
Remove the battery
1. Push the battery release at the base of the battery.
2. Then lift the battery upwards to remove.
Fit the battery
1. Check that the smartcard holder is secured before fitting the battery.
2. Insert the battery into the battery compartment.
3. Press the battery downwards until it clicks into position.
Ensure the battery fits securely.
Level 1 Service Guide 11

Smartcard
If required by your Network Operator, the radio may be fitted with a smartcard to enable access to
the network.
NOTE: Mod State 1-3 - If a smartcard is not required, the radio must be fitted
with a dummy smartcard (part no. 700-00883).
It is recommended that the smartcard (or dummy smartcard) is removed when cleaning the battery
and smartcard compartments.
Remove the smartcard or dummy smartcard
Caution! If a belt clip is fitted to the radio, lift the belt clip before attempting to
remove or fit the battery. Do not attempt to slide the battery into the battery
compartment sideways under the belt clip. This may result in damage to the
radio and the battery contacts.
Power off the radio and remove the battery. See Battery on page11.
Caution! Risk of damage to the radio. Do not attempt to remove the
smartcard cover by levering along the sealed edges with tooling.
1. Using the handle recesses, carefully lift the smart card cover (if fitted) away from the radio with
your thumb and forefinger.
12 SC21 Series hand-portable radio
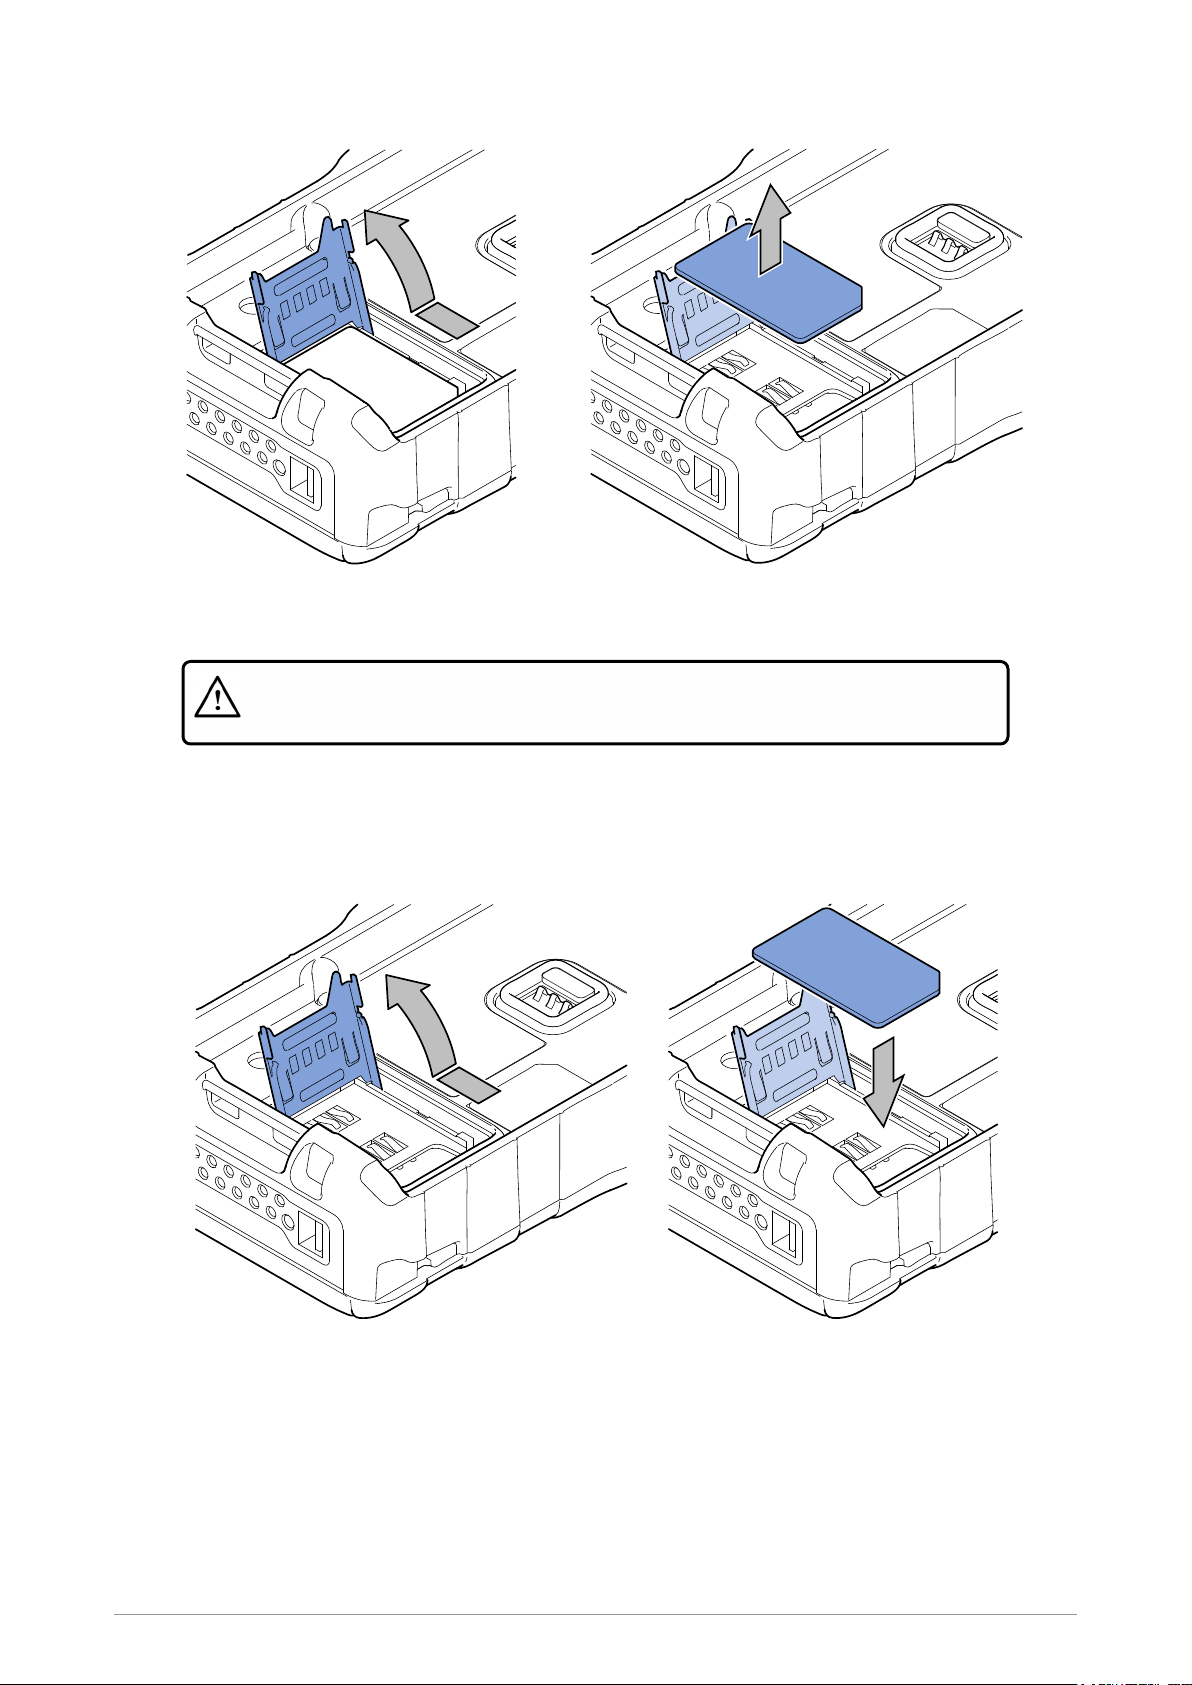
2. Slide the card holder left to unlock and then carefully lift and pivot to open it. Remove the
smartcard (or dummy smartcard). Do not use force or over-bend the retainer.
Fit the smartcard or dummy smartcard
Caution! Risk of damage to the radio. The smartcard cover must be refitted
correctly to retain the radio's IP rating (mod state 4 onwards ).
1. Slide the card holder retainer left until it unlocks.
2. Slide the card holder left to unlock and then carefully lift and pivot to open it. Fit the smartcard
(or dummy smartcard). Do not use force or over-bend the retainer.
Level 1 Service Guide 13

3. Close the retainer. Slide the retainer right until it locks.
4. Refit the smartcard cover (if applicable). Apply even pressure to the cover to ensure it is firmly
seated and seals the card compartment to retain the radio's IP rating (Mod State 4 onwards).
14 SC21 Series hand-portable radio
Other manuals for SC21 Series
4
This manual suits for next models
3
Table of contents
Other Sepura Portable Radio manuals

Sepura
Sepura SC2024W User manual

Sepura
Sepura STP8000 Series Operation manual

Sepura
Sepura SC20 series User manual

Sepura
Sepura SC21 Series User manual

Sepura
Sepura TETRA STP8 Series User manual

Sepura
Sepura TETRA STP9000 Series User manual

Sepura
Sepura SBP8000 User manual

Sepura
Sepura SC21 Series User manual

Sepura
Sepura STP8000 Series User manual

Sepura
Sepura TETRA SC2128W User manual


