RANE SL2 FOR SERATO SCRATCH LIVE • QUICK START 3
When setting up Scratch Live in a new
location, calibrate the software to the
background noise picked up by the
needles, cables and CD players.
1. Put one Virtual Deck in INT mode, load
a track, press the play button, and
turn up the mixer volume and sound
system as loud as you will be playing
your session.
2. When using turntables, place the
needles on the records with the motors
off and switch to the SETUP screen.
When using CD players, pause the CD
and switch to the SETUP screen.
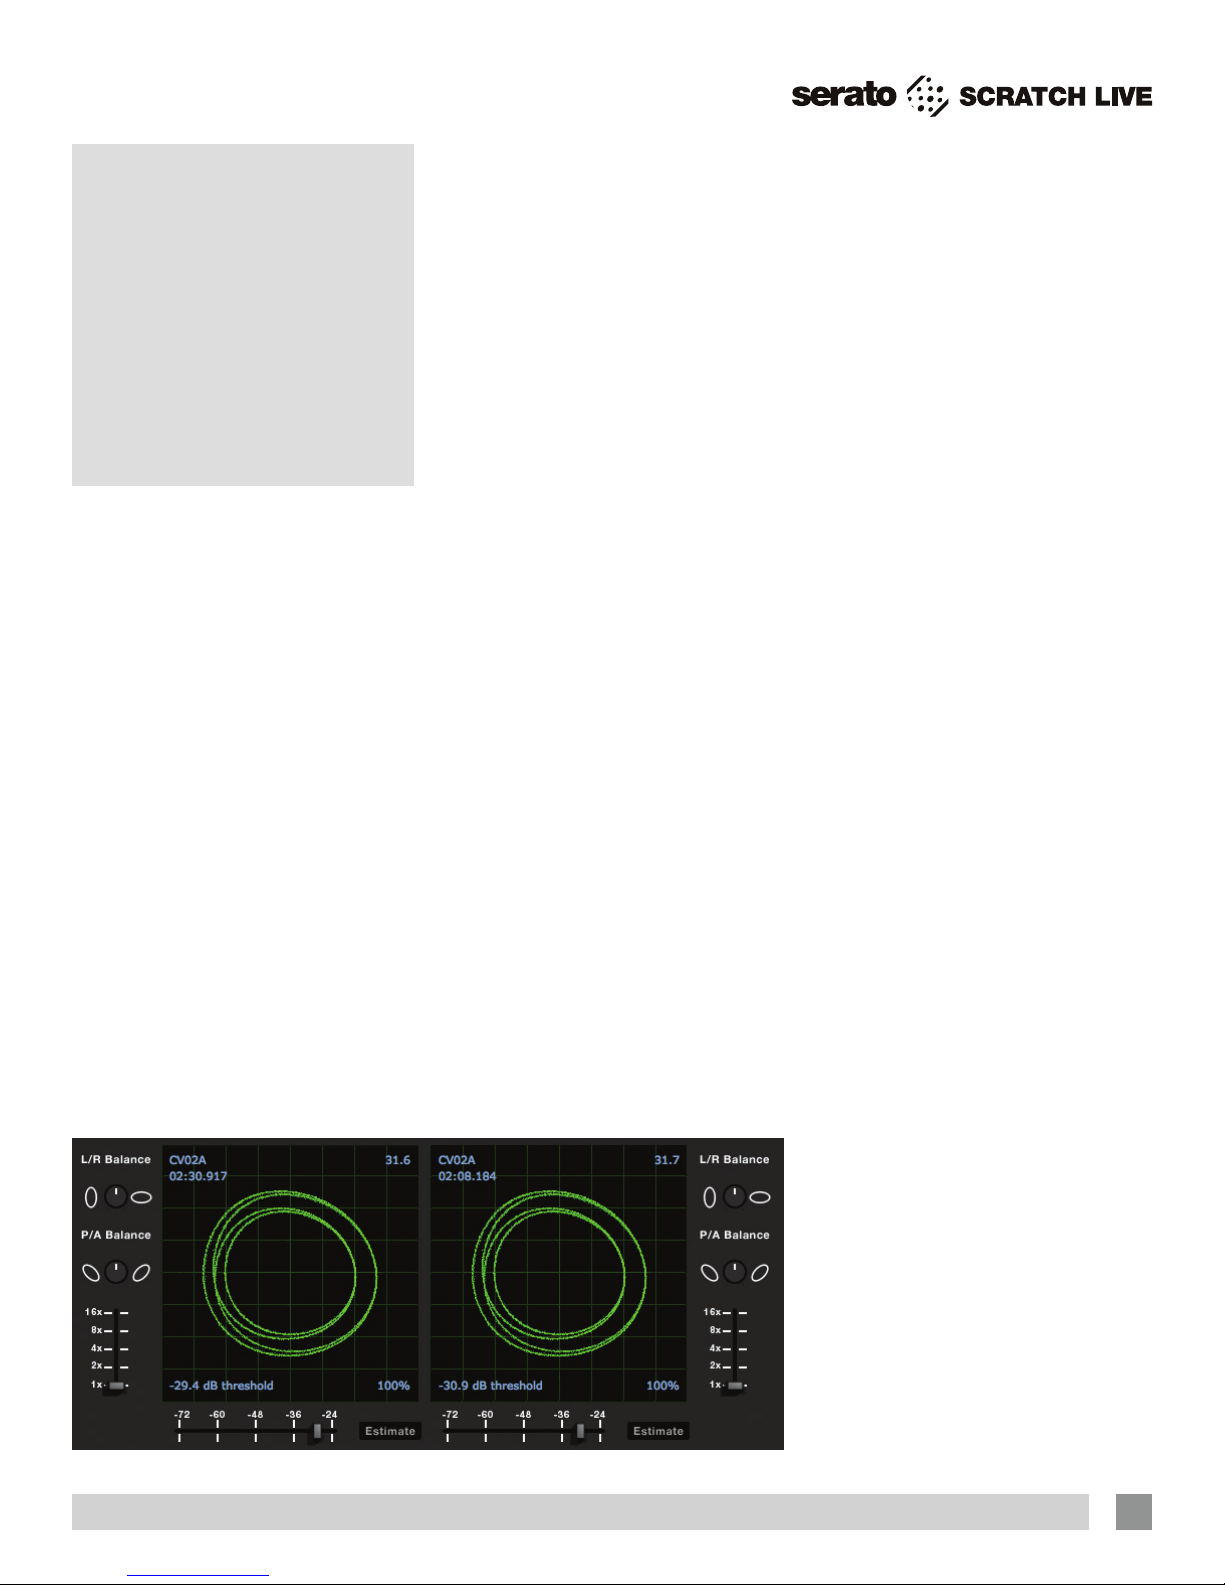
3. Press and hold the Estimate button
for each side, letting go when the
threshold setting is stable (usually about
one second). In situations with lots of
background noise, the threshold will
need to be higher.
4. Start the turntables, and adjust the
L/R Balance and P/A Balance next
to each calibration scope to adjust the
shape of the inner ring. Use the scope
zoom slider (1x to 16x) to zoom in or
out as necessary. Note: If you have
trouble getting the rings circular, try
cleaning or changing your needles. If
the image appears as a line, then one
channel of the turntable is not working.
See examples of “Scope Reading and
Fixes” in the manual.
5. Check the percentage (%) in the bottom
right corner of each calibration scope,
indicating the percentage of readable
signal — this number should be close
to 100% when your system is calibrated
properly.
These are the basics of calibrating. If you
run into any problems or questions, we
really recommend reading “Calibrating
Scratch Live” in the manual. If you aren’t
seeing good circles, refer to “Scope
Reading and Fixes” in the manual.
After your setup is calibrated properly
you are ready to import music. See
“Importing and Playing Music” in the
manual to get started.
TROUBLESHOOTING
If you aren’t getting any sound,
disconnect all cables and start fresh. For
now, let’s keep it simple and get Scratch
Live running.
• The SL2 outputs connect to a “LINE”
or “CD” input on your mixer. Set any
phono/line switches on the top or the
back of the mixer to the “LINE” or “CD”
position.
• The little switch on the SL2 needs to
match what is plugged in — Switch to
“PHONO” (turntable) or “CD” (line).
• If you aren’t hearing audio, you should
at least see the waveform move on
the screen as the control vinyl or CD is
playing. The meters next to the Virtual
Deck should display sound levels. If not,
check that you are using ABS or REL
mode above the Virtual Deck.
• If nothing is moving onscreen, re-check
connections and see “Troubleshooting
and Frequently Asked Questions.”
• Make sure you are playing the control
vinyl from the beginning (outer part).
When using the control CD, be certain
you are playing from the beginning of
Track 1.
• In Setup, set the “Vinyl Start Offset”
knob in the Vinyl Control tab to 0.
• If you hear music in INT mode but not in
ABS or REL mode while using control
vinyl or CDs, see “Scope Reading
and Fixes” in the manual. A common
problem is seeing a straight or diagonal
line in the scope. This means you are
either getting an uneven stereo signal or
a mono signal. Scratch Live needs an
even stereo signal to function.
• Many things can cause perfect circles
in one scope but a straight line or
nothing in the other. A bad needle, loose
cartridge-to-headshell wiring, dirty
contacts between the headshell and
tonearm, dirty control vinyl, dust bunny
on the needle, or loose RCA output
wiring.
• Start by taking the needle from the
“good” turntable and put it on the “bad”
turntable. Does it now play ne? If so,
you need a new needle. If not, put the
“good” needle back on the “good “
turntable.
• If we have established good playback
from one input of the SL2, plug the
turntable giving the problem into the
“good” SL2 input. If the turntable
still gives you a line or nothing in the
scope, the problem is somewhere in the
turntable cartridge, tonearm or its RCA
cable.
• If you are using a CD player, try
replacing its RCA cable to the SL2
inputs.
Step 3:
Calibration