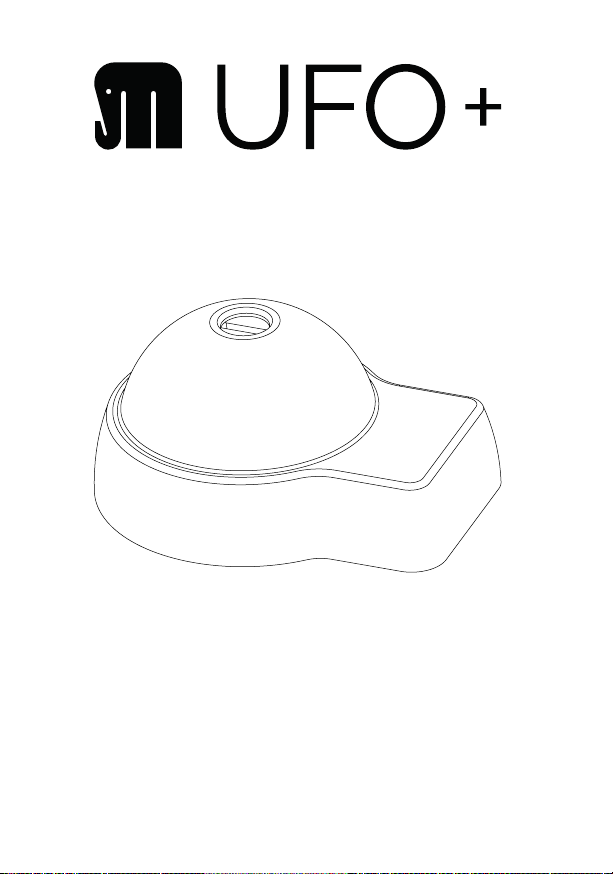
Serrature Meroni UFO+ User manual
ISTRUZIONI DI MONTAGGIO
FITTING INSTRUCTIONS
INSTRUCCIONES DE MONTAJE
INSTRUCTIONS DE MONTAGE
2
3
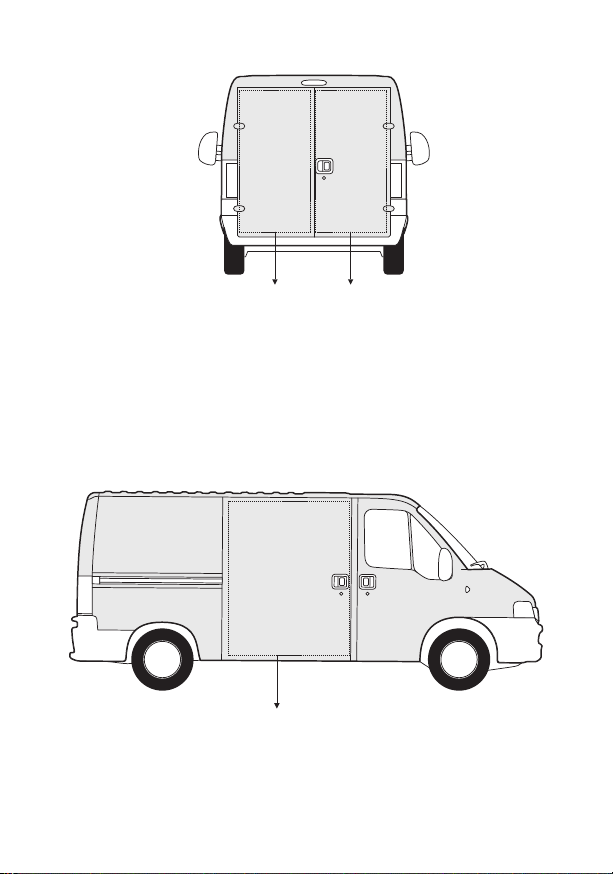
IT Porta ssa
EN Fixed door
ES Puerta ja
FR Porte xe
Porta battente
Swing door
Puerta batiente
Porte battante
ü
IT Porta scorrevole
EN Side loading door
ES Puerta corredera
FR Porte coulissante
üû
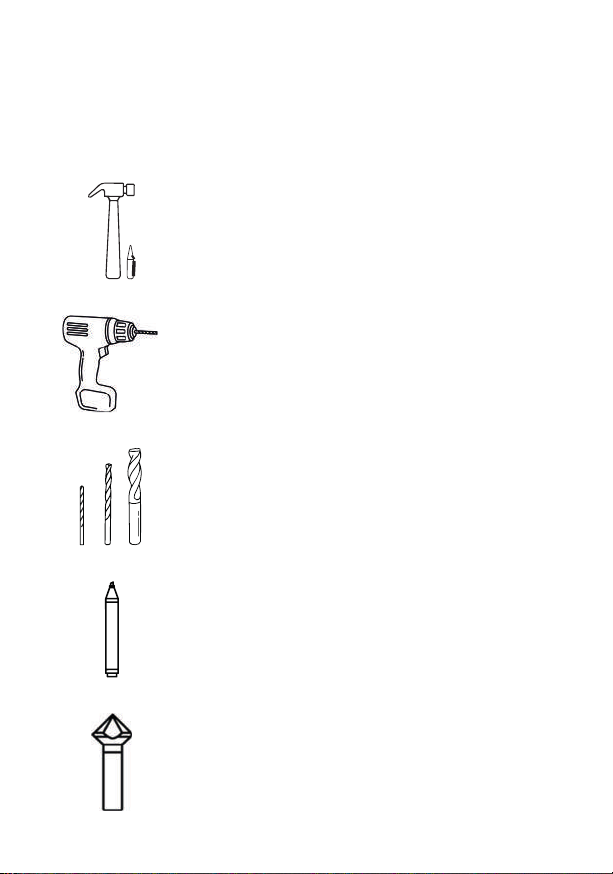
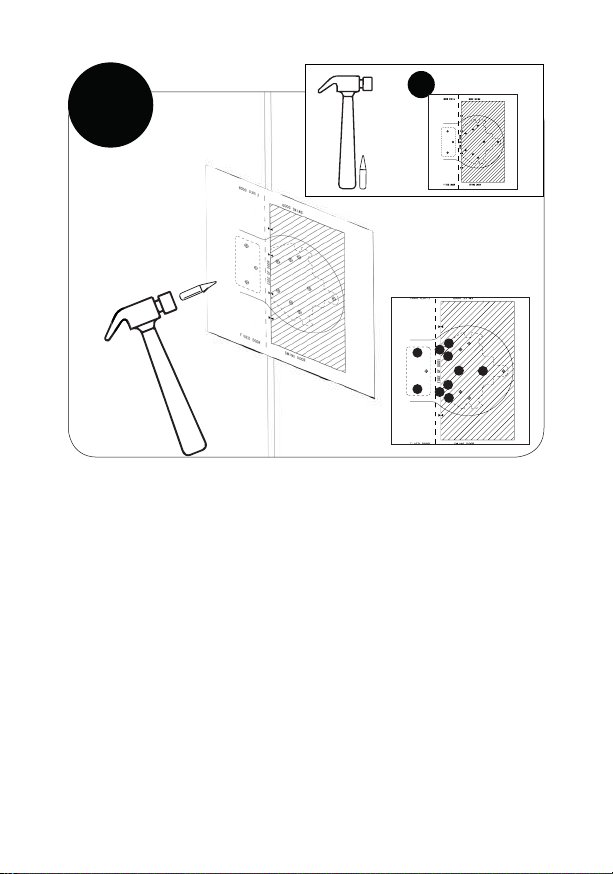
STRUMENTI DI LAVORO*
FITTING TOOLS*
HERRAMIENTAS DE TRABAJO*
OUTILS DE TRAVAIL*
IT Martello e bulino
EN Hammer and centre punch tool
ES Martillo y punzón
FR Marteau et poinçon
IT Trapano
EN Drill
ES Taladro
FR Perceuse
IT Vernice protettiva antiruggine
EN Anti-corrosive metal primer
ES Pintura de protección
FR Peinture antirouille
IT Punte da foratura
EN Drill bits
ES Brocas
FR Forets
IT Svasatore
EN Countersink tool
ES Avellanador
FR Fraiseuse 4

*Non forniti
*Not supplied
*No se suministra
*Non fournis
IT Metro
EN Tape measure
ES Metro
FR Mètre
IT Pinza
EN Pliers
ES Alicates
FR Pinces
IT Flessibile
EN Angle grinder
ES Amoladora
FR Meuleuse
IT Rivettatrice per inserti lettati
EN Riveting tool
ES Remachadora
FR Riveteuse
IT Chiavi a brugola
EN Allen key set
ES Llave allen
FR Clés hexagonales
5

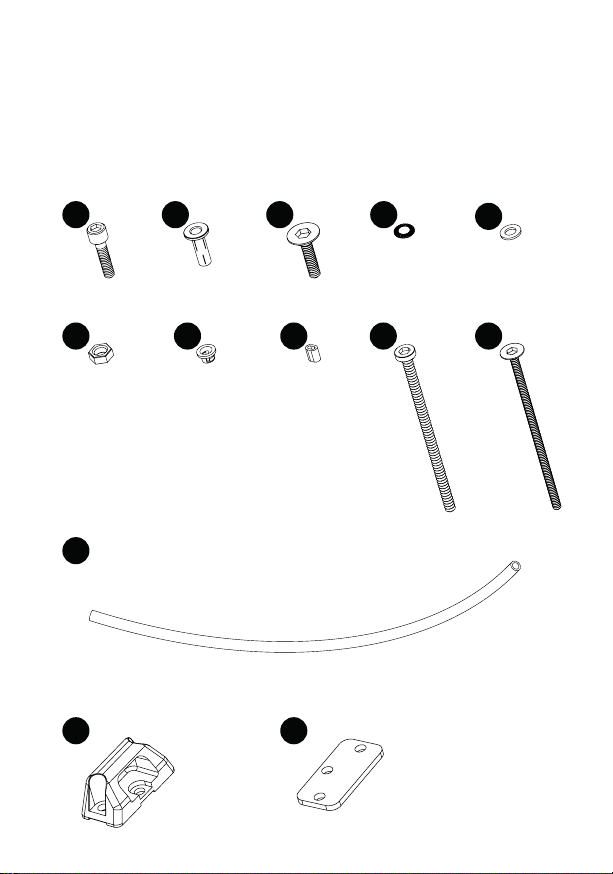
CONTENUTO CONFEZIONE | SINGOLO*
PACKAGE CONTENTS | SINGLE*
CONTENIDO DEL PAQUETE | SENCILLO*
CONTENU DE L’EMBALLAGE | SIMPLE*
6
x1
G
x1
H
x1
I
x7
D
x4
A
x5
B
x3
CD1
x5
x1
E
x1
F
x5
D2
x2
A1
x3
C1

7
*Tutte le eccedenze sono da considerarsi come parti di ricambio
*Any excess parts are to be considered as spares
*Todos los excedentes deben considerarse como piezas de recambio
*Tous les excédents doivent être considérés comme des pièces de rechange
x1
x1
M
N
x1
porta posteriore
rear door
puerta posterior
porte arrière
L
x1
O
x1
P
x1
R
CONTENUTO CONFEZIONE | DOPPIO*
PACKAGE CONTENTS | DOUBLE*
CONTENIDO DEL PAQUETE | DOBLE*
CONTENU DE L’EMBALLAGE | DOUBLE*
8
x1
G
x2
H
x2
I
x14
D
x8
A
x10
B
x6
CD1
x10
x1
E
x1
F
x10
D2
x4
A1
x6
C1
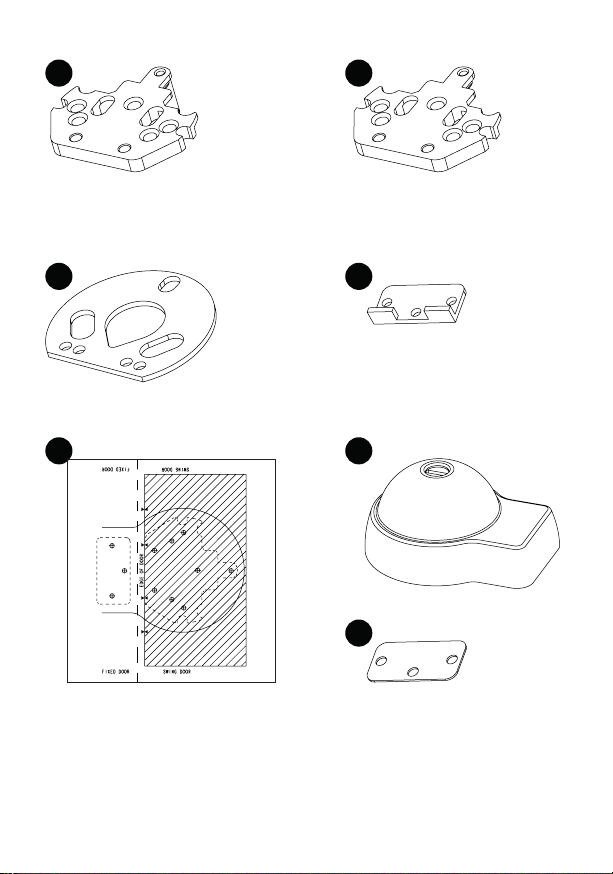
9
*Tutte le eccedenze sono da considerarsi come parti di ricambio
*Any excess parts are to be considered as spares
*Todos los excedentes deben considerarse como piezas de recambio
*Tous les excédents doivent être considérés comme des pièces de rechange
x2
x2
MN
x1
porta posteriore
rear door
puerta posterior
porte arrière
L
x1
porta laterale
side door
puerta lateral
porte latérale
L1
x2
O
x2
P
x2
R

CONTENUTO CONFEZIONE | TRIPLO*
PACKAGE CONTENTS | TRIPLE*
CONTENIDO DEL PAQUETE | TRIPLE*
CONTENU DE L’EMBALLAGE | TRIPLE*
10
x1
G
x3
H
x3
I
x21
D
x12
A
x15
B
x9
CD1
x15
x1
E
x1
F
x15
D2
x6
A1
x9
C1

11
*Tutte le eccedenze sono da considerarsi come parti di ricambio
*Any excess parts are to be considered as spares
*Todos los excedentes deben considerarse como piezas de recambio
*Tous les excédents doivent être considérés comme des pièces de rechange
x3
x3
MN
x1
porta posteriore
rear door
puerta posterior
porte arrière
L
x2
porta laterale
side door
puerta lateral
porte latérale
L1
x3
O
x3
P
x3
R
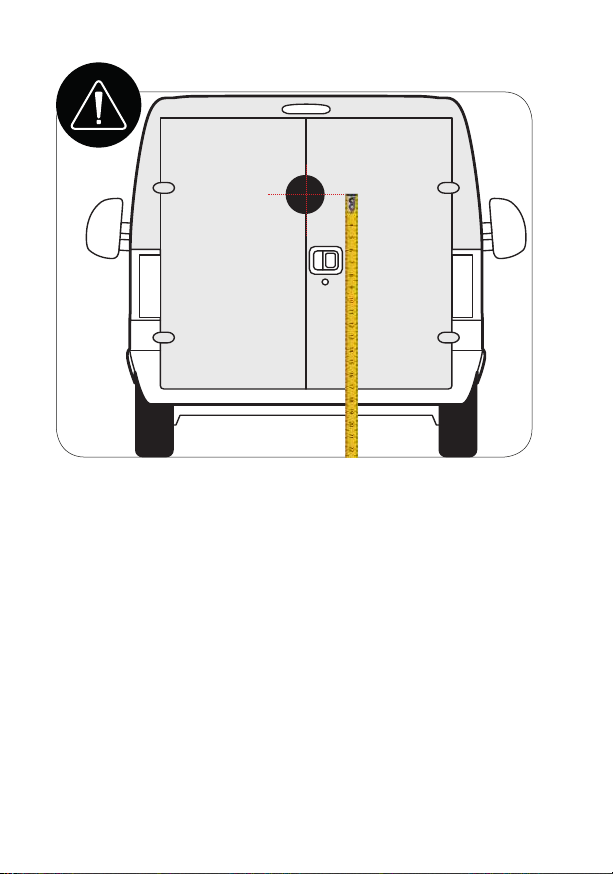
IT Misurare l’altezza da terra no alla mezzeria della
dima (fai scan del QR code a pagina 13)
EN Measure the height from the ground to the centre
of the drilling template (scan QR code on page 13)
ES Mida la altura desde el suelo hasta el centro de la
plantilla de perforaciòn (escaner el còdigo QR en la
pàgina 13)
FR Mesurez la hauteur entre le sol et le centre du
gabarit de perçage (scanner le code QR à la page 13)
12

ALTEZZA DI INSTALLAZIONE SUGGERITA
SUGGESTED INSTALLATION HEIGHT
ALTURA DE INSTALACIÓN SUGERIDA
HAUTEUR D’INSTALLATION SUGGÉRÉE
ufomeroni.com/area-tecnica-download/
ufomeroni.com/es/descargar/
ufomeroni.com/en/downloads/
ufomeroni.com/fr/telechargement/
IT
ES
EN
FR
13
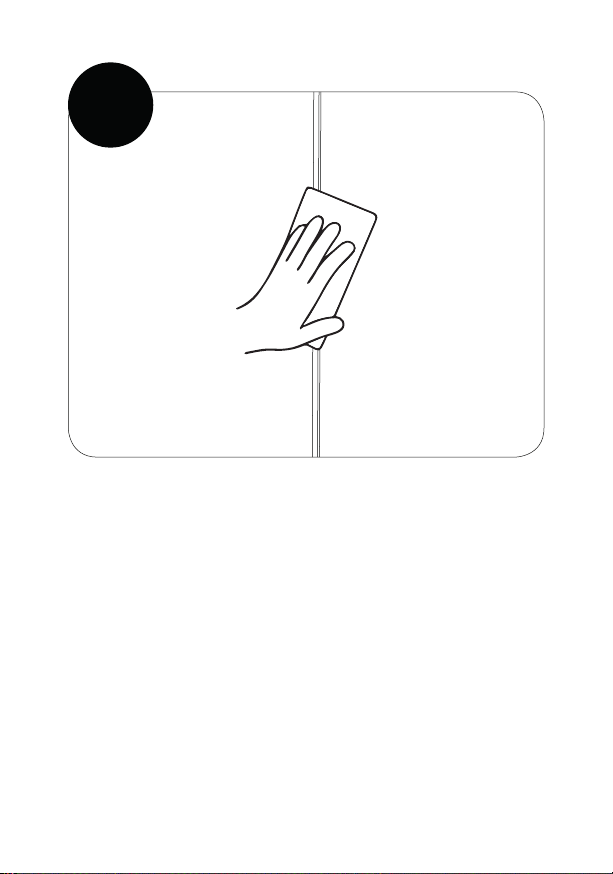
1
IT Pulire la supercie del portellone
EN Clean the bodywork
ES Limpie la supercie de la puerta
FR Nettoyez la surface de la porte
14
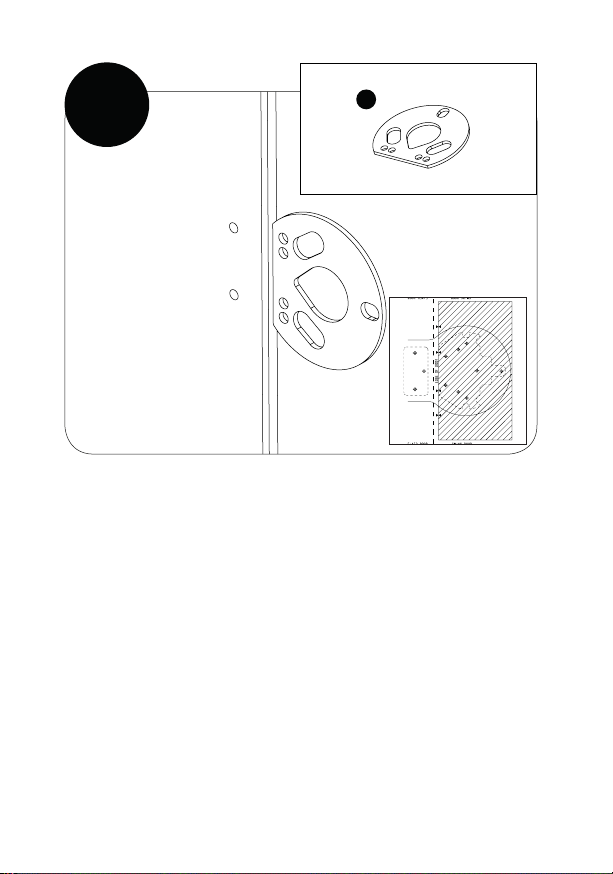
2
IT Posizionare la dima adesiva O all’altezza suggerita
(pagina 13) e segnare i punti di foratura A - B - E - F. In base
alla conformazione della carrozzeria, segnare i punti Co i
punti D
EN Place the adhesive drilling template O at the suggested
height (page 13) and mark the centre of holes A - B - E - F.
Depending on the shape of the bodywork, mark points C
or D
ES Coloque la plantilla adhesiva O a la altura indicada
(página 13) y marque los puntos de perforación A - B - E - F.
Según la forma de la carrocería, marque los puntos Co D
FR Positionnez le gabarit adhésif O à la hauteur indiquée
(page 13) et marquez les points de perçage A - B - E - F.
Selon la forme de la carrosserie, marquer les points C ou D
O
x1
15
A
A
B
D
D
EF
C
C
B

IT Eseguire i pre-fori Ø4 mm nelle posizioni A - B -
E - F. In base alla conformazione della carrozzeria,
scegliere se forare i punti C o i punti D
EN Drill the pilot holes A - B - E - F using a Ø4 mm
drill bit. Depending on the shape of the bodywork,
mark points Cor D
ES Hacer agujeros de Ø4 mm en las posiciones
premarcadas A - B - E - F. Según la forma de la
carrocería, marque los puntos Co D
FR Percez des trous de Ø4 mm sur les marques que
vous avez eectuées A - B - E - F. Selon la forme de
la carrosserie, marquer les points C ou D 16
3
A
A
B
D
D
EF
C
C
B

IT Allargare i fori A: Ø 7,5mm | B: Ø 6mm | C/D: Ø 7,5mm |
E: Ø 6mm | F: Ø 9mm esterno / Ø 6,5mm interno. Svasare
tutti i fori con uno svasatore
EN Drill out larger holes in positions A: Ø 7,5mm | B: Ø
6mm | C/D: Ø 7,5mm | E: Ø 6mm | F: Ø 9mm external /
Ø 6.5mm internal. Clean the holes with a countersink tool
ES Re-taladrar A: Ø 7,5mm | B: Ø 6mm | C/D: Ø 7,5mm | E:
Ø 6mm | F: Ø 9mm externo / Ø 6,5mm interno. Limpiar los
agujeros con un avellanador
FR Repasser les trous A: Ø 7,5mm | B: Ø 6mm | C/D:
Ø 7,5mm | E: Ø 6mm | F: Ø 9mm extérieur / Ø 6.5mm
intérieur. Évaser les trous avec une fraiseuse
17
4
A
A
B
D
D
EF
C
C
B

IT Applicare sui fori la vernice protettiva (fosfato di
zinco) antiruggine
EN Apply quick dry zinc phosphate anti-corrosive
metal primer over the holes
ES Aplicar la pintura de protección contra óxido
(fosfato de zinc) sobre los agujeros
FR Appliquez une peinture antirouille (phosphate de
zinc) sur les trous
18
5

IT Inserire i rivetti Bnei fori A - C/D - E. In caso si scelga
di utilizzare le viti passanti per l’installazione, non inserire i
rivetti e sostituire lo step 8 con lo step 8a
EN Insert the B rivet nuts in positions A - C/D - E. If you
choose to use through-bolting for installation, do not insert
rivets and replace step 8 with step 8a
ES Colocar las tuercas B en las posiciones A - C/D - E.
Si decide utilizar pernos pasantes para la instalación, no
inserte remaches y sustituya el paso 8 por el paso 8a.
FR Placez les écrous à river B en position A - C/D - E.
Si vous choisissez d’utiliser des boulons traversants pour
l’installation, n’insérez pas de rivets et remplacez l’étape 8
par l’étape 8a
6
19
A
A
D
D
E
C
C
B
x5
IT Posizionare la guarnizione M sulla porta battente
allineandola ai fori eettuati nella carrozzeria
EN Position the rubber pad M on the swing door.
Align the rubber pads to the holes in the bodywork
ES Posicionar la junta M en la puerta batiente,
alineándolas con los agujeros realizados en la
carrocería
FR Positionnez le joint M sur la porte battante en les
alignant avec les trous realisés dans la carrosserie
7
20
x1
M
Other manuals for UFO+
1
This manual suits for next models
3
Other Serrature Meroni Automobile Accessories manuals


Popular Automobile Accessories manuals by other brands


ULTIMATE SPEED
ULTIMATE SPEED 279746 Assembly and Safety Advice

SSV Works
SSV Works DF-F65 manual

ULTIMATE SPEED
ULTIMATE SPEED CARBON Assembly and Safety Advice

Witter
Witter F174 Fitting instructions

WeatherTech
WeatherTech No-Drill installation instructions

TAUBENREUTHER
TAUBENREUTHER 1-336050 Installation instruction