Setcom 900 series User manual

3019 Alvin DeVane Boulevard, Suite 560 • Austin, Texas 78741 USA
Ph (650) 965-8020 Fax (650) 965-1193
900 Series Wireless Headsets: Third and Fourth Generation
User Guide
1.0 GENERAL
Before using your wireless headset, read these instructions carefully.
Each 900 Series Wireless Headset comes as a kit which includes the following components:
-wireless headset (Fig. 1);
-Base Station (Fig. 2);
-two power cables, one to charge the headset and one to power the Base Station (part number: 25-1004);
-one headset hanger for the headset (part number: 14-7014);
-four mounting screws for the Base Station (part number: 21-8006);
-two screw-on Headset Antennas (one is included with headset, one with base – Fig. 1 [g]; part number: 28-2017)
Please confirm that you have received all of these components.
Confirm that the headset is fully charged (See 2.1 below) and that the Base Station is powered.
Note: these instructions cover Setcom’s third generation of 900 Series wireless headsets. If you received your headset prior to
April 2012, you have Setcom’s second generation wireless headset, which functions identically to the third generation, only
without the Cell Phone Button (Fig. 1 [h]) and optional cell phone interface capability.
Note: if you received your headset prior to March 2011, you have Setcom’s first generation wireless headset, which functions
differently than the second and third generations and has its own user guide. Please refer to this document for further information
on its use and operation.
2.0 HEADSET OPERATION
2.1 Charging
Plug Charging Cable (25-1004) into the headset’s Charging Jack (Fig. 1 [a]).
To fully charge the headset takes approximately 3.5 hours.
While the headset is being charged, its LED Indicator (Fig. 1 [b]) will show a steady amber color. The LED Indicator will go
off when the headset is fully charged.
The headset may be used while charging. In this case, the LED Indicator will show a steady amber color while also slowly
flashing green.
2.2 Turning the Headset On and Off
Locate the Volume Control (Fig. 1 [c]) on the headset’s right cup: this is also the headset’s on-off switch.
Turn the knob clockwise to turn on the headset.
Immediately after being turned on, the headset will beep one-to-three times, indicating its battery charge level:
-One beep: Low battery/ charging required
-Two beeps: Moderate charge remaining
-Three beeps: Fully charged
The headset will link to the Base Station very quickly. Within about five seconds, the headset will beep three times, low-to-
high, indicating that it is linked.
To turn off the headset, turn the Volume Control counter-clockwise until it clicks.

Setcom 900 Series Wireless Headset: User Guide
2
When the headset is turned on and left undisturbed for 15 minutes, it will automatically go into “sleep” mode. When the
headset is picked up or moved, it will immediately “wake up” (turn itself back on) and link with the Base Station within
about five seconds. This feature works when the Volume Control is on, not when the Volume Control is in the off position.
2.3 Keying the Mobile Radio
Locate and press the Mobile Radio Push-to-Talk (Fig. 1 [d]) on the headset’s right cup to key and transmit over the mobile
radio.
Release the Mobile Radio Push-to-Talk when you have finished transmitting.
Note: the mobile radio transmit function applies only to radio transmit models (kit numbers: CSB-900W3 and CSB-
902W3). For intercom-only headsets (kit numbers: CSB-901W3 and CSB-901W3-3), the Mobile Radio Push-to-Talk
functions as an on/ off switch for the headset’s microphone.
2.4 Keying the Portable Radio
Install the Portable Radio Adapter Cable (part number: PRAC-W__ [where the underscore is Setcom’s portable radio
designator]; sold separately). Connect the PRAC’s radio adapter to your portable radio. Then plug the round connector (5-
pin, mini-XLR) into the Portable Radio Interface Connector (Fig. 1 [e]) on the headset’s left cup.
To key and transmit over the portable radio, locate and press Portable Radio Push-to-Talk (Fig. 1 [f]) on the headset’s left
cup.
Release the Portable Radio Push-to-Talk when you have finished transmitting.
2.5 Pairing
Your headset is shipped already paired to its Base Station.
A video showing the pairing process can be found at:
www.setcomcorp.com/cr/900wireless.php
If you need to re-pair your headset to its Base Station or pair it to another Base Station, follow these steps:
1. Power on both the base station and the headset.
2. If a Portable Radio Adapter Cable (part number PRAC-Wxx) is connected to the headset, disconnect it.
3. Press and hold the base station’s pairing button until the LED on the base station begins to flash amber, at which point
you can release the base station’s pairing button.
4. Press and hold both the left-side and right-side PTT buttons on the headset until the LED on the headset begins to rapidly
flash green, at which point you can release the buttons on the headset. The headset will also give one low-tone beep
when the LED begins to flash green.
5. The headset and base station will take a few seconds to finish the pairing process, at which point you will hear an
acknowledgement tone in the headset, and the LEDs on both the headset and base station will slowly flash green,
indicating that they have exited pairing mode and successfully linked. You will now be able to use the headset normally.
A base station will exit pairing mode after 45 seconds if it does not successfully pair with a headset, and a headset will exit
pairing mode after 8 seconds if it does not successfully pair with a base station.
To force a headset or a base station to exit pairing mode, turn the unit off and back on.
2.6 Headset LED Indicator (Fig. 1 [b])
Steady green: Power is on and the headset is idle (not linked).
Slow flashing green: Power is on, and the headset is linked to the Base Station.
Very slow flashing green: The headset has gone into sleep mode.
Steady amber: The headset is charging and turned off. The LED turns off when the headset is fully charged.
Steady yellow: The headset is charging and turned on. The LED goes steady green when the headset is fully
charged.
Amber with green flashes: The headset is turned on, linked to the Base Station and charging.
Fast flashing amber: The headset is in pairing mode and seeking a link with the Base Station.

Setcom 900 Series Wireless Headset: User Guide
3
3.0 BASE STATION OPERATION
3.1 Installing the Base Station
Mount the Base Station in an enclosed area away from direct exposure to the elements using the four mounting screws
provided (part number: 21-8006). For optimal range, position the Base Station as high as practically possible (e.g. on the
roof of a vehicle’s cab, where the Base Station is installed in a vehicle). In all cases, position the Base Station’s antenna
vertically (relative to the ground).
Note: For optimal range, the Base Station’s antenna should be mounted as far away from large metal objects as possible.
For example, if the Base Station is mounted on the metal wall of a vehicle’s cab, the headset’s range on the opposite side of
the metal wall may be diminished.
Base stations should be mounted a minimum of 3 feet apart from each other and from other antennas. Farther apart is better.
Connect one of the two power cables supplied with the 900 Wireless Headset kit (part number: 25-1004) to a power source
(12Vdc) and plug it into the Base Station’s Power Cable Connector (Fig. 2 [c]).
The Base Station will turn on automatically when DC power is supplied.
Connect one end of the 900 Wireless Adapter Cable (e.g. part number: 25-0735-10; sold separately) to the intercom system’s
headset jack (e.g. the tip-ring-sleeve jack on a Setcom System 900 master station - IM-900 or IM-900E). Connect the
Adapter Cable’s round connector (5-pin, mini-XLR) to the Base Station’s Adapter Cable Connector (Fig. 2 [d]).
3.2 Pairing
See Section 2.5 above.
3.3 Base Station LED Indicator (Fig. 2 [a])
Steady green: Power is on and the Base Station is idle (not linked).
Slow flashing green: Power is on, and the Base Station is linked to the headset.
Slow flashing amber: The Base Station is in pairing mode and seeking a link with the headset.
Amber with green flashes: The headset’s Mobile Radio Push-to-Talk has been pushed, and the mobile radio is keyed to
transmit.
4.0 CELL PHONE OPERATION
Note: while all third generation wireless headsets include the Cell Phone Button (Fig. 1 [h]), interfacing a cell phone is only
possible with those headsets that have the feature enabled (kit numbers ending with “-CP”, e.g. CSB-900W3-CP Kit).
Note: please carefully review your cell phone’s user manual for specific instructions regarding connecting to Bluetooth devices,
such as Setcom’s third generation wireless headset.
4.1 Pairing with a Bluetooth-enabled Cell Phone
Activate the Bluetooth function on your cell phone. Bluetooth power should be ON, and the phone should be in “Visible” or
“Discoverable” mode.
Locate the Cell Phone Button (Fig. 1 [h]) on the headset. Press and hold it until a single “beep” is heard. The headset will
enter search mode, and the LED will flash green faster than it normally would when linked to the Base Station.
Set your cell phone to Search mode. In short order, it should find or “see” a device labeled “SETCOM”. Accept this
connection, and set your cell phone to pair with it. The PIN code is: 0000
Once the connection has been made, you will hear a low beep and then three higher beeps. Until you pair the headset with
another phone or the phone with another Bluetooth-enabled device, the headset should automatically connect to your cell
phone. You are now ready to receive or initiate phone calls with your phone. The headset will remain in Cell Phone Mode
until you manually switch back to Headset Mode (intercom and/or mobile radio functions).
While in Cell Phone Mode, you will not be able to communicate over intercom and/or mobile radio.
While in Cell Phone Mode, even during a phone call, you can switch to Headset Mode, then talk on intercom and/or mobile
radio, and the call will remain active. When switching back to Cell Phone Mode, the call will simply resume. See below

Setcom 900 Series Wireless Headset: User Guide
4
about mode switching.
4.2 Switching between Headset and Cell Phone Mode
To return to Headset Mode, press the Cell Phone Button twice within one second (about half a second between presses works
best; if the button is pressed too rapidly, the headset may not recognize both presses). When you are entering Headset Mode,
you will hear a short falling trill sound (a quick sequence of notes decreasing in pitch).
To then enter Cell Phone Mode, press the Cell Phone Button twice as above. As you are entering Cell Phone Mode, you will
hear a rising trill sound (a quick sequence of notes increasing in pitch).
The headset will “remember” the phone it has been paired with, even if it has been turned off and back on again. If you wish
to use another cell phone, you will have to pair that phone with the headset.
5.0 GEL PAD INSTALL GUIDE
With a little practice and patience installing gel pads on a wireless headset is easy. The best way is as follows:
Remove the over the headset support sling from the cup ring and the cup ring from the headset cup (see Fig. 3).
Insert as much of the gel pad’s retaining lip as possible into the groove of the cup. It is easiest to start at the top of the cup
(see Fig. 4).
While holding the gel pad where its retaining lip was inserted in step two, work the rest of the retaining lip into the groove
around the cup (see Fig. 5).
Reinstall the cup ring (removed in step one) over the gel pad and into the groove of the cup by starting at the top and pulling
down over the bottom of the gel pad. The cup ring helps to secure the gel pad (see Fig. 6).
Reattach the over the head strap (removed in step one) to the cup ring.
6.0 SUPPORT
For technical support, please contact Setcom at the number below. Please have your sales or purchase order number when you
call.
7.0 WARRANTY
Setcom's Standard Limited Warranty covers this product. For more information on Setcom’s warranty, see:
http://www.setcomcorp.com/warranty.html

(a) Charging Jack
DC input power (7 to 24Vdc)
(f) Portable Radio
Push-to-Talk (e) Portable Radio
Interface Connector
(c) Volume Control
Also Power On/ Off
(d) Mobile Radio
Push-to-Talk
(b) LED Indicator
CSB-900W3
SN: SXXXXXXXXX
Figure 1
900 Series Wireless Headset
Third Generation
(rear view)
(g) Headset Antenna
(h) Cell Phone
Button

900W3-BASE
SN: Sxxxxxxxxx
Figure 2
900 Series Wireless Base Station
Third Generation
(side view)
(side one) (side two)
(a) LED Indicator (a) LED Indicator
(b) Pairing Button(c) Power Cable Connector
DC input power (7 to 24Vdc)
(d) Adapter Cable Connector
(e) Base Station Antenna
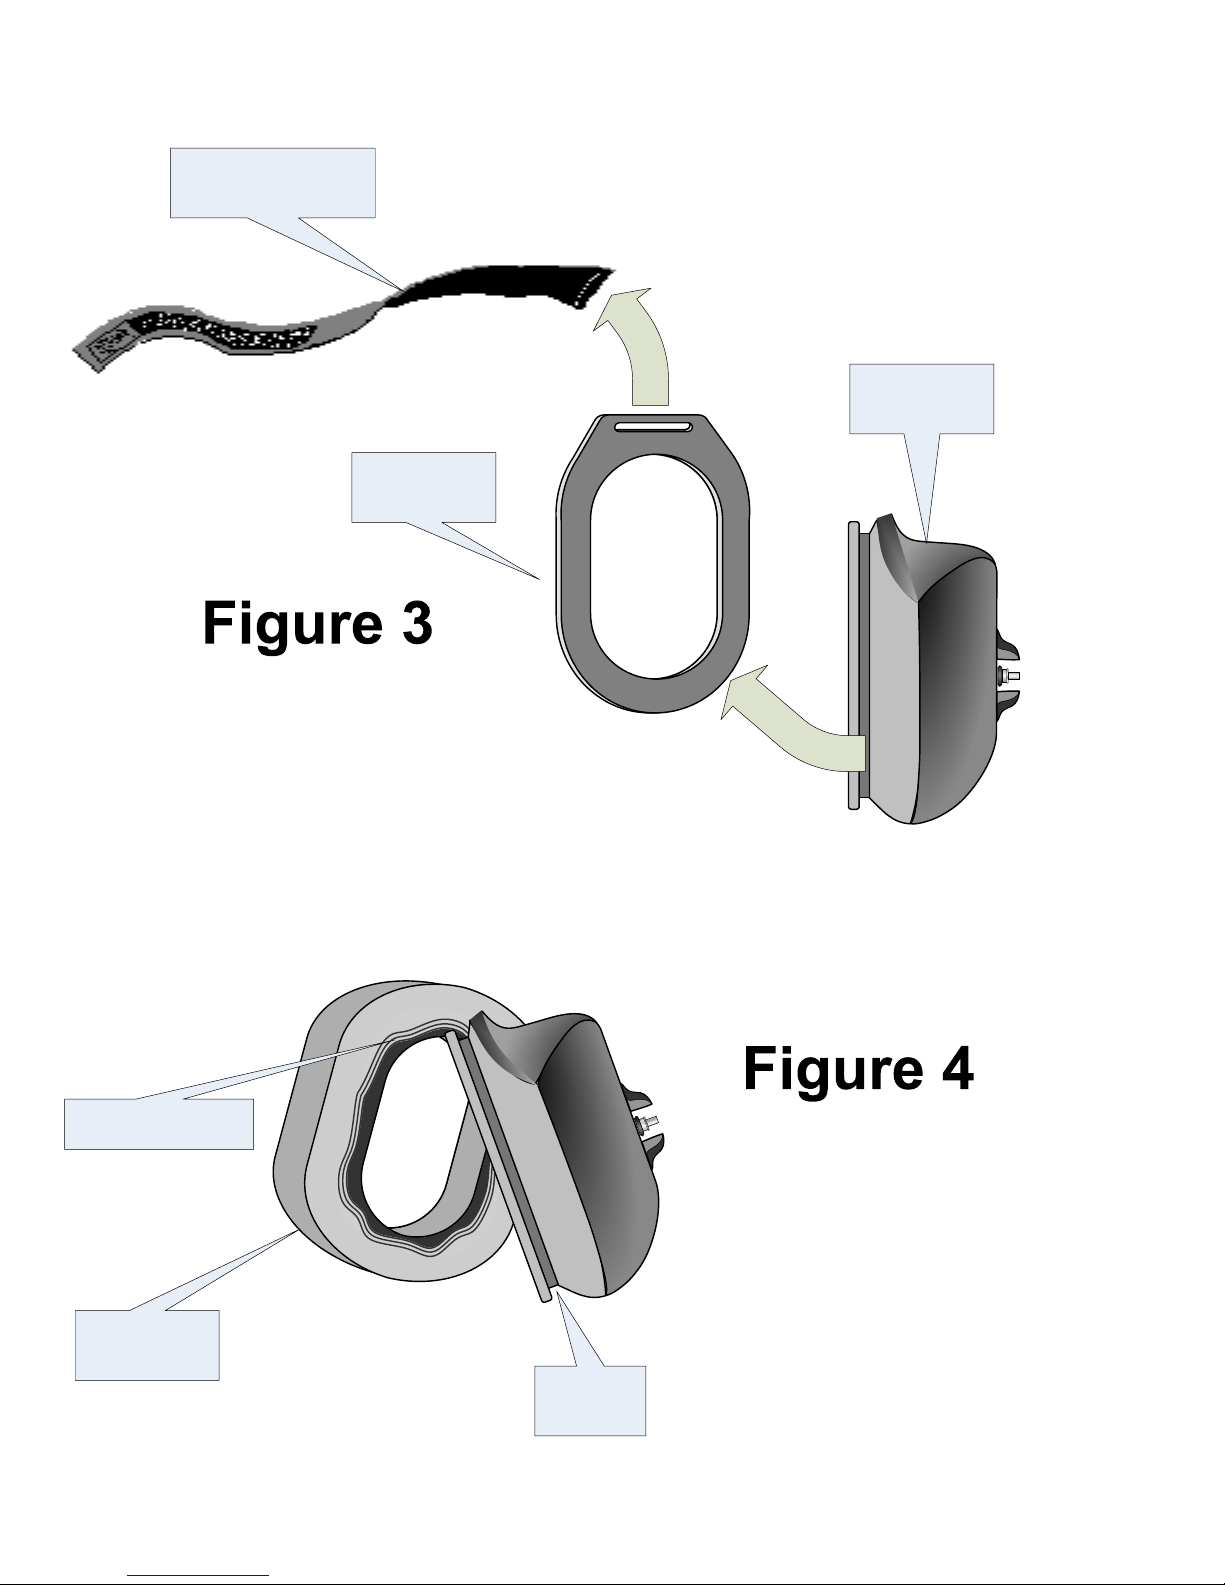
Headset
Support Sling
Cup Ring
Headset
Cup
Gel Pad
Remove the headset support
sling from the cup ring.
Stretch and pull to remove the
cup ring from the headset cup.
Cup
Groove
Retaining Lip Starting at the top, insert as
much the gel pad’s retaining
lip as possible into the cup’s
groove.
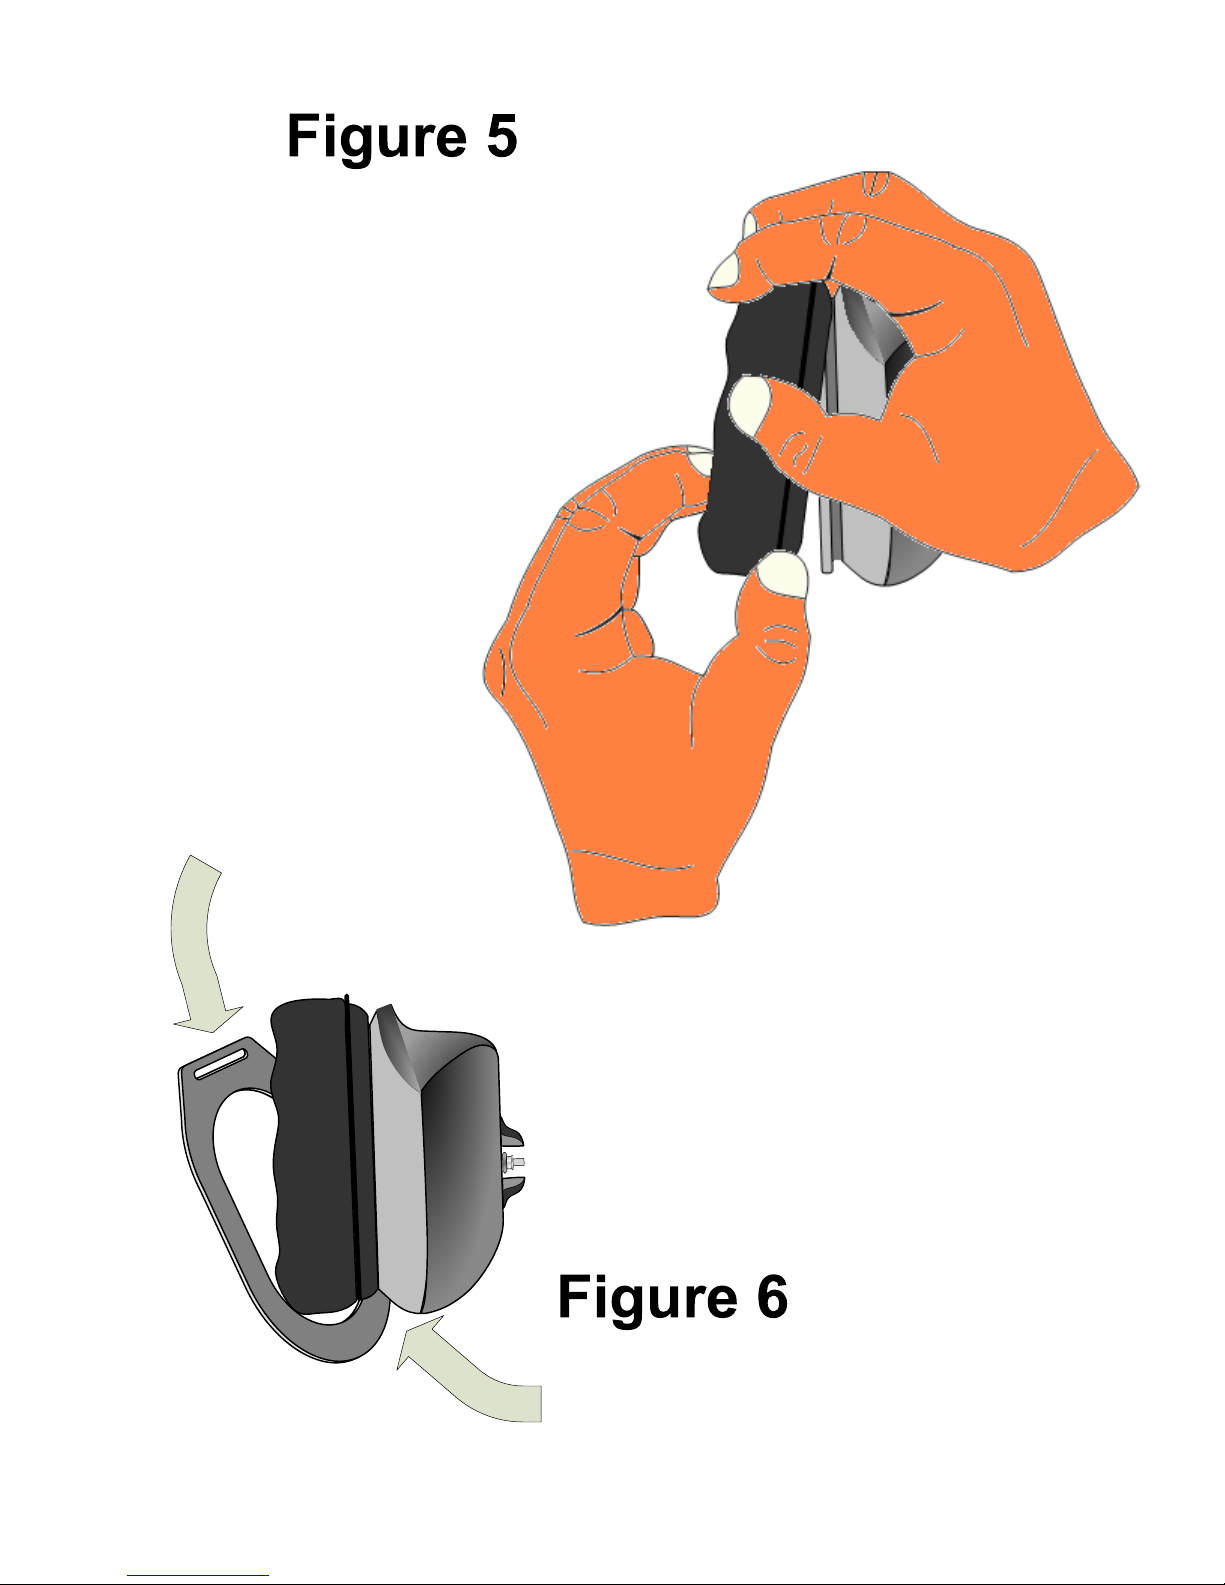
While holding the gel pad
where its retaining lip was
inserted in step two, work the
rest of the retaining lip into the
groove around the cup.
When reinstalling the cup ring, start
at the bottom and pull it up and over
gel pad.
Using this tab for
leverage, lift and
stretch the cup ring
over the gel pad. The
cup ring should rest in
the cup groove on top
of the gel pad, helping
to secure the gel pad
in place.
Table of contents
Other Setcom Headset manuals


