SEVEN CHGCT30I-1E User manual

CHGCT30I-1E CHGCT30I-1K
CHARGE CART - User Manual - EN
LADEWAGEN - Bedienungsanleitung - DE
CARRO DE CARGA - Manual del usuario - ES
CHARIOT CLASSE MOBILE - Manuel d’utilisation - FR
CARRELLO DI RICARICA - Manuale utente - IT

INHALTSVERZEICHNIS
SICHERHEITS- UND WARNHINWEISE
ERSTE SCHRITTE
EINRICHTUNG UND VERWENDUNG
TECHNISCHE DATEN
Sicherheits- und Warnhinweise
Auspacken
Übersicht
Abschließen des Wagens
Richtlinien
Ladesystem
Wagen mit Steckdose verbinden
Ladefunktion anpassen
Intelligente Ladefunktion
Technische Daten
GARANTIE
Garantie
TABLE OF CONTENTS
SAFETY AND WARNINGS
GETTING STARTED
SETUP AND USAGE
TECHNICAL SPECIFICATIONS
Safety and warnings
Unboxing
Cart Diagram
Locking the cart
Guidelines
Charging System
Plug cart into outlet
Customize Charging
Intelligent charging
Technical specications
WARRANTY
Warranty
5
6
9
13
14
19
20
21
24
25
27
31
32
35
39
40
45
46
47
50
51
53

ÍNDICE
SEGURIDAD Y ADVERTENCIAS
INICIO
MONTAJE Y USO
ESPECIFICACIONES TÉCNICAS
Seguridad y advertencias
Desempaquetado
Diagrama del carro
Bloqueo del carro
Directrices
Sistema de carga
Enchufe el carro a la toma
Carga personalizada
Carga inteligente
Especicaciones técnicas
GARANTÍA
Garantía
TABLE DES MATIÈRES
SÉCURITÉ ET AVERTISSEMENTS
PREMIERS PAS
INSTALLATION ET UTILISATION
SPÉCIFICATIONS TECHNIQUES
Sécurité et avertissements
Déballage
Schéma du chariot
Verrouillage du chariot
Recommandations
Système de charge
Branchement du chariot à une prise
Charge personnalisable
Charge intelligente
Spécications techniques
GARANTIE
Garantie
57
58
61
65
66
71
72
73
76
77
79
83
84
87
91
92
97
98
99
102
103
105

INDICE
SICUREZZA E AVVERTENZE
OPERAZIONI PRELIMINARI
INSTALLAZIONE E UTILIZZO
SPECIFICHE TECNICHE
Sicurezza e avvertenze
Disimballaggio
Diagramma del carrello
Blocco del carrello
Linee guida
Sistema di carica
Collegare il carrello alla presa
Personalizzazione della carica
Carica intelligente
Speciche tecniche
GARANZIA
Garanzia
109
110
113
117
118
123
124
125
128
129
131

SAFETY AND WARNINGS
CAUTION
!This symbol on the product indicates important
literature concerning operation and maintenance.
Do not remove or alter labels.
2
To reduce risk of electric shock only use this product indoors.•
•Do not allow anyone to sit, stand, or climb on this product.
•Do not block the ventilation holes used for air circulation.
•Do not overload heavy objects on or inside this product.
•Before moving this product, disconnect the power from the wall outlet.
•While moving this product, make sure the power cord is secured.
•This product should always be used by adults or with adult supervision.
•Never unplug this product from the outlet when hands are wet or by pulling the power cord.
•Do not use an extension cord in conjunction with this product.
•Connection to any other type of receptacle other than a two-pole, three-wire grounded /
receptacle may result in shock hazard as well as violate local electrical codes.
•In the event of an emergency, disconnect the power cord from the AC power outlet.
•This product is heavy. Use caution handling and keep upright. Do not attempt to unpack or
move it unassisted.
•Use caution when unpacking and save the packing material for later use. Scratches and other
damage caused by mishandling is not covered by the warranty.
Do not plug the input of this product into its own output.•
Do not attach an additional extension cord, power strip, or surge protector to this product.•
Do not attach non-computer-related items, such as medical equipment, life-support equipment,
microwave ovens, or vacuum cleaners to this product.
•
Place cables in such a way that they won’t be pulled or snagged, and no one can step on or trip
over them.
•
Do not attempt to disassemble this product. This product contains no user replaceable parts.
Only factory service personnel may perform repairs.
•
If this product is misused, incorrectly operated or repaired, the warranty will be void.•
Remove objects from top while moving.•
10 kg max load on top.•
Do not open more than one shelf at a time.•
Place items in the bottom shelf first.
•
Always spread items as much as possible on the shelves.•
Only place items in slots.•
Maximum weight per shelf is 30 kg•
5

Unboxing: CAUTION
!Two person handling required
GETTING STARTED
1
2
Remove all parts of the packaging.
Use caution when unpacking and
save the packing material for later
use.
Ensure that brakes are locked.
Remove screws (using a
screwdriver)
Remove wooden blocks
A
B
3
EU VERSION
INSTRUCTION
EU VERSION
INSTRUCTION
1
2
Remove all parts of the packaging.
Use caution when unpacking and
save the packing material for later
use.
Ensure that brakes are locked.
Remove screws (using a
screwdriver)
Remove wooden blocks
A
B
A
B
6

4
3
4
Tilt the cart with caution by
rotating it on the wheels
equipped with brakes.
While one person is titling the cart,
the other person should:
Remove the cardboard
insert
Then gently lower the cart back
down to the pallet.
Unlock the brakes and
gently push the cart down
the pallet starting with the
wheels that have brakes
Lock the brakes again
Tilt the cart on the wheels
that have brakes
Remove the pallet
Then gently lower the cart down
to the ground.
A
A
B
C
D
B
EU VERSION
INSTRUCTION
EU VERSION
INSTRUCTION
3
4
Tilt the cart with caution by
rotating it on the wheels
equipped with brakes.
While one person is titling the cart,
the other person should:
Remove the cardboard
insert
Then gently lower the cart back
down to the pallet.
Unlock the brakes and
gently push the cart down
the pallet starting with the
wheels that have brakes
Lock the brakes again
Tilt the cart on the wheels
that have brakes
Remove the pallet
Then gently lower the cart down
to the ground.
A
A
B
C
D
B
A
B
D
C
Lock
A
B
7

5
Package includes:
Laser engraving plateKeys Power cord (EU) Power cord (UK)
CHGCT30I-1K (UK)
CHGCT30I-1E (EU)
8
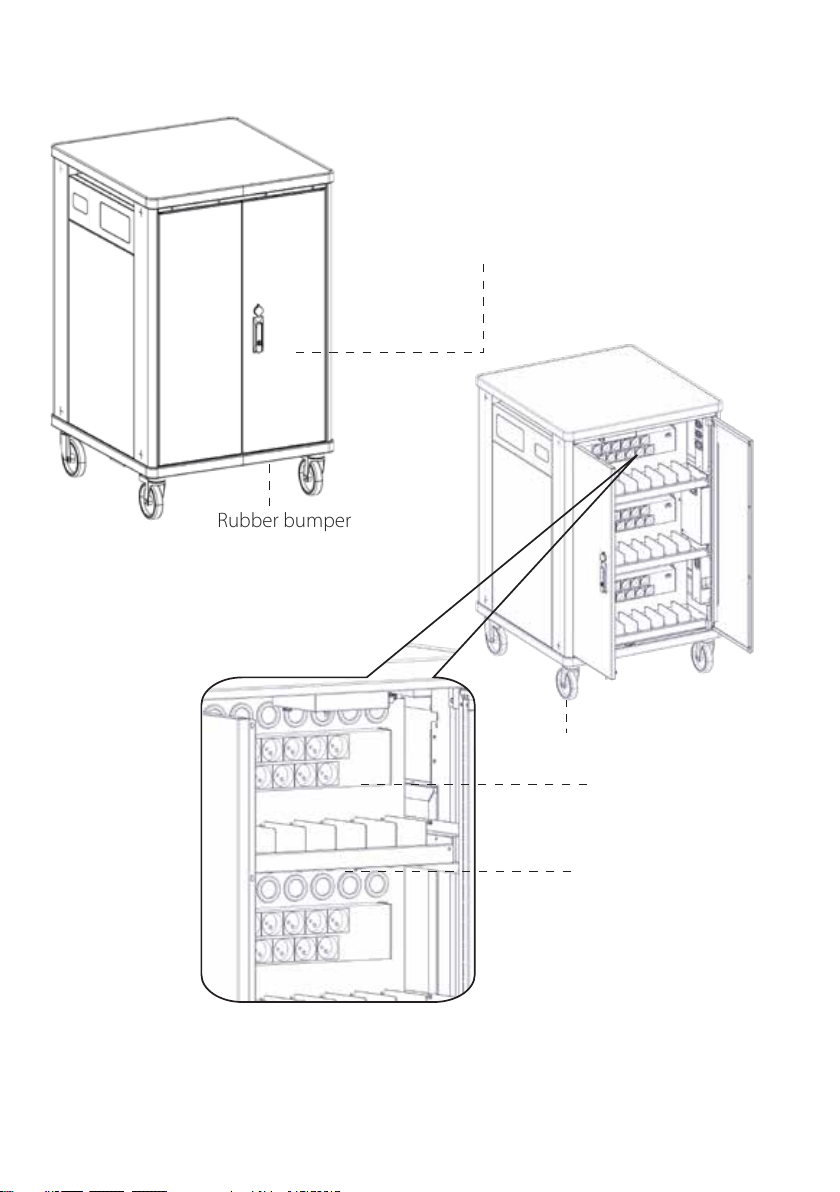
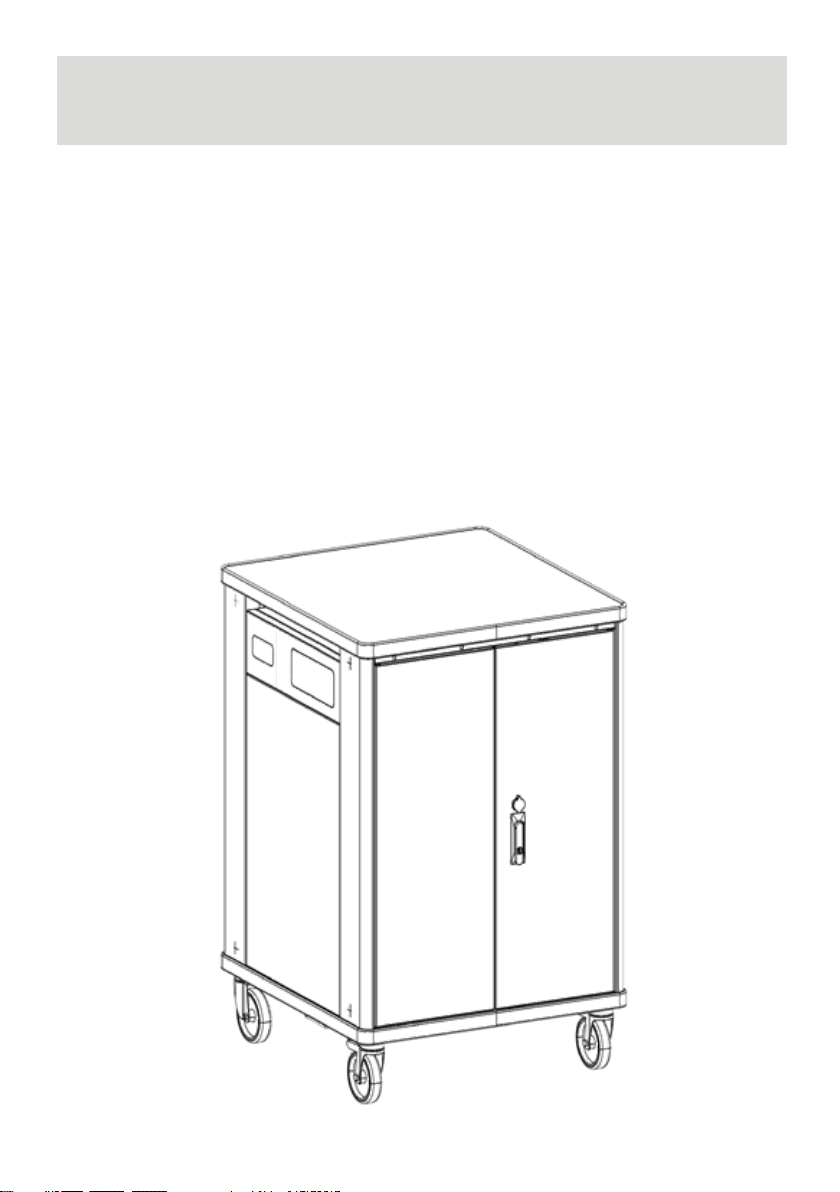
Cart Diagram
6
Front
Door handle and locks
Rubber bumpers
Rear
Caster
Power strip
Power Adapter slots
9
7
Rear
Power Switch
10
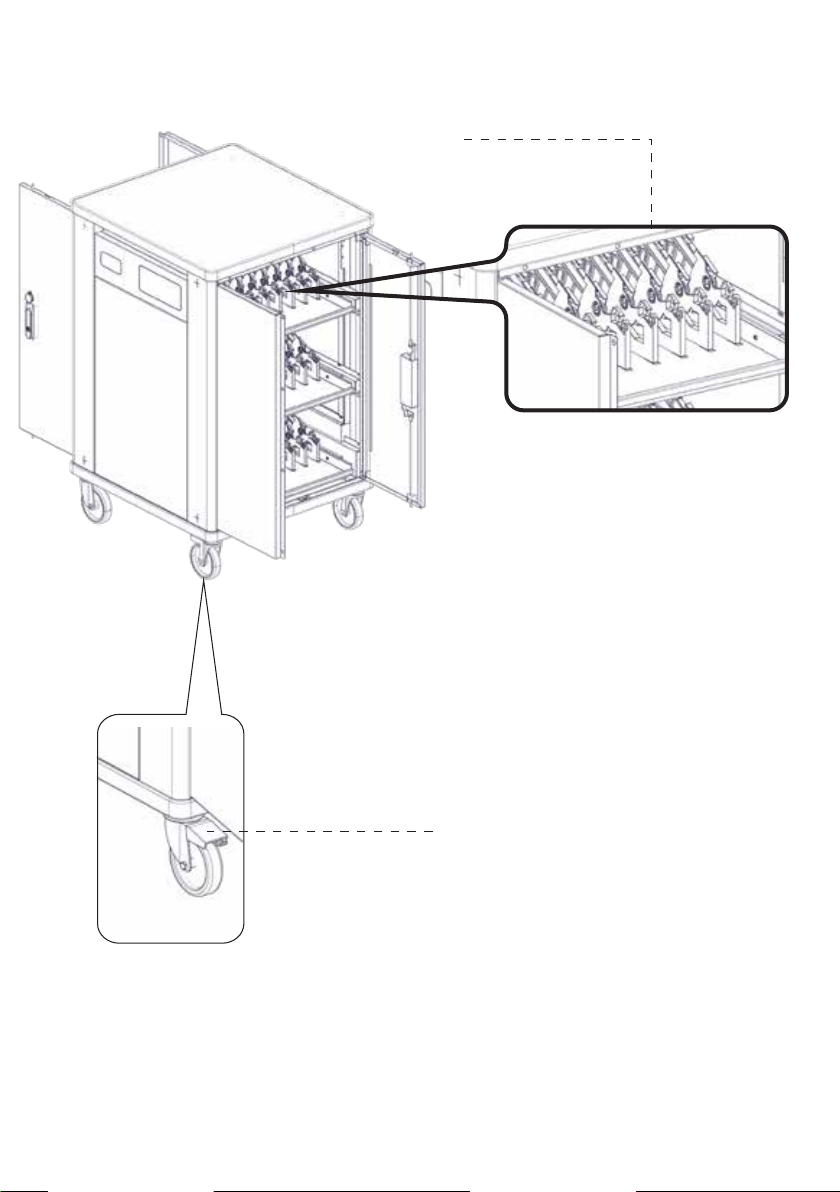
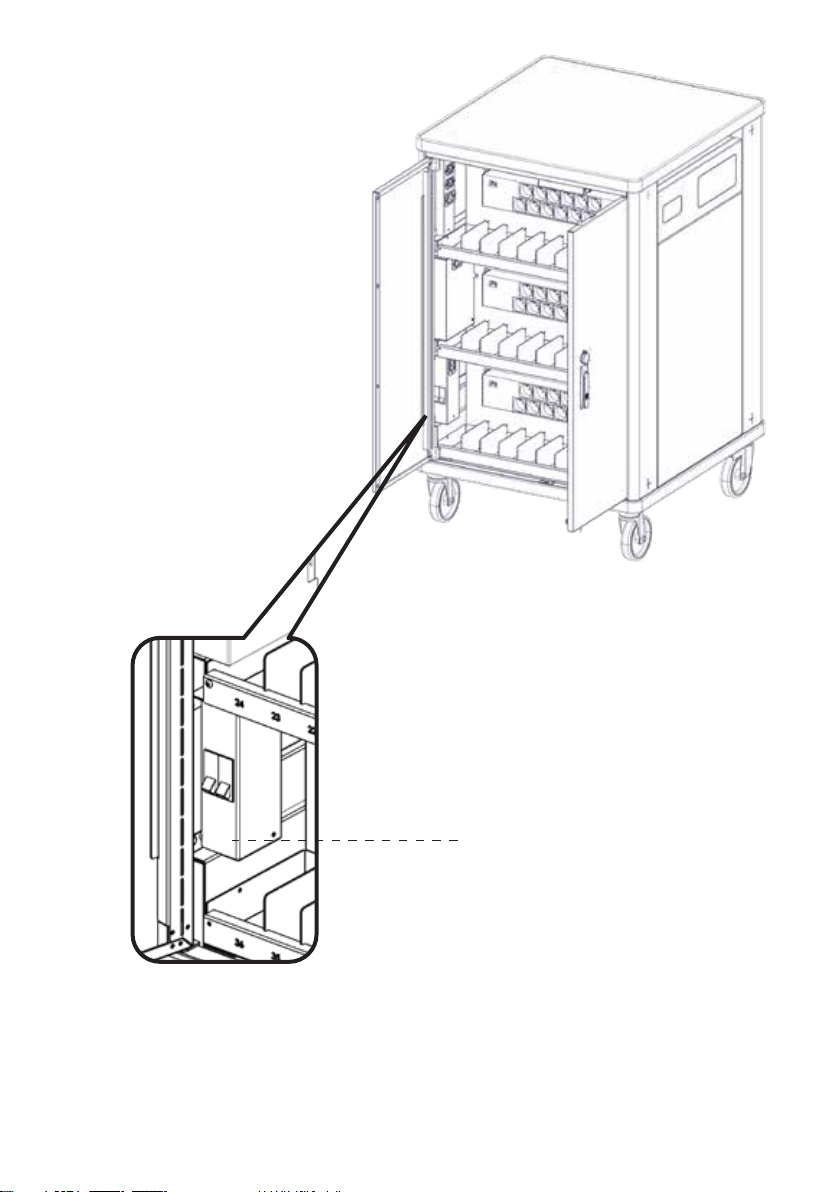
8
Front
Device slots
Locking caster
11
9
Front
Charging LED indicators
12
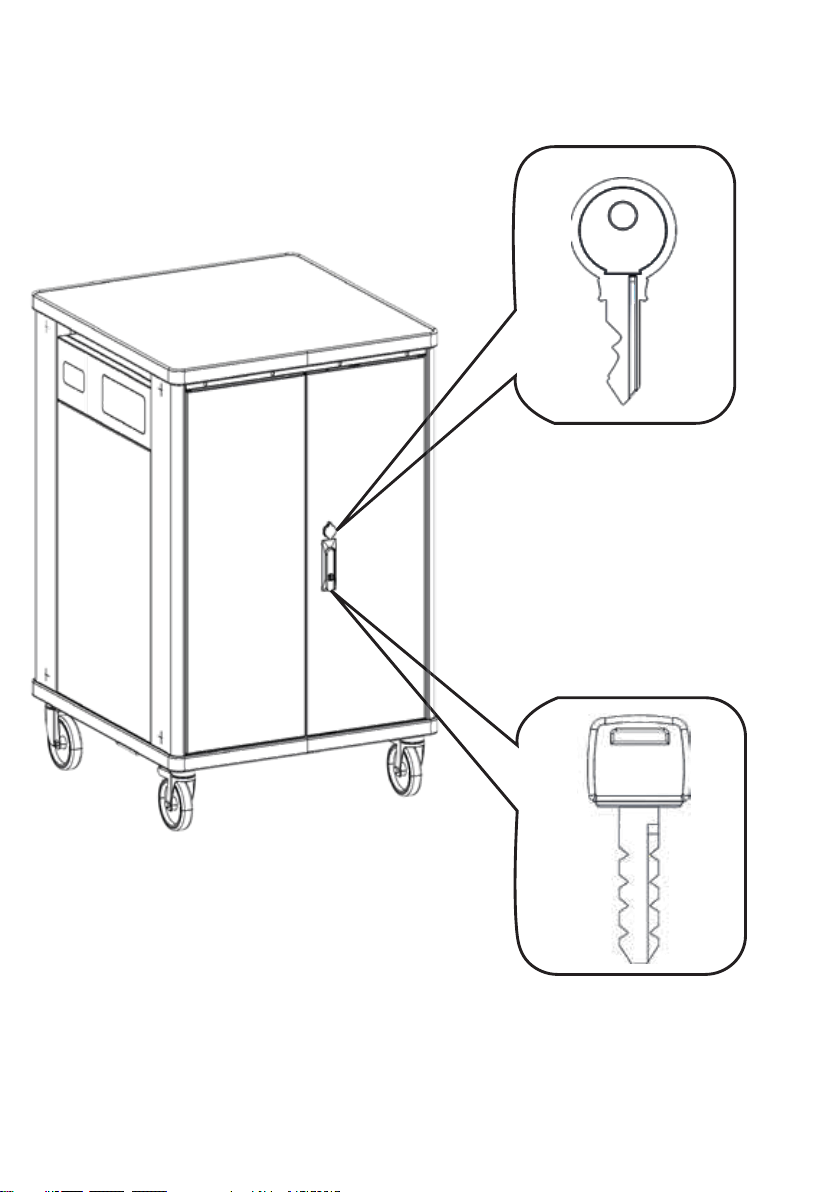
Locking the cart
10
System Administrator Lock
User Lock
13
For best performance follow these guidelines:
SETUP AND USAGE
11
Spread the devices as much as possible on the three shelves. For example, if you
have 21 devices, load 7 on each shelf.
•
Load the devices starting from the lowest shelf.•
Avoid using defective/broken/repaired power supply units.•
Avoid using cables with exposed wires or with home-made repairs with tape•
Always use power supply units with EU plug. Avoid using global power adapters.•
Always use the original power supply units for your devices, avoid using power
supply units that requires adapters on the connector
•
14
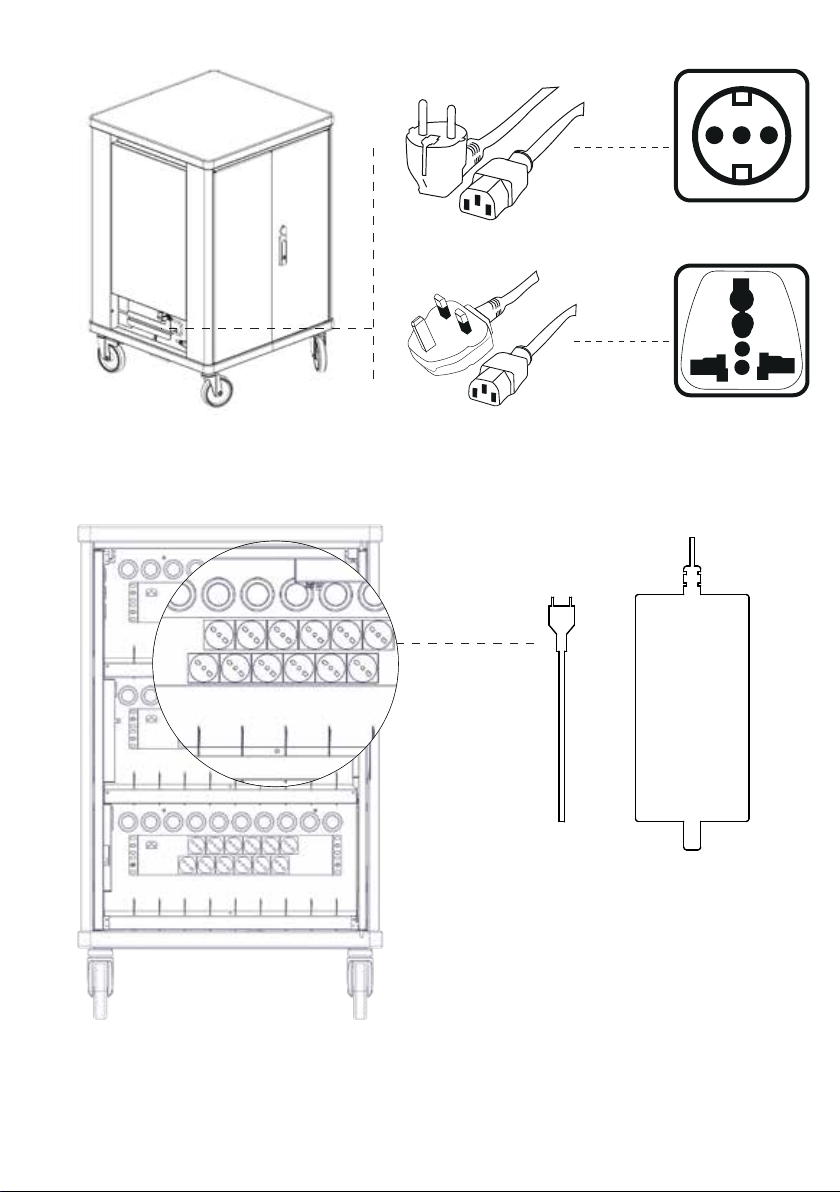
12
Plug in AC adapters into power strips
EU version
UK version
15
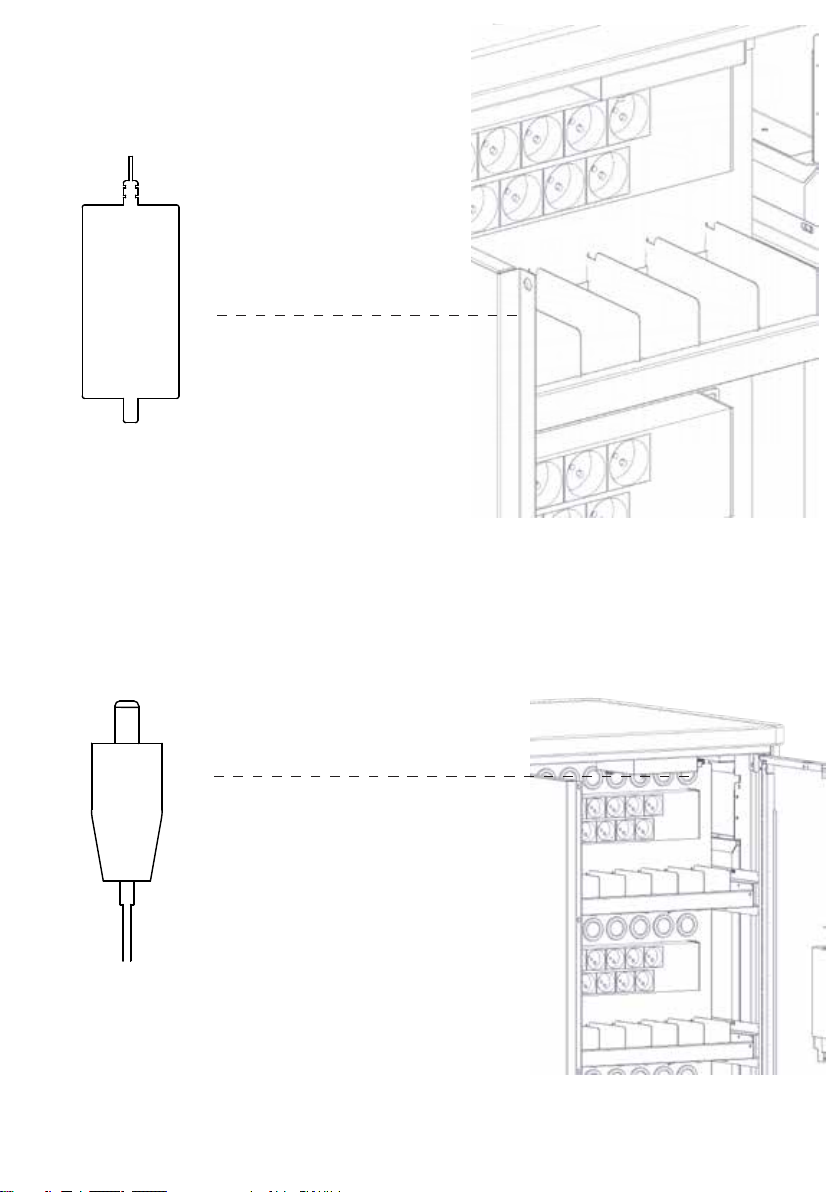
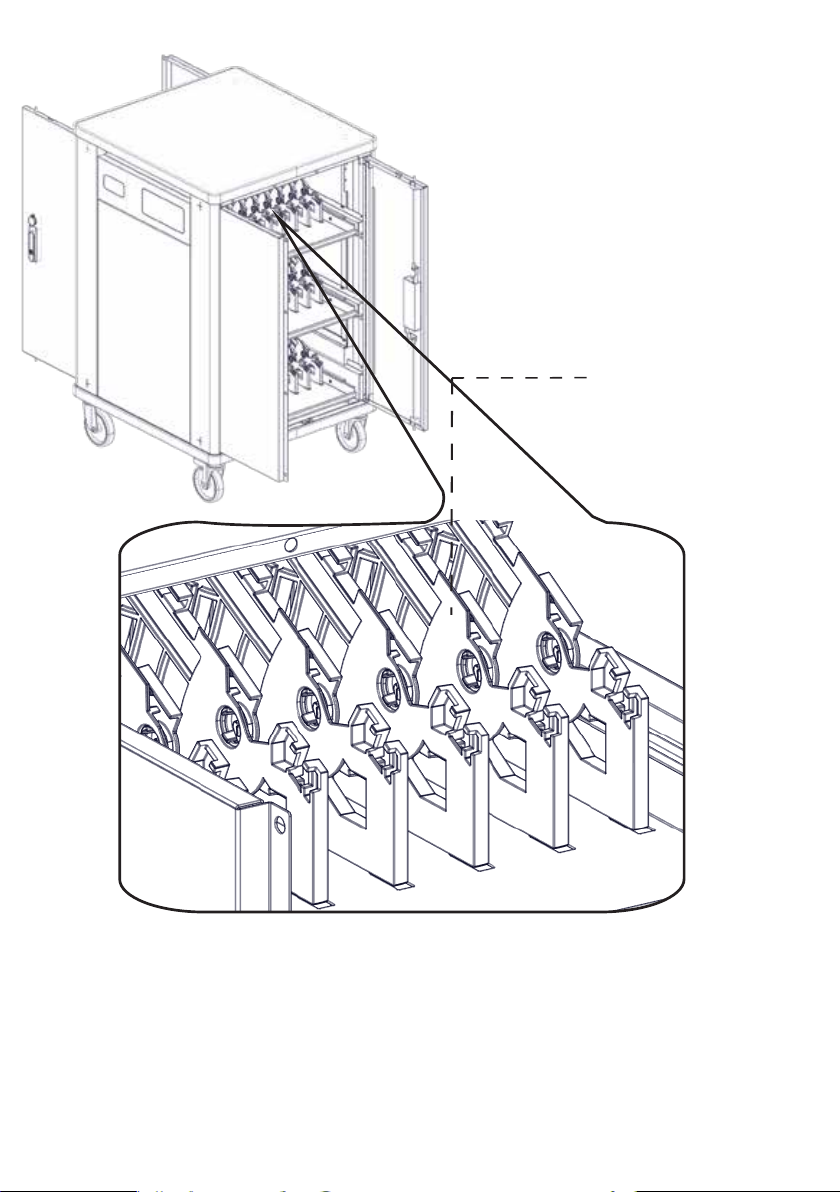
13
Place power adapters into slots
Insert the cable through the pass-trough holes
16
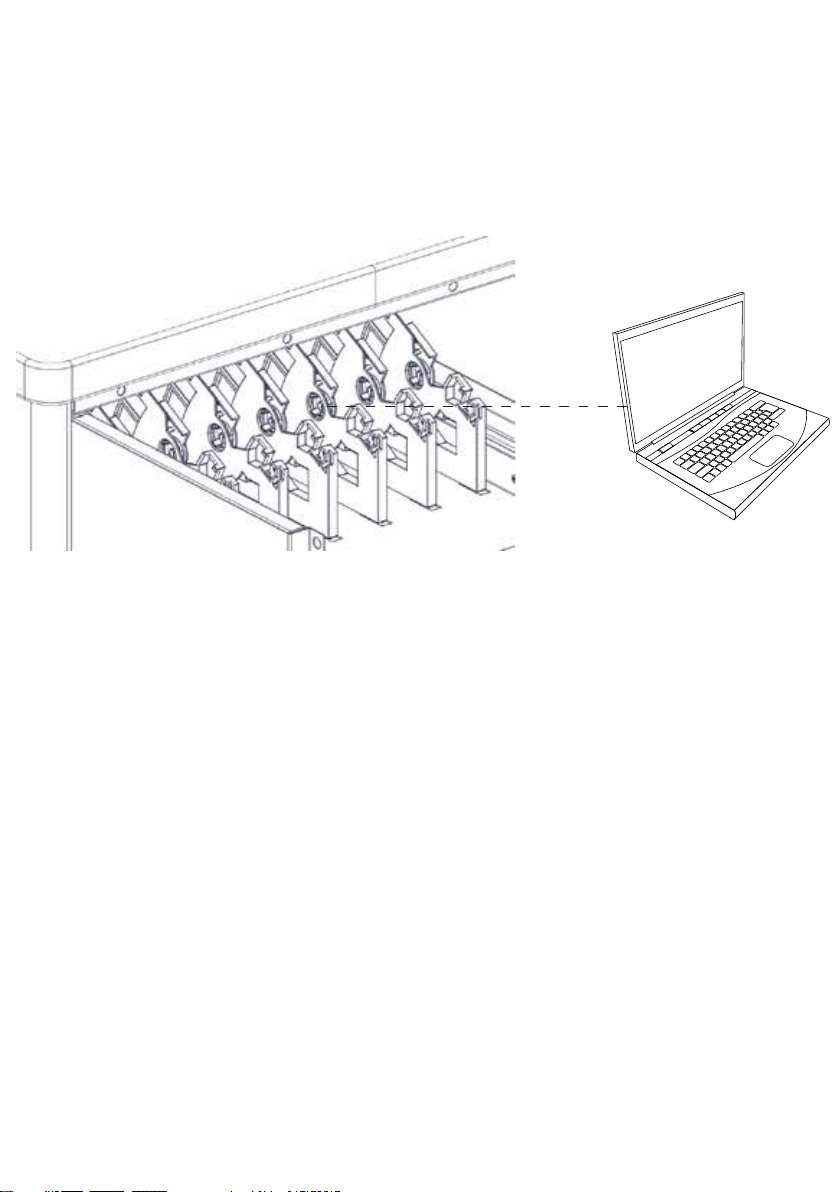
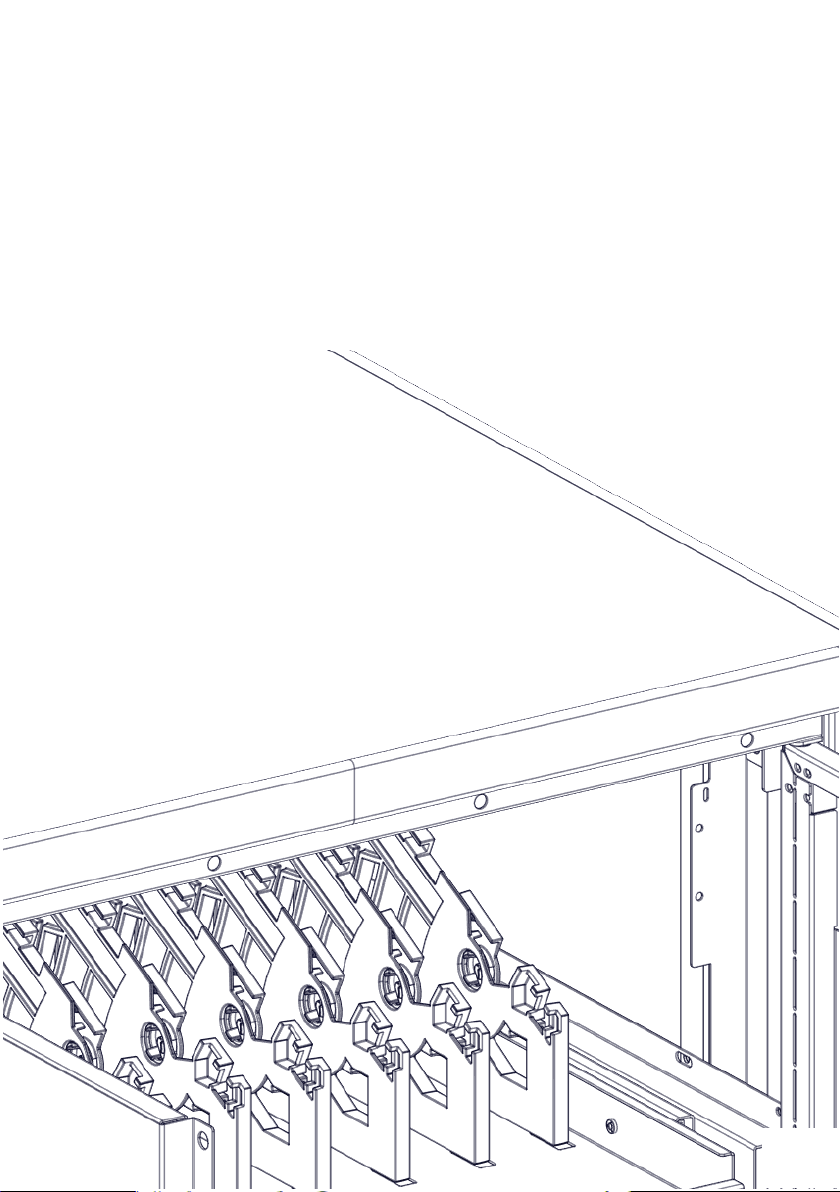
14
Place the cable on the cable holder dividers
Before running the cable, unlock the mechanism shown in the image below
Open Closed
17
Put devices inside the slots
Total maximum weight per shelf is 30 kg
15
Plug the power adapters in to your devices so they can charge
18
Charging system
Charging all of your devices at one time can overload a typical circuit. V7 Charge Carts are
equipped with intelligent charging that automatically switches the power to the devices that
need it first. It has sensors for each power strip in the charge cart, and constantly monitors the
incoming current from the wall outlet. It limits the initial inrush current to protect the devices
when first powered on. As devices charge it, continuously monitors the amount of current to keep
the maximum number of devices charging while protecting the devices and the building’s
electrical system.
The LED indicators will show you which power strips are currently charging.
16
19

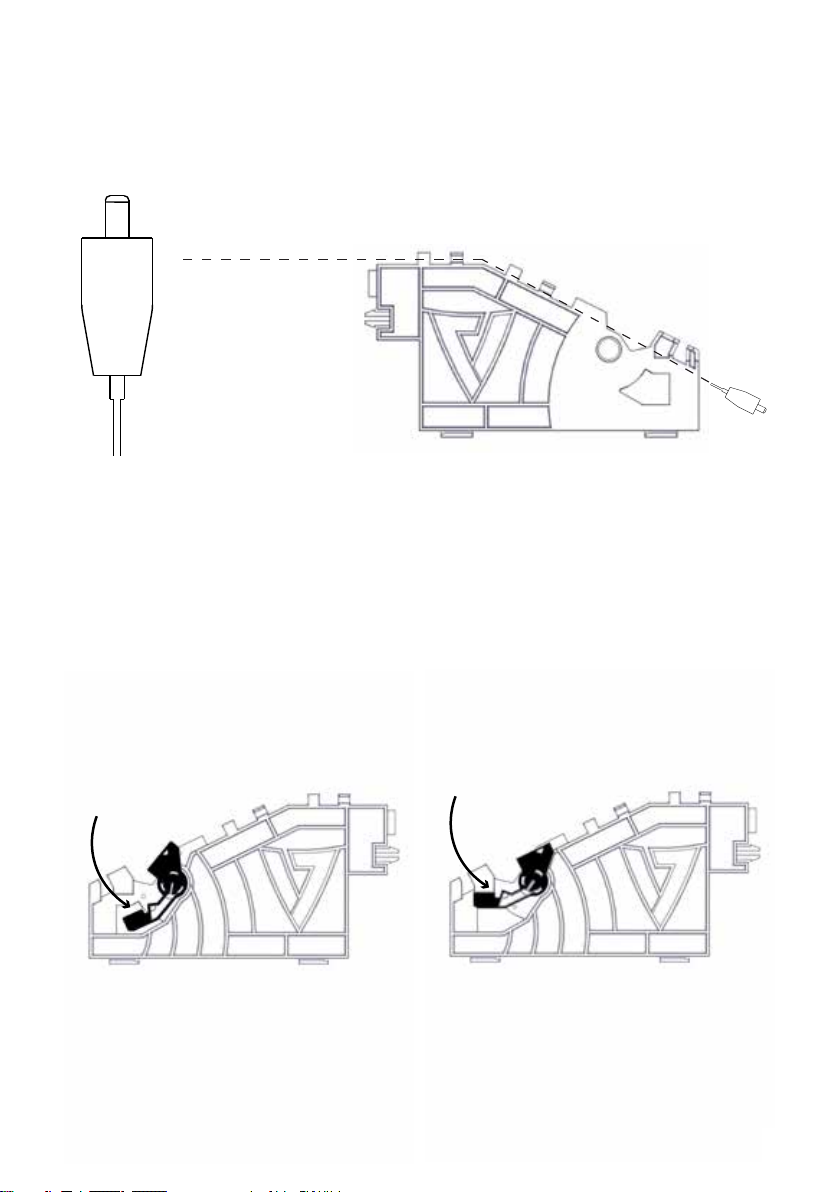
17
Turn o the main power switch, make all the indicated connections and turn
on the power switch again.
Plug cart into outlet
CAUTION
!Lock the front wheels rst
The power cable strain relief mechanism ensures that the cable is not stressed
incorrectly. If the cable needs replacing, simply remove the screw.
20
This manual suits for next models
1
Table of contents
Languages:
Other SEVEN Outdoor Cart manuals


