SGM Idea Par LED Zoom RGB User manual

GB
Idea Par Led Zoom RGB XM368-V1.2 -B
1
Sommario
INTRODUCTION:...............................................................................................................................................2
DESCRIPTION OF THE DEVICE.................................................................................................................2
Features.................................................................................................................................................................. 2
OVERVIEW ...........................................................................................................................................................3
SAFETY INSTRUCTIONS ...............................................................................................................................3
GENERAL GUIDELINES..................................................................................................................................4
INSTALLATION INSTRUCTIONS..............................................................................................................5
Mounting t e device........................................................................................................................................... 5
Over ead rigging................................................................................................................................................. 6
DMX-512 control connection................................................................. Errore. Il segnalibro non è definito.
Control Board ....................................................................................................................................................... 8
Main functions: .................................................................................................................................................... 9
INSTRUCTIONS ON USE: ...........................................................................................................................15
INSTRUCTIONS FOR INSTALLING THE BARN-DOOR AND FROST FILTER....................17
CLEANING AND MAINTENANCE.............................................................................................................17
TECHNICAL SPECIFICATIONS ................................................................................................................18

GB
XM368-V1.2 -B Idea Par Led Zoom RGB
2
KEEP THIS MANUAL FOR FUTURE NEEDS
T ank you for your patronage. We are confident t at our excellent products and service can satisfy you.
For your own safety, please read t is user manual carefully before installing t e device.
CAUTION
Keep t is device away from rain and moisture!
Unplug mains lead before opening t e ousing
Every person involved wit t e installation, operation and maintenance of t is device as to
- be qualified
- follow t e instructions of t is manual
- consider t is manual to be part of t e total product
- keep t is manual for t e entire service life of t e product
- pass t is manual on to every furt er owner or user of t e product
- download t e latest version of t e user manual from t e Internet
INTRODUCTION:
T ank you for aving c osen t is professional LED lig ting.
You will see you ave acquired a powerful and versatile device.
Unpack t e device. Inside t e box you s ould find:
1. T e fixture device
2. One power cables
3. One XLR connection cable
4. One safety rope and t is manual
Belows are t e optional accessories, please purc ase from your local dealer if needed
1. Barn-door
2. Frost filter
Please c eck carefully t at t ere is no damage caused by transportation. S ould t ere be any, consult your
dealer and don’t install t is device.
DESCRIPTION OF THE DEVICE
Fea ures
Equipped wit 36 x3 W LEDS: 10 x red, 10 x blue, 16 x green
50,0 000 ours LED life
DMX c annel: 8 c annels
Strobe-effect wit 1-18 flas es per second
Zoom: 13°~55° linear zoom
Stepless RGB colour c anging
Programmable color-c ange speed and strobe effect
4digit LED display
Software-upload by optional accessory via DMX line
GB
Idea Par Led Zoom RGB XM368-V1.2 -B
3
OVERVIEW
SAFETY INSTRUCTIONS
CAUTION!
Be careful wit your operations. Wit a dangerous voltage you can suffer a
dangerous electric s ock w en touc ing wires!
T is device as left t e factory in perfect condition. In order to maintain t is condition and to ensure a safe
operation, it is absolutely necessary for t e user to follow t e safety instructions and warning notes written
in t is user manual.
Important:
Damages caused by the disregard of this user manual are not subject to warranty. The
dealer will not accept liability for any resulting defects or problems.
If t e device as been exposed to temperature c anges due to environmental c anges, do not switc it on
immediately. T e arising condensation could damage t e device. Leave t e device switc ed off until it as
reac ed room temperature.
T is device falls under protection-class I. T erefore it is essential t at t e device be eart ed.
T e electric connection must carry out by qualified person.
T e device s all only be used wit rate voltage and frequency.
Make sure t at t e available voltage is not ig er t an stated at t e end of t is manual.
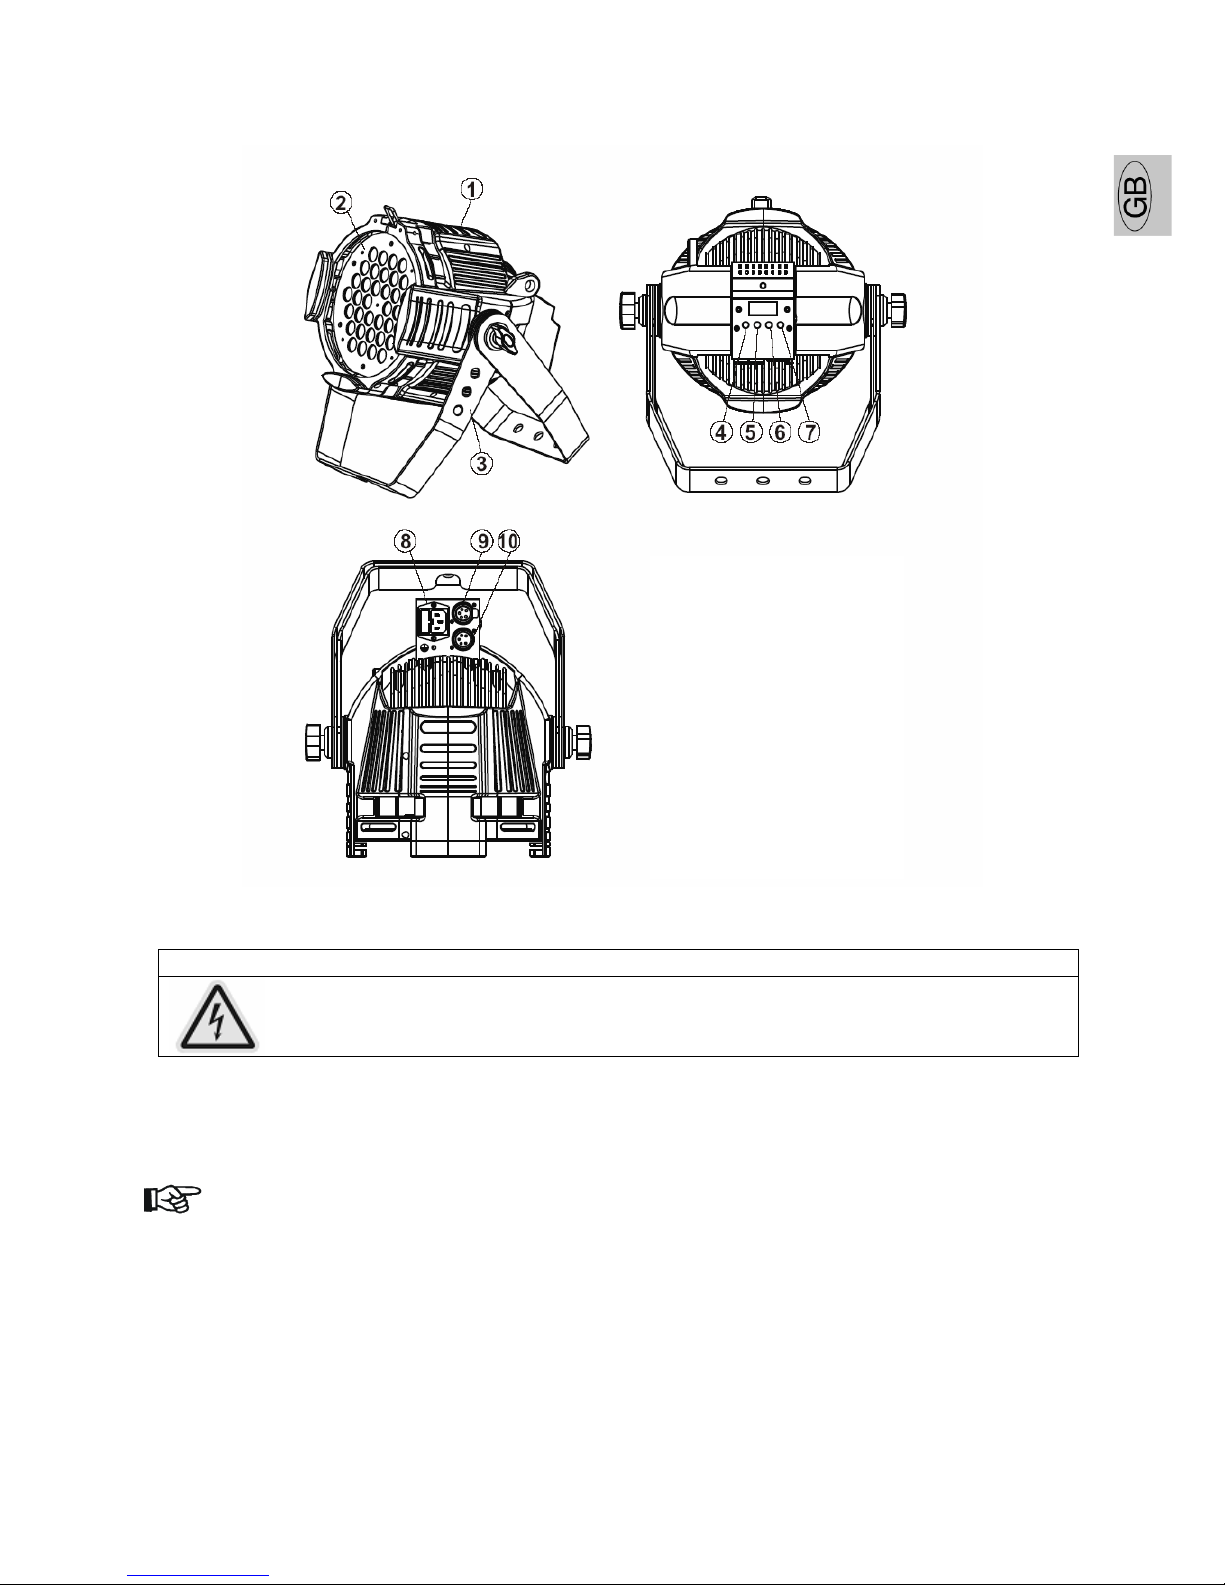
1. Housing
2. LEDS
3. Floor-stand
4. Menu-button
5. Up-button
6. Down-button
7. Enter-button
8. Power input
9. DMX output
10. DMX-input

GB
XM368-V1.2 -B Idea Par Led Zoom RGB
4
Make sure t e power cord is never crimped or damaged by s arp edges. If t is would be t e case,
replacement of t e cable must be done by an aut orized dealer.
Always disconnect from t e mains, w en t e device is not in use or before cleaning it. Only andle t e power
cord by t e plug. Never pull out t e plug by tugging t e power cord.
During initial start-up some smoke or smell may arise. T is is a normal process and does not necessarily
mean t at t e device is defective, it s ould decrease gradually.
Please don't project t e beam onto combustible substances.
Fixtures cannot be installed on combustible substances, keep more t an 30cm distance wit wall for smoot
air flow, so t ere s ould be no s elter for fans and ventilation for eat radiation.
If t e external flexible cable or cord of t is luminaire is damaged, it s all be exclusively replaced by t e
manufacturer or is service agent or a similar qualified person in order to avoid a azard.
CAUTION!
Never touc device during operation! T e ousing may eat up
Never look directly into t e lig t source, as sensitive persons may suffer an
epileptic s ock.
Please be aware t at damages caused by manual modifications to t e device are not subject to warranty.
Keep away from c ildren and non-professionals.
GENERAL GUIDELINES
T is device is a lig ting effect for professional use on stages, in discot eques, t eatres, etc.
T is fixture is only allowed to be operated wit t e max alternating current w ic stated in t e tec nical
specifications in t e last page of t is manual, t e device was designed for indoor use only.
Lig ting effects are not designed for permanent operation. Consistent operation breaks may ensure t at t e
device will serve you for a long time wit out defects. Do not s ake t e device.
Avoid brute force w en installing or operating t e device.
T e device s all only be used complete wit its protective s ield.
W ile c oosing t e installation-spot, please make sure t at t e device is not exposed to extreme eat,
moisture or dust. T e minimum distance between lig t-output from t e projector and t e illuminated
surface must be more t an 0.1 meter.
Operate t e device only after aving familiarized wit its functions. Do not permit operation by persons not
qualified for operating t e device. Most damages are t e result of unprofessional operation.
Please use t e original packaging if t e device is to be transported.
For safety reasons, please be aware t at all modifications on t e device are forbidden.
If t is device will be operated in any way different to t e one described in t is manual, t e product may
suffer damages and t e guarantee becomes void. Furt ermore, any ot er operation may lead to
s ort-circuit, burns, electric s ock, lamp explosion, cras , etc.

GB
Idea Par Led Zoom RGB XM368-V1.2 -B
5
INSTALLATION INSTRUCTIONS
CAUTION!
Do not operate t is device wit open cover.
Only install t e lamp wit t e device unplugged from t e mains
.
Moun ing he device
CAUTION
Please consider t e EN 60598-2-17 and t e ot er respective national
norms during t e installation. T e installation must only be carried out by
a qualified person.
T e applicable temperature for t e lignting is between -25°C to 45°C. Do not use t e lig ting under or above
t e temperature.
T e installation of t e effect as to be built and constructed in a way t at it can old 10 times t e weig t for
1 our wit out any arming deformation.
The ins alla ion mus always be secured wi h a secondary safe y a achmen , e.g. an appropria e
safe y rope.
Never stand directly below t e device w en mounting, removing or servicing t e fixture.
T e operator as to make sure t e safety relating and mac ine tec nical installations are approved by an
expert before taking t e device into operation for t e first time.
T ese installations ave to be approved by a skilled person once a year.
CAUTION
Before taking into operation for t e first time, t e installation as to be
approved by an expert.
Cau ions:
The effec should be ins alled ou side areas where persons may reach i , walk by or be sea ed.
CAUTION
W en installing t e device, make sure t ere in no ig ly inflamm able
material wit in a distance of min. 0,5m
Over ead mounting requires extensive experience, including amongst ot ers calculating working load limits,
installation material being used, and periodic safety inspection of all installation material and t e device. If
you lack t ese qualifications, do not attempt t e installation yourself. Improper installation can result in
bodily injury.
CAUTION
T e electric connection must only be carried out by a qualified electrician.
Before mounting make sure t at t e installation area can old a minimum point load of 10 times t e device’s
weig t.
Connect t e fixture to t e mains wit t e power plug.
GB
XM368-V1.2 -B Idea Par Led Zoom RGB
6
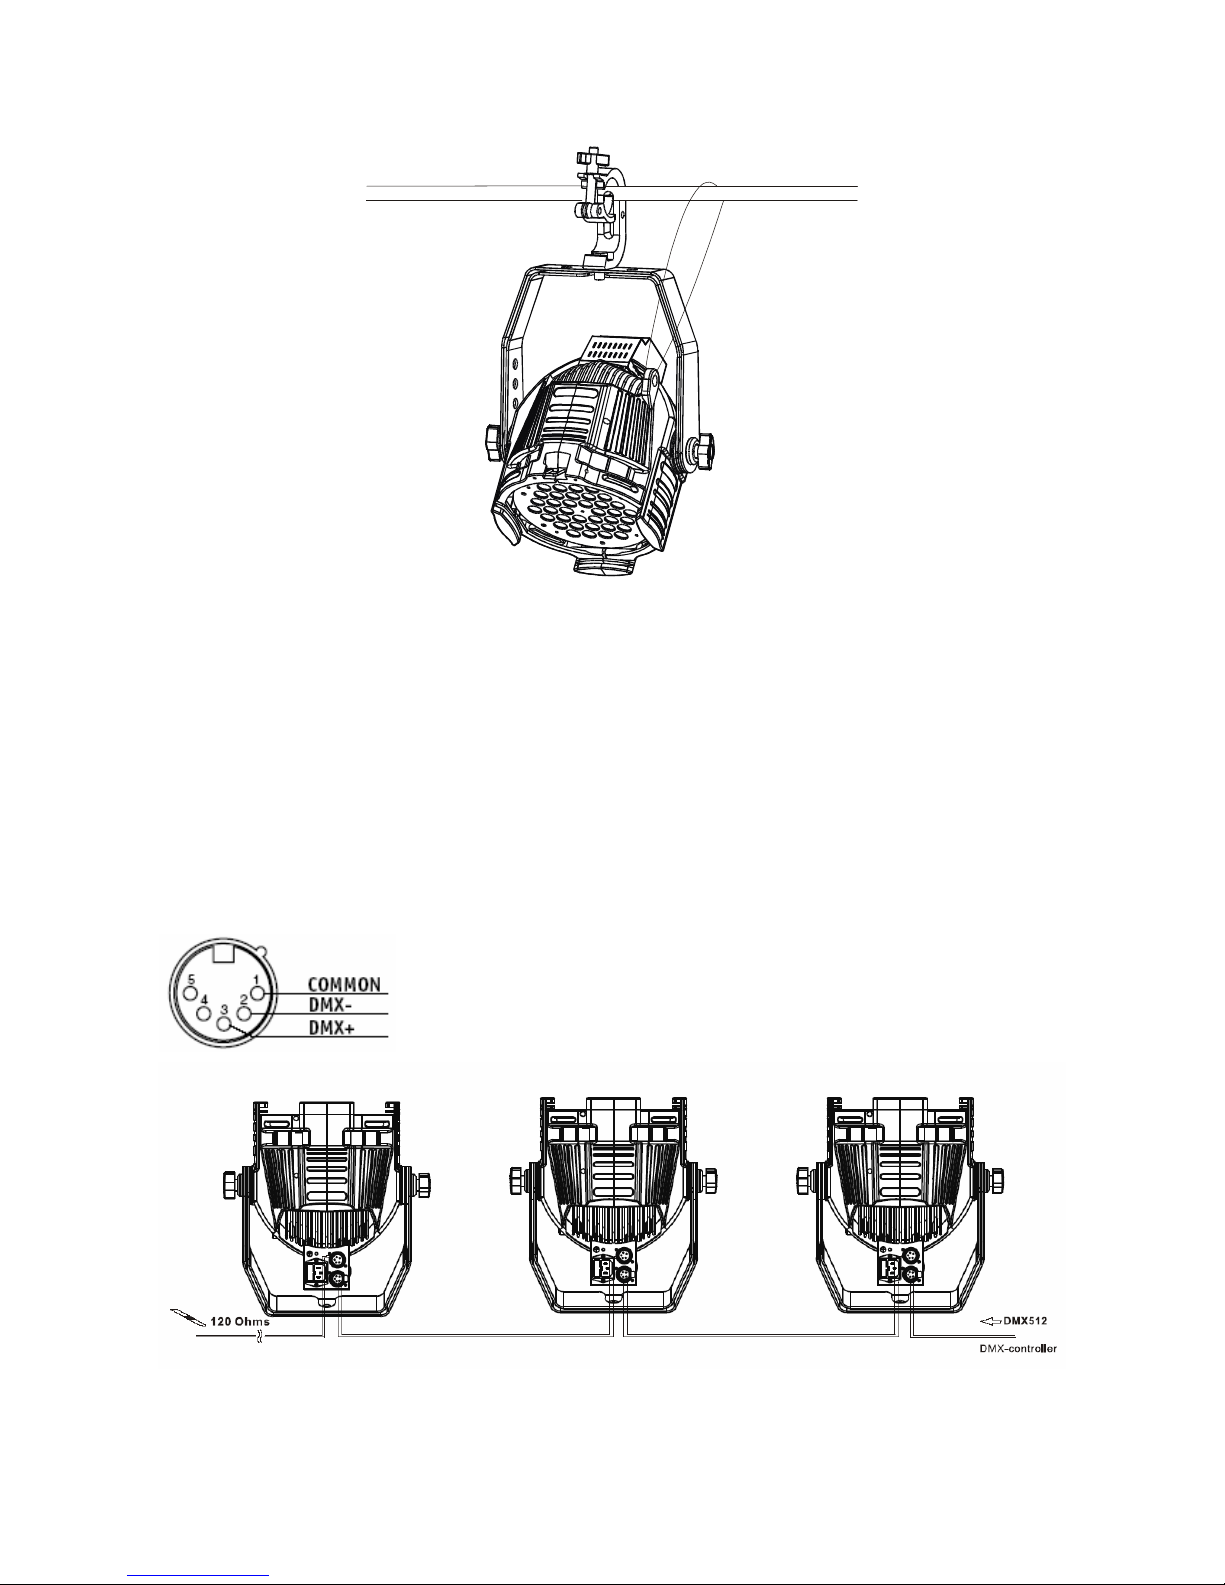
Overhead rigging
Screw t e bolt of t e clamp into t e old of t e bracket, and tig ten t e screw underneat .
Pull t e safety-rope t roug t e oles on t e bracket of t e base and over t e trussing system or a safe
fixation spot. Insert t e end in t e carabine and tig ten t e safety screw.
DMX-512 con rol connec ion
T e product as a DMX 512 input fitted wit standard 5-pin XLR connectors. Screened cables in compliance
wit EIA RS-485 specifications and t e following c aracteristics must be used for connections:
- 2 conductors plus screen
- 120O m impedance
- low capacitance
- max. transmission rate 250kBaud.
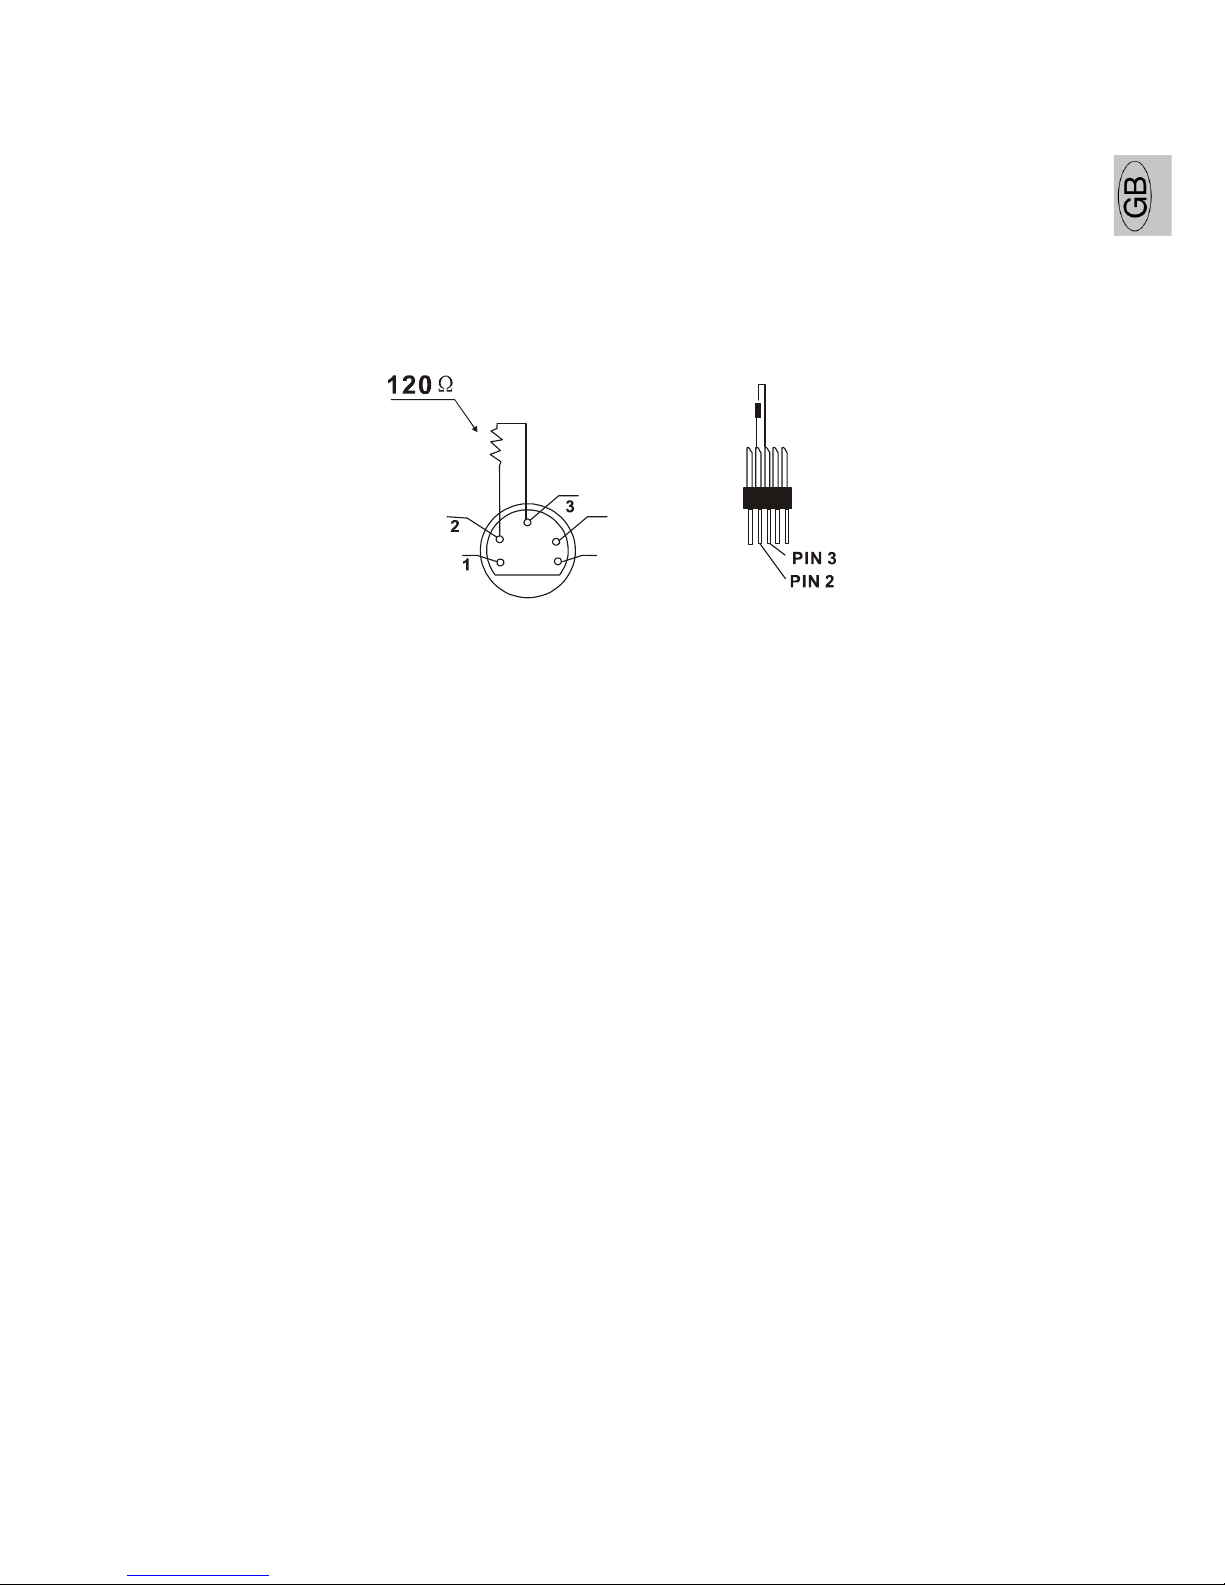
Cable connec ions:
see illus ra ion, aking care wi h he screen, which mus be connec ed
o Pin 1
Address 13 Address 7 Address 1
Please note: to ensure maximal stability, w en t e voltage is 120V, only six devices may be connected
GB
Idea Par Led Zoom RGB XM368-V1.2 -B
7
Please no e: to ensure maximal stability, w en t e voltage is 120V, only five devices may be connected
toget er in t is manner! From t e sixt device, please connect to power supply to get power for t e second
link; w en t e voltage is over 220V, only ten devices may be connected toget er in t is manner! From t e
elevent device, please connect to power supply to get power for t e second link.
DMX-512 connec ion wi h DMX ermina or
For installations w ere t e DMX cable as to run a long distance or is in an electrically noisy environment,
suc as in a discot eque, it is recommended to use a DMX terminator. T is elps in preventing corruption of
t e digital control signal by electrical noise. T e DMX terminator is simply an XLR plug wit a 120 Ω resistor
connected between pins 2 and 3,w ic is t en plugged into t e output XLR socket of t e last fixture in t e
c ain. Please see illustrations below.
4
5
Projector DMX starting address selection
All fixtures s ould be given a DMX starting address w en using a DMX signal, so t at t e correct fixture
responds to t e correct control signals. T is digital starting address is t e c annel number from w ic t e
fixture starts to “listen” to t e digital control information sent out from t e DMX controller. T e allocation of
t is starting address is ac ieved by setting t e correct number on t e display located on t e base of t e
device.
You can set t e same starting address for all fixtures or a group of fixtures, or make different address for
eac fixture individually.
If you set t e same address, all t e units will start to “listen” to t e same control signal from t e same
c annel number. In ot er words, c anging t e settings of one c annel will affect all t e fixtures
simultaneously.
If you set a different address, eac unit will start to “listen” to t e c annel number you ave set, based on
t e quantity of control c annels of t e unit. T at means c anging t e settings of one c annel will affect only
t e selected fixture.
In t e case of t e led lig ting, w ic is 8 c annels fixture w en you select t e standard c annel mode, you
s ould set t e starting address of t e first unit to 1, t e second unit to 9(8 + 1), t e t ird unit to 17 (8+ 9),
and so on.

GB
XM368-V1.2 -B Idea Par Led Zoom RGB
8
Con rol Board
Default settings s aded.
VALU A001~XXX
(AXXX) DMX address setting
SLAV ON/OFF
(SLAV) Slave setting
ADDR
RDMX ON/OFF C ange DMX address via
external controller
ALON (AU-A) Automatic Run in Stand
Alone
AUTO
MAST (AU-M) Automatic Run as Master
ALON (SO-A) Sound-controlled Run in
Stand Alone
RUN
SOUN
MAST (SO-M) Sound-controlled Run as
Master
VALU D–XX D-00
(DXXX)
Display t e DMX 512 value
of eac c annel
FLIP ON/OFF Reverse display
D ON ON/OFF S ut off LED display
0 MODE
DISP
LOCK ON/OFF
Key lock
(Press t e MENU button
for 3 seconds to activate)
MIC M-XX Mic sensitivity
FAIL OFF/HOLD/
AUTO/SOUN
No DMX Status
REST Reset
DFSE ON/OFF Restore factory settings
POHO ON/OFF
Power on to preserve t e
MANL settings
1 SET
VER V-1.0~V-9.9 Software version
2 MANL
<RED
GREN
BLUE
MACO
PROG
STRB
DIMM
ZOOM>
R
XXX(000~255)
G
XXX(000~255)
B
XXX(000~255)
M
XXX(000~255)
P
XXX(000~255)
S
XXX(000~255)
D
XXX(000~255)
Z
XXX(000~255)
Test function of eac
c annel
LIFE 0000~9999( ours)
Fixture running time
3 TIME CLFE ON/OFF Clear fixture time *code is
“838”
STEP S–01 ~S–48 Steps of Program Run
REC. RE.XX Auto Save Scene
<RED
GREN
BLUE
MACO
PROG
STRB
DIMM
ZOOM>
R
XXX(000~255)
G
XXX(000~255)
B
XXX(000~255)
M
XXX(000~255)
P
XXX(000~255)
S
XXX(000~255)
D
XXX(000~255)
Z
XXX(000~255)
Edit t e c annels of eac
scene
FADE XXX Adjust fade speed
4 EDIT SC01
~ SC48
CEDT ON/OFF Edit program via controller

GB
Idea Par Led Zoom RGB XM368-V1.2 -B
9
Main func ions:
- Main menu 0
1. Press [MENU] to enter t e main menu "MODE" (display flas ing)
2. Press [ENTER] and select "ADDR", “RUN” or "DISP" by pressing [UP] or [DOWN] button.
3. Press [ENTER] for selecting t e desired sub menu.
- DMX address se ing, Slave se ing
-
DMX address se ing
Wit t is function, you can adjust t e desired DMX-address via t e Control Board.
1. Select “VALU” by pressing [UP] or [DOWN] button.
2. Press [ENTER], adjust t e DMX address by pressing [UP] or [DOWN] button.
3. Press [ENTER] to confirm or pressing [MENU] to return to main menu.
- Slave se ing
Wit t is function, you can define t e device as slave.
1. Select “SLAV” by pressing [UP] or [DOWN] button.
2. Press [ENTER], t e display s ows “ON” or “OFF”.
3. Press [UP] to select “ON” if you wis to enable t is function or press [DOWN] to select “OFF” if you
don’t.
4. Press [ENTER] to confirm or press [MENU] to return to main menu.
-
DMX address se ing via con roller
Wit t is function, you can adjust t e desired DMX-address via an external controller.
T is function can only be activated w en t e DMX-value of all ot er c annels is set to "0" on t e
controller.
1. Select “RDMX” by pressing [UP] or [DOWN].
2. Press [ENTER], t e display s ows “ON” or “OFF”.
3. Press [UP] to select “ON” if you wis to enable t is function or [DOWN] to select “OFF” if you don’t.
4. Press [MENU] to confirm.
5. Press [ENTER] in order to return to t e main menu.

GB
XM368-V1.2 -B Idea Par Led Zoom RGB
10
- Program Run, Mas er se ing
Wit t e function "RUN", you can run t e internal program. You can set t e number of steps under Step.
You can edit t e individual scenes under Edit. You can run t e individual scenes eit er automatically (AUTO),
i.e. wit t e adjusted Step-Time or sound-controlled (SOUN). T e selection "ALON" means Stand
Alone-mode and "MAST" t at t e device is defined as master.
1. Select "AUTO" or "SOUN" by pressing [UP] or [DOWN] button.
2. Press [ENTER] for selecting t e desired extension menu.
3. Select "ALON" or "MAST" by pressing [UP] or [DOWN] button.
4. Press [ENTER] to confirm or Press [MENU] to return to t e main menu.
-
Display he DMX-value, Reverse display, Shu off LED display
- Display he DMX 512 value of each channel
Wit t is function you can display t e DMX 512 value of eac c annel.
1. Select "VALU" by pressing [UP] or [DOWN] button.
2. Press [ENTER] to confirm; t e display s ows“D-00”. In t is setting, t e DMX-adjustment of every
c annel will be displayed.
3. Press [UP] or [DOWN] button in order to select t e desired c annel. If you select “D-12” t e display
will only s ow t e DMX-value of t e 12
t
c annel.
4. Press [ENTER] to confirm or Press [MENU] to return to t e main menu.
5. T e display s ows "D- XX”, “X” stands for t e DMX-value of t e selected c annel.
- Reverse display
Wit t is function you can rotate t e display by 180°.
1. Select "FLIP" by pressing [UP] or [DOWN] button.
2. Press [ENTER], t e display s ows “ON” or “OFF”.
3. Press [UP] to select “ON” if you wis to enable t is function or press [DOWN] button to “OFF” if you
don’t; t e display will rotate by 180°.
4. Press [ENTER] to confirm or Press [MENU] to return to t e main menu.
- Shu off LED display
Wit t is function you can s ut off t e LED display after 2 minutes.
1. Select "D ON" by pressing [UP] or [DOWN] button.
2. Press [ENTER], t e display s ows “ON” or “OFF”.
3. Press [UP] to select “ON” if you wis to enable t is function or press [DOWN] button to “OFF” if you
don’t.
4. Press [ENTER] to confirm or Press [MENU] to return to t e main menu.

GB
Idea Par Led Zoom RGB XM368-V1.2 -B
11
—
Locked keys he display
Wit t is function you can activate t e automatic keylock status. If t is function is activated, t e keys will be
locked automatically after exiting t e edit mode for 15 seconds. keeping press t e [MENU] key for 3seconds
if you do not need t is function.
1. Tap t e [UP] button until “LOCK” is displayed and tap t e [ENTER] button.
2. Press t e [UP] button to select “ON” to activate t is function, or “OFF” to deactivate t is function.
Press [ENTER] to confirm.
3. Press [MENU] to return to t e main menu.
-
Main menu 1
1. Press [MENU] to enter t e main menu (display flas ing).
2. Press [UP] or [DOWN] button. to select “SET”.
-
Mic sensi ivi y
Wit t is function you can adjust t e sensitivity of t e microp one.
1. Select “MIC” by pressing [UP] or [DOWN] button.
2. Press [ENTER], t e display s ows “M-XX”, “XX” stands for t e number from 0 to 99.
3. Press [ENTER] to confirm or Press [MENU] to return to t e main menu.
-Au oma ic Run by no DMX
Wit t is function you can automatic run t e device by no DMX.
1. Select “FAIL” by pressing [UP] or [DOWN] button.
2. Press [ENTER], t e display s ows “OFF”, “HOLD”, “AUTO” or “SOUN”.
3. Press [UP] or [DOWN] button to select“OFF”, “HOLD”, “AUTO” or “SOUN”., t e default is “HOLD”.
4. Press [ENTER] to confirm or Press [MENU] to return to t e main menu.
-
Rese
Wit t is function you can reset t e device via t e Control Board.
1. Select “REST” by pressing [UP] or [DOWN] button.
2. Press [ENTER] to reset or Press [MENU] to return to t e main menu.
- Res ore fac ory se ings
Wit t is function you can restore t e factory settings of t e device. All settings will be set back to t e default
values (s aded). Any edited scenes will be lost.
1. Select “DFSE” by pressing [UP] or [DOWN] button.
2. Press [ENTER], t e display s ows “ON” or “OFF”.
3. Press [UP] to select “ON” if you wis to enable t is function or press [DOWN] button to “OFF” if you
don’t.
4. Press [ENTER] to confirm or Press [MENU] to return to t e main menu.

GB
XM368-V1.2 -B Idea Par Led Zoom RGB
12
——Power on o preserve he MANL se ings
Wit t is function you can activate. T e fixture will return to t e scene manual set before automatically
after re-power on.
1. Tap t e [UP] button until “POHO” is displayed and tap t e [ENTER] button.
2. Press t e [UP] button to select “ON” to activate t is function, or “OFF” to deactivate t is function.
Press [ENTER] to confirm.
3. Press [MENU] to return to t e main menu.
- Sof ware version
Wit t is function you can display t e software version of t e device.
1. Select “VER” by pressing [UP] or [DOWN] button.
2. Press [ENTER], T e display will s ow “V-XX”, "XX" stands for t e version number, suc as t e display
may also s ow,"V-1.0","V-9.9"etc.
3. Press [ENTER] to confirm or Press [MENU] to return to t e main menu.
—
Main menu 2
Wit t is function you can Manual adjust intensity
1. Select “MANL” by pressing [UP] or [DOWN] button.
2. Press [ENTER], t e display s ows“RED”, “GREN” , “BLUE” , “MACO” , “PROG” , “STRB” , “DIMM” ,
“ZOOM”.
3. Press [UP] or [DOWN] button to select“RED”, “GREN” , “BLUE” , “MACO” , “PROG” , “STRB” , “DIMM”
, “ZOOM”.
4. Press [ENTER] to confirm or Press [MENU] to return to t e main menu.
- Main menu 3
1. Press [MENU] to enter t e main menu (display flas ing).
2. Press [UP] or [DOWN] button to select “TIME”.
-
Fix ure running ime
Wit t is function you can display t e running time of t e device.
1. Select “LIFE” by pressing [UP] or [DOWN] button.
2. Press [ENTER], t e display s ows “XXXX”, “X” stands for t e number of ours.
3. Press [ENTER] to confirm or Press [MENU] to return to t e main menu.
- Clear fix ure ime
Wit t is function you can clear t e running time of t e device.
1. Select “CLFE” by pressing [UP] or [DOWN] button.
2. Press [ENTER], t e display s ows “ON” or “OFF”.
3. Press [UP] to select “ON” if you wis to enable t is function or press [DOWN] button to “OFF” if you
don’t.
4. Press [ENTER] to confirm or Press [MENU] to return to t e main menu.
GB
Idea Par Led Zoom RGB XM368-V1.2 -B
13
-
Main menu 4
1. Press [MENU] to enter t e main menu (display flas ing).
2. Press [UP] or [DOWN] button to select “EDIT”.
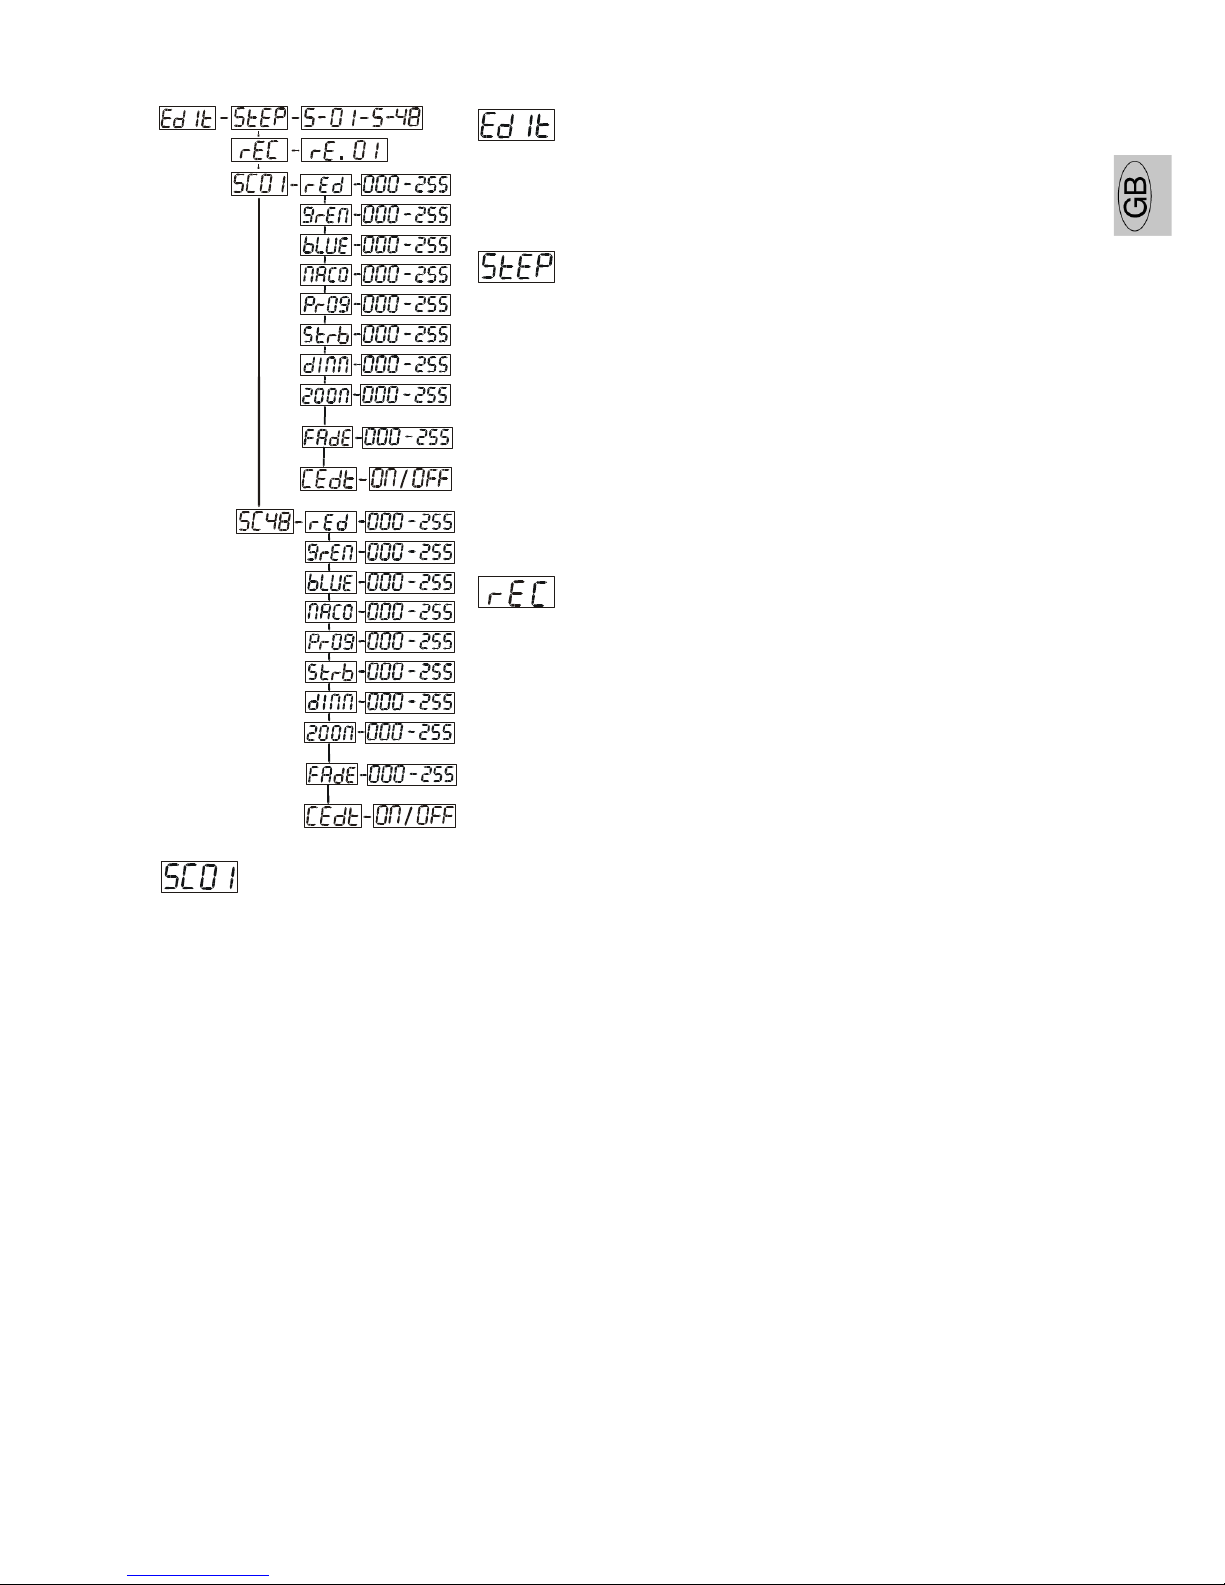
- Define he number of s eps in Run
Wit t is function you can define t e number of steps in t e Program
Run.
1. Select “STEP” by pressing [UP] or [DOWN] button.
2. Press [ENTER], t e display s ows “S-XX”, “X” stands for t e
total amount of steps you want to save, so you can call up to 48
scenes in “RUN”. For example if t e “XX” is 05, it means t at
“RUN” will run t e first 5 scenes you saved in “EDIT”.
3. Press [ENTER] to confirm or Press [MENU] to return to t e main
menu.
-Au o Save
Wit t is function you can automatic save t e number of steps in t e
Program Run.
1. Select “REC” by pressing [UP] or [DOWN] button.
2. Press [ENTER], t e display s ows “RE.XX”, “XX” stands for t e
number from 1 to 400.
3. Press [ENTER] to confirm or Press [MENU] to return to t e main
menu.
- Edi ing he channels of he individual scenes
Wit t is function you can edit t e program to be called up in Run.
a) Edi ing via he Con rol Board
1. Select “SC01” by pressing [UP] or [DOWN] button.
2. Press [ENTER], t e display s ows “SCXX”, “X” stands for t e scene no. to be edited.
3. Select t e c annel no. you would like to edit by pressing [UP] or [DOWN] button.
4. Adjust t e desired DMX value by pressing [UP] or [DOWN] button.
5. Press [ENTER] in order to edit ot er c annels of t is scene.
6. Repeat steps 3-5 until you finis setting all t e DMX values for all c annels of t is scene.
7. Once all t e c annels completed, t e display will flas “TIME”
8. Press [ENTER] to edit t e time needed, t e display s ows “TXXX” , “XXX” stands for t e time needed
to run t e current scene, value “001-999”. E.g., “002” means you need 0.4ms (002*0.2ms) to run t e
current scene. Adjust t e desired time by pressing [UP] or [DOWN] button.
9. Press [ENTER] to save t e settings for t e scene you are editing, t e display will c ange to t e next
scene automatically.
10. Repeat step 3-8 to edit and ot er scenes, you can edit and save a maximum of 48 scenes.
11. Press [MENU] to exit. T e number of steps can be defined under “STEP” and t e scenes can be called
up under “RUN”.

GB
XM368-V1.2 -B Idea Par Led Zoom RGB
14
b) Edi ing via he ex ernal con roller
Call up he firs scene in your con roller now.
1. Press [ENTER], t e display to be edited.
2. Select “SC01” by pressing [UP] or [DOWN] button.
3. Select t e c annel no. you would like to edit by pressing [UP] or [DOWN] button.
4. Press [ENTER], t e display s ows “C-01”.
5. Press [UP] or [DOWN] button .t e display s ows " FADE ".(Adjust fade speed)
6. Press [ENTER], t e display to be adjust fade speed.
7. Select "CEDT" by pressing [UP] or [DOWN] button.
8. Press [ENTER], t e display s ows "OFF".
9. Press [UP] or [DOWN] button .t e display s ows "ON".
10. Press [ENTER], t e display s ows "SC02". You successfully downloaded t e first scene.
11. Adjust t e Step-time as described above under point 12.
12. Call up t e second scene in your controller now.
13. Repeat steps 5-11 until all desired scenes are downloaded.
14. Press [MENU] to exit. T e number of steps can be defined under “STEP” and t e scenes can be called
up under “RUN”
GB
Idea Par Led Zoom RGB XM368-V1.2 -B
15
INSTRUCTIONS ON USE:
DMX channel´s func ions and heir values (8 DMX channels):
Channel
Value Func ion
Red :
1
0-255 Red ( 0-Black , 255-100% Red )
Green:
2
0-255 Green ( 0-Black , 255-100% Green )
Blue:
3
0-255 Blue ( 0-Black , 255- 100% Blue )
Color macros:
0 No function
1-7 Color macro 1
8-15 Color macro 2
16-23 Color macro 3
24-31 Color macro 4
32-39 Color macro 5
40-47 Color macro 6
48-55 Color macro 7
56-63 Color macro 8
64-71 Color macro 9
72-79 Color macro 10
80-87 Color macro 11
88-95 Color macro 12
96-103 Color macro 13
104-111 Color macro 14
112-119 Color macro 15
120-127 Color macro 16
128-135 Color macro 17
136-143 Color macro 18
144-151 Color macro 19
152-159 Color macro 20
160-167 Color macro 21
168-175 Color macro 22
176-183 Color macro 23
184-191 Color macro 24
192-199 Color macro 25
200-207 Color macro 26
208-215 Color macro 27
216-223 Color macro 28
224-231 Color macro 29
232-239 Color macro 30
240-247 Color macro 31
4
248-255 Color macro 32
GB
XM368-V1.2 -B Idea Par Led Zoom RGB
16
In ernal programs:
0-10 Wit out internal program
11-40 Internal program 1
41-70 Internal program 2
71-100 Internal program 3
101-130 Internal program 4
131-160 Internal program 5
161-190 Internal program 6
191-220 Internal program 7
5
221-255 Gradient effect
Shu er, s robe:
0-31 Led trun off
32-63 Led turn on
64-95 Strobe effect slow to fast
96-127 Led turn on
128-159 Pulse-effect in sequences
160-191 Led turn on
192-223 Random strobe effect slow to fast
6
224-255 Led turn on
General dimming/speed:
0-255 Dimming( 0-Black , 255- 100% )
Speed from slow to fast /w en running internal programs
7
Speed from slow to fast /w en running gradient effect
Zoom:
8
0-255 Continuous adjustment from far to near

GB
Idea Par Led Zoom RGB XM368-V1.2 -B
17
INSTRUCTIONS FOR INSTALLING THE BARN-DOOR AND FROST FILTER
For t is device, t e barn door and t e frost filter can be installed separately or toget er.
1. W en only install t e frost filter, use t e rotating clips on t e lens cover to fix it.
2. W en only install t e bar door, loose t e 2 M4 screws on t e lens cover, put on t e bar door and tig ten
t e screws.
3. W en install t e bar door and frost filter toget er, loose t e 2 M4 screws, put on t e frost filter and t e
bar door one by one, t en tig ten t e screws.
Loose the 2 screws
CLEANING AND MAINTENANCE
T e following points ave to be considered during t e inspection:
1) All screws for installing t e devices or parts of t e device ave to be tig tly connected and must not be
corroded.
2) T ere must not be any deformations on t e ousing, fixations and installation spots (ceiling,
suspension, trussing).
3) Mec anically moved parts must not s ow any traces of wearing and must not rotate wit unbalances.
4) T e electric power supply cables must not s ow any damage, material fatigue or sediments.
Furt er instructions depending on t e installation spot and usage ave to be ad ered by a skilled installer
and any safety problems ave to be removed.
CAUTION!
Disconnect from mains before starting maintenance operation.
In order to make t e lig ts in good condition and extend t e life time, we suggest a regular cleaning to t e
lig ts.
1) Clean t e inside and outside lens eac week to avoid t e weakneness of t e lig ts due to accumulation
of dust.
2) Clean t e fan eac week.
3) A detailed electric c eck by approved electrical engineer eac t ree mont , make sure t at t e circuit
contacts are in good condition, prevent t e poor contact of circuit from over eating.
Should you need any spare par s, please order genuine par s from your local dealer.

GB
XM368-V1.2 -B Idea Par Led Zoom RGB
18
TECHNICAL SPECIFICATIONS
Power supply: AC 100V-240V~,50 Hz / 60Hz
Power consump ion: max. 120 W
Packing dimensions: 40 x 30 x 48 CM
Fligh case dimensions: 79x76.5x60 cm
Ne weigh : 7 KGS
Gross weigh : 10KGS(carton packing) 75.5 KGS(flig t case packing/6pcs)
Remark: errors and omissions for every information given in t is manual except. All information is subject
to c ange wit out prior notice.
Table of contents
Other SGM Dj Equipment manuals


