Shanling EH3 User manual

EH3
快速入门指南
Quick Start Guide
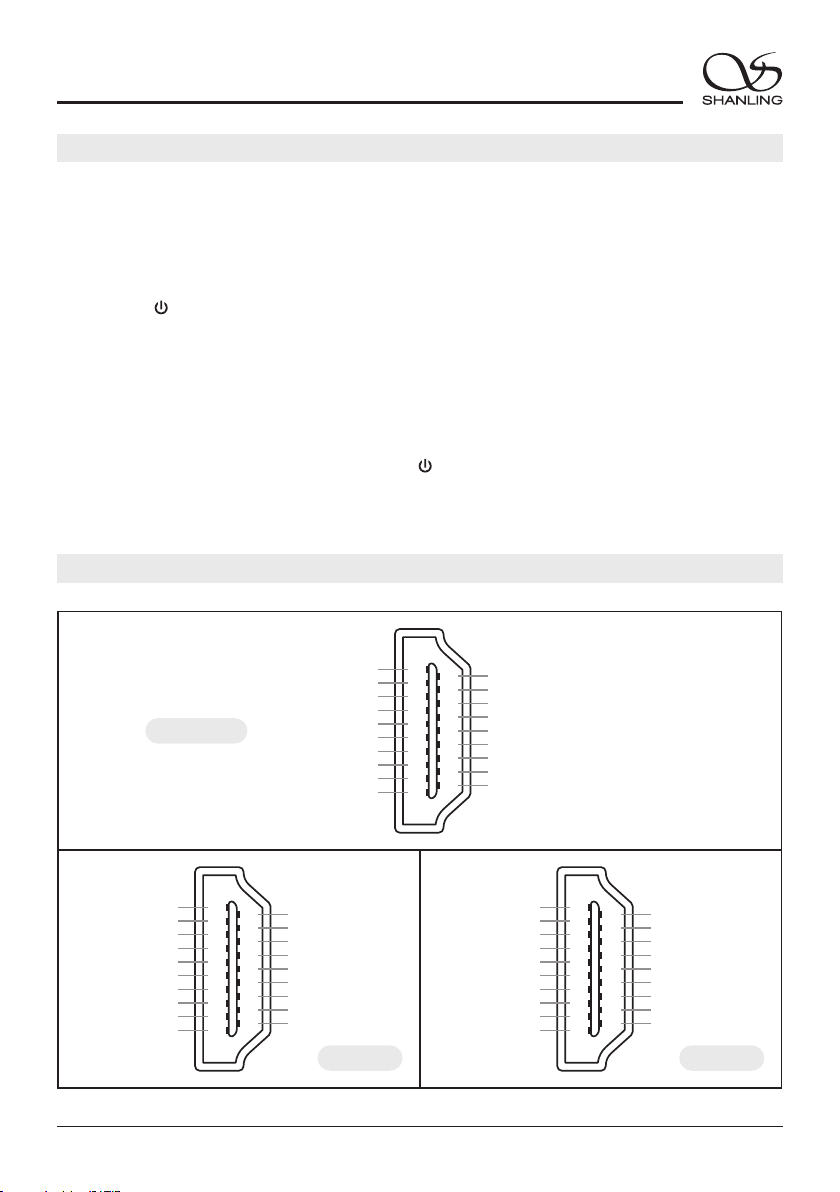
/ MENU
BAL SE
SOURCE
Desktop DAC Ampli fier EH3
Block Diagram
FPGA
SS1712
USB Audio
XU316
ALL TO DSD
CT7302CL
LPF
OPA1612 x 2
I V
/
OPA1611
USB DAC
COAXIAL
OPTICAL
PHONE OUT
Phone Amplifier
XLR
4.4mm
35mm
.
PRE-AMP OUT
BUF
LTA8092 x 2
XLR
RCA
DAC
ES9039PRO
635mm.
OPA1612 x 2 + BUF x 4
MCU
X2000
Volume
NJW1195
AUX
IIS-LVDS


安全指示
3. 设备不应遭受水滴或水溅,机器上不应放置诸如花瓶一类的装满液体的物品。
4. 通风孔不要覆盖诸如报纸、桌布和窗帘等物品而防碍通风。
2. 为了充分通风,设备背面和两侧应最少保留10cm,顶部应最少保留20cm的空间。
7. 用电源插头和器具耦合器作为断开装置,断开装置应当保持能方便地操作。
6. 设备应当连接到带保护接地连接的电网电源输出插座上。
5. 设备上不要放置裸露的火焰源,如点燃的蜡烛。
8. 必须遵照电池废弃的相关地方条例来废弃旧电池。
9. 仅适用于海拔2000m以下地区安全使用,标志见图1。
10. 仅适用于非热带气候条件下安全使用,标志见图2。 图1 图2
产品技术标准:GB4943.1-2022
1. 不可自行开启本机进行维修、拆卸或改造。
安全注意事项
3
警 告:谨防触电,切勿打开机盖。
等边三角形中有箭头闪电符号的图形表示警告
使用者在产品内有高压电,会导致人为的触电。
等边三角形中有叹号的图形表示警告使用者该
设备有重要的操作和维护指示。
警告 CAUTION
谨防触电.切勿打开机盖
RISK OF ELECTRIC SHOCK
DO NOT OPEN
EH3
桌面解码耳放
~220V-240V/50Hz
/AC IN
交流输 入
POWER
OFF ON
开
关
ANTENNA
RL
XLR
OPTICAL
AUX RCA
COAXIAL
DIGITAL IN
USB DAC
USB AUDIOUSB
ANALOG IN ANALOG OUT
R
L
IIS-LVDS
/ MENU
BAL SE
SOURCE
Desktop DAC Ampli fier EH3
Block Diagram
FPGA
SS1712
USB Audio
XU316
ALL TO DSD
CT7302CL
LPF
OPA1612 x 2
I V
/
OPA1611
USB DAC
COAXIAL
OPTICAL
PHONE OUT
Phone Amplifier
XLR
4.4mm
35mm
.
PRE-AMP OUT
BUF
LTA8092 x 2
XLR
RCA
DAC
ES9039PRO
635mm
.
OPA1612 x 2 + BUF x 4
MCU
X2000
Volume
NJW1195
AUX
IIS-LVDS
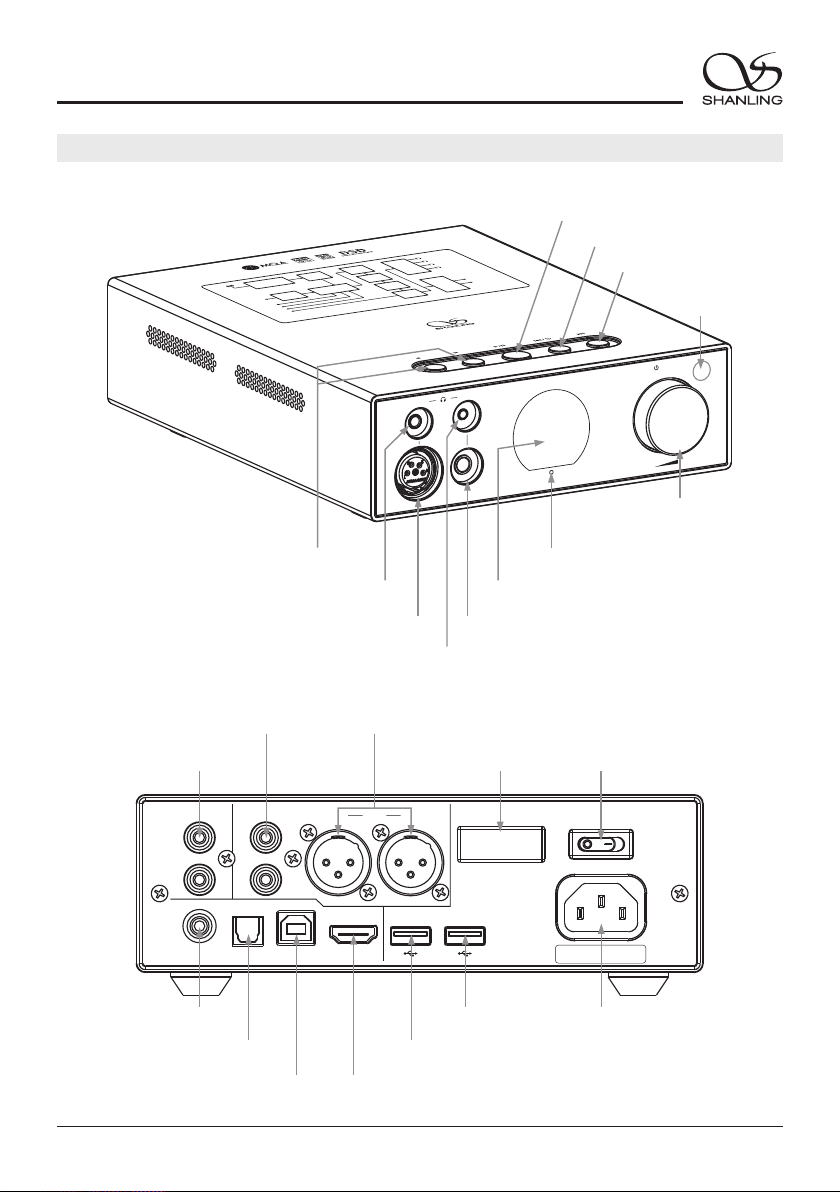
电源按钮/菜单设置/音量调节
状态指示灯
多功能显示窗
播放/暂停键
下一曲选择键
上一曲选择/返回键
遥控接收窗
部件名称
总电源开关
4
数字光纤输入端口
交流电源输入插座
USB音频输出 口端
EH3
桌面解码耳放
XLR平衡耳机输出 6.35mm单端耳机输出
3.5mm单端耳机输出
4.4mm平衡耳机输出
音源选择键
AUX模拟音频输入 口端
XLR模拟音频输出 口端RCA模拟音频输出 口端
数字同轴输入端口
USB DAC数字音频输入 口端 数字IIS-LVDS输入端口
USB外部存储设备 口(可接U盘/硬盘)端
WiFi/蓝牙天线

DA C
-
RC 3 T
CD AM P
PO W E R
VO L
INP UT
DI M M ER
MU T E
RE P
5
遥控器示意图
EH3
桌面解码耳放
短按: 下一曲播放键
长按: 快速向前搜索键
短按 上一曲播放键
长按: 快速向后搜索键
:
重复播放键
机型切换键
输入选择键
播放/暂停键
遥控器为多机型通用,使用
前先切换到对应的机型键。
解码耳放:按DAC键
注: 长按为待机开关
随机播放键
注:
1. 遥控器有效距离不大于10米,遥控夹角不大于30度。
2. 遥控器未标示按键非本机功能,操作无效属正常现象。
静音键
音量控制键
熄屏 亮屏/ 键
音量控制
6
按下机器上的 [ SOURCE ] 或遥控器上的[ INPUT ] 键,可将音频信号切换到“USB DAC、 、
COAXIAL、OPTICAL、IIS、AUX、U盘”等模式。
2. 按下后板上的电源开关键至 [ON/开] 位置,此时显示屏上的状态指示灯先显示为红蓝色,然后再
变为红色。
1. 首先连接好机器的电源线及信号输出线。
5. 要关闭本机电源时,将后板电源开关置于 [OFF/关] 位置即可。若长时间不使用本机时,请将本机
的交流输入电源线与市电插座分离。
操作说明
开/关机器
暂停播放
在播放过程中,若想要中断播放而短时间进入暂停状态,则按下前面板或遥控器上的 [ ] 键,此
时显示屏上显示“ ”图标,若再按一次该键则恢复正常播放状态。
下一曲
在正常播放时,若想跳过当前曲目,只需按下前面板或遥控器上的 [ ] 键即能跳到下一个曲目,此
时中断原曲目的播放而进入到下一个曲目的播放。
上一曲
在正常播放时,按下前面板或遥控器上的 [ ] 键,若当前曲目播放时间少于3秒,则跳向前一个曲
目。若当前曲目播放时间大于5秒,则回到当前曲目起始处播放,再按一下才跳向前一个曲目,此时
中断原曲目的播放而进入到上一个曲目的播放。
3. 长按面板上的 [ ] 旋钮2秒,指示灯由红色变为蓝色,即进入开机状态。
4. 开机状态下,长按面板上的 [ ] 旋钮2秒,指示灯变为红色,机器将停止播放并关闭部份
电源。
快速搜索
长按前面板或遥控器上的 [ ] 键时为快速向后搜索,长按 [ ] 键时为快速向前搜索,放
开该键时恢复正常播放状态。
/ MENU
/ MENU
音源选择
EH3
桌面解码耳放
旋转 旋钮 可以增加或减小音量。机器上的 或按遥控器上的[VOL +/- ] 键,

7
EH3
桌面解码耳放
菜单设置
U盘播放
2. 机器后板上的USB口,支持高达2TB容量的存储设备。
3. 支持最高采样频率:768kHz和DSD512。
1. 建议U盘使用前先格式化为FAT32格式,再拷入音乐文件,否则机器有可能无法识别U盘。
在主界面按下机器上 [ ] 旋钮即可进入“设置”菜单界面。
Bluetooth 输入
1. 将信号源切换到“ ”模式。
2. 此时本机蓝牙会一直处于可以被搜索状态,打开手机或iPad等搜索蓝牙设备。
3. 在搜索到的设备中选择“Shanling EH3”。
4. 设备连接好后,使用播放软件播放音乐即可。
旋转:可进行上下选择。
按下:确认选择。
返回:按机器上的 [ ] 键可返回上一级菜单。
4. 支持文件格式:DSD、DXD、APE、FLAC、WAV、AIFF/AIF、DTS、MP3、WMA、AAC、OGG、ALAC、
MP2、M4A、AC3、OPUS、TAK等,支持CUE。
/ MENU
随机播放
1. 遥控器上的 “ ” 播放碟
片曲目直至全部播放完毕。
在播放状态下,按下 随机播放键 [ ] ,显示屏上显示 图标。碟机随机
2. 按一次 [ ] 键,即可取消随机播放。 [ ] 或
重复播放
如果连续重复播放当前曲目,按遥控器上的 [REP] 键一次,显示屏显示“ ”图标。如果连续重放
整张碟片上的曲目,则再按一次 [REP] 键,显示屏显示“ ”图标。若想取消重复播放功能,则再
按一次 [REP] 键,显示屏显示“ ”图标。
1
熄屏/亮屏
按下遥控器上的 [DIMMER] 键可打开或关闭屏幕显示。
静 音
1. 在放音状态下按下遥控器上的 [MUTE] 键,显示屏显示“ ”图标,此时无声 出。音输
2. 在静音状态下,再按下遥控器上的 [MUTE] 键一次,恢复正常放音状态。

8
EH3
桌面解码耳放
注:ET3/ 使用教程相同。EH3
SyncLink控制
1. 在主界面按下 [ ] 旋钮即可进入“设置”
菜单界面。
2. 进入“蓝牙配置 - 蓝牙”选项并将开关打开,按
[ ] 键返回上一级菜单。
3. 选择“SyncLink”选项并将开关打开,按 [ ]
键返回主界面。
4. 将U盘插于后板上,旋转 [ ] 旋钮将音 频
信号切换到“U盘”模式并按下确认选择。
5. 手机打开“Eddict Player”APP,点击左上角的
“ ”图标, 选择“SyncLink - SyncLink控制端”
并将开关打开,在搜索到的设备中选择
“Shanling EH3”后返回上一级菜单。
6. 选择“扫描音乐”选项并点击扫描,扫描完成后U盘上的曲目即可在手机上进行播放。
7. 返回到“Eddict Player”APP主界面,选择“本地音乐”即可在手机上进行播放操控。
扫描二维码即可观看
CD-S100(21)连接手
机APP使用教程。
(SyncLink功能)
扫码即可观看
使 用 教 程
注:CD-S100(21)/ 使用教程相同。EH3
/ MENU
/ MENU
扫描二维码并对应下载
Eddict Player APP
装完成后即可对产品进
行操控。
,安
扫码即可下载
Eddict Player
WiFi连接操作
1. 在主界面按下 [ ] 旋钮即可进入“设置”
菜单界面。
2. 进入“WiFi配置 - WiFi”选项并将开关打开。
4. 在EH3菜单界面选择“WiFi配置 - 一键配网”并按下 [ ] 旋钮进入自动配网,配网完成后
按 [ ] 键返回主界面。
/ MENU
3. 手机打开“Eddict Player”APP,点击左上角的
“ ”图标, 选择“无线配网”,在搜索到的
设备中选择“Shanling EH3”,然后点击“下
一步”并输入WiFi密码,再点击“开始配网”。
/ MENU
扫描二维码即可观看
ET3
用教程。
(WiFi连接操作)
连接手机APP使
扫码即可观看
使 用 教 程
1. 将USB线从电脑连接到机器后板上的USB端口。
3. 连接电脑后,请将“USB驱动”安装至电脑上(MAC电脑免安装驱动)。
USB设置
USB驱动程序下载方式:
2. 按下机器上的 [ SOURCE ] 或遥控器上的[ INPUT ] 键将音频信号切换到“USB DAC”模式。
4. 在电脑选择设置对应的声音输出设备即可。
请登录官网 进入下载中心,对应产品型号进行下载。www.shanling.com并

9
EH3
桌面解码耳放
2. 机器插上U盘,
级 - 本地升级”并选择“确定”即可进行升级。
在主界面按下 [ ] 旋钮进入“设置”菜单界面,前往“系统设置 - 系统升
1.
根目录下。
请在山灵官网 - 产品中心 - EH3产品页面下载固件升级程序,将新固件 (update.bin) 拷贝到U盘
/ MENU
U盘升级
IIS-LVDS输入接口脚位定义
Model 1 Model 2
1
3
5
7
9
11
13
15
17
19
2
4
6
8
10
12
14
16
18
DATA/DSDL+
DATA/DSDL-
GND
LRCK/DSDR+
LRCK/DSDR-
GND
NC
NC
GND
GND
GND
BCLK/DSDCLK+
BCLK/DSDCLK-
GND
MCLK+
MCLK-
NC
NC
NC
1
3
5
7
9
11
13
15
17
19
2
4
6
8
10
12
14
16
18
DATA/DSDR-
DATA/DSDR+
GND
LRCK/DSDL-
LRCK/DSDL+
GND
NC
NC
GND
GND
GND
BCLK/DSDCLK+
BCLK/DSDCLK-
GND
MCLK+
MCLK-
NC
NC
NC
1
3
5
7
9
11
13
15
17
19
2
4
6
8
10
12
14
16
18
DATA/DSDR-
DATA/DSDR+
GND
LRCK/DSDL-
LRCK/DSDL+
GND
NC
F_MUTE
GND
GND
GND
BCLK/DSDCLK+
BCLK/DSDCLK-
GND
MCLK+
MCLK-
NC
F_DSD
NC
ET3 Model
升级过程中请不要操作机器。
打开WiFi功能并连接到可用网络,在主界面按下 [ ] 旋钮进入“设置”菜单界面,前往"系
统设置 - 系统升级 - 网络升级"进行更新。
/ MENU
OTA在线升级
固件升级
Model 3 Model 4
1
3
5
7
9
11
13
15
17
19
2
4
6
8
10
12
14
16
18
DATA/DSDL-
DATA/DSDL+
GND
LRCK/DSDR-
LRCK/DSDR+
GND
NC
NC
GND
GND
GND
BCLK/DSDCLK+
BCLK/DSDCLK-
GND
MCLK+
MCLK-
NC
NC
NC
1
3
5
7
9
11
13
15
17
19
2
4
6
8
10
12
14
16
18
DATA/DSDR+
DATA/DSDR-
GND
LRCK/DSDL+
LRCK/DSDL-
GND
NC
NC
GND
GND
GND
BCLK/DSDCLK+
BCLK/DSDCLK-
GND
MCLK+
MCLK-
NC
NC
NC
10
随机附件
快速入门指南:1份
保修卡:1份
三联电源线:1根
USB线:1根
遥控器:1个
EH3
桌面解码耳放

11
1. Don't repair disassemble or modify the device without permission. ,
2. For good ventilation, a minimum of 10cm clearance shall be maintained at the back and both sides
and 20cm at the top of the player.
3. Allow no water dripping or splashing into the player. Place no object containing liquid on the player,
e.g. Vase.
4. Do not cover any ventilation hole with newspaper, cloth, curtain, etc. in case of ventilation blocking.
5. Allow no exposed flame source on the player, e.g. burning candle.
6. The player shall be connected to AC power output socket with grounding protection.
7. If power plug and appliance coupler are used as disconnecting device, the disconnecting device shall
be easily operable.
8. The waste battery must be treated according to relevant local battery wasting regulations.
9. Only applicable for safe use in the area with elevation under 2000m. See Fig. 1 for the sign.
10. Only applicable for safe use under non-tropical climate conditions. See Fig. 2 for the sign. Fig. 1 Fig. 2
Safety Instructions
Safety Precautions
Caution: Risk of electric shock. DO NOT OPEN.
The sign with arrowed lightning inside an equilateral
triangle warns the user that the player has high voltages
inside which can cause electric shock.
The sign with an exclamation mark inside an equilateral
triangle warns the user that the player has important
operation and maintenance instructions.
Laser Warning
1. Since the laser beam in this player can damage the eye, please do not open the enclosure. Only a
qualified technician should carry out repairs.
2. This player is classified as a Class 1 laser product, and is identified as such on
the label located on the rear of the enclosure.
3. The laser components of this product can generate laser radiation above the Class 1 limit.
EH3 Desktop DAC Amplifier
警告 CAUTION
谨防触电.切勿打开机盖
RISK OF ELECTRIC SHOCK
DO NOT OPEN
CLASS 1 LASER PRODUCT
1类激光产品

~220V-240V/50Hz
/AC IN
交流输 入
POWER
OFF ON
开
关
ANTENNA
RL
XLR
OPTICAL
AUX RCA
COAXIAL
DIGITAL IN
USB DAC
USB AUDIOUSB
ANALOG IN ANALOG OUT
R
L
IIS-LVDS
/ MENU
BAL SE
SOURCE
Desktop DAC Ampli fier EH3
Block Diagram
FPGA
SS1712
USB Audio
XU316
ALL TO DSD
CT7302CL
LPF
OPA1612 x 2
I V
/
OPA1611
USB DAC
COAXIAL
OPTICAL
PHONE OUT
Phone Amplifier
XLR
4.4mm
35mm
.
PRE-AMP OUT
BUF
LTA8092 x 2
XLR
RCA
DAC
ES9039PRO
635mm
.
OPA1612 x 2 + BUF x 4
MCU
X2000
Volume
NJW1195
AUX
IIS-LVDS
12
Parts Name
EH3 Desktop DAC Amplifier
Play/Pause
Next Track
Previous /Track Return
Remote Control
Receiver
Source Selector Button Status Indicator
Power Button /
Menu Setting / Volume Wheel
XLR Balanced Headphone Output
4.4mm Balanced Headphone Output
3 5mm Single Ended Headphone Output.
6.35mm Single Ended Headphone Output
Multifunction Display
Power Connector
Power Switch
Balanced Audio OutputAnalog Output
Analog Input
USB for Connecting External Disk
USB for Digital
Audio Output
Digital IIS-LVDS Input
Digital Coaxial Input
Digital Optical Input
USB DAC Input
WiFi/Bluetooth Antenna

DA C
-
RC 3 T
CD AM P
PO W E R
VO L
INP UT
DI M M ER
MU T E
RE P
13
Remote Control Diagram
EH3 Desktop DAC Amplifier
Universal remote can be used
with different components.
Switch to the matching setting.
Press the DAC button to
use remote.
Long press DAC button to
switch into standby mode.
Short press: Previous track
Long press: Rewind
Mute
Switch input
Play/Pause
Repeat
Random
Short press: Next track
Long press: Forward
Note:
1. Use remote within 10m distance and less than 30 degree angle.
2. Some buttons on universal remote server no functions with EH3.
Volume control
Screen On/Off

14
Operating instructions
Turn ON/OFF
1. Connect the power cord and signal cable of the player.
5. Put the power button on the rear side into OFF position to completely power off the player.
Pause Playback
Press the [ ] button on player or remote to pause playback. Press the button again to resume
playback. " " Icon will be displayed while playback is paused.
Previous Track
Press the [ ] button on player or remote. If the current track played for less than 3 seconds, it will switch
to previous track. If the current track played for more than 5 seconds, it will jump to the beginning of the
current track. Press the button again to switch to previous track.
Next Track
Rewind / Fast Forard
Press the [ ] button on player or remote to switch to the next track.
Long press the [ ]or [ ] button to rewind or fast forward in the current track.
Volume Control
Select Input Source
2. Put the power button on the rear side of the player into On position. Indicator on display should turn
red/blue and then red.
3. Press down volume wheel for 2 seconds. Indicator will turn blue and device power On. the [ ]
/ MENU
4. Press down the volume wheel for 2 seconds. Indicator will turn red and device power off. [ ]
/ MENU
EH3 Desktop DAC Amplifier
Press the [ SOURCE ] button on the machine or the [ INPUT ] button on the remote control to switch
between the audio input "USB DAC, , COAXIAL, OPTICAL, I2S, AUX Analog , USB Drive".
Turn the wheel on the machine or press the [VOL +/- ] buttons on the remote control to increase or
decrease the volume.
15
1
Repeat
If you want to play the current track repetitively, press [REP] button on remote control once. Display will
show " " .
If you want to play the entire disc repetitively, press [REP] button on remote control again. Display will
show " " .
To cancel repeat, press the button again. Display will show " " .
EH3 Desktop DAC Amplifier
/ MENU
Menu Settting
USB Driver Playback
1. It's recommended to use USB drivers formatted to FAT32.
2. Drives up to 2TB are supported.
Rotate the knob to move through menu.
Press the knob to confirm.
Press the [ ] button to return to previous menu.
3. Support up to PCM 768kHz and DSD512.
4. Supported formats: DSD、DXD、APE、FLAC、WAV、AIFF/AIF、DTS、MP3、WMA、AAC、OGG、
ALAC、MP2、M4A、AC3、OPUS、TAK,CUE
Press in on the volume wheel to enter the System Settings menu. [ ]
Mute Playback
1. Press the [MUTE] button to mute playback. Display will show " ".
2. Press the [MUTE] button again to resume playback.
Random Playback
1. Press the [ ] button. Display will show " ".
2. Press the [ ] or [ ] button to end random playback。
Screen On/Off
Press the [DIMMER] button on the remote to turn display On/Off.

16
EH3 Desktop DAC Amplifier
SyncLink Control
Scan code to download
the Eddict Player app
1. Press the [ ] knob to enter the settings menu.
2. Go to Bluetooth settings and turn on Bluetooth.
3. Turn on the SyncLink function in the settings menu." "
4. Insert USB drive and switch source to the USB Drive input.
5. On your phone, open Eddict player app, go to SyncLink function and turn on SyncLink Controller .
Select "Shanling EH3" from list of available devices.
" "
6. Click on Scan Music to scan for music files on the USB Drive." "
7. Now you can control music playback on your EH3.
/ MENU
Eddict Player
WiFi Connection
2. Go to Wi-Fi settings and enable Wi-Fi.
3. Open the Eddict Player app on your smartphone. Click the icon in top left corner and then select
"Wireless Distribution Network". From searched device, click on "Shanling EH3", click on "Next" and
enter Wi-Fi password. To finish, click on "Start Network Configuration".
" " " "
4. On the EH3, select Wi-Fi Configuration – One-key network configuration and press [ ] to finish. " "
1. Press the [ ] to enter settings menu.
/ MENU
Bluetooth Input
1. Switch the source / input to Bluetooth mode.
2. Open Bluetooth settings on your device and search for new devices.
3. Player will show up as "Shanling EH3".
4. Pair it with your device and let it connect.
USB DAC Mode
1. Connect player to the computer using USB cable.
2. to switch to "USB DAC mode. Press the [ SOURCE ] button on the machine or the [ INPUT ] button "
USB drivers download:
3. For Windows, please download our dedicated drivers. No drivers are needed for other systems.
4. Make sure to set EH3 as the active sound device on your computer.
Visit download section on our official website to downloads the latest USB drivers for your device:
en.shanling.com
Model 1 Model 2
1
3
5
7
9
11
13
15
17
19
2
4
6
8
10
12
14
16
18
DATA/DSDL+
DATA/DSDL-
GND
LRCK/DSDR+
LRCK/DSDR-
GND
NC
NC
GND
GND
GND
BCLK/DSDCLK+
BCLK/DSDCLK-
GND
MCLK+
MCLK-
NC
NC
NC
1
3
5
7
9
11
13
15
17
19
2
4
6
8
10
12
14
16
18
DATA/DSDR-
DATA/DSDR+
GND
LRCK/DSDL-
LRCK/DSDL+
GND
NC
NC
GND
GND
GND
BCLK/DSDCLK+
BCLK/DSDCLK-
GND
MCLK+
MCLK-
NC
NC
NC
1
3
5
7
9
11
13
15
17
19
2
4
6
8
10
12
14
16
18
DATA/DSDR-
DATA/DSDR+
GND
LRCK/DSDL-
LRCK/DSDL+
GND
NC
F_MUTE
GND
GND
GND
BCLK/DSDCLK+
BCLK/DSDCLK-
GND
MCLK+
MCLK-
NC
F_DSD
NC
ET3 Model
17
EH3 Desktop DAC Amplifier
2.
"System Setting - System Update - Local Update" and confirm to start the update process.
Connect the USB Drive to the device. Press the [ ] knob to enter the settings menu. Go to
1.
root/main directory of USB Drive.
Download the firmware update from Shanling official website. Copy the "update.bin" file to
/ MENU
USB Drive Update
IIS-LVDS Input Interface
Do not do operate the player during the update process.
Firmware Update
1. Turn on WiFi in the player and connect to an available network.
Over-the-Air Update
2. Press the [ ] knob to enter the settings menu. Go to "System Setting - System Update -
Network Update" to update to the latest firmware automatically.
/ MENU

18
Accessories
Quick Start Guide: 1
Warranty Card: 1
Power Cord: 1
USB Cord: 1
Remote Control: 1
EH3 Desktop DAC Amplifier
Model 3 Model 4
1
3
5
7
9
11
13
15
17
19
2
4
6
8
10
12
14
16
18
DATA/DSDL-
DATA/DSDL+
GND
LRCK/DSDR-
LRCK/DSDR+
GND
NC
NC
GND
GND
GND
BCLK/DSDCLK+
BCLK/DSDCLK-
GND
MCLK+
MCLK-
NC
NC
NC
1
3
5
7
9
11
13
15
17
19
2
4
6
8
10
12
14
16
18
DATA/DSDR+
DATA/DSDR-
GND
LRCK/DSDL+
LRCK/DSDL-
GND
NC
NC
GND
GND
GND
BCLK/DSDCLK+
BCLK/DSDCLK-
GND
MCLK+
MCLK-
NC
NC
NC

由于产品不断改进,各项规格及设计随时更改,恕不另行通知。
Due to continuous improvement, every specification and design is subject to change at any time
without further notice.
公司名称: 深圳山灵数码科技发展有限公司
公司地址: 深圳市南山区蛇口赤湾一路10号
Address: No.10, Chiwan 1 Road, Shekou Nanshan District of Shenzhen City, China.
服务热线/Telephone: 400-630-7786
电子邮件/E-mail: info@shanling.com
官 网/Official Website: www.shanling.com
QQ群/QQ Group: 667914815; 303983891; 554058348
: : : :
工作时间 ( ): 08 00-12 00; 13 30-17 30周一至周五
Company: Shenzhen Shanling Digital Technology Development Co.,Ltd.
微博公众号
山 灵 微 博
微信公众号
山 灵 微 信
扫码即可下载
Eddict Player
Table of contents
Other Shanling Amplifier manuals

Shanling
Shanling A3.2 User manual

Shanling
Shanling UP2 User manual

Shanling
Shanling UA2 User manual

Shanling
Shanling CA80 User manual

Shanling
Shanling P600 User manual

Shanling
Shanling UA4 User manual

Shanling
Shanling UP4 User manual

Shanling
Shanling A600 User manual

Shanling
Shanling UA1 Plus User manual

Shanling
Shanling UP4 User manual
Popular Amplifier manuals by other brands


Blu Stream
Blu Stream NPA70DA user manual

Audio Control
Audio Control ACM-2.300 quick start guide

Power Max
Power Max PM4-15 Installation & maintenance instructions

EMPHASER
EMPHASER EA1800D Installation & operating manual

Sound Sation
Sound Sation ZEUS v120 user manual

TV One
TV One 1T-DA-672 instruction manual


