Shark FlexStyle HD400 User guide

FlexStyle™
Air Styling & Drying System
STYLING GUIDE

How it worksGet to know your Shark FlexStyle™
Air Styling & Drying System.
Table of Contents
How it Works ��������������������������������������������������������������������������������������������������������������������������������������������������������������������� 1
Transform from Styler to Dryer �������������������������������������������������������������������������������������������������������������������������������� 2
Get to Know Your Stylers ������������������������������������������������������������������������������������������������������������������������������������������� 3
Auto-Wrap Curlers ���������������������������������������������������������������������������������������������������������������������������������������������������� 4–5
Oval Brush ��������������������������������������������������������������������������������������������������������������������������������������������������������������������� 6-7
Paddle Brush ���������������������������������������������������������������������������������������������������������������������������������������������������������������� 8-9
Styling Concentrator ����������������������������������������������������������������������������������������������������������������������������������������������� 10-11
Curl-Defining Diuser ������������������������������������������������������������������������������������������������������������������������������������������� 12-13
Wide-Tooth Comb ��������������������������������������������������������������������������������������������������������������������������������������������������� 14-15
Airflow
Low / Medium / High
Cool Shot
Press and hold Cool Shot as
desired to seal the hair cuticle
and lock in your styles�
Temperature
No Heat / Low / Medium / High
On/O
Styler Lock
Slide lock down to unlock the
styler so it can be removed
Styler Attachment Location
Push styler onto the nozzle
until it clicks
'click'
Hinge Latch
Slide latch down and rotate the
nozzle left to switch to the hair
dryer mode�
TIP: All 3 red Temperature lights will be OFF when Cool Shot is engaged.
1

Attach in
Dryer Mode
Get to know your stylers.Transform from styler to dryer.
Rotates to change modes Auto-Wrap Curlers
Hassle-free curls in seconds.
• Uses air power to automatically wrap hair around
the barrel, from ends to roots
• 2 curler barrels to create curls in both directions
Oval Brush
Smooths & defrizzes, adds volume & bounce
Smoothing bristles—on the rounded edge for
grabbing, smoothing, and shining
Detangling bristles—in the middle for combing
and detangling
Paddle Brush
Straighten & smooth all at once
Smoothing bristles—to create added tension for
straightening, smoothing, and shining
Detangling bristles—for combing and detangling
Styling Concentrator
Style & dry at the same time
Rotates for easy styling
Curl-Defining Diuser
Fast, even drying from root to tip
Use the lever to extend or retract the prongs
for a customizable air flow
Extended prongs—for longer, thicker hair or reaching
and lifting the roots
Retracted prongs—for shorter, finer hair or if the ends
need a little extra air
Wide-Tooth Comb
Stretch & lengthen from roots to ends
Uses two rows and two lengths of teeth to stretch
and elongate natural curls and coils
1 4
5
6
2
3
Attach in
Wand Mode
Styling Wand Mode /Hair Dryer Mode
32
Hold these accessories by
the tip when removing them� Hold these accessories by the sides
when removing them�
Cool Touch Locations
Hold the Cool Touch location
to remove the accessory after use.
2 3 4 5 6
1

Additional Styling Tips:
• Take smaller sections if your hair is having difficulty wrapping around the barrel.
• Use sectioning clips to prevent unwanted hair from being wrapped around the barrel.
• Test different moisture levels to understand the level of moisture that works best for your hair type!
• For curly or coily hair, prep your hair for curling by lengthening it using the paddle brush.
Additional Styling Tips:
• Take smaller sections and make sure your hair isn't too wet if it is having diculty wrapping around the barrel�
• Use sectioning clips to prevent unwanted hair from being wrapped around the barrel�
• Test dierent moisture levels to understand the level of moisture that works best for your hair type�
• For curly or coily hair, prep your hair for curling by lengthening it using the paddle brush or oval brush�
54
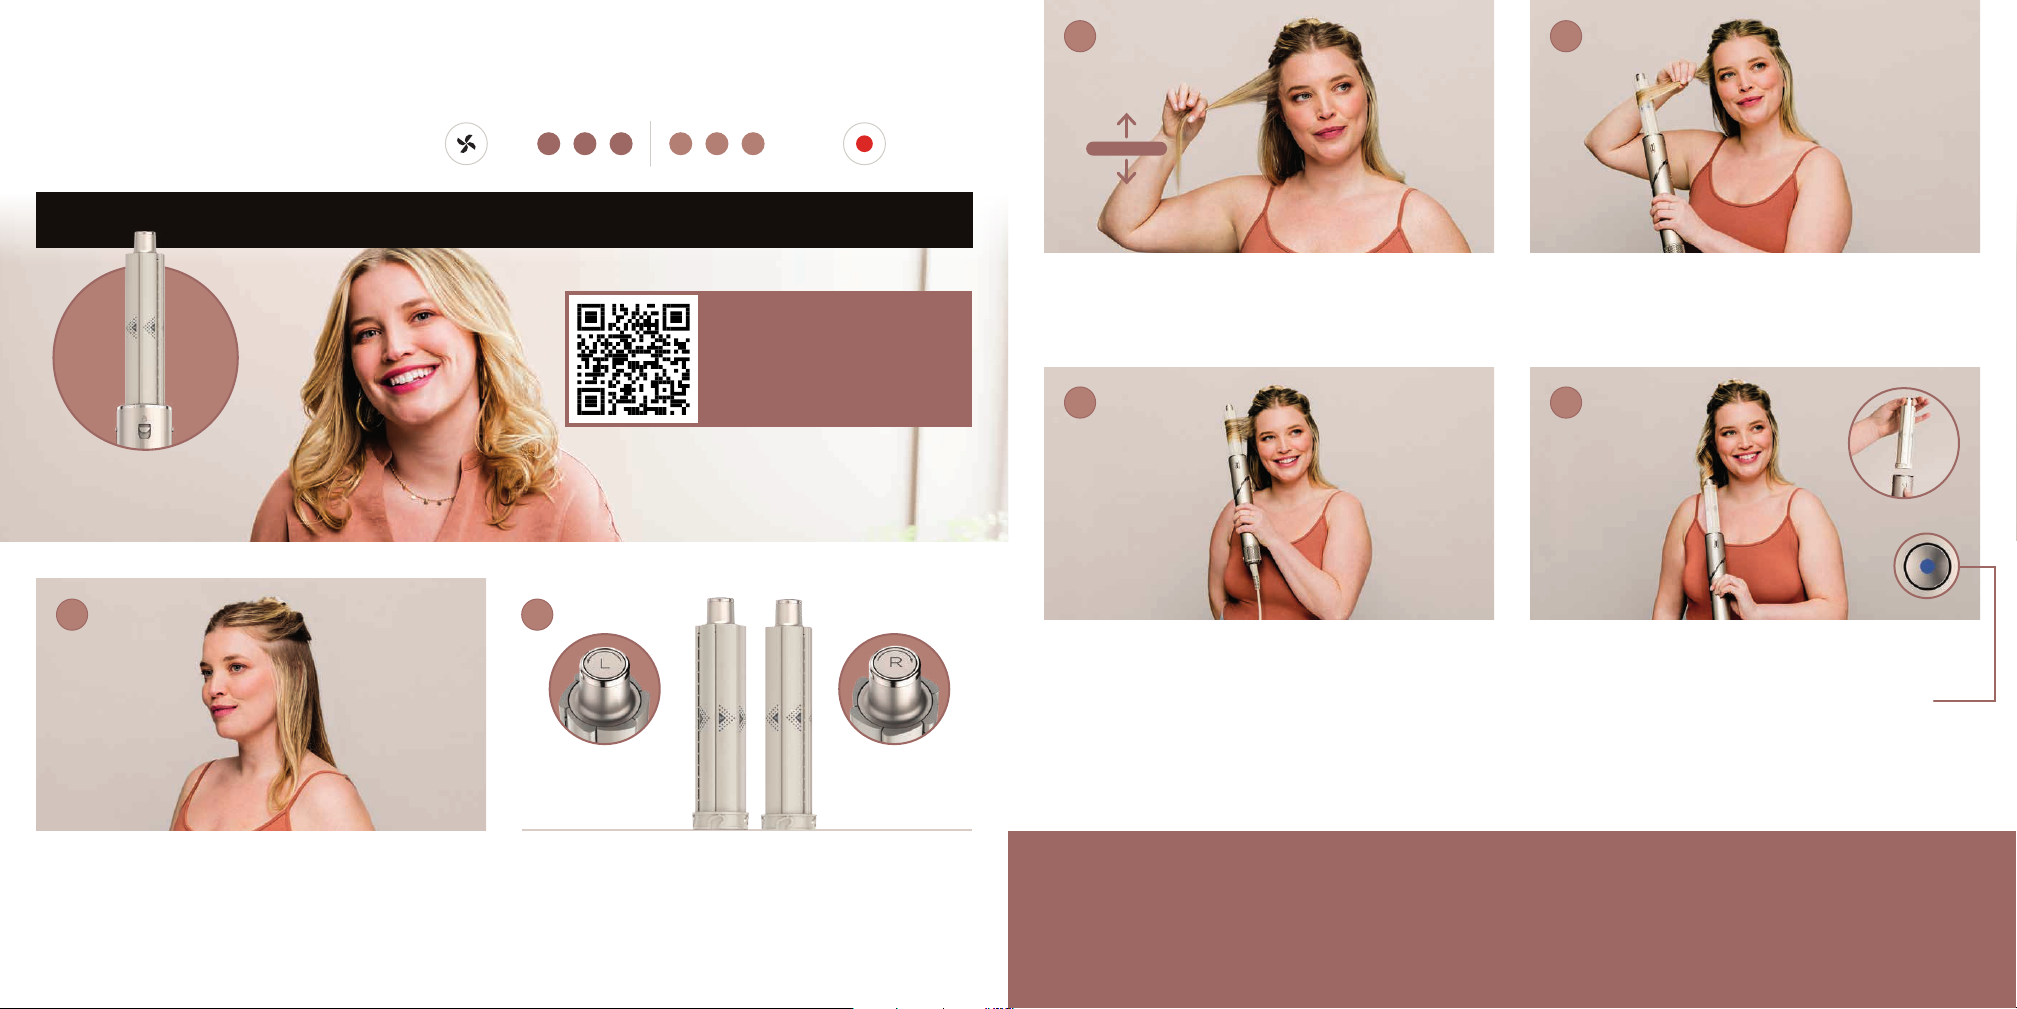
Once the ends wrap, let go of the hair section
and slowly bring the barrel directly to the roots,
allowing the hair to continue to wrap itself around
the barrel�No need to twist the wand�
For best results and to avoid heat damage, hold the
barrel in place for 10 seconds, then press and hold
the Cool Shot button for at least 10 seconds�
Repeat as needed until hair is dry� Turn o the
styling wand and pull the barrel straight down to
reveal your curl!
Pro Tip: Use a setting or holding spray as desired for an even
longer-lasting look�
Hold the middle of a ½-inch-to-1-inch section of
hair� Let the ends dangle�
Pro tip: Grab a section of hair that is a consistent length�
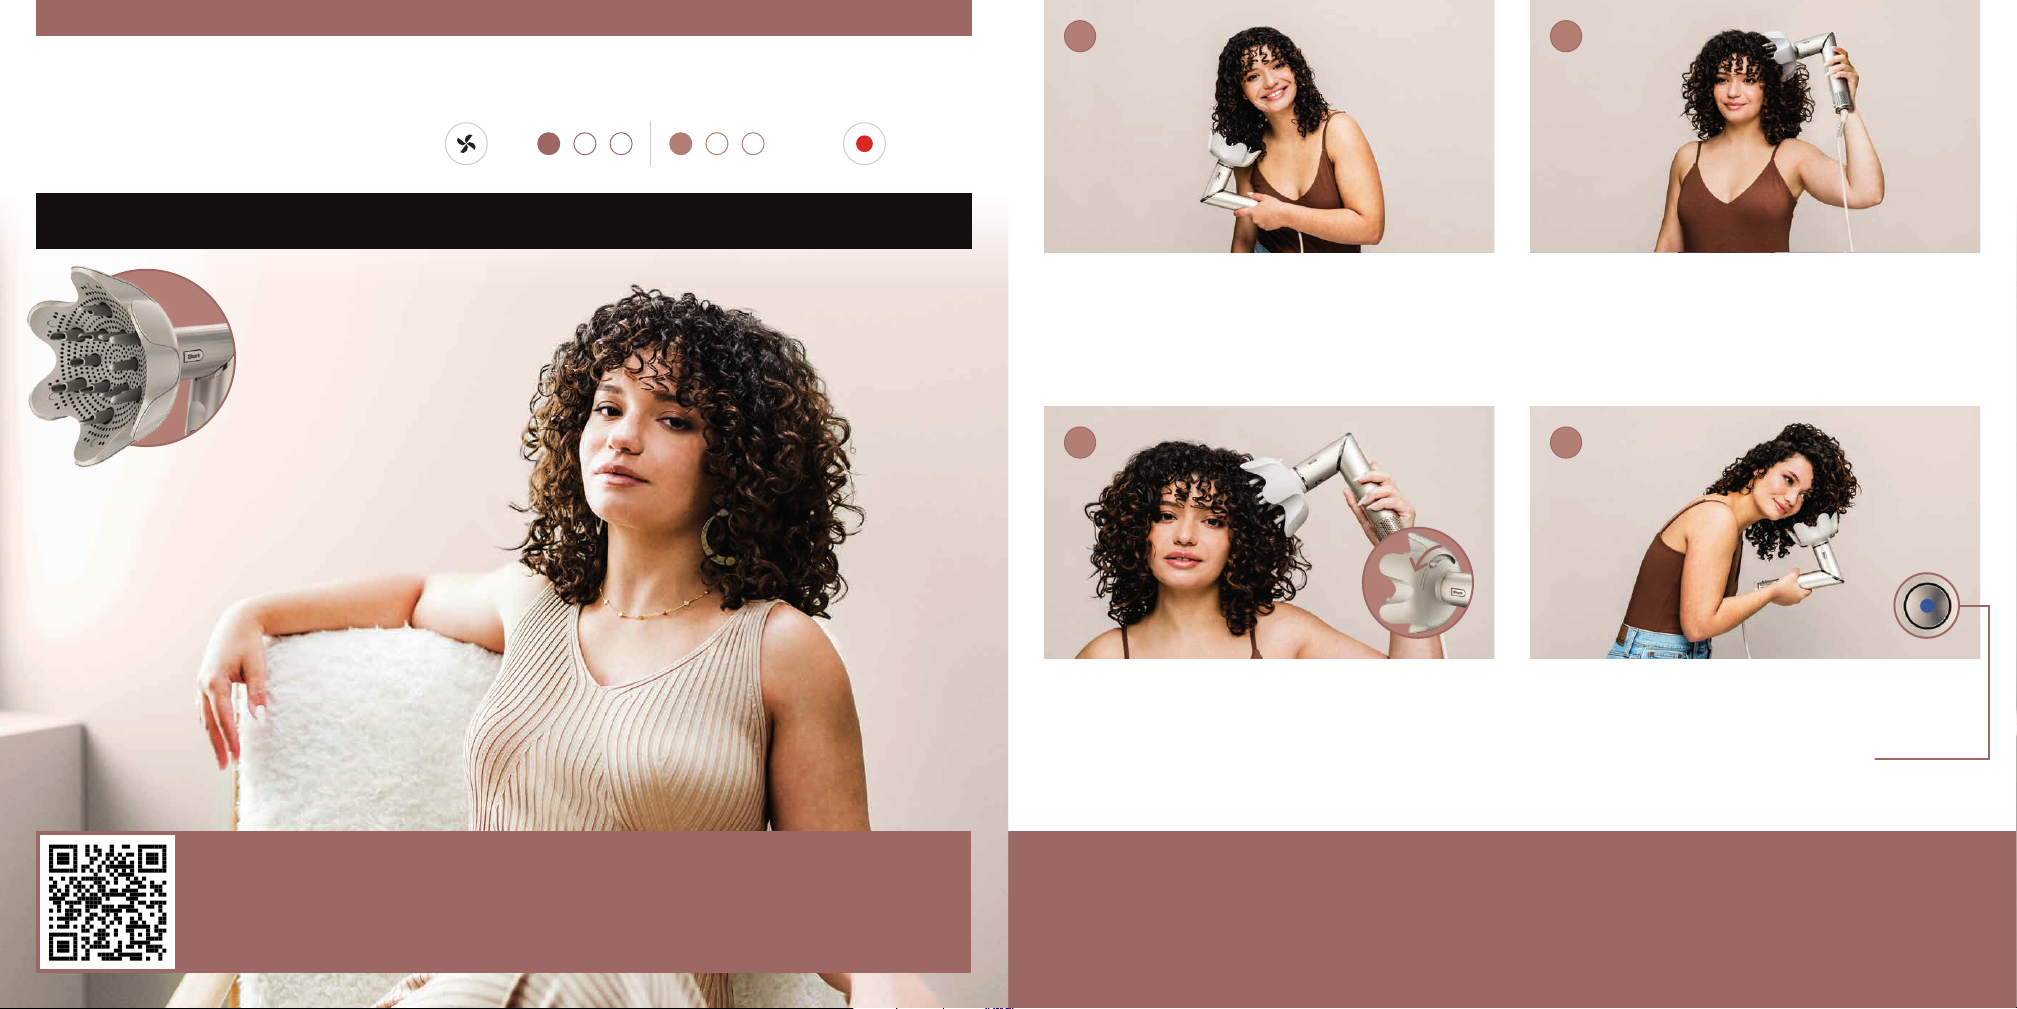
Begin with slightly damp hair� Separate the top
and bottom sections of your hair�
Pro Tip: Apply hair products or styling agents as desired�
Turn on the styling wand� Bring the barrel behind
the dangling ends� The ends will automatically
wrap around the barrel - no need to manually wrap�
Change the way you curl.
™
Auto-Wrap Curlers
Recommended Setting: tempair
5 6
3 4
1
Select the direction of the curls by choosing the
corresponding barrel�
Recommended for
right side of head
Clockwise Curl
Recommended
for left side of head
Counterclockwise Curl
2
Left
Barrel Right
Barrel
Scan the QR code and
watch the how-to video
to learn how to use your
Auto-Wrap Curlers!
ends dangle

Additional Styling Tips:
• If you have fine hair, try reducing the airflow to help cut down on frizz�
•If you have thick hair, try increasing the heat for even faster results�
• If you have curly or coily hair, try increasing the heat to help achieve a straighter style�
• For an added curl, place the brush under the ends of the hair and roll the brush towards the roots to engage the bristles�
Twist the hair o the brush to release the curl� 76
Roll the brush outwards from the roots to the ends
to engage the bristles and gently grip the hair�
Pro Tip: For extra volume, brush your hair in an upward
direction�
Repeat on remaining sections until hair has been
dried into a bouncy, voluminous style�
Pro Tip: Set your style and help reduce frizz by pressing the
Cool Shot button.
Begin with rough-dried or towel-dried hair�
Pro Tip: Apply hair products or styling agents as desired�
Section your hair as desired� For voluminous
blowouts, start by placing theround brush under
the hair close to the roots�
Pro Tip: For even more volume, hold the brush under
your hair close to the roots for 3 seconds before brushing
outwards.
Turn up the volume.
Oval Brush
Recommended Setting: tempair
3 4
1 2
For additional help and tips based on your hair type, scan the
QR code to watch the how-to video and to visit our FAQ page!

Additional Styling Tips:
• If you have fine hair, try reducing the airflow to help cut down on frizz�
• If you have thick hair, try brushing smaller sections for smoother results�
• If you have curly or coily hair, try repeatedly brushing smaller sections and increasing the heat to help achieve a straighter style�
• For added volume, place the brush under the hair section close to the roots and brush upwards using a rounding motion�
98
Brush down your hair, making sure to engage the
smoothing bristles, and gently grip the hair�
Pro Tip: Hold the ends of your hair while brushing for added
tension and smoothing�
Repeat on remaining sections until hair has been
dried into a smooth, straight style�
Pro Tip: Set your style and help reduce frizz by pressing the
Cool Shot button.
Begin with rough-dried or towel-dried hair� Section
your hair asdesired�
Pro Tip: Apply hair products or styling agents as desired�
For a smooth, sleek style, start by placing the
brush close to the roots to engage the detangling
bristles�
Perfect sleek, straight styles.
Paddle Brush
Recommended Setting: tempair
3 4
1 2
For additional help and tips based on your hair type, scan the
QR code to watch the how-to video and to visit our FAQ page!

Additional Styling Tips:
• If you have fine hair, try reducing the airflow to help cut down on frizz�
• To create a curl, wrap your hair around a round brush and dry it in place using the concentrator
• For added volume, place a round brush under the roots and brush upwards while drying with the concentrator�
• For an added curl at the ends, roll the ends of the hair onto a round brush and dry in place using the concentrator�
11
10
Apply heat in a downward motion for smoothing�
Pro Tip: Apply heat at ends for shaping and bending�
Finish styling by setting shape at ends
and pressing the Cool Shot button.
Begin with rough-dried or towel-dried hair�
Pro Tip: Apply hair products or styling agents as desired�
Section your hair as desired and start styling with a
round brush� Rotate the concentrator so airflow is
always in line with the round brush�
Master smooth, stylish blowouts.
Styling Concentrator
Recommended Setting: tempair
3 4
1 2
For additional help and tips based on your hair type, scan the
QR code to watch the how-to video and to visit our FAQ page!

Additional Styling Tips:
• Apply curly hair products to wet hair before drying to help define your curls and cut down on frizz�
• If you have thick hair, try increasing the heat for even faster results�
1312
For more volume, slide the lever to extend prongs
to lift roots higher.
Pro Tip: Gather hair in diuser with prongs retracted, then
extend them when you reach the roots to increase grab and
maximize flow�
If desired, filp upside down and bunch from below
for extra volume�
Pro Tip: Keep the integrity of your natural curls by switching
between Low temp and the Cool Shot button�
Begin with towel-dried hair. Working around your
head, bunch curls from ends between the petals of
the diuser�
Pro Tip: Apply curly hair products or styling agents as
desired to wet hair�
Bring the diuser up to the roots. Pause and hold�
Curl-Defining Diuser
Define your natural curls.
SOLD SEPARATELY
Recommended Setting: tempair
3 4
1 2
For additional help and tips based on your hair type, scan the
QR code to watch the how-to video and to visit our FAQ page!

Additional Styling Tips:
• Try using the comb while in styling wand mode for more styling versatility�
• For added volume at the roots, comb through hair in an upward direction�
• Decrease the heat to help maintain hair texture while stretching�
1514
Repeat on remaining sections� Press the Cool Shot
button to lock in your style�
Pro Tip: Detach and re-orient the comb as needed to easily
reach all areas on your head�
Continue styling your stretched hair as desired�
Begin with towel dried hair� Section your hair as
desired� Make sure to detangle each section to
help prevent snagging�
Pro Tip: Apply your favorite styling products as desired�
Slowly comb your hair from the roots to the ends�
Continue combing your section until hair has been
stretched and dried�
Pro Tip: Hold the ends of your hair while combing for added
tension and length�
Wide-Tooth Comb
Stretch Your Natural Hair
3 4
1 2
For additional help and tips based on your hair type, scan the
QR code to watch the how-to video and to visit our FAQ page!
Recommended Setting: tempair

Looking for more inspiration, tips, and tricks?
Scan the QR code below or
visit qr.sharkclean.com/flexstyle
HD400_Series_StyleGuide_REV_Mv1
© 2022 Shark Ninja Operating LLC�
CHANGE THE WAY YOU CURL and SHARK FLEXSTYLE are trademarks of SharkNinja Operating LLC�
Other manuals for FlexStyle HD400
1
This manual suits for next models
8
Table of contents
Other Shark Hair Styler manuals

Shark
Shark STYLE iQ HD102EU User manual

Shark
Shark FlexStyle User guide

Shark
Shark HyperAIR HD102 User manual

Shark
Shark Style iQ HD110SLEU User manual

Shark
Shark STYLEiQ HD120SLEU User manual

Shark
Shark HyperAIR HD125CO User manual

Shark
Shark STYLEiQ HD120EU User manual

Shark
Shark FlexStyle HD400 User manual