Shark SharkTooth User manual

SHARKTOOTH®

1. Retirer le pare nuque,
si nécessaire.
1. Remove the neck pad,
if necessary .
1.Wennnötig,denNackenschutz
abnehmen.
1. Ritirare il paranuca,
se necessario.
1. Retire la almohadilla del cuel-
lo, si es necesario.
1. Retirar o para nuca se neces-
sário.
2. Insérer la batterie dans le
logement prévu dans le calotin EPS
a l’arrière du casque.
2. insert the battery in its hou-
sing at the rear of the EPS shock
absorber.
2. Die Batterie in die in der EPS-
Kappe hinter dem Headset vorge-
sehene Aufnahme setzen.
2. Inserire la batteria nell’appo-
sito posto della calotta EPS parte
posteriore del casco.
2. Inserte la batería en el aloja-
miento previsto en la parte trasera
de la calota EPS.
2. Inserir bateria no compar-
timento previsto no casco EPS
(Poliestireno) na parte traseira do
capacete.
1 2
2

3. Fixer le boitier de commande
du Sharktooth sur l’extérieur de la
calotte, cote gauche.
• Bien nettoyer la calotte dans la
zone de fixation.
• Attention à ne pas position-
ner le boitier de commande
dans une zone qui perturbera les
mouvements d’une éventuelle
mentonnière ou autres.
• Retirer le film de protection de l’ad-
hésif, positionner le boitier et main-
tenir une pression forte sur celui-ci
durant au minima 20 sec. La tenue
maximale de l’adhésif est obtenue
après 24h.
3. Place the Sharktooth control
box on the left hand side outside
the helmet
3
• Clean the surface before placing the
Sharktooth control box.
• Caution: do not locate the control
box where it would cause problem to
operate the helmet properly (chinbar
movement etc)
• Remove plastic film covering the
controlbox,positiontheboxandkeep
pressing for at least 20 secondes.
Maximum gluing is achieved after 24
hours.
3. Den Bedienungskasten des
Sharktooth außen an der Kappe, an
der linken Seite befestigen.
• Die Kappe im Befestigungsbereich
reinigen.
• Darauf achten, den Bedienungskasten
nicht in einem Bereich zu positionie-
ren, der die Bewegungen eines even-
tuellenKinnriemensoderdergleichen
behindert.
• Die Schutzfolie abziehen, den Kasten
positionieren und mindestens 20
Sekunden fest andrücken. Der maxi-
male Halt des Klebers ist nach 24
Stunden erreicht.
3. fissare il telecomando dello
Sharktooth sulla parte esterna della
calotta, lato sinistro. *
3

3
•ben pulire la calotta nella zona di
fissaggio.
• Attenzione non posizionare il tele-
comando in un’area che puo’ osta-
colare i movimenti possibili della
mentoniera o altro.
• Rimozione della pellicola adesiva
protettiva,posizionarel’apparecchio
e premere forte su quest’ultimo per
una durata di 20 secondi minimo.
L’efficacità perfetta dell’adesivo é
ottenuta dopo 24h .
3. Fije la caja de control en
Sharktooth fuera de la calota, lado
izquierdo.
• Limpie la tapa en la superficie de
montaje.
• Tenga cuidado de no montar la caja
de control en un área que suponga
unobstáculoalosmovimientosdela
mentonera o cualquier otro.
• Quite la película protectora del
adhesivo, coloque el mando y man-
tenga una fuerte presión sobre él
como mínimo 20 segundos. La fija-
ciónmaximadeladhesivoseobtiene
después de 24 horas.
3. Fixar caixa do comando do
SHARKTOOTH no exterior da car-
caça, lado esquerdo.
• Limpar bem a carcaça na zona de
fixação
• Cuidado em não fixar a caixa do
comando noutra zona, poderá afec-
tar o movimento do queixal frontal
ou outros acessórios.
• Retirar filme de protecção do
adesivo, posicionar caixa, efectuar
forte pressão sobre esta durante
20 segundos no mínimo. A fixação
máxima do adesivo e obtida após
24 horas.
4

4
4. Positionner le haut-parleur
gauche + micro dans le logement
de la joue EPS. Il est important pour
une meilleure audition de bien
positionner le haut-parleur en face
de l’oreille.
4. Place the left hand side
speaker + microphone in its hou-
sing within the EPS cheek pad. It
is important for best hearing to
locate the speaker precisely at hear
canal level.
4. Den linken + rechten
Lautsprecher in die Aufnahme
der EPS-Backe setzen. Für ein bes-
seres Hören ist es wichtig, den
Lautsprecher dem Ohr gegenüber
anzuordnen.
4. Posizionare l’altoparlante sinis-
tro + microfono nell’alloggiamento
della guancia EPS. È importante per
un’audizione migliore di posizionare
l’altoparlante di fronte all’orecchio.
4. Coloque el auricular izquierdo
+ micro en al alojamiento de la pieza
EPS lateral. Es importante que para
una mejor audición, posicionar los
auriculares a la altura de la oreja.
4. Colocar o altifalante esquer-
do + micro no compartimento do
queixal EPS. Importante para uma
melhor audição colocar o altifalante
em frente á orelha.
5

5
5. La tige flexible du micro se
place entre les 2 pressions rouges a
l’avant de la joue textile. Attention:
le micro a un sens de fonctionne-
ment (Positionner la marquage qui
se trouve sous la bonnette face a la
bouche).
5. The flexible part of the micro-
phone must be placed in between
the 2 red press studs on the front
part of the cheek. Caution: the
microphone Is single sided, place
the marking under the foam facing
the mouth.
5. Das biegsame Stäbchen des
Mikrofons wird zwischen die 2 roten
Druckknöpfe an der Vorderseite der
Textilbacke positioniert. Achtung: das
Mikrofon hat eine Funktionsrichtung
(die Markierung unter der Bügel dem
Mund gegenüber platzieren).
5. Il flessibile del microfono si
posiziona tra i 2 bottoni a pressione
rossi all’inizio del guanciale tessile.
Attenzione: il microfono ha un senso di
funzionamento (posizione della mar-
catura sottola spugnetta coprente).
5. El micrófono de brazo flexible
se coloca hacia adelante entre las
dos presiones rojas de las almoha-
dillas.
Nota: El micrófono tiene una posición
defuncionamiento(Posiciónmarcada
que ha de quedar frente a la boca).
5. A linha flexível do microfone
coloca-se entre os 2 pontos vermel-
hos na frente do queixal em tecido.
Atenção: O microfone tem um sen-
tido de funcionamento (Colocar a
marcação que está sob a viseira em
frente da boca).
6

6
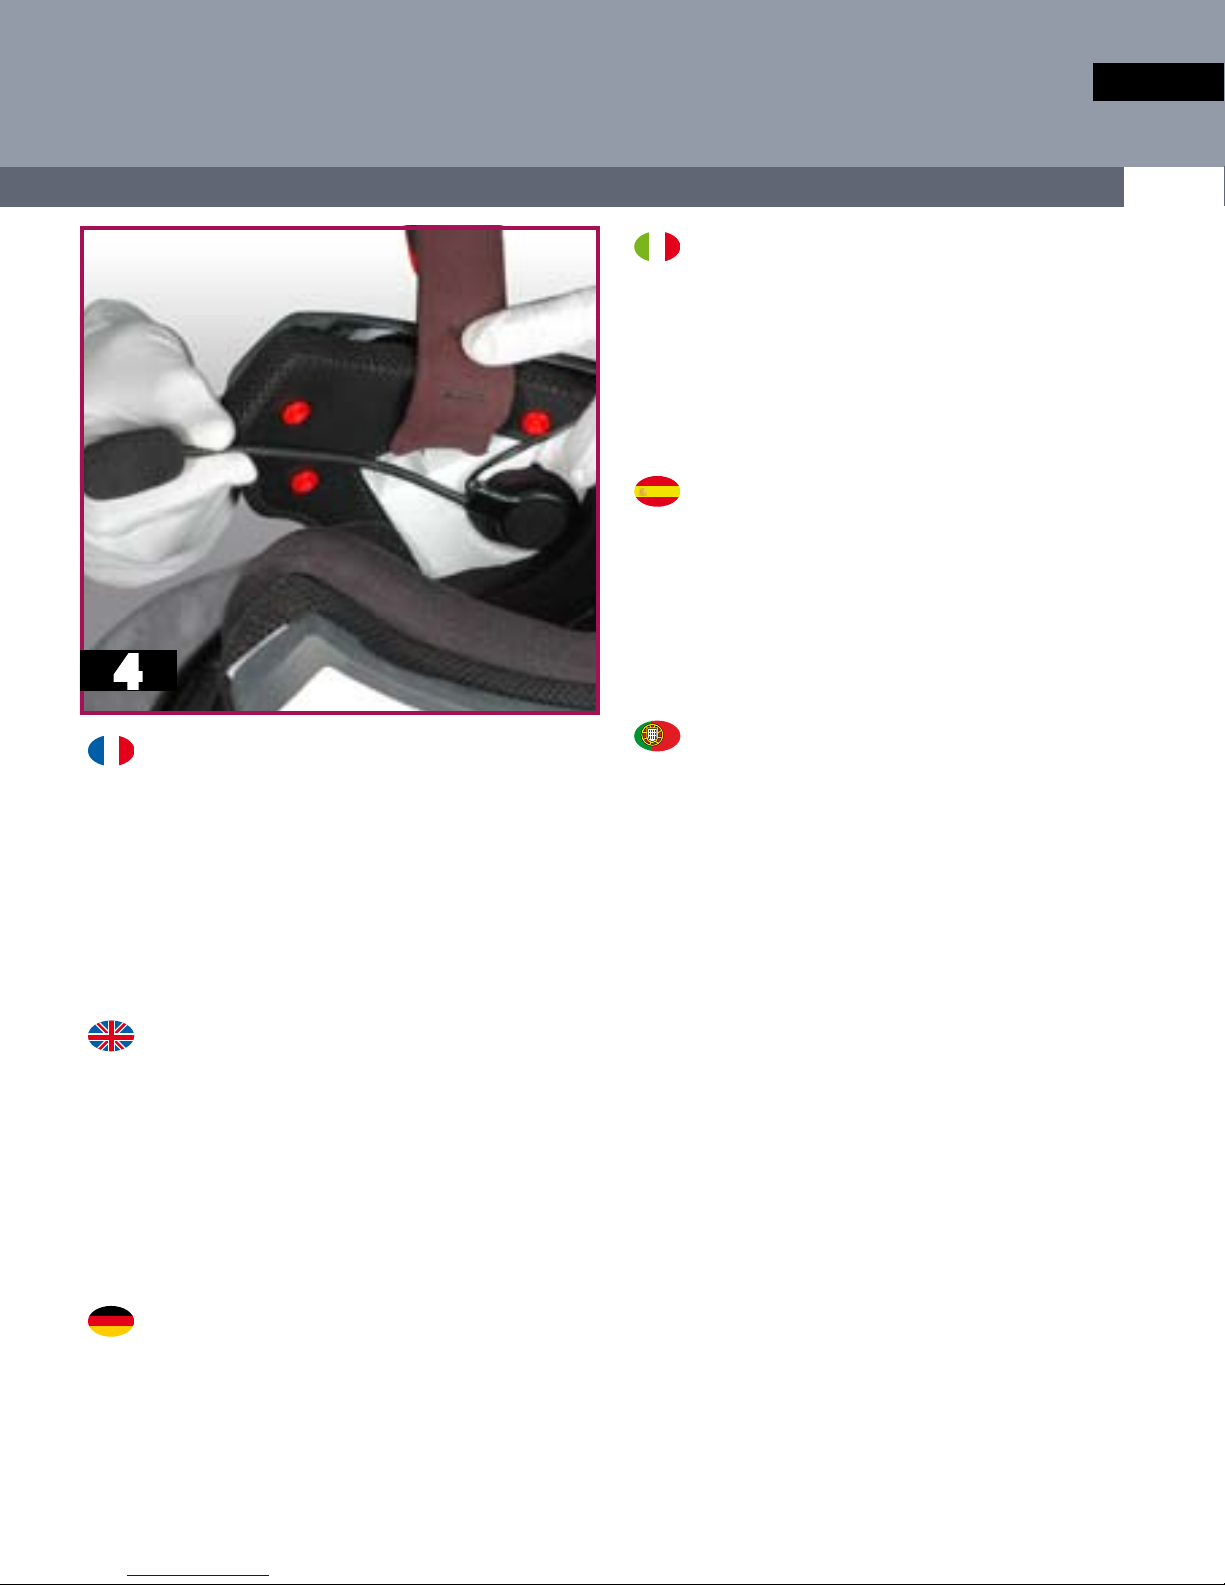
6. Positionner dans son loge-
ment et face à l’oreille le H.P. droit en
passant le fils sous la coiffe.
6. Place the right hand side spea-
ker in its housing and in front of the
hear canal by placing the wire under
the foam lining.
6. Den rechten Lautsprecher
in seine Aufnahme und dem Ohr
gegenüber setzen, die Drähte dabei
unter die Abdeckung legen.
6.Posizionare nell’apposito posto
e difronte all’orecchio il H.P. dritto e
passando il figlio sotto la carenatura.
6. Situado en su alojamiento y
junto a la oreja derecha, pasar el hilo
del auricular a través de la cofia.
6. Colocar o altifalante no com-
partimento respectivo e em frente á
orelha, passando o fio por baixo do
interno.
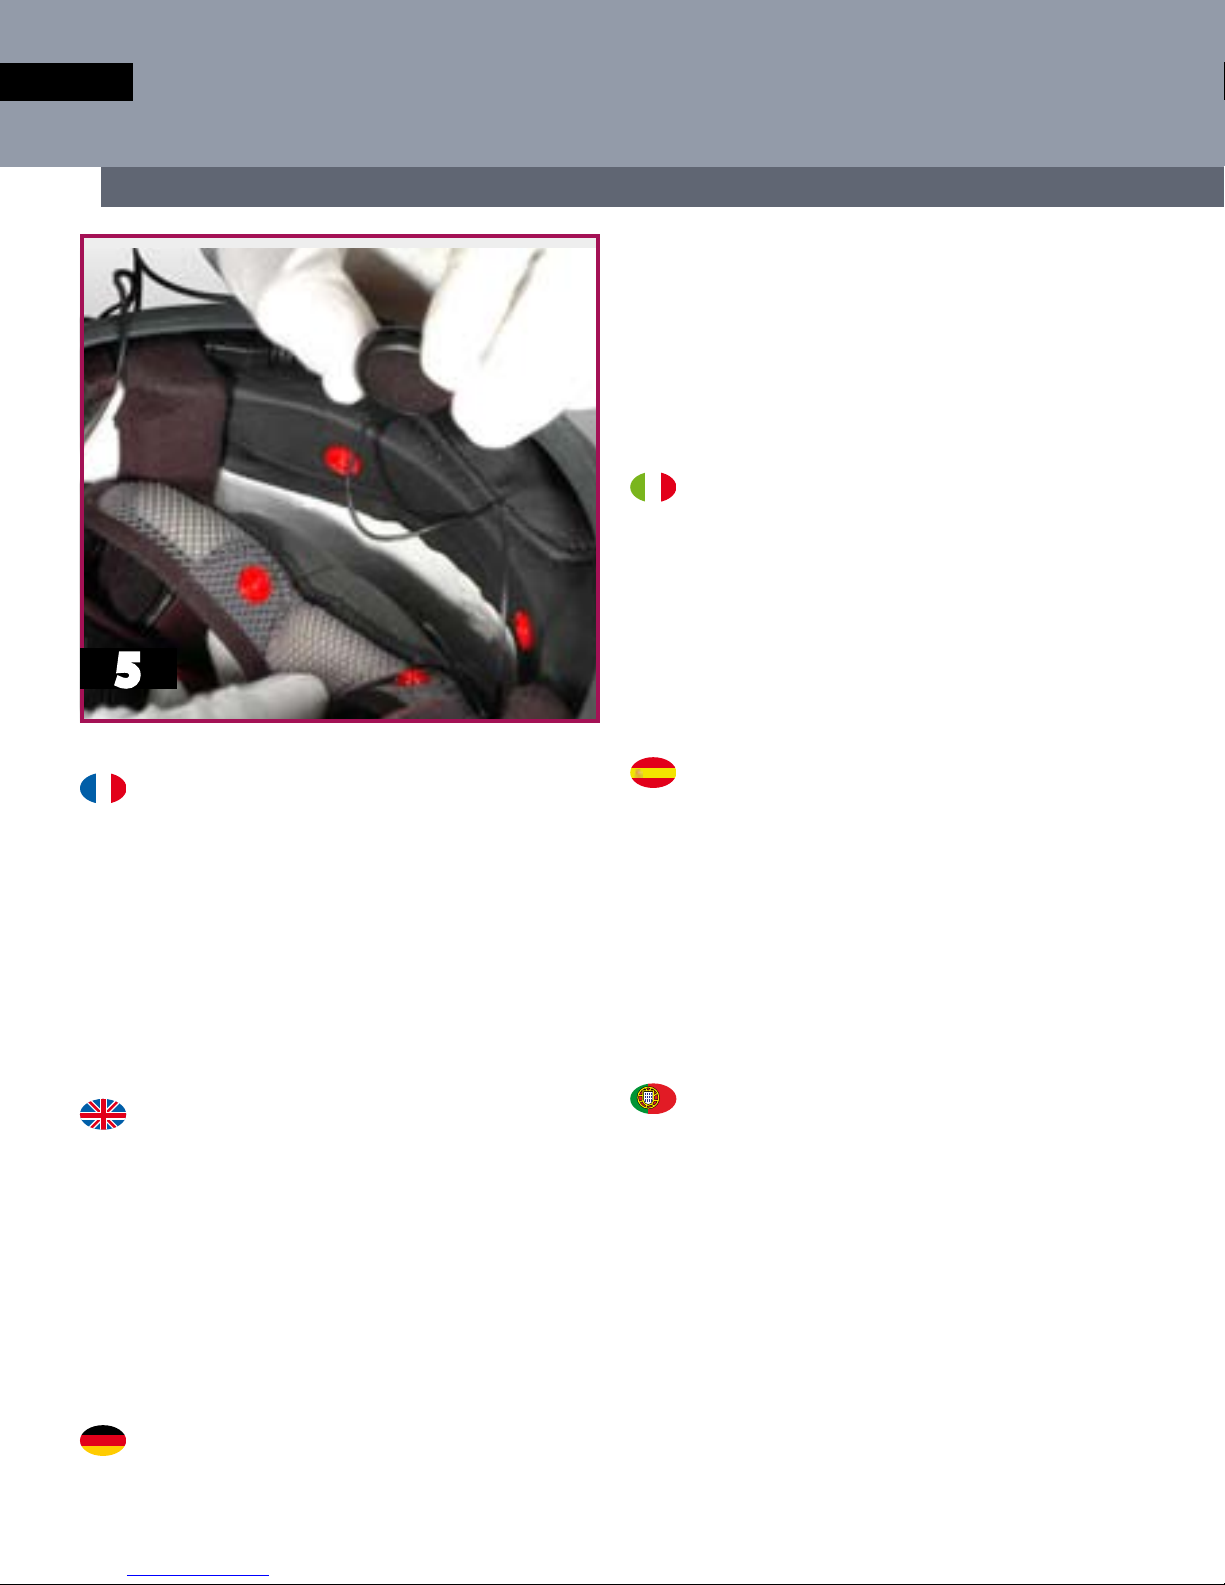
7. Replacer le pare-nuque si néces-
saire – Le connecteur micro USB qui
sert à recharger la batterie se loge
sous le pare nuque.
7. Replace the neck pad if necessa-
ry. The USB connecter (for recharging
the battery) goes under the neck pad.
7. Wenn nötig, den Nackenschutz
wieder anbringen. – Der Mikrostecker
USB, der zum Aufladen der Batterie
dient, wird unter den Nackenschutz
gesteckt.
7. Riposizionare il paranuca -se
necessario - il connettore USB micro
che viene utilizzato per ricaricare la
batteria si posiziona sotto il paranu.
7. Desmontar el cubre-nuca si es
necesario. El conector micro USB que
se utiliza para recargar la batería se
coloca bajo el cubre-nuca.
7. Substituir o para nuca se neces-
sário – O cabo de alimentação USB
que serve para o carregamento da
bateria se arruma debaixo do para
nuca.
7
7

www.shark-helmets.com
SHARK S.A.
110, route de la Valentine. Z.A.C. de La Valentine
13396 • Marseille cédex 11 • FRANCE
SHARKTOOTH®
The Bluetooth® word mark and logos are registered trademarks owned by Bluetooth® SIG, Inc. and any use of such marks by
Euro-CB (Phils.), Inc is under license. Other trademarks and trade names are those of their respective owners.
Other manuals for SharkTooth
2
Other Shark Headset manuals