Sharp PE-105-CS User manual

Fully-Automatic Process
Makes Dough
Multi-Purpose Appliance
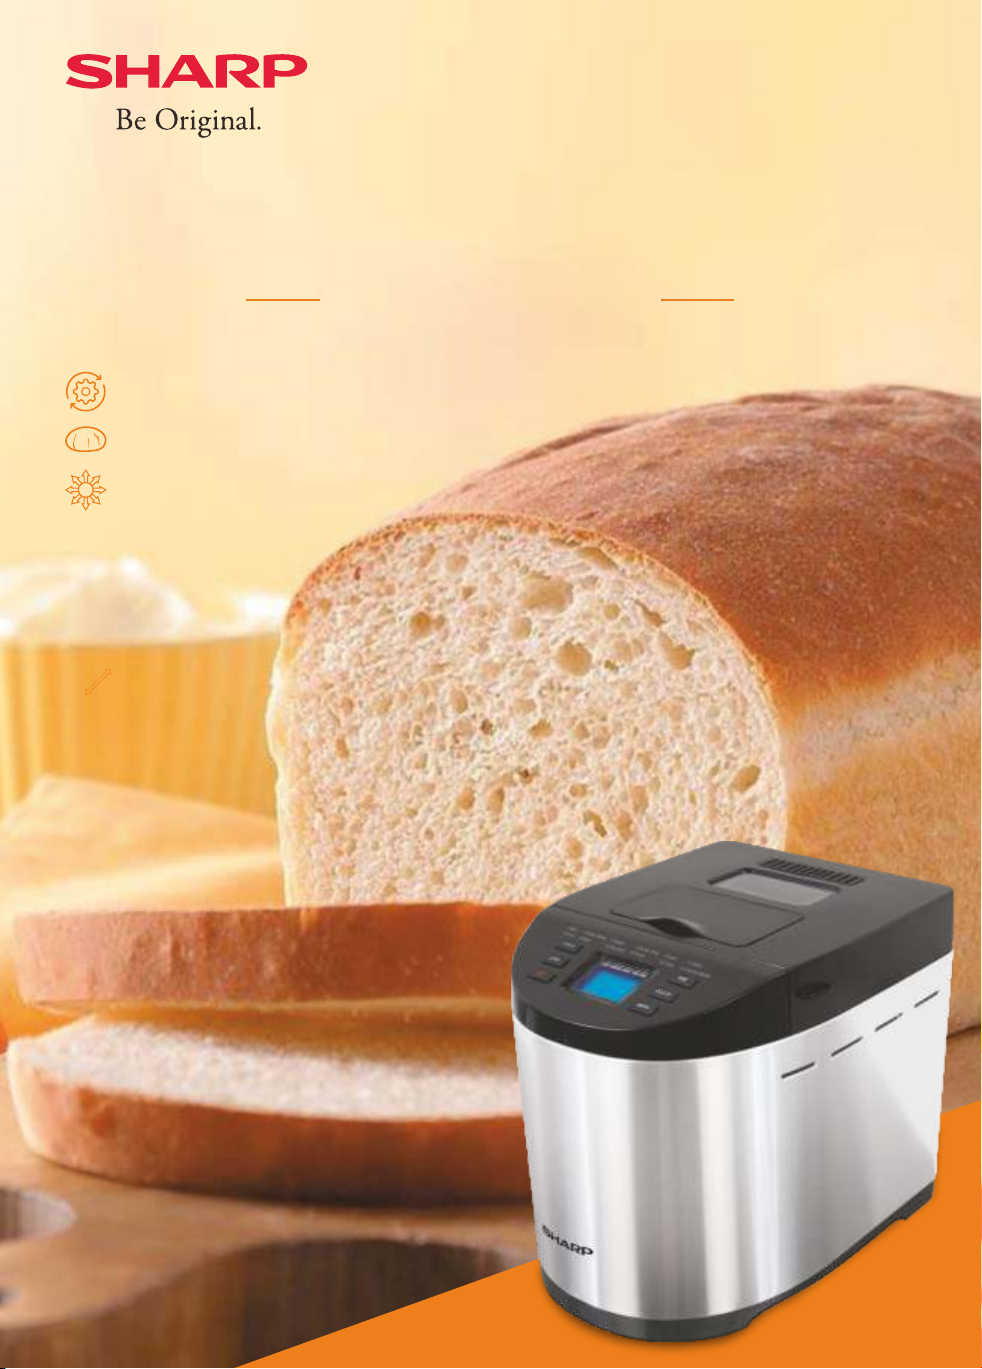
Bread Maker
Make Healthy Bread, Cake & Gourmet Jam

Welcome to SHARP
Dear Customer,
Congratulations, you have now joined millions of worldwide users of SHARP
World Class Kitchen Appliances. The Bread Maker from SHARP is uniquely
designed to bring health & happiness in your home, like no factory produced
bread can offer.
At the outset, we thank you for your trust in SHARP. At SHARP we take pride in
designing and developing innovative products that are manufactured at
world class factories.
We are sure that you will enjoy and be more than satisfied with SHARP Bread
Maker like rest of the worldwide users.
The highest quality standards that SHARP follows ensure years of trouble free
service of the appliance.
This all in one manual would help you to get the best out of your appliance. Please
go through this manual to familiarise yourself with its operation and easy
maintenance.
To ensure that the warranty of your appliance is effective, it is important you fill up
enclosed warranty card and mail it to us or email at [email protected] the
details or call at our call centre at 1800 425 4322.
Bon Appe'tit

TABLE OF CONTENT
Important Safeguards ...................................................................................... 01
Know Your Bread Maker .................................................................................. 03
Introduction to Control Panel ........................................................................... 04
Keep Warm ...................................................................................................... 07
Memory ............................................................................................................ 07
Environment ..................................................................................................... 07
Warning Display ............................................................................................... 07
Before the First Use ......................................................................................... 07
How to Make Bread ......................................................................................... 08
Cleaning & Maintenance .................................................................................. 09
Know Your Bread Ingredients .......................................................................... 09
Bread Maker Unit - Problem, Cause & Solution .............................................. 11
Error with Recipes ........................................................................................... 11
Technical Specification .................................................................................... 12
Recipes ............................................................................................................ 13
Warranty Card .................................................................................................. 25
Environment Friendly Disposal ........................................................................ 27

IMPORTANT SAFEGUARDS
• Read all instructions carefully before using the bread maker.
• Before using check the voltage of wall outlet so that it corresponds to one shown on the
rating label.
• Do not operate any appliance with a damaged cord/plug or after the appliance malfunctions
or has been dropped or damaged in any manner. Call the manufacturer or the nearest
authorised service agent for inspection, repair and for any electrical / mechanical adjustment.
• Do not touch hot surface. Use oven gloves.
• To protect against electric shock, do not immerse cord, plug or housing in water or any other
liquid.
• Unplug from outlet when appliance is not in use, before putting on or taking off parts and
before cleaning.
• Do not let the cord hang on edge of table or hot surface.
• Use of any accessories is not recommended by the appliance manufacturer as it may cause
injuries.
• This appliance is not intended for the use by person (including children) with reduced
physical, sensory or mental capabilities, or lack of experience and knowledge, unless they
have been supervised or given proper instructions concerning the use of appliance by an
authorised person.
• Ensure that children do not play with the appliance.
• Do not place the appliance near hot gas burner or electric burner or heated oven.
• Extreme caution must be taken while moving appliance containing hot oil or other hot
substances.
• Do not touch any moving or spinning parts of the machine when baking.
• Never switch ON the appliance without properly placing the bread pan filled with ingredients.
• Do not beat the bread pan on the top or edge to remove pan. This may damage the bread
pan.
• Metal foil or such material must not be inserted into the bread maker as it can cause fire or
short circuit.
• Do not cover the bread maker with towel or any other material while in use. Heat and steam
must be able to freely escape from the vent. Or else it may cause fire.
• Turn OFF all buttons before removing plug from wall outlet.
• Do not operate the appliance apart from its intended use.
Before using this appliance, following basic precautions should always be adhered to
01

• This appliance has been incorporated with a ground pin. Please ensure the wall outlet in your
house is well earthed.
• This appliance is designed for household and similar application use such as Pantry area in
shops, offices and other working environment. Also farm houses, patron of hotels, motels,
bed & breakfast and other such residential type of environment.
• The appliance is not intended to use with external timer or separate remote control system.
• Do not operate the unit without bread pan placed in the chamber to avoid damage to the
appliance.
• If the supply cord is damaged, it must be replaced by authorised service person only.
• Do not use the appliance outdoor.
• Keep long hair, loose clothes and hand away from the appliance.
• Do not attempt to disassemble, repair or alter the machine on your own. It may cause failure
of appliance or irreparable damage.
• Save these instructions.
02

KNOW YOUR BREAD MAKER
Lid
Ingredient
box
Control
panel
Housing
Viewing
Lid Lug
window
Hook
Measuring cup
Measuring spoon
Bread pan
(with kneading
blade)
03

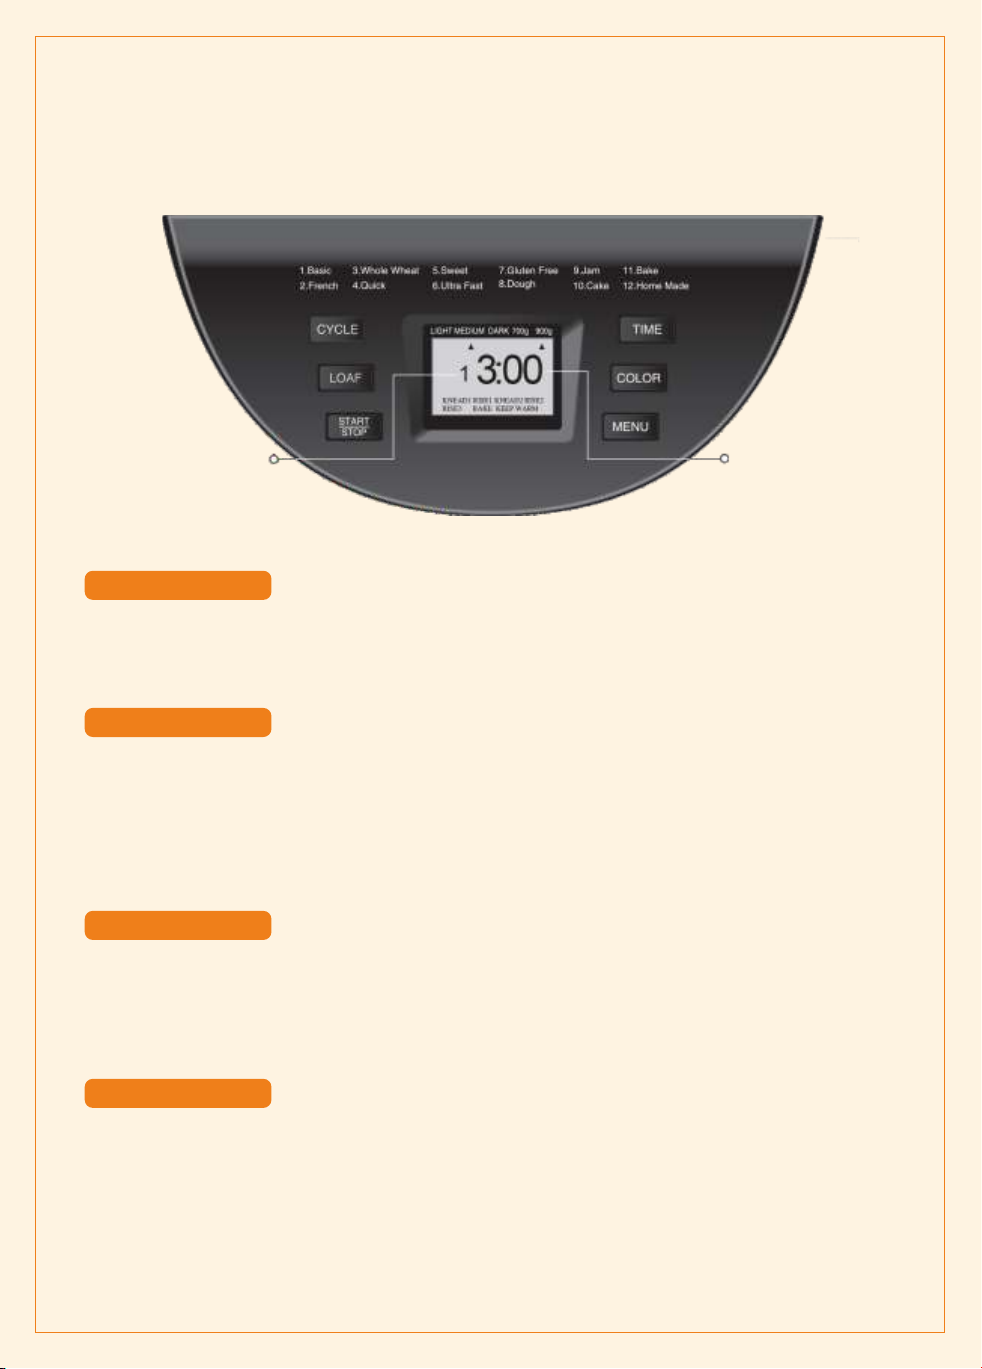
INTRODUCTION TO CONTROL PANEL
This indicates the program
you have chosen
The operation time
for each program
AFTER START-UP
As soon as the bread maker is plugged to the power supply, a beep will be heard and “1 3:00”
appears in the display. But the two dots between the “3” and “00” don’t flash constantly. The blue
backlight will turn off within 20 seconds when there’s no action. “1” is the default program. “900g”
and “Medium” are default settings.
START/STOP
For starting, pausing and stopping the selected operation program.
To start a program, press the START/STOP button once. A short beep will be heard and the two
dots in the time display begin to flash and the program starts. All other buttons are deactivated
except the START/STOP button after a program has begun.
To stop the program, press the START/STOP button for more than 2 seconds, then a long beep
will be heard, it means that the program has been switched off.
PAUSE FUNCTION
After process starts up, you can press START/STOP button to interrupt at any time for less than 2
seconds, the operation will be paused but the setting will be saved, the outstanding time will be
flashed on the LCD panel.
Press START/STOP button again or within 10 min without pressing any other button, the program
will continue.
PROGRAM MENU
It is used to set different programs. Each time it is pressed (accompanied by a short beep) the
program will vary. Press the button discontinuously, the 12 menus will be cycled to show on the
LCD display. Select your desired program. The functions of 12 menus will be explained below.
Program 1: Basic
For white and mixed breads, it mainly consists of wheat flour or rye flour. The bread has a
compact consistency. You can adjust the bread brown by setting the COLOR button.
04

Program 2: French
For light breads made from fine flour. French bread requires special timing and temperatures to
achieve that wonderful crispy and nicely browned crust. This is not suitable for baking recipes
requiring butter, margarine or milk.
Program 3: Whole wheat
Whole wheat bread is a yeast bread that is made with a significant portion of whole wheat flour
(50% or more), rather than with all white bread flour. Breads made from whole wheat flour are
more nutritious because the flour is milled from the entire wheat berry (including the bran and the
germ). Using whole wheat flour produces a bread that is brown to dark brown in color (when all
whole wheat flour is used), and the bread is more flavorful and healthy than breads made with
refined white flours (even though “lost”nutrients are added back into white flours).
Program 4: Quick (the loaf size and delay time are not applicable)
Kneading, rising and baking loaf uses less time than the Basic bread. But the bread baked on this
setting is usually smaller with a dense texture.
Program 5: Sweet
The Sweet Breads settings are for baking breads with high amount of sugar, fats and proteins, all
of which tend to increase browning. Due to a longer phase of rising the bread will be light and airy.
Program 6: Ultra-fast (the delay time is not applicable)
Kneading, rising and baking loaf in a shortest time. Usually the bread made is smaller and rougher
than that is made with Quick program.
Program 7: Gluten Free
The ingredients to create gluten-free breads are unique. While they are “yeast breads,” the dough
is generally wetter and more like a batter. It is also important not to over-mix or over-knead gluten-
free dough. There is only one rise, and due to the high moisture content, baking time is increased.
Mix-ins must be added at the very beginning of the cycle with other basic ingredients.
Program 8: Dough (the color and loaf size are not applicable)
Kneading and rising, but without baking, remove the dough and use for making bread rolls, pizza,
steamed bread, etc.
Program 9: Jam (the color, loaf size and delay time are not applicable. Directly press
START/STOP button once to begin working)
The bread maker is a great for cooking, homemade jams and chutneys. The paddle automatically
keeps the ingredients stirring through the process and they make a wonderful complement to
freshly baked bread!
Program 10: Cake (the loaf size is not applicable)
Kneading, rising and baking but rise with soda or baking powder.
Program 11: Bake (the loaf size and delay time are not applicable, but the operation time can be
adjusted by pressing TIME button. Press the TIME button once, the time will increase or decrease
1 minute. The adjusted time range is 10-60 minutes).
The bake setting is a “bake only”, which can be used to increase the baking time on selected
settings. This feature is very helpful to set jams and marmalades.
05

Program 12: Home made
Be able to self-program by customer to reset kneading, rising and baking to keep it warm at every
step time. The time range of each program is as follows:
KNEAD1: 6-14 minutes
RISE1: 20-60 minutes
KNEAD2: 5-20 minutes
RISE2: 5-120 minutes
RISE3: 0-120 minutes
BAKE: 0-80 minutes
KEEP WARM: 0-60 minutes
Under the menu of Home Made,
a) Press CYCLE button once, KNEAD1 will appear on LCD, then press TIME button to
adjust the minutes, and press CYCLE to confirm the time for this step;
b) Press CYCLE to enter the next step, RISE1 will appear on LCD and then press TIME
button to adjust the minutes, the number will increase rapidly if TIME button is hold.
Further press CYCLE to confirm.
c) In this way set the remaining steps. Upon finishing setting for all steps, press
START/STOP button to exit the setting.
d) Press START/STOP button further to activate the operation.
NOTE: The setting can be saved and is effective in next use.
06

Bread can be automatically kept warm for 1 hour after baking. During keeping warm, if you would
like to take the bread out, switch the program off by pressing the START/STOP button. After
baking, the LCD displays “0:00” and beeps will be heard. Then go back to the default setting of
the machine. NOTE: The programs of Dough and Jam do not have the function to keep warm.
KEEP WARM
If the power supply has been interrupted during the course of making bread, the process of
making bread will be continued automatically within 10 minutes, even without pressing
START/STOP button. If the interruption time exceeds 10 minutes, the memory cannot be kept, you
must discard the ingredients in the bread pan and add the ingredients into bread pan again, and
the bread maker must be restarted. If the dough has not entered the rising phase when the power
supply breaks off, you can press the START/STOP directly to continue the program from the
beginning.
MEMORY
The machine may work well in a wide range of temperature, but there may be some difference in
loaf size between a very warm room and a very cold room. We suggest that the room temperature
o o
should be within the range of 15 C to 34 C.
ENVIRONMENT
1. If the display shows “HHH” after you have pressed START/STOP button, 5 beeps will be
heard, it means that the temperature inside is still too high. The program will not be
performed. Open the lid and let the machine cool down for 10 to 20 minutes.
2. If the display shows “LLL” after you have pressed START/STOP button, 5 beeps will be
heard, it means that the temperature inside of bread pan is too low. The bread maker should
be placed into environment of higher temperature for use (Except the program of Bake).
3. If the display shows “EE0” after you have pressed START/STOP button, beeps will be heard,
it means the temperature sensor open circuit, press START/STOP button to stop beeps
sound, but the “EE0” in the LCD will continue flashing, please check the sensor carefully with
an authorized expert. If the display shows “EE1”, it means the temperature sensor short
circuited.
WARNING DISPLAY
The appliance may emit a little smoke and a specific smell when you turn it on for the first time.
This is normal and will soon stop. Make sure the appliance has sufficient ventilation.
1. Please check whether all parts and accessories are complete and free of damage.
2. Clean all the parts according to the section “Cleaning and Maintenance”.
3. Set the bread maker on Bake mode and bake empty for about 10 minutes. Then let it cool
down and clean all the detached parts again.
4. Dry all parts thoroughly and assemble them, the appliance is ready for using.
BEFORE THE FIRST USE
07

1. Lay the appliance on a firm and even surface.
2. Place the bread pan in position and then turn it clockwise to the LOCK position until a click
can be heard. Open the lid by lifting any lid lug and fix the kneading blade onto the drive shaft.
It is recommended to apply hole with heat-resisting margarine prior to place the kneading
blade to avoid the dough sticking the kneading blade, this would also make the kneading
blade be removed from bread easily.
3. Place ingredients into the bread pan. Usually the water or liquid substance should be put
firstly, then add sugar, salt and flour, always add yeast or baking powder as the last ingredient.
4. Make a small indentation on the top of flour with finger,
add yeast into the indentation, make sure it does not
come into contact with the liquid or salt.
NOTE: The maximum quantity of flour and yeast is 600g and
3 teaspoons.
5. Close the lid gently and plug the power cord into a wall outlet.
6. Press the MENU button until your desired program is selected.
7. Press the COLOR button to select the desired crust color (if applicable).
8. Press the LOAF/SIZE button to select the desired size (if applicable).
9. Set the delay time by pressing TIME button. This step may be skipped if you want the bread
maker to start working immediately.
10. Press the START/STOP button to start working.
11. During operation, the appliance will add the fruit or nut ingredients placed into the ingredient
box to the bread pan automatically (except for the programs of Dough, Jam and Bake).
12. Once the process has been completed, 10 beeps will be heard. Press START/STOP button
for approx. 2 seconds to stop the process and take out the bread. With the oven mitts, Open
the Lid, turn the bread pan anti-clockwise to the UNLOCK position, and then take it out from
the bread maker.
CAUTION: The Bread pan and bread may be very hot! Always handle with care.
13. Let the bread pan cool down before removing the bread. Then use non-stick spatula to gently
loosen the sides of the bread from the pan.
14. Turn bread pan upside down onto a wire cooling rack or clean cooking surface and gently
shake until bread falls out.
15. Let the bread cool for about 20 minutes before slicing. It is recommended slicing bread with
electric cutter or dentate cutter rather than fruit knife or kitchen knife, otherwise the bread may
be subject to deformation.
16. If you are out of the room or have not pressed START/STOP button at the end of operation,
the bread will be kept warm automatically for 1 hour (if applicable), when keep warm is done,
beeps will be heard.
17. Unplug the power cord when appliance not in use or when operation has ended.
CAUTION: Before slicing the loaf, use the hook to remove the kneading blade hidden at the
bottom of loaf. The loaf is hot, do not use hand to remove the kneading blade.
NOTE: If bread has not been completely consumed, we advice you to store the remaining bread in
sealed plastic bag or container. Bread can be stored for about three days under room temperature,
if need more days in storage, pack it with sealed plastic bag or container and then place it in the
refrigerator. Storage time is at most ten days. As the bread is made without preservative, generally
storage time is no longer than that for compared with bread in the market.
HOW TO MAKE BREAD
Yeast or soda
Dry ingredients
Water or liquid
08

Disconnect the machine from the power outlet and let it cool down before cleaning.
1. Bread pan: Remove the bread pan by turning it anti-clockwise, then pulling the handle to
remove it, wipe inside and outside of pan with a damp cloth, do not use any sharp or abrasive
agents for the consideration of protecting the non-stick coating. The pan must be dried
completely before reuse.
NOTE: Insert the bread pan in correct position and then press it down. If it cannot be inserted,
adjust the pan slightly to find the correct position and then press it down.
2. Kneading blade: If the kneading blade is difficult to remove from the bread, use the hook.
Also wipe the blade carefully with a cotton or damp cloth. Both the bread pan and kneading
blade are dishwasher safe components.
3. Ingredient box: After each use, clean the ingredient box with damp cloth, then use a dry
cloth to wipe again.
4. Housing: Gently wipe the outer surface of housing with a wet cloth. Do not use any abrasive
cleaner for cleaning, as this would degrade the high polish of the surface. Never immerse the
housing into water for cleaning.
NOTE: It is suggested not to disassemble the lid for cleaning.
5. Before the bread maker is packed for storage, ensure that it has completely cooled down, is
clean and dry, and the lid is closed.
CLEANING AND MAINTENANCE
1. Bread flour: Bread flour has high content of high gluten (so it can be also called high-gluten
flour which contains high protein), it has good elasticity and can keep the size of the bread
from collapsing after rise. As the gluten content is higher than common flour, so it can be
used for making bread with large size and better inner fiber. Bread flour is the most important
ingredient in making bread.
2. Plain flour: Flour that contains no baking powder, it is applicable for making express bread.
3. Whole-wheat flour: Whole-wheat flour is ground from grain. It contains wheat skin and
gluten. Whole-wheat flour is heavier and more nutrient than common flour. The bread made
with whole-wheat flour is usually small in size. Many recipes usually combine whole-wheat
flour with bread flour to achieve best results.
4. Black wheat flour: Black wheat flour, also named as “rough flour”, is a kind of high fiber flour,
and is similar to whole-wheat flour. To obtain the large size after rising, it must be used in
combination with high proportion of bread flour.
5. Self-rising flour: A type of flour that contains baking powder, it is used for making cakes
specially.
6. Corn flour and oatmeal flour: Corn flour and oatmeal flour are ground from corn and
oatmeal separately. They are the additive ingredients for making rough bread, for enhancing
the flavor and texture.
7. Sugar: Sugar is very important ingredient to increase sweet taste and color of bread. It is also
considered as nourishment in the yeast bread. White sugar is largely used. Brown sugar,
powder sugar or cotton sugar can also be used as per requirement.
8. Yeast: After yeasting process, the yeast will produce carbon dioxide. The carbon dioxide will
expand the bread and softens the inner fiber. However, yeast fast action needs carbohydrate
in sugar and flour as nourishment.
KNOW YOUR BREAD INGREDIENTS
09

1 tsp. active dry yeast =3/4 tsp. instant yeast
1.5 tsp. active dry yeast =1 tsp. instant yeast
2 tsp. active dry yeast =1.5 tsp. instant yeast
Yeast must be stored in the refrigerator, as the fungus in it will be killed at high temperature.
Before using, check the production date and storage life of your yeast. Store it back into the
refrigerator as soon as possible after each use. Usually the failure of bread rising is caused
by bad yeast.
The ways described below will check whether your yeast is fresh and active.
o
(1) Pour 1/2 cup warm water (45-50 C) into a measuring cup.
(2) Put 1 tsp. white sugar into the cup and stir, then sprinkle 2 tsp. yeast over the water.
(3) Place the measuring cup in a warm place for about 10min. Do not stir the water.
(4) The froth should be up to 1 cup. Otherwise the yeast is dead or inactive.
9. Salt: Salt is necessary to improve bread flavor and crust color. But salt can also restrain yeast
from rising. Never use too much salt in a recipe. But bread would be larger if without salt.
10. Egg: Eggs can improve bread texture, make the bread more nourished and large in size, the
egg must be peeled and stirred evenly.
11. Fat, butter and vegetable oil: Fat can make bread soften and delay storage life. Butter
should be melted or chopped to small pieces before using.
12. Baking powder: Baking powder is used for rising the Ultra Fast bread and cake. As it does
not need rise time and it can produce the air, the air will form bubble to soften the texture of
bread utilizing chemical principle.
13. Soda: It is similar with baking powder. It can also be used in combination with baking powder.
14. Water and other liquid: Water is essential ingredient for making bread. Generally speaking,
water temperature between 20ºC and 25ºC is the best. The water may be replaced with fresh
milk or water mixed with 2% of milk powder, which may enhance bread flavor and improve
crust color. Some recipes may require juice for the purpose of enhancing bread flavor, e.g.
apple juice, orange juice, lemon juice and so on.
INGREDIENTS MEASUREMENT
One of the important steps for making good bread is proper amount of ingredients. It is strongly
suggested that the use of measuring cup or measuring spoon obtains accurate amount, otherwise
the bread will be largely influenced.
1. Weighing liquid ingredients: Water, fresh milk or milk powder solution should be measured
with measuring cups. Observe the level of the measuring cup with your eyes horizontally.
When you measure cooking oil or other ingredients, clean the measuring cup thoroughly
without any other ingredients.
2. Dry measurements: Dry measuring must be done by gently spooning ingredients into the
measuring cup and then once filled, level it off with a knife. Scooping or tapping a measuring
cup with more than it is required could affect the balance of the recipe. When measuring small
amounts of dry ingredients, the measuring spoon must be used. Measurements must be
leveled, not heaped as this small difference could throw out the critical balance of the recipe.
3. Adding sequence: The sequence of adding ingredients should be abided. Generally
speaking, the sequence is: liquid ingredients, eggs, salt and milk powder etc. When adding
the ingredient, the flour can't be wetted by liquid completely. The yeast can only be placed on
the dry flour and it can't touch with salt. After the flour has been kneaded for some time and a
beep will prompt you to put fruit ingredients into the mixture. If the fruit ingredients are added
too early, the flavor will be diminished after long time mixing. When you use the delay function
for a long time, do not add the perishable ingredients such as eggs and fruit ingredients.
10

BREAD MAKER UNIT - PROBLEM, CAUSE & SOLUTION
Problem Cause Solution
Questions & Answers On Bread Maker
Smoke from
ventilation hole while
baking
Some ingredients adhere to the heating element or nearby. During the
first use, oil remains on the surface of heating element.
Unplug the bread maker and clean the heating element, but beware of
the heat. During the first use, dry operating and open the lid.
1
Bread bottom crust is
too thick
Keeping bread warm and leaving bread in the bread pan for a long time.
Too much of water loss.
Take bread out soon without keeping it warm.
2
It is very difficult to
take bread out
Kneader adheres tightly to the shaft in bread pan.
After taking bread out, put hot water into bread pan and immerse
kneader for 10 minutes, then take it out and clean.
3
Stirring ingredients
unevenly and bad
baking
1. Inappropriate selection of menu program.
Select the proper program menu.
2. After operating, opening cover several times makes the bread dry, no
brown crust color.
Do not open cover at the last rise.
3. Stirring resistance is too strong which makes kneader difficult to rotate
and stir adequately.
Check kneader hole, then take bread pan out and operate without
load, if it's not normal, contact authorized service facility.
4
Display shows “H:HH”
after pressing
“START/STOP”
button
The temperature in bread maker is too high to bake bread.
Press “START/STOP” button and unplug bread maker, then take bread
pan out and open cover until the bread maker cools down.
5
Hear the motor noise
but dough isn't
stirring
Bread pan is fixed improperly or dough is too large to be stirred.
Check whether bread pan is fixed properly and dough is made
according to recipe and the ingredients weighed accurately.
6
ERROR WITH THE RECIPES
Bread size is too large
as to push cover
Too much yeast or excessive flour or water or high environment
temperature.
Check the above factors, reduce the amount according to the reasons.
1
Bread size is too
small or bread did not
rise
No yeast or the amount of yeast is not enough. Moreover, yeast may have
a poor activity as the water temperature is too high or yeast is mixed
together with salt, or low environment temperature.
Check the amount and performance of yeast, increase the
environment temperature accurately.
2
Dough is so large to
overflow bread pan
The amount of liquids is so much as to make dough soft and also
excessive amount of yeast.
Reduce the amount of liquids and improve dough elasticity.
3
11

ERROR WITH THE RECIPES
Problem Cause Solution
Bread collapses in the
middle parts while
baking dough
1. Using a not so strong flour can't make the dough rise
Use bread flour or strong powder.
2. Yeast rate is too rapid or its temperature is too high
o o
Use yeast under room temperature (15 C-40 C).
3. Excessive water makes dough too wet and soft
According to the ability of water absorption, adjust water amount on
recipe.
4
Bread weight is very
large and too dense
1. Too much flour or short of water.
Reduce flour or increase water.
2. Too many fruit ingredients or too much whole wheat flour.
Reduce the amount of corresponding ingredients and increase yeast.
5
Middle parts are
hollow after cutting
bread
1. Excessive water or yeast or no salt.
Reduce water or yeast accurately and check salt.
2. Water temperature is too high.
Check water temperature.
6
Bread surface is
adhered to dry
powder
1. There are strong glutinosity ingredients in bread such as butter and
bananas etc.
Do not add strong glutinosity ingredients into bread.
2. Stirring inadequately for short of water.
Check water and mechanical construct of bread maker.
7
Different recipes or ingredients have great effect on making bread, baking
color will become very dark because of much sugar.
If baking color is too dark for the recipe with excessive sugar, press
START/STOP to interrupt the program ahead 5-10min of intended
finishing time. Before removing out the bread you should keep the bread
or cake in bread pan for about 20 minutes with cover closed.
Crust is too thick and
baking color is too
dark when making
cakes or food with
excessive sugar
8
12
TECHNICAL SPECIFICATION
Model Name
Sharp Bread Maker
Model Number
PE-105-CS
Mounting
Table Top
Input Power Supply
Single Phase 220-240 V AC, 50 Hz
Product Dimension (mm)
259(L) X 360(W) X 313(H)
Power Consumption
600W

Basic White Bread
*Images for illustration purpose only.
13
Ingredients 700 gms
(1.5lbs)
1000 gms
(2.2lbs) Method
High protein flour 400 gms 550 gms 1) Pour in all liquid ingredients in to bread pan
Water 240 gms 330 gms 2) Add in salt, sugar and butter
Sugar 1 tbsp 1 1/2 tbsp 3) Pour in flour and lastly instant yeast
Salt 1 1/2 tsb 1 3/4 tsp 4) Touch "BASIC" and select loaf size and colour
Instant yeast 1 1/2 tsp 1 3/4 tsp 5) Touch START/STOP
Butter 18 gms 24 gms 6) Remove immediately after baking
7) Cool completely before slicing
Baking Time
3 hours 710 gms 940 gms

Quick Bread
*Images for illustration purpose only.
Remarks: 1) Quick Bread uses only baking powder or baking soda as leavening. 2) The texture is between bread and cake.
3) It does not rise at all. 4) It will be compact cake bread.
14
Ingredients
700 gms
(1.5lbs)
1000 gms
(2.2lbs)
Method
All pupose flour
350 gms
(sieve)
500 gms
(sieve)
1) Place all wet ingredients into bread pan.
Salt
1/4 tsp (scant)
1/2 tsp
2) Pour in all dry ingredients.
Baking soda
1 1/2 tsp (sieve)
2 tsp
3) Place raisins into ingredients drawer.
Sugar
2 1/2 tbsp
3 1/2 tbsp
4) Touch "QUICK" then select medium colour for
1000 gms loaf or light colour for 700 gms loaf.
Butter (Softened)
21 gms
30 gms
5) Touch START/STOP.
Raisins
56 gms
80 gms
6) Use Spatula to scrap down side.
Eggs
78 gms
(1 ‘A’ Grade)
112 gms
(2 ‘A’ Grade)
7) Let stand for 10 mins after baking and then
pour out.
Butter milk
119 gms
170 gms
8) Cool completely before slicing.
Sour cream
56 gms
80 gms
Baking Time
2 hours10 mins
715 gms
1026 gms

Whe Wheat Bread
Remarks: Special Wholemeal flour is a combination of whole wheat flour and High Protein flour to make a lighter wholemeal
loaf 50% of each flour.
*Images for illustration purpose only.
15
Ingredients 700 gms
(1.5lbs)
900 gms
(2.0lbs) Method
Special wholemeal
flour 225 gms 275 gms 1) Place all ingredients into bread pan
High protein flour 225 gms 275gms 2) Add in salt, sugar and butter
Instant yeast 1 1/2tsp 1 3/4tsp 3) Pour in flour and lastly Instant Yeast
Salt 1 1/2tsp 1 3/2tsp 4) Touch "Whole WHEAT" and select loaf size and
medium colour
Eggs 45 gms 55 gms 5) Touch START/STOP
Water 250 gms 305 gms 6) Remove immediately after baking
Butter 20 gms 25 gms 7) Cool completely before slicing
Sugar 3/4 tbsp 1 tbsp
Baking Time
3 hours 40 mins 789 gms 966 gms

French Bread
Remarks: To have the crustier surface, please bake additional 30 minutes of time.
*Images for illustration purpose only.
16
Ingredients 700 gms
(1.5lbs)
1000 gms
(2.2lbs) Method
High protein flour
(Unbleached) 450 gms 600 gms 1) Place water and salt into bread pan
Water
(lcy cold water) 303 gms 402 gms 2) Pour in flour and instant yeast
Instant yeast 1 1/2 tsp 1 3/4 tsp 3) Touch "FRENCH"
Salt 1 1/2 tsp 2 tsp 4) Select loaf size and colour (dark)
Sugar 2.25 gms 5 gms 5) Touch START/STOP
Lemon Juice 7.5 gms 15 gms 6) Once done, remove bread immediately
7) Let cool completely
Baking Time
3 hours 50 mins 764 gms 1016 gms

Sweet Bread
*Images for illustration purpose only.
17
Ingredients 700 gms
(1.5lbs)
1000 gms
(2.2lbs) Method
High protein flour 400 gms 500 gms 1) Place all liquid ingredients in to bread pan
Instant yeast 1 1/2 tsp 1 3/4 tsp 2) Add in salt, sugar and butter
Water 155 gms 200 gms 3) Pour in flour and lastly instant yeast
Salt 1 1/2 tsp 1 3/4 tsp 4) Touch "SWEET" and select loaf size
Sugar 70 gms
(4 tbsp)
90 gms
(5 tbsp) 5) Touch medium for colour
Egg 45 gms 57 gms 6) Touch START/STOP
Condensed milk 40 gms 51 gms 7) Remove immediately after baking
Butter 55 gms 71 gms 8) Cool completely before slicing
Baking time
2 hours 50 mins 779 gms 982 gms
Other manuals for PE-105-CS
1
Table of contents
Other Sharp Bread Maker manuals