e02_dv55_7e.fm
[31/58]
31
Continued on next page
Before Using the Handset
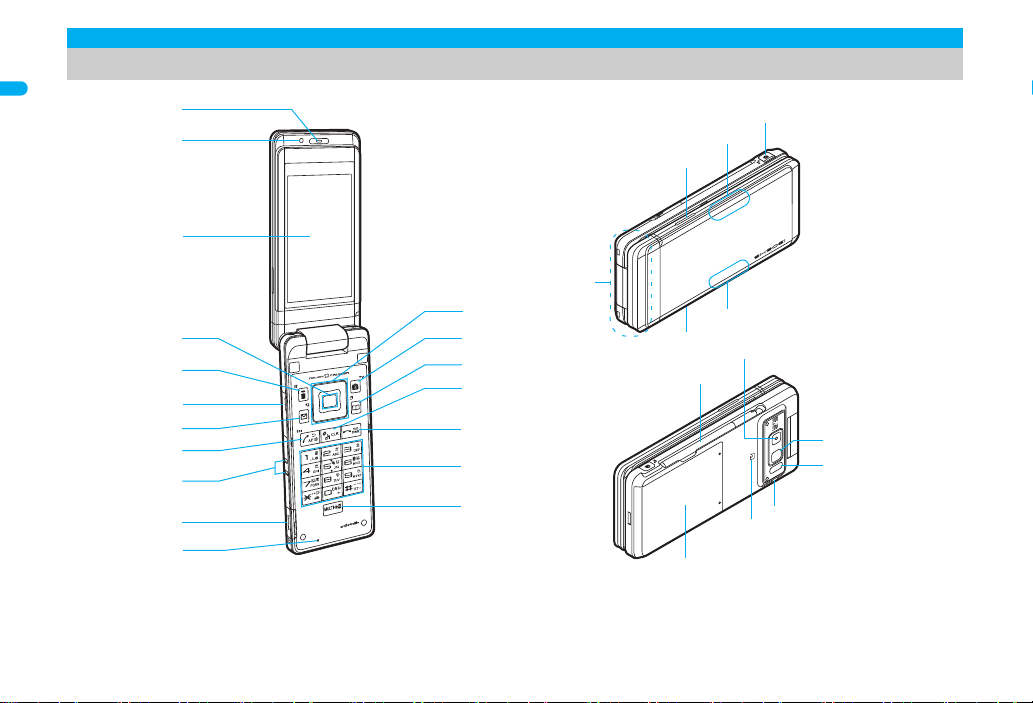
1Earpiece
Listen to the other party’s voice.
Listen to Record message/Voice memo.
2Brightness sensor (nP. 118)
The sensor detects the light of the surrounding area and
automatically adjusts the display brightness and turns on/off the
keypad backlight.
Do not cover the sensor area with your hand or a sticker. May
interfere with the sensor.
3Display/Touch panel (nP. 34, P. 40)
4Optical TOUCH CRUISER ,(nP. 39)
Slide the finger to perform the same operations as those for w
of Multi-guide key.
5i-mode/Operation guidance key i(,)
Press to use i-mode (nP. 170).
Press to execute the functions of the operation guidance
(nP. 34).
Press for 1+ seconds to display the i-appli software list screen
(nP. 231).
6External connector terminal
Connect to an external device such as AC adapter/DC adapter,
FOMA USB Cable with Charge Function 01/02 (sold separately)
(nP. 52, P. 342).
Use a flat-plug earphone/microphone with switch (sold
separately), etc. by connecting to an Earphone Plug Adapter for
External connector terminal (nP. 400).
7Mail/Operation guidance key m
Press to use mail functions (nP. 196).
Press to execute the functions of the operation guidance
(nP. 34).
Press twice to check new messages (nP. 207).
Press for 1+ seconds to display a compose message screen
(nP. 196).
8Start/Hands-free key s
Press to make or receive a voice call.
Press to use Hands-free (nP. 61).
Press for 1+ seconds to use the Eco mode (Power saver)
(nP. 117).
9Charger terminal (nP. 53)
Terminal for recharging with the desktop holder.
amicroSD Card slot (nP. 333)
bMouthpiece
Sends out your own voice.
cMulti-guide key wt
Move the cursor to select an item and execute or set (nP. 34).
Press to display Menu, Redial list screen, Received calls list
screen, Shortcut menu and Quick search.
Press tfor 1+ seconds to use Multi easy lock (nP. 136).
Press rfor 1+ seconds to use IC card lock (nP. 263).
Press qfor 1+ seconds to use Side key guard (nP. 137).
Press ufor 1+ seconds to adjust the earpiece volume
(nP. 110).
dCamera/Operation guidance key C
Press to activate the camera (nP. 151).
Press to execute the functions of the operation guidance
(nP. 34).
Press for 1+ seconds to activate 1Seg (nP. 285).
ePhonebook/Operation guidance key a
Press to use the phonebook (nP. 96).
Press to execute the functions of the operation guidance
(nP. 34).
Press for 1+ seconds to display the phonebook entry screen
(nP. 97).
fi-Channel/Clear key c(J)
Press to show the channel list (nP. 192).
Press to return to the previous screen.
Use to delete phone numbers and text.
gPower/End key H
Press for 2+ seconds to turn the power on/off (nP. 55).
Use to end the function being used and return to stand-by
display.
dv55_E.book 31 ページ 2008年5月6日 火曜日 午前9時8分