Sharp HT-SBW182 User manual

HT-SBW182
User manual
2.1 Soundbar Home Theatre System
EN


Trademarks
The Bluetooth® word mark and logos are registered trademarks owned by
Bluetooth SIG,. Inc.
The terms HDMI, HDMI High-Denition Multimedia Interface, and the
HDMI Logo are trademarks or registered trademarks of HDMI Licensing
Administrator, Inc.
Dear Customer, thank you for having purchased this SHARP product. We would like to inform you that your warranty rights are in the European warranty
card. You can download them from www.sharpconsumer.eu or contact the retailer where you purchased your device. You can also obtain the copy of
the warranty rights via the electronic or conventional mail by submitting a request to [email protected] or calling
+44 (0) 330 024 0803 (UK) | +353 1443 3323 (IE). Calls are charged at your normal telephone call rate.
Keep proof of purchase because it is necessary to apply warranty rights.
The telephone opening hours are:
Monday to Friday 8.30am to 6pm, Saturday 9am – 5pm.
Bank Holidays - 10am to 4pm
Closed Christmas and New Years day

2EN
Important safety instructions
CAUTION
RISK OF ELECTRIC SHOCK
DO NOT OPEN
Please, read these safety instructions and respect
the following warnings before the appliance is
operated:
The lightning ash with arrowhead symbol, within an
equilateral triangle, is intended to alert the user to the
presence of uninsulated“dangerous voltage”within the
product’s enclosure that may be of sucient magnitude as to
constitute a risk of electric shock to persons.
The exclamation point within an equilateral triangle is
intended to alert the user to the presence of important
operating and maintenance (servicing) instructions in the
literature accompanying the appliance.
Use only power supply listed in the user manual.
This symbol means that the product should be disposed of
in an environmentally friendly manner and not with general
household waste.
AC voltage
DC voltage
Class II equipment
In order to prevent re always
keep candles and other open
ames away from this product.
Warning:
• Always follow basic safety precautions when using this applience, espe-
cially when children are present.
• Children should be supervised to ensure that they do not play with the
appliance.
• Do not damage the power cord, or place any heavy objects on it, do not
strech it or bend it. Also do not use extension cables. Damage to the
power cord may result in re or electric shock.
• If the supply cord is damaged, it must be replaced by the manufacturer,
a service agent or similarly qualied persons.
• Ensure that the unit is plugged into an AC 100-240V 50/60Hz power
outlet. Using higher voltage may cause the unit to malfunction or even
catch re.
• If the power plug does not t into your outlet, do not force the plug into
the electrical socket.
• To switch o the unit place it in to standby and unplug it from the mains
power supply.
• Do not disconnect or connect the power cord with wet hands. It may
cause an electric shock.
• Disconnect the power cord if it is not used for a long time.
• Ensure that the mains plug is always easily accessible.
• This product does not contain any parts that are serviceable by the
user. In case of a fault, contact the manufacturer or authorised service
department. Exposing the internal parts inside the device may endanger
your life. The manufacturers guarantee does not extend to faults caused
by repairs carried out by unauthorised third parties.
• Do not use this product immediately after unpacking. Wait until it warms
up to room temperature before using it.
• Ensure this product is used in moderate climates only (not in tropical/
subtropical climates).
• Place product on a at, stable surface that is not subject to vibrations.
• Ensure the product and its parts do not overhang the edge of the
supporting furniture.
• To reduce the risk of fire, electric shock or damage to this product, do
not expose it to direct sunlight, dust, rain and moisture. Never expose it
to dripping or splashing and do not place objects filled with liquids on
or near the product.
• Do not install near any heat sources such as radiators, heat registers,
stoves, or other apparatus (including ampliers) that produce heat.
• Do not place the product where the humidity is high and ventilation is
poor.
• Ensure a minimum distance of 5 cm around the apparatus for sucient
ventilation. Do not block any ventilation openings of this and ensure
they are not covered with items such as newspapers, table-cloths,
curtains, etc.
• NEVER let anyone, especially children, push anything into holes, slots
or any other openings in the unit’s casing as this could result in a fatal
electric shock.
• Storms are dangerous for all electric appliances. If the mains or aerial
wiring is struck by lightning, the appliance might get damaged, even if it
is turned o. You should disconnect all the cables and connectors of the
appliance before a storm.
Maintenance
• Unplug the power cable from the power source before cleaning the
appliance.
• Use a soft and clean rag to clean the outside of the unit. Never clean it
with chemicals or detergent.
Power Adapter
• To disconnect the unit from the mains supply, unplug the lead from the
mains socket.
• Only use the supplied mains adaptor as failure to do this may result in a
safety risk and/or damage to the unit.
Batteries
• Observe the correct polarity when inserting the
batteries.
• Do not expose batteries to high temperatures and do
not place them on locations where the temperature
might increase quickly, e.g. near the re or on the
direct sunshine.
• Do not expose batteries to excessive radiant heat, do
not throw them into the re, do not disassemble them and do not try to
recharge un-rechargeable batteries. They could leak or explode.
• Disposal of a battery into re or a hot oven, or mechanically crushing or
cutting a battery, may result in it exploding;
• Leaving a battery in an extremely high temperature environment may
result in an explosion or the leakage of ammable liquids or gases;
• A battery subjected to extremely low air pressure may result in an explo-
sion or leakage of ammable liquid or gas.
• CAUTION: Risk of explosion if the battery is replaced by an incorrect
type.
• Never use dierent batteries together or mix new and old ones.
• When the Remote Control is not to be used for a long time (more than a
month), remove the battery from the Remote Control to prevent it from
leaking.
• If the batteries leak, wipe away the leakage inside the battery compart-
ment and replace the batteries with new ones.
CAUTION
RISK OF ELECTRIC SHOCK
DO NOT OPEN
CAUTION
RISK OF ELECTRIC SHOCK
DO NOT OPEN

EN
• Do not use any batteries other than those specied.
Do not ingest battery, chemical burn hazard
• If the battery is swallowed, it can cause severe internal burns in just
2 hours and lead to death. Keep new and used batteries away from
children. If the battery compartment does not close securely, stop
using the product and keep it away from children. If you think batteries
might have been swallowed or placed inside any part of the body, seek
immediate medical attention.
Disposal of this equipment and Batteries
• Do not dispose of this product or its batteries as unsorted
municipal waste. Return it to a designated collection point
for the recycling of WEEE in accordance with local law. By
doing so, you will help to conserve resources and protect
the environment.
• Most EU countries regulate the disposal of batteries by
law. Contact your retailer or local authorities for more information.
• The shown above appears on electrical equipment and batteries (or their
packaging) to remind users of the disposal requirements.. If "Hg" or 'Pb'
appears below the symbol, this means that the battery cantains traces of
mercury (Hg) or lead (Pb), respectively.
• Users are requested to use the locally provided return facilities for used
equipment and batteries.
CE Statement:
• Hereby, UMC Poland Sp. z o.o. declares that this audio device is in com-
pliance with the essential requirements and other relevant provisions of
RED Directive 2014/53/EU. The full text of the EU declaration of conform-
ity is available by following the link
https://www.sharpconsumer.eu/documents-of-conformity/

4EN
What is included in the box:
• 1x Main unit
• 1x Wireless Subwoofer
• 1x Remote control
• 2x AAA battery
• 1x User guide
• 1x Power Adapter
• 1x Power cord
• 1x Wall-mounting installation kit
Controls
1 2 3 4
1. Standby button – Switch the unit between ON and STANDBY
mode.
2. Source button – Select the audio input channel.
3. Volume +/- button – Increase/decrease the volume level.
4. Indicator light
• Red: In STANDBY mode.
• Blue: In Bluetooth mode.
• Green: In LINE IN mode.
• Yellow: In Optical mode.
• Purple: In HDMI ARC mode.
Inputs/Outputs
1 2 3 4 5
1. HDMI (ARC) IN Socket – Connect to a HDMI video source device (Blu-
ray player, gaming console etc.).
2. SERVICE ONLY Socket
3. AUX IN – Connect to an external audio device.
4. OPTICAL Socket – Opticial input jack.
5. DC IN Socket – Socket for connecting power adapter (DC 12V/2.0A).
Remote control
1. – Switch the unit between ON and STANDBY mode.
2. – Select the Bluetooth mode.
Press and hold to activate the pairing function in Bluetooth mode or
disconnect the existing paired Bluetooth device.
3. – Select the play function.
4. VOL +/- – Increase/decrease the volume level.
5. / – Skip to previous/next track in Bluetooth mode.
6. – Play/pause/resume playback in Bluetooth mode.
7. – (MUTE) Mute or resume the sound.
8. BASS +/- – Adjust bass level.
9. TRE +/- – Adjust treble level.
10. EQ – Select a preset sound mode.
RC OPERATIONS
The provided Remote Control allows the unit to be operated from distance.
• Even if the Remote Control is operated within the eective range of 6m,
remote control operation may be aected if there are obstacles between
the unit and the remote control.
• If the Remote Control is operated near other products which generate
infrared rays, or if other remote control devices using infrared rays are
used near the unit, it may operate incorrectly. Conversely, the other
products may operate incorrectly.
BATTERY INSTALLATION
1. Press and slide the back cover to open the battery compartment of the
remote control.
2. Insert two AAA size batteries (included). Make sure the (+) and (–) ends
of the batteries match the (+) and (–) ends indicated in the battery
compartment.
3. Close the battery compartment cover.

EN
First time installation
Placement and Mounting
A B
A: Normal Placement
(Place Soundbar on leveled surface in front of TV.)
B: Wall Mounting
Wall Mounting
NOTE:
Installation must be carried out by qualied personnel only. Incorrect
assembly can result in severe personal injury and property damage (if
you intend to install this product yourself, you must check for installa-
tions such as electrical wiring and plumbing that may be buried inside
the wall). It is the installer’s responsibility to verify that the wall will safely
support the total load of the unit and wall brackets.
Additional tools (not included) are required for the installation.
Do not overtighten screws.
Keep this instruction manual for future reference.
Use an electronic stud nder to check the wall type before drilling and
mounting.
560 mm
560 mm
1
1
2
(4mm)
2
560 mm
ARC OPTICAL LINEIN UPGRADE ~ACIN
1. Drill 2 parallel holes (Ø 6 mm) in the wall. The distance between the
holes should be 560 mm.
Firmly x one dowel into each hole in the wall and then insert screws
into them.
2. Leave a 4mm gap between the wall and the screw’s head. Lift the unit
with the attached wall brackets over the heads of the screws and slot
into place.
Connections
HDMI output (ARC)
The ARC (Audio Return Channel) function allows you to send audio
from your ARC- compliant TV to your sound bar through a single HDMI
connection. To enjoy the ARC function, please ensure your TV is both
HDMI-CEC and ARC compliant and set up accordingly. When correctly set
up, you can use your TV remote control to adjust the volume output (VOL
+/- and MUTE) of the sound bar.
Connect the HDMI cable (not included) from unit‘s HDMI OUT (ARC)
socket to the HDMI (ARC) socket on your ARC compliant TV. Then press
the remote control to select HDMI ARC.
TIPS:
• Your TV must support the HDMI-CEC and ARC function. HDMI-CEC and
ARC must be set to On.
• The setting method of HDMI-CEC and ARC may dier depending on
the TV. For details about ARC function, please refer to your TV owner’s
manual.
• Only HDMI cables of version 1.4 or higher can support the ARC function.
• While in HDMI/ARC/OPTICAL mode, if there’s no sound output from the
unit, you may need to activate PCM signal output on your source device
(eg. TV, DVD or Blu-ray player).
OPTICAL input
• Use the optical cable to connect the optical input of this soundbar to the
optical output of VCD, CD, VCR, DVD player.
TIPS:
• While in HDMI/ARC/OPTICAL mode, if there’s no sound output from the
unit, you may need to activate PCM signal output on your source device
(eg. TV, DVD or Blu-ray player).

6EN
AUX IN
A. Use a RCA to 3.5mm audio cable (not included) to connect the TV’s
audio output sockets to the AUX IN socket on the unit.
B. Use a 3.5mm to 3.5mm audio cable (not included) to connect the TV’s
or external audio device headphone socket to the AUX IN socket on
the unit.
TIP:
When you use the headphone output on the TV set, you will be able to
adjust the volume level directly using the TV remote control.
DC IN
~AC IN
Connect to Power
• Before connecting this device to power, ensure you have completed all
other connections.
• Risk of product damage! Only use the supplied mains adaptor as failure
to do this may result in a safety risk and/or damage to the unit.
• Connect power adapter to the DC IN socket of the unit and then connect
it into a mains socket.
• Should you need to change the power adaptor plug type follow the
instructions below:
1. Remove the current AC plug adaptor by pressing plastic clip on the
left side and at the same time rotating the AC plug adaptor in an anti-
clockwise direction until it pops out of position.
2. Now insert the correct AC plug adaptor by locating it into the AC power
adaptor socket and rotate clockwise until you hear a click conrming
that it is locked in position.
• Use the power cord to connect the subwoofer to the mains socket.
Pairing the Wireless Subwoofer with the
Main Unit
Automatic pairing
The subwoofer and soundbar will automatically pair when both units are
plugged into the power supply and turned on. No cable is needed for
connecting the two units.
When the subwoofer is pairing with the main unit, the Pairing Indicator
will ash fast.
When the subwoofer is paired with the main unit, the Pairing Indicator
will light up.
NOTE:
Do not press the PAIR button on the rear of the subwoofer, except for
manual pairing.
If the automatic pairing fails, pair the subwoofer with the main unit
manually.
Manual pairing
1. Press the PAIR button on the rear of the subwoofer, subwoofer's red
light will ash 2x.
2. Reset the soundbar - long press (5s) the power key when Soundbar is in
LINE mode. Than soundbar will reset and standby.
3. Power on the soundbar. The soundbar will search and pair with the
subwoofer automatically.
NOTE:
If the wireless connection fails again, check if there is conict or strong
interference (for example, interference from an electronic device) around
your location. Remove these conicts or strong interferences and repeat
the above procedures.
The subwoofer should be within 6m of the soundbar in an open area.
If a device is connected via HDMI (CEC active), the main unit and the
subwoofer will switch on automatically when the external device is
switched on.
Basic Operation
Standby/ON
• When you rst connect the unit to the main socket, the unit will be in
STANDBY mode.
• Press the button on the remote control to switch the main unit ON
or OFF.
• Disconnect the plug from the mains socket if you want to switch the unit
o completely.
When the unit has no input signal for over 15 minutes, it will automati-
cally switch to Standby mode.
Select Modes
Press the button on the unit repeatedly or press the / button on
the remote control to select the desired mode.
Adjust the Volume
Press the + / - buttons on the unit or on the remote control to adjust the
volume.
If you wish to turn the sound o, press the button on the remote
control. Press the button again or press the +/- buttons on the unit or
on the remote control to resume normal listening.

EN
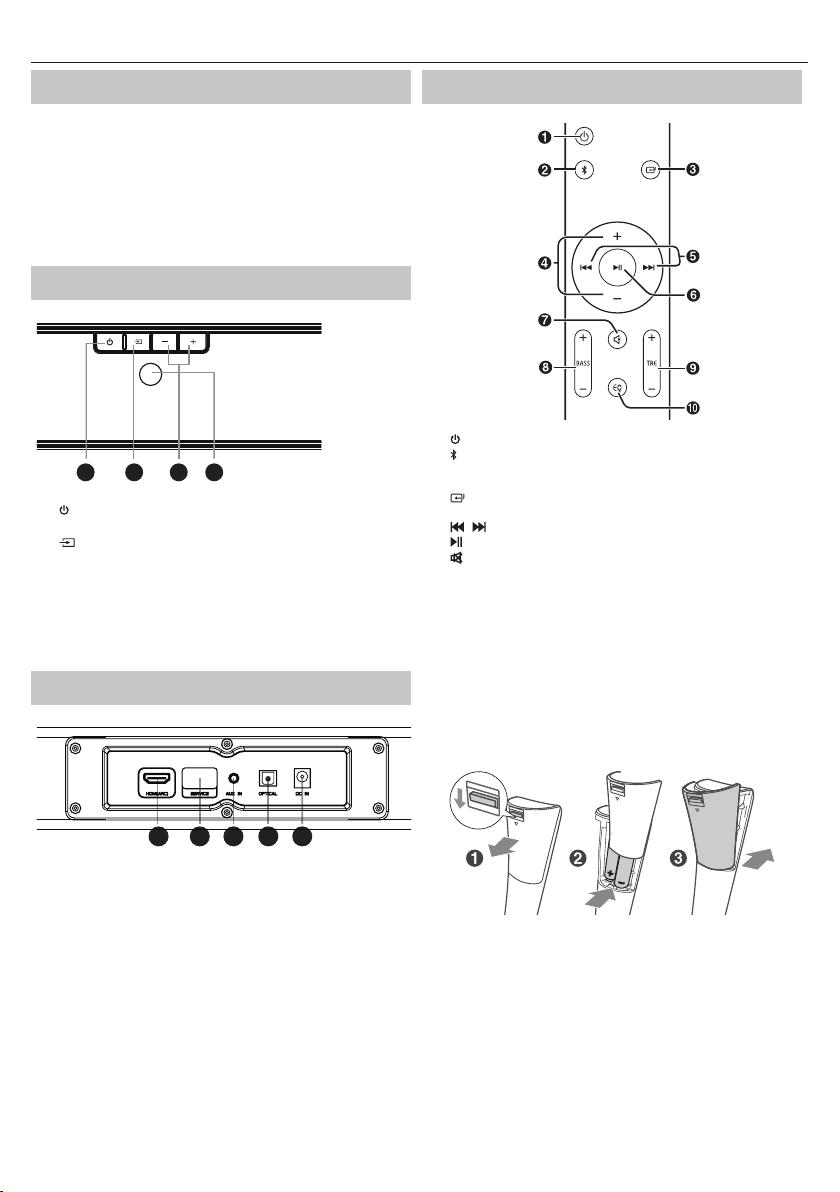
Select Equaliser (EQ) Effect
While playing, press the EQ button on the remote control to select
between preset equalisers.
Each time the button is pressed it will move between the EQ functions as
below:
Music (recommended for listening to all types of music) - white light
ashes 2 seconds
Movie (recommended for use with movies) - green light ashes for 2
seconds
News (recommended for listening to voices) - red light ashes for 2
seconds
Custom (use to set personal bass/treble settings) - cyan light ashes 2
seconds
NOTE: Bass/Treble setting is available only in custom preset.
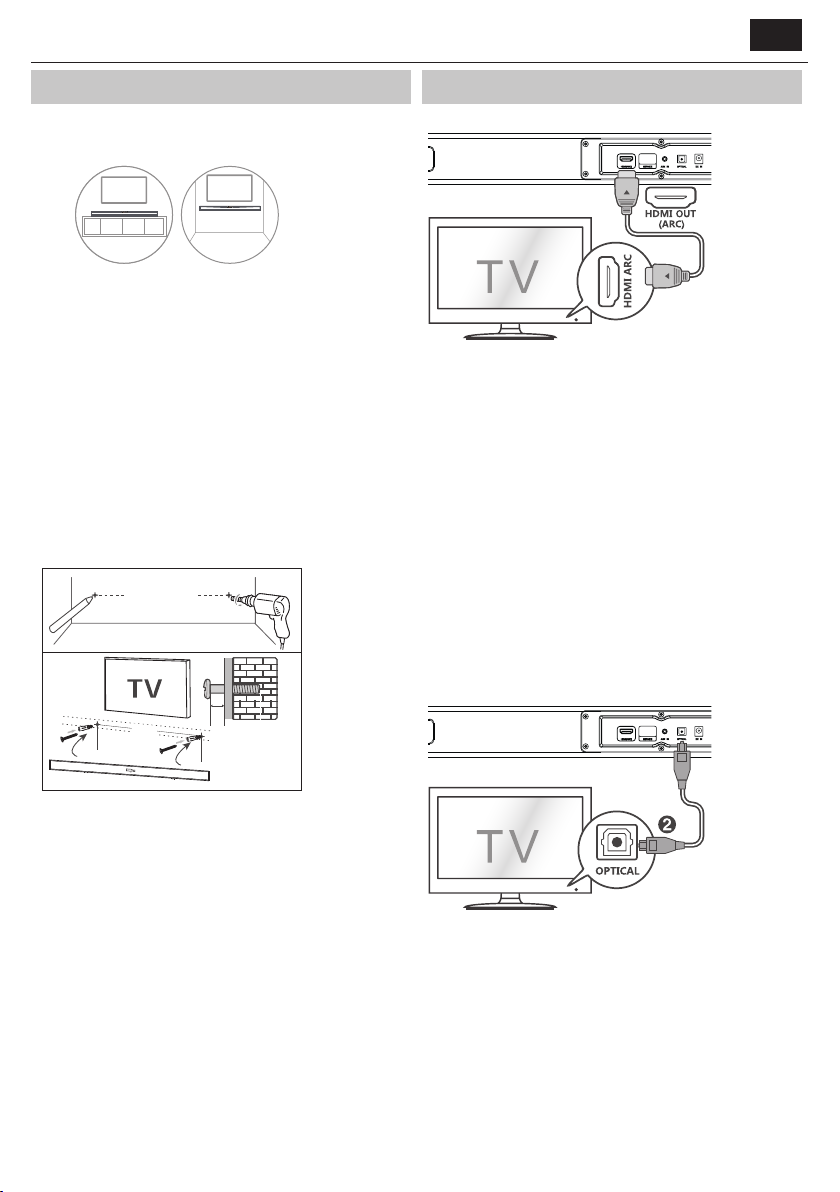
LINE IN/OPTICAL/HDMI ARC
1. Ensure that the unit is connected to the TV or audio device.
2. While in ON mode, press the button on the unit repeatedly to select
the desired mode.
3. Operate your audio device directly for playback features.
4. Press the +/– button to adjust the volume to your desired level.
TIP:
While in HDMI ARC/OPTICAL mode, if there’s no sound output from the
unit, you may need to activate PCM signal output on your source device
(eg. TV, DVD or Blu-ray player).
Bluetooth Operation
Pair Bluetooth-enabled Devices
The rst time you connect your Bluetooth device to this player, you need to
pair your device to this player.
NOTE:
The operational range between this player and a Bluetooth device is
approximately 8 meters (without any object between the Bluetooth
device and the unit).
Before you connect a Bluetooth device to this unit, ensure you know the
device’s capabilities.
Compatibility with all Bluetooth devices is not guaranteed.
Any obstacle between this unit and a Bluetooth device can reduce the
operational range.
If the signal strength is weak, your Bluetooth receiver may disconnect,
but it will re-enter pairing mode automatically.
1. Turn on the soundbar by pressing the standby button.
2. Press the button on the unit repeatedly or button on the remote
control to select Bluetooth mode. Bluetooth mode is activated when
the indicator light turns blue.
3. Enter the Bluetooth search mode on the device you wish to connect to
the soundbar.
4. Select SHARP HT-SBW182 from the list.
5. Your device and the soundbar will now be connected; the blue
indicator will stop ashing.
– To disconnect your device, switch o the Bluetooth connection or hold
down button on the remote control for 3 seconds.
TIPS:
• Enter„0000“ for the password if necessary.
• The player will also be disconnected when your device is moved beyond
the operational range.
• If you want to reconnect your device to this player, place it within the
operational range.
• If the device is moved beyond the operational range, when it is brought
back, please check if the device is still connected to the player.
• If the connection is lost, follow the instructions above to pair your device
to the player again.
Listen to Music from Bluetooth Device
If the connected Bluetooth device supports Advanced Audio Distri-
bution Prole (A2DP), you can listen to the music stored on the device
through the soundbar‘.
If the device also supports Audio Video Remote Control Prole (AVRCP),
you can use the soundbar‘s remote control to play music stored on the
device.
1. Pair your device with the player.
2. Play music via your device (if it supports A2DP).
3. Use supplied remote control to control play (if it supports AVRCP).
To pause/resume play, press the button on the remote control.
To skip to a track, press the / buttons on the remote control.
Troubleshooting
To keep the warranty valid, never try to repair the system yourself. If you
encounter problems when using this unit, review the following before
requesting service.
No power
Ensure that the power adaptor is properly connected to the units DC IN
socket and to the mains socket.
Ensure that there is power at the AC outlet.
Press standby button on the remote control or soundbar to turn the
soundbar on.
No sound
Increase the volume. Press Volume Up on the remote control or on the
right side of the soundbar.
Press MUTE on the remote control to ensure the soundbar is not muted.
Press source buttons to select a dierent input source.
When using either of the Digital input, if there is no audio:
Try setting the TV output to PCM or
Connect directly to your Blu-ray/other source, some TVs do not pass
through digital audio.
Your TV may be set to variable audio output. Conrm that the audio output
setting is set to FIXED or STANDARD, not VARIABLE. Consult your TV’s user
manual for more detailed information.
If using Bluetooth, ensure that the volume on your source device is turned
up and that the device is not muted.
Remote control does not work
Before you press any playback control button, rst select the correct
source.
Reduce the distance between the remote control and the unit.
Insert the battery with its polarities (+/-) aligned as indicated.
Replace the battery.
Aim the remote control directly at the sensor on the front of the unit.
I hear buzzing or humming
Ensure all cables and wires are securely connected.
Connect a dierent source device (TV, Blu-ray player, etc) to see if the
buzzing persists. If it does not, the problem may be with the original
device.
Connect your device to a dierent input on the soundbar.
I can’t nd the Bluetooth name of this unit on my Bluetooth device
Ensure the Bluetooth function is activated on your Bluetooth device.
Re-pair the unit with your Bluetooth device.
This is a 15 mins power off function, one of the ERPII standard
requirements for saving power
When the unit’s external input signal level is too low, the unit will be
turned o automatically in 15 minutes. Please increase the volume level of
your external device.

8EN
Technical specication
Model HT-SBW182
Sound Bar
Power Supply DC 12.0V ⎓2.0A
Power Consumption 15 W
Power Consumption StandBy <0.5W
Output Power 2 x 10 W (RMS)
Frequency Response 200Hz - 16kHz (±10dB)
Subwoofer
Power Supply AC 100-240V ~ 50/60Hz
Power Consumption 20 W
Power Consumption StandBy <3.0W
Output Power 40 W (RMS)
Frequency Response 60Hz - 100Hz (±6 dB)
Bluetooth
Version V 4.2
Maximum power transmitted <20 dbm
Frequency bands 2402 MHz ~ 2480 MHz
Remote Control
Battery Type 2 x AAA/1.5V
Power Adapter
Manufacturer: ShenZhen Perfect Gallant Tec Co.,Ltd.
Model name: PG241-1202000I
Input: AC 100-240V ~ 50/60Hz 0.8A Max
Output: DC 12.0V ⎓ 2.0A
740mm 80mm 150mm
63mm
202mm
250mm
1,3kg
KG
1,7kg
KG


UMC Poland Sp. z o.o.
Ostaszewo 57B, 87-148 Łysomice,
Poland
Made in China
www.sharpconsumer.eu
SAU/MAN/0111
Other manuals for HT-SBW182
3
Table of contents
Other Sharp Home Theater System manuals

Sharp
Sharp HT-DV40U User manual

Sharp
Sharp HT-SB100 User manual

Sharp
Sharp HT-SB20 User manual

Sharp
Sharp SD-AT50H User manual

Sharp
Sharp HT-SB95 User manual

Sharp
Sharp HT-SB60 User manual

Sharp
Sharp HT-SB602 User manual

Sharp
Sharp HT-SB603 User manual

Sharp
Sharp HT-M750H User manual

Sharp
Sharp 8A-C22CX1 User manual

Sharp
Sharp SD-AS10H(S) User manual

Sharp
Sharp AQUOS BD-MPC41U User manual

Sharp
Sharp HT-X1W User manual

Sharp
Sharp HT-C21DS1 User manual

Sharp
Sharp CD-DVD500 User manual

Sharp
Sharp HT-DV50U User manual

Sharp
Sharp SD-AT50H User manual

Sharp
Sharp AN-PR1000H User manual

Sharp
Sharp HT-M700H User manual

Sharp
Sharp HT-CN400DVA User manual