Sharp SD-AS10W User manual

SD-AS10W_EX_FRONT.fm05/3/30 TINSZA124AWZZ
62 1
1-BIT DIGITAL HOME THEATER WITH DVD
SISTEMA 1-BIT PARA HOME CINEMA CON DVD
MODEL
MODELO
OPERATION MANUAL
MANUAL DE MANEJO
SD-AS10W
ENGLISH
Please refer to
pages E-1 to E-62.
ESPAÑOL
Consulte las
páginas S-1 a S-62.
SHARP CORPORATION

E-1
05/3/18 SD-AS10W_EX_E.fm
ENGLISH
TINSZA124AWZZ
SD-AS10W
ENGLISH
Important Instruction
- Introduction / Special notes -
Introduction
Special notes
WARNING
!When the ON/STAND-BY button is set at STAND-BY position, mains voltage is still
present inside the unit. When the ON/STAND-BY button is set at STAND-BY posi-
tion, the unit may be brought into operation by the timer mode or remote control.
!This unit contains no user serviceable parts. Never remove covers unless qualified
to do so. This unit contains dangerous voltages, always remove mains plug from
the socket before any service operation and when not in use for a long period.
!To prevent fire or shock hazard, do not expose this appliance to dripping or splash-
ing. No objects filled with liquids, such as vases, should be placed on the appara-
tus.
Types of playable DVD discs vary depending on the region. This unit can play back
only DVDs with the region number shown on the bottom of the unit or with "ALL".
Thank you for purchasing this SHARP product. To obtain the best performance
from this product, please read this manual carefully. It will guide you in operat-
ing your SHARP product.
SD-AS10W 1-Bit Digital Home Theater with DVD consisting of SD-AS10W (main unit
and amplifier unit), CP-AS10WF (front speakers), CP-AS10WC (centre speaker), CP-
AS10WR (surround speakers) and CP-AS10WSW (subwoofer).
Icons used in this operation manual
Some functions may not be available depending on discs. The following icons
indicate the discs that can be used in the section.
... DVD-Video discs and DVD-R/DVD-RW.
... Super video CDs.
... Video CDs.
... Audio CDs.
... CD-R/CD-RW with MP3 recording.
... CD-R/CD-RW withWMA recording.
... CD-R/CD-RW with JPEG recording.
"DTS" and "DTS Digital Surround" are registered trademarks of Digital Theater Systems,
Inc.
Manufactured under license fromDolby Laboratories. "Dolby", "Pro Logic" and the double-
D symbol are trademarks of Dolby Laboratories.
This product is classified as a CLASS 1 LASER product.
The letters in brackets contained in the model number indicate the colour of the product
only. Operation and specifications are unaffected.
32 4
ALL
and

F
S
V
I
N
P
E
E
E-2
SD-AS10W_EX_E.fm05/3/18
ENGLISH
TINSZA124AWZZ
SD-AS10W
General Information
- Accessories -
Accessories
Please confirm that the following accessories are included.
Note:
Only the above accessories are included.
Remote control 1 "AA" size battery (UM/SUM-3,
R6, HP-7 or similar) 2 System connection cable 1 Video cable 1 Main unit stand 1
FM aerial 1 AM loop aerial 1 Button name label 1
Main unit leg cushion 4 Non-slip sheet for speakers 20 Speaker wire 6
Green
(for centre
speaker)
approx.5 m (16 feet)
White
(for left front
speaker)
approx.5 m (16 feet)
Red
(for right front
speaker)
approx.5 m (16 feet)
Purple
(for subwoofer)
approx.5 m (16 feet)
Blue
(for left surround
speaker)
approx.15 m (49 feet)
Grey
(for right surround
speaker)
approx.15 m (49 feet)
1
SHARP TINSZA124AWZZ (W)

E-3
SD-AS10W_EX_E.fm05/3/18
ENGLISH
TINSZA124AWZZ
SD-AS10W
General Information
- Contents -
Contents
"General Information Page
Precautions . . . . . . . . . . . . . . . . . . . . . . . . . . . . . . . . . . . . . . . . . . . . . . . . . . . . . . . 4
Description of discs . . . . . . . . . . . . . . . . . . . . . . . . . . . . . . . . . . . . . . . . . . . . . . 5, 6
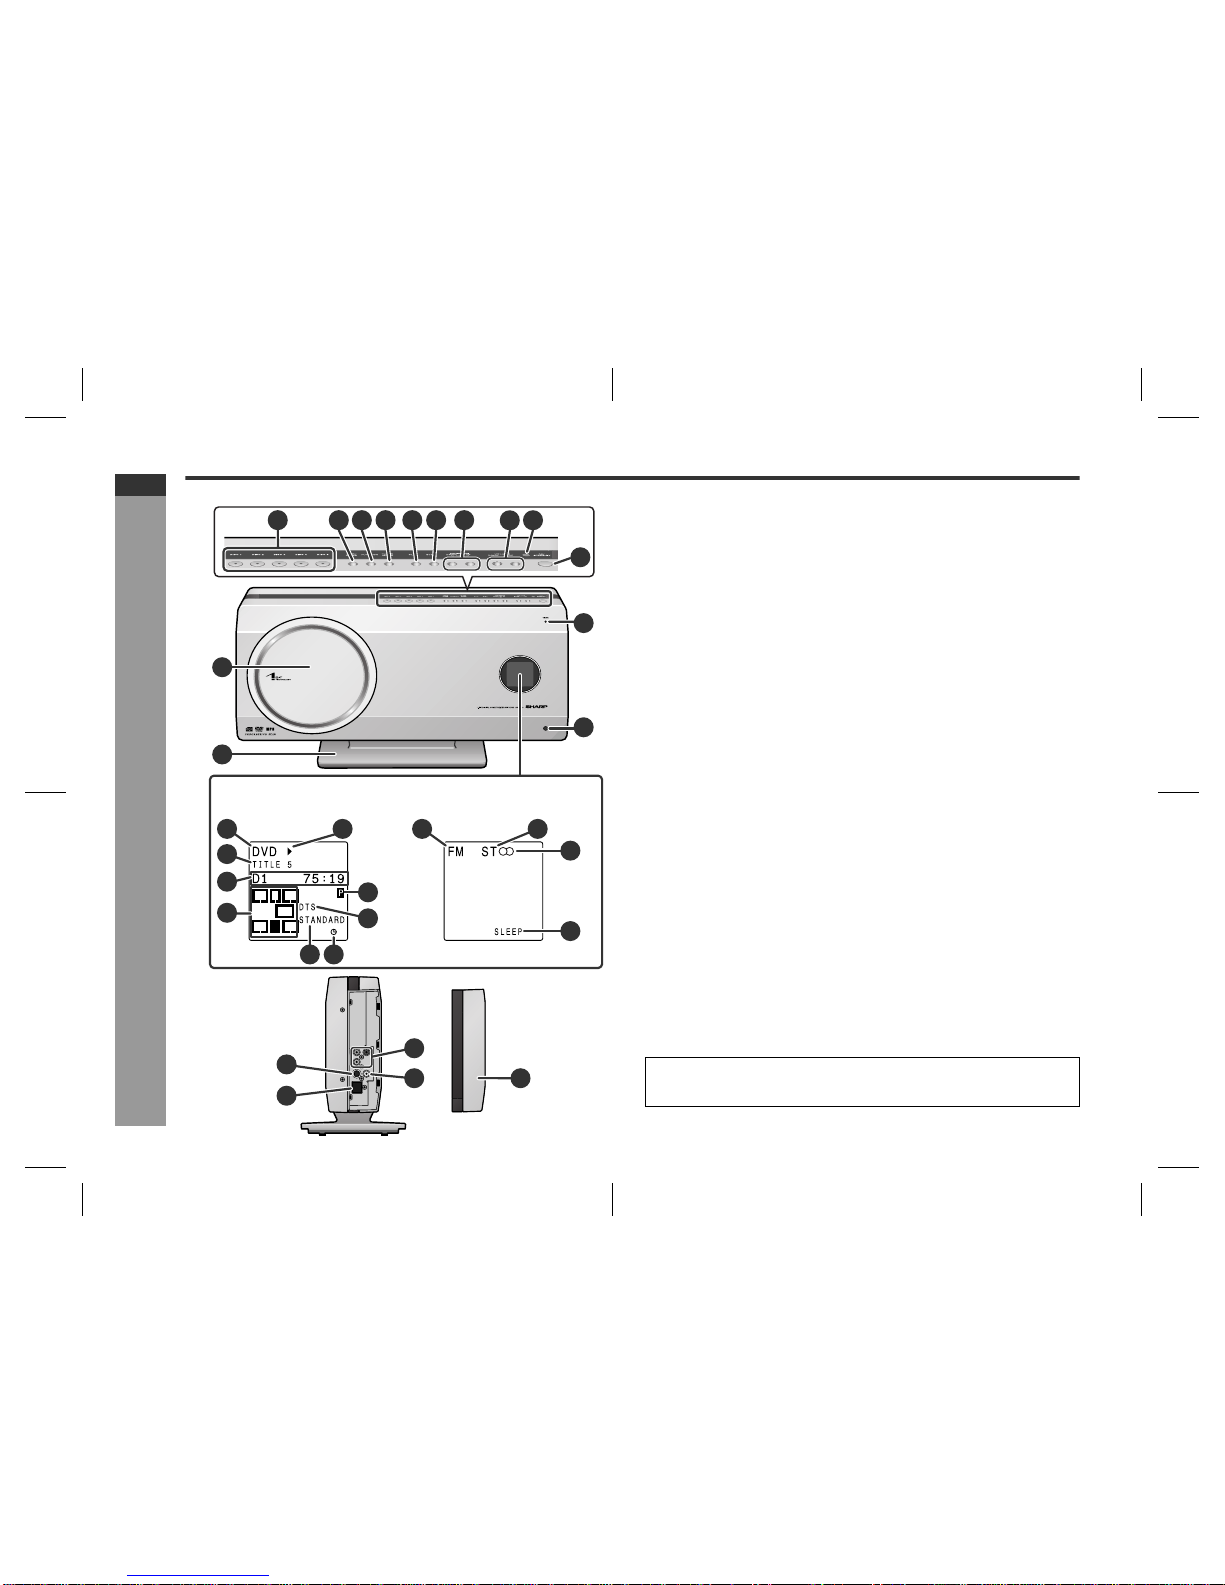
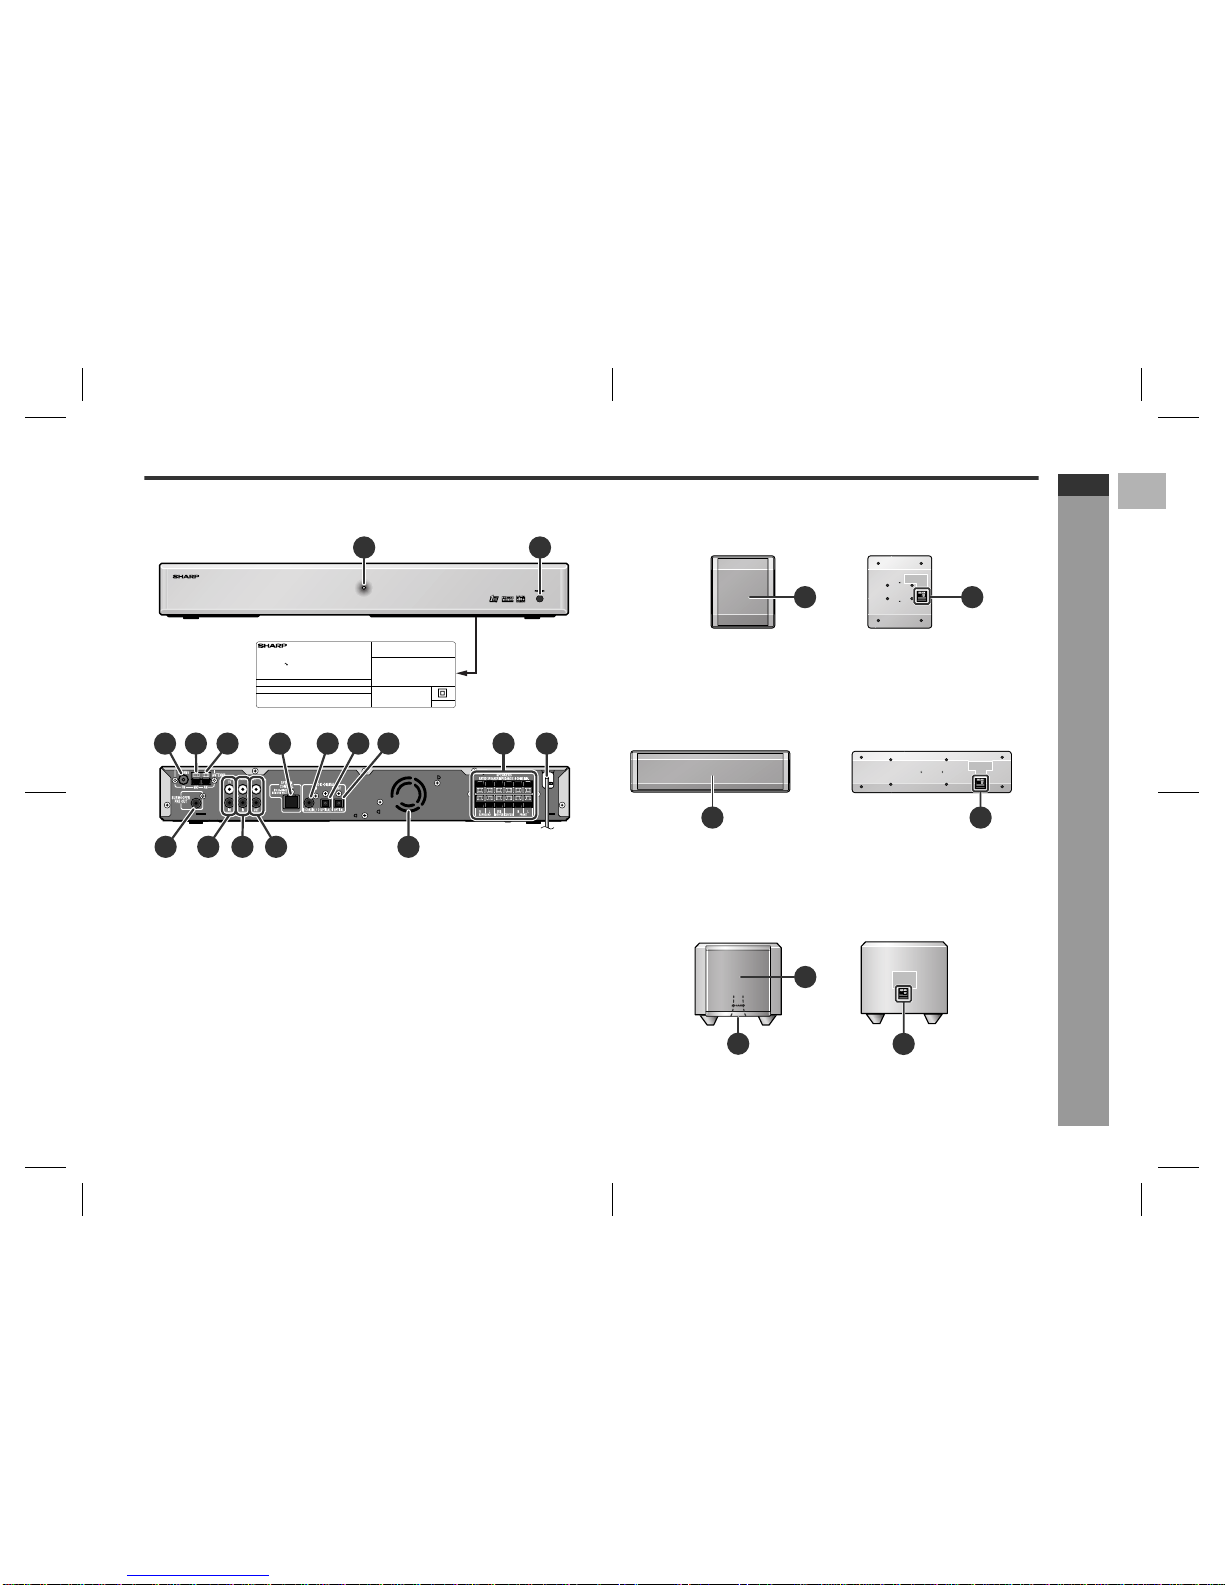
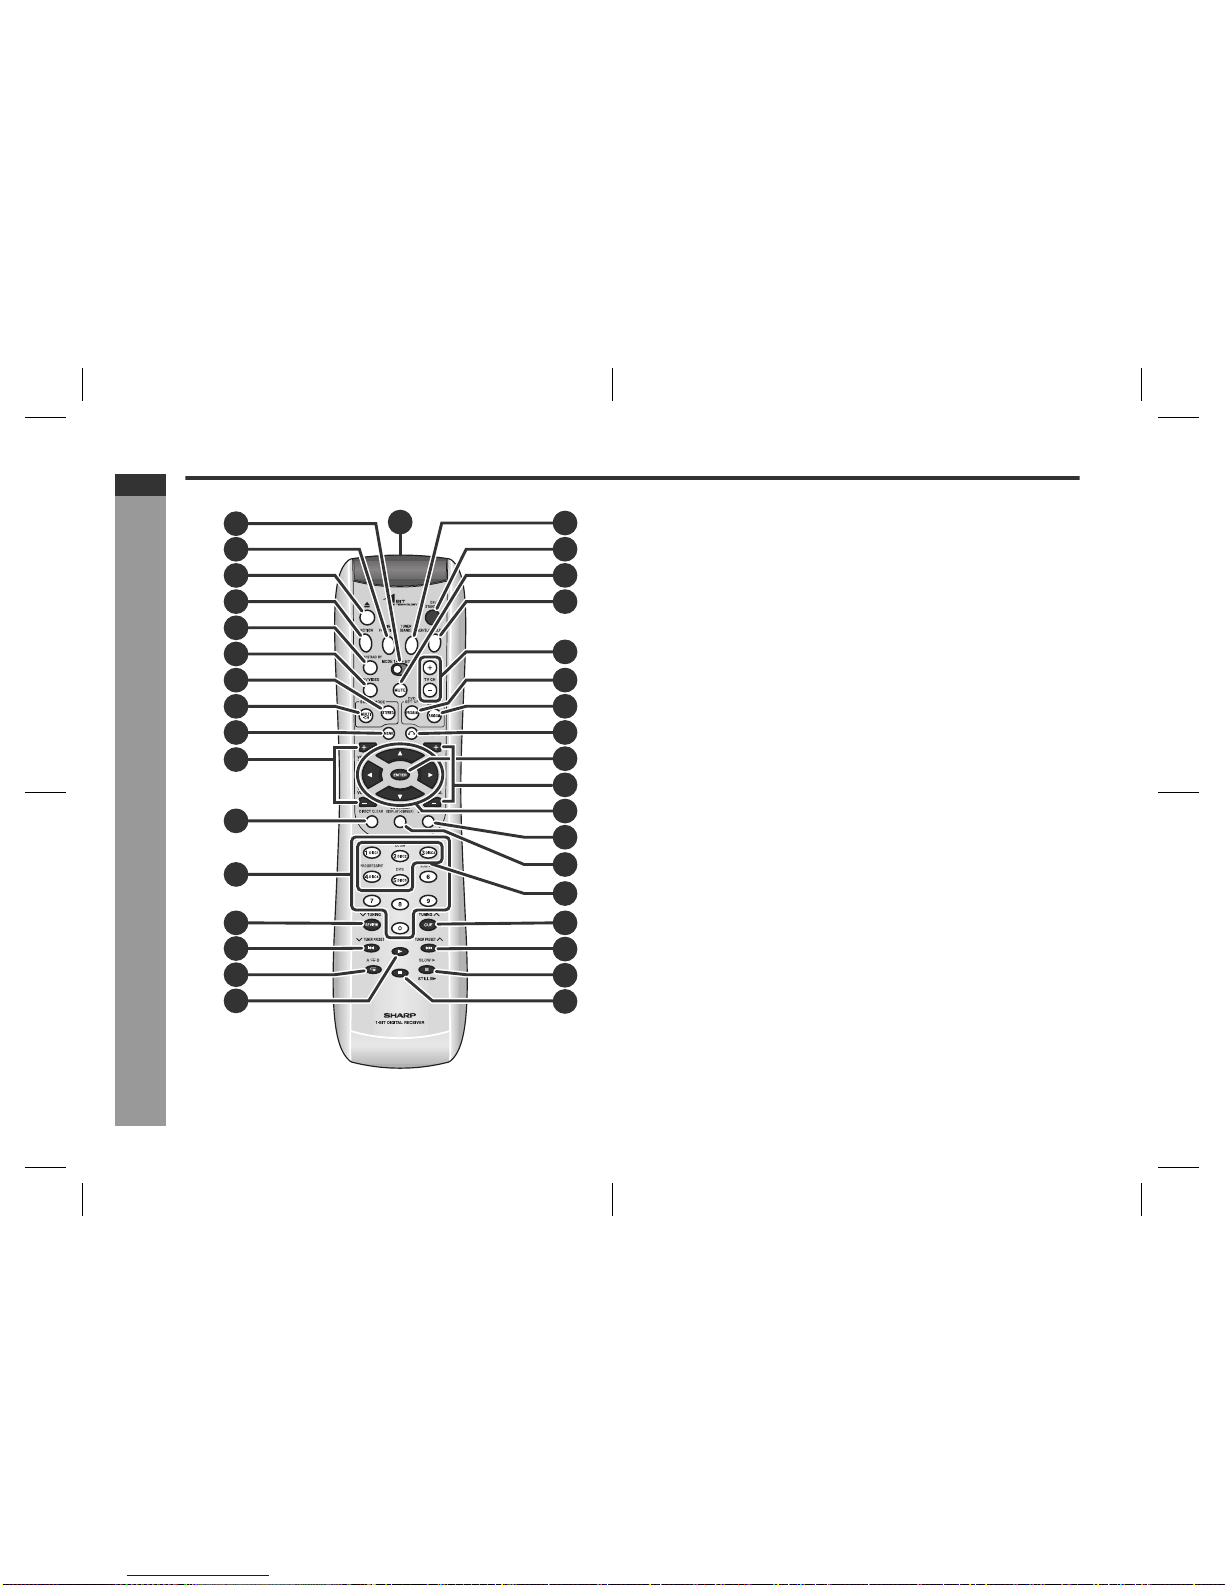
Controls and indicators . . . . . . . . . . . . . . . . . . . . . . . . . . . . . . . . . . . . . . . . . 7 - 10
"Preparation for Use
System installation . . . . . . . . . . . . . . . . . . . . . . . . . . . . . . . . . . . . . . . . . . . . . . . . 11
Main unit preparation . . . . . . . . . . . . . . . . . . . . . . . . . . . . . . . . . . . . . . . . . . . . . . 12
System connections . . . . . . . . . . . . . . . . . . . . . . . . . . . . . . . . . . . . . . . . . . . . 13, 14
Aerial connection . . . . . . . . . . . . . . . . . . . . . . . . . . . . . . . . . . . . . . . . . . . . . . . . . 14
Speaker connection . . . . . . . . . . . . . . . . . . . . . . . . . . . . . . . . . . . . . . . . . . . . . . . 15
TV connection . . . . . . . . . . . . . . . . . . . . . . . . . . . . . . . . . . . . . . . . . . . . . . . . . . . . 16
AC power connection . . . . . . . . . . . . . . . . . . . . . . . . . . . . . . . . . . . . . . . . . . . . . . 17
Setting the AM/FM interval . . . . . . . . . . . . . . . . . . . . . . . . . . . . . . . . . . . . . . . . . . 17
To turn the power on . . . . . . . . . . . . . . . . . . . . . . . . . . . . . . . . . . . . . . . . . . . . . . . 18
Remote control . . . . . . . . . . . . . . . . . . . . . . . . . . . . . . . . . . . . . . . . . . . . . . . . . . . 18
General control . . . . . . . . . . . . . . . . . . . . . . . . . . . . . . . . . . . . . . . . . . . . . . . . . . . 19
Setting the clock . . . . . . . . . . . . . . . . . . . . . . . . . . . . . . . . . . . . . . . . . . . . . . . . . . 20
"DVD Operation
Inserting and removing discs
Inserting a disc . . . . . . . . . . . . . . . . . . . . . . . . . . . . . . . . . . . . . . . . . . . . . . . . 21, 22
To remove the disc . . . . . . . . . . . . . . . . . . . . . . . . . . . . . . . . . . . . . . . . . . . . . . . . 22
Playing a disc
Playback . . . . . . . . . . . . . . . . . . . . . . . . . . . . . . . . . . . . . . . . . . . . . . . . . . . . . . 23, 24
To resume playback after stopping (resume play) . . . . . . . . . . . . . . . . . . . . . . . 24
To exchange other discs whilst playing a disc . . . . . . . . . . . . . . . . . . . . . . . . . 24
Basic operation
To locate the beginning of a chapter (track) (skip) . . . . . . . . . . . . . . . . . . . . . . 25
Fast forward/Fast reverse (search) . . . . . . . . . . . . . . . . . . . . . . . . . . . . . . . . . . . 25
Still picture/Frame advance . . . . . . . . . . . . . . . . . . . . . . . . . . . . . . . . . . . . . . . . . 26
Slow-motion play . . . . . . . . . . . . . . . . . . . . . . . . . . . . . . . . . . . . . . . . . . . . . . . . . 26
To start playback from the desired point (direct play) . . . . . . . . . . . . . . . . . . . . 26
To play by specifying time (time search) . . . . . . . . . . . . . . . . . . . . . . . . . . . . . . 26
Useful operation
To change the display on the main unit . . . . . . . . . . . . . . . . . . . . . . . . . . . . . . . 27
To change the display on TV screen . . . . . . . . . . . . . . . . . . . . . . . . . . . . . . . . . . 27
To select a title from the top menu of the disc . . . . . . . . . . . . . . . . . . . . . . . . . . 28
To select a subtitle or audio language from the disc menu . . . . . . . . . . . . . . . 28
To change the audio language (audio output) . . . . . . . . . . . . . . . . . . . . . . . . . . 28
To change the subtitle language . . . . . . . . . . . . . . . . . . . . . . . . . . . . . . . . . . . . . 29
To change the angle . . . . . . . . . . . . . . . . . . . . . . . . . . . . . . . . . . . . . . . . . . . . . . . 29
To zoom images (zoom) . . . . . . . . . . . . . . . . . . . . . . . . . . . . . . . . . . . . . . . . . . . . 29
To play the contents between the specified points repeatedly (A-B repeat) . . 30
To play repeatedly (repeat play) . . . . . . . . . . . . . . . . . . . . . . . . . . . . . . . . . . . . . . 30
"Video CD and Super Video CD Operation
Page
Video CD and Super Video CD playback
Playback of a video CD (super video CD) with P.B.C. . . . . . . . . . . . . . . . . . . . . 31
To play without activating the playback control function . . . . . . . . . . . . . . . . . 32
To play in random order (random play) . . . . . . . . . . . . . . . . . . . . . . . . . . . . . . . . 32
To start playback from the desired point (direct play) . . . . . . . . . . . . . . . . . . . . 32
To play by specifying time (time search) . . . . . . . . . . . . . . . . . . . . . . . . . . . . . . 32
To play in the desired order (programmed play) . . . . . . . . . . . . . . . . . . . . . . . . 33
"CD, CD-R and CD-RW Operation
MP3, WMA and JPEG disc operation
Playback on the MP3, WMA and JPEG menu screen. . . . . . . . . . . . . . . . . . . . . 34
To play in the desired order (programmed play) . . . . . . . . . . . . . . . . . . . . . . . . 35
Zoom function . . . . . . . . . . . . . . . . . . . . . . . . . . . . . . . . . . . . . . . . . . . . . . . . . . . . 36
Rotating a picture . . . . . . . . . . . . . . . . . . . . . . . . . . . . . . . . . . . . . . . . . . . . . . . . . 36
"Radio Operation
Listening to the radio . . . . . . . . . . . . . . . . . . . . . . . . . . . . . . . . . . . . . . . . . . . 37, 38
"Advanced Features
Enjoying surround sound (sound mode) . . . . . . . . . . . . . . . . . . . . . . . . . . 39 - 41
Changing the default settings of the amplifier . . . . . . . . . . . . . . . . . . . . . . 42 - 44
Changing the initial setting of DVD . . . . . . . . . . . . . . . . . . . . . . . . . . . . . . . 45 - 48
Setting the timer. . . . . . . . . . . . . . . . . . . . . . . . . . . . . . . . . . . . . . . . . . . . . . . . 49, 50
Operations after setting the timer . . . . . . . . . . . . . . . . . . . . . . . . . . . . . . . . . . . . 51
Sleep timer . . . . . . . . . . . . . . . . . . . . . . . . . . . . . . . . . . . . . . . . . . . . . . . . . . . . . . . 52
Operating the connected TV . . . . . . . . . . . . . . . . . . . . . . . . . . . . . . . . . . . . . 53, 54
Connecting other equipment . . . . . . . . . . . . . . . . . . . . . . . . . . . . . . . . . . . . 55 - 57
"References
Error indicators and warnings . . . . . . . . . . . . . . . . . . . . . . . . . . . . . . . . . . . . . . . 58
Troubleshooting chart . . . . . . . . . . . . . . . . . . . . . . . . . . . . . . . . . . . . . . . . . . 59, 60
Maintenance . . . . . . . . . . . . . . . . . . . . . . . . . . . . . . . . . . . . . . . . . . . . . . . . . . . . . 61
Optional accessory . . . . . . . . . . . . . . . . . . . . . . . . . . . . . . . . . . . . . . . . . . . . . . . . 61
Specifications . . . . . . . . . . . . . . . . . . . . . . . . . . . . . . . . . . . . . . . . . . . . . . . . . 61, 62

F
S
V
I
N
P
E
E
E-4
SD-AS10W_EX_E.fm05/3/18
ENGLISH
TINSZA124AWZZ
SD-AS10W
General Information
- Precautions -
Precautions
"General
Warning:
The voltage used must be the same as that specified by this unit. Using this product
with a higher voltage other than that specified is dangerous and may result in a fire or
other types of accident, causing damage. SHARP will not be held responsible for any
damage resulting from the use of this unit with a voltage other than that specified.
"Volume control
The sound level at a given volume setting depends on speaker efficiency, location,
and various other factors. It is advisable to avoid exposure to high volume levels. Do
not turn the volume on to full at switch on and listen to music at moderate levels.
!Please ensure that the equipment is positioned in a well ventilated area and that
there is at least 10 cm (4") of free space along the sides and back. There must also
be a minimum of 15 cm (6") of free space on the top of the unit.
!Use the unit on a firm, level surface free from vibra-
tion.
!Keep the unit away from direct sunlight, strong mag-
netic fields, excessive dust, humidity and electronic/
electrical equipment (home computers, facsimiles,
etc.) which generate electrical noise.
Amplifier unit
10 cm (4") 10 cm (4")
10 cm (4")10 cm (4")
10 cm (4")
10 cm (4")
10 cm (4")
10 cm (4")
Main unit
Position A
Position B
Position C
15 cm (6")
15 cm (6")
15 cm (6")
15 cm (6")
!Do not place anything on top of the unit.
!Do not expose the unit to moisture, to temperatures higher than 60°C (140°F) or to
extremely low temperatures.
!If the unit does not work properly, unplug and plug it in again. Then turn on the unit.
!In case of an electrical storm, unplug the unit for safety.
!Hold the AC power plug by the head when removing it from the wall socket, as pull-
ing the lead can damage internal wires.
!Do not remove the outer cover, as this may result
in electric shock. Refer internal service to your lo-
cal SHARP service facility.
!The ventilation should not be impeded by covering
the ventilation openings with items, such as newspa-
pers, tablecloths, curtains, etc.
!No naked flame sources, such as lighted candles,
should be placed on the apparatus.
!Attention should be drawn to the environmental aspects of battery disposal.
!This unit should only be used within the range of 5°C - 35°C (41°F - 95°F).

E-5
SD-AS10W_EX_E.fm05/3/18
ENGLISH
TINSZA124AWZZ
SD-AS10W
General Information
- Description of discs -
Description of discs
"Types of playable discs
The unit can play back discs bearing any of the following marks:
Some DVD discs may not function as described in the manual. See the disc
jacket for restrictions.
"Discs that cannot be played
Notes:
!The discs above cannot be played at all, or no sound is heard although images
appear on the screen or vice versa.
!Faulty playback may damage the speakers and can have an adverse effect on
your hearing when played at high volume settings.
!You cannot play illegally produced discs.
"DVD-Video
A popular type of DVD disc of the same size as a CD, mainly containing video
images.
Region number
Title and chapter
"DVD-R/DVD-RW playback
!You can play DVD-R and DVD-RW discs recorded in the video mode.
!Before playing DVD-R/DVD-RW discs with this unit, finalize them with the
equipment used for recording.
"Super video CD/video CD/CD
Track
DVD
DVD-Video Disc DVD-R DVD-RW
Recorded in the video
mode (*) Recorded in the video
mode (*)
Discs recorded in VR
mode (Video Recording
format) cannot be played
back.
Video CD
Super Video CD Video CD
CD
Audio CD Audio CD-R Audio CD-RW
Or CD-R recorded in MP3/
WMA/JPEG format (*) Or CD-RW recorded in
MP3/WMA/JPEG format
(*)
(*) Some discs may not play properly due to the status of the equipment used for re-
cording, characteristics of the discs, scratches, dirt, or dirty optical pickup lens.
!8 cm (3") discs are not supported (disc adaptor cannot be used).
4.7
!DVDs without the region number "2",
"3", "4" or "ALL". !DVD-Audio
!SACD
!DVDs with SECAM system !CDG
!DVDs with MPEG sound !Photo CD
!DVD-ROM !CD-ROM
!DVD-RAM !Discs recorded in special formats, etc.
DVD discs are programmed with region num-
bers indicating countries in which they can be
played. This unit can play discs with region
number "2", "3", "4" or "ALL".
Region number
(playable area number)
DVD-Video discs are divided into "titles" and
"chapters". If the disc has more than one movie
on it, each movie is a separate "title". "Chap-
ters" are subdivisions of titles.
Super video CD/video CD and audio CD are
composed of "tracks". Tracks are equivalent to
songs on a CD.
3 4
ALL
2
Chapter 1
Title 1 Title 2
Chapter 2 Chapter 1 Chapter 2
Track 1 Track 2 Track 3

F
S
V
I
N
P
E
E
E-6
SD-AS10W_EX_E.fm05/3/18
ENGLISH
TINSZA124AWZZ
SD-AS10W
General Information
- Description of discs -
"MP3/WMA/JPEG format on CD-R/CD-RW
An MP3 file is an audio data compressed in the MPEG 1 audio layer 3 format. MP3
files have the extension ".mp3". (Files with the extension ".mp3" may not play, or
noise may occur during playback if not recorded in the MP3 format.)
WMA is an audio file format developed by Microsoft with the ".wma" extension. This
type of audio file is recorded through Microsoft Windows operating system.
A JPEG file is still image data compressed in the JPEG (Joint Photographic Experts
Group) format. JPEG files have the extension ".jpg".
Folder and file
MP3/WMA/JPEG discs consist of "folders" and "files".
"Icons used on DVD discs
Check the icons of the DVD jacket before playing your discs.
Copy Protection:
This unit supports Macrovision copy protection.
On DVD discs that include a copy protection code, if the contents of the DVD disc are
copied using a VCR, the copy protection code prevents the videotape copy from play-
ing normally.
Display Description
Format recorded on the DVD Select a type according to the connected
TV type.
Type of subtitles recorded Recorded subtitle languages.
Example: You can select a subtitle language.
1: English
2: German
Number of camera angles Number of angles recorded on the DVD.
You can view scenes from different an-
gles.
Number of audio tracks and audio
recording systems The number of audio tracks and audio re-
cording systems are indicated.
Example: !You can change the audio language.
1: Original <English> (Dolby Dig-
ital 5.1 Surround) !Audio and recording system vary de-
pending on the DVD. Check them in
the DVD's manual.
2: German (Dolby Digital 2 ch)
File 1 File
2
File
1
File
2
File
3
Folder
1
Folder
2
MP3
disc WMA
disc JPEG
disc
2
2
Copyright Information:
!Unauthorised copying, broadcast, public display, transmission, public perfor-
mance and rental (regardless of whether or not such activities are for profit) of
disc contents are prohibited by law.
!This system is equipped with copy protection technology that causes substantial
degradation of images when the contents of a disc are copied to a videotape.
Apparatus Claims of U.S. Patent Nos. 4,631,603, 4,577,216, 4,819,098 and
4,907,093 licensed for limited viewing uses only.
This product incorporates copyright protection technology that is protected by
method claims of certain U.S. patents and other intellectual property rights owned
by Macrovision Corporation and other rights owners.
Use of this copyright protection technology must be authorized by Macrovision
Corporation, and is intended for home and other limited viewing uses only unless
otherwise authorized by Macrovision Corporation.
Reverse engineering or disassembly is prohibited.
0407
Supply of this product does not convey a license nor imply any right to distribute
content created with this product in revenue-generating broadcast systems
(terrestrial, satellite, cable and/or other distribution channels), revenue-generating
streaming applications (via Internet, intranets and/or other networks), other revenue-
generatingcontentdistributionsystems(pay-audiooraudio-on-demandapplications
andthelike)oronrevenue-generatingphysicalmedia(compactdiscs,digitalversatile
discs,semiconductorchips, harddrives,memorycards and thelike).An independent
license for such use is required. For details, please visit http://mp3licensing.com.
MPEG Layer-3 audio coding technology licensed from Fraunhofer IIS and Thomson.
Note:

E-7
SD-AS10W_EX_E.fm05/3/18
ENGLISH
TINSZA124AWZZ
SD-AS10W
General Information
- Controls and indicators -
Controls and indicators
"Main unit Reference page
1.Disc Number Select Buttons . . . . . . . . . . . . . . . . . . . . . . . . . . .21, 23
2.Disc Compartment Open/Close Button . . . . . . . . . . . . . . . . . . . . . .21
3.Function Button . . . . . . . . . . . . . . . . . . . . . . . . . . . . . . . . . . . . . . . . .55
4.Tuner (Band) Button . . . . . . . . . . . . . . . . . . . . . . . . . . . . . . . . . . . . .37
5.Play Button . . . . . . . . . . . . . . . . . . . . . . . . . . . . . . . . . . . . . . . . . . . . .23
6.Stop Button . . . . . . . . . . . . . . . . . . . . . . . . . . . . . . . . . . . . . . . . .21, 24
7.Chapter (Track) Skip Up and Down,
Search or Tuning Up and Down buttons. . . . . . . . . . . . . . . . . . .25, 37
8.Volume Up and Down Buttons . . . . . . . . . . . . . . . . . . . . . . . . . . . . .19
9.Remote Sensor . . . . . . . . . . . . . . . . . . . . . . . . . . . . . . . . . . . . . . . . .18
10.On/Stand-by Button . . . . . . . . . . . . . . . . . . . . . . . . . . . . . . . . . . . . . .18
11.Timer Set Indicator . . . . . . . . . . . . . . . . . . . . . . . . . . . . . . . . . . . . . .50
12.Disc Compartment . . . . . . . . . . . . . . . . . . . . . . . . . . . . . . . . . . . . . . .21
13.Main Unit Stand . . . . . . . . . . . . . . . . . . . . . . . . . . . . . . . . . . . . . . . . .12
14.Function Indicator . . . . . . . . . . . . . . . . . . . . . . . . . . . . . . . . . . . . . . .27
15.Track, Title, Chapter, Total Information Indicator . . . . . . . . . . . . . .27
16.Time and Present Disc Indicator . . . . . . . . . . . . . . . . . . . . . . . . . . .27
17.Speaker Indicators . . . . . . . . . . . . . . . . . . . . . . . . . . . . . . . . . . . . . . .41
18.Operation Indicator . . . . . . . . . . . . . . . . . . . . . . . . . . . . . . . . . . . . . .27
19.Progressive Scan Mode Indicator . . . . . . . . . . . . . . . . . . . . . . . . . .24
20.Audio Signal Indicator . . . . . . . . . . . . . . . . . . . . . . . . . . . . . . . . . . . .41
21.Surround Indicator . . . . . . . . . . . . . . . . . . . . . . . . . . . . . . . . . . . . . . .27
22.Timer Indicator . . . . . . . . . . . . . . . . . . . . . . . . . . . . . . . . . . . . . . . . . .51
23.Tuner (Band) Indicator . . . . . . . . . . . . . . . . . . . . . . . . . . . . . . . . . . . .37
24.FM Stereo Mode Indicator . . . . . . . . . . . . . . . . . . . . . . . . . . . . . . . . .37
25.FM Stereo Receiving Indicator . . . . . . . . . . . . . . . . . . . . . . . . . . . . .37
26.Sleep Indicator . . . . . . . . . . . . . . . . . . . . . . . . . . . . . . . . . . . . . . . . . .52
27.S-video Output Socket . . . . . . . . . . . . . . . . . . . . . . . . . . . . . . . . . . .16
28.System Connection Socket (to amplifier unit) . . . . . . . . . . . . . . . .14
29.Component Video Output sockets . . . . . . . . . . . . . . . . . . . . . . . . . .16
30.Video Output Socket . . . . . . . . . . . . . . . . . . . . . . . . . . . . . . . . . . . . .16
31.Side Cover . . . . . . . . . . . . . . . . . . . . . . . . . . . . . . . . . . . . . . . . . .14, 16
RCL
SW
SRSL
LFE
L R
SW
C
RS
SLS
9
12
13
(Right side)
(Display) Indicators vary according to operations.
DVD/CD TUNER
11
27
28 30
29
31
12 3 4 5 6
10
9
8
7
14 18 25
26
24
17 20
19
21 22
15
16
23
Notes:
!Make sure to attach the main unit stand (see page 12).
!To remove the side cover, see page 14.

F
S
V
I
N
P
E
E
E-8
SD-AS10W_EX_E.fm05/3/18
ENGLISH
TINSZA124AWZZ
SD-AS10W
General Information
- Controls and indicators -
"Amplifier unit
Reference page
1.Power Indicator . . . . . . . . . . . . . . . . . . . . . . . . . . . . . . . . . . . . . . . . .18
2.Headphone Socket . . . . . . . . . . . . . . . . . . . . . . . . . . . . . . . . . . . . . .57
3.FM 75 Ohm Aerial Socket . . . . . . . . . . . . . . . . . . . . . . . . . . . . . . . . .14
4.AM Aerial Earth Terminal . . . . . . . . . . . . . . . . . . . . . . . . . . . . . . . . .14
5.AM Aerial Terminal . . . . . . . . . . . . . . . . . . . . . . . . . . . . . . . . . . . . . .14
6.System Connection Socket (to main unit) . . . . . . . . . . . . . . . . . . . .14
7.Coaxial Digital Audio Input Socket . . . . . . . . . . . . . . . . . . . . . . . . .56
8.Optical Digital Audio Input Socket . . . . . . . . . . . . . . . . . . . . . . . . . .55
9.Optical Digital Audio Output Socket . . . . . . . . . . . . . . . . . . . . . . . .56
10.Speaker Terminals . . . . . . . . . . . . . . . . . . . . . . . . . . . . . . . . . . . . . . .15
11.AC Power Lead . . . . . . . . . . . . . . . . . . . . . . . . . . . . . . . . . . . . . . . . . .17
12.Subwoofer Pre Output Socket . . . . . . . . . . . . . . . . . . . . . . . . . . . . .57
13.TV Audio Input Sockets . . . . . . . . . . . . . . . . . . . . . . . . . . . . . . . . . . .55
14.VCR Audio Input Sockets . . . . . . . . . . . . . . . . . . . . . . . . . . . . . . . . .55
15.VCR Audio Output Sockets . . . . . . . . . . . . . . . . . . . . . . . . . . . . . . . .55
16.Cooling Fan . . . . . . . . . . . . . . . . . . . . . . . . . . . . . . . . . . . . . . . . . . . .24
"Front/surround speakers
Reference page
1.Speaker
2.Speaker Terminals . . . . . . . . . . . . . . . . . . . . . . . . . . . . . . . . . . . . . . 15
"Centre speaker
Reference page
1.Speaker
2.Speaker Terminals . . . . . . . . . . . . . . . . . . . . . . . . . . . . . . . . . . . . . . 15
"Subwoofer
Reference page
1.Woofer
2.Bass Reflex Duct
3.Speaker Terminals . . . . . . . . . . . . . . . . . . . . . . . . . . . . . . . . . . . . . . 15
(Connect a commercially available subwoofer with a built-in amplifier.)
2
1
3 4 5 6 7 8 9
12 13 14 15 16
10 11
< The bottom of the amplifier unit >
220-240V 50/60Hz 87W
FREQUENCY RANGE: FM 88 - 108 MHz
AM 531 - 1602 kHz
MODEL NO. SD-AS10W(S)
1-BIT DIGITAL HOME THEATER WITH DVD
SERIAL NO.
SHARP CORPORATION
(AMP UNIT)
(Front)
(Rear)
2
(Front) (Rear)
1
21
(Front) (Rear)
3
2
1
(Front) (Rear)

E-9
SD-AS10W_EX_E.fm05/3/18
ENGLISH
TINSZA124AWZZ
SD-AS10W
General Information
- Controls and indicators -
Controls and indicators (continued)
"Remote control
Set the MODE 1/MODE 2 switch to MODE 1 and press the following buttons.
Reference page
1.Remote Control Transmitter . . . . . . . . . . . . . . . . . . . . . . . . . . . . . . .18
2.MODE 1/MODE 2 Switch . . . . . . . . . . . . . . . . . . . . . . . . . . . . . . . . . .10
3.Function Select Button (DIG1/DIG2) . . . . . . . . . . . . . . . . . . . . . . . .55
4.Disc Compartment Open/Close Button . . . . . . . . . . . . . . . . . . . . . .21
5.Function Select Button (TV/VCR) . . . . . . . . . . . . . . . . . . . . . . . . . . .55
6.TV On/Stand-by Button . . . . . . . . . . . . . . . . . . . . . . . . . . . . . . . . . . .53
7.TV/Video Select Button . . . . . . . . . . . . . . . . . . . . . . . . . . . . . . . . . . .53
8.Stereo (2 channel) Select Button . . . . . . . . . . . . . . . . . . . . . . . . . . .39
9.Multi Channel Select Button . . . . . . . . . . . . . . . . . . . . . . . . . . . . . . .39
10.Menu or Playback Control On/Off Button . . . . . . . . . . . . . . . . .28, 32
11.TV Volume Up and Down Buttons . . . . . . . . . . . . . . . . . . . . . . . . . .53
12.Direct Select Button . . . . . . . . . . . . . . . . . . . . . . . . . . . . . . . . . .26, 32
13.Direct Number Buttons . . . . . . . . . . . . . . . . . . . . . . . . . . . . . . . .26, 32
14.Review/Tuning Down Button . . . . . . . . . . . . . . . . . . . . . . . . . . . .25, 37
15.Chapter (Track) Skip Down/Tuner Preset Down Button . . . . . .25, 38
16.Repeat Play Button . . . . . . . . . . . . . . . . . . . . . . . . . . . . . . . . . . . . . .30
17.Play Button . . . . . . . . . . . . . . . . . . . . . . . . . . . . . . . . . . . . . . . . . . . . .23
18.Tuner (Band) Button . . . . . . . . . . . . . . . . . . . . . . . . . . . . . . . . . . . . .37
19.On/Stand-by Button . . . . . . . . . . . . . . . . . . . . . . . . . . . . . . . . . . . . . .18
20.Mute Button . . . . . . . . . . . . . . . . . . . . . . . . . . . . . . . . . . . . . . . . . . . .19
21.Timer/Sleep/Clock Button . . . . . . . . . . . . . . . . . . . . . . . . . . .20, 50, 52
22.TV Channel Up and Down Buttons . . . . . . . . . . . . . . . . . . . . . . . . . .53
23.Programme Button . . . . . . . . . . . . . . . . . . . . . . . . . . . . . . . . . . .33, 35
24.Random Play Button . . . . . . . . . . . . . . . . . . . . . . . . . . . . . . . . . . . . .32
25.Return Button . . . . . . . . . . . . . . . . . . . . . . . . . . . . . . . . . . . . . . . .31, 43
26.Enter Button . . . . . . . . . . . . . . . . . . . . . . . . . . . . . . . . . . . . . . . . . . . .20
27.Volume Up and Down Buttons . . . . . . . . . . . . . . . . . . . . . . . . . . . . .19
28.Cursor Buttons . . . . . . . . . . . . . . . . . . . . . . . . . . . . . . . . . . . . . . . . . .20
29.Disc Select Button . . . . . . . . . . . . . . . . . . . . . . . . . . . . . . . . . . . .21, 23
30.On Screen Button . . . . . . . . . . . . . . . . . . . . . . . . . . . . . . . . . . . . . . .27
31.Disc Number Select Buttons . . . . . . . . . . . . . . . . . . . . . . . . . . .21, 23
32.Cue/Tuning Up Button . . . . . . . . . . . . . . . . . . . . . . . . . . . . . . . . .25, 37
33.Chapter (Track) Skip Up/Tuner Preset Up Button . . . . . . . . . . .25, 38
34.DVD Still Frame Advance/Disc Pause Button . . . . . . . . . . . . . .24, 26
35.Stop Button . . . . . . . . . . . . . . . . . . . . . . . . . . . . . . . . . . . . . . . . .21, 24
1
5
6
3
2
4
7
8
9
11
10
12
13
14
15
16
17
18
19
20
21
22
23
24
25
26
28
29
31
30
32
33
34
35
27

F
S
V
I
N
P
E
E
E-10
SD-AS10W_EX_E.fm05/3/18
ENGLISH
TINSZA124AWZZ
SD-AS10W
General Information
- Controls and indicators -
"Remote control
Set the MODE 1/MODE 2 switch to MODE 2 and press the following buttons (indi-
cated in blue). Available operations change.
Reference page
1.DVD Top Menu Button . . . . . . . . . . . . . . . . . . . . . . . . . . . . . . . . . . . . 28
2.Clear Button . . . . . . . . . . . . . . . . . . . . . . . . . . . . . . . . . . . . . . . . . . . . 38
3.Display (Dimmer) Button . . . . . . . . . . . . . . . . . . . . . . . . . . . . . . 19, 27
4.DVD Angle Button . . . . . . . . . . . . . . . . . . . . . . . . . . . . . . . . . . . . . . . 29
5.Progressive Scan Mode Select Button . . . . . . . . . . . . . . . . . . . . . . 24
6.A - B Repeat Button . . . . . . . . . . . . . . . . . . . . . . . . . . . . . . . . . . . . . 30
7.DVD Setup Button . . . . . . . . . . . . . . . . . . . . . . . . . . . . . . . . . . . . . . . 45
8.Amplifier Setup Button . . . . . . . . . . . . . . . . . . . . . . . . . . . . . . . . . . . 43
9.DVD Zoom Button . . . . . . . . . . . . . . . . . . . . . . . . . . . . . . . . . . . . . . . 29
10.DVD Audio Language Select Button . . . . . . . . . . . . . . . . . . . . . . . . 28
11.DVD Subtitle Button . . . . . . . . . . . . . . . . . . . . . . . . . . . . . . . . . . . . . 29
12.Dolby Virtual Speaker Button . . . . . . . . . . . . . . . . . . . . . . . . . . . . . 40
13.DVD Slow Button . . . . . . . . . . . . . . . . . . . . . . . . . . . . . . . . . . . . . . . . 26
Note:
In "MODE 2", you can use buttons other than the above for the same operations as in
"MODE 1".
3
2
1
4
5
6
7
8
9
10
11
12
13

E-11
SD-AS10W_EX_E.fm05/3/18
ENGLISH
TINSZA124AWZZ
SD-AS10W
Preparation for Use
- System installation -
System installation
You can attach the floor speaker stand (optional accessory) to the front and surround
speakers.
(For details on the optional accessory, refer to page 61.)
"Magnetically shielded speakers
The front, surround and centre speakers may be placed beside or near the TV as
they are magnetically shielded. However, discolouration may occur depending on the
TV type.
If colour variation occurs...
Turn off the TV (with the power switch).
After 15 - 30 minutes, turn the TV on again.
If the colour variation is still present...
Move the speakers further away from the TV.
Refer to the manual of the TV for details.
Note:
The subwoofer is not magnetically shielded.
"Placing the speaker system
The best surround effect will be achieved by placing each speaker at the same
distance from the listening position.
It is recommended to arrange the speakers as shown below.
Notes:
!The default distance is set to 2 m (6 feet). If speakers cannot be placed at equal
distances, refer to "Speaker delay setting" (see page 43).
!Place the TV halfway between the front speakers.
!It is recommended that the centre speaker be placed near the television.
!Place the surround speakers at a position just above the height of your ears.
!You can place the subwoofer anywhere you like. As it vibrates whilst reproducing
bass, place it on a stable, sturdy surface.
Installation image (with optional accessories):
Front
speaker
(right)
Surround
speaker
(right)
Surround
speaker
(left)
Subwoofer
Front
speaker
(left) Centre speaker Front
speaker (left)
Subwoofer
Front
speaker (right)
Surround
speaker (left) Surround
speaker (right)
Default setting:
2 m (6 feet)
Centre
speaker
Centre speaker
Front speaker
(left) Front speaker
(right)
Same distance

F
S
V
I
N
P
E
E
E-12
SD-AS10W_EX_E.fm05/3/18
ENGLISH
TINSZA124AWZZ
SD-AS10W
Preparation for Use
- Main unit preparation -
Main unit preparation
Make sure to unplug the AC power lead before installing the main unit or change the position.
Position B Position C
Main unit
stand
Make all connections
before attaching the
stand (see pages
14, 16).
Button name label
Non-slip sheet for main unit
Remote
sensor
Select from three installation methods according to the location.
For position A or B, make sure to use the included main unit stand. Otherwise the unit may fall.
The display direction changes according to the installation direction.
Position A
1
Remove the 2 screws.
1
Remove the 2 screws.
Main unit
stand
2
Secure the stand with the removed screws.
2
Secure the stand with the removed screws.
1
Align the position with the remote sensor
and attach the included button name label.
2
Fit the non-slip sheets into the groove.
YES
Correct NO
YES
Correct
NO
Notes:
!When attaching the stand, place the main unit on a cushion or soft cloth to avoid
damage.
!Use the removed screws to secure the stand. Otherwise, the unit may break.
!Remove the only specified screws. Otherwise malfunction may occur. Be careful
not to lose the removed screws.
!Attach the button name label carefully. It is difficult to peel off.
Caution:
!Do not change the installation direction when the main unit is turned on. Discs may
not be read or may be damaged.
!To turn on the power after the first installation or after changing the installation
method, use the ON/STAND-BY button on the main unit. From the next time, you
can also use the remote control.

E-13
SD-AS10W_EX_E.fm05/3/18
ENGLISH
TINSZA124AWZZ
SD-AS10W
Preparation for Use
- System connections -
System connections
Make sure to unplug the AC power lead before making any connections.
Amplifier unit
Main unit
TV
FM aerial
Aerial connection (see page 14)
AM loop aerial
Speaker connection (see page 15)
AC power
connection
(see page 17)
Surround speaker
(left) Subwoofer Surround speaker
(right)
Front speaker
(left) Centre speaker Front speaker
(right)
Connecting the system
connection cable (see page 14)
TV connection (see page 16)
Connect a TV and main unit with the included video cable.
If your TV is equipped with an S-video input socket or
component video input sockets, purchase an appropriate
cable to enjoy higher quality images.
Attaching the side cover (see page 16)
You can position cables differently by changing installation.

F
S
V
I
N
P
E
E
E-14
SD-AS10W_EX_E.fm05/3/18
ENGLISH
TINSZA124AWZZ
SD-AS10W
Preparation for Use
- System connections / Aerial connection -
"Connecting the system connection cable
Connect the main unit and amplifier unit as follows.
Aerial connection
Installing the AM loop aerial:
External FM or AM aerial:
Use an external FM or AM aerial if you require better reception. Consult your dealer.
When using an external AM aerial, be sure to keep the wire of the AM loop aerial
connected.
1
2
Amplifier unit
Main unit
Arrow
Screw
Push
Unplug
1
2
To connect:
The plug is directional.
Connect it with the arrow
pointing at the screw.
To disconnect:
Pull the plug straight out
pressing the plug.
How to remove side cover
Remove the side cover to connect the system.
System
connection cable
Supplied FM aerial:
Connect the FM aerial wire to the FM 75 OHMS
socket and position the FM aerial wire in the di-
rection where the strongest signal can be re-
ceived.
Supplied AM loop aerial:
Connect the AM loop aerial wire to the AM and
GND terminals. Position the AM loop aerial for
optimum reception. Place the AM loop aerial on
a shelf, etc., or attach it to a stand or a wall with
screws (not supplied).
Note:
Placing the aerial on the unit or near the AC
power lead may cause noise pickup. Place the
aerial away from the unit for better reception.
< Assembling > < Attaching to the wall >
Wall Screws (not supplied)
White
Black
FM aerial AM loop aerial
Amplifier unit
External FM aerial External AM aerial
15 m (49 feet)
7.5 m (25 feet)
AM loop
aerial
Earth wire
Earth rod

E-15
SD-AS10W_EX_E.fm05/3/18
ENGLISH
TINSZA124AWZZ
SD-AS10W
Preparation for Use
- Speaker connection -
Speaker connection
To prevent accidental short circuits between and terminals, connect the
speaker wires to the speakers first and then to the unit.
Connect the speaker and the unit by matching the colours.
Caution:
!The supplied speakers are designed exclusively for the SD-AS10W. Do not
connect these speakers to other equipment. Also, do not connect other
speakers to the SD-AS10W. It may cause malfunction.
!Do not mistake the and , and right and left terminals of the speaker wires. (The
right speaker is placed on the right when you face the unit.)
Non-slip sheet for speakers:
Attach the sheets to the bottom of the speaker to prevent it from sliding.
Make sure to leave the AC power lead disconnected when connecting the
speakers.
RedBlack
Tube (grey)
Label
(grey)
Example: To connect the right surround speaker.
1Connect the wires to the speakers.
2
Connect the other end to the amplifier unit.
Amplifier unit
Speaker terminal (grey)
Tube (grey) Red
Black
!Do not let the bare speaker wires touch each other.
!Do not stand or sit on the speakers. You may be injured.
!Do not short-circuit the speaker wire. If it happens with the
power on, the protection circuit is activated and the unit is
set to the power stand-by mode. In this case, check that the
speaker wire is connected correctly before turning on the
power again.
!The speakers grilles are not removable.
!Do not allow any objects to fall into or to be placed in the bass
reflex ducts. Incorrect
Front/surround speakers Centre speaker
Non-slip sheet for speakers
Non-slip sheet
for speakers

F
S
V
I
N
P
E
E
E-16
SD-AS10W_EX_E.fm05/3/18
ENGLISH
TINSZA124AWZZ
SD-AS10W
Preparation for Use
- TV connection -
TV connection
Connecting to a TV with a video input socket
Connecting to a TV with an S-video input socket
Connecting to a TV with component video input sockets
Notes:
!Change the TV input in accordance with the connected socket.
!Do not connect other equipment between the TV and this unit. If they are con-
nected via a VCR, pictures may be distorted.
!If your TV has different indications for the component video inputs (Y, CB and CR
or Y, B-Y and P-Y), connect sockets with its matching colour.
!Do not connect to a component video input socket designed for the high-vision
system, which is not DVD-compatible (the images may be distorted or not appear).
!Using the audio cable, you can listen to the TV sound with this unit (see page 55).
"Attaching the side cover
Three types of sockets (VIDEO OUT, S-VIDEO OUT and COMPONENT VIDEO
OUT) are available for connection of a TV and this unit. Connect according to your
TV.
Connect the optional S-video cable or component video cable for higher quality DVD
images. For the component video cable, the progressive video mode is available
and you can enjoy images with less flicker (default setting: PROGRESSIVE OFF).
See page 24 for details.
TV
Video cable (supplied) To video
input socket
To video
output socket
Main unit
TV
S-video cable
(commercially available) To S-video
input socket
To S-video
output socket
Main unit
1 After making all the connections, attach the side cover to the main unit. Fit the
claws into the holes.
2 Route all the cables through the hole of the cover.
To component
video input sockets
To component
video output sockets
Red
Blue
Component video cable
(commercially available)
Green
Red
Blue
Green
TV
Main unit

E-17
SD-AS10W_EX_E.fm05/3/18
ENGLISH
TINSZA124AWZZ
SD-AS10W
Preparation for Use
- AC power connection / Setting the AM/FM interval -
AC power connection
"Connecting the AC power lead
After checking all the connections have been made correctly, plug in the amplifier
unit.
Note:
!Unplug the AC power lead from the wall socket if the unit will not be in use for a
prolonged period of time.
!Before unplugging the AC power lead, remove all the discs.
AC Plug Adaptor
In areas (or countries) where a wall socket shown in illustration is used, connect
the unit using the AC plug adaptor supplied with the unit, as illustrated. The AC plug
adaptor is not included in areas where the wall socket and AC power plug can be
directly connected (see illustration ).
Note for users in Australia and New Zealand:
An AC plug adaptor is not supplied if the lead has an Australian Standard plug.
Setting the AM/FM interval
The International Telecommunication Union (ITU) has established that member coun-
tries should maintain either a 10 kHz or 9 kHz interval between broadcasting frequen-
cies of AM stations and 100 kHz or 50 kHz for FM stations. The illustration shows the
50/9 kHz zones (regions 1 and 3), and the 100/10 kHz zone (region 2).
Before using the unit, be sure to set it to the AM/FM tuning interval (span) used in
your area.
To change the AM/FM tuning interval:
Note:
The AM/FM tuning interval will not change unless you press the ENTER button within
6 seconds.
Caution:
!When the unit is left for a few hours after the span is switched and the AC power
lead is disconnected, the AM span automatically returns to 9 kHz (FM span to 50
kHz). If this happens, set the span again.
!When the span is switched, all the memorised stations will be cancelled.
Wall socket
(AC 220 V - 240 V, 50/60 Hz)
1
2
1 Press the ON/STAND-BY button to enter the power stand-by mode.
2 Whilst holding down the TUNER (BAND) button, press the ON/STAND-BY button.
3 Within 6 seconds, press the , , or button to select the interval (span) in your
area.
The display switches each time you press the button.
4 Within 6 seconds, press the ENTER button on the remote control.
The unit will enter the power stand-by mode automatically.
1
SHARP TINSZA124AWZZ (W)

F
S
V
I
N
P
E
E
E-18
SD-AS10W_EX_E.fm05/3/18
ENGLISH
TINSZA124AWZZ
SD-AS10W
Preparation for Use
- To turn the power on / Remote control -
To turn the power on
Press the ON/STAND-BY button.
The power indicator on the amplifier unit lights up.
If the power does not turn on, check whether the power lead and system connection
cable are plugged in properly.
To set the unit to stand-by mode:
Press the ON/STAND-BY button again.
Note:
After the unit enters the power stand-by mode, wait a few seconds to turn on again.
"Auto power off function
The unit enters the stand-by mode after 20 minutes of inactivity in DVD operation.
Remote control
"Battery installation
Precautions for battery use:
!Replace all old batteries with new ones at the same time.
!Do not mix old and new batteries.
!Remove the batteries if the unit is not to be used for long periods of time. This will
prevent potential damage due to battery leakage.
Caution:
!Do not use rechargeable batteries (nickel-cadmium battery, etc.).
!Installing the batteries incorrectly may cause the unit to malfunction.
Battery removal:
Remove the battery cover. Push each battery toward the battery terminal and take
them out.
Notes concerning use:
!Replace the batteries if the operating distance is reduced or if the operation
becomes erratic. Purchase 2 "AA" size batteries (UM/SUM-3, R6, HP-7 or similar).
!Periodically clean the transmitter on the remote control and the sensor on the unit
with a soft cloth.
!Exposing the sensor on the unit to strong light may interfere with operation.
Change the lighting or the direction of the unit.
!Keep the remote control away from moisture, heat, shock, and vibrations.
"Test of the remote control
Amplifier unit
Power indicator
Main unit
1 Open the battery cover.
2 Insert the supplied batteries ac-
cording to the direction indicated in
the battery compartment.
When inserting or removing the batteries,
push them toward the battery terminals.
3 Close the cover.
Point the remote control directly at the remote
sensor on the unit.
The remotecontrol can be used within
the range shown on the right.
Press the ON/STAND-BY button. Does the
power turn on? Now, you can enjoy your sys-
tem.
!Use 2 remote sensors on the main unit ac-
cording to the installation direction. 0.2 m - 6 m
(8" - 20')
Remote
sensor
Main unit
2
SHARP TINSZA124AWZZ (W)

E-19
SD-AS10W_EX_E.fm05/3/18
ENGLISH
TINSZA124AWZZ
SD-AS10W
Preparation for Use
- General control -
General control
"Volume control
"Muting
"To change the display brightness (2 levels)
Set the MODE 1/MODE 2 switch to MODE 2 and hold downthe DISPLAY (-DIMMER)
button for 3 seconds or more.
Each time you press, brightness changes.
Main unit operation:
Press the VOLUME UP button to increase the volume and
the VOLUME DOWN button for decreasing.
Remote control operation:
Press the VOL + button to increase the volume and the VOL
- button for decreasing.
The volume is muted when pressing the MUTE button.
!Press again to restore the volume.
!The mute status is cancelled when you adjust the vol-
ume.
Dimmed (*) Brightened
(*) After approx. 5 seconds of DVD playback, the display dims and the original bright-
ness returns when you stop playback. The brightness remains unchanged during
playback of other media.
0 1 ... 15 ... 39 40
Other manuals for SD-AS10W
1
Table of contents
Other Sharp Home Theater System manuals

Sharp
Sharp HT-DV40H User manual

Sharp
Sharp SD-AT1000 User manual

Sharp
Sharp HT-SB60 User manual

Sharp
Sharp HT-CN650DVW User manual

Sharp
Sharp HT-CN410DVH User manual

Sharp
Sharp HT-SB110 User manual

Sharp
Sharp HT-SB60 User manual

Sharp
Sharp SD-AS10 User manual

Sharp
Sharp HT-CN400DVW User manual

Sharp
Sharp SD-AS10 User manual

Sharp
Sharp HT-CN300 User manual

Sharp
Sharp SD-AT100H User manual

Sharp
Sharp HT-SB100 User manual

Sharp
Sharp HT-SBW460 User manual

Sharp
Sharp HT-X1H User manual

Sharp
Sharp HT-SBW460 User manual

Sharp
Sharp HT-SB35D User manual

Sharp
Sharp HT-X15H User manual

Sharp
Sharp HT-CN500DVE User manual

Sharp
Sharp AN-PR1000H User manual