Sharp MD-E9000H User manual

MD-E9000H
CONTENTS Page
SAFETY PRECAUTION OF MD SECTION FOR SERVICE MANUAL..............................................................................2
SAFETY PRECAUTION OF CD SECTION FOR SERVICE MANUAL ..............................................................................3
IMPORTANT SERVICE NOTES (FOR U.K. ONLY) .......................................................................................................... 4
SPECIFICATIONS ............................................................................................................................................................. 4
NAMES OF PARTS ........................................................................................................................................................... 5
OPERATION MANUAL ...................................................................................................................................................... 7
DISASSEMBLY................................................................................................................................................................ 12
REMOVING AND REINSTALLING THE MAIN PARTS................................................................................................... 15
TEST MODE .................................................................................................................................................................... 17
ADJUSTMENT ................................................................................................................................................................. 22
ERROR MESSAGE LIST................................................................................................................................................. 32
EEPROM WRITING PROCEDURE ................................................................................................................................. 33
NOTES ON SCHEMATIC DIAGRAM .............................................................................................................................. 37
TYPES OF TRANSISTOR AND LED............................................................................................................................... 37
BLOCK DIAGRAM ........................................................................................................................................................... 38
WIRING SIDE OF P.W.BOARD....................................................................................................................................... 42
SCHEMATIC DIAGRAM .................................................................................................................................................. 52
VOLTAGE ........................................................................................................................................................................ 64
WAVEFORMS OF CD CIRCUIT...................................................................................................................................... 65
WAVEFORMS OF MD CIRCUIT ..................................................................................................................................... 66
TROUBLESHOOTING ..................................................................................................................................................... 68
FUNCTION TABLE OF IC................................................................................................................................................ 76
FL DISPLAY..................................................................................................................................................................... 90
PARTS GUIDE/EXPLODED VIEW
PACKING METHOD (FOR U.K. ONLY)
SERVICE MANUAL
SHARP CORPORATION
No. S8151MDE9000H
• In the interests of user-safety the set should be restored to its
originalconditionandonlypartsidenticaltothosespecifiedshould
be used.
This document has been published to be used
for after sales service only.
The contents are subject to change without notice.
MD-E9000H MD Compact Component System consisting
of MD-E9000H (main unit) and CP-E9000H (speaker
system).
MD COMPACT COMPONENT SYSTEM
MODEL MD-E9000H
All manuals and user guides at all-guides.com
all-guides.com

MD-E9000H
– 2 –
SAFETY PRECAUTION OF MD SECTION FOR SERVICE MANUAL
The AEL (Accessible Emission Level) of the laser power output is less than class 1 but the laser component is capable of emitting radiation
exceeding the limit for Class 1. Therefore it is important that the following precautions are observer during servicing to protect your eyes
against exposure to the laser beam.
1)When theunitcase cover isremovedand LOADINGSW(SW1932)is turnedonand then PLAYSW(SW1934 mechanismPWB)is turned
on in a few second.
The laser will light for several second to detect a disk.
2) The laser power output of the pickup unit and replacement service parts are all factory preset before shipment.
Do not attempt to readjust the laser pickup unit during replacement or servicing.
3) Under no circumstances stare into the pickup lens at any time.
4) If laser optical unit becomes faulty, replace the complete laser optical unit.
5) CAUTION-Use of controls or adjustments, or performance of procedures other than those specified herein may result in hazardous
radiation exposure.
VARO ! Avattaessa ja suojalukitus ohitettaessa olet alttiina näkymättömälle lasersäteilylle. Älä katso säteeseen.
VARNING! Osynlig laserstralning när denna del är öppnad och spärren är urkopplad. Betrakta ej strälen.
Precaution to be taken when replacing and servicing the laser pickup.
The following precautions must be observed during servicing to protect your eyesvagainst exposure to the laser.
Warning of possible eye damage when repairing:
IftheACpowerplugisconnectedwhentheinnercoveroftheunitisremoved,thelaserwilllightupduringfocus access(about
1 second) (Fig. 2-1).
During this operation, the laser will leak from the opening between the magnetic head and cartridge holder (Fig. 2-2).
In order to protect your eyes, you must not look at the laser during repair.
Before repairing, be sure to disconnect the AC power plug.
Figure 2-1 Figure 2-2
Magnetic Head Optical Pickup
,,
Magnetic Head
Optical PickupSpindle Motor
Laser Beam
Cartridge Holder
Mechanism
Chassis
WARNINGS
CAUTION-INVISIBLE LASER RADIATION WHEN OPEN AND INTERLOCKS
DEFEATED. AVOID EXPOSURE TO BEAM.
VARNING-OSYNLIG LASERSTRÅLNING NÄR DENNA DEL ÄR ÖPPNAD OCH
SPÄRRAR ÄR URKOPPLADE. STRÅLEN ÄR FARLIG.
ADVERSEL-USYNLIG LASERSTRÅLING NÅR DEKSEL ÅPNES OG SIKKERHEDSLÅS
BRYTES. UNNGÅ EKSPONERING FOR STRÅLEN.
VARO! AVATTAESSA JA SUOJALUKITUS OHITETTAESSA OLET ALTTIINA
NÄKYMÄTÖN LASERSÄTEILYLLE. ÄLÄ KATSO SÄTEESEN.
ADVERSEL-USYNLIG LASERSTRÅLING VED ÅBNING. NÅR SIKKERHEDSAFBRYDERE
ER UDE AF FUNKTION. UNDGÅ UDSETTELSE FOR STRÅLING.
VARNING-OSYNLIG LASERSTRÅLNING NÄR DENNA DEL ÄR ÖPPNAD OCH SPÄRREN
ÄR URKOPPLAD. BETRAKTA EI STRÅLEN.
Laser Diode Properties
Material: GaAIAs
Wavelength: 785 nm
Pluse time:
Read mode: 0.8 mW Continuous
Write mode: max 10 m W 0.5S
min cycle 1.5S
Repetition
All manuals and user guides at all-guides.com

– 3 –
MD-E9000H
Precaution to be taken when replacing and servicing the Laser Pickup.
TheAEL(AccessibleEmissionLevel)ofLaserPowerOutputforthismodelisspecifiedtobelowerthanClass1Requirements.
However, the following precautions must be observed during servicing to protect your eyes against exposure to the Laser
beam.
(1) When the cabinet has been removed, the power is turned on without a compact disc, and the Pickup is on a position outer
than the lead-in position, the Laser will light for several seconds to detect a disc. Do not look into the Pickup Lens.
(2) The Laser Power Output of the Pickup inside the unit and replacement service parts have already been adjusted prior to
shipping.
(3) No adjustment to the Laser Power should be attempted when replacing or servicing the Pickup.
(4) Under no circumstances look directly into the Pickup Lens at any time.
(5) CAUTION - Use of controls or adjustments, or performance of procedures other than those specified herein may result in
hazardous radiation exposure.
(For U.K.) (Except for U.K.)
WARNINGS
SAFETY PRECAUTION OF CD SECTION FOR SERVICE MANUAL
LASER KLASSE 1
LUOKAN 1 LASERLAITE
KLASS 1 LASERAPPARAT
VAROITUS! LAITTEEN KÄYTTÄMINEN MUULLA KUIN TÄSSÄ
KÄYTTÖOHJEESSA MAINITULLA TAVALLA SAATTAA ALTISTAA
KÄYTTÄJÄN TURVALLISUUSLUOKAN 1
YLITTÄVÄLLENÄKYMÄTTÖMÄLLE
LASERSÄTEILYLLE.
VARNING - OM APPARATEN ANVÄNDS PÅ ANNAT SÄTT ÄN I DENNA
BRUKSANVISNING SPECIFICERAS. KAN ANVÄNDAREN UTSÄTTAS FÖR
OSYNLIG LASERSTRÅLNING, SOM ÖVERSKRIDER GRÄNSEN FÖR
LASERKLASS 1.
CAUTION-INVISIBLE LASER RADIATION WHEN OPEN. DO NOT STARE INTO BEAM
OR VIEW DIRECTLY WITH OPTICAL INSTRUMENTS.
VARNING-OSYNLIG LASERSTRALNING NAR DENNA DEL AR OPPNAD. STIRRA EJ
IN I STRALEN OCH BETRAKTA EJ STRALEN MED OPTISKA INSTRUMENT.
ADVERSEL-USYNLIG LASERSTRALING VED ABNING. SE IKKE IND I
STRALEN-HELLER IKKE MED OPTISKE INSTRUMENTER.
VARO! AVATTAESSA OLET ALTTIINA NAKYMATON LASERSATEILYLLE. ALA
TUIJOTA SATEESEEN ALAKA KATSO SITA OPTISEN LAITTEEN LAPI.
VARNING-OSYNLIG LASERSTRALNING NAR DENNA DEL AR OPPNAD. STIRRA EJ
IN I STRALEN OCH BETRAKTA EJ STRALEN GENOM OPTISKT INSTRUMENT.
ADVERSEL-USYNLIG LASERSTRALING NAR DEKSEL APNES. STIRR IKKE INN I
STRALEN ELLER SE DIREKTE MED OPTISKE INSTRUMENTER.
Laser Diode Properties
Material: GaAIAs
Wavelength: 780 nm
Emission Duration: continuous
Laser Output: max. 0.6 mW
All manuals and user guides at all-guides.com

MD-E9000H
– 4 –
FOR A COMPLETE DESCRIPTION OF THE OPERATION OF THIS UNIT, PLEASE REFER
TO THE OPERATION MANUAL.
SPECIFICATIONS
Specifications for this model are subject to change without
prior notice.
IMPORTANT SERVICE NOTES (FOR U.K. ONLY)
Beforereturningthe unit tothecustomer aftercompletionofa
repairor adjustmentit isnecessaryforthefollowingwithstand
voltage test to be applied to ensure the unit is safe for the
customer to use.
Setting of Withstanding Voltage Tester and set.
Set name set value
Withstanding Voltage Tester
Test voltage 4,240 VPEAK
3,000 VRMS
Set time 6 secs
Set current (Cutoff current) 4 mA
Unit
Judgment
OK: The “GOOD” lamp lights.
NG: The “NG” lamp lights and the buzzer sounds.
PROBE
AC OUT UNIT
SHORT-CIRCUIT
AC POWER
SUPPLY CORD
CONNECT THE PROBE
TO GND OF CHASSIS
SCREW
WITHSTANDING
VOLTAGE TESTER
MD-E9000H
CP-E9000H
MiniDisc
Type MiniDisc recorder
Signal readout Non-contact, 3-beam semiconductor laser pickup
Rotation speed 400 - 900 rpm CLV, Approx.
Error correction ACIRC (Advanced Cross Interleave Reed-Solomon
Code)
Quantization 20-bit linear (A/D converter)
Coding ATRAC/ATRAC 3 (Adaptive TRansform Acoustic Cod-
ing)
Sampling frequency 44.1 kHz
Recording method Magnetic modulation overwrite method
Frequency response 20 - 20,000 Hz
D/A converter 1-bit D/A converter
Wow and flutter Unmeasurable (less than 0.001% W. peak)
Signal/noise ratio 95 dB (1 kHz)
Dynamic range 90 dB (1 kHz)
Audio channel Stereo: 2 channels (SP, LP2, LP4)
Tuner
Frequency range FM: 87.5 - 108 MHz
AM: 522 - 1,620 kHz
Type 2-way type speaker system
5 cm (2") Tweeter
10 cm (4") Woofer
Maximum input power 40 W
Rated input power 20 W
Impedance 4 ohms
Dimensions Width: 140 mm (5-9/16")
Height: 300 mm (11-13/16")
Depth: 187 mm (7-3/8")
Weight 1.5 kg (3.3 lbs.)/each
General
Power source AC 230 V, 50 Hz
Power consumption Power on: 50 W
Power stand-by: 0.6 W (*)
Dimensions Width: 230 mm (9-1/16")
Height: 173 mm (6-13/16")
Depth: 290 mm (11-7/16")
Weight 4.1 kg (9.0 lbs.)
(*) This power consumption value is obtained when the demonstration mode is can-
celled in the power stand-by mode. To cancel the demonstration mode.
Amplifier (Except for U.K.)
Output power PMPO: 132 W (Total)
MPO: 66 W (33 W + 33 W) (DIN 45 324)
RMS: 40 W (20 W + 20 W) (DIN 45 324)
RMS: 28 W (14 W + 14 W) (DIN 45 500)
Output terminals Speakers: 4 ohms
Headphones: 16 - 50 ohms (recommended: 32 ohms)
Input terminals Auxiliary: 500 mV/47 kohms
CD player
Type Compact disc player
Signal readout Non-contact, 3-beam semiconductor laser pickup
D/A converter 1-bit D/A converter
Frequency response 20 - 20,000 Hz
Dynamic range 90 dB (1 kHz)
Amplifier (For U.K.)
Output power MPO: 66 W (33 W + 33 W) (10 % T. H. D.)
RMS: 40 W (20 W + 20 W) (10 % T. H. D.)
RMS: 28 W (14 W + 14 W) (1kHz 0.9 % T. H. D.)
Output terminals Speakers: 4 ohms
Headphones: 16 - 50 ohms (recommended: 32 ohms)
Input terminals Auxiliary: 500 mV/47 kohms
All manuals and user guides at all-guides.com

– 5 –
MD-E9000H
NAMES OF PARTS
MD-E9000H
Front panel
1. CD Compartment
2. Timer Set Indicator
3. Remote Sensor
4. MD Compartment
5. On/Stand-by Button
6. MD Eject Button
7. Tuner (Band) Button
8. Auxiliary Button
9. Extra Bass Button
10. Equalizer Button
11. Memory/Enter Button
12. Display (Demo) Button
13. CD Open/Close Button
14. Volume Up and Down Buttons
15. MD Record Mode Selector Buttons (SP/LP2/LP4)
16. CD/MD Normal Speed Record Button
17. CD/MD High Speed Record Button
18. MD Record Button
19. CD Stop Button
20. CD Play or Pause Button
21. CD/MD Track Up and Fast Forward, Tuner Preset
Up Button
22. CD/MD Track Down and Fast Reverse, Tuner Preset
Down Button
23. MD Stop Button
24. MD Play or Pause Button
1
2
3
4
15
19
16 17 18 21 22 23 24
20
5 7 8 9 10 11 12 13 14
Display
1. Record Indicator
24, 41-43
2. Record Pause Indicator
3. High Speed Record Indicator
4. CD/MD Repeat Indicator
5. RDS Indicator
6. Programme Type Indicator
7. Traffic Programme Indicator
8. Traffic Announcement Indicator
9. EON Indicator
10. Traffic Information Indicator
11. FM Stereo Mode Indicator
12. FM Stereo Receiving Indicator
13. TOC Indicator
14. Over Indicator
15. Track Edit Indicator
16. Extra Bass Indicator
17. Timer Play/Record Indicator
18. 2 times Long Recording (stereo) Indicator
19. 4 times Long Recording (stereo) Indicator
20. Sleep Indicator
21. Level Meter/Character Information/Frequency Indicator
22. Track Indicator
23. Random Play Indicator
24. Memory Indicator
25. Disc Indicator
1
171819 20 21 22 23 24 25
234 5 6 7 89101112131415 16
6
All manuals and user guides at all-guides.com

MD-E9000H
– 6 –
CP-E9000H
Rear Panel
1. AM Loop Aerial Socket
2. FM 75 Ohms Aerial Socket
3. Auxiliary (Audio Signal) Input Sockets
4. Headphone Socket
5. Speaker Terminals
6. AC Power Input Socket
35
6
1
2
4
Remote Control
1. Remote Control Transmitter
2. On/Stand-by Button
3. Extra Bass Button
4. Video/Auxiliary Button
5. Timer Button
6. Clock Button
7. Tuning Up and Down Buttons
8. Clear/Delete Button
9. Cursor Buttons
10. Volume Up and Down Buttons
11. Equalizer Mode Selector Button
12. Tuner (Band) Button
13. Sleep Button
14. CD Open/Close Button
15. Memory/Enter Button
16. Character Input/CD, MD Direct Buttons
17. Symbol/Time Button
18. Dimmer Button
19. MD Play or Pause Button
20. CD/MD Fast Reverse, Track Down Button
21. Recording Mode Selector Button
22. MD Stop Button
23. CD Play or Pause Button
24. CD/MD Fast Forward, Track Up Button
25. CD Stop Button
26. MD Record Button
27. RDS EON Button
28. RDS Programme Type/Traffic Information Search Button
29. CD/MD Play Mode Selector Button
30. Auto Marker Button
31. RDS ASPM (Auto Station Programme Memory) Button
32. Display/Character Button
33. Name/TOC Button
34. Track Edit Button
Buttonswith “ “ mark intheillustrationcan be operated ontheremotecontrol only.
Other buttons can be operated both on the main unit and the remote control.
1. Tweeter
2. Woofer
3. Bass Reflex Duct
4. Speaker Terminals
1
2
3
4
1
2
3
4
5
6
7
8
9
17
16 30
29
28
27
34
33
32
31
15 22
21
20
19
18 23
24
25
26
14
13
12
11
10
All manuals and user guides at all-guides.com
all-guides.com

– 7 –
MD-E9000H
OPERATION MANUAL
This may be operated only with the remote control.
In this example, the clock is set for the 24-hour (0:00) display.
1
Press the CLOCK button and within 10 seconds, press the
MEMORY/ENTER button.
2
Press the or button to select 24-hour or 12-hour
display and then press the MEMORY/ENTER button.
“0:00” →The 24-hour display will appear.
(0:00 - 23:59)
“AM 0:00” →The 12-hour display will appear.
(AM 0:00 - PM 11:59)
“AM 12:00” →The 12-hour display will appear.
(AM 12:00 - PM 11:59)
3
Press the or button to adjust the hour and then
press the MEMORY/ENTER button.
When the 12-hour display is selected, “AM” will change automatically to
“PM”.
4
Press the or button to adjust the minutes and
then press the MEMORY/ENTER button.
The hour will not advance even if minutes advance from “59” to “00”.
The clock starts from “0” second. (Seconds are not displayed.)
To check the time:
Press the CLOCK button.
The time display will appear for about 10 seconds.
Note:
The “CLOCK” or time will flash at the push of the CLOCK button when the AC power
supply is restored after a power failure or unplugging the unit.
Readjust the clock by performing “Setting the Clock” from the beginning.
Setting the Clock
//
//
//
Error Messages
Error messages
BLANK MD
Can’t COPY
Can’t EDIT
Can’t READ
(:Number or
symbol)
Can’t REC
Can’t WRITE
DISC FULL
Er-CD 20
Er-MD
(:Number or
symbol)
EDIT OVER
MD NO DISC
CD NO DISC
Remedy
Replace it with another disc.
Replace the CD.
Changethe stoppositionofthe
track and then try editing it.
Replace it with another disc.
Erasethedisc andtry record-
ing again.
Re-record or replace the
MiniDisc.
Set this unit to the stand-by
mode and try to write the
TOC again. (Remove any
source of shock or vibration
whilst writing.)
Replacethedisc withanother
recordable disc.
Set this unit to the stand-by
mode and turn the power on
again.
Set this unit to the stand-by
mode and turn the power on
again.
Decrease the number of
tracks.
Replaceitwith adisc that has
enough time to record.
Load a MiniDisc.
Reload the MiniDisc.
Load a CD.
Reload the CD.
Meaning
Nothing is recorded.
(Neithermusicnor discname
is recorded.)
You tried to record from a
copy prohibited CD.
A track cannot be edited.
The disc is damaged.
TOC information cannot be
read.
MiniDisc not specified.
Recording cannot be per-
formedcorrectlydue tovibra-
tion or shock in the unit.
The TOC information could
not be created properly due
to a mechanical shock or to
scratches on the disc.
The disc is out of recording
space.
The CD cover is not working
properly.
A MiniDisc is not working
properly.
You chose 21 or more tracks
for track editing.
The remaining time available
for recording is short.
A MiniDisc has not been
loaded.
The MiniDisc data cannot be
read.
A CD has not been loaded.
The CD data cannot be read.
When an error message is displayed, proceed as follows:
Meaning
Thenumberof characters for
the disc name or track name
exceeds 40.
The data recorded on this
disc is not audio data.
You tried to record on a play-
back-only disc.
The disc is write protected.
The temperature is too high.
TOCinformation recordedon
the MD does not match the
MiniDisc specifications or it
cannot be read.
There is no space left for re-
cording track numbers.
There is no space left for re-
cording character informa-
tion.
The data contains an error.
MiniDisc not specified.
MiniDisc is not working prop-
erly.
Tunerisnot workingproperly.
Error messages
NAME FULL
NOT AUDIO
PLAYBACK MD
PROTECTED
TEMP OVER
TOC FORM
(:Number or
symbol)
TOC FULL
TOC FULL1
? MD DISC
POWER?
ER-TU
(:Number or
symbol)
Remedy
Shorten the disc or track
name.
Select another track.
Replace the disc.
Replace it with another re-
cordable disc.
Move the write protection tab
back to its original position.
Set this unit to the stand-by
mode and wait for a whilst.
Replace it with another disc.
Erasethedisc andtry record-
ing again.
Replace it with another re-
cordable disc.
Replace it with another re-
cordable disc.
Erase the needless charac-
ters.
Replace it with another disc.
Set this unit to the stand-by
mode and turn the power on
again.
Set the unit to the stand-by
mode and turn the power on
again.
All manuals and user guides at all-guides.com

MD-E9000H
– 8 –
Using the Radio Data System (RDS)
Information provided by RDS
Each time the DISPLAY/CHARACTER button is pressed, the display
will switch as follows:
When you are tuning in to a station other than an RDS station or to an RDS station
which sends weak signal, the display will change in the following order:
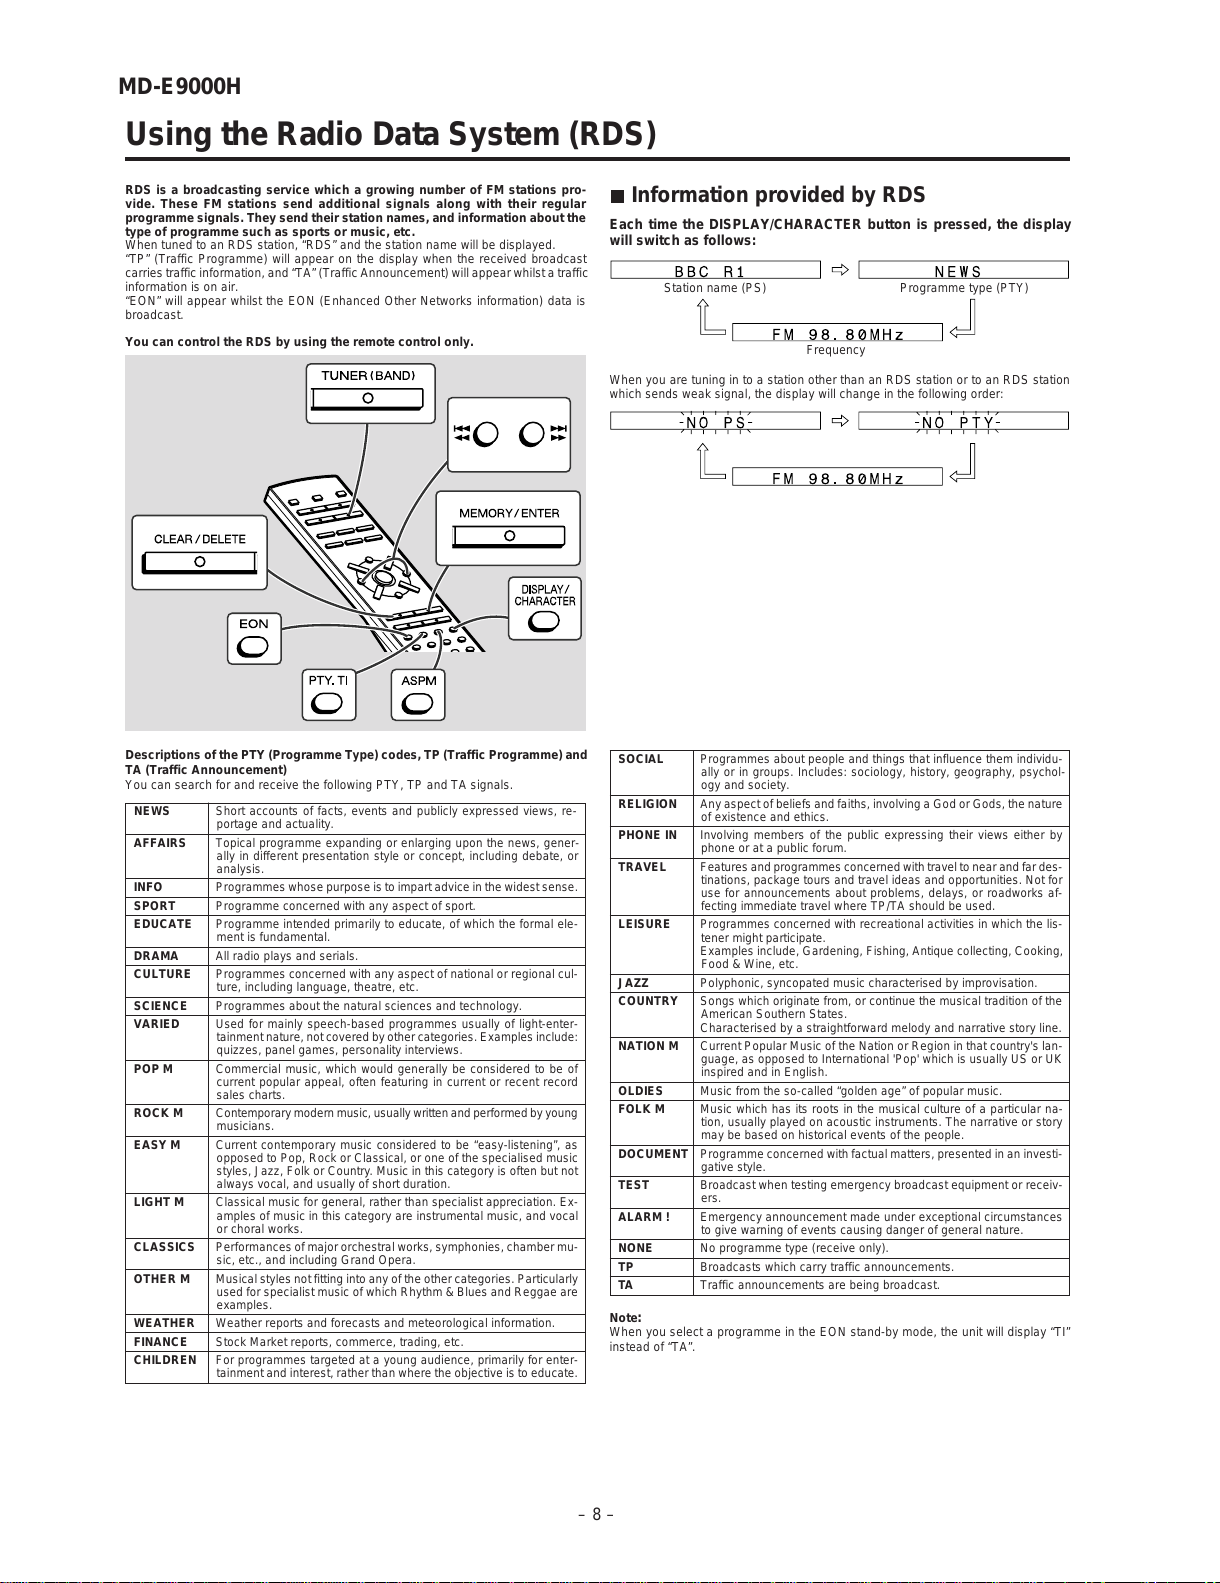
RDS is a broadcasting service which a growing number of FM stations pro-
vide. These FM stations send additional signals along with their regular
programme signals. They send their station names, and information about the
type of programme such as sports or music, etc.
When tuned to an RDS station, “RDS” and the station name will be displayed.
“TP” (Traffic Programme) will appear on the display when the received broadcast
carries traffic information, and “TA” (Traffic Announcement) will appear whilst a traffic
information is on air.
“EON” will appear whilst the EON (Enhanced Other Networks information) data is
broadcast.
You can control the RDS by using the remote control only.
Station name (PS) Programme type (PTY)
Frequency
SOCIAL Programmes about people and things that influence them individu-
ally or in groups. Includes: sociology, history, geography, psychol-
ogy and society.
RELIGION Any aspect of beliefs and faiths, involving a God or Gods, the nature
of existence and ethics.
PHONE IN Involving members of the public expressing their views either by
phone or at a public forum.
TRAVEL Features and programmes concerned with travel to near and far des-
tinations, package tours and travel ideas and opportunities. Not for
use for announcements about problems, delays, or roadworks af-
fecting immediate travel where TP/TA should be used.
LEISURE Programmes concerned with recreational activities in which the lis-
tener might participate.
Examples include, Gardening, Fishing, Antique collecting, Cooking,
Food & Wine, etc.
JAZZ Polyphonic, syncopated music characterised by improvisation.
COUNTRY Songs which originate from, or continue the musical tradition of the
American Southern States.
Characterised by a straightforward melody and narrative story line.
NATION M Current Popular Music of the Nation or Region in that country's lan-
guage, as opposed to International 'Pop' which is usually US or UK
inspired and in English.
OLDIES Music from the so-called “golden age” of popular music.
FOLK M Music which has its roots in the musical culture of a particular na-
tion, usually played on acoustic instruments. The narrative or story
may be based on historical events of the people.
DOCUMENT Programme concerned with factual matters, presented in an investi-
gative style.
TEST Broadcast when testing emergency broadcast equipment or receiv-
ers.
ALARM ! Emergency announcement made under exceptional circumstances
to give warning of events causing danger of general nature.
NONE No programme type (receive only).
TP Broadcasts which carry traffic announcements.
TA Traffic announcements are being broadcast.
Note
:
When you select a programme in the EON stand-by mode, the unit will display “TI”
instead of “TA”.
NEWS Short accounts of facts, events and publicly expressed views, re-
portage and actuality.
AFFAIRS Topical programme expanding or enlarging upon the news, gener-
ally in different presentation style or concept, including debate, or
analysis.
INFO Programmes whose purpose is to impart advice in the widest sense.
SPORT Programme concerned with any aspect of sport.
EDUCATE Programme intended primarily to educate, of which the formal ele-
ment is fundamental.
DRAMA All radio plays and serials.
CULTURE Programmes concerned with any aspect of national or regional cul-
ture, including language, theatre, etc.
SCIENCE Programmes about the natural sciences and technology.
VARIED Used for mainly speech-based programmes usually of light-enter-
tainment nature, not covered by other categories. Examples include:
quizzes, panel games, personality interviews.
POP M Commercial music, which would generally be considered to be of
current popular appeal, often featuring in current or recent record
sales charts.
ROCK M Contemporary modernmusic,usually writtenandperformed byyoung
musicians.
EASY M Current contemporary music considered to be “easy-listening”, as
opposed to Pop, Rock or Classical, or one of the specialised music
styles, Jazz, Folk or Country. Music in this category is often but not
always vocal, and usually of short duration.
LIGHT M Classical music for general, rather than specialist appreciation. Ex-
amples of music in this category are instrumental music, and vocal
or choral works.
CLASSICS Performances of major orchestral works, symphonies, chamber mu-
sic, etc., and including Grand Opera.
OTHER M Musical styles not fitting into any of the other categories. Particularly
used for specialist music of which Rhythm & Blues and Reggae are
examples.
WEATHER Weather reports and forecasts and meteorological information.
FINANCE Stock Market reports, commerce, trading, etc.
CHILDREN For programmes targeted at a young audience, primarily for enter-
tainment and interest, rather than where the objective is to educate.
Descriptions of the PTY (Programme Type) codes, TP (Traffic Programme) and
TA (Traffic Announcement)
You can search for and receive the following PTY, TP and TA signals.
All manuals and user guides at all-guides.com

– 9 –
MD-E9000H
Troubleshooting Chart
Many potential “problems” can be resolved by the owner without calling a service
technician. If something is wrong with this product, check the following before calling
your authorised SHARP dealer or service centre.
Tuner
Symptom
Radio makes unusual noise con-
secutively.
Remote control
Symptom
The remote control does not op-
erate.
Possible cause
Is the stereo system placed near the TV
or computer?
Is the AC power lead located near the
aerial?
Possible cause
Is the stereo system unplugged?
Is the battery polarity incorrect?
Are batteries dead?
Is the distance or angle incorrect?
Does the remote control sensor receive
strong light?
General
Symptom
The clock is not on time.
Whena buttonis pressed,theunit
does not respond.
Nosound isheard fromthespeak-
ers.
Possible cause
Did a power failure occur?
Reset the clock.
Setthis unitto thepower stand-bymode
and then turn it back on.
Does the unit still malfunction?
Reset it.
Is the volume level set to “0”?
Are the headphones connected?
Are the speaker wires disconnected?
CD player
Symptom
Playback does not start.
Playback stops in the middle or is
not performed properly.
Playback sounds are skipped, or
stopped in the middle of a track.
Possible cause
Is the disc loaded upside down?
Does the disc dissatisfy the standards?
Is the disc distorted or scratched?
Is the unit located near excessive vibra-
tion?
Is the disc very dirty?
Hascondensation formedinsidethe unit?
MiniDisc
Symptom
A recording cannot be made.
Even though a disc has been
loaded, “CD/MD NO DISC” or
“Can’t READ” is displayed.
Playback sounds are skipped.
Possible cause
Is the MiniDisc protected against acci-
dental erasure?
Did you try to make recording on a play-
back-only MiniDisc?
Can you see the "DISC FULL" or "TOC
FULL" message in the display?
Is the unit located near excessive vibra-
tion?
Is the disc very dirty?
Has condensation formed inside the
unit?
Condensation
Sudden temperature changes, storage or operation in an extremely humid environ-
ment may cause condensation inside the cabinet (CD/MD pickup, etc.) or on the
transmitter on the remote control.
Condensation can cause the unit to malfunction.
If this happens, leave the power on with no disc in the unit until normal playback is
possible (about 1 hour). Wipe off any condensation on the transmitter with a soft
cloth before operating the unit.
If trouble occurs
When this product is subjected to strong external interference (mechanical shock,
excessive static electricity, abnormal supply voltage due to lightning, etc.) or if it is
operated incorrectly, it may malfunction.
If such a problem occurs, do the following:
1. Set the unit to the stand-by mode and turn the power on again.
2. If the unit is not restored in step 1, unplug and plug in the unit, and then turn the
power on.
Note:
If neither operation above restores the unit, clear all the memory by resetting it.
■
Clearing all the memory (reset)
1. Press the ON/STAND-BY button to enter the power stand-by mode.
2. Whilst pressing down the PRESET button and the DISPLAY (DEMO) button,
press the ON/STAND-BY button.
After the “RESET” is displayed for about 1 second, the unit will enter the power
stand-by mode.
Caution:
This operation will erase all data stored in memory including clock, timer settings,
tuner preset, and CD or MiniDisc programme.
■
Before transporting the unit
Remove the CD and the MiniDisc from the unit. Your unit checks whether there is a
disc inside the unit when the compartment is closed. “NO DISC” appears if no disc is
left. Then, set the unit to the power stand-by mode. Carrying the unit with discs left
inside can damage it.
Test of the remote control
Face the remote control directly to the remote sensor on the unit.
The remote control can be used within the range shown below:
Press the ON/STAND-BY button. Does the power turn on? Now, you can enjoy the
music.
Remote Control
0.2 m - 6 m
(8" - 20')
Remote sensor
Precautions
Placing the system
Please ensure that the equipment is positioned in a well-ventilated area
and that there is at least 10 cm (4") of free space along the sides and
back.
There must also be a minimum of 20 cm (8") of free space on the top of
the unit.
10 cm (4”) 10 cm (4”) 20 cm (8”)
10 cm (4”)
All manuals and user guides at all-guides.com

MD-E9000H
– 10 –
Accessories
Remote control × 1
AM loop aerial × 1
123
Battery installation of remote control
Remove the
Insert the batteries
Replace the cover.
battery cover.
as shown.
FM aerial × 1
AC power lead × 1
(For U.K.) AC power lead × 1
(Except for U.K.)
Speaker wire × 2
“AAA” size battery
(UM-4, R03, HP-16 or similar) × 2
1
1
2
2
Black
Red
System Connections
AM loop aerial
FM
aerial
Right speaker
Left speaker
Wall socket
(AC230V, 50Hz)
RCA lead
(not supplied)
VCR, DVD, etc.
RedWhite
Red White Headphones
3
3
(For U.K.)
(Except For U.K.)
All manuals and user guides at all-guides.com

– 11 –
MD-E9000H
12
Turn on your system
Listening to a CD
1
Press the CD button.
2
Press the CD (OPEN/CLOSE) button to
open the CD compartment.
3
Place a CD on the spindle, label side up.
4
Press the CD (OPEN/CLOSE) button to
close the CD compartment.
5
Press the CD ()
button to start play-
back.
Listening to a MiniDisc
The first time the unit is plugged, the
unit will enter the demonstration
mode. You will see words scroll.
Press the DISPLAY
(DEMO) button to can-
cel the demonstration
mode.
Press the ON/STAND-
BY button to turn the
power on.
1
Press the MD button.
2
Load a MiniDisc into the MD compartment,
label side up.
3
Press the MD ()
button to start play-
back.
4
4
If trouble occurs
When this product is subjected to strong external inter-
ference (mechanical shock, excessive static electric-
ity, abnormal supply voltage due to lightning, etc.) or if
it is operated incorrectly, it may malfunction.
If such a problem occurs, do the following:
1. Set theunittothe stand-by modeandturn the power
on again.
2. If the unit is not restored in step 1, unplug and plug
in the unit, and then turn the power on.
Note:
If neither operation above restores the unit, clear all
the memory by resetting it.
Clearing all the memory (reset)
1. Press the ON/STAND-BY button to enter the power
stand-by mode.
2. Whilst pressing down the PRESET button and
theDISPLAY(DEMO) button, presstheON/STAND-
BY button.
After the “RESET” is displayed for about 1 second,
the power will be turned off.
Caution:
This operation will erase all data stored in memory in-
cluding clock, timer settings, tuner preset, and CD or
MiniDisc programme.
Maintenance
Cleaning the CD pickup lens
Do not touch the laser pickup lens. If fingerprints or
dust accumulate on the pickup, clean it gently with
a dry cotton swab.
Listening to the Radio
1
Press the TUNER (BAND) button until “FM”
or “ AM” appears on the display.
2
Press the TUNING ( or ) button on the
remote control to tune in to the desired sta-
tion.
Manual tuning:
Press the TUNING button as many times as re-
quired to tune in to the desired station.
Auto tuning:
When the TUNING button is pressed for more
than 0.5 seconds, scanning will start automati-
cally and the tuner will stop at the first receiv-
able broadcast station.
To receive an FM stereo transmission:
Press the TUNER (BAND) button to display “ST”.
“ ” will appear when an FM broadcast is in stereo.
FM Stereo mode indicator
FM Stereo receiving indicator
All manuals and user guides at all-guides.com
all-guides.com

MD-E9000H
– 12 –
DISASSEMBLY
Figure 12-3
Figure 12-1
1 Side Panel 1. Screw................. (A1) x6 12-1
2. Screw................. (A2) x2
2 Top Cabinet with 1. Screw................. (B1) x6 12-1, 3
Rear Cabinet 2. Flat Cable .......... (B2) x2 12-2
3. Socket................ (B3) x2
3 Rear Panel/Aux 1. Screw................. (C1) x6 12-2
Input PWB with 2. Socket................ (C2) x2
Fan Motor
4 Main PWB 1. Screw................. (D1) x2 12-2
2. Flat Cable ..........(D2) x1
3. Socket................ (D3) x3
4. Hook .................. (D4) x2
5 Tuner PWB 1. Screw................. (E1) x3 12-3
2. Bracket .............. (E2) x1
6 Power Amp. PWB 1. Screw................. (F1) x3 12-3
2. Socket................ (F2) x1
7
MD Mechanism Unit
1. Screw.................(G1) x3 12-3
8 CD Servo PWB 1. Screw.................(H1) x3 13-1
(Note) 2. Socket................ (H2) x4
9 Display PWB 1. Screw................(J1) x10 13-1
2. Socket.................(J2) x1
10 Rear Cabinet 1. Screw................. (K1) x2 13-2
11 CD Lid Open/Close 1. Screw................. (L1) x4 13-2
PWB with CD Lid 2. Cam Plate.......... (L2) x1
Gear Unit Ass'y 3.
CD Lid Lever B ....
(L3) x1
12 LED PWB 1. Screw................ (M1) x1 13-2
13 CD Mechanism 1. Screw.................(N1) x4 13-2
14 MD Mechanism/ 1. Screw................. (P1) x4 13-3
MD Main PWB 2. MD Mechanism Holder
............................... (P2) x2
3. Screw................. (P3) x8
4. Flat Cable .......... (P4) x1
5. Socket................ (P5) x1
6. Flexible PWB..... (P6) x1
STEP REMOVAL PROCEDURE FIGURE
MD-E9000H
Note:
After removing the connector for the optical pickup from the
connector, wrap the conductive aluminium foil around the
front end of connector remove to protect the optical pickup
from electrostatic damage.
Figure 12-2
MD-E9000H
Caution on Disassembly
Follow the below-mentioned notes when disassembling
the unit and reassembling it, to keep it safe and ensure
excellent performance:
1. Take compact disc and minidisc out of the unit.
2. Be sure to remove the power supply plug from the wall
outlet before starting to disassemble the unit.
3.Takeoff nylonbandsor wire holderswherethey needto
beremovedwhendisassemblingtheunit.Afterservicing
theunit,be sure torearrangethe leadswherethey were
before disassembling.
If the screw of the wrong length is applied on the MD
mechanism unit (screw for mounting parts to the MD
mechanism chassis), it may contact the optical pickup
and cause the unit to malfunction.
4. Take sufficient care on static electricity of integrated
circuits and other circuits when servicing. Side Panel
(Right)
Top Cabinet
Rear
Panel
Rear
Cabinet
Side
Panel
(Left)
(A1)x1
ø3x10mm
(A2)x1
ø2.6x8mm
(A1)x1
ø3x10mm (A2)x1
ø2.6x8mm
(B1)x2
ø3x10mm
(A1)x4
ø3x10mm
(B1)x3
ø2.6x8mm
(C2)x1
(B2)x1
(D2)x1
(B3)x2
(C2)x1
(D3)x1
(B2)x1 Power
PWB
Rear
Panel
(D1)x2
ø3x10mm
Power
Amp.
PWB
(C1)x1
ø3x10mm
Tuner
PWB
Main
PWB
Aux Input
PWB
(C1)x5
ø3x10mm
(D4)x2
(D3)x2
MD Mechanism
Unit
Power
PWB
Power Amp.
PWB
Tuner PWB
(G1)x1
ø3x8mm
(E1)x1
ø3x8mm
(E1)x1
ø3x8mm
(F1)x2
ø3x8mm
(F1)x1
ø3x10mm
(E1)x1
ø3x10mm
(G1)x2
ø3x8mm
(B1)x1
ø3x8mm
(E2)x1 (F2)x1
Lug Wire
All manuals and user guides at all-guides.com

– 13 –
MD-E9000H
Figure 13-1
(H1)x1
ø2.6x10mm
(J1)x10
ø2.6x10mm
(J2)x1
(H2)x2
(H2)x1
(H2)x1
Rear
Cabinet
Top
Cabinet
CD Servo
PWB
Display
PWB
CD Lid
Open/Close
PWB
(H1)x2
ø2.6x10mm
(L1)x2
ø2.6x10mm
(L1)x2
ø2.6x10mm
(K1)x2
ø2.8x10mm
(N1)x4
ø2.6x10mm
(L2)x1 (L3)x1
Rear
Cabinet
CD Mechanism
Top
Cabinet
(M1)x1
ø2.6x8mm
LED PWB
CD Lid Gear
Unit Ass'y
CD Lid
Open/Close
PWB
Figure 13-2 Figure 13-3
(P4)x1
(P5)x1
(P3)x1
ø2x2mm
(P3)x1
ø2x3mm
(P3)x1
ø2x3mm
(P3)x1
ø2x3mm
(P3)x1
ø2x3mm
(P3)x1
ø2x3mm
(P3)x2
ø1.7x3mm
(P1)x2
ø3x6mm
(P1)x2
ø3x6mm
Shield Cover,Top
MD Mechanism
Shield Cover,Side
Shield Cover,Bottom
MD Main PWB
(Note 1)
After removing the flexible PWB for optical pickup from the connector
wrap the front end of flexible PWB in conductive aluminum foil so as
to protect the optical pickup from being damaged electrostatically.
(P2)x1
(P2)x1
(P6)x1
Optical pickup
Flexible PWB (Note 1)
Pull
Pull
All manuals and user guides at all-guides.com

MD-E9000H
– 14 –
1 Front Panel 1. Screw................. (A1) x8 14-1
2. Tip...................... (A2) x4
2 Woofer 1. Screw................. (B1) x4 14-2
3 Tweeter 1. Screw................. (C1) x2 14-2
STEP REMOVAL PROCEDURE FIGURE
CP-E9000H
Figure 14-1
(A1)x4
ø4x20mm
(A1)x4
ø4x20mm
Front Panel
(B1)x4
ø4x12mm
(C1)x2
ø3x10mm
Front Panel
(A2)x2
(A2)x2
Woofer
Tweeter
Figure 14-2
All manuals and user guides at all-guides.com

– 15 –
MD-E9000H
REMOVING AND REINSTALLINGTHE MAIN PARTS
MD MECHANISM SECTION
Perform steps 1 to 4, 7 and 14 of the disassembly method to
remove the MD mechanism. (See page 12 and 13.)
Caution:
After pulling out the optical pickup connector, wrap the end of
the connector in conductive aluminium foil to prevent the
optical pickup from being destroyed by static electricity.
Figure 15-1
Figure 15-2
Figure 15-4 Figure 15-3
MD Mechanism
(A1)x1
ø1.7x5mm
Magnetic Head
Optical Pickup
(B3)x2
ø1.7x3mm
(B1)x1
ø1.7x6mm
MD Loading Motor
MD Loading
Motor PWB
(B2)x2
(B2)x1
(C1)x2
ø1.4x4.5mm
(C1)x1
ø1.4x5mm
Optical
Pickup MD Sled Motor
MD Mechanism
Switch PWB
Washer
(D1)x3
ø1.4x3mm
MD Spindle Motor
How to remove the magnetic head
(See Fig. 15-1)
1. Remove the screw (A1) x 1 pc.
Caution:
Take utmost care so that the magnetic head is not damaged
when it is mounted.
How to remove the MD loading motor PWB/MD
loading motor (See Fig. 15-2)
1. Remove the screw (B1) x 1 pc.
2. Remove the Hooks (B2) x 3 pcs., and remove the MD
loading PWB.
3. Remove the screws (B3) x 2 pcs., and remove the MD
loading motor.
HowtoremovetheMDsledmotor/opticalpickup
(See Fig. 15-3)
1. Remove the screws (C1) x 3 pcs., and remove the MD sled
motor.
2. Remove the optical pickup.
Caution:
Be careful so that the gear is not damaged.
(The damaged gear emits noise during searching.)
How to remove the MD spindle motor
(See Fig. 15-4)
1. Remove the screws (D1) x 3 pcs., and remove the MD
spindle motor.
Caution:
Be careful so that the gear is not damaged.
(The damaged gear emits noise during searching.)
All manuals and user guides at all-guides.com

MD-E9000H
– 16 –
CD MECHANISM SECTION
Perform steps 1, 2, 8 and 13 of the disassembly method to
remove the CD mechanism. (See page 12 and 13.)
Note:
After removing the connector for the optical pickup from the
connector, wrap the conductive aluminium foil around the
front end of connector remove to protect the optical pickup
from electrostatic damage.
How to Remove the CD lid motor
(See Fig. 16-2.)
1. Remove the top cabinet, CD lid open/close PWB and rear
cabinet. (Refer to the disassembly method on page 13.)
2. Remove the screws (B1) x 2 pcs.
3. Remove the CD lid motor.
How to remove the pickup (See Fig. 16-1)
1. Remove the CD mechanism cover, paying attention to the
pawls (A1) x 4 pcs.
2. Remove the screws (A2) x 2 pcs., to remove the shaft (A3)
x 1 pc.
3. Remove the stop washer (A4) x 1 pc., to remove the gear
(A5) x 1 pc.
4. Remove the pickup.
Caution:
Be careful not to damage the gear.
(If the gear is damaged, noise is heard when searching.)
(A2)x2
ø2.6x6mm
(A1)x4
Shaft
(A3)x1
Gear
(A5)x1
Stop Washer
(A4)x1
CD Mechanism Cover
CD Mechanism
Pickup
Figure 16-1
(B1)x2
ø2x4mm
CD Lid Gear
Unit Ass'y
CD Lid Motor
Figure 16-2
All manuals and user guides at all-guides.com
all-guides.com

– 17 –
MD-E9000H
TEST MODE
From power off state to TEST mode
During power off, hold down CD OPEN/CLOSE button and PRESET UP button and then press ON/STAND-BY button.
It will show micom version display. "Y2K1 X.XX"
Press direct button to enter the test mode.
TEST MODE DIRECT KEY
CD CD PLAY
MD DISPLAY MD STOP
KEY X-BASS
TUNER TUNER
RDS TUN SM DISPLAY
Cancelling the TEST mode
To cancel, press ON/STAND-BY button and it will display. "COMPLETE"
MD TEST mode
During power off, hold down EQUALIZER button and PRESET UP button and then press ON/STAND-BY button.
TEST MODE
1. CD test
Outline: It is impossible to read setting value after automatic adjustment (Use for judgement a difference between initial value)
Pickup forcement operation
Move to inner, move to outer, LD ON/OFF
TEST mode entering method
Press CD PLAY button from TEST mode menu.
After enter to CD TEST mode
1) Direct power on at CD function
2) DSP initialize process
3) Transmit command correspond to button input
Validation Button: CD PLAY, CD STOP, SKIP UP, SKIP DOWN, ON/STAND-BY, DISPLAY, VOLUME UP, VOLUME
DOWN
1. CD PLAY : STEP of CD operation
STEP1: CD PLAY button from STOP condition , LD ON
STEP2: CD PLAY button from STEP1, FOCUS ON
STEP3: CD PLAY button from STEP2, CLV SERVO ON
STEP4: CD PLAY button from STEP3, TRACKING SERVO ON
STEP5: CD PLAY button from STEP4, SUB-CODE READING and DISPLAY
* Direct to STEP5 if press CD PLAY button more than 1 sec
2. CD STOP : STOP from PLAY operation (STOP from each STEP)
Return to NORMAL DISPLAY (PARAMETER DISPLAY)
3. SKIP UP : Force pickup to forward direction
4. SKIP DOWN : Force pickup to reverse direction
Slide STOP after PICKUP IN switch ON
5. MD STOP : Access automatic adjustment (Present PICKUP point)
6. ON/STAND-BY : TEST mode cancel
7. DISPLAY : Read parameter register when CD STOP
8. VOLUME UP/DOWN : Normal volume control
Adjustment value reading
Read the following item every DISPLAY button input during stop.
Return to normal display if press CD STOP button.
Item Display RAM Address
Focus gain _ _ F G : × × 0×5C h
Focus offset F O F F : × × 0×9F h
Tracking balance T B A L : × × 0×4D h
Tracking gain _ _ T G : × × 0×5D h
Tracking offset T O F F : × × 0×AF h
RF Levelshift R F L S : × × 31××
Monitor setting value (××) when transmit command 31××
All manuals and user guides at all-guides.com

MD-E9000H
– 18 –
CD PLAY B2 Servo adjustment mode
NORMAL EDIT B4 Recording mode
HIGH EDIT F2 Other mode
MD REC A8 Menu change at each mode
MD PLAY A2 Menu access
MD STOP A7 Menu stop
SKIP UP AA Slide to outer
SKIP DOWN AC Slide to inner
VOLUME UP F3 Adjustment value +1
VOLUME DOWN F4 Adjustment value -1
CD STOP F5 Display change
ON/STAND-BY 1F+D1 MD test mode
LOAD-SW ON B5 Access loading operation
MD EJECT B3 Eject operation
3. MD test mode
a. Communication start after proceed MD reset process
b. Power ON at MD function
c. Transmit command correspond to each button during button input (min 5 transmission)
Display: Display all 10 characters which transmitting from text area by MD command
d. Eject and loading is same as normal operation
e. Change to MD non adjustment mode by ON/STAND-BY button
f. MD no adjustment mode is like procedure below
1) Transmit power off command (1F) to MD
2) Wait until function bit: 00 (POWER OFF) confirmation
3) MD micom reset
4) Transmit non automatic adjustment test mode command (D1) until change to MD mode (E0) after communication start
5) Display 1, 3, 5, 7 segment according to music calender data when MD mode E0
6) Normal operation for next step
Reference
Tocancelnonautomaticadjustmentmode,need todo eitherresetorpowerfailureMDmicom willstart normalmode operation
if not receive non adjustment mode command when recover from power failure.
Button Name Function
Button and command when MD TEST mode
Command
High (double) speed mode
It is possible to change between high speed/normal speed by pressing HIGH EDIT/NORMAL EDIT button during stop.
"HIGH" mark will light up when high speed mode.
Actual operation is just only sending 1 time/2 time speed operation command other is same with normal speed.
When change from high speed to normal speed, it will set normal speed parameter and RF amp.
All manuals and user guides at all-guides.com

– 19 –
MD-E9000H
KEY Segment
5. KEY test (Function: Key and last display)
Function: Key and last display
Power off after lighting up the odd number grids, even numbered grids and lighting up FL pipe segment which corresponded
to KEY until TEST MODE is cancelled.
TEST MODE
LIGHT UP ODD
NUMBERED GRID
1.0 sec TIMER
(WAIT)
1.0 sec TIMER
(WAIT)
LIGHT OFF
KEY INPUT
LIGHT UP EVEN
NUMBERED GRID
KEY INPUT =
"POWER"?
It does the display which was
allocated for the key while each
KEY INPUT was pressed.
NO
YES
POWER OFF.
TEST CANCEL.
Notice: 1. REMOCON input during test mode is invalid.
2. Volume "0"
Segment light up when pressed correspond key
MD EJECT ALL LIGHT UP AUX OVER
SP TUNER ST &
LP2 LP2 CD EJECT TOC
LP4 LP4 VOLUME UP RDS
NORMAL EDIT GROUP VOLUME DOWN PTY
HIGH EDIT HIGH CD STOP TP &
MD REC REC CD PLAY TA
MEMORY MEMORY MD STOP DISC
DISPLAY RANDOM MD PLAY TRACK &
X-BASS BASS SKIP UP EON &
EQUALIZER T-EDIT SKIP DOWN TI & SLEEP
KEY Segment
All manuals and user guides at all-guides.com

MD-E9000H
– 20 –
8. TUNER test
Set TUNER PRESET MEMORY according to below condition for each destination.
Condition
Function : TUNER
Band : FM MONO
Frequency : LOW FREQUENCY
Volume : LAST MEMORY
Preset G-EQ : LAST
PRESET LIST
1 FM 87.50 MHz
2 FM 108.00 MHz
3 FM 90.00 MHz
4 FM 106.00 MHz
5 FM 98.00 MHz
6 AM 522 kHz
7 AM 1620 kHz
8 AM 603 kHz
9 AM 1404 kHz
10 AM 990 kHz
9. RDS test mode 1 (RDS Distination only)
Function: — ASPM Test mode.
— CH4~CH40 will automatically memorize FM STEREO 87.50 MHz.
— CH1~CH3 will be used for this test mode.
Input: During POWER OFF (ECO/DEMO), press TUNER + ON/STAND-BY button.
.
Operation: — POWER ON at Tuner function.
— Press ASPM button to go to ASPM TEST MODE.
— Auto Scan will start from 105.00 MHz until 108.00 MHz.
— It will show the memorized station after sean.
— The test mode will be cancelled if press OTHER KEY first, before press ASPM button.
— After cancelled the test mode, the operation become NORMAL POWER ON according to the button input.
The test mode setting when it starts.
1. Volume : LAST CONDITION
2. Preset G-EQ : LAST CONDITION
3. X-Bass : LAST CONDITION
4. Function : TUNER
5. Band : FM STEREO
6. Frequency : 106.50 MHz
All manuals and user guides at all-guides.com
Other manuals for MD-E9000H
3
This manual suits for next models
1
Table of contents
Other Sharp Stereo System manuals

Sharp
Sharp XL-3000H User manual

Sharp
Sharp CD-G20000 User manual

Sharp
Sharp QT-CD131H User manual

Sharp
Sharp SD-EX220H User manual

Sharp
Sharp XL-DV75H User manual

Sharp
Sharp CD-BK250W User manual

Sharp
Sharp CD-XP500 User manual

Sharp
Sharp CD-MP700 User manual

Sharp
Sharp XL-55H User manual

Sharp
Sharp XL-ES5 User manual

Sharp
Sharp XL-MP8H User manual

Sharp
Sharp XL-E80 User manual

Sharp
Sharp CD-BA1300H User manual

Sharp
Sharp GX-M10H User manual

Sharp
Sharp MD-M1H User manual

Sharp
Sharp XL-DV60 User manual

Sharp
Sharp CD-BK250W User manual

Sharp
Sharp XL-HP888H User manual

Sharp
Sharp CD-SW300 User manual

Sharp
Sharp CD-RW5000 User manual