Sharper Image SI263 User manual

Intelligent
Battery Manager
SI263 Instructions
Read and save these instructions.
SI263 IM 0205v1.indd 1 3/2/05 4:41:02 PM

Dear Sharper Image Customer,
Thank you for your purchase! We appreciate your business very much.
This item was created by Sharper Image Design, our company’s own
product development group. Please accept my personal assurance of your
complete satisfaction with this product’s quality and performance.
We offer generous return privileges and excellent warranties on all
our products.
For more than 25 years, The Sharper Image has shared the fun of
discovering innovative products that make life better and more enjoyable.
We’ve been in business a long time because we are an exciting place to
shop and — just as importantly — we strive to deliver great customer
service that exceeds your expectations.
Enjoy your purchase!
Respectfully,
Richard Thalheimer
Founder, Chairman and Chief Executive Officer
Call 1-800-344-4444 for 24-7 ordering and customer service,
or go to , our complete online store.
SI263 IM 0205v1.indd 2 3/2/05 4:41:06 PM

Table of Contents
Important Safety Precautions .....................................................5
Warnings ...................................................................................6
Personal Safety Precautions ........................................................9
Charging Preparation ...............................................................10
Features ...................................................................................11
Extension Cord Use .................................................................12
Battery Preparation ..................................................................13
Operation ................................................................................14
Charging Battery in the Vehicle ............................................14
Negative-Grounded System (Standard) .................................16
Positive-Grounded System ...................................................17
Charging a Removed Battery ................................................18
Operating Features ..................................................................20
Charge Rate .........................................................................20
Battery Type Button ..............................................................21
General Notes ......................................................................22
Charging Tips .......................................................................23
SI263 IM 0205v1.indd 3 3/2/05 4:41:06 PM

Table of Contents
Maintenance and Care ............................................................24
Troubleshooting .......................................................................25
Statement of FCC Compliance .................................................30
FCC Label Compliance Statement ............................................31
SI263 IM 0205v1.indd 4 3/2/05 4:41:06 PM

WARNING - RISK OF EXPLOSIVE GASES
WORKING IN THE VICINITY OF A LEAD-ACID BATTERY IS
DANGEROUS. BATTERIES GENERATE EXPLOSIVE GASES
DURING NORMAL OPERATION. FOR THIS REASON, IT IS
IMPORTANT TO ALWAYS READ THIS MANUAL BEFORE USING
THE INTELLIGENT BATTERY MANAGER AND FOLLOW THE
INSTRUCTIONS EXACTLY.
To reduce risk of battery explosion, follow these instructions and
those published by battery manufacturer and the manufacturer
of any equipment you intend to use in the vicinity of the bat-
tery. Review cautionary markings on these products and on the
engine.
SAVE THESE INSTRUCTIONS — This manual contains important
safety and operating instructions.
5
Important Safety Precautions
5
SI263 IM 0205v1.indd 5 3/2/05 4:41:06 PM

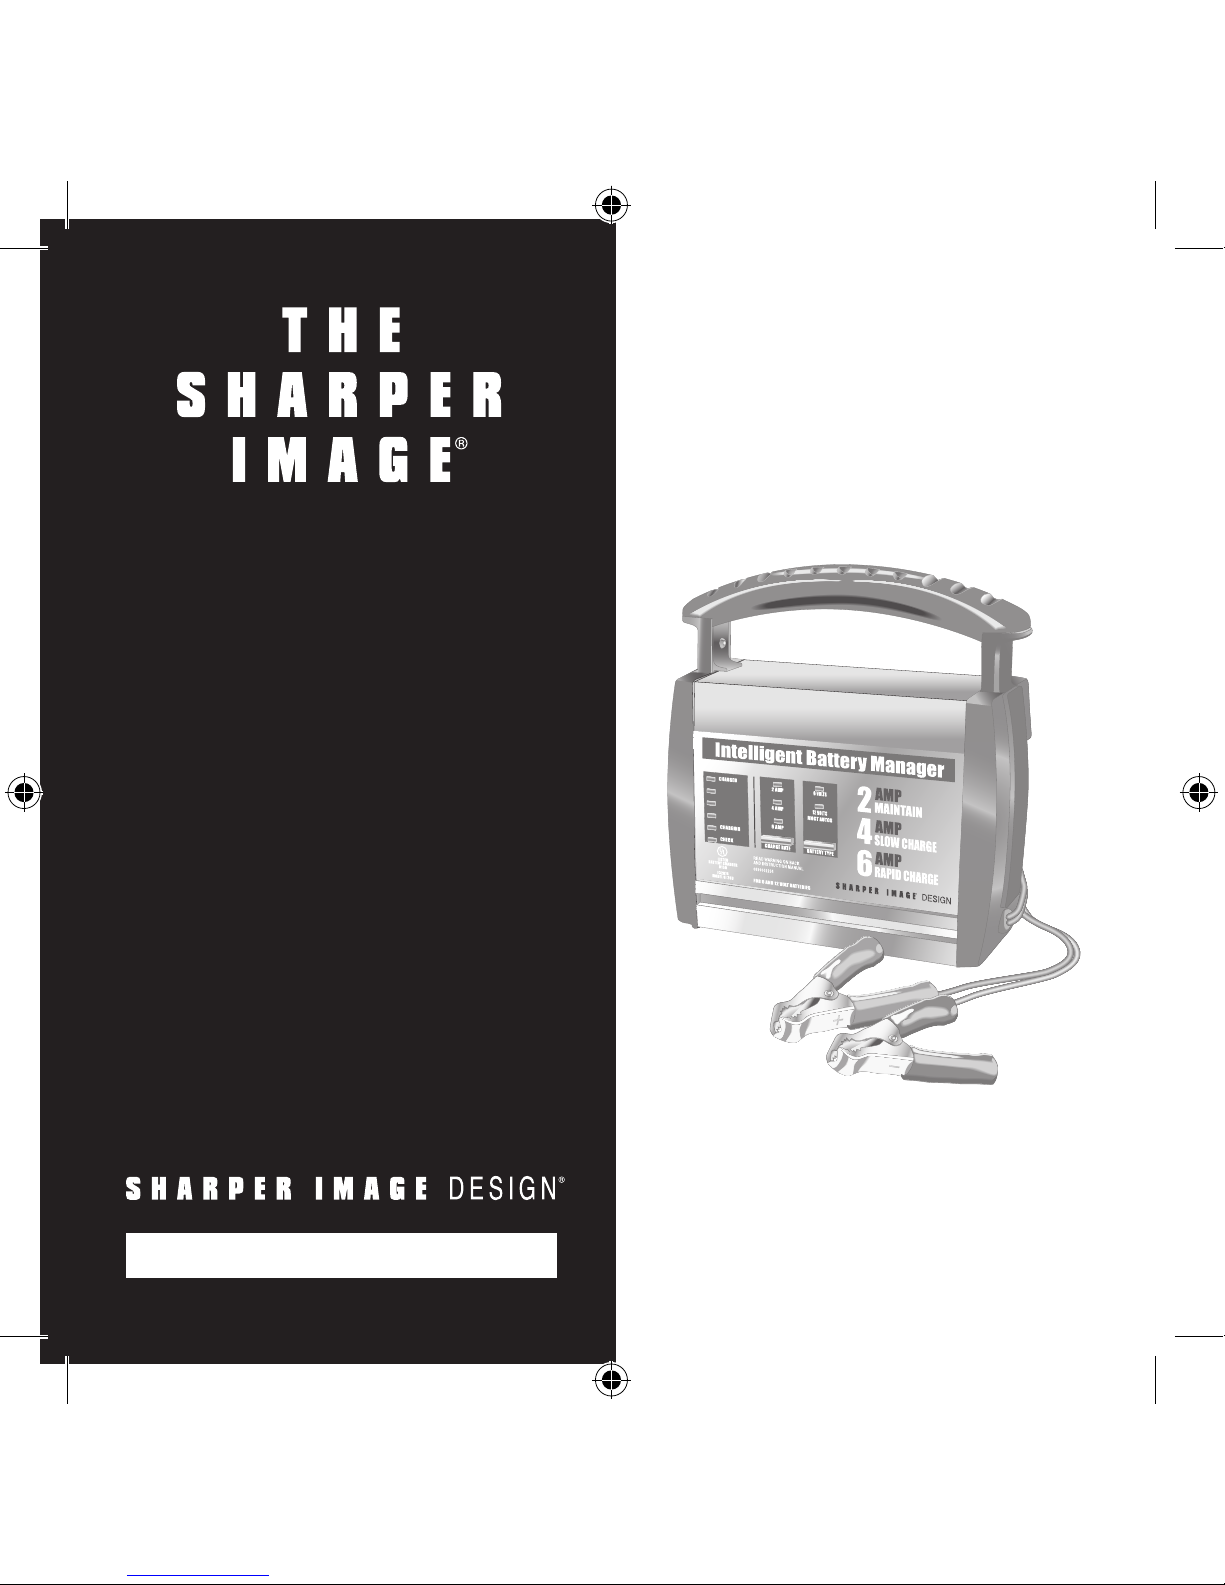
• Read all instructions and cautions printed on the Battery
Manager, battery and vehicle, or equipment using a battery.
• Use the Battery Manager only on lead-acid type rechargeable
batteries, such as those typically used in cars, trucks, tractors,
airplanes, vans, RV’s, trolling motors, etc. The Battery Manager
is not intended to supply power to a low-voltage electrical
system other than in an automotive application.
• Never use the Battery Manager for charging dry cell batteries
that are commonly used in home appliances such as radios,
stereos, remote controls, etc. These batteries may explode
and cause personal injury.
• Do not disassemble the Battery Manager. If service or repair is
required, take the Battery Manager to a qualified service profes-
sional. Incorrect assembly may result in fire or electrical shock.
• To reduce risk of electrical shock, unplug the Battery Manager
from the outlet before attempting any maintenance or cleaning.
• Always charge batteries in a well-ventilated area. The Battery
Manager produces heat during operation and requires proper
ventilation. Air-flow is required around the entire unit.
Warnings
66
SI263 IM 0205v1.indd 6 3/2/05 4:41:07 PM

• Do not set the Battery Manager on flammable materials such
as carpeting, upholstery, paper, cardboard, etc. It may damage
leather, plastic and rubber.
• Place the Battery Manager as far away from the battery being
charged as cables permit.
• Do not expose the Battery Manager to rain or snow.
• Never charge a frozen battery. If battery fluid (electrolyte)
becomes frozen, bring the battery into a warm area and allow
it to thaw before charging begins.
• Never allow battery acid to drip on the Battery Manager when
checking the battery.
• Never set a battery on top of the Battery Manager.
• Never place the Battery Manager directly above the battery
being charged. The gases from the battery will corrode and
damage the Battery Manager.
• Never touch the battery clamps together when the Battery Man-
ager is on. This could cause a spark.
7
Warnings
7
SI263 IM 0205v1.indd 7 3/2/05 4:41:07 PM

• Never operate the Battery Manager if it has received a hard
blow, been dropped or otherwise damaged. Take it to a quali-
fied service professional for inspection and repair.
• Be sure to position the Battery Manager power cord to prevent
it from being stepped on, tripped over or damaged.
• When unplugging the Battery Manager, never pull out the plug
by the cord. Pulling on the cord may cause damage to the cord
or the plug.
• Do not operate the Battery Manager if it has a damaged power
cord or plug. Replace the cord.
Warnings
88
SI263 IM 0205v1.indd 8 3/2/05 4:41:07 PM

• Wear complete eye and clothing protection when working
with lead-acid batteries.
• Ensure someone is within range of your voice in case aid is
needed while working with or near a lead-acid battery.
• Always have plenty of fresh water and soap nearby in case
battery acid gets in your eyes, or on your skin or clothing. If
this occurs, wash with soap and water immediately and get
medical attention.
• When working with a battery, avoid touching your eyes. Acid
particles (corrosion) may get into your eyes. If this occurs, flush
eyes immediately with running cold water for at least 10 min-
utes and get medical attention.
• Remove all personal metal items from your body, such as rings,
bracelets, necklaces and watches, while working with a lead-
acid battery. A battery can produce a short-circuit current high
enough to weld a ring (or similar object) to metal, causing a
severe burn.
Personal Safety Precautions
99
SI263 IM 0205v1.indd 9 3/2/05 4:41:07 PM

• Do not drop any metal tool or metal object onto the battery.
This may result in a spark or short circuit across the battery or
another electrical device that may cause an explosion.
• Always operate the Battery Manager in an open, well-ventilated
area.
• Never smoke or allow a spark or flame in the vicinity of the
battery or engine. Batteries generate explosive gases.
• Before attempting to clean up a battery, neutralize any acid
spills thoroughly with baking soda.
Charging Preparation
Power
The Battery Manager requires a three-prong grounded 120V AC
outlet that meets all local codes and ordinances.
Personal Safety Precautions
10
Grounding Pin Grounding Outlet
10
SI263 IM 0205v1.indd 10 3/2/05 4:41:07 PM

Features
• Charges 6- and 12-volt lead-acid and AGM batteries of all sizes.
• Automatically adjusts charging rate to match battery requirements.
• “Intelligent” microprocessor-controlled circuitry monitors and
self-adjusts to protect batteries from any damage.
• Safely maintains batteries in motorcycles, snowmobiles and
lawn tractors while in long-term storage or between uses.
• Easy-to-read LED indicators display battery charge status.
• Automatic overload and short-circuit protection.
• Electronic push-button controls for selecting charge rate and
battery type.
• Wall-mountable, high-impact, corrosion-resistant molded case.
• 2 amp Maintenance Charge.
• 4 amp Slow Charge.
• 6 amp Rapid Charge.
11
Features
11
SI263 IM 0205v1.indd 11 3/2/05 4:41:07 PM

The use of an extension cord is not recommended. If you must
use an extension cord, please follow these guidelines:
• Ensure the pins on the extension cord plug match the Battery
Manager’s plug exactly (e.g. same number, size, shape, etc.).
• Ensure the extension cord is properly wired and is in good
electrical condition.
• Ensure the wire length and gauge correspond to the AC
ampere rating, as specified in the chart below:
Extension Cord (Minimum Recommended)
Length of Cord (Feet) 25 50 100 150
AWG* Size of Cord 18 16 12 10
*AWG=American Wire Gauge
Extension Cord Use
1212
SI263 IM 0205v1.indd 12 3/2/05 4:41:07 PM

While preparing to charge a battery, read and follow these
guidelines:
1. Ensure you’re working with a 12- or 6-volt lead-acid battery.
To determine the voltage of the battery, refer to the vehicle
owner’s manual or the battery markings. Set the Battery
Manager to the 6V or 12V mode accordingly.
2. Clean the battery terminals. Be careful to keep corrosion from
getting in or around your eyes.
3. Wear safety glasses. (See “Personal Safety Precautions” section
this manual.)
4. Read all of the battery manufacturer’s specific precautions, for
example, removing or not removing vent caps while charging
and recommended rates of charge.
5. To add water to batteries with removable vent caps, carefully
pour distilled water into each cell until battery acid reaches
the level recommended by the manufacturer. This helps purge
excessive gases from the cells. Do not overfill. If the battery is
sealed, with non-removable vent caps, no action is necessary.
Battery Preparation
1313
SI263 IM 0205v1.indd 13 3/2/05 4:41:07 PM

6. Ensure the area around the battery is well ventilated. Gas can
be blown away using a piece of cardboard, or other nonme-
tallic material, as a fan.
7. If it is necessary to remove the battery from the vehicle before
charging, always remove the grounded terminal from the
battery first. Switch off all vehicle accessories to avoid sparks
from occurring.
Note: A marine battery installed in a boat must be removed and
charged on shore.
Operation
Charging Battery in the Vehicle
1. To avoid personal injury, stand clear of all fan blades, belts,
pulleys and other engine parts.
2. To avoid damaging the Battery Manager, keep the power
cord and output cords away from the hood, door and moving
engine parts.
Battery Preparation
1414
SI263 IM 0205v1.indd 14 3/2/05 4:41:07 PM

3. To determine the polarity of the battery posts, check the iden-
tification marks on the battery: POSITIVE (POS, P or +) and
NEGATIVE (NEG, N or -). The positive post is usually marked
red and is larger than the negative post.
4. Identify which battery post is grounded or connected to the
chassis. THIS IS NORMALLY THE NEGATIVE POST.
Charging Battery in the Vehicle
1515
SI263 IM 0205v1.indd 15 3/2/05 4:41:08 PM

1. To connect to a negative-grounded system, attach the red
POSITIVE output clamp to the POSITIVE post of the battery.
Twist the clamp back and forth to ensure a solid electrical
connection is made.
2. Connect the black NEGATIVE output clamp to a heavy, un-
painted metal part of the chassis or engine block, away from
the battery. (See illustration.) DO NOT connect the clamp to
the negative battery post, carburetor, fuel line or sheet metal
part.
3. Plug the power cord into an AC outlet.
4. To select the desired charge rate and battery voltage, press
the appropriate CONTROL BUTTONS: The CHARGING
(yellow) LED illuminates when the charging process begins.
If the CHECK (red) LED illuminates, ensure correct cable
connections.
5. To disconnect the Battery Manager, unplug its power cord
before disconnecting the output clamps. While standing away
from the battery, remove the output clamp from the chassis
or engine block. Finally, remove the output clamp from the
battery post.
Negative-Grounded System (Standard)
1616
SI263 IM 0205v1.indd 16 3/2/05 4:41:08 PM

6. Clean and store the Battery Manager in a dry location.
Positive-Grounded System
1. To connect to a positive-grounded system, attach the black
NEGATIVE output clamp to the NEGATIVE post of the
battery. Twist the clamp back and forth to ensure a solid
electrical connection is made.
2. Connect the red POSITIVE output clamp to a heavy, unpaint-
ed metal part of the chassis or engine block, away from the
battery. DO NOT connect to the positive battery post, carbu-
retor, and fuel line or sheet metal part.
POSITIVE NEGATIVE
BATTERY CHARGER
BATTERY
24", 6 GAUGE
CABLE
POWER
CORD
TO
GROUNDED
POWER
OUTLET
Negative-Grounded System (Standard)
1717
SI263 IM 0205v1.indd 17 3/2/05 4:41:08 PM

Charging a Removed Battery
1. To charge a battery that has been removed from the vehicle,
check the polarity identification marks on the battery post:
POSITIVE (POS, P or +) and NEGATIVE (NEG, N or -). The
positive post is usually marked red and is larger than the
negative post.
2. Attach a 24-inch-long (at least), 6-gauge (AWG), insulated
battery cable to the NEGATIVE (NEG, N or -) battery post.
Twist the clamp back and forth to ensure a solid electrical
connection is made.
3. Connect the POSITIVE (red) output clamp to the POSITIVE
battery post. Twist the clamp back and forth to be sure a
solid electrical connection is made.
4. Position yourself as far away from the battery as possible and
connect the NEGATIVE (black) output clamp to the free end
of the cable.
5. Plug the power cord into an AC outlet.
1818
SI263 IM 0205v1.indd 18 3/2/05 4:41:08 PM

6. To select the desired charge rate and battery voltage, press
the appropriate CONTROL BUTTONS. The CHARGING
(yellow) LED illuminates when the charging process begins.
If the CHECK (red) LED illuminates, check for correct cable
connections.
7. To disconnect the Battery Manager, unplug its power cord
before attempting to disconnect the Battery Manager clamps.
While standing away from the battery, remove the output
clamp from the NEGATIVE battery post. Finally, remove the
output clamp from the POSITIVE battery post.
8. Clean and store the Battery Manager in a dry location.
Charging a Removed Battery
1919
SI263 IM 0205v1.indd 19 3/2/05 4:41:08 PM

Charge Rate
To set the charge rate to one of the following three selections,
press the CHARGE RATE button.
• 2A or 4A CHARGE RATE: Intended for charging small batteries
such as those commonly used in garden tractors, snowmobiles
and motorcycles.
Note: The 2A rate is not intended for use as a trickle charge for
larger batteries.
• 6A CHARGE RATE: For charging automotive and marine batter-
ies. Not intended for industrial applications.
Operating Features
2020
Control Panel
SI263 IM 0205v1.indd 20 3/2/05 4:41:08 PM
Table of contents
Other Sharper Image Batteries Charger manuals
Popular Batteries Charger manuals by other brands

ML Accessories
ML Accessories Knightsbridge SK0015 Installation & maintenance manual

NOCO Genius
NOCO Genius G26000 user guide

AA Portable Power Corp
AA Portable Power Corp CH-L3705 user manual

Sealey
Sealey CP20VMC instructions

Charles
Charles 93-IMC80-A owner's manual

Armstrong
Armstrong 59176 quick start guide