Shelfology Randle Monkey Bar User manual

Randle Monkey Bar
Install Guide
Shelfology
Certied Rad™
Made In The U.S.A.
By Woodworkers, For
Woodworkers_

Required
Tools Optional
Tools
Drill Socket
Wrench
1⁄2" Socket 3⁄16"
Diameter
Drill Bit
Pencil
Stud Finder
Level
Measuring
Tape
Table of Contents Page
Installation Steps 004
Warnings 006
Rad Tips 007
4
GET MORE RADNESS NOW AT SHELFOLOGY.COM_
NEED A HAND? 949.244.1083 // [email protected]_
P.002
Randle Monkey Bar Install Guide
Introduction

What’s In
The Box What You’ll
Need
Randle brings your
kid’s playroom to the
next level with monkey
bars literally anywhere.
Cover your wall or
ceiling with 30+ color
choices of sheer fun.
Monkeys not included.
Made in-house by us
in the United States of
Awesome. Rad!
Randle
Monkey Bar
1x
¼" Lag Screw
4x
Washer
4x
Innate Radness
Done!
P.003
CERTIFIED
RAD™_
MADE IN THE
U.S. OF A.
LIGHTNING FAST
LEAD TIMES_
Randle Monkey Bar Install Guide
Introduction

STUD
STUD
JOIST
JOIST
EXPOSED BLOCKING
STUD
STUD
STUD
JOIST
JOIST
JOIST
BLOCKING
BLOCKING
BLOCKING
BLOCKING
BLOCKING
BLOCKING
BLOCKING
BLOCKING
STUD
STUD
JOIST
JOIST
16" OC
Spacing
Between
Joists
16" OC
Spacing
Between
Studs
Installation
Steps
01A
01B
01C
1B: Hidden wall or ceiling blocking
The use of an electronic stud finder is
recommended to find blocking that aligns
with the mounting holes of the handle.
Install additional blocking as needed to
ensure all monkey bars are completely
backed by blocking.
Before installation can begin, the install
location must be professionally inspected
and prepared with structural support as
outlined in options 1A, 1B or 1C. Choose the
option that best represents your structural
situation and desired aesthetic. User safety is
top priority. Review all warnings on page 6
before continuing!
1A: Hidden wall studs and ceiling joists
with 16" OC (on center) spacing
The use of an electronic stud nder is
recommended to nd studs or joists that
align with the mounting holes of the handle.
If any of the holes are not in alignment with
studs or joists, install hidden blocking (step
1B) or external blocking (step 1C) in your
desired location.
1C: External studs or blocking
If hidden structural elements cannot be
used, this is an easy option to make sure the
monkey bars have ample support and an
accessible mounting surface for the entire
line of monkey bars. You must ensure these
external studs are correctly mounted to the
studs or joists behind your wall or ceiling
before continuing with this option.
GET MORE RADNESS NOW AT SHELFOLOGY.COM_
NEED A HAND? 949.244.1083 // [email protected]_
P.004
Randle Monkey Bar Install Guide
Installation Steps
5–7'
4'
SAFETY PAD
STUD
STUD
STUD
STUD
STUD
STUD
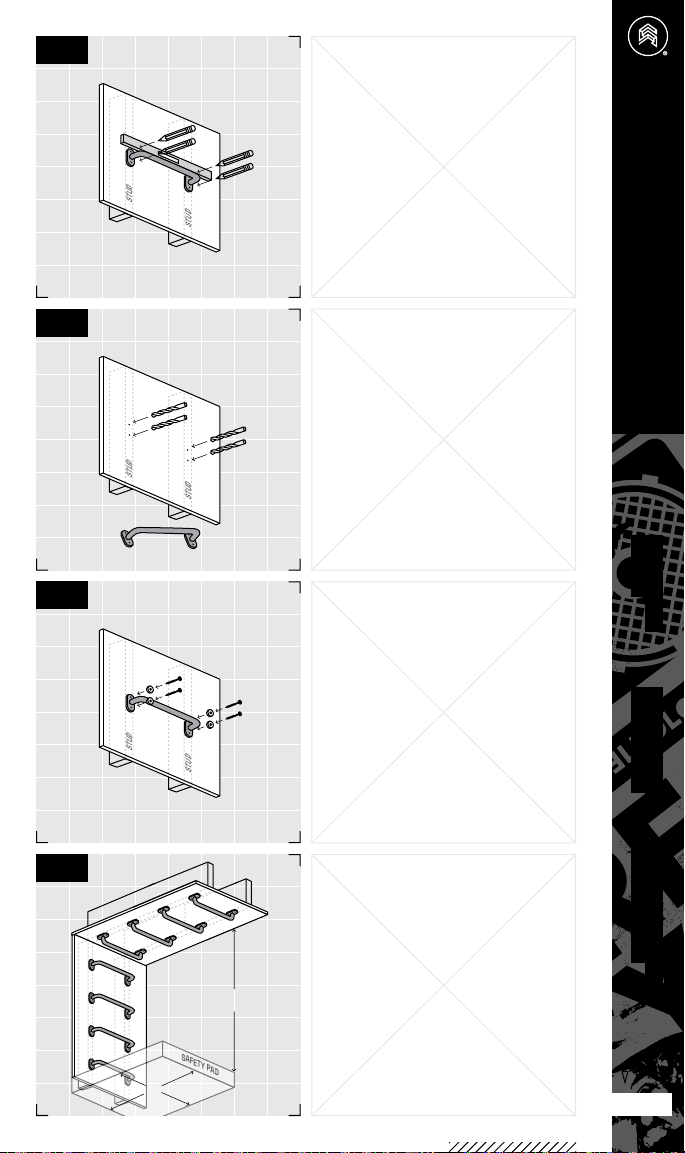
Once the structural support described in
Step 1 has been established, hold the handle
in desired location and mark the center of
each mounting hole location with a pencil.
A bubble level can be used during this step
to ensure straightness.
See Rad Tip ➀ on page 7 about aligning
multiple monkey bars.
Use a ⁄" drill bit to create a pilot hole at
least 1½"deep in the center of the mounting
location before installing lag screws.
Failure to properly drill pilot holes may split
the stud or blocking, resulting in major
structural rework to your wall and monkey
bar project.
Using a socket wrench with a ½" socket,
install a washer and lag screw through each
mounting hole. Do not fully tighten until
each lag screw is in place. Once lag screws
are installed, fully tighten each, checking for
solid engagement between the lag screw
and the blocking or stud/joist.
Inspect your install; be sure each fastener
is securely installed, and check for level.
Repeat all installation steps for additional
handles.
It’s worth mentioning again: safety is priority
one. Read all warnings and rad tips, double
check your work before allowing anyone to
begin climbing.
After you are confident the installation is
complete, stand back and revel in your
childlike glory! You just gained the envy
of third graders everywhere and became
jungle gym royalty.
002
004
003
005
P.005
CERTIFIED
RAD™_
MADE IN THE
U.S. OF A.
LIGHTNING FAST
LEAD TIMES_
Randle Monkey Bar Install Guide
Installation Steps

Warnings
1.1 Monkey bar
hardware must be
correctly installed into
studs, blocking, or
ceiling joists. Failure
to do so may result
in sagging product,
falling objects, or
serious injury. We take
safety seriously. Please
ensure your installation
follows all structural
requirements.
2.1 Wood or composite
sheeting is NOT
structural, and is not
sucient as a handle
mounting surface.
All blocking must be
professionally secured
to permanent wall
studs or ceiling joists.
Provided lag screw
fastener threads must
have at least 1 full
inch of solid thread
engagement into studs
or blocking to avoid
accidental pull out.
3.1 Randle monkey
bars should never be
used without adequate
padding beneath them.
A fall from any distance
can be hazardous or
deadly. Pad thickness
should correspond to
weight, height, and
build of the user, and
the recommendations
of the pad manufacturer
should be strictly
followed. Every eort
to maintain safety
should be considered
when children are the
intended users. Distance
to safety pad should
never exceed 7 feet.
4.1 This product
contains chemicals
known to the State
of California to cause
cancer and birth defects
or other reproductive
harm. Don't eat these
monkey bars. If you live
outside of California,
do whatever you
want. For more boring
information, visit www.
p65warnings.ca.gov.
➁
Anchor Randle
Securely
➂
Use Adequate
Padding
➃
California
Proposition 65
Warning
➀
Correct Install
Required For
Safe Use
Whoa, you made it! We
are vicariously stoking
for you right now. Post
your sweet shele on
Instagram now!
@shelfology
#radshele
Need a hand? Speak with a
Shelf Geek at 949.244.1083 or
hello@shelfology.com today.
How did we do? You’ll get
an email soon asking for a
product review, and we’d be
stoked if you oblige. You rock in
advance!
GET MORE RADNESS NOW AT SHELFOLOGY.COM_
NEED A HAND? 949.244.1083 // [email protected]_
P.006
Randle Monkey Bar Install Guide
Warnings

2.1 For children 2–5
years old, the monkey
bar rungs should be a
height of 5 feet or less
above the surface. For
children 5–12 years
old, the recommended
height is 7 feet above
the surface.
1.1 To align multiple
monkey bars, draw
a vertical line along
adequate studs or
blocking in desired
mounting location.
Then mark fastener hole
locations for desired
number of monkey bars.
Each monkey bar has
two fastener locations,
2⁄" apart. 12"-14"
spacing is
recommended between
each set of fastener
locations.
➀
Aligning
& Spacing
Multiple
Monkey Bars
➁
Ceiling Height
Best Practices
2⁄"
2⁄"
12–14"
≤5' or ≤7'
P.007
CERTIFIED
RAD™_
MADE IN THE
U.S. OF A.
LIGHTNING FAST
LEAD TIMES_
Randle Monkey Bar Install Guide
Rad Tips

Need a hand? Speak with a
Shelf Geek at 949.244.1083 or
hello@shelfology.com today.
How did we do? You’ll get
an email soon asking for a
product review, and we’d be
stoked if you oblige. You rock
in advance!
© Shelfology 2023
Printed In The USA
TM
Table of contents
Other Shelfology Indoor Furnishing manuals


Popular Indoor Furnishing manuals by other brands

Verco
Verco Maya operating instructions

Home affaire
Home affaire LKZ 41629 Assembly instructions

URBAN OUTFITTERS
URBAN OUTFITTERS Arlo Bed Assembly instructions

Studio Designs
Studio Designs HOME ESTRADE 74002 Assembly instructions

Lorell
Lorell 60501 Assembly instructions

Argos
Argos HOME 617/9296 Assembly instructions


Flash Furniture
Flash Furniture ZG-035-GY-GG Assembly instructions

TRICA
TRICA Q-MOT-632 Assembly instructions

Foremost
Foremost A3274 Assembly instruction

CARRARO
CARRARO 1086 manual

Mocka
Mocka Parker Desk Assembly instructions

The Children's Furniture Company
The Children's Furniture Company Jango Hi Sleeper Assembly instructions