Shelldome SH-RO205015 User manual
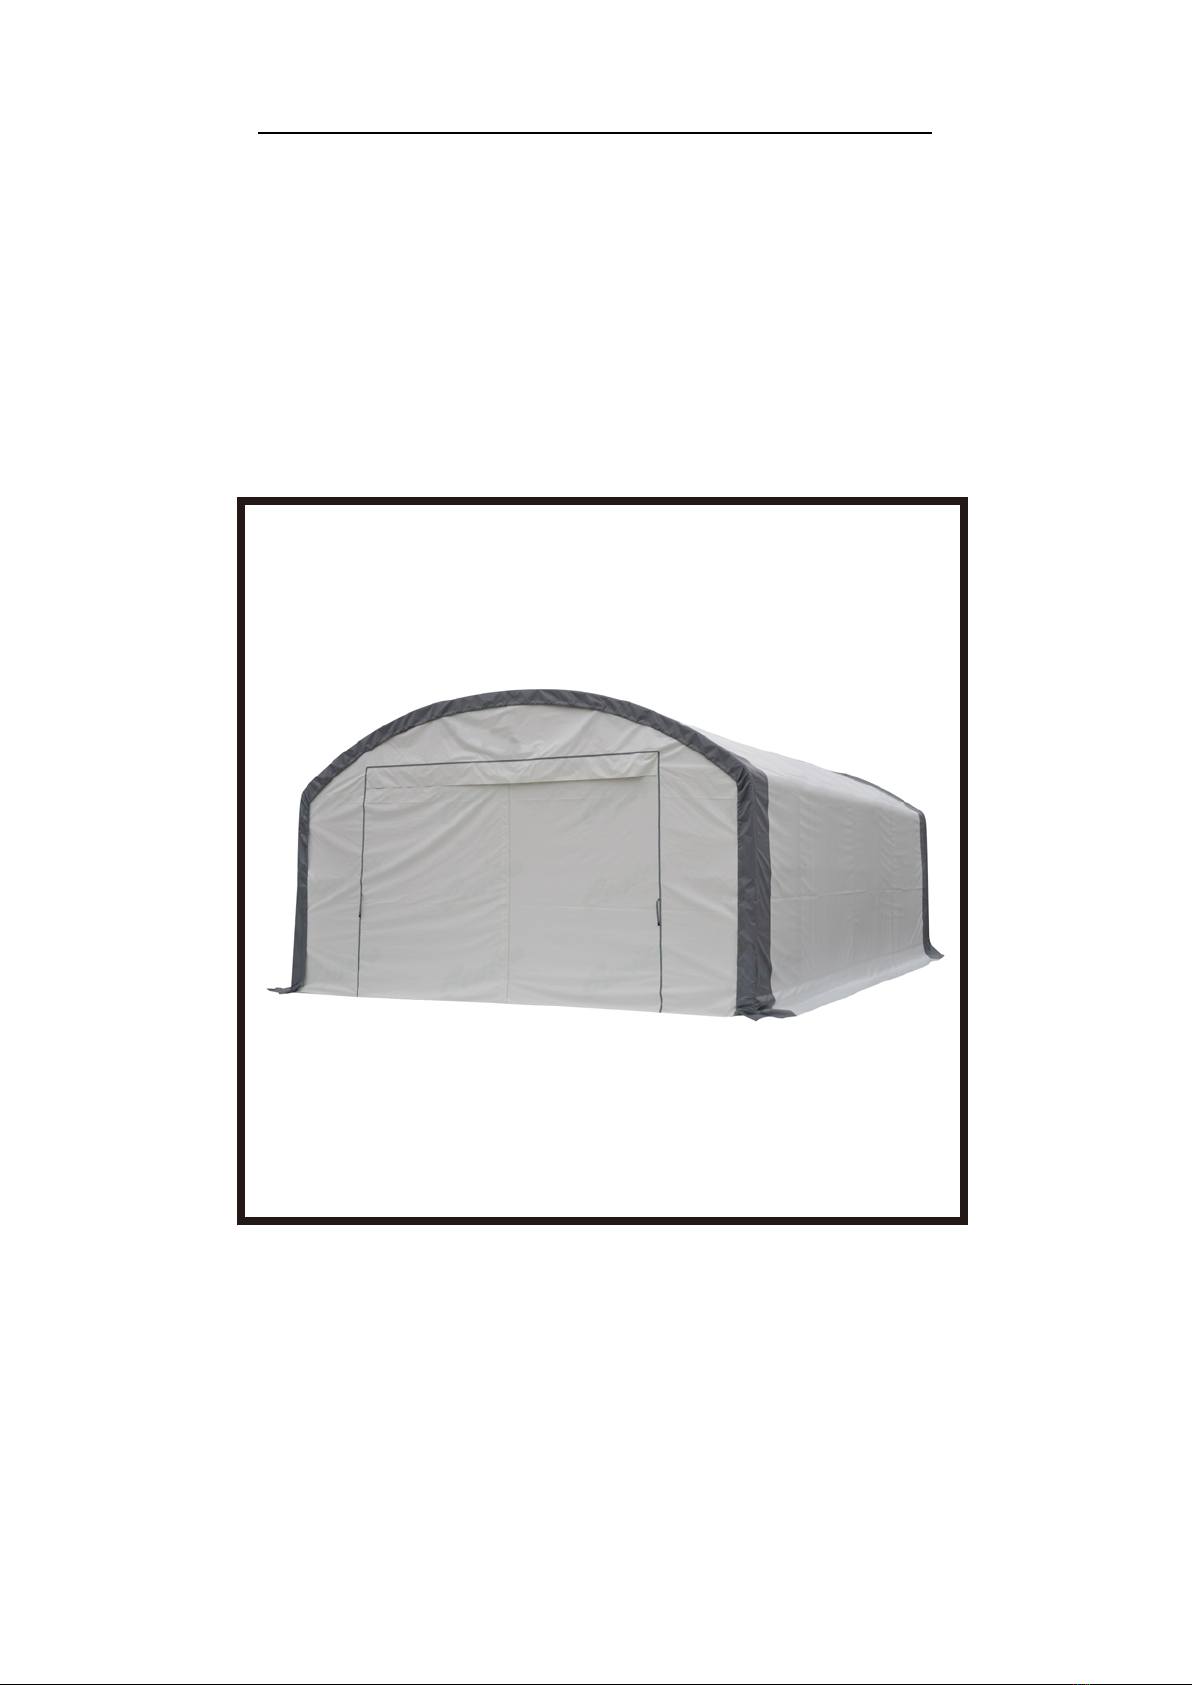
PICTURE MAY NOT REFLECT THE EXACT MODEL
Covering Your World
FABRIC BUILDING INSTRUCTIONS
MODEL:SH-RO205015
W6.1xL15.2xH4.6(m)

WEAR GLOVES
Working with or under heavy parts included with this shelter can cause
serious head injury.
CHECK WITH YOUR LOCAL AUTHORITIES
Underground POWER CABLES or GAS LINES may result in injury while
securing the shelter. It may also result in having to move the building. A
cursory check with the local building authorities will help alleviate these
concerns.
And Now a Few Words About Safety
HEAD PROTECTION IS RECOMMENDED!
TO OUR NEW AND VALUED CUSTOMER
You will be working with metal parts which may have SHARP edges
Thank you for purchasing your new Instant Shelter. We know
you will have as much pleasure owning your new shelter as we had in making
it for you. Our shelters have been designed for rapid assembly and minimal
maintenance. We have rigorous quality control at every step of the shelters
manufacturing process to insure you the best unit money can buy. Our parts
are triple checked prior to packaging to insure you will have everything you
need before you start. In the unlikely event that a part is damaged or missing,
you should immediately contact your place of purchase for a speedy
replacement.
Covering Your World

STORING HAZARDOUS MATERIALS
Check Shelter for co workers before locking up. Always provide for
escape in case of emergency.
Working in and around the portable shelter during severe weather is not
recommended. Serious injury could result. In the event that
extraordinarily severe wind, snow or other severe conditions are
predicted and if time permits, it is recommended that the shelter cover
be removed.
SEVERE WEATHER CONDITIONS
Check all local building codes prior to storing any hazardous material.
Shelter may require additional ventilation to meet local codes.
It is highly recommended that scaffolding, ladders and mechanical
lifting equipment conform to all local building codes when erecting the
shelter. Safety straps and harnesses should be used at all times. The
metal structure of the shelter has not been designed for human weight.
Erecting shelter during wind or rain is unsafe and could result in serious
injury.
PREVENT ENTRAPMENT
Check your local weather forecast prior to planning your building day.
Wind, snow and/or rain may cause unsafe conditions that could lead to
serious injury.
CLIMBING EQUIPMENT
CHECK LOCAL WEATHER CONDITIONS
Covering Your World

UNPACKING & IDENTIFYING PARTS
Prior to assembling your New Portable Shelter, unpack all crates and
complete an inventory of all parts according to the following list and
diagrams
Should the shelter require relocation or disassembly for any reason, it is
strongly recommended that the structure and its cover are thoroughly
inspected prior to rebuilding
PERIODIC SHELTER INSPECTION
SHELTER RELOCATION
PLEASE BE Safety CONSCIOUS!
Common Sense is the knack of seeing things as they are, and doing things as they
ought to be done. Harriet Beecher Stowe
As with all structures, periodic inspection of the cover and all structural
components is highly recommended. Tightening the cover and the
structure will prolong the life of your investment
Covering Your World

1
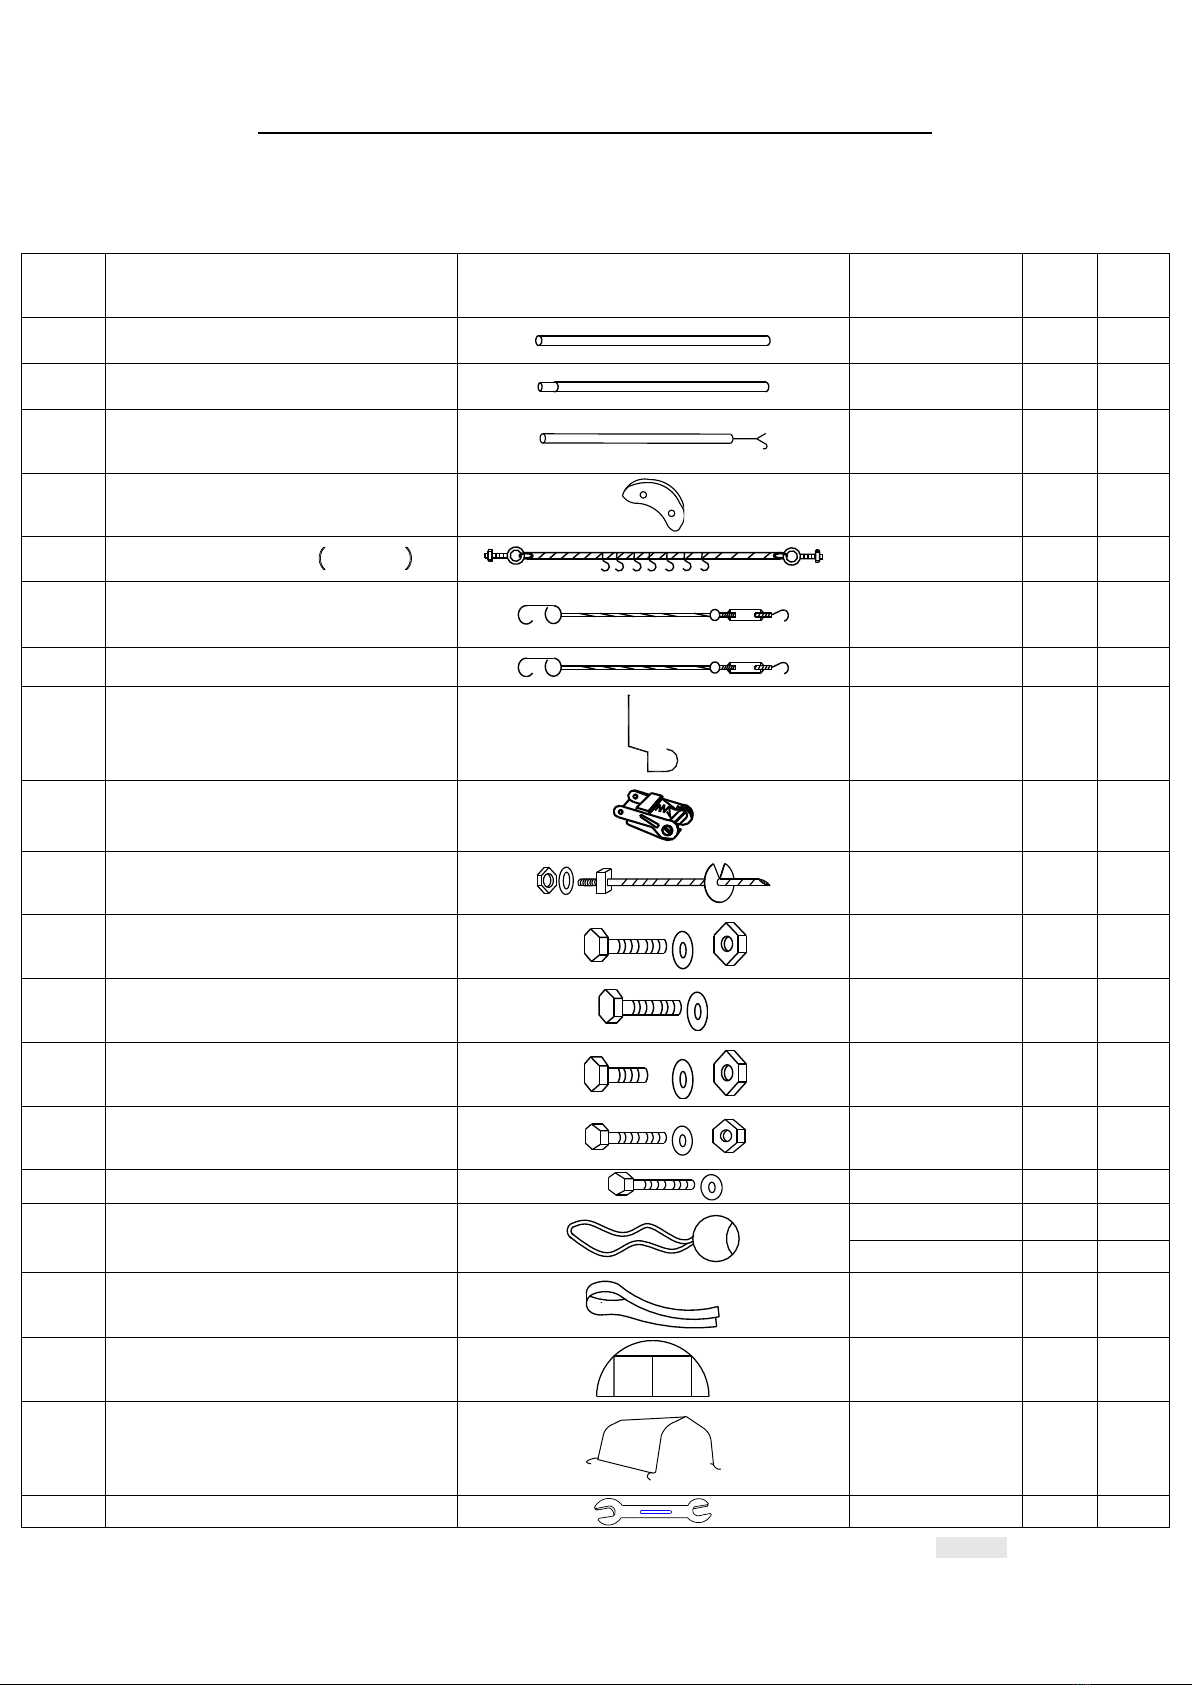
PARTS LIST FOR SH-RO205015
Parts# Descriptions Diagram Dimensions
( in mm ) Q'TY BOX
1 Top roof arched rafter(left)
Φ60x1600 9 1
2 Roof arched rafter
Φ60x1600x1 23 1
3 Lower Roof arched rafter (end)
Φ60x1600 4 1
4 Side upper curved rafter
Φ60x1450 14 1
5 Side upper curved rafter(end)
Φ60x1450 4 1
6 Side vertical rafter(leg)
Φ
60x1800 18 3
7 Inside door vertical tube(lower) Φ60x2000 4 3
8 Inside door vertical tube(upper) Φ60x2035 4 3
9 Upper door cross tube
Φ
60x1800 2 3
10 Upper door cross tube
Φ
60x1800 2 3
11 Side door frame cross support
tube
Φ45x1035 4 3
12 Top and side roof purlin
Φ
45x1838 24 2
13 Purlin
Φ
45x1838 32 2
14 Upper door vertical support Φ60x770 2 3
15 Door frame base rail 90x30x1180 4 3
16 Side base rail(end) 90x30x1980 2 3
17 Side base rail 90x30x1888 14 3
18 Upper door vertical support
connector 2 1
Covering Your World
2
PARTS LIST FOR SH-RO205015
Parts# Descriptions Diagram Dimensions
( in mm ) Q'TY BOX
19 Cover conduit
Φ
25x1935 2 4
20 Cover conduit
Φ
25x1935 14 4
21 Zipper tool(open/close) Φ16x1800 1 4
22 Fixer (for door frame)
30 1
23 Door sliding cable
(
S:14pcs
)
Φ
6x3600 2 1
24 Roof bracing cable kit Φ6x3630 32 1
25 Side wall bracing cable kit
Φ
6x3260 32 1
26 Door sliding cable support hook
2 1
27 Ratchet tie-down 16 3
28 Anchor M16x450 36 3
29 Screw, washer and nut
M8x80 192 1
30 Screw and washer for door
frame and door base rail
M8x80 8 1
31 Screw, washer and nut for
ratchet
M8x15 32 1
32 Screw, washer and nut M8x120 14 1
33 Screws for door base
M8x120 4 1
34 Ball type bungee
Φ5x570
68 1
Φ5x380
72 1
35 Strap band( for ratchet) 25x700 16 1
36 End and door cover
2 4
37 Main cover
1 4
38
Wrench
#12-14 2 1
Covering Your World
3
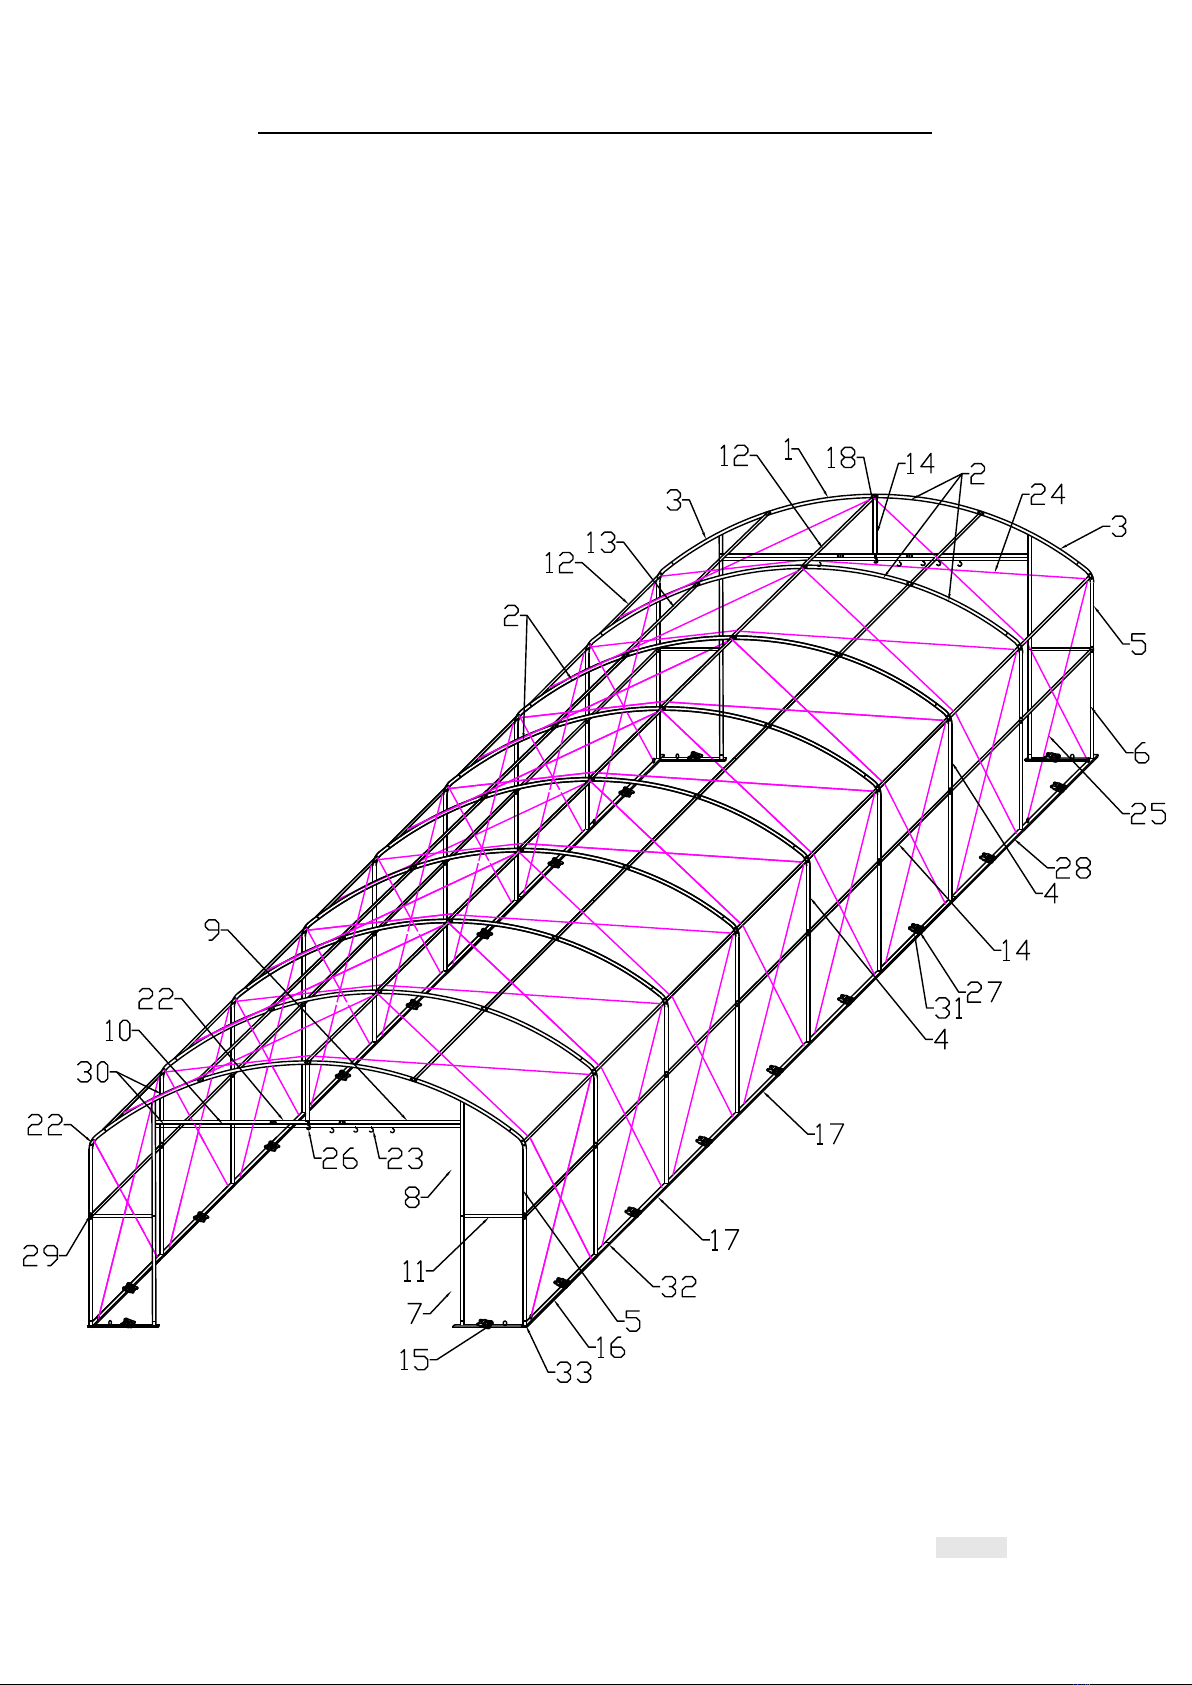
L15.2 x W 6.1x H4.6m SH-RO205015
Covering Your World

4
SH-RO205015 Main Dimension(mm)
Covering Your World
5
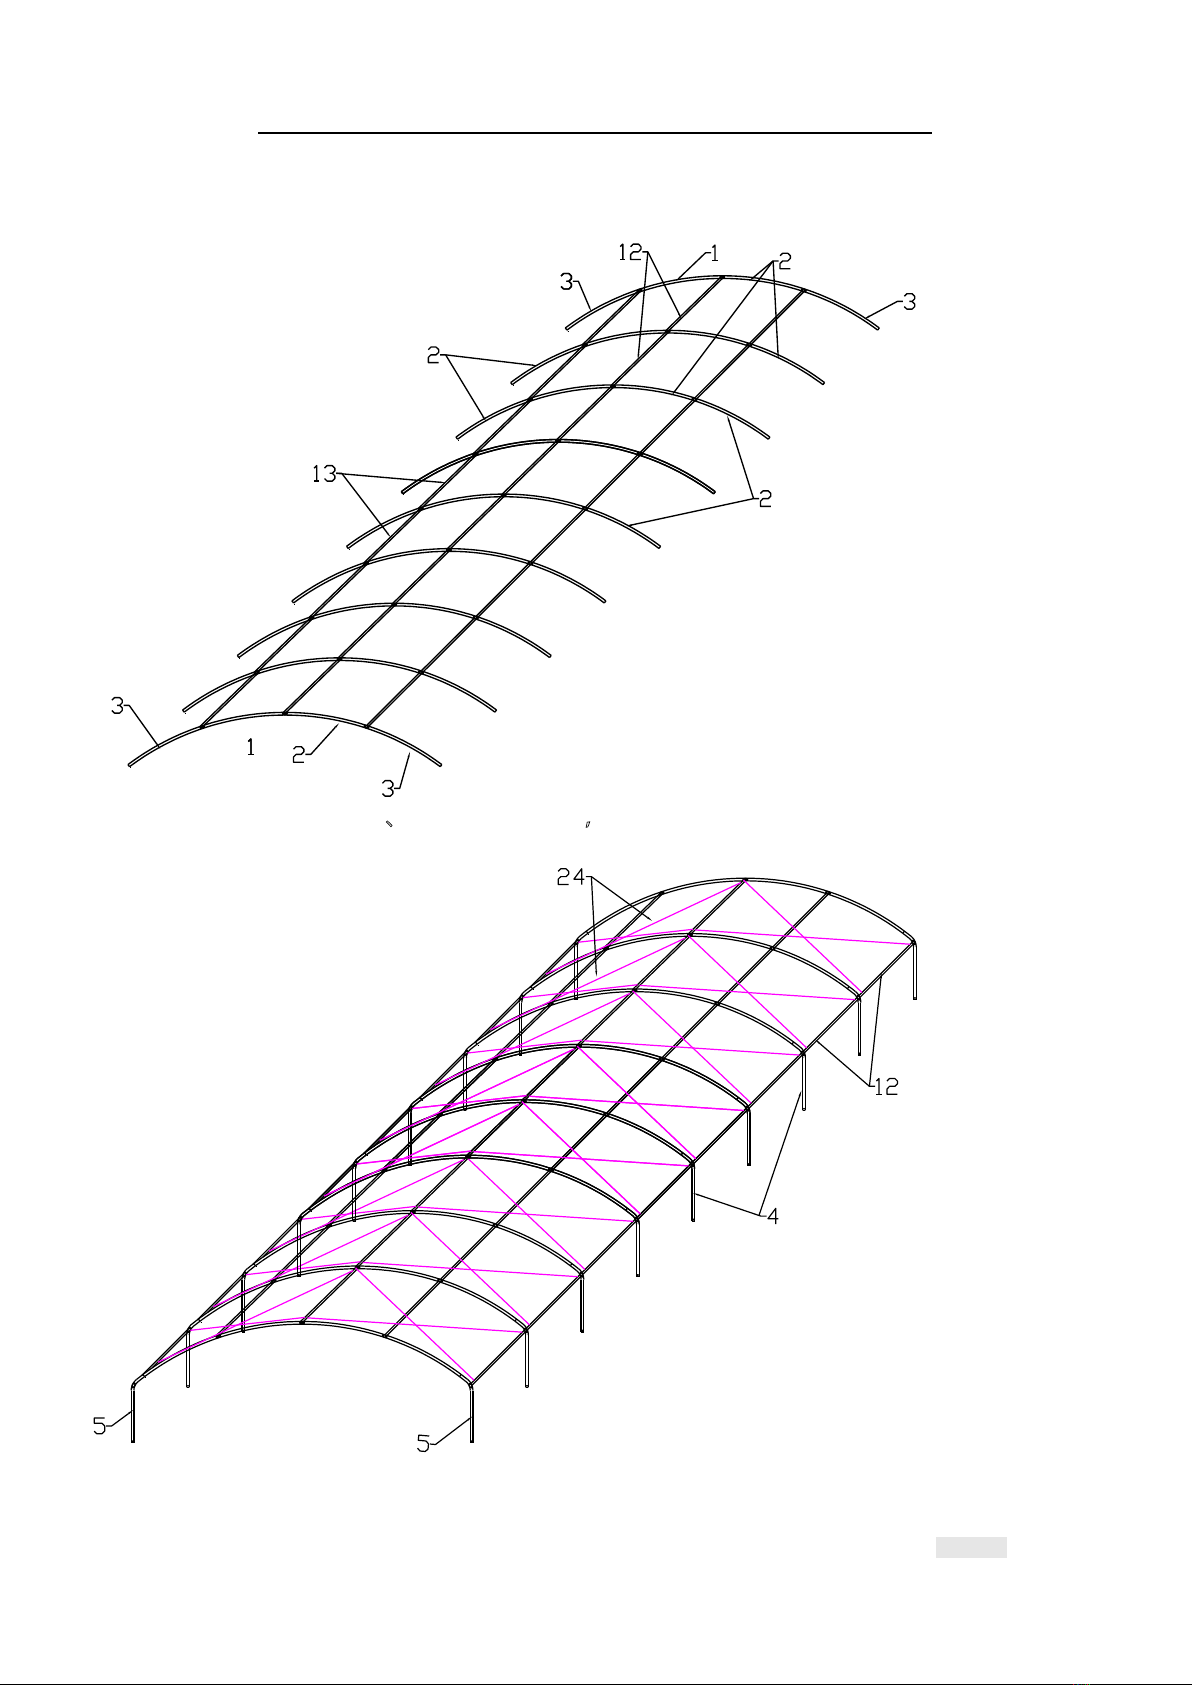
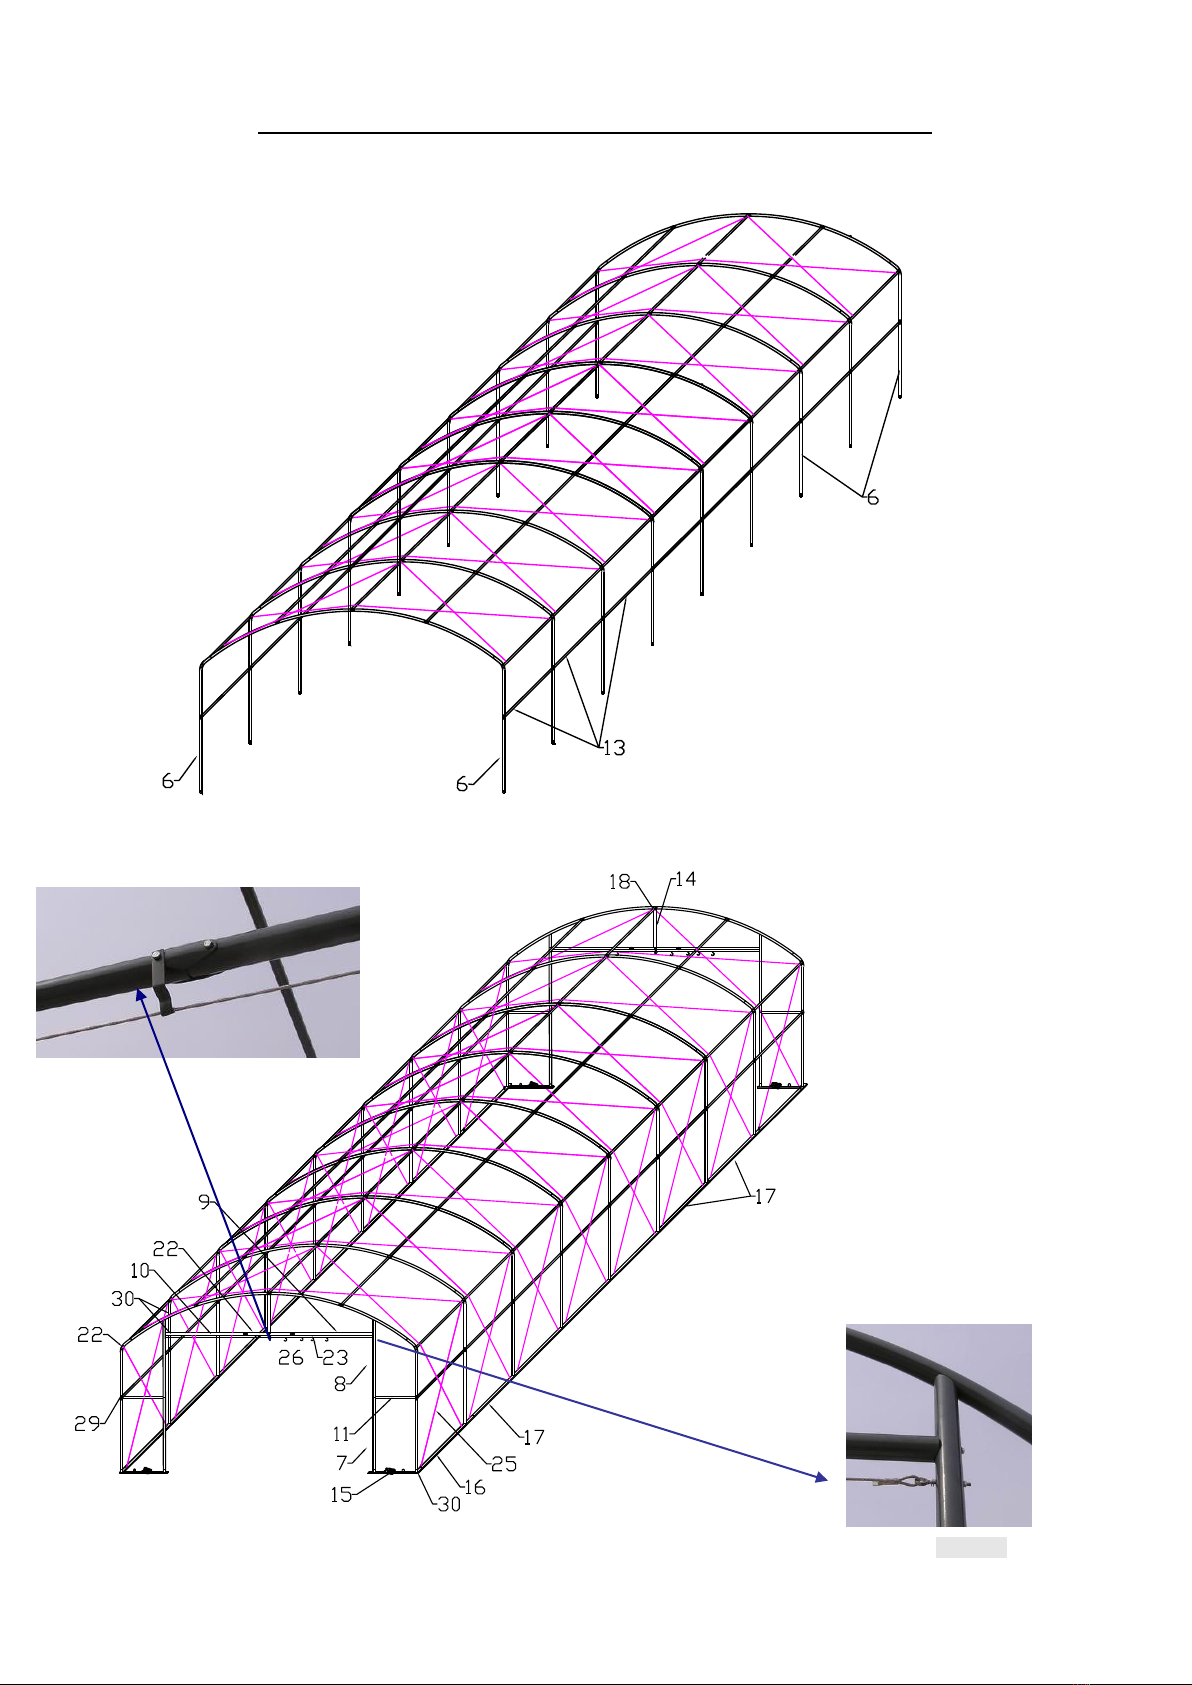
Frame Assembly Steps
Step A : Assemble roof rafter#1,#2 and #3,then connect with purlin#12 and #13
Step B: Install side curved rafter#4、#5 and purlin #12,then brace the roof with cables.
Notice: Apply heavy duct tape on all pipe connections and clamps that may contact the cover.
(tape are not included in the packaging, please buy it on market)
Covering Your World
6
Step C :Install side vertical rafters #6 and connect with purlin.
Step D: Put the base rails #15、#16、#17 in position, put the above frame into base feet. Then
install the door frame as shown below.(fasten each part by screws)
Covering Your World
7
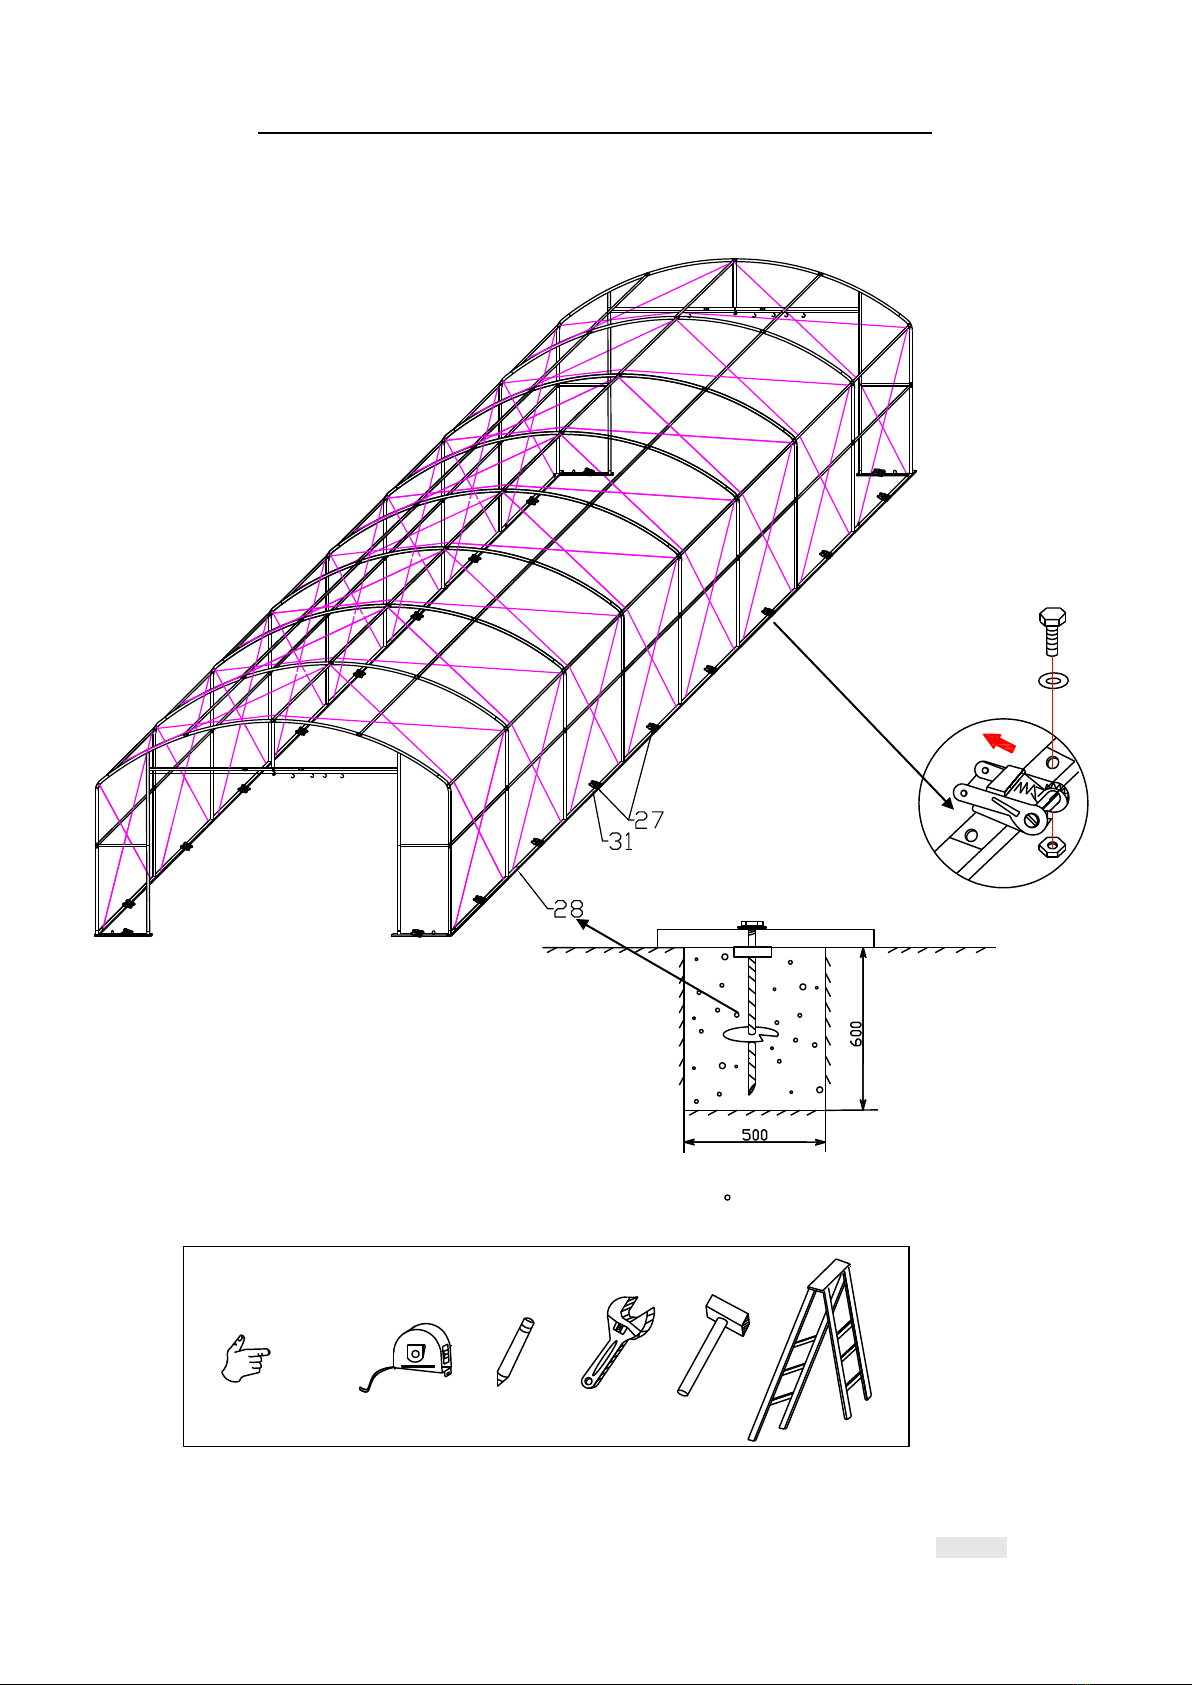
Step E : Install ratchet #27 on base rails with screws#31,fix the base rail on solid ground with
anchor#28.
Tips: The tools below may needed while installing the shelter。
Covering Your World

8
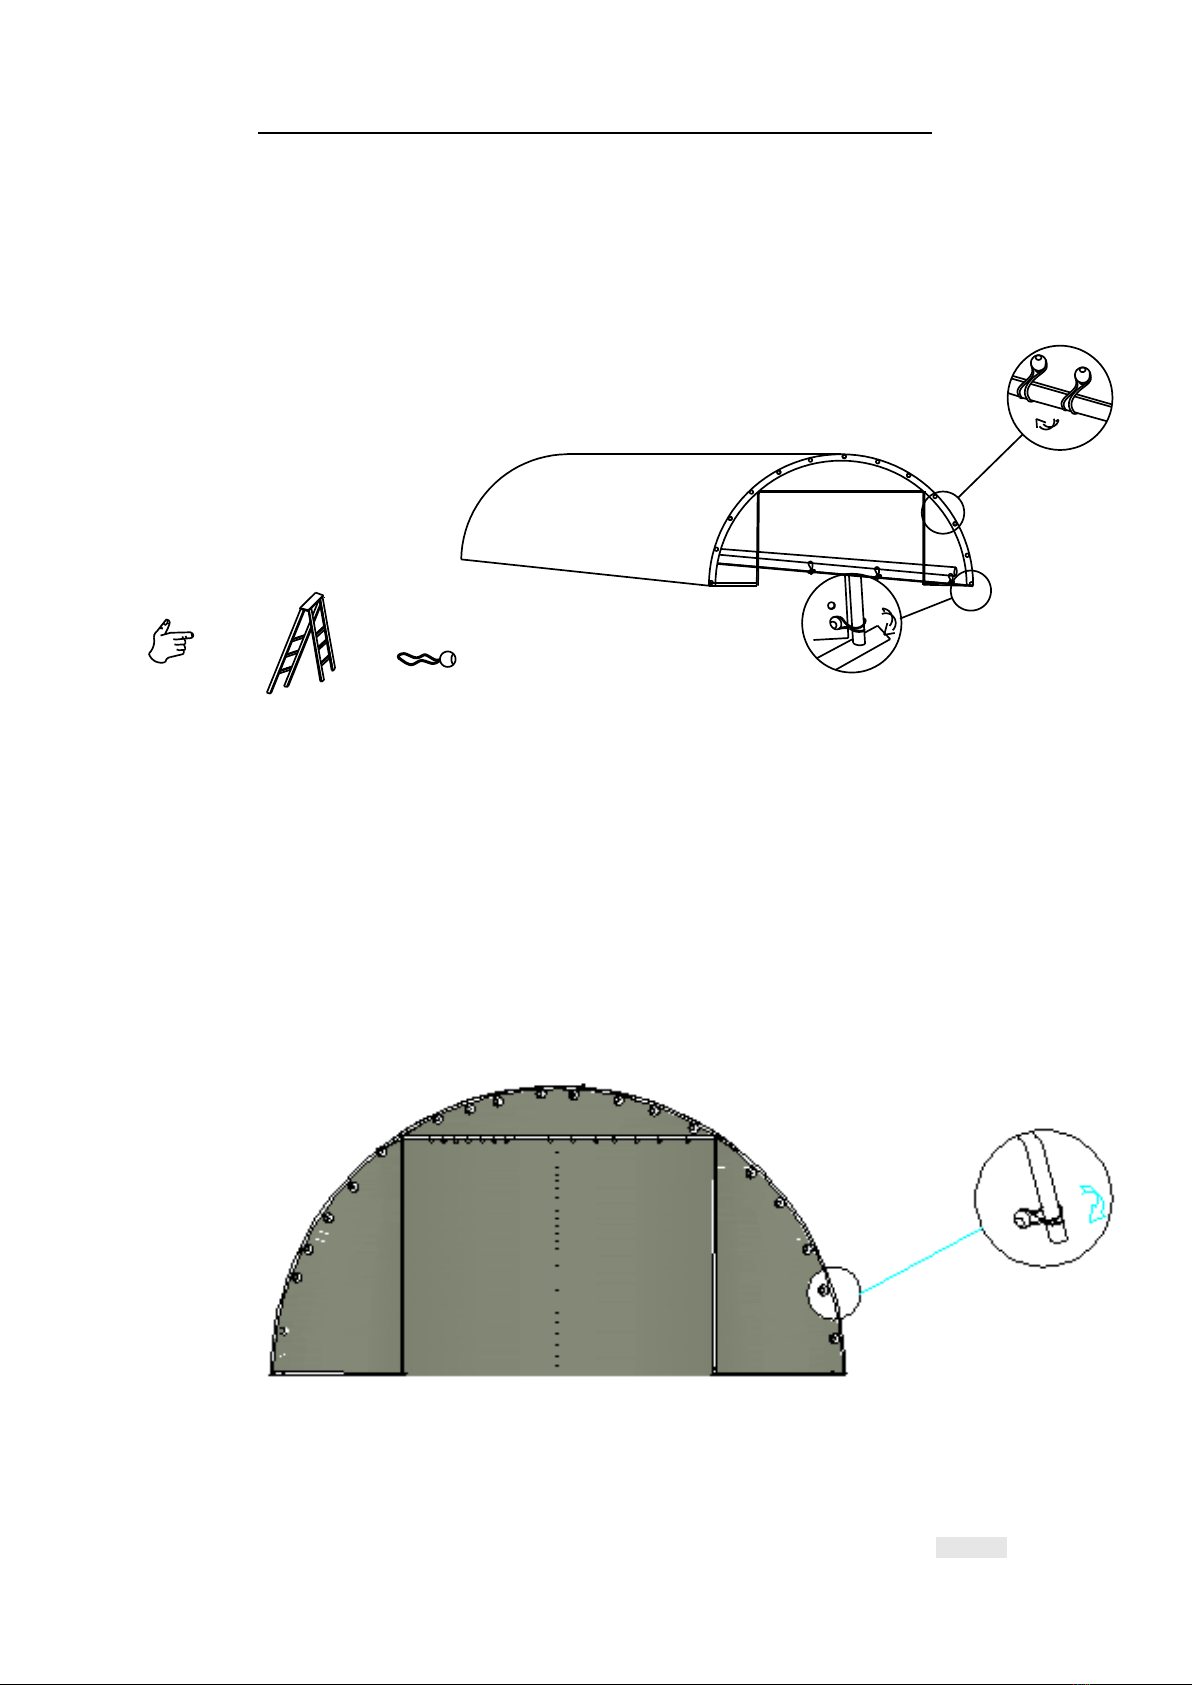
Roof Cover Assembly
TIPS : Slide the roof cover over assembled frame from one side and insert the conduit to
pocket:
#19and#20
#37
Pocket for side wall conduit #35
Ratchet Tie-Down for Tensioning the side wall (roof cover)
Covering Your World
9
#34
Attach door cover to frame with bungee.
#36
TIPS : Secure the ends to frame with bungee and Velcro and
attach the door cover to the doorframe as following :
Covering Your World

10
Attach door cover to frame with Ball Bungee and velcro.
Insert the strap(sewed on cover) through the ring and into the ratchet and tie.
Covering Your World
Other Shelldome Tent manuals


Popular Tent manuals by other brands

Eskimo
Eskimo QUICKFISH Series Assembly and use instructions

Extreme Canopy
Extreme Canopy QUASAR Q8 Series Instructions & Care

Coleman
Coleman 2000004413 Setup instructions

KING CANOPY
KING CANOPY Event Tent 20ft x 20ft Assembly instructions

Coleman
Coleman Instant up 6P Gold Series Setup instructions

Crivit Outdoor
Crivit Outdoor 96716 instruction manual

Ozark Trail
Ozark Trail W784.1 Assembly instructions and owner's manual

Rhino-Rack
Rhino-Rack SUNSEEKER II Fitting instructions

paramondo
paramondo Faltpavillon Quick and Easy installation instructions

Burton
Burton BIG AGNES X quick start guide

Vango
Vango GALAXY Pitching instructions

toolport
toolport PT-L2-Q2 Assembly instructions


