SHENZHEN FANHAI SANJIANG ELECTRONICS JB-QBL-9116E User manual

I
JB-QBL-9116E
Fire Alarm Control Panel
USER’S MANUAL
SHENZHEN FANHAI SANJIANG ELECTRONICS CO.,LTD.
Address: Floor 3, Guangcai Xintiandi Mansion, Nanshan
Avenue, Nanshan District, Shenzhen, China
Post code: 518054
Tel: +86 (755) 86226969
Fax: +86 (755) 86223939
Service Hotline: 400-7700-119
Website: www.fhsjdz.com
Fanhai Sanjiang

Version: 5066160421
Preface
JB-QBL-9116E fire alarm control unit is a new generation of intelligent and integrated fire
alarm and linkage control unit designed by Shenzhen Fanhai Sanjiang Electronics Co., Ltd. The
company strictly follows the requirements and spirit of GB 4717-2005 Fire Alarm Control Unit and
refers to related requirements in EN 54-2 and EN 54-4, combining with sufficient surveys of fire
protection market requirements and years of experience in fire engineering projects in the fire
industry.
The fire alarm control unit is of modular design and features with powerful functions,
outstanding cost performance and other advantages. The system is equipped with 7"color LCD
and a dedicated mini-printer as standard, which can print English character information of all
alarms, faults and various operations. It has the capabilities of comprehensive field programming
and solving complex linkage relation setup. It imitates Windows operation interface, which is easy
to learn and use, and to enter English characters. The maximum capacity of a single equipment
reaches 5184 bus alarm points.
JB-QBL-9116E intelligent two-bus alarm linkage control unit may be connected (as required)
to intelligent fire detectors, input modules, output modules and multi-wire linkage units produced
by the company, thus forming a fire alarm system integrated with alarm and linkage, bus and
multi-wire, so as to satisfy the requirements of fire engineering.
(Thank you for selecting the quality product produced by
SHENZHEN FANHAI SANJIANG ELECTRONICS CO.,LTD!)
Please be sure to read this user’s manual carefully before using
and operating the equipment. After debugging and acceptance, this
user’s manual should be taken charge of by a special person and be
kept properly for future reference!

I
Contents
Chapter 1 System Overview....................................................................................................................... 1
1.1 System introduction.........................................................................................................................1
1.2 System features............................................................................................................................... 1
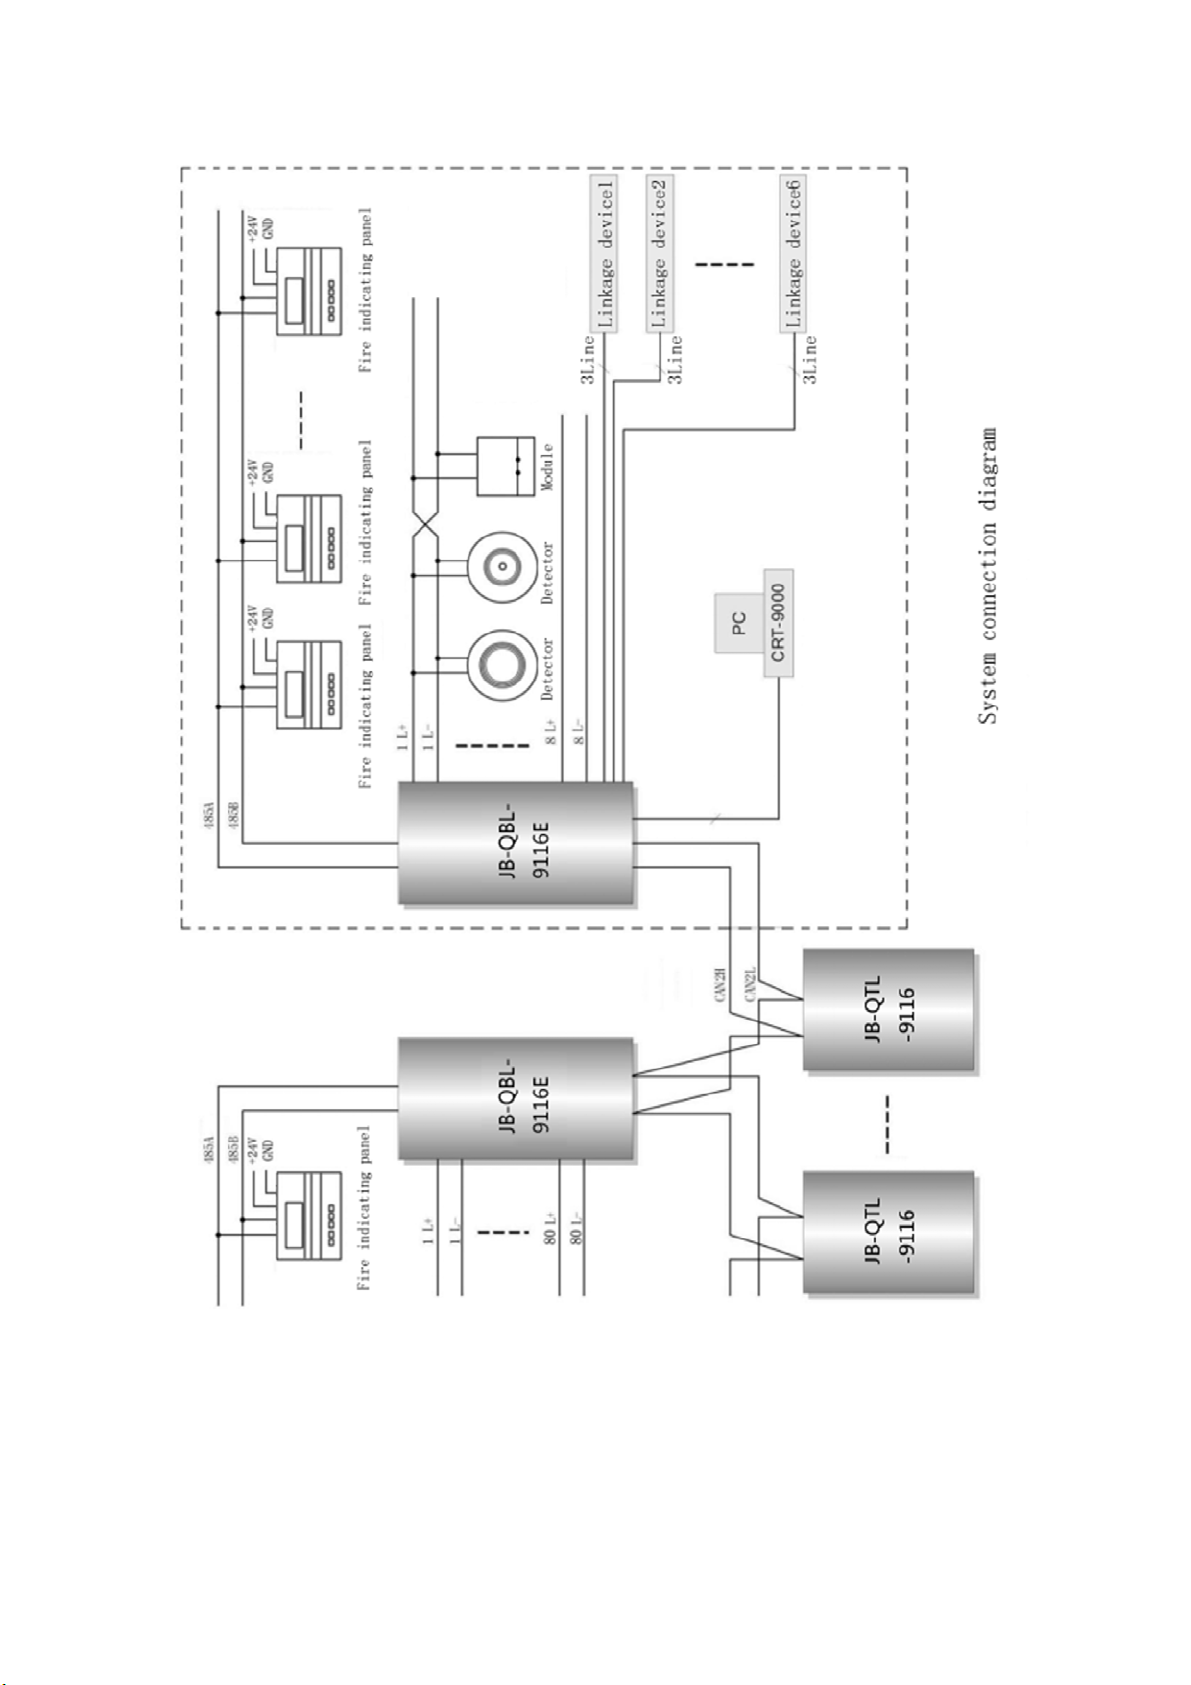
1.3 System connection diagram.......................................................................................................... 2
1.4 Introduction to system equipments...............................................................................................2
1.5 Technical parameters of system products................................................................................... 3
1.5.1 Power supply.........................................................................................................................3
1.5.2 System operating environment.......................................................................................... 3
1.5.3 Peripheral equipment.......................................................................................................... 3
Chapter 2 Engineering Installation and Dimension of the System....................................................... 4
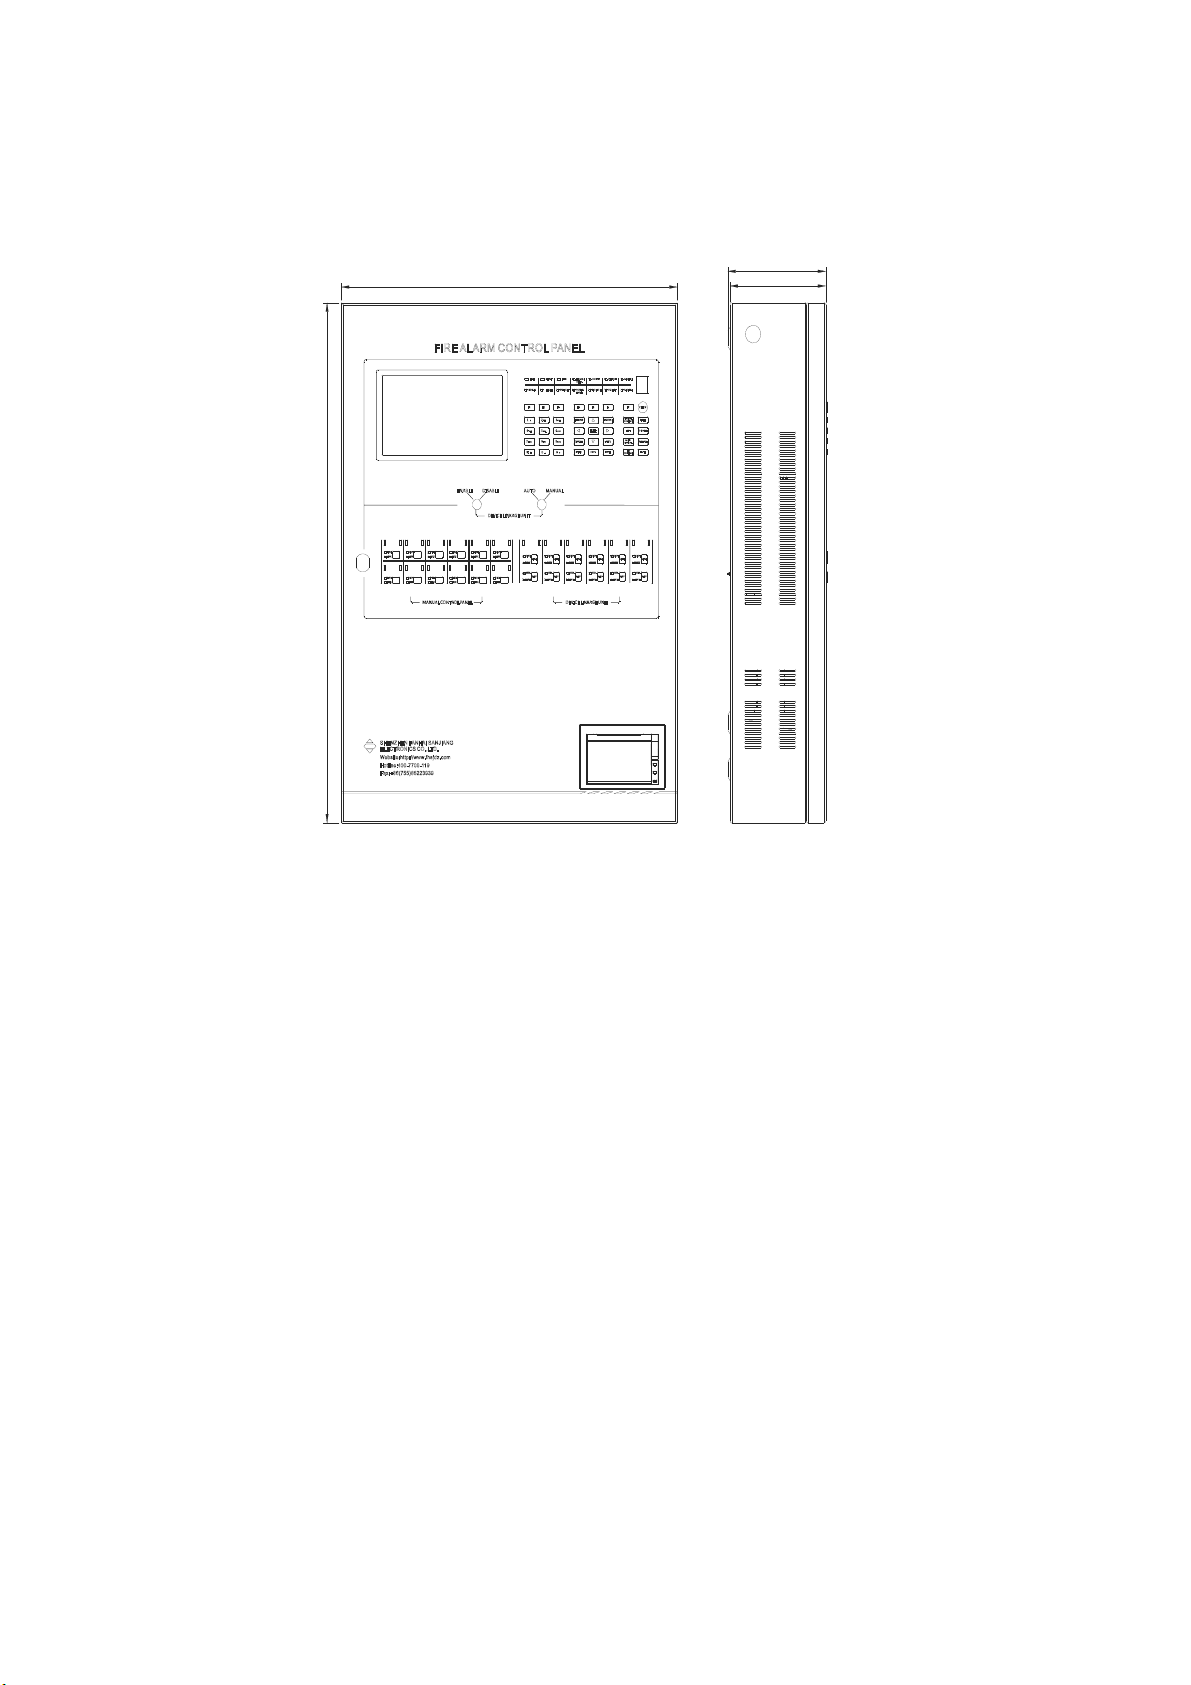
2.1 Outline and dimension diagram of products............................................................................... 4
2.2 System installation...........................................................................................................................4
2.2.1 Items check........................................................................................................................... 4
2.2.2 Check of engineering configuration.................................................................................. 4
2.2.3 Check and connection of external equipment.................................................................4
2.2.4 Power-on test........................................................................................................................4
Chapter 3 System Debugging and Use.....................................................................................................5
3.1 System debugging.......................................................................................................................... 5
3.2 System operating instructions.......................................................................................................5
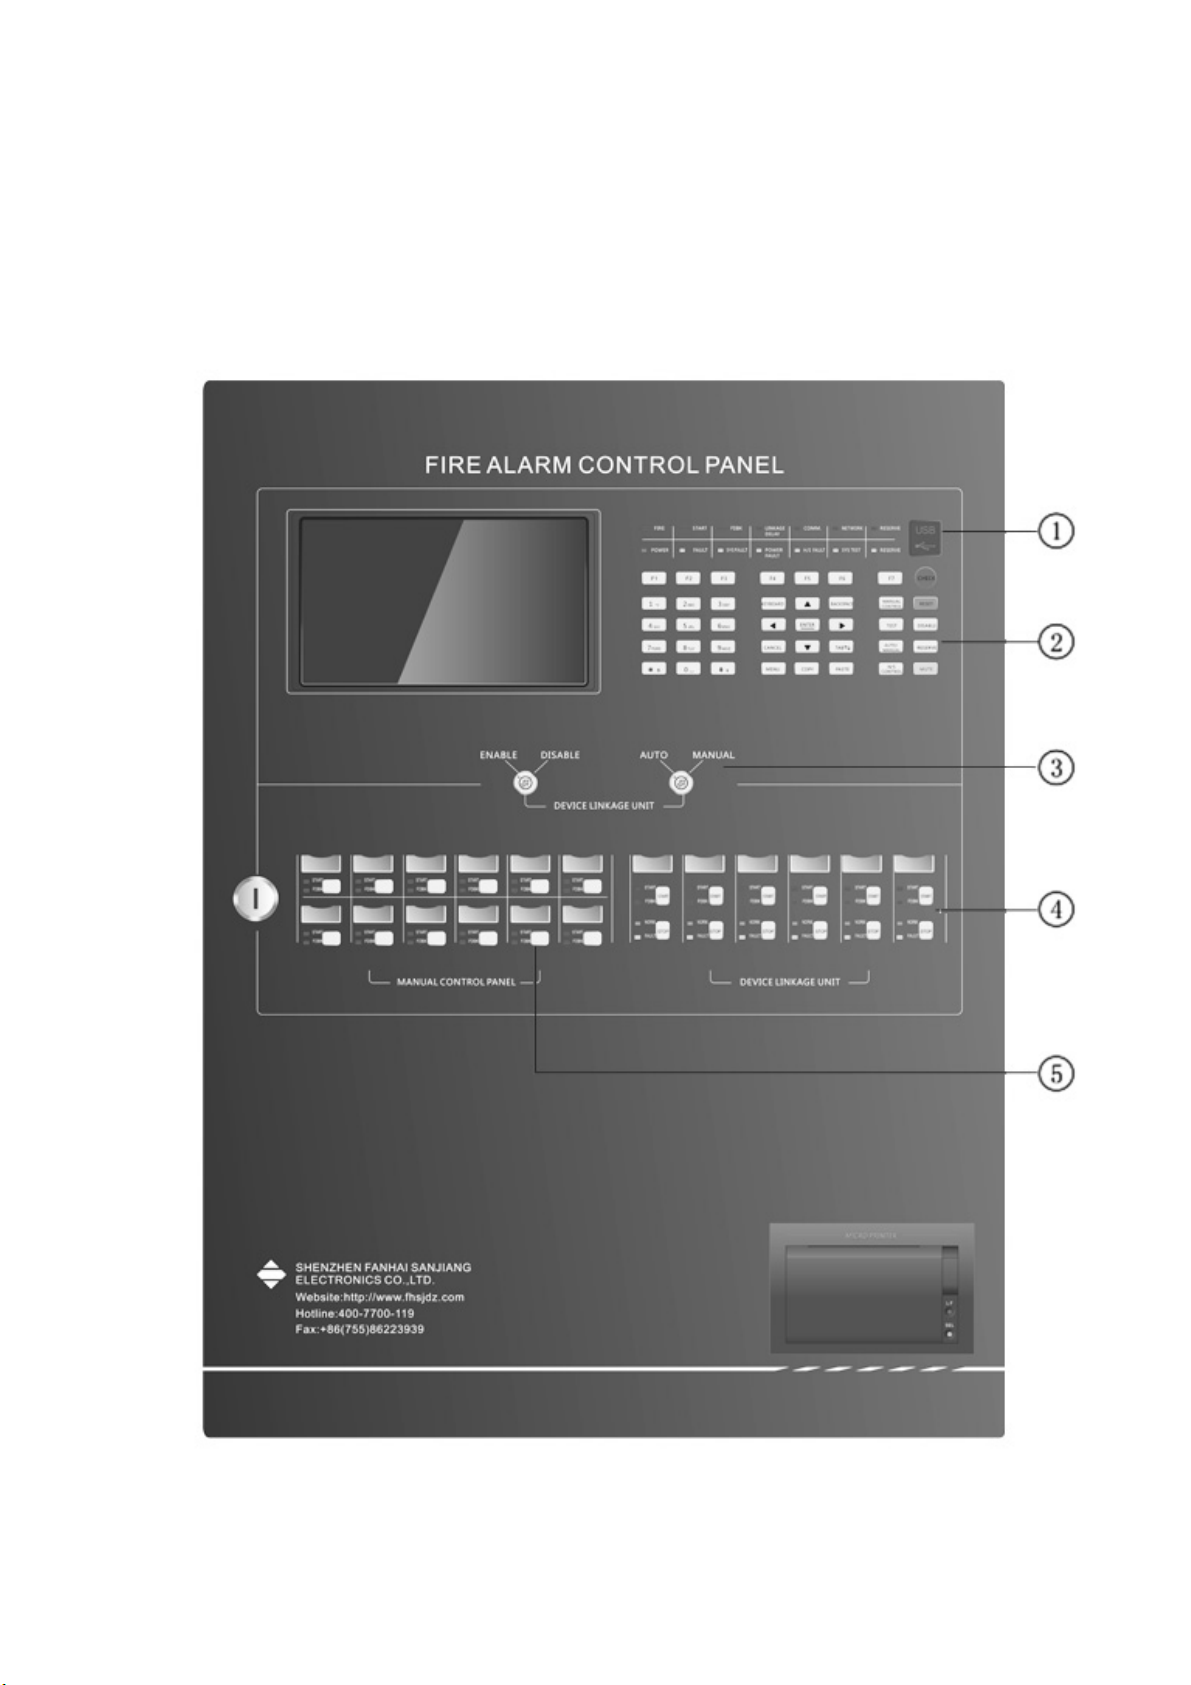
3.2.1 Functions of the panel......................................................................................................... 5
3.2.2 Start-up and power-on.......................................................................................................11
3.2.3 Login operation of the users.............................................................................................12
3.2.4 Special function keys of the system................................................................................14
3.2.5 Input of characters............................................................................................................. 15
Chapter 4 System Configuration Details.................................................................................................17
4.1 System setup..................................................................................................................................17
4.1.1 Time setup........................................................................................................................... 17
4.1.2 Zone setup, Building setup, floor setup..........................................................................18
4.1.3 Network setup..................................................................................................................... 20
4.1.4 Password setup.................................................................................................................. 24
4.1.5 FIP/Extender setup............................................................................................................ 24
4.1.6 EXT.-connected FIP setup................................................................................................ 25
4.1.7 Power setup........................................................................................................................ 25
4.1.8 Printer setup........................................................................................................................26
4.1.9 Rename system..................................................................................................................26
4.1.10 LCD Auto-off......................................................................................................................26
4.2 CAN-bus..........................................................................................................................................27
4.2.1 IO-Board setup................................................................................................................... 27
4.2.2 Detector/module setup...................................................................................................... 27
4.2.3 Working mode setup..........................................................................................................32
4.3 Linkage............................................................................................................................................ 32
4.3.1 System linkage setup................................................................................................................ 33
4.3.2 Zone linkage setup.....................................................................................................................37
4.3.3 Building linkage setup................................................................................................................37
4.3.4 Floor linkage setup.....................................................................................................................38
4.3.5 Room linkage setup................................................................................................................... 39
4.3.6 Complex linkage setup.............................................................................................................. 40
4.3.7 Manual control panel................................................................................................................. 40
4.3.8 Fire Hydrant Setup..................................................................................................................... 41
4.4 Operation.........................................................................................................................................42
4.4.1 Mute,Reset,System test,Horn/strobe control,Linkage Auto/Manual,Sounder
Auto/manual,Manual permit/PRHB...........................................................................................42
4.4.2 Recoding check.................................................................................................................. 42
4.4.3 Single Point Test.................................................................................................................43

II
4.4.4 SP-Test Start/Stop..............................................................................................................44
4.4.5 Auto Register.......................................................................................................................44
4.4.6 Disable Current Alarm....................................................................................................... 45
4.4.7 Query Disable Device........................................................................................................45
4.4.8 Cancel All Disable.............................................................................................................. 46
4.4.9 Query Current Delay..........................................................................................................46
4.4.10 Ethernet Check.................................................................................................................47
4.5 Special............................................................................................................................................. 47
4.5.1 USB backup........................................................................................................................ 47
4.5.2 USB loading........................................................................................................................ 48
4.5.3 Special fault.........................................................................................................................49
4.5.4 Bus check............................................................................................................................ 49
4.5.5 File Resuming..................................................................................................................... 49
4.5.6 Statistics...............................................................................................................................50
4.5.7 Adjust LCD brightness.......................................................................................................50
4.6 History..............................................................................................................................................50
4.6.1 History fire ......................................................................................................................... 51
4.6.2 History fault......................................................................................................................... 52
4.6.3 History linkage.................................................................................................................... 52
4.6.4 History operation................................................................................................................ 53
4.6.5 History deletion................................................................................................................... 54
4.7 About................................................................................................................................................54
Chapter 5 Alarm Function..........................................................................................................................55
Chapter 6 Analysis and Elimination of Possible Causes of the Fault................................................ 59
Chapter 7 Appendix....................................................................................................................................61
Appendix1: List of Equipment Types................................................................................................ 61

1
Cha
p
ter 1 System Overview
1.1 System introduction
JB-QBL-9116E fire alarm control panel (Linkage)(hereinafter referred to fire control unit) is
a new generation of fire alarm control panel launched by Shenzhen Fanhai Sanjiang Electronics
Co., Ltd. It can support uses of other related products of the Company to form an integrated
alarm and linkage control system, which is perfectly suitable for the application of small and
medium-sized fire alarm and firefighting and linkage integrated control system.
The fire alarm control system is widely used in small and medium-sized firefighting
engineering, such as high-grade office building, residence community, department store,
gymnasium, exhibition room, library, workshop, supermarket and hotels.
1.2 System features
Adopts the latest generation of high-speed microprocessor. Data processing rate and data
storage capacity reach 100-fold and 1000-fold increase, respectively, compared to traditional
technologies
JB-QBL-9116E is provided with 7" color display screen (LCD), with a display resolution of
800×480.
The operation interface imitates Windows menus and window interfaces and is almost the
same as the computer operating and using habits, thus facilitates the learning.
Operation and control are flexible and convenient through the standard USB-interfaced
computer keyboard and mouse. the panel buttons are used as field programming devices.
T9 pinyin input method is provided and texts can be input easily and freely.
Use smart U disk (optional), which can be used to copy or restore setup file and historical file
of the system, thus facilitating the system maintenance.
It adopts the non-polarity two-bus intelligent alarm linkage pattern and can connect 324
intelligent detectors or intelligent modules at most. The addresses of module detectors can
be mix-programmed (optional 1-324)
Several high-speed CAN bus interface guarantee speedy and reliable data transmission.
It can supports interconnection of 20 JB-QBL-9116E control units with CAN Bus and the
maximum system capacity after networking reaches 16×324=5184 (alarm point).It can
supports interconnection of 254 control units with Ethernet and the maximum system
capacity after networking reaches 254×5184=1316731 (alarm point).
Each conventional control panel includes 6 controlled outputs.
The system has the function of recording operation history: 1000 pieces of historical fire
alarms, historical requests, historical feedbacks, historical faults and historical operations,
respectively
The user may customize the equipment type, which can facilitate the system linkage
It has the modular manual single-point start/stop functions, which can facilitate field
debugging and testing
It has the single-point detector/module testing function, the detector working status and test
data are clearly displayed
The system is provided with a dedicated mini-printer as standard, which is used to print
various operating statuses of the system immediately
It can be accessed with area indicating panels, building indicating panels and floor indicating
panels, which will extend display information of the control unit to corridor and other locations
It can be connected with PC contributing to display information of fire alarms(alternative).
The system carries out the hierarchy management of multi-level users and the users of
different levels are granted with corresponding operating system permissions, which is
convenient for system management
It is possible to update the system on field or remotely to ensure the system operates stably
and reliably
Standards: GB 4717-2005 Fire Alarm Control Unit
GB 16806-2006 Fire control linkage control system

2
1.3 System connection diagram
Figure 1-1 System connection diagram
1.4 Introduction to system equipments
As shown in Figure 1-1,in order to familiarize you with this system, the equipments are
introduced briefly in the following sections. The fire control system is composed of the
following main constituent parts:
Main control part
The main control part is responsible for processing and analyzing the data messages
transmitted from other parts, and directing, based on results of data analysis, other parts in
the system to execute corresponding orders, such as controlling buzzer to sound for fire.

3
Display component
The display component provides main output interface for alarm message and routine
maintenance and query interface.
Input device
The system transplants the computer standard peripheral interface, panel buttons or
USB-interfaced keyboard / button as input devices, which brings much convenience for the
user to set up and maintain the system.
Power supply
The power supply is used for all internal equipment in the whole system. The system adopts
the special firefighting equipment power with DC 24V output, which can provide alarm or
feedback signals, such as main electrical faults, backup electrical faults, standby power
under-voltage and standby power charging, and have good immunity characteristics.
Bus
The bus is used as the driver of detector/module bus, which may drive 324 intelligent
detectors or intelligent modules and can be equipped with bus indicating panel.
Fire detector
The system can get access to various intelligent smoke, thermal or compound detectors
produced by the company, and the main types include JTY-GD-930E and JTW-ZD -920E.
Manual module panel
Each manual panel has 12 manual control buttons, each button corresponds to a control
module. Button pressed completes start/stop of control module.
conventional control panel
Each conventional control panel includes 6 controlled outputs, controls 6 main devices under
direct control, such as fire pump etc.
acousto-optic alarm apparatus, manual alarm apparatus and fire hydrant
It can get access to intelligent acousto-optic alarm apparatus SG-991E, intelligent manual
alarm button J-SAP-M-960E and intelligent fire hydrant J-SAP-M-961E.
Printer
The system is equipped with a special mini-printer (hereinafter referred to printer) as standard,
which can print alarms, feedbacks and fault messages for future reference.
Fire indicating panel
The fire-indicating panel is also called floor-indicating panel and its application is expanded in
the system, which can be used as both "building indicating panel" and "floor indicating panel".
The model of indicating panel accessed to the system is JB-FSD-982E.
1.5 Technical parameters of system products
1.5.1 Power supply
Main power supply: AC 220V±20%/50Hz or DC24V;
standby power supply: DC24V maintenance-free battery BAT12V/14AH×2
1.5.2 System operating environment
Ambient temperature: Operating -10℃~+55℃
Ambient humidity: ≤95% (40℃±2℃, no condensation)
1.5.3 Peripheral equipment
See product instructions for detailed technical parameters of detector, module and
acousto-optic equipment.

4
Cha
p
ter 2 Engineering Installation and Dimension of the
System
2.1 Outline and dimension diagram of products
Outline and dimension of JB-QBL-9116E
440 125
128
580
Figure 2‑1Casedimension
2.2System installation
2.2.1 Items check
Before installation, check the field equipment at first. After opening the packing box, check
the goods inside the box one by one according to the packing list and the main check contents
including installation and operation instructions, fuse, standby screw and key of the control unit,
and then, if necessary, check appearance of the control box after verification. Please call the
sales personnel of our company immediately in case of any discrepancies found during the check.
2.2.2 Check of engineering configuration
Check packaging list of the control equipment against engineering configuration. The
requirements shall match with the design drawing.
2.2.3 Check and connection of external equipment
Check the conditions of the bus connected with the control unit and measure the insulation
resistance between different loop buses, between bus and ground, as well as load condition of
the loop. Wherein, insulation resistance should be higher than 20M Ωand loop impedance
should be lower than 40Ω.
Check the status of circuit equipment with debugging device, that is, whether equipment
number, coding and operating status comply with the design requirements, eliminate existing
faults and prepare for system connection.
Connect peripheral equipment or connecting line of the system into input terminal of the
system control unit, see instructions on the label for definitions of each terminal. The contact shall
be good. Check with multimeter that it is free of short circuits or open circuits after connection.
2.2.4 Power-on test
After verification by above checks, power on and carry out simple tests of the control unit,
and verify whether power supply and basic functions (such as button and indication functions) of
the control unit operate normally without connecting the peripheral equipment.

5
Cha
p
ter 3 System Debugging and Use
3.1 System debugging
After connection and verification, the system may be switched on for debugging, mainly
including logging and testing of detector and module, and setup of linkage relation.
3.2 System operating instructions
3.2.1 Functions of the panel
The layout of JB-QBL-9116E panel is as follows:
Figure 3-1 Layout diagram of the panel
The design of panel contains the basic functions of alarm enquiries and control. The
indication in the above figure is detailed as follows:
Indication function zone:

6
①Indication function:
Figure 3-2 Indication function zone
No.
Silk-screen
characters
Light
color
Function description
01 POWER Green
The indicator light will be on when the mainboard is normally
supplied by the host (or standby power supply).
The illuminating of the indicator
light does not indicate other system components
(except for the mainboard) are normally supplied, that
is, the indicator light will be on as long as the power
supply of the mainboard is normal.
02 FIRE Red
The indicator light is on when the system detects any fire
alarm.
03 FAULT Yellow
The indicator light will be lit when the system detects any fault
alarm (regardless of fault types).
04 START Red
The indicator light will be lit if the system has sent out a
linkage request of a certain module.
05
SYSTEM
FAULT
Yellow
The indicator light will be lit when the machine is in fault or the
system is not operating as expected.
06 FDBK Red
The indicator light will be lit if the system has received a
linkage feedback of a certain module.
07
POWER
FAUIT
Yellow
The indicator light will be lit when the system detects the alarm
of power supply (regardless of fault type).
08
LINKAGE
DELAY
Red The indicator light has been lit up until the end of linkage delay.
09
H/S
FAULT
Yellow
The indicator light will be lit when the horn/strobe alarm
apparatus or far sound equipment (alarm bell) in the system
goes wrong.
10 COMM. Red
The indicator light will be flash when the CAN communication
or Ethernet communication is normally.
11
SYSTEM
TEST
Yellow
The indicator light will be lit when the machine carries out
self-test or single-point test and will go off after self-test
completion.
12 NETWORK Red The indicator light is temporarily useless.

7
13 RESERVE Yellow The indicator light is temporarily useless.
14 RESERVE Red The indicator light is temporarily useless.
②Key functional zone:
Figure 3-3 Key function zone
1) KEYBOARD function key (with light key)
Originally, the panel keys are under OFF state at power-on, AND KEYBOARD indicator light
is off. Press KEYBOARD key or * key of panel keyboard or CTRL+ALT+ DEL of USB
keyboard and the password input box will prompt on the display, then enter into the password
and login in (see User’s Manual for details). The system will open the panel keyboard when
receiving the correct password and KEYBOARD indicator light is lit. Under open state, press
KEYBOARD or *KEY of panel keyboard or CTRL+ALT+DEL of USB keyboard to close the
keyboard and log out.
When the panel keyboard is open, the system will
automatically log out the logging status and close the panel keyboard if it is
inactive for about 3 minutes. Except for MUTE,and F7 ,other function keys are
allowed to be operated only when the panel keyboard is open.
2) AUTO/MAUAL function key(with light key)
In manual status, pressing AUTO/MAUAL to switch to automatic status, meanwhile the
"auto" indicator lights up; switch to the manual status after pressing again, and the indicator is
out. In CAN-Net, press AUTO/MAUAL on any host,the integrated status of any other hosts
will be changed as well.
3) MANUAL CONTROL function key (with light key)
If MANUAL CONTROL of the system is prohibited, press MANUAL CONTROL to enable all
manual control panels of the bus switched in, and meanwhile the permission light under
MANUAL CONTROL is lit. Press again to return to the prohibited status and the indicator light
goes off. If multiple hosts are networked, press MANUAL CONTROL of host 1 in the network,
and the status of all manual control panels of the bus will be changed simultaneously and
stay the same with host 1; if MANUAL CONTROL of other host is pressed, the status of the
host will be changed only. The manual control panels of the bus will be saved at power-off,
which means the manual control panels of the bus will resume the status before power-off
when the system is switched on again after power-off.
4) MUTE function key

8
Press MUTE key to mute the sounds of interior buzzer, fire indicating panel and graphic
display device in the fire control room. Under mute state, the buzzer and other audible alarm
apparatus will be restarted in case of any new alarm. MUTE key is the only key without
password protection in the system. It will stay valid regardless of on or off states of the panel
keyboard.
5) H/S CONTROL function key (with light key)
Press H/S CONTROL to mute all the external equipment (alarm bell and horn/strobe alarm
apparatus) in the system. In case of fire alarm, H/S CONTROL key can be used to switch off
or restart sounds of corresponding alarm apparatus. When H/S CONTROL is pressed and
the alarm sound is muted, H/S CONTROL indicator light is lit. In case of new fire alarm in the
system and linking with alarm bell or acousto-optic alarm apparatus, H/S CONTROL indicator
light turns off and alarm sound of corresponding alarm apparatus will be restarted. The key
can be operated only if the user has logged in the system.
6) DISABLE function key (with light key)
Pressing DISABLE will isolate all bus equipment (any bus equipment in the networking
system) under alarm state (fire alarm, feedback or fault state) currently. The system will not
send any acousto-optic alarm for the alarm message generated by a certain isolated
equipment. The fault messages including power supply, printer, indicating panel and host
communication cannot be isolated. The isolation light is lit in case of any isolated bus
equipment existing in the system.
Only the super user has the permission to operate this
function. The isolation is only valid for the display information and the isolated
equipment will operate normally. The entry for isolating current alarm is provided
on the panel only and isolation operations menu querying isolation and cancelling
all isolation, can be achieved by the menu.
7) TEST function key
Press TEST to get the system into self-test process: light up all indicator lights for light test,
try many acoustic modes for buzzer (fire alarm, fault and feedback) and illuminate the pixel
matrix on the screen by sequence. The system will log out automatically after self-test
completion.
The system will not receive alarm signals temporarily under self-test
state.
8) RESET function key
Press RESET to eliminate all current alarms and reboot the system. The whole process takes
30-60s. If multiple hosts are networked, press RESET key of host 1 and all hosts in the
network will be reset; press RESET key of other host, this host itself will be reset.
If multiple hosts are networked, host 1 is used as the concentrator
(system host), press RESET,MUTE,H/S CONTROL keys,all regional units (host
2-20) will execute this operation; when the regional unit operates these keys, the
state of itself will only be changed. When the regional units in the networking
system are under set state, press RESET key on the concentrator, the regional
units will response the restore command immediately and the files currently set
by the regional units will lose this update, which means the data set since last
storage will not be saved automatically! Therefore, if multiple debuggers operate
at the same time, please disconnect the connecting line of the host being set
temporarily before inputting large data volume!
9
)
CHECK
The function is used for counting registered number of zones, buildings and floors in the
system and registered number of detectors and modules of each type set on the interface
board. All information will scroll up and down on the display screen.

9
10) RESERVE function key
In manual status, pressing RESERVE switch to automatic status, meanwhile the "auto"
indicator lights up; switch to manual status after pressing again and the indicator is out. In
CAN-Net, press RESERVE on one host, then the status of all hosts is changed at the same
time.
11) Selection and query edit of LCD content
There are 9 keys in this section: ▲,▼,,ENTER, BACKSPACE, CANCEL, MENU,
COPY, PASTE. Meaning and purpose of these 9 keys:
▲- scroll upward ▼- scroll downward
ENTER - SELECT THE OPTION CORRESPONDING
TO THE CURSOR
BACKSPACE - DELETE TO THE LEFT
CANCEL -EXIT CURRENT OPTION PASTE - COPY CONTENT OF SELECTED ITEM
COPY - PASTE COPIED CONTENT TO CURRENT
POSITION
MENU - ENTER INTO MENU INTERFACE
- skip to different options by the sequence of from left to right and from top to bottom
③Key switch of device linkage unit
Figure 3-4 Key switch of linkage unit
ENABLE/DISABLE ke
y
switch: Enable/disable the use of the button o
f
linka
g
eunit.
AUTO/MANUAL key switch: If the system is in a state of fire alarm, the corresponding device
will be started automatically when the "AUTO" is chosen . The device will not be started in the
condition of fire alarm when the "MANUAL" is chosen.
Key switch is only effective for device linkage unit.
④Device linkage unit
Each conventional control panel includes 6 controlled outputs, controls 6 main devices under
direct control, such as fire pump etc.
The binary address can be changed by the S14 of linkage unit. The address range of linkage
unit is as follows:
Starting address = address*6+1
Last address = address*6+6
The S13 is used to set output and feedback. Setting method is as follows:
Jumper 2(Output) 1(Feedback)
0 Normally-off Level output
1 Normally-on Pulse output
The controller panel of linkage unit including 6 controlled outputs is as follows:

10
Figure 3-5 linkage unit function zone
If the key switch of the system is allowed, press START to enable corresponding control
panels of the bus switched in, and meanwhile the indicator light is lit. On the contrary, press
STOP to disable corresponding control panels of the bus switched in.
The "FDBK" indicator light will be lit when the feedback signal access(For example,1-2 and
1-3 short-circuit).
The "FAULT" indicator light will be lit when the lines have problems.
Restart and login the system when the address is changed.
⑤Manual module panel
Each manual panel has 12 manual control buttons, each button corresponds to a control
module. Button pressed completes start/stop of control module.Meanwhile the indicator light
will be lit.The binary address can be changed by these jumpers ranged from JP1 to JP4 of
manual panel. The address range of manual panel is as follows:
Starting address = address*30+1
Last address = address*30+12
The controller panel of manual panel including 12 controlled outputs is as follows:
Figure 3-6 manual panel function zone
If MANUAL CONTROL of the system is allowed, press to enable corresponding control
panels of the bus switched in,and meanwhile the indicator light is lit. On the contrary, press
the button again to disable corresponding control panels of the bus switched in.The "FDBK"
indicator light will be lit when the feedback signal access.
Display interface of the screen:

11
Figure 3‑7 Display interface
The following describes the conventional display bars on the screen, which will be displayed
no matter what state the screen is in. There are 4 conventional display bars on the display screen,
as shown in the following figure:
The title bar
Display model and name of the host as well as company logo
The status bar
It has the following main functions:
Display the special function buttons available currently
Display the total amount of fire alarm, request, feedback and faults under alarm
state
Time bar
Display current date and time of the system
Power status bar
Display the current power status of the host by icon, as shown in the figure:
Figure 3‑8 Status and meaning of icons
3.2.2 Start-up and power-on
The power supply required for normal operation of the system is AC 220V±20%, 50Hz.
The equipment must be well grounded. After confirmation of these operating environments,
power on and start up.
At this moment, the system will check and load the data required for system operation and set
the external equipment as required. The current initialization steps will be displayed in the status
bar. The initialization process will take 10-20s and them the system will enter into the interface as
follows after initialization:

12
Figure 3‑9 Normal prompt interface of the system operation
The prompt interface means the system has entered into the monitoring status.
3.2.3 Login operation of the users
Login in refers to the process of entering password by the users and identifying by the
system.
The users may operate the functions with the system complying with its identity after login
in.
The users may be divided into four categories based on different operating authorization:
1.Super user: system designer (8-digital password)
2.System debugger: System debugger of the manufacturer (8-digital password)
3.System administrator: maintenance personnel of the user system (6-digital
password)
4.Watchman: person on duty at the fire control room (4-digital password)
The user classification aims to prevent possible mal-operation and
facilitate system maintenance and management.
The watchman is not allowed to enter the system setting interface and can login
in, check and operate through the panel keyboard only.
The system will record the operation content of each user to
facilitate the responsibility tracing; therefore the password shall be kept
strictly confidential and carefully managed and be kept away from irrelevant
personnel.
3.2.3.1 Login of super user, system debugger and system administrator:
Super user, system debugger and system administrator may login in the system by two ways.
1. Login in through standard USB keyboard. Pop up the login window by pressing Ctrl, Alt and
Del keys simultaneously (as shown below).
Figure 3-10 Example of USB keyboard
2. Press "*" key at the left bottom corner of the panel, and pop up the login window.

13
Login operation
Under not-logged-in state, press CTRL 、ALT +DEL on USB keyboard simultaneously, or press
"*" key at the left bottom corner of the panel, and pop up the password input window (as
shown below). Press ENTER key on USB keyboard or "OK" key on the panel keyboard after
entering the password.
Figure 3‑11 Password logging window
In order to keep confidential, "*" will be displayed in the input
box when entering any key value. After login-in, panel keyboard will be opened at the
same time and KEYBOARD indicator light on the panel will be lightened.
Log out
Under logging state, press CTRL, ALT +DEL keys on USB keyboard simultaneously, or press
"*" keys at the left bottom corner of the panel,and pop up the inquiry window. Select ENTER.
The system logs out.
Figure 3‑12 Inquiry window of log out
3.2.3.2 The watchman logins in via panel keyboard
The watchman can login in directly via panel of the control unit and it is only required to
operate the panel.
Login operation
Under not-logged-in state, press KEYBOARD on the panel, pop up the password input
window and enter into the password according to the numeric keys on the panel keyboard.
Press ENTER to confirm after inputting the password and KEYBOARD indicator light is lit at
the same time.
Figure 3‑13 Watchman login interface
Log out
Under logging state, press KEYBOARD key on the panel, and the system will exit the logging
status and KEYBOARD light goes off.
Under logging state, the system will log out automatically if it
is inactive within 3 minutes (no key is pressed and the mouse does not move).

14
Under not-logged-in state, the user may only execute "MUTE"
operation and other operations are not allowed.
3.2.4 Special function keys of the system
The system adopts the standard USB keyboard compatible with PC and defines the following
special function keys. The function keys corresponding to keyboard are set on the panel keyboard
and the specific contents are as follows:
Function keys Shortcuts Corresponding
panel keys
F1 Switch to main setting interface Menu
F2 Switch to alarm interface F2
F3 Switch to shielding inquiry interface F3
F4 Switch to single-point start / stop interface F4
None Switch to start-up quickly interface F5
F5 Copy cells in the spreadsheet Copy
None The button is temporarily useless. F6
F7 Switch to ID inquiry interface None
F9 Paste cells in the spreadsheet Paste
Ctrl+Alt+Del Switch to login in interface or log out
interface
*
Ctrl+Space Switch to Chinese input method or exit
Chinese input method
#
Del Delete text characters at the right side of the
cursor
None
Backspace Delete text characters at the left side of the
cursor
BACKSPACE
The above special function keys are not active under all
conditions. The main function keys active currently will be scrolled on the status bar
(see the panel layout diagram for its position) at the lower end of the main interface.
The panel keyboard is under digital input state normally. It is
switched to phonetic alphabet input state, letter input state in proper order and
returned to digital input state after pressing "#" key. Refer to the interface prompt box
for specific states.
Under fire alarm and feedback state, the system administrator is not
allowed to enter into the setting interface. This is because the system decides

15
emergencies have been detected and must be disposed preferentially. At this
moment, F1 key is in vain. However, the system debugger and the super user may
enter into the setting interface under fire alarm and feedback state as the system
decides it is under debugging or maintenance state currently.
The alarm interface will pop up in case of new alarms (including fire alarm and
faults), no matter what kind of operator is in the non-alarm interfaces, such as setting
interface. Then only the system debugger and the super user may re-enter into the
setting interface.
Start-up quickly interface:
Figure 3‑14 Start-up quickly interface
Under start-up quickly state,press ▲ , ▼ , ◄,►or key switch to the need to
start-up the device type. In addition,press corresponding numerical keyson the panel and
press ENTER key can also achieve the above functions.T
he system will enter into the interface as
follows :
Figure 3-15 Start-up or stop quickly interface
Press Sor STOP key to complete the corresponding operation.
3.2.5 Input of characters
The system support three Chinese input methods: Quanpin input method / zone bit code
input method / T9 input method
Switching method:
Ctrl+Space (space key) ------ Switch to Chinese input method or exit Chinese input
method
Shift + Space (Space key)------Switch over Quanpin input method/zone bit code input
method
Zone bit code input method is cancelled when the panel keyboard is used for operation only.
Press "#" to switch over digital input/T9 input method/alphabet input.

16
3.2.5.1 Quanpin input method:
Only support word input, not support word group input;
Enter rightful phonetic alphabets and press SPACE key to prompt the lookup floating window
(as shown in Figure below);
Select according to word number 1-9 and press +and - keys to turn pages for
the lookup character window;
Only support the mainland Standard Chinese phonetics.
Figure 3-16 The character input interface for system renaming
3.2.5.2 T9 input method
Only support word input, not support word group input
Enter rightful phonetic alphabets and press "0" key to prompt the lookup floating
window
Select according to word number 1-9 and press ←and →keys to turn pages for the
lookup character window
Table of contents
Other SHENZHEN FANHAI SANJIANG ELECTRONICS Control Panel manuals