manuals.online logo
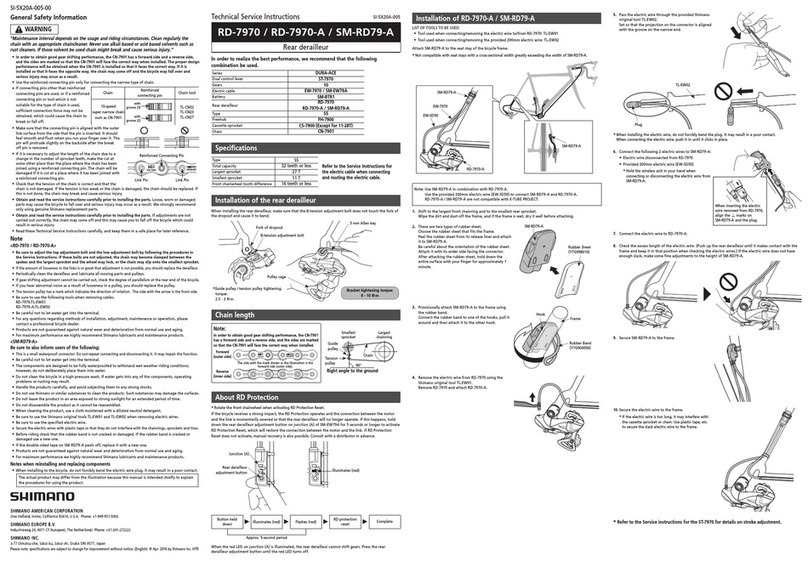
Brands
  1. Home
  2. •
  3. Brands
  4. •
  5. Shimano
  6. •
  7. Bicycle Accessories
  8. •
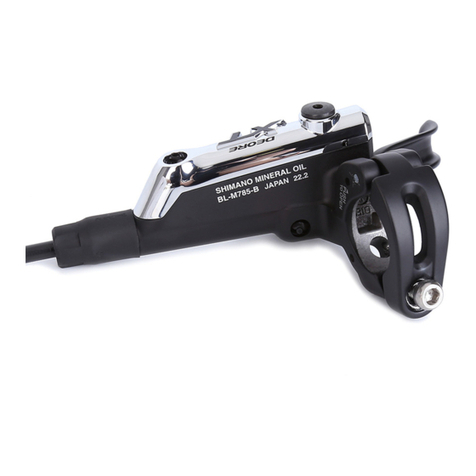
  9. Shimano BR-M965 User manual

Shimano BR-M965 User manual

One Holland, Irvine, CA 92618 U.S.A.
Phone 949-951-5003 Fax 949-951-7519
685 The Queensway Peterborough, Ontario K9J 7J6
Phone 705-745-3232 Fax 705-745-1949
Industrieweg 24, NL-8071 CT Nunspeet, Holland
Phone 31-(0)341-272222 Fax 31-(0)341-272200
3-77 Oimatsu-cho Sakai Osaka Japan
Phone 81-(0)72-223-3243 Fax 81-(0)722-23-3493
www.shimano.com
6/30 Endeavor Road, Caringbah, NSW Australia. 2229
Phone 61-(0)2-9526-7799 Fax 61-(0)2-9526-7622
20 Benoi Sector, Jurong Town, Singapore 629852
Phone 65-6-2654777 Fax 65-6-6632504
This publication is printed on recycled paper.
Specifications are subject to change for improvement without notice.
MA8CMEC © Dec. 2002 Shimano Inc., 1202 Printed in Japan XBC IZM
UCI official neutral
technical support
•
Shimano recommends that helmets be worn at all times when
riding bicycles.
When participating in the sports depicted in this brochure, Shimano recommends
that you use the proper safety protection for that sport. The riders seen in these
pictures are experienced experts or professionals, and Shimano requests that you
do not attempt to duplicate any of the actions shown in this brochure that are
beyond the capabilities of your equipment or your own abilities.
For best performance
SHIMANO
Disc Brake
Systems
Service manual
vol.
1
2
WARNING
• The calipers and rotor will become hot when
the brakes are operated, so do not touch them
while riding or immediately after dismounting
from the bicycle, otherwise you may get
burned. Check that the brake components have
cooled down sufficiently before attempting to
adjust the brakes.
• The required braking distance will be longer
during wet weather.
Reduce your speed and apply the brakes early
and gently.
• If the road surface is wet, the tires will skid
more easily. If the tires skid, you may fall off
the bicycle. To avoid this, reduce your speed
and apply the brakes early and gently.
• Always make sure that the front and rear
brakes are working correctly before you ride
the bicycle.
• Be careful not to allow any oil or grease to get
onto the rotor and brake pads, otherwise the
brakes may not work correctly.
• If any oil or grease do get on the pads, you
should replace the pads. If any oil or grease
gets on the rotor, you should clean the rotor. If
this is not done, the brakes may not work
correctly.
• Use only genuine Shimano mineral oil. If other
types of oil are used, it may cause problems
with brake operation, and cause the system to
be unuseable.
• Be sure to use only oil from a freshly-opened
container, and do not re-use oil which has been
drained from the bleed nipple. Old oil or
already-used oil may contain water which could
cause vapor lock in the brake system.
• Be careful not to let water or air bubbles to get
into the brake system, otherwise vapor lock
may occur. Be particularly careful when
removing the cover of the reservoir tank.
• Vapor lock may occur if the brakes are applied
continuously. To relieve this condition,
momentarily release the lever.
• If fluid leaks occur, immediately stop using the
brakes and carry out the appropriate repairs. If
you continue riding the bicycle while fluid is
leaking, there is the danger that the brakes
may suddenly stop working.
• Check that the quick release lever is on the
right side (the opposite side to the rotor). If the
quick release lever is on the same side as the
rotor, there is the danger that it may interfere
with the rotor, so check that it does not
interfere.
• It is important to completely understand the
operation of your bicycle's brake system.
Improper use of your bicycle's brake system may
result in a loss of control or an accident, which
could lead to severe injury. Because each bicycle
may handle differently, be sure to learn the
proper braking technique (including brake lever
pressure and bicycle control characteristics) and
operation of your bicycle. This can be done by
consulting your professional bicycle dealer and
the bicycle's owners manual, and by practicing
your riding and braking technique.
• Obtain, read and carefully service instructions
when installing parts. A loose, worn, or
damaged parts may cause injury to the rider.
We strongly recommend that only genuine
Shimano replacement parts be used.
• Read these Technical Service Instructions
carefully, and keep them in a safe place for
later reference.
■Handling the mineral oil
• Use safety glasses when handling, and avoid
contact with eyes. Contact with eyes may result
in irritation.
• Use gloves when handling. Contact with skin
may cause a rash and discomfort.
• Inhalation of oil mist or vapors may cause
nausea. Cover nose and mouth with a respirator
type mask and use in a well ventilated area.
• Do not drink. May cause vomiting or diarrhea.
• Keep out of reach of children.
• Do not cut, heat, weld or pressurize the oil
container, as this may cause explosion or fire.
■Emergency Care
• In the event of eye contact, flush with fresh
water and seek medical assistance immediately.
• In the event of skin contact, wash well with
soap and water.
• If mist or vapor is inhaled, go immediately to
an area with fresh air. Cover up with a blanket.
Stay warm and stable and seek professional
medical advice.
■Disposal of Used Oil
• Follow local county and/or state codes for
disposal. Use care when preparing oil for
disposal.
■Directions
• Keep the container sealed to prevent foreign
objects and moisture from getting inside, and
store it in a cool, dark area away from direct
sunlight or heat.
General Safety Information
Vapor lock is a phenomenon in which the oil
inside the brake system becomes heated,
which causes any water or air bubbles inside
the brake system to expand. This can then
result in a sudden increase in the brake lever
stroke.
CAUTION
Hydraulic
Disc Brake
3
WARNING
• Adjust the inner cable so that
the protruding length is less
than 20 mm (3/4 inch). If the
protruding length is any
longer, the end of the inner
cable may become stuck in the
rotor, which could cause the
wheel to lock and the bicycle
could fall forward causing
serious injuries.
• The calipers and rotor will become hot when
the brakes are operated, so do not touch them
while riding or immediately after dismounting
from the bicycle, otherwise you may get
burned. Check that the brake components have
cooled down sufficiently before attempting to
adjust the brakes.
• Always make sure that the front and rear
brakes are working correctly before you ride
the bicycle.
• Before riding the bicycle, check
that the pad thicknesses are
0.5 (0.9) mm or more.
• If noise occurs when the brakes
are operated, it may indicate
that the brake pads have worn
down to their usage limit. After
checking that the brake system
has cooled down sufficiently,
check the brake pad thicknesses.
Replace the brake pads if the pad
wear indicators are visible.
• Be careful not to allow any oil or
grease to get onto the rotor and brake pads,
otherwise the brakes may not work correctly.
• If any oil or grease do get on the pads, you
should replace the pads. If any oil or grease
gets on the rotor, you should clean the rotor.
If this is not done, the brakes may not work
correctly.
• Check the brake cable for rust and fraying, and
replace the cable immediately if any such
problems are found. If this is not done, the
brakes may not work correctly.
• The required braking distance will be longer
during wet weather.
Reduce your speed and apply the brakes early
and gently.
• If the road surface is wet, the tires will skid
more easily. If the tires skid, you may fall off
the bicycle. To avoid this, reduce your speed
and apply the brakes early and gently.
• Check that the quick release lever is on the
right side (the opposite side to the rotor). If the
quick release lever is on the same side as the
rotor, there is the danger that it may interfere
with the rotor, so check that it does not
interfere.
• It is important to completely understand the
operation of your bicycle's brake system.
Improper use of your bicycle's brake system may
result in a loss of control or an accident, which
could lead to severe injury. Because each bicycle
may handle differently, be sure to learn the
proper braking technique (including brake lever
pressure and bicycle control characteristics) and
operation of your bicycle. This can be done by
consulting your professional bicycle dealer and
the bicycle's owners manual, and by practicing
your riding and braking technique.
• Obtain, read and carefully service instructions
when installing parts. A loose, worn, or
damaged parts may cause injury to the rider.
We strongly recommend that only genuine
Shimano replacement parts be used.
• Read these Technical Service Instructions
carefully, and keep them in a safe place for
later reference.
• Disc brakes have a burn-in period, and the
braking force will gradually increase as the
burn-in period progresses. Make sure that you
are aware of any such increases in braking force
when using the brakes during the burn-in
period. The same thing will happen when the
brake pads or rotor are replaced.
General Safety Information
0.5mm
0.9mm
(M515,C601)
2mm
Pad wear
indicators
CAUTION
Cable type
Disc Brake
Less than
20mm
4
Contents
■
General Safety Information
••••
2-3
■
Shimano Disc Brake Features
• Shimano Linear Response
Disc Brake System
•••••••••••••
6
• Disc Brake Line-up
•••••••••••••
7
• User friendly features
••••••••
8-9
■
Handling Shimano Disc Brakes
• Part names
••••••••••••••••••
10
• Differences between hydraulic
disc brake systems and
cable type brake systems
••••••
10
• Vapor lock prevention
and remedying
•••••••••••
10 - 11
• Burn-in period
•••••••••••••••
11
• If the bicycle is inverted
•••••••
12
• Using in cold temperature
conditions
•••••••••••••••••••
12
• Applicable forks and frames
••••
12
• Combining with other
manufacturers' products
•••••••
12
• Guide to replacement
(Shimano genuine mineral oil,
brake pads, rotors)
•••••••••
12 - 13
• Notes on installation
•••••••
13 - 14
• Replacement of
the brake lever unit
•••••••••••
14
■
Technical Notes
• Disc brake dimensions
•••••
15 - 16
• Hub dimensions for
Shimano disc brake
•••••••••••
17
• Dimensions for XTR Disc
(Rotor & Hub)
••••••••••••••••
17
• Combination Chart
(Hydraulic Disc )
••••••••••••••
18
• Brake Hose
••••••••••••••••••
19
• Combination Chart
(Mechanical Disc)
•••••••••••••
20
• Power Modulator (SM-PM50)
•••
20
• Brake Pad Interchangeability
•••
21
• Performance of Brake Pad
Combinations
••••••••••••
21 - 23
• Wheel Spoke Lacing
•••••••••••
24
• Recommended tools
•••••••••••
24
■
Technical Service Instructions
• Hydraulic Disc Brake
•••••••
25 - 32
• Brake Hose
•••••••••••••••
33 - 37
• Cable type Disc Brake
••••••
38 - 40
■
Parts list
• Brake Pads for Disc Brake
••••••
41
• M965
•••••••••••••••••••
42 - 43
• M755
•••••••••••••••••••
44 - 49
• M555
•••••••••••••••••••
50 - 55
• M525
•••••••••••••••••••
56 - 58
• M515
•••••••••••••••••••
59 - 62
• M475
•••••••••••••••••••••••
63
• C901
••••••••••••••••••••
64 - 65
• C601
•••••••••••••••••••••••
66
• C501
•••••••••••••••••••••••
67
BL-M755
BL-M756
BR-M755
SM-RT75
SM-RT75-DH
FH-M756
-S/L
HB-M756
-S/L
ST-M965
BR-M966
SM-RT96 FH-M965
HB-M965
BR-M965
SHIMANO
DEORE
XT
BR-M555
FH-M525
-S/L
HB-M525
-S/L
BL-M556
BL-M555
BR-M525
BL-M525
FH-C901
HB-C901
BL-C901 BR-C901
BR-M515 HB-M475
FH-M475
HB-M525-S/L
FH-M525-S/L
ST-M510-S/L
BL-M510-S/L
SM-RT61
SM-RT60
SM-RT61
SM-RT60
OPEN
OPEN
BR-M475 SM-RT50
SM-RT61
SM-RT60
SM-RT50
HB-M475
FH-M475
BL-M510
FH-C901
HB-C901
BL-C600
Power
modulator
HB-C501
FH-C501
SM-PM50
XTR
M965
DeoreXT
M755
Deore
M555
Deore
M525
Nexave
C901
M475
Nexave
C601
Nexave
C501
Deore
M515-LA
BR-C601
BR-C501
ST-C503
SM-BH62
SM-BH96
SM-BH60/61
SM-BH59
SM-BH60/61
5
Shimano Disc Brake Features
Handling Shimano Disc Brakes
Technical Notes
Technical Service Instructions
Parts list
Combination
Chart
••••••
P. 1 8
Combination
Chart
••••••
P. 2 0
Adjustable reach
lever
••••
P. 8
Brake lever
Interchangeability
•••••••
P. 2 0
Mount dimensions
••••••••••••
P. 1 5
Brake Pad
•••••••••••••••
P. 21, 23
Preventing loosening
of the bolts
••••••••••••••
P. 9 , 3 9
Installation of
the rotor
•••••••
P. 3 8
Installation of
the hose
••••
P. 19, 33
Hose material
& length
••••••
P. 1 8
Mount dimensions
••••
P. 1 5
Brake Pad
•••••••••
P. 2 1
Installation of shims
••
P. 9 , 2 8
Preventing loosening
of the bolts
••••••
P. 9 , 3 0
Technical Service
Instructions
••
P. 2 5
Part lists
M965
••
P. 42 – 43
Technical Service
Instructions
••
P. 2 5
Part lists
M755
••
P. 44 – 49
Part lists
M555
••
P. 50 – 55
Part lists
M525
••
P. 56 – 58
Part lists
C901
••
P. 64 – 65
Technical Service
Instructions
••
P. 3 8
Part lists
M515
••
P. 59 – 62
Part lists
M475
••••••
P. 6 3
Technical Service
Instructions
••
P. 3 8
Part lists
C601
••••••
P. 6 6
Part lists
C501
••••••
P. 6 7
Power modulator
•••••••
P. 2 0
Adapter for
203mm rotor
•••••
P. 9 , 3 0
Installation of the rotor
•
P. 8 , 2 5
Rotor Specification
••••
P. 1 8
Hub dimensions
•••••••
P. 1 7
HubRotorCaliperHoseBrake Lever
Hydraulic
Disc Brake
Cable type
Disc Brake
6
Shimano Disc Brake Features
Shimano Linear Response Disc Brake System
Data acquisition devices
Brian with Shimano
R & D engineer
Recently we conducted testing with world
champion caliber pros Nicolas Vouilloz,
Brian Lopes and Mike King to confirm our
disc brake design priorities.
As our testing confirmed, the highest
priority is not “Power”. One of the most
important things that a disc brake needs
for severe off-road conditions is a highly
modulated feeling of control. The brake
must be able to provide a balance of speed
control as well as strong stopping power
when quick deceleration or stops are
needed. Our engineer’s development and
effort is in creating and improving
modulation and control. It is “Linear
Response Disc Brake System”.
Disc Brake Line-up
BR-M965
ST-M965
SM-RT96
SM-BH96
XC Competition
M755-DH
For Downhill 203mm
Roter and adapter
BR-M755
BL-M756
SM-RT75
SM-BH62
MTB All-around
BR-M555
BL-M556
SM-RT61
SM-BH62
BR-M525
BL-M525
SM-RT61
SM-BH59
MTB All-around
BR-M515-LA SM-RT61
MTB Sport / Recreational
BR-M475 SM-RT61
BR-C901
BL-C901
SM-RT61
SM-BH61/60
Premium Comfort Disc Brakes for Utility / Recreational
BR-C601
BL-C600
SM-RT61
BR-C501
SM-RT61
ST-C503
SM-PM50 SM-PM50
Note : Hydraliuc disc brake hoses SM-BH96/SM-BH62/
SM-BH61/SM-BH59 are cuttable
7
Shimano Disc Brake Features
8
Shimano Disc Brake Features
User friendly features
Bleed kit
Bleeding
spacer
(BR-M965/966)
Adjustable reach lever
Center-lock mounting system
New shape shim
for easy adjust
Disc brake with
power
modulator
0.2mm0.5mm
TL-LR15
Becomes
wider
Becomes
narrower
4-finger
Brake Lever
SM-PM50
Power Modulator
Brake Caliper
Rotor
rotor
lockring
hub spline
9
Shimano Disc Brake Features
Fixing bolt plate
Rotor fixing bolts
(#T25 torx)
Hub
TL-LR15 (Y-120 09230)
0.2mm Y-8CL 14000
0.5mm Y-8CL 13000
Rotor
Shim
(0.5mm, 0.2mm)
Shim
(0.5mm, 0.2mm)
Rotor lock ring
■Installation of shims ■Installation of the brake hose
BL-M755/M555
BL-M756/M556
■Installation of the rotor
Adapter for 203mm rotor
(SM-RT75-DH)
SM-RT75/61
SM-RT96
for Manitou
M965 M755 M555 M525 M515
—
●
●
●
(M966)
●
●
●
●
—
—
●
●
—
—
—
—
—
—
—
—
Y-8B2 98110
Y-8B2 98100
Y-8B2 98210
Y-8B2 98120
for Boxxer fork
for International
standard
International
standard (Rear)
0.2 mm 0.5 mm
O-rings
NEW
0.5mm
0.9mm
■Preventing loosening of the caliper
fixing bolts
M755
M555
M525
M515
M475
C901
C601
C501
M965
M755-DH
Wire
Bolt
■Guide to brake pad replacement
Caps
M965
M755
M555
M525
M475
C901
C501
M515
C601
Minimum
brake pad
width
NEW
10
Handling Shimano Disc Brakes
Part names
Vapor lock
prevention and
remedying
Differences
between
hydraulic disc
brake systems
and cable-type
brake systems
With normal brake systems and cable-type disc brake systems, operating
the lever causes a cable to be pulled, which in turn operates the brake
body. In contrast, hydraulic-type brake systems use oil in place of the
cable. As a result, an important point to note with hydraulic-type
systems which is not required for cable-type systems is the prevention
of vapor lock.
When the brakes are used, the calipers and rotors become hot. The
heat from the calipers is transferred to the hydraulic oil, which also
becomes hot. This heating of the oil can cause any water or air bubbles
in the oil to expand, which can cause sudden changes in the operating
feel of the brake lever. This phenomenon is called “vapor lock”.
Brake Lever Rotor
Caliper
Caliper
Brake Hose
Hydraulic
Disc Brake
Hydraulic
Disc Brake
Cable type
Disc Brake
Cable type
Disc Brake
Hydraulic
Disc Brake
Brake Lever
Rotor
Brake Cable
11
Handling Shimano Disc Brakes
Vapor lock prevention and remedying
Use only Shimano genuine mineral oil or a
proper equivalent. If any other type of oil
is used, it may not only cause vapor lock,
but may also damage the brake system.
Be sure to use only oil from a freshly-
opened container. This is because the oil
may absorb moisture from the air after the
container is opened.
Be careful not to let any water or air
bubbles get into the brake system,
otherwise vapor lock may occur. Be
particularly careful when removing the
cover of the reservoir tank.
Vapor lock may occur if the brakes are
applied continuously. To relieve
this condition,
momentarily
release the lever.
If vapor lock occurs, stop riding the
bicycle immediately.
The cause of vapor lock is usually water
mixed in with the oil, so replace the oil with
Shimano genuine mineral oil.
If vapor lock occurs
burn-in
period
Disc brakes have a burn-in period during which the rotors are rubbed
by the pads, and the braking force will gradually increase as the burn-in
period progresses. Make sure that you are aware of any such increases
in braking force when using the brakes during the burn-in period. The
same thing will happen when the brake pads or rotor are replaced.
Hydraulic
Disc Brake
Cable type
Disc Brake
If the bicycle
is inverted
The hydraulic disc brake system is not designed to be turned upside
down, so if the bicycle is turned upside down, the air bubbles inside the
reservoir tank may move in the direction of the calipers. If the bicycle is
ridden in this condition, there is the danger that the brakes may not
operate.
If the bicycle has been turned upside down, be sure to operate
the brake lever a few times to check
that the brakes operate normally
before riding the bicycle. If the
brakes do not operate normally,
bleed the air bubbles
(refer to pages 25-26).
Using in cold
temperature
conditions
If using the bicycle in cold temperature conditions, the ambient
temperature during use should not be less than -20°C.
Applicable forks
and frames
The shimano disc brake system is compatible with flange or
International standard bosses. For some installations, it will be
necessary to mount a Shimano adapter for post type frame and fork
bosses. If an adaptor needs to be installed, consult the place of
purchase for further details.
Combining
with other
manufacturers'
products
The Shimano disc brakes are designed for optimum performance when
used in combination with the calipers, brake lever, rotor, brake
hose/cable and the Shimano pad unit. If used with any other
combination of products, the brakes may not provide enough braking
force or the rotor and calipers may interfere with each other during
operation.
The oil should be replaced when
severe discoloration is visible. Oil
will become discolored when oil
heats up through frequent brake
use, such as racing or extreme
riding conditions.
Guide to
replacement
(
Shimano genuine
mineral oil,
brake pads, rotors
)
Shimano genuine mineral oil
Hydraulic
Disc Brake
Hydraulic
Disc Brake
Hydraulic
Disc Brake
Cable type
Disc Brake
Hydraulic
Disc Brake
Cable type
Disc Brake
Hydraulic
Disc Brake
12
Handling Shimano Disc Brakes
13
Handling Shimano Disc Brakes
If the brake pads are contaminated with oil, if the brake
pads are worn down to a thickness of 0.5mm (0.9mm), or
if the brake pad presser springs are interfering with the
rotor, it is recommended that you replace the brake pads.
At such times, Do not apply any pad grease to prevent
brake noise. If pad grease is applied, the grease will melt
due to heat from the pads during riding, and the grease
may get onto the surface of the pads affecting braking
performance. Furthermore always replace the snap rings
or cotter pins when replacing the brake pads.
Brake pads
If the rotors are bent or severely damaged, they should be replaced.
Rotors
Notes on
installation
I
During installation or maintenance,
do not touch the rotor while it is
turning, otherwise injury may result.
I
When connecting the hose, apply Shimano genuine mineral oil to the
O-ring to help preserve the O-ring from deterioration.
I
The hose should be long enough so that it will not be damaged or
become disconnected if the bicycle falls over.
Hydraulic
Disc Brake
Cable type
Disc Brake
Hydraulic
Disc Brake
Cable type
Disc Brake
Hydraulic
Disc Brake
Cable type
Disc Brake
Hydraulic
Disc Brake
Hydraulic
Disc Brake
M08
M05
00..55mm
00..99mm
(
M515, C601
)
4
Install by carrying out the removal procedure in
reverse. Make sure that the installation direction
of the lever shaft is correct.
< BL-M755 >
1
Remove the lever shaft fixing bolt from the brake lever.
(Turn counterclockwise using a 2 mm Allen key.)
2
Remove the lever shaft.
3
Use a 2 mm Allen key to turn the reach
adjustment bolt clockwise in order to
remove the lever.
I
Secure the hose with plastic ties or similar so that the hose does not
stick out from the bicycle frame. If the hose is not secured correctly
and sticks out, it may get caught on
parts such as bushes during riding,
which may result in damage to the hose
or it might cause the bicycle to fall over.
I
When opening and closing the bleed
nipple, use a socket wrench so as not
to damage the head of the bolt.
< M965 / M755-DH >
I
Use a wire to secure the caliper fixing bolt in order to prevent the
bolt from loosening.
I
If using shims to provisionally secure the calipers during installation,
be sure to only tighten the bolts to the specified torque.
The caliper holding force will be sufficient even if all of the supplied
shims are used to eliminate any interference between the pads and
the rotor.
I
When removing the diaphragm inside the reservoir tank, keep the
diaphragm clean at all times and be careful not to let any foreign
particles get onto it. If the diaphragm is dirty when it is installed, it
may cause problems with the operation of the brakes. If the
diaphragm is dirty, make sure that it is fully cleaned before it is
installed.
Replacement
of the brake
lever unit
2 mm Allen key
Reach
adjustment bolt
Lever shaft
fixing bolt
Lever shaft
2 mm
Allen key
Hydraulic
Disc Brake
Cable type
Disc Brake
Hydraulic
Disc Brake
Cable type
Disc Brake
Hydraulic
Disc Brake
Hydraulic
Disc Brake
14
Handling Shimano Disc Brakes
15
Technical Notes
Technical Notes
Disc brake
dimensions
Shimano disc brakes are designed to fit the frame and fork as shown below.
(The dimensions shown below are as same as the International Standard disc brake mount.)
The following mount dimensions (A~H) for each model are recommended.
The gray area should be flat.
Note:
A bent brake mount may result in interference between the brake pad and rotor causing noise.
Disc brake mount dimensions
Front fork dimensions
ø
6.2 ±
0.1
ø
6.2 ±
0.1
R87.3 ±
0.1
R49.7 ±
0.1
51±
0.1
25(max.)
4 ±0.1
+1
0
7
F
F
C
A
A
G
G
D
D
B
B
C
Dimension
Cap type
Wiring type
Cap type
Wiring type
BR-M965
BR-M755
BR-M555
BR-M525
BR-M515
BR-C601
BR-M475
BR-C501
BR-M965
BR-M755
BR-M555
BR-M525
BR-M515
BR-C601
BR-M475
BR-C501
6mm
6mm
6mm
8mm
8mm
A
(min)
60
60
60
-
-
60
60
30
45
65
45
B°
(min) D
(max)
C°
(min) F°
(min) H
(min)
G°
(max)
12mm
-
-
8mm
8mm
-
-
-
45
50
45
-
-
60
-
30
45
-
2.5mm
-
6.5mm
1mm
1mm
4mm
1mm
Model
Model
Part: A
Part: A
Part: B
Dimension
6mm
6mm
6mm
8mm
8mm
A
(min)
60
60
30
45
90
-
60
60
60
45
-
45
B°
(min) D
(max)
C°
(min) F°
(min) H
(min)
G°
(max)
8mm
-
10mm
8mm
6.5mm
8mm
-
-
-
45
10
-
-
-
-
40
-
2.5mm
-
6.5mm
1mm
1mm
4mm
1mm
Part: B
H
Shimano disc brakes are designed to fit the frame and fork as shown below.
(The dimensions shown below are as same as the International Standard disc brake mount.)
The following mount dimensions (A~H) for each model are recommended.
Disc brake mount dimensions
Rear frame dimensions
ø
6.2 ±0.1
0 ±0.1
+1
0
ø
6.2 ±
0.1
R39.9 ±
0.1
R78.1 ±
0.1
51±
0.1
Part: C
E
C
C
G
B
B
D
D
H
A
A
Part: D
Dimension
6mm
6mm
6mm
8mm
8mm
A
(min)
60
60
60
-
-
60
60
30
45
90
45
B°
(min) D
(max)
C°
(min) F°
(min) H
(min)
G°
(max)
8mm
-
-
8mm
8mm
-
-
-
45
10
45
-
-
60
-
45
-
-
6.0mm
-
6.5mm
-
1.3mm
-
4mm
-
1mm
-
4mm
Part: C
Dimension
6mm
6mm
6mm
8mm
8mm
A
(min)
60
60
30
-
-
60
60
60
45
45
B°
(min) D
(max)
C°
(min) H
(min)
(18mm)
-
10mm
8mm
8mm
-
6.0mm
-
6.5mm
-
1.3mm
-
4mm
-
1mm
-
4mm
Part: D
Cap type
Wiring type BR-M965
BR-M755
BR-M555
BR-M525
BR-M515
BR-C601
BR-M475
BR-C501
Model
Cap type
Wiring type BR-M965
BR-M755
BR-M555
BR-M525
BR-M515
BR-C601
BR-M475
BR-C501
Model
16
Technical Notes
17
Technical Notes
•
Shimano rotors (except RT96) are able to mount to hubs with the following dimensions.
Required dimensions are the same as Hayes disc brake standard.
A B
ø
44 ±0.1
60
°
A
Front
Dimension
B
Dimension
Rear
10.5 ±0.1
M755
15.1
16.7
M756/M525/M475/C501
15.3
16.915.25 ±0.1
A
Front
Dimension
Rear
10.5 ±0.1
15.25 ±0.1
ø
32.9
ø
160
ø
52.8
91.75 A
PCD
ø
44
ø
38.8
Hub dimensions
for Shimano
disc brake
Dimensions for
XTR Disc
(Rotor & Hub)
Technical Notes
Combination
Chart
(Hydraulic Disc )
Shimano Hydraulic Disc Brake combination chart
Rotor Specification
Hose material & length
In order to realize the best performance, we recommend that the following
combination be used.
M07 Resin
(M06 Metal)
BR-M965
BR-M966
SM-RT96
SM-RT75S
Hose
PAD (option)
Roter
Brake Lever
Mount type
CaliperSeries
Front Only (BR-M966)
SM-BH60/61 Co1 Metal
BL-C901 BR-C901NEXAVE
Deore / NEXAVE
Deore / NEXAVE
Series
Series for Front for Rear
Hose length (mm)
XTR
XTR
XT / Deore
900,1300,1700mm
900,1300,1700mm
500-1000
(every 50mm)
1200-1700
(every 50mm)
900,1300,1700mm
SM-RT60/61
SM-BH59 BL/BR-M525
SM-BH60
Resin
SM-BH61
SM-BH96 Cutable
Cutable
Cutable
900,1300,1700mm Cutable
SM-RT75-DH
SM-RT75M
SM-RT75S
SM-RT96
Model No.
Model No. Material
ST-M965
Compatible brake
lever & caliper
44mm
160mm
203mm For BR-M755-DH
for Manitou suspension , *Only for
front side , *Not available for '2000
Manitou Mars CL
Lock ring type mount
170mm
160mm
160mm
Outside Diameter
-
PCD (mm)
Deore XT
Deore
Deore XT
BR-M555-MSM-BH60/61
BL-M555
BR-M555SM-BH62BL-M556
International
standard
International
standard
Post mount
Post mount
International
standard
International
standard
XTR
SM-RT60/61
SM-BH59 M08 Resin
BL-M525 BR-M525 *3
*2
M01 Metal
(M02 Resin)
For Manitou fork,
Front only
*3 : FRONT MOUNT:
International standard /
Post mount
REAR MOUNT:
International standard
*1 :
For Manitou post
mount use only
*2 : Front: Boxxer, Post
(Manitou) & International
Standard (DH, XC)
Mounting available.
Rear: International
standard
M03 Metal
(M04 Resin)
SM-BH62
BL-M756
SM-RT75-DH
BR-M755-DH
BL-M755
SM-BH60/61
SM-RT96
SM-RT75S
RT75M *1
BR-M755
BL-M756
BR-M755
()
BL-M556
BR-M555
()
SM-BH62
BL/BR-M755,
BL/BR-M555,
BL/BR-C901
BL-M755
ST-M965
SM-BH60/61
SM-BH96
18
Technical Notes
19
Technical Notes
Technical Notes
Brake Hose
Olive
Connecting bolt
Brake Lever
Olive
Connecting bolt
Brake Lever
Olive
Connecting
bolt
Caliper
Connector
insert
Olive
Hose Connecting bolt
Cut end
At brake lever end
At brake lever end
At caliper end
At caliper end
Banjo bolt
Hose
Banjo
Brake lever
O-ring
Connector
insert
Olive
Hose Connecting bolt
Cut end
Banjo bolt
Banjo A
Banjo nut
Hose
Olive
O-ring
O-ring
Connector
insert
Banjo
Hose
Banjo sleeve Banjo bolt
O-ring
SM-BH96 (Cutable)
ST-M965
BR-M965 / M966
SM-BH62 (Cutable)
At brake lever end At caliper end
SM-BH61 (Cutable)
SM-BH59 (Cutable)
Hose
Caliper
Banjo
Banjo bolt
O-ring
While pushing the brake hose,
tighten the banjo nut.
While pushing the brake hose,
tighten the connecting bolt.
While pushing the brake hose,
tighten the connecting bolt.
Hose
Banjo
O-rings
Hose
Banjo
O-rings
O-rings
Olive
Cut end
Banjo nut
Hose
BL-M756 / M556
BR-M755 / M555
BL-M755 / M555
BR-M755 / M555
BL-M525
BR-M525

This manual suits for next models

7

Other Shimano Bicycle Accessories manuals

Shimano DEORE XT RD-M972 Operating instructions

Shimano

Shimano DEORE XT RD-M972 Operating instructions

Shimano CN-9000 User manual

Shimano

Shimano CN-9000 User manual

Shimano XTR FC-M980 Operating instructions

Shimano

Shimano XTR FC-M980 Operating instructions

Shimano HP-NX10 Operating instructions

Shimano

Shimano HP-NX10 Operating instructions

Shimano EW-WU101 User manual

Shimano

Shimano EW-WU101 User manual

Shimano RD-7970 Operating instructions

Shimano

Shimano RD-7970 Operating instructions

Shimano SG-8R20 User manual

Shimano

Shimano SG-8R20 User manual

Shimano DURA-ACE FC-R9100 User manual

Shimano

Shimano DURA-ACE FC-R9100 User manual

Shimano RD-M760 User manual

Shimano

Shimano RD-M760 User manual

Shimano TIAGRA RD-4500 User manual

Shimano

Shimano TIAGRA RD-4500 User manual

Shimano SM-CD800 User manual

Shimano

Shimano SM-CD800 User manual

Shimano RD-6700 Operating instructions

Shimano

Shimano RD-6700 Operating instructions

Shimano XT series Operating instructions

Shimano

Shimano XT series Operating instructions

Shimano Nexus CJ-8S20 Operating instructions

Shimano

Shimano Nexus CJ-8S20 Operating instructions

Shimano DIGI-PACE-WR User manual

Shimano

Shimano DIGI-PACE-WR User manual

Shimano SM-BH96 Operating instructions

Shimano

Shimano SM-BH96 Operating instructions

Shimano FD-M661 User manual

Shimano

Shimano FD-M661 User manual

Shimano WH-M505 User manual

Shimano

Shimano WH-M505 User manual

Shimano RD-TX30 Operating instructions

Shimano

Shimano RD-TX30 Operating instructions

Shimano SL-TZ20-6 User manual

Shimano

Shimano SL-TZ20-6 User manual

Shimano Alfine SM-RT62 Operating instructions

Shimano

Shimano Alfine SM-RT62 Operating instructions

Shimano GRX RX 815 Series User manual

Shimano

Shimano GRX RX 815 Series User manual

Shimano FD-M780 User manual

Shimano

Shimano FD-M780 User manual

Shimano SM-EC79 Operating instructions

Shimano

Shimano SM-EC79 Operating instructions

Popular Bicycle Accessories manuals by other brands

Rungu Rear Rack owner's manual

Rungu

Rungu Rear Rack owner's manual

RIESE & MULLER avenue instruction manual

RIESE & MULLER

RIESE & MULLER avenue instruction manual

AddBike Carry'Box Kid instruction manual

AddBike

AddBike Carry'Box Kid instruction manual

EVBIKE C961 installation manual

EVBIKE

EVBIKE C961 installation manual

Busch+Müller 160 Series instruction manual

Busch+Müller

Busch+Müller 160 Series instruction manual

Schwinn Cadence Pro Installation instructions manual

Schwinn

Schwinn Cadence Pro Installation instructions manual

ERGOTEC Pedals EP-2 Assembly and safety instructions

ERGOTEC

ERGOTEC Pedals EP-2 Assembly and safety instructions

Busch & Müller IXON Core instruction manual

Busch & Müller

Busch & Müller IXON Core instruction manual

Bike2Power SpinPower S1 user manual

Bike2Power

Bike2Power SpinPower S1 user manual

Babboe CONFIGACC-002 instruction manual

Babboe

Babboe CONFIGACC-002 instruction manual

Cube LITENING C:68 X Additional instructions

Cube

Cube LITENING C:68 X Additional instructions

e-bike vision Power Pack Manual/Safety Notes

e-bike vision

e-bike vision Power Pack Manual/Safety Notes

Vetta PathFinder II Wireless Quick start manual

Vetta

Vetta PathFinder II Wireless Quick start manual

EVBIKE EVBIKE-SET-CMS-48 installation manual

EVBIKE

EVBIKE EVBIKE-SET-CMS-48 installation manual

Pyle Sports IB9015 manual

Pyle Sports

Pyle Sports IB9015 manual

SENDER RAMPS CORE 200 manual

SENDER RAMPS

SENDER RAMPS CORE 200 manual

Look KEO BLADE manual

Look

Look KEO BLADE manual

kinetic T-6100 manual

kinetic

kinetic T-6100 manual

manuals.online logo
manuals.online logoBrands
  • About & Mission
  • Contact us
  • Privacy Policy
  • Terms and Conditions

Copyright 2025 Manuals.Online. All Rights Reserved.