Shindaiwa DGW400DM-380A User manual

OWNER’S AND
OPERATOR’S
MANUAL
DGW400DM-380A
Vertical, Water-Cooled
4-Cycle Diesel Engine
Table of Contents Page
1.Safety Guidelines
2.Specifications
3.Use
4.Parts
5.Equipment
5-1.Eco Welding
5-2.Remote Control(Option)
5-3.Monitor Lamp
5-4.Frequency Change
5-5.Earth Leakage Relay
5-6.Single Phase Breaker for
the receptacle circuit only
5-7.The Slow-Down Feature
5-8.Voltage Adjusting Dial
6.Initialization and Pre-check
6-1.Checking Engine Oil
6-2.Checking Coolant/Water
6-3.Checking Fuel
6-4.Checking Fuel, Engine Oil
and water Leakage
6-5.Checking Battery
7.Operation
7-1.Starting
7-2.Stopping
8.Welding Operation
8-1.Selection-Welding Cable
8-2.Polarity
8-3.Connection-Welding Cable
8-4.Duty Cycle
8-5.Welding
9.Generator Operation
9-1.Output Range
9-2.Output Limitation
9-3.Operation
10.Simultaneous Use of Welding and
Generating
11.Checking and Maintenance
12.Long-term Storage
13.Troubleshooting
14.Engine Wiring Diagram
15.Generator Wiring Diagram
2
5
6
6
7
7
7
8
10
11
13
13
14
14
14
15
16
17
17
19
19
20
21
21
21
21
22
23
24
24
25
26
28
28
33
33
35
36
SOUND PROOF DIESEL ENGINE
GENERATOR/WELDER
CAUTION: Do not operate the Generator/Welder, or any other appliance, before you
have read and understood the instructions for use.
Shindaiwa Corporation

Introduction
Thank you for purchasing Shindaiwa Sound Proof Diesel Engine Generator/Welder.
zThis user manual was created to ensure the safe operation of this equipment.
Therefore, the manufacturer of this equipment strongly recommends that the
user follow the instructions herein, to avoid unnecessary accidents and repairs.
zPlease operate this equipment after thoroughly reviewing and understanding
the contents of this manual.
zPlease attach this manual, if the equipment will be sub-leased.
zPlease store this manual near the equipment for easy reference.
■Following convention will be used throughout the manual to indicate the
degree of cautions.
Danger Can cause serious injuries or death.
Caution Can cause minor injuries or damage to the equipment or other
properties.
<Caution> Other types of caution
zEven some of the items noted in『Caution 』may lead to serious injuries.
Please read all item and follow all the safety guidelines.
- 1 -

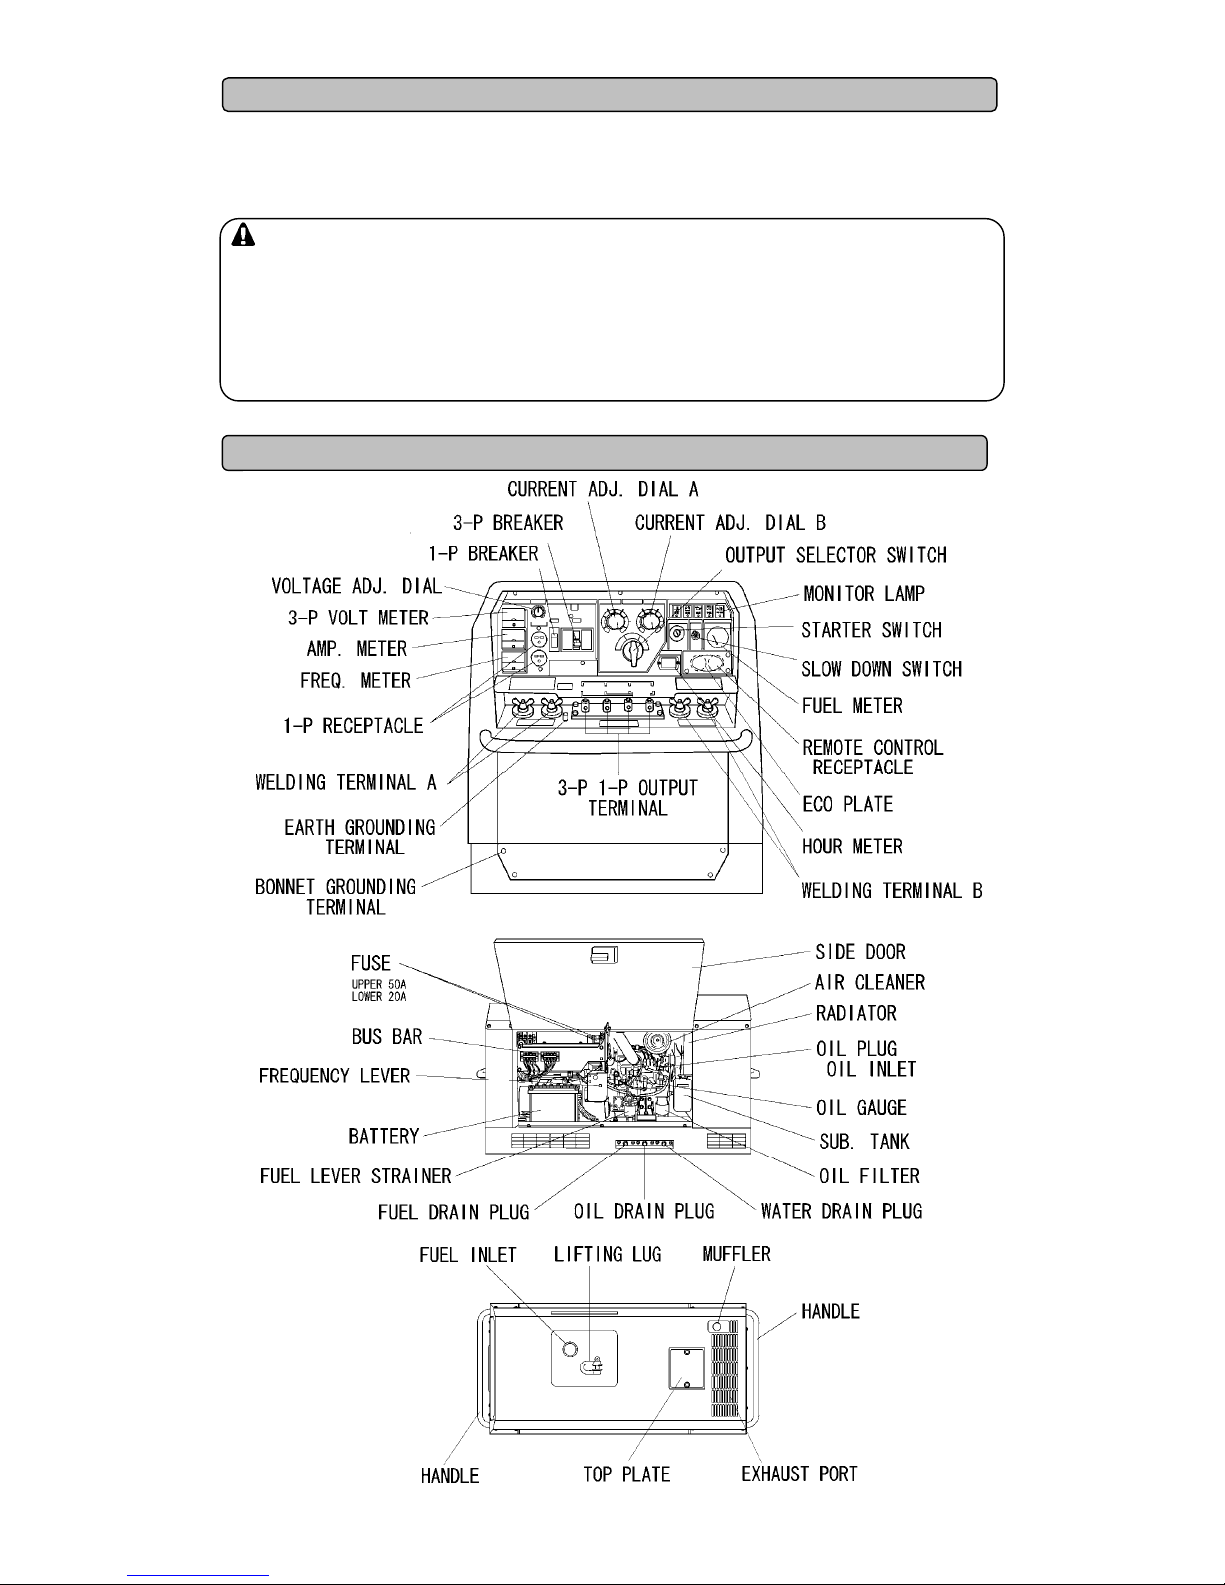
1. Safety Guidelines
Danger : Suffocation from exhaust fume
zExhaust fume from the engine contains many elements harmful to human. Do
not operate this equipment in poorly ventilated area, such as inside a room or in
a tunnel.
Danger : Electric Shock
zDo not touch the output terminals during operation.
zDo not insert metal objects (such as pin or wire) into plug-in receptacles.
zDo not touch wiring or electric parts inside the equipment during operation.
zBefore connecting or disconnecting a load cable from output terminals, always
turn the circuit breaker to OFF position.
zBefore connecting or disconnecting a welding cable from output terminals, stop
the engine, and remove the engine key.
zBefore performing any equipment check or maintenance, stop the engine, and
remove the engine key. A person performing the maintenance should always
keep the key.
Danger : Burns
zDo not open the radiator cap while operating this equipment or immediately
after stopping the equipment, to avoid sustaining burns from hot vapor.
Danger : Injuries
zClose all doors and place locks during operating this equipment, to avoid
injuries by unintentionally touching cooling fan and fan belt.
Caution : Suffocation from exhaust fume
zDo not point the exhaust fume toward pedestrians or building.
Caution : Suffocation from welding fume
zBe sure to wear a fume proof mask in operation, because welding fume
contains poisonous gas and dust. Pay attention to the airflow direction and
sufficient ventilation also in order to prevent from inhaling the fume.
Caution : Injuries to eyes and skin
zBe sure to wear spark protection glass(es), long-sleeve shirts, gloves, etc. in
order to protect eyes and skin from harmful spark in welding.
zBattery fluid contains diluted sulfuric acid. Avoid contact with eyes, skin or on
clothing. If the acid comes in contact, especially with eyes, flush with a lot of
water, and contact your physician immediately.
Caution : Electric shock
zDo not flush water onto the equipment nor operate it in the rain.
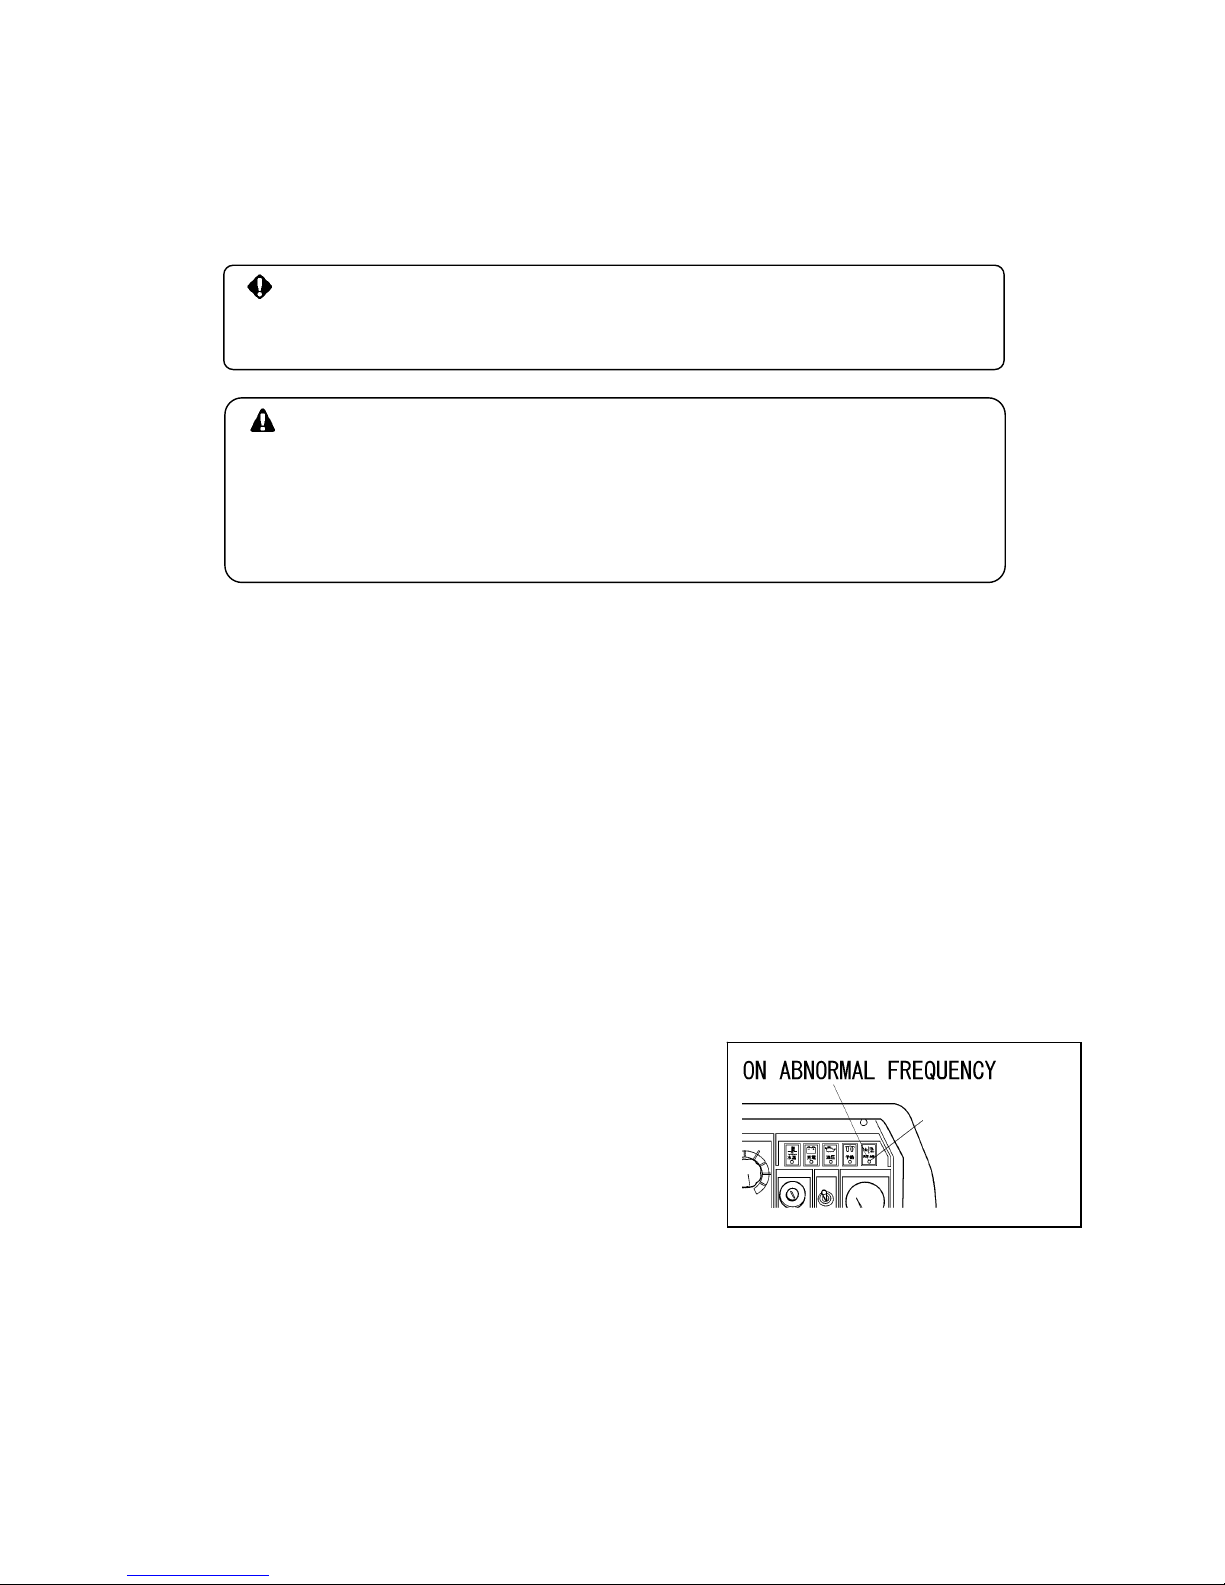
Caution : Explosion
zDo not use the equipment or charge the battery, in the case the battery fluid
level is lower than the LOWER level.
zBattery may emit some combustible gas, so keep it away from fire and sparks.
- 2 -

Caution : Fire
zThe equipment uses Diesel Oil as a fuel. When refueling, always stop the
engine and keep away from fire. Moreover, always wait until the engine cools
down before refueling.
zAlways wipe any drip of Diesel fuel or lubrication oil. Do not use this equipment
when a leak is found. Repair the equipment before use.
zTemperature around muffler and exhaust can get extremely high. Keep any
inflammable items (such as fuel, gas, paint, etc.) away from the equipment.
zKeep any inflammable items and easily burning items away from the place in
welding, because welding splashes spatters.
zAlways operate this equipment on flat surface and, at least 1 meter away from
any objects (wall, box, etc.).
zDo not connect AC output to any indoor wiring.
zAlways wait until the equipment cools down, before placing any covering
materials for storage.
Caution : Burns
zDo not touch the engine and muffler during operation and immediately after
stopping the equipment, for the temperature can reach extremely high.
zWhen checking engine oil or changing oil, always stop the engine, and wait until
the engine cools down. If you open either the oil gauge or the oil plug during
operation, hot oil may cause some injury.
zBe sure to wear leather gloves, apron, shoe covers, eye protection glass(es)
(mask), safety shoes, safety cap, and long sleeve shirts, because welding
splashes spatters.
Caution : Injuries
zWhen lifting the equipment, always use a lift hook. Do not lift a handle, for it
may cause equipment to drop due to handle breaking off.
zAlways place the equipment on a flat and stable surface, to keep the
equipment from sliding. Be sure to lock the wheels for the wheeled models.
zWhen starting the engine, turn off the connected equipment and set the circuit
breaker to OFF position.
zDo not move the equipment during operation.
zWhen performing equipment check and maintenance, always stop the engine.
zDo not operate the equipment, if the equipment is being modified or if the parts
are removed.
- 3 -

Location of Warning labels
When the warning labels become unreadable or damaged, place new labels on
the appropriate locations, as specified in the following figure.
When ordering the label, use the following part numbers.
①Suffocation from exhaust fume (No. 19402-00194)
②Suffocation from welding fume (No. 19402-00195)
③Electric shock (No. 19402-00192)
④Electric shock (No. 19402-00193)
⑤Injuries (No. 19402-00199)
⑥Burns (No. 19402-00201)
⑦Burns (No. 19402-00200)
- 4 -

2. Specifications
Model DGW400DM
Generating Method Rotating Field
Rated Current (A) 370 / 390
Rated Voltage (V) 34.8 / 35.6
Duty Cycle (%) 60
Rated Speed (min-1 ) 3000 / 3600
No Load Voltage (A) MAX 85
Current Adj. Range (A) 90 – 380 / 110 - 400Single
Welding Rod (Ф) 2.6 - 8.0
Current Adj. Range (A) 50 – 190 / 55 - 210Dual
Welding Rod (Ф) 2.0 - 4.0
Current Adj. Range (A) 40 - 240
Welding Generator
Output Change
Eco
Welding Rod (Ф) 2.0 - 5.0
Rated Frequency (Hz) 50 / 60
Rated Speed (min-1 ) 3000 / 3600
Phase 1-Phase 3-Phase
Rated Voltage (V) 220-240 380-415 380-415
Power Factor 1.0 0.8
Rated Output (kVA) 3 12 15
AC Generator
Rating Continuous
Model Kubota D1005
Type Vertical, Water-Cooled 4-Cycle Diesel Engine
Displacement (L) 1.001
Rated Output (kW/min-1) 16.5 / 3000 or 19.1 / 3600
Fuel ASTM No.2 Diesel Fuel or Equivalent
Lubricant Oil API Class CC or Higher
Lubrication Oil Volume (L) 5.1 (Effective 1.4)
Cooling Water Volume (L) 4.3 (Sub Tank Capacity 0.6 L included)
Engine
Starting Method Starter Motor
Battery 55B24L
Fuel Tank Capacity (L) 37
Length (mm) 1519
Width (mm) 700
Dimension
Height (mm) 760
Dry Weight (kg) 469
- 5 -

3. Usage
zArc Welding
zElectric Tools and Home Appliances
zPower Source for lights
Caution : Damage to the equipment or other properties
zThe equipment is designed for the above purposes only. Do not use it for the other
purpose. When it will be used for the equipment with the microcomputers control or
for the ultra-precision devices, the load may be malfunctioned.
zWhenever connecting to use medical equipment or appliances, be sure to consult
with the medical equipment company, doctor or hospital personnel.
4. Parts
- 6 -

5. Equipment
5-1 Eco Welding
The equipment is incorporated in Eco welding features that are aimed at performing
the lower noise, the lower fuel consumption and the lower gas emission than
conventional models.
When you turn the selector switch to Eco, you will be able to weld with Max.
5.0mmφwelding rod at the slow down speed.
<Caution>
zWhen welding is performed, do not turn the output selector switch, which causes
the burnout of the switch.
zEco is designed for welding only. The 3-phase circuit breaker trips and
simultaneously the outputs of welding and generating would fall down and you will
not do anything when Eco is used for AC power supply.
5-2 Remote Control (Option)
Using the remote control box, the remote control to adjust the welding current
makes it possible.
Remote Control Box Connection
Remove “Eco” plate. (M4 Screw 2 pieces)
Insert the plug of the extension cable reel
into A side or B side receptacle
Insert the plug of the remote control box
into the receptacle of the extension cable
reel.
<Caution>
zNever connect the plug of the remote control box to the receptacle of the
extension cable reel when the reel is connected to 1-P receptacle.
zNever connect the other loads additionally than the remote control box.
zIn the case the extension cable reel is installing the breaker, use the equipment to
have turned the breaker ON.
- 7 -

5-3 Monitor Lamp
The equipment is incorporated in monitoring function of WATER TEMP, BATTERY
CHARGING, OIL PRESSURE, Hz/OVERHEAT.
Under normal condition, when the starter switch changes from STOP to RUN, all the
lamps of BATTERY CHARGING, OIL PRESSURE and Hz/OVERHEAT turn ON.
When the engine starts, all the lamps turn OFF. When abnormality is detected on
other than Hz/OVERHEAT, the corresponding monitor lamp will flash, and the engine
automatically shutoff.
When the automatic shutoff is engaged, turn the starter switch to STOP position
once, and then restart the engine. In the event the automatic shutoff is engaged next
time, check which lamp turns ON or OFF and point out where is the abnormality.
(1) Coolant/Water Temperature Monitor Lamp
Danger: Injuries
zClose all doors and place during operating this equipment, to avoid injuries by
unintentionally touching cooling fan and fan belt.
Danger: Burns
zDo not open the radiator cap while operating this equipment or immediately
after stopping the equipment, to avoid sustaining burns from hot vapor.
Caution: Burns
zDo not touch the engine and muffler during operation and immediately after
stopping the equipment, for the temperature can reach extremely high.
When the water temperature rises abnormally, the coolant/water temperature
monitor lamp will flash, and the automatic shutoff will be engaged.
When this occurs, check the coolant/water reservoir tank, and replenish if needed.
(Refer to No. 6-2 Checking coolant/water temperature.)
If the water level is normal, there may be a possibility of overloading. Always use the
equipment within the rated duty cycle and output power.
(2) Battery Charge Monitor Lamp
When the battery turns unable to be charged during operation, the battery
charge monitor lamp will flash and the automatic shutoff will be engaged.
In the event this occurs, consult with the authorized distributor or our ngineering
section.
- 8 -

<Caution>
zThe battery charge monitor cannot detect the degradation of the battery nor the
battery fluid level. Check the battery fluid level periodically. (Refer to No. 6-5
Checking Battery)
(3) Oil Pressure Monitor Lamp
Danger : Injuries
zClose all doors and place locks during operating this equipment, to avoid
injuries by unintentionally touching cooling fan and fan belt.
Caution : Burns
zDo not touch the engine and muffler during operation and immediately after
stopping the equipment, for the temperature can reach extremely high.
zWhen checking engine oil, always stop the engine, and wait until the engine
cools down. If you open either the oil gauge or the oil filter cap during operation,
hot oil may cause some injury.
When the engine oil pressure drops during operation, the oil pressure monitor lamp will
flash, and the automatic shutoff will be engaged.
When this occurs, check the engine oil level, and replenish to the maximum level if
needed.
<Caution>
zThe engine oil pressure monitor cannot detect the degradation of engine
oil itself. Please check the engine oil periodically, and change if needed.
(Refer to No. 11. Maintenance.)
zCheck the fuse next, when the abnormality, other than WATER TEMP,
BATTERY CHARGED OR OIL PRESSURE is detected. If the fuse is burned
out, consult with our authorized distributor or our engineering section, because
there may be an abnormality of electric/electronic parts or wiring and repairing
may be required.
(4) Hz/Overheat Monitor Lamp
zUnless the frequency selector lever position
and the bus bars in the equipment are
correspondent to each other, Hz/OVERHEAT
monitor lamp will turn ON. OVERHEAT
FLASH
zHz/OVERHEAT monitor lamp may flash
in the case the machine is used excessively
over the duty cycle.
<Caution>
zWhen Hz/OVERHEAT monitor turns ON, as the output power reduces
remarkably, the AC output power can hardly be used.
zThere may be a case that the lamp will not flash, depending on the welding
type or the weather condition.
- 9 -

5-4 Frequency Change
Danger : Injuries
zFrequency change should be done, after stopping the engine. Moreover, close
doors and place locks during operating this equipment, to avoid injuries by
unintentionally touching cooling fan and fan belt.
Danger: Electric Shock
zNever touch the frequency change bus bar during operation.
Caution: Burns
zDo not touch the engine and muffler during operation and immediately after
stopping the equipment, for the temperature can reach extremely high.
The equipment can be used to 50Hz and 60Hz. Select the frequency according to the
load.
Stop the engine.
Open the side door.
Turn the selector switch and the metal bus bars to the other frequency as per the
drawing.
Start the engine. (Refer to 7-1. Starting)
Turn the slow-down switch to OFF. (Refer to 5-7. Slow-Down)
Check the frequency in the frequency meter in the control panel.
- 10 -

5-5 Earth Leakage Relay
Danger : Electric Shock
zGround every grounding terminal to the earth as set out in the manual.
If even one of all is unconnected by mistake or accident, it will be much more
dangerous for human body than the NO RELAY case, because leaking current
inevitably goes through the body.
zEven though all the terminals of the loads have been grounded to the earth, the
earth grounding terminal and the bonnet (canopy) grounding terminal should be
grounded to the earth.
zGrounding should be made after the engine is stopped.
zWhenever the earth leakage relay has activated, you should always repair the
leaking place first of all.
The equipment is provided with the earth leakage relay in the 3-Phase Circuit Breaker
to detect any leakage arisen due to the troubles as insulation failure of the load while
the generator is running. And cutting off the circuit for protection against any accident
such as electrical shock resulting from the trouble.
<Caution>
zThe earth leakage relays (3-Phase 380V and 1-Phase 220V) activate the AC
to the terminals but not to receptacles.
zThe 3-phase circuit breaker trips to protect the loads, whenever AC power is
used where the selector switch is in the Eco position.
The specifications of the earth leakage relay:
zRated Sensitive Current: 30mA (or below)
(Grounding resistance: 500Ωor below)
zSensitive time: Within 0.1 second
(1) Grounding Work
The qualified electrician should perform the grounding work of the following 3 points
(500Ωor below).
zThe earth grounding terminal in the output terminals
zThe Outer Bonnet of the equipment (bonnet grounding terminal)
zThe Outer Bonnet of the load
<Caution>
zIn the event you cannot ground the generator to the earth, consult with the
authorized distributor or our engineering section.
- 11 -

(2) Operation Check
Before operating the equipment, check always if the device can work duly as
shown in the following procedure.
①Turn the starter switch from STOP to RUN.
②Turn (Push-up) the 3-P circuit breaker (lever) to ON position.
③Push the test button. The device is found to be normal as the earth leakage
indication lamp turns ON and the 3-P circuit breaker positions in the middle of
ON and OFF.
④Push the reset button. (The earth leakage indication lamp turns OFF.)
⑤Turn (Push-down) the 3-P circuit breaker (lever) to OFF position.
⑥Restore the switch to STOP once, when starting the engine.
zIn the event you cannot complete all steps in the above procedure to the end,
the device is out of order. Consult with our authorized distributor or our
engineering section to repair.
(3) The Earth Leakage Relay has activated
Caution : Electric Shock / Injuries
Be sure to disconnect all the loads to the equipment when turning the breakers ON
again, after the earth leakage relay has activated.
When the earth leakage relay has activated, the earth leakage indication lamp
turns ON and also the 3-P circuit breaker (lever) trips to the middle of ON and OFF.
In the case, stop the engine promptly and find the leakage point to repair.
After repairing leakage point(s), proceed with the following restoration steps.
①Push the reset button or stop the engine.
②Restore (push-down) the 3-P circuit breaker (lever) to OFF position.
By the above procedures, you can reset the breaker to ON position.
<Caution>
When the breaker has tripped to the middle but the lamp does not turn ON
simultaneously, the cause to have tripped is OVER-LOAD or the output selector
switch is positioned to ECO. Restore as per the procedures No. 9-3 Operation.
- 12 -

5-6 Single Phase Breaker for the receptacle circuit only
Caution : Electric Shock・Injuries
zBe sure to disconnect all the loads to the generator when turning the breakers
ON again, after the 1-Phase Breaker has activated.
①Disconnect all the loads.
②Turn the breaker to ON.
<Caution>
zDo not exceed the maximum output. Refer to 9-2 Output Limitation.
zThe 1-P breaker protects the receptacle circuit only.
5-7 The Slow-Down Feature
The slow-down feature is to set the engine speed low automatically (in about 8
seconds) for the purpose of reducing noise and fuel consumption, whenever no
welding operation or electric supply is performed.
In the case of using the SLOW-DOWN feature, turn the slow-down switch to ON. By
the condition, the engine automatically moves to high speed, whenever welding
operation or electric supply starts.
Caution : Damage to the equipment or other properties
zTurn always the slow-down switch to OFF, when the load is incorporated with
any magnet switch.
<Caution>
zWhen the load of less than 0.5A is connected to use, the Slow-Down feature
does not function sometimes. Therefore, turn the switch to OFF.
zWhen welding operation or electric supply performs alternately or intermittently,
turn the switch to OFF.
zWhen the output selector switch is positioned to Eco, the engine does not turn
to high speed.
- 13 -

5-8 Voltage Adjusting Dial
Adjust the dial whenever the AC Output adjustment is necessary. Set the dial in the
center usually.
<Caution>
zWhen raising the voltage, the current is decreasing. (Use the output within the
output capacity.)
zIn you raise the voltage exceeding the allowable voltage range, which causes
the damage to the loads. (Especially using the output terminals connected to
the 1-P loads.
6. Initialization and Pre-check
Caution : Fire・Burns・Injuries
zWhen checking engine, always stop the engine, and keep away from fire. Wait
until the engine cools down, before performing any checks.
6-1 Checking Engine Oil
When checking for engine oil, be sure to keep the equipment leveled, and insert
the oil gauge all the way in.
Prior to starting the equipment, make sure to fill the engine oil to the UPPER line
through the oil inlet.
<Caution>
zIf the equipment is not leveled, you cannot obtain accurate oil level.
Do not overfill (over UPPER line) the engine oil. The excessive amount of
engine oil may damage the engine (inside the cylinders)
- 14 -

Selecting proper engine oil
<Caution>
Use the API class CC or higher.
Viscosity and Temperature
Temperature Over +20℃+10〜+20℃-10〜+40℃
Viscosity SAE30 SAE20 SAE10W/30
6-2 Checking Coolant / Water
Danger : Injuries
zClose all doors and place locks during operating this equipment, to avoid
injuries by unintentionally touching cooling fan and fan belt.
Danger : Burns
zDo not open the radiator cap while operating this equipment or immediately
after stopping the equipment, to avoid sustaining burns from hot vapor.
Caution : Burns
zDo not touch the engine and muffler during operation and immediately after
stopping the equipment, for the temperature can reach extremely high.
Check to see if the coolant/water level is between FULL and LOW levels in the sub
tank. If the coolant/water is below the LOW level, fill the tank and the radiator
accordingly.
- 15 -

(1) Filling to the Reservoir Tank
①Remove the sub tank cap.
②Fill up the sub tank to the FULL level.
③Install the cap back.
(2) Filling to the Radiator
①Remove the top plate.
②Remove the radiator cap.
③Fill the radiator up to the top.
④Install the cap back and tighten.
⑤Reinstall the top plate.
<Caution>
zUse soft water, such as tap water.
zIf the ambient temperature is near freezing, use Long Life Coolant (LLC) (30%
mixture LLC is filled when shipped from factory)
zMixture ratio of the coolant should be 30%-45%, depending on the ambient
temperature.
zReplace LLC at every year or 2000 hours.
Mixture Ratio (for reference only)
Lowest Ambient
Temperature -15℃-20℃-30℃
Mixture Ratio 30% 35% 45%
6-3 Checking Fuel
Caution : Fire
zAlways wipe any drip of fuel. Do not use this equipment when any leak is found.
Repair the equipment before use.
Check for the fuel level in the tank. Add if necessary.
- 16 -

<Caution>
zUse Diesel fuel, ASTM D975 No.2-D in the event ambient temperature reaches
down to -5℃.
zThe engine is designed to use either No.1-D or No.2-D Diesel fuel. However,
for better economy, use No. 2-D Diesel Fuel whenever possible. At
temperatures less than -7(20℉), No.2-D fuel may pose operating problems
(see “Cold Weather Operation which follows). At colder temperatures, use
No.1-D fuel (if available) or use a “winterized” No.2-D (a blend of No.1-D and
No.2-D). This blended fuel is usually called No.2-D also, but can be used in
colder temperatures than No.2-D fuel which has not been “winterized”. Check
with the services stations operator to be sure you can get the properly blended
fuel. Note that Diesel fuel may foam during a fill-up. This can cause the
automatic pump nozzle to shut off even though your tank is not full.
zAlways use the fuel strainer.
zFill the fuel tank slightly less than the FULL tank.
6-4 Checking Fuel, Engine Oil and Water Leakage
Caution : Fire
zDo not use this equipment when a leak is found. Repair the equipment before
use.
Be sure to check any leakage for fuel, oil and coolant/water at the hose
connections by opening side doors. Whenever checking any fuel leakage, turn
the fuel lever OPEN and be sure to close the fuel lever after checking.
6-5 Checking Battery
Caution : Injuries to eyes and skin
zBattery fluid contains diluted sulfuric acid. Avoid contact with eyes, skin or
clothing.
zIf the acid comes to contact, especially with eyes, flush with a lot of water, and
contact your physician immediately.
Caution : Explosion
zDo not use the equipment or charge the battery, in the case the battery fluid
level is lower than the LOWER level.
zBattery may emit some combustible gas, so keep it away from fire and sparks.
Caution : Fire
zBattery may emit some combustible gas, so keep it away from fire and sparks.
- 17 -

①Check the fluid level. If the level is near or lower than LOWER level, add
distilled water until the fluid level reaches UPPER level.
②Make sure that the battery cables are firmly secured to the posts. Tighten the
clamps if necessary.
<Caution>
zCheck the hydrometer of the battery fluid. If it falls below 1.23, the battery
requires recharging. Please consult with our authorized distributor or our
engineering section.
Replacing battery
①Remove the clamp and cable from negative (-) post in the battery.
(Remove always negative side first)
②Remove the hold-down clamp from the battery.
③Remove the clamp and cable from positive (+) post in the battery.
④Remove the battery from the seat.
※ Reinstall a new battery in the reverse order.
(Install always the cable to the positive (+) post in the new battery first.)
<Caution>
zUse the following battery.
55B24L
- 18 -

7. Operation
Danger : Suffocation from exhaust fume
zExhaust fume from the engine contains many elements harmful to human.
Do not operate this equipment in poorly ventilated area, such as inside a room
or in a tunnel.
Caution : Suffocation from exhaust fume
zDo not point the exhaust fume toward pedestrians or building.
Caution : Fire
zTemperature around muffler and exhaust can get extremely high.
Keep any inflammable items (such as fuel, gas, paint, etc.) away from the
equipment.
zAlways operate this equipment on flat surface and, at least 1 meter away from
any objects (wall, box, etc.)
Caution : Injuries
zAlways place the equipment on a flat and stable surface, to keep the
equipment from sliding. Be sure to lock the wheels for the wheeled models.
zBefore starting the engine, be sure to disconnect the loads and set the
breakers (1-P and 3-P) to OFF position.
7-1 Starting
①Turn the breakers (1-P and 3-P) to OFF position.
②Turn the fuel lever to OPEN.
③Turn the Slow-Down switch to ON.
④When the temperature is below -5℃,turn and keep the starter switch to
PREHEAT until the preheat lamp turns OFF (about 5 seconds).
⑤Turn the starter switch to START and then the engine starts by the starter
motor.
<Caution>
zDo not drive the starter motor for more than 15 seconds successively.
zIf you need to restart, wait for 30 seconds or more before retry.
⑥Release the switch, as soon as the engine has started.
<Caution>
zOnce the engine has started, never turn the starter switch to START.
⑦Keep the engine idle for about 5 minutes.
- 19 -
Table of contents
Other Shindaiwa Welding System manuals

Shindaiwa
Shindaiwa 3 Series User manual

Shindaiwa
Shindaiwa EGW165M-I/UKV User manual

Shindaiwa
Shindaiwa DGW340DM User manual

Shindaiwa
Shindaiwa DGW500DM User manual

Shindaiwa
Shindaiwa DGW300M User manual

Shindaiwa
Shindaiwa DGW311DM User manual

Shindaiwa
Shindaiwa DGW310DMC User manual

Shindaiwa
Shindaiwa DGW400DM-C User manual
Popular Welding System manuals by other brands

Miller
Miller TRUE BLUE MigMatic 260i owner's manual

Lincoln Electric
Lincoln Electric POWERARC 5500 SVM197-A Service manual

Snap-On
Snap-On MM250SL Service manual

HG
HG Soldatech TL200PHG user manual

Rohr
Rohr MMA-160FI Operation manual

Lincoln Electric
Lincoln Electric INVERTEC V320-T AC/DC Operator's manual