Shizuoka Seiki VAL6 KBE1S User manual

• Lea y entienda bien este Manual del usuario antes de emplear el calefactor para que pueda funcionar
con seguridad.
• Conserve este manual para que el usuario pueda consultarlo cuando sea necesario.
• Avant d’utiliser cet appareil de chauffage et pour des raisons de sécurité, veuillez lire attentivement
le contenu de ce manuel et en comprendre le sens.
• Conservez ce manuel de manière à pouvoir vous y reporter en cas de besoin.
• Read and thoroughly understand this Owner’s Manual before using the heater for safety operation.
• Please keep this Manual for the user’s need and reference.
Owner’s Manual
Manuel d’utilisation
Betriebsanleitung
Handleiding
Manual del usuario
Nederlands
Deutsch Français
• Die Betriebanleitung vor der Inbetriebnahme aufmerksam durchlesen, um einen sicheren Betrieb zu
gewährleisten.
• Diese Anleitung für anfallende Fragen zur Bezugnahme sicher aufbewahren.
• Lees deze handleiding zorgvuldig door en zorg dat u alles goed begrijpt zodat u de verwarming
veilig zult kunnen gebruiken.
• Bewaar deze handleiding zodat u er later nog eens iets in op kunt zoeken.
Español English

4-1.Täglich zu kontrollierende Punkte ................. 37
4-2. Regelmäßige Wartung .................................... 38
5. Einlagerung des Heizstrahlers ............................. 39
6. Störungssuche ...................................................... 39
7. Austauschverfahren .............................................. 40
7-1. Sicherung ....................................................... 40
7-2. Düse ................................................................ 40
8. Technische Daten .................................................. 41
9. Sicherheitsschilder ............................................... 42
ZUSAMMENBAUANWEISUNGEN ................................... 29
1. Informationen zur Sicherheit ................................ 30
2. Bezeichnung der Bauteile..................................... 33
3. Betrieb ................................................................... 34
3-1. Betriebsvorbereitungen ................................. 34
3-2. Bedienung ...................................................... 35
3-3.Verwendung der Hitzeschutzmatte ................ 36
3-4. Betrieb mit tragbarem Generator .................. 36
4. Inspektion .............................................................. 37
Inhalt
Inhoud
MONTAGE-INSTRUCTIES ............................................... 43
1. Informatie aangaande de veiligheid ..................... 44
2. Namen van de onderdelen .................................... 47
3. Gebruiksaanwijzing .............................................. 48
3-1.Voorbereidingen voor gebruik ....................... 48
3-2. Bedieningsprocedures ................................... 49
3-3.
Gebruik van de hittebestendige beschermingsmat ......
50
3-4. Gebruik met draagbare generator ................. 50
4. Inspectie ................................................................ 51
4-1. Dagelijkse inspectie ....................................... 51
4-2. Periodieke inspectie ....................................... 52
5. Opslaan van de verwarming ................................. 53
6. Problemen oplossen ............................................. 53
7. Vervangen .............................................................. 54
7-1. Zekering .......................................................... 54
7-2. Mondstuk ........................................................ 54
8. Technische gegevens ........................................... 55
9. Veiligheidslabels ................................................... 56
4-1. Inspection quotidienne .................................. 23
4-2. Inspection périodique .................................... 24
5. Comment entreposer l'appareil
de chauffage .......................................................... 25
6. Dépannage ............................................................ 25
7. Méthode de remplacement ................................... 26
7-1. Fusible ............................................................ 26
7-2. Buse ................................................................ 26
8. Caractéristiques techniques................................. 27
9. Étiquettes de sécurité ........................................... 28
DIRECTIVES RELATIVES À L'ASSEMBLAGE
...............................
15
1. Consignes de sécurité
....................................................
16
2.
Noms des principaux composants
......................... 19
3. Comment l'utiliser ................................................. 20
3-1. Préparatifs d'utilisation .................................. 20
3-2. Procédures d'utilisation ................................. 21
3-3.
Utilisation du tapis de protection thermique ........
22
3-4. Alimentation à partir d’un groupe
électrogène portatif ........................................ 22
4. Inspection .............................................................. 22
Table des matières
4-1. Daily Inspection .................................................9
4-2. Periodic Inspection ......................................... 10
5. How to Store the Heater ..........................................11
6.Troubleshooting .......................................................11
7. Exchange Procedure ...............................................12
7-1. Fuse .................................................................12
7-2. Nozzle ..............................................................12
8. Specifications .......................................................... 13
9. Safety Labels ...........................................................14
ASSEMBLY INSTRUCTION ................................................ 1
1. Safety Information .....................................................2
2. Names of Components .............................................5
3. How to Use .................................................................6
3-1. Preparation for the Operation ...........................6
3-2. Operating Procedures .......................................7
3-3. Use of the Heat shielding mat...........................8
3-4. Operation with Portable generator ...................8
4. Inspection ..................................................................8
Contents
Contenido
INSTRUCCIONES DE MONTAJE .................................... 57
1. Información de seguridad..................................... 58
2. Nombres de los componentes ............................. 61
3. Modo de utilización ............................................... 62
3-1. Preparativos para la operación...................... 62
3-2. Procedimientos de operación........................ 63
3-3.
Uso de la placa de protección contra el calor
..... 64
3-4.
Funcionamiento con un generador portátil
..... 64
4. Inspección ............................................................. 64
4-1. Inspección diaria ............................................ 64
4-2. Inspección periódica ...................................... 65
5. Cómo guardar el calefactor .................................. 66
6. Solución de problemas ......................................... 66
7. Procedimiento de sustitución .............................. 67
7-1. Fusible ............................................................ 68
7-2. Boquilla ........................................................... 68
8. Especificaciones ................................................... 69
9. Etiquetas de seguridad ......................................... 70
English
ASSEMBLY INSTRUCTION
ASSEMBLY INSTRUCTION
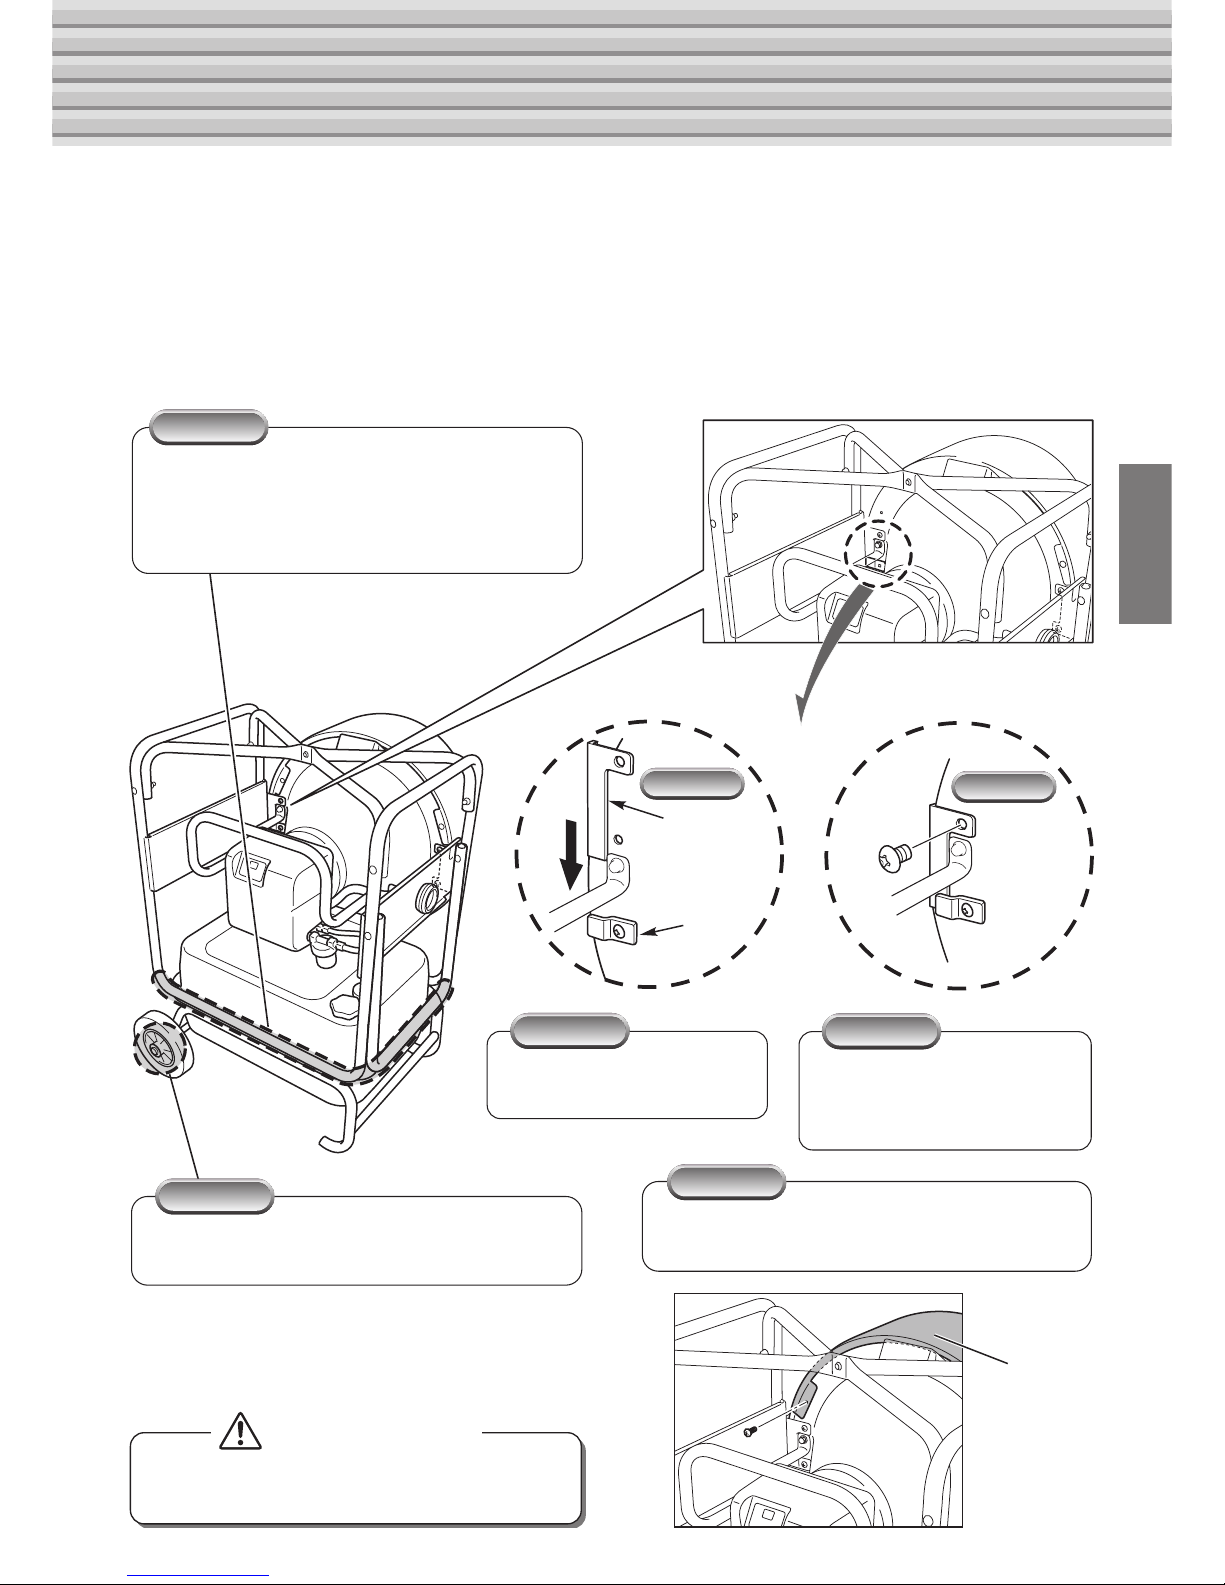
CAUTION
Do not use the unit without the safety
guard to prevent from the accident.
The unit is packaged without having the safety guard, visor and wheel parts
assembled.
Be sure to assemble the safety guard and the visor properly before the unit is used.
Follow the instruction below to assemble the safety guard, visor and wheel parts
in the correct order.
Visor
Finally, the visor must be fastened with the
screws provided on both sides.
No.3-3
No.3-3
Put the main structure on the wheel frame
and fasten them with the screws provided.
Note: Screws which are used for temporary joint in
packing are not needed for assembling.
No.2
No.2
Put the shaft through the shaft plate, then
mount the wheels, washers and cutter-pins.
No.1
No.1
Closeup
No.3-1
No.3-1 No.3-2
No.3-2
Safety
guard
Hook
No.3-1
No.3-1 No.3-2
No.3-2
Then the safety guard must
be fastened with the screws
provided on both sides.
At first the safety guard must
be slid under the hook.
1

Thank you for having bought our Infrared Oil Heater “VAL6”.
WARNING
●Read this Owner’s manual carefully and completely before assembling, operating, or servicing this heater. Improper use of this
heater can cause serious injury or death from burns, fire, explosion, electrical shock, and carbon monoxide poisoning.
●When operating or servicing this heater, please follow all instructions described in this Manual.
●When replacing parts, use only the genuine parts. Please be noted that we shall not be held responsible or liable for any damage
or accident that results from using any unapproved or non-genuine parts.
●We shall not be held liable or responsible for any damage or accident that results from disobeying or not properly carrying out
any instructions in this Manual, or from the improper modificatoin or operation.
1. As we cannot predict every possible situation of danger while operating this heater, the contents described in this Manual
could not fully foresee a whole range of possible dangers. So, when operating or doing daily inspection (to this heater), please
pay full attention not only to the contents of this Manual and the Labels on the heater itself, but also to thoughtful consideration
to be duly paid to the safety operation.
2. If you have any question or more detailed information to know about the heater, please contact your dealer.
3. If any irregular or missing page (s) is found in this Manual, please contact your dealer and we will exchange it with a new one.
4. Please keep a set of Standard Parts supplied together with the heater.
5. The operator of the heater is responsible for warning anyone who works around the heater or comes near the heater of the
dangers of the heater and the safety precautions that must thereby be taken pursuant to this Manual.
6. The heater must not be operated where children, pets and other animals could come into contact with it.
○○○○○○○○○○○○○○○○○○○○○○○○○○○○○○○○○○○○○○○○○○○○○○○○○○○○○○○○○○○○○○○○
○○○○○○○○○○○○○○○○○○○○○○○○○○○○○○○○○○○○○○○○○○○○○○○○○○○○○○○○○○○○○○○○
◆This Manual explains every caution that should be strictly taken, for the proper and safety operation.
Caution is divided into 3 categories of Danger, Warning, and Caution. Please read and understand
well the detailed meanings of each category.
* Depending upon the circumstances, even the category of “CAUTION” can lead to grave results. Caution and recom-
mendation listed in category are equally important for the safety operation, so be sure to follow well all 3 categories.
1Safety Information
Important Notice
• The requirements of local authorities having jurisdiction shall be followed.
• The installation of the unit shall be in accordance with the regulations of the authorities having jurisdiction.
2
Negligence of this indication “DANGER” and the improper operation can lead to
death, serious injury and/or major fire.
Negligence of this indication “WARNING” and the improper operation may likely
result in death, serious injury, fire and/or possible explosion.
Negligence of this indication “CAUTION” and the improper operation may re-
sult in serious injury and/or property damage.
DANGER
WARNING
CAUTION
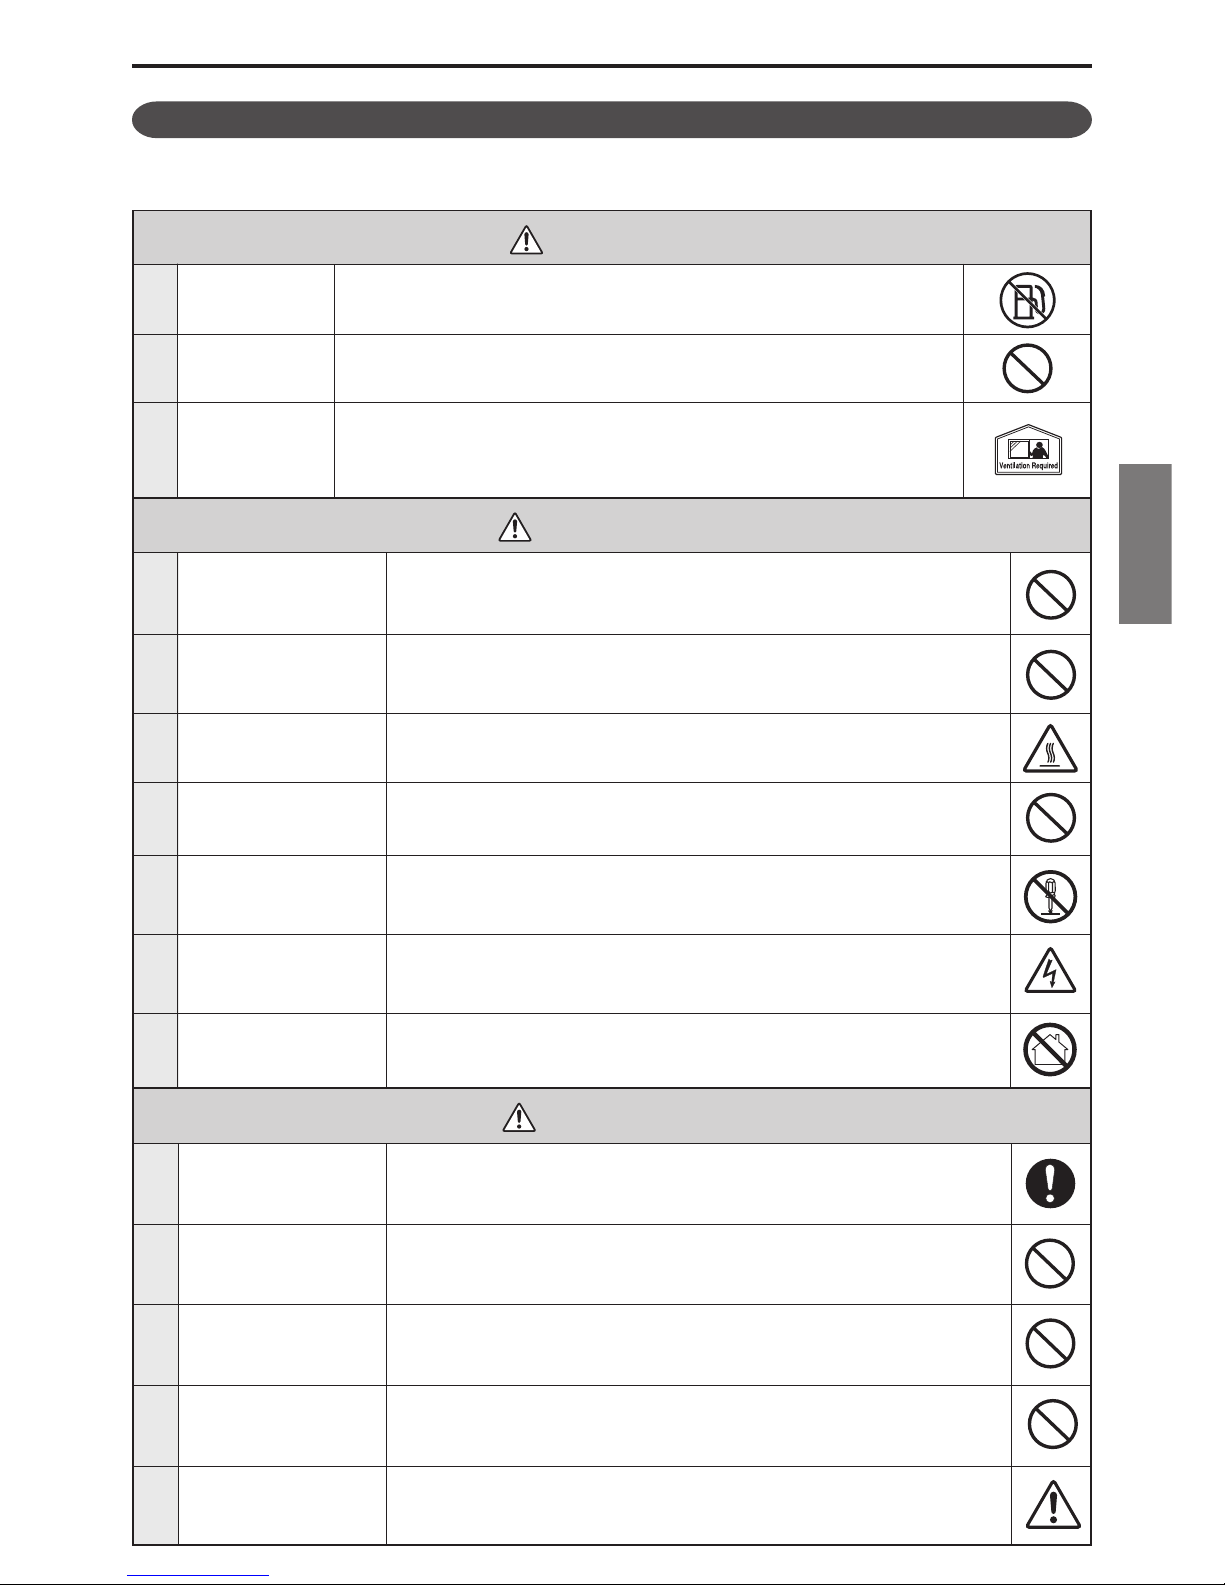
■Following signs, used throughout this Manual, define as follows:
Prohibited
(This indicates “actions” that are strictly forbidden.)
Mandatory
(This indicates “actions or instructions” that must be carried out.)
Caution
(This indicates “actions” that must require attention.)
English
* Following signs mean the very important points for the safety operation, so please don’t fail to read
them well, before using.
3
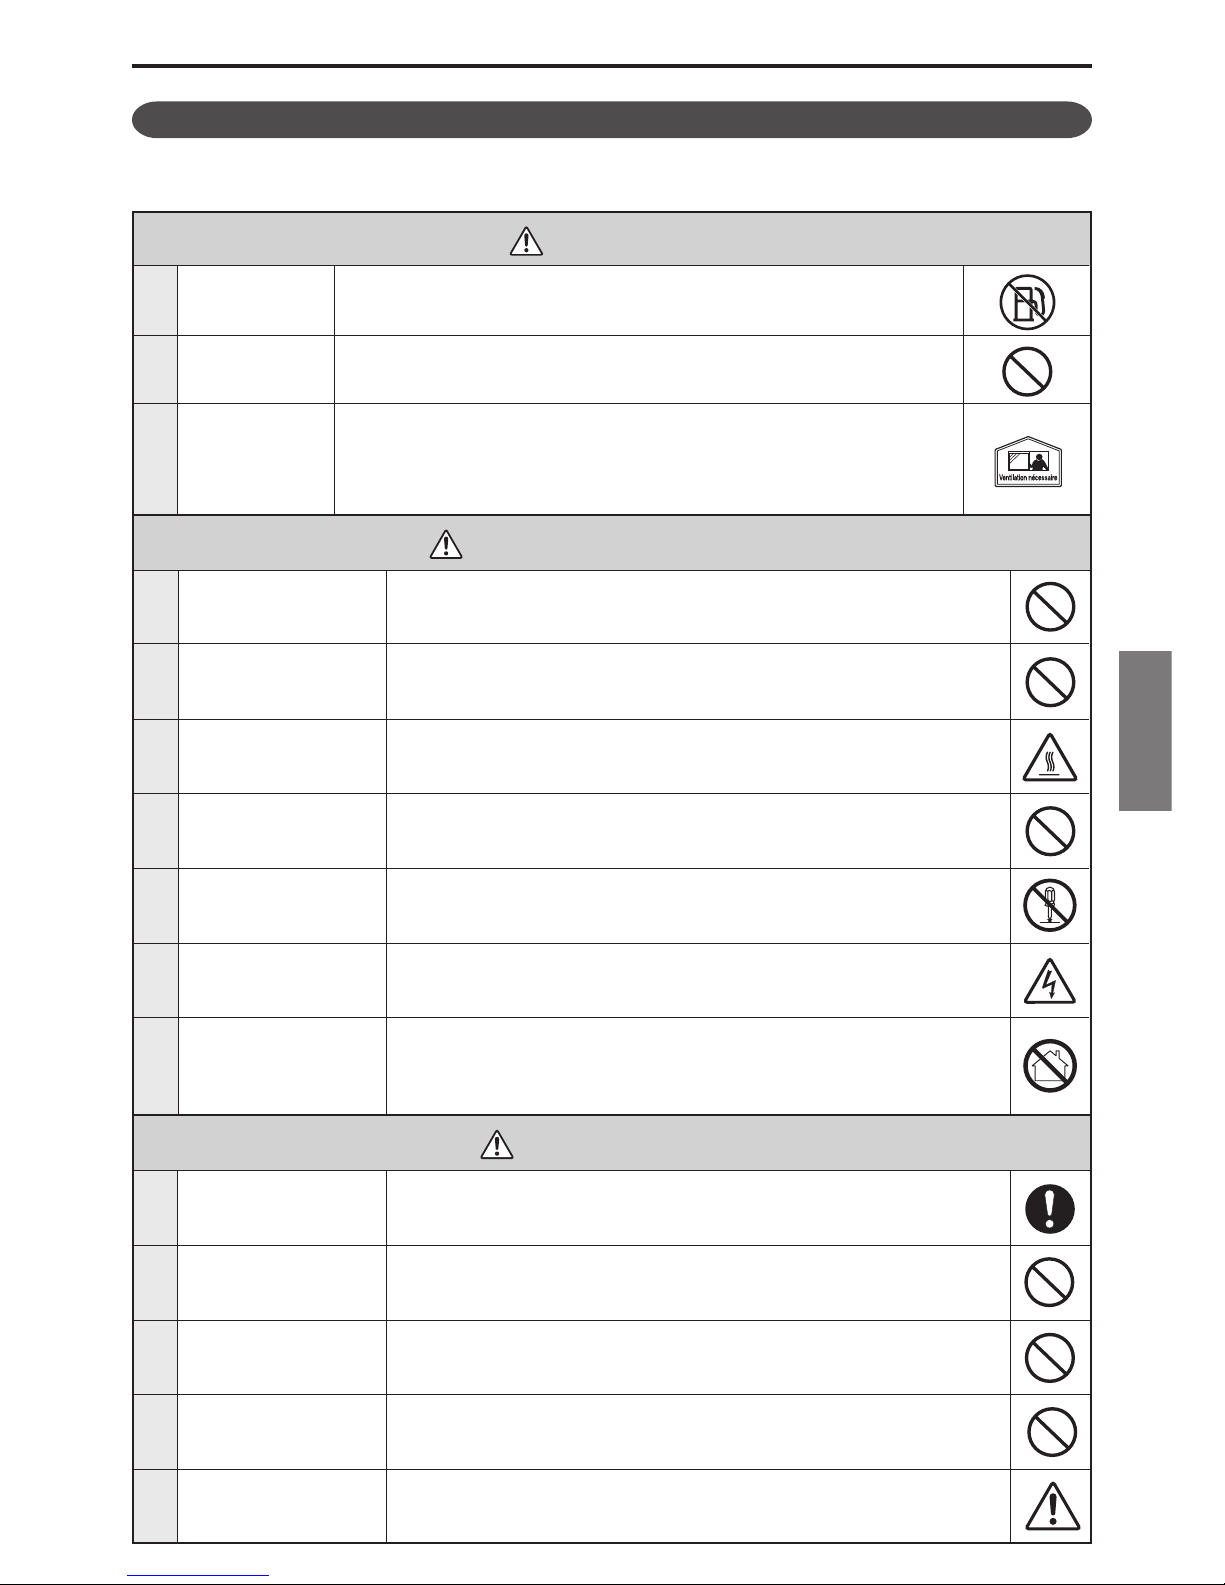
For Safety Operation, Please Pay Special Attention to the Following
1
2
3
5
6
WARNING
Keep aerosol bottles
away from the heater
Never put the sealed containers like aerosol bottles where they are exposed and heated by
the heater, because the inner pressure of aerosol bottles, heated, goes to burst and hurt the
human body.
Never use the heater
where flammable
dusts are present.
Never operate the heater where highly flammable dusts (of wood, paper, textile, etc.) are
present. Dusts, after sucked and heated by the heater, will be blown out “sparked” and
cause a fire.
Be careful of hot sur-
faces
Never touch the hot surfaces around the burner, while burning or for 30 minutes after switched
off, to avoid a burn. Also do not move or service the heater while it is operating or hot.
Modification of the
heater prohibited Never modify the heater by any means, to avoid trouble or fire.
Be careful of electrical
shock
To avoid electrical shock, never use the heater where exposed to rain, snow or high
humidity. Make sure the power plug is disconnected from the electrical outlet, before
starting daily inspection and maintenance.
4Do not service the
heater while burning
Do not service or handle the heater while burning, in operation, hot or plugged-in to
avoid any injury and/or trouble.
DANGER
1Use of Gasoline
Prohibited Never use gasoline, which surely causes a fire.
2Also Following
Operation
Prohibited
Never use the heater where thinner, gasoline, liquid propane gas, other highly flammable
vapors, etc., are present, because these lead to explosion or fire.
3Ventilation
Required
Never use the heater in badly ventilated areas, also never continue using it in such circum-
stances. Insufficient supply of oxygen causes incomplete combustion, producing carbon
monoxide which may result in carbon monoxide toxication. Provide the heater with fresh
air always when in use. Carbon monoxide poisoning may lead to death.
7
Never use the heater
for any residential
application
This heater is for industrial use only. Never use the heater for any residential application
at all time. Wrong use of this heater can result in potential death, serious injury, fire and/
or possible explosion.
1
2
3
CAUTION
To avoid a fire, please keep all flammables more than 2.5m (8.2ft.) away from the front
of the radiation disk, and more than 2m (6.56ft.) away from all sides (left/right and top/
rear) of the heater.
Do not block the
heater
To avoid a fire, never place any object within one (1) meter (3.28 feet) from (the front of)
the radiation disk.
Do not try to ignite the
heater more than 3
times in a row
If the heater does not ignite the first time, do not try to ignite more than two more times
in a row thereafter because a fire may result. If the heater does not ignite after the third
attempt, stop trying and consult your dealer prior to further operation of the heater.
4Do not operate the
heater unattended
Do not operate the heater at unattended situation in order to avoid unexpected trouble or
fire.
Keep the flammables
away from the heater
5Be careful of tempera-
ture of the floor
The heater is for use on Non Combustible Flooring unless the shielding mat (available as
“optional” part) is used.

For Safety Operation, Please Pay Special Attention to the Following
CAUTION
6
7
8
Do not use the heater
in high altitudes
When the heater is used in an altitude higher than 1000m (3000 ft) above the sea level,
some adjustments will be required. Please contact your dealer about the adjustments.
The heater, if not duly adjusted, may lead to wrong burning or fire.
Stop using the heater
when anything irregu-
lar is found
When wrong burning, smell or smoke, etc is found during the operation, please stop
immediately the operation and contact your dealer. If you continue using the heater in
such a situation, a fire likely takes place.
Do not move the
heater while burning
9
10
16
Caution for switching
off the heater. Before taking the electric plug off the outlet, please make sure the operating lamp is OFF.
Turn off while refuel-
ing Always make sure that the heater is turned off while refueling, to avoid a fire.
Do not use the heater
in the following places
To prevent disaster, injury, etc., please do not use the heater in the following places:
• On vibrating and trembling floor.
• On slant floor (not horizontal).
• In stairs, emergency exit, doorways, etc.
• Near the unstable stacks/pilings-up.
• In windy, humid, dusty or metal particles floating areas.
• In areas disturbing the moves of people, etc.
11
12
13
15
Use only the correct
voltage
Earth/Ground the
heater before operation
Please confirm if or not a grounded power cord is connected. To operate the heater with-
out proper grounding may result in electrical shock.
Only the electrical voltage and frequency specified on the model plate must be used, to
avoid a fire, electrical shock and/or damage.
Use gloves When cleaning up the heater, please use the gloves, to avoid any injury to hand or fingers.
Do not dispose of the
heater illegally When you dispose of the heater, please do not dispose of it illegally and consult your
local authorities or specialists on how to properly dispose of it.
17
18
Temperature in sur-
rounding area.
Make sure that the heater operates at temperatures between –20°and 40°C (-4°and 104°F).
If the heater operates at more than 40°C (104°F), the heater will overheat and result in
fire. When operating the heater in temperatures less then 0°C (32°F), make sure winter
grade fuel is used.
Owner’s Manual
Read and thoroughly understand this Owner’s Manual before using the heater for safety
operation.
Please keep this Manual for user’s need and reference.
19 Do not use the fuel of
low quality Do not use the fuel of low quality such as discarded oil or fuel mixed with water.
Do not move the heater, while burning or in operation, to prevent a fire when it is over-
turned.
20 Be careful of moving
or storing the heater When heater is moved or stored, it must be in a level position to avoid a leakage of fuel.
14 Make sure the flame is
extinguished
After shutting down the operation, please confirm that the flame is completely extin-
guished, before you leave the place.
4
21
22
Children or the handi-
capped are not to
operate this heater
Never look directly
straight into the radia-
tion disk
This heater is not to be operated by children or physically handicapped or person with-
out proper knowledge and experience unless they have been given proper supervision
or instruction.
While the heater is in operation, avoid looking straight into the radiation disk.
It may cause eye injury.

English
2Names of Components
∅562
!0!4 !5 o !7
!2 !3 !6
!1
732
ewq
t y ui
655
815
r
◆Burner Section
@0 !9 !8
!2 Tank Inlet Filter
!3 Fuel Gauge
!4 Fuel Filter
!5 Fuel Suction and Return Hoses
!6 Protector
!7 Visor
!8 Flame Monitor (Flame Eye)
!9 Fuse
@0 Fan Motor
qBurner Cover
wBurner Handle
eSwitch Section
rTransport Handle
tWheel
yFuel Tank
uDrain Bolt
iTank Legs
oRadiation Disk
!0 Knob Bolt
!1 Fuel Cap
◆Switch Section
RUN MISFIRE
OFFON
@1
@
2
@
3
@1 Operating Switch
This ignites or extinguishes the flame.
(Refer to pages 7 and 8.)
@2 Operating Lamp
This is lit while (the heater is) operating and flashes while
(the heater is) cooling down.
@3 Misfire Lamp
This flashes when the flame is extinguished.
5
This shuts off the power supply when excessive electric current passes
through, due to irregular trouble of the devices.
Operating Condition: The whole operation stops.
Description of Safety Devices
!8 Flame Monitor
This automatically extinguishes the flame when ignition fails or flame goes
out during the operation. This monitor, when detects any irregularity be-
fore ignition, automatically extinguishes the flame.
Operating Condition: Misfire lamp flashes and Post-Purge continues for three
(3) minutes.
!9 Electric Overload
System (Fuse)
3How to Use
1Remove the fuel cap and insert a handy suc-
tion pump into the fuel tank.
2Watch the fuel gauge while refueling.
When the gauge reaches the maximum level,
stop refueling.
3Tighten well the fuel cap, and wipe off any
spilt fuel.
■Refueling
• Never use highly flammable fuel like gasoline, to avoid fire.
DANGER
3-1. Preparation for the Operation
○○○○○○○○○○○○○○○○○○○○○○○○○○○○
Observations
• Make sure that the tank inlet filter (in the fuel tank) is free of dirt/dusts, etc. If the filter is filled up with dirt/dusts, take out
the filter and wash it with kerosene. Do not pour back into the fuel tank the kerosene used for washing, to avoid troubles.
• Please use “kerosene” or “diesel” and do not use poor quality or foul kerosene, to have no troubles at all.
• Always make sure that the heater is turned off before refueling. Fire can occur.
• Make sure the heater is powered with the electrical voltage and frequency specified on
specification label. Not doing so can result in fire, electrical shock and/or damage.
• Make sure a grounded power pin or connection is used. Operating the heater without a
proper ground may result in electrical shock.
• When disconnecting the power cord, always pull on the plug to unplug the cord. Do not
place excessive force on the cord by bending or pulling. Doing so may damage the cord,
resulting in fire or electrical shock.
CAUTION
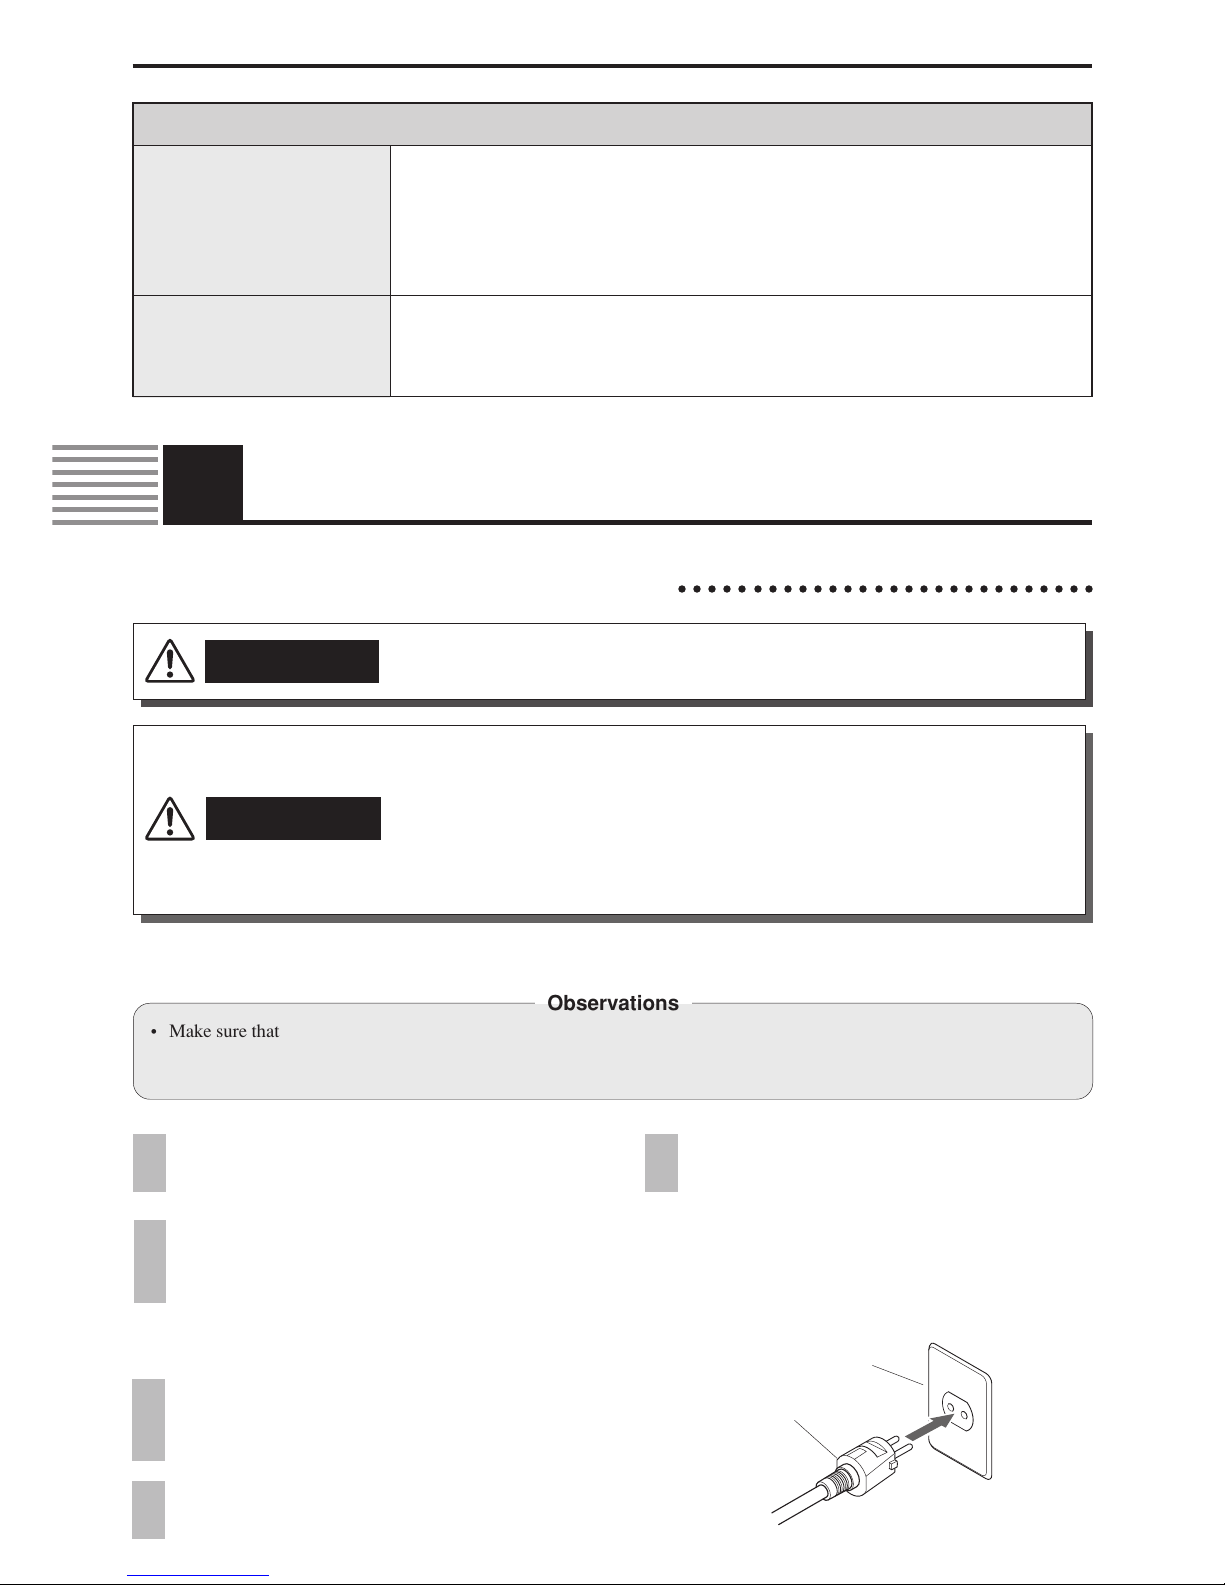
■ Connecting the Power Supply
1Make sure that the operating switch is “OFF”,
then plug the power plug into the AC power
outlet.
2Make sure a grounded power pin or connec-
tion is used.
AC Outlet
Power Plug Connect
6

English
1Use the fuel gauge to check if the fuel is suf-
ficiently filled up in the tank.
If ignition fails, try again its procedures
as follows
Stop completely the operation. The operat-
ing lamp has turned off, then try again the
procedures.
3-2. Operating Procedures
○○○○○○○○○○○○○○○○○○○○○○○○○○○○○○○○○○○
■ Ignition Procedures
• When smell, smoke, wrong burning, etc. takes place, stop immediately operation to avoid
a fire, and contact your dealer.
• If the heater does not ignite with three consecutive tries, stop trying more than three (3)
times, to avoid a fire, and contact your dealer.
• When using the heater, be careful so that the floor surface (in front of it ) may not get
overheated.
• Do not operate the heater, while fuel tank is dirty and foul, to prevent poor ignition or
wrong burning.
CAUTION
Observations
• Not to miss the ignition, please do not leave the heater until you confirm that it is properly burning.
2Tur n “ ON” the operating switch, and the oper-
ating lamp will light and the heater will ignite
in about 5 seconds.
Adjust the angle of the main unit
Loosen the knob bolt to move and set the
main heater unit at the desired angle, and
tighten the knob bolt firmly.
The vertical angle of the radiation disk is ad-
justable up to 20 degrees upward. Loosen
Tighten
20 degrees
• Do not adjust the angle of the main unit while the heater is plugged in operating or hot to
avoid sever burns and electric shock.
CAUTION
7
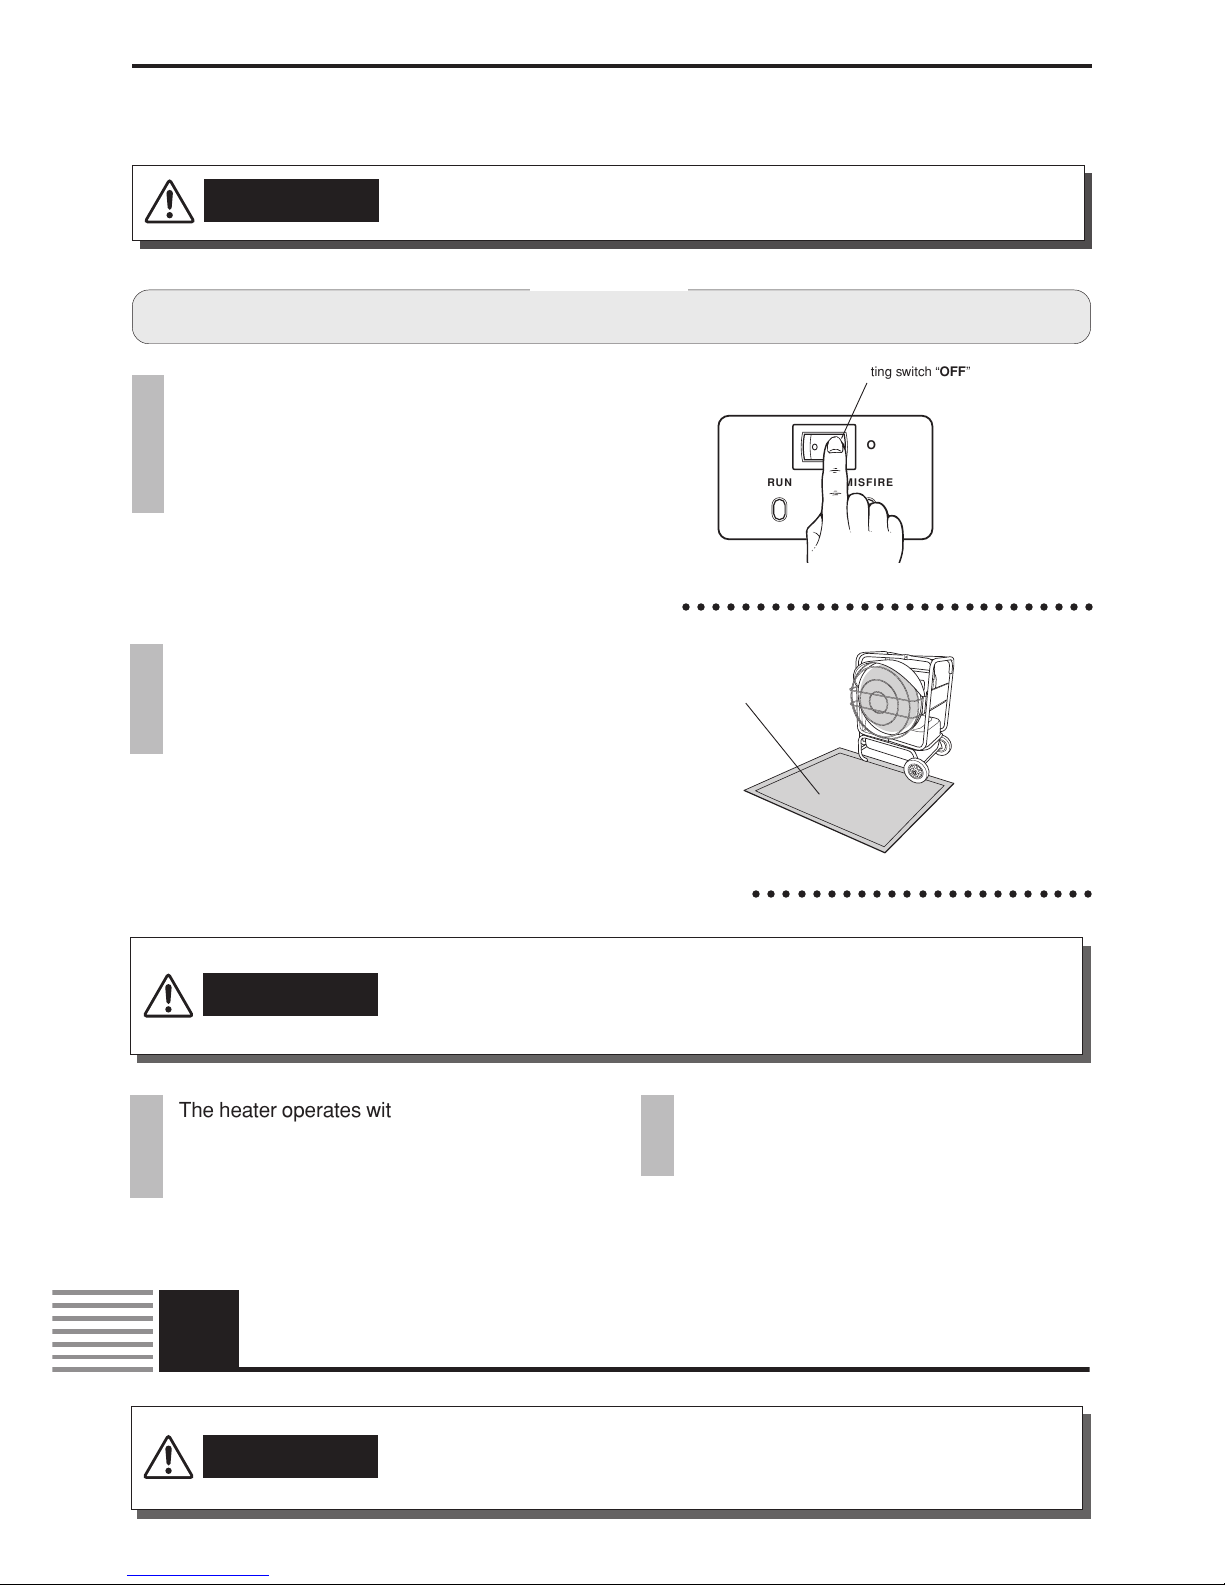
Operating Switch “ON”
RUN MISFIRE
OFFON
■ Shut-Down Operation
CAUTION • After the operation is shut down, please make sure that the flame is completely extin-
guished before leaving the place.
Observations
• To disconnect the power plug from the AC outlet, please make sure that the fan motor is stopped.
Tur n “OFF” the operating switch, and the
heater flame will be extinguished, then the
fan motor will also automatically stop after
about three (3) minutes, and finally the oper-
ating lamp will turn off.
4Inspection
• Before starting any inspection or service, to avoid electric shock, please make sure the
heater is shut down and that the power cord is disconnected.
• When cleaning the heater, please wear gloves to prevent possible injury.
CAUTION
3-4. Operation with Portable Generator
○○○○○○○○○○○○○○○○○○○○○○○
The heater operates within the voltage range
of 207 Volts to 253 Volts. Before plugging the
heater into the generator, the output voltage
of generator should be verified.
• Before operating the heater from a portable generator, please confirm that the generator
has been properly connected to the ground earth. To operate the generator without proper
grounding may result in electrical shock. Please refer to the owner’s manual supplied by
the generator’s manufacturer.
WARNING
If the voltage does not measure in this range,
the heater should not be plugged into the gen-
erator.
3-3. Use of the Heat Shielding Mat
To avoid unexpected fire or trouble, NEVER
use the heater on combustible flooring un-
less the heat shielding mat, which is avail-
able as an option, is used.
○○○○○○○○○○○○○○○○○○○○○○○○○○○○
Heat shielding mat
Operating switch “OFF”
RUN MISFIRE
OFFON
8

English
Observations
• Please do not pour in the fuel tank the fuel used for cleaning the tank inlet filter ; after you finish to inspect inside the fuel
tank, please do not return back into the fuel tank foul fuel taken out of the tank.
9
4-1. Daily Inspection
○○○○○○○○○○○○○○○○○○○○○○○○○○○○○○○○○○○○○○○○○○
■ Inspection of the tank inlet filter
1Please remove the fuel cap and check if dirt/
dusts stick to the tank inlet filter.
Kerosene
Tank Inlet Filter
2If there are any dirt/dusts, remove the filter
and wash it with fuel.
3Please restore the tank inlet filter, and tighten
firmly the fuel cap.
■ Inspection of the filter and drainage of water from the fuel tank.
Checking the filter element
1Check whether or not the filter element is dirt
and foul.
2In case the filter element is dirty or clogged,
please replace it with a new one, and bind
firmly the cup with the tightening ring.
3If water has collected in the cup, discard wa-
ter. Also, water in the cup means there is
water in the tank as well. Follow the instruc-
tions on page 10 and drain the water from
the fuel tank.
Fuel Strainer
Element
Loosen
Tightening Ring
Tightening Ring
Cup
O Ring Gasket
Remove
Element

Drainage of water from the fuel tank
1Remove the fuel cap, take out the tank inlet
filter and insert a handy suction pump into
the tank.
2Remove as much fuel as possible (with the
handy suction pump).
3Restore the tank inlet filter and tighten firmly
the fuel cap.
6Restore the drain bolt packing and tighten the
drain bolt so firmly that fuel can not leak out
(of the fuel tank).
7Wipe off kerosene or water spilt over the tank.
4Prepare an empty container of about 3 liters
(0.7 gallons) capacity: to hold kerosene and
water remained in the fuel tank, place the
container under the drain bolt (of the fuel
tank).
Wrench (24mm)
Loosen
Drain bolt packing
Drain bolt
5Later on, please remove with wrench the
drain bolt and tilt the fuel tank until the fuel is
completely drained out of the tank. (At the
same time, be careful not to lose the drain
bolt packing.)
■ Inspection and cleaning of the flame monitor
Observations
• When removing the flame monitor, hold it by its main assembly; do not pull out the cord.
Lens
Cotton Swab
Soft Cloth
Flame Monitor
1Remove the burner cover and pull out the
flame monitor, and check whether or not its
lens is dirty/foul.
2If the lens is dirty/foul, please wipe the sur-
face of the lens with a soft cloth, etc. until it
becomes clear.
3Restore the flame monitor, then please surely
fix with screws the burner cover.
Pull out
Flame Monitor
○○○○○○○○○○○○○○○○○○○○○○○○○○○○○○○○○○○○○○
The heater must be checked, if used for a
long time.
4-2. Periodic Inspection
■ Inspection of “dirt/dusts” on the main unit
1Check whether or not dirt/dusts are on and
around the heater.
Please ask the dealer from whom you pur-
chased the heater to check the heater once
every other season.
2If dusts are found, please remove them with
a vacuum cleaner or wipe with a soft cloth,
etc.
10
English
5How to Store the Heater
When you store the heater, please disconnect the power plug from the AC outlet and store it indoors
where it is less humid.
CAUTION • When you store the heater or hold it unused for a long time, please make sure that the fuel
tank is empty, for preventing a leakage of fuel and fire.
Observations
• Do not store the fuel over summer months for use during next heater season. Using old fuel could damege the heater.
6Troubleshooting
In case satisfactory results do not come out through referring to the table, or you have problems not de-
scribed in this table, please contact your dealer. While consulting him, please describe the problem you
have, together with type and serial number of your heater.
(For finding the heater’s serial number, please refer to page 14.)
■When you face problems on your heater, please refer to this check-
table before consulting your service shop.
Please connect the power cord with an AC outlet, and
check the power supply.
Replace fuse with a new one. (Please refer to page 12.)
Please confirm if “Flame Monitor” is exposed to any type of light
(sunlight or electric lamp, etc.), and remove the heater to pre-
vent the radiation disk from detecting any type of light directly.
Please pour fuel into the tank.
Please clean up the tank and fill it with fresh/clean fuel.
Check well the filter element and replace it with a new one.
Replace nozzle with a new one.
(Please refer to page 12.)
Please clean up the fuel tank and fill it with fresh/new
fuel.
Please clean up the Flame Monitor
(Please refer to page 10).
Please check the filter element and replace it with a
new one.
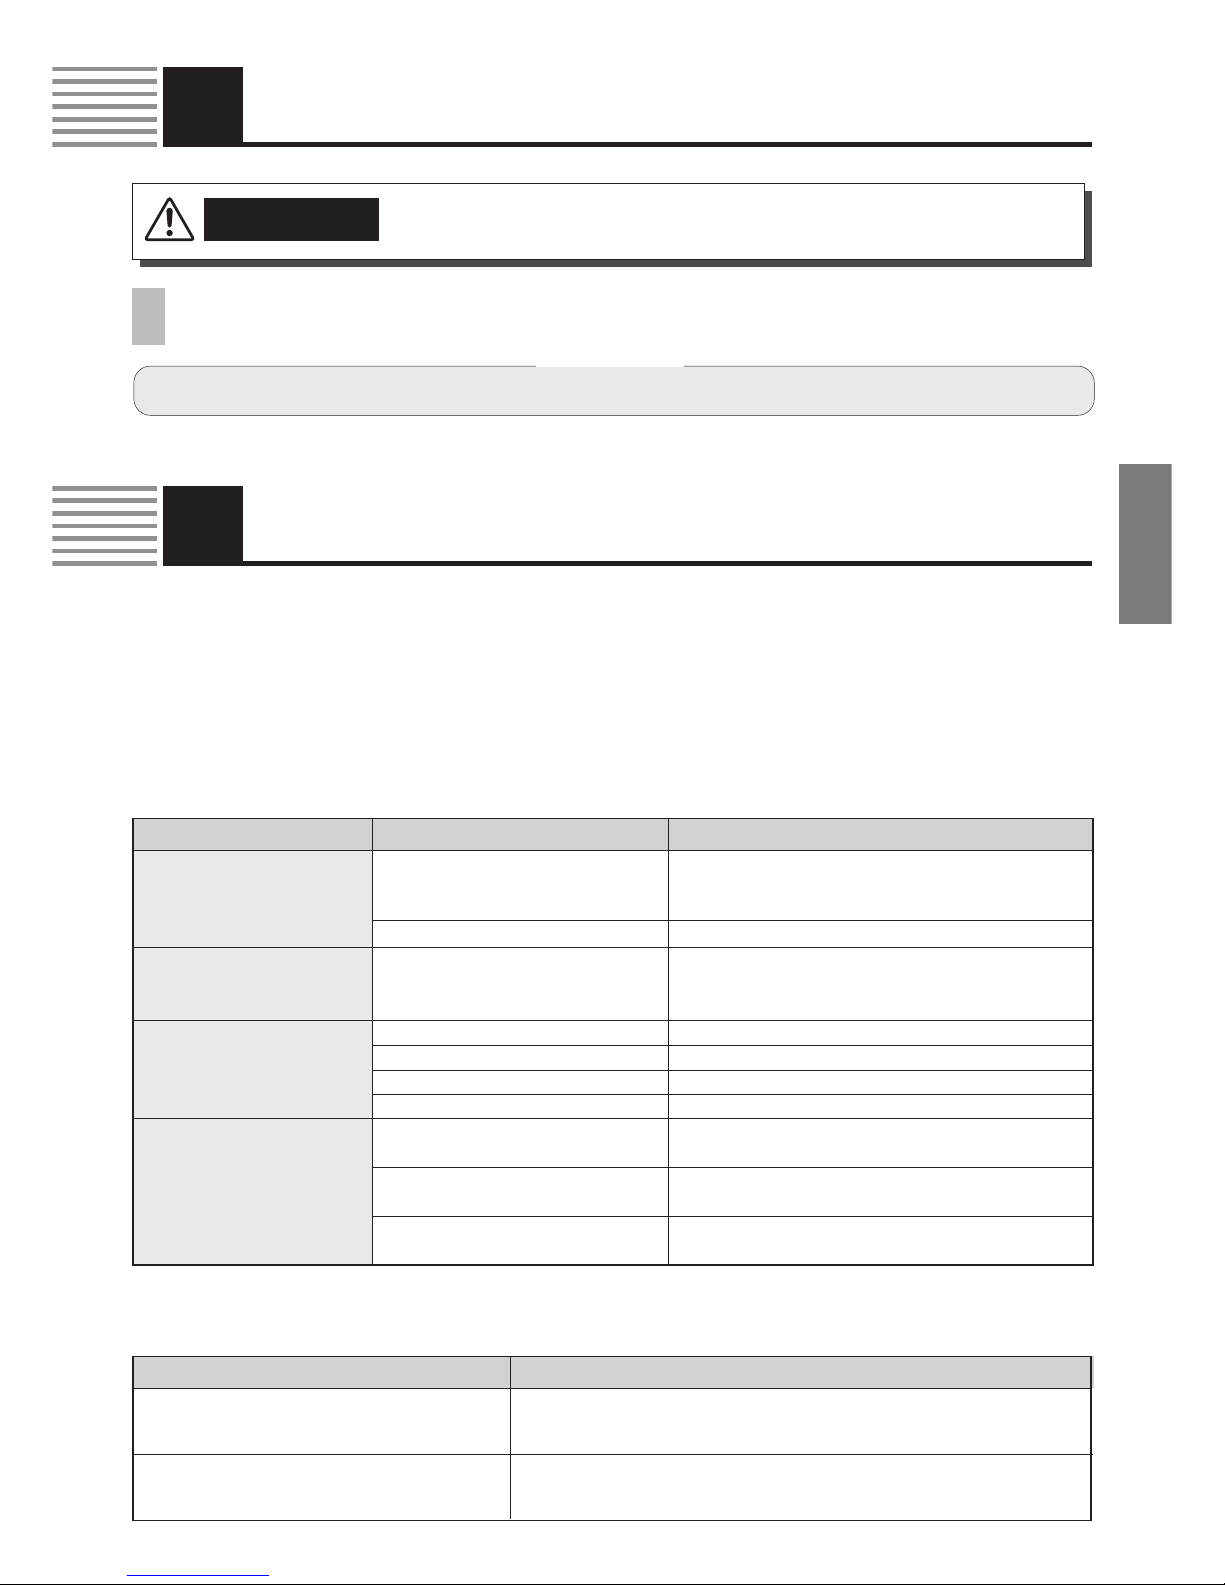
Phenomenon Possible Cause Remedy
The heater does not start.
(The lamp does not light
on.)
The heater does not start.
(The lamp is lit.)
The heater does not ignite.
The flame goes out during
the operation.
Power cord is not connected with an
AC outlet. Power supply is cut off.
Blown fuse
Safety devices are working.
No fuel in the fuel tank.
There is water in the fuel tank.
Fuel filter element is clogged.
Nozzle is clogged
Wrong or foul fuel is used.
Flame monitor is dirty.
Fuel filter element is clogged.
If the following phenomenon takes place, it is not an irregular trouble. Please check again
before consulting your service shop.
Because fuel is burning together with dusts, etc.This phenomenon will disap-
pear after a short while.
Noise is caused by expansion or shrinkage of the burner section due to
temperature’s up and down. This is not irregular.
Phenomenon Explanation
When used for the first time, smoke or smell
comes out of the heater.
At the time of ignition or shut-down of the
heater, noise comes from the burner section.
11
7Exchange Procedure
• Never service the heater while it is burning, in operation, hot or plugged-in to avoid any
injury and/or trouble.
WARNING
Burner assembly
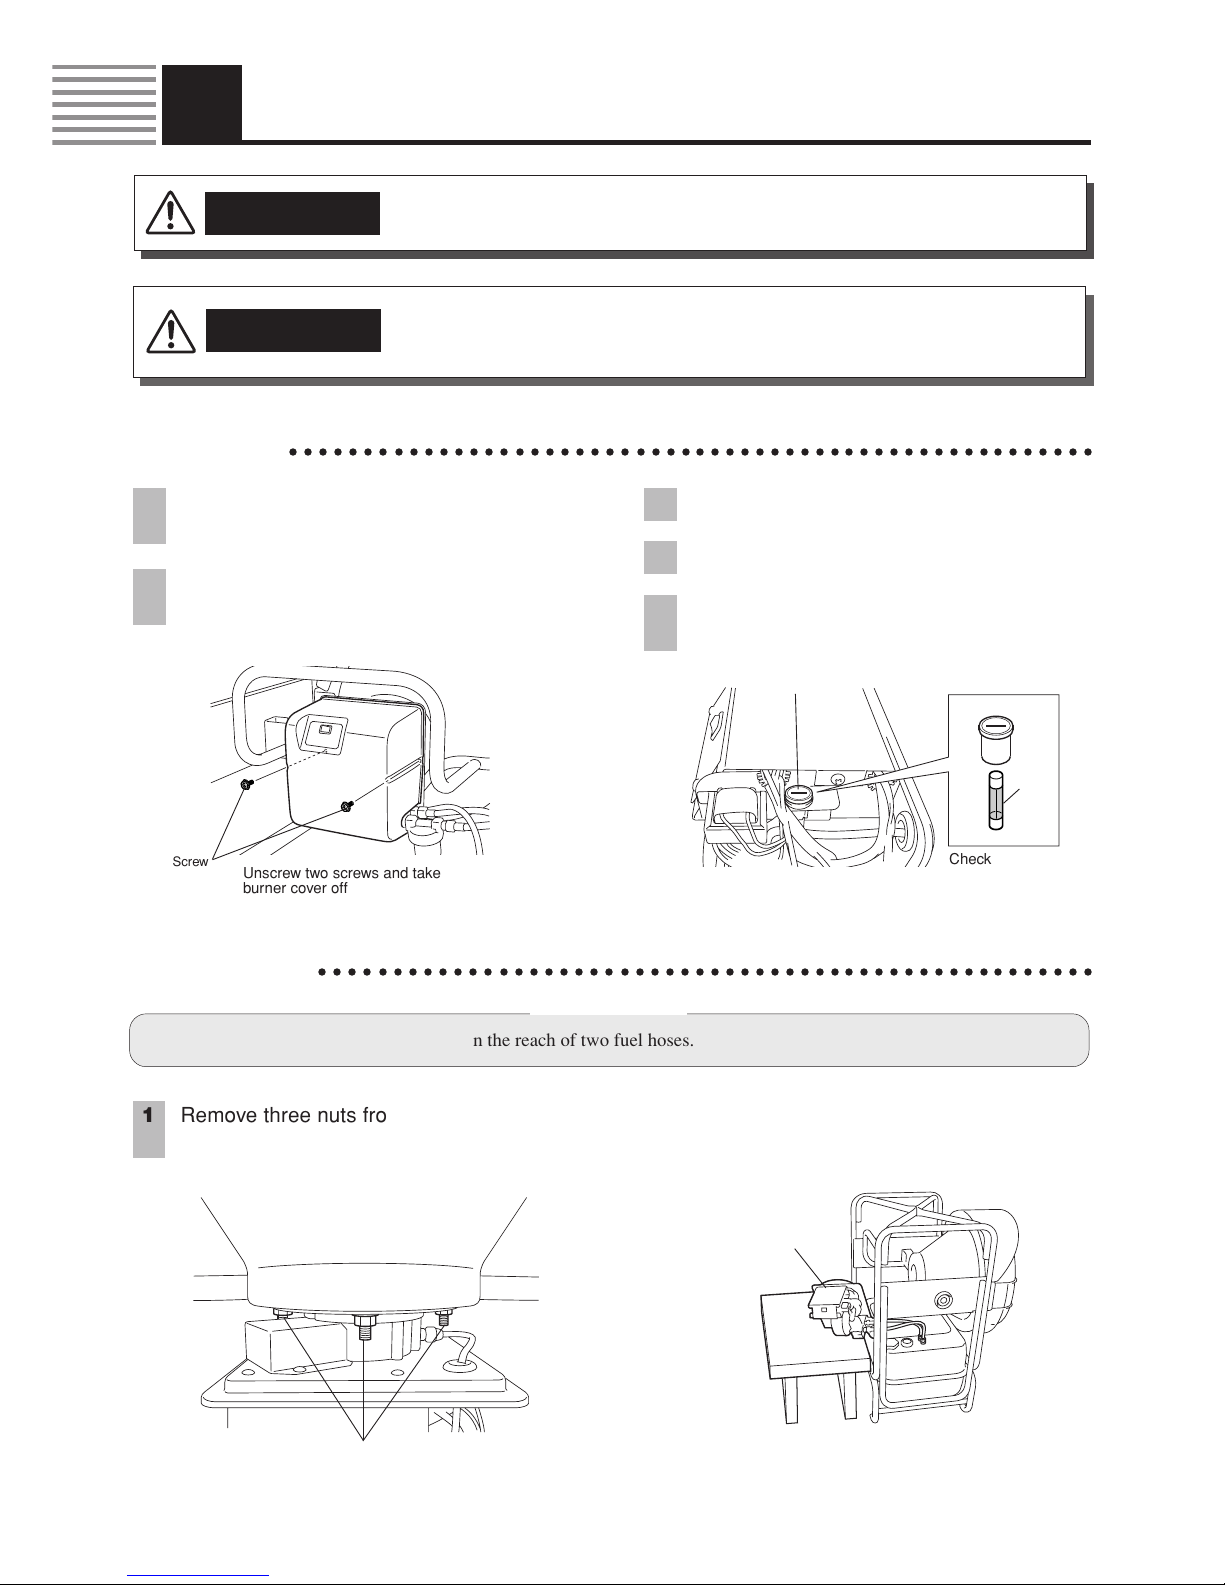
1Unscrew two screws of burner cover and re-
move the burner cover.
2Unscrew the screw cap of fuse holder and
take out the fuse.
3Replace with a new one.
4Put the screw cap back into fuse holder.
5Put the burner cover back with two screws
removed.
• Before starting any service, to avoid electric shock, please make sure the heater is shut
down and that the power cord is disconnected.
• When servicing the heater, please wear gloves to prevent possible injury.
CAUTION
7-1. Fuse
○○○○○○○○○○○○○○○○○○○○○○○○○○○○○○○○○○○○○○○○○○○○○○○○○○○○○○
Screw Unscrew two screws and take
burner cover off
Check whether
the fuse is blown
out
Screw cap
Fuse
Open a screw cap and take out a fuse
7-2. Nozzle
○○○○○○○○○○○○○○○○○○○○○○○○○○○○○○○○○○○○○○○○○○○○○○○○○○○○
Observations
• Place the burner assembly taken out within the reach of two fuel hoses.
1Remove three nuts from burner attachment
bolts and take the burner assembly off.
Nut
Unscrew three nuts and take the burner off
12
English
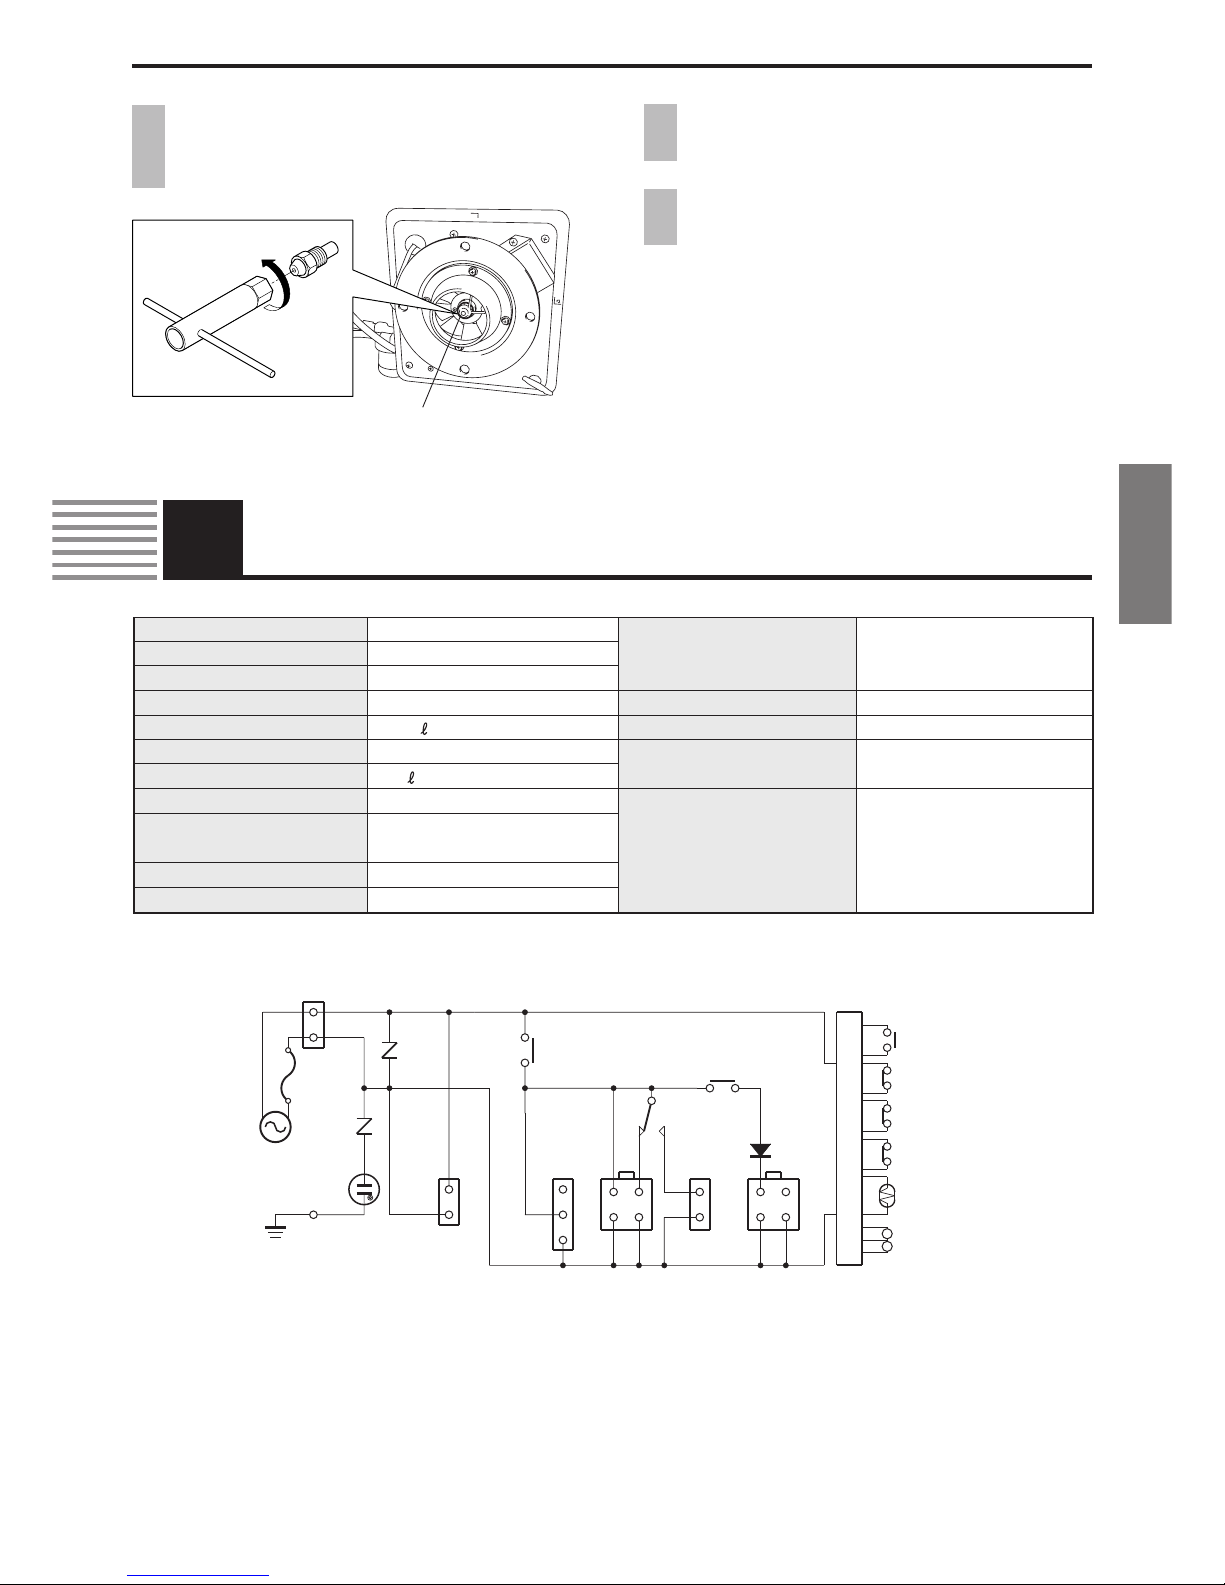
8Specifications
Model Number VAL6KBE1S
Type Radiated direct fired
Ignition System High intensity discharge
Fuel Kerosene or DIESEL
Fuel Consumption 3.21 /h 2.67kg/h
Heat Output 28,000 kcal/h 32.5kW
Tank Capacity 35
Continuous Operating Time
10 hours
Dimensions 815(H) x 655(W) x 732(D) mm
Disk Diameter 562 mm
Weight (Dry) 83.8 lbs, 38kgs.
Power Supply AC230V (50Hz)
Power Consumption • When igniting: 85 W
• When burning: 60 W
•
Optional : +50W for Preheater
Electric Overload Fuse 1.6A
Noise Level (in operation) 69dB (A)
Safety System • Flame Monitor (Flame Eye)
• Electric Overload System
Standard Parts • Fuse x 2
• Filter Element x 2
• Nozzle x 1
• Nozzle Wrench x 1
• Oil Seal x 2
Wiring Diagram
2Remove the nozzle using the nozzle wrench
provided as standard parts.
Replace with a new nozzle.
Loosen
Nozzle
3Tighten the nozzle using the nozzle wrench
until the nozzle is fixed.
4Put the burner assembly back with three nuts
removed.
PS : Power Source
SW1 : Operation Switch
ALM : Short
TH : Thermostat
FE : Photo Cell
FG : Flame Grand
HT : Open
FM : Fan Motor
CM : Open (Pre Heater)
IG : Igniter
SP : Solenoid Pump
RUN : Running Lamp
MISFIRE : Misfire Lamp
KA* : Control Relay
F : Line Fuse
ES : Earthquake Sensor (Short)
MISFIRE
RUN
ALM
TH
CM
KAFM
PS
FKASP
FE
SPIG
FM
FG HT
KAIG
SW1
ES
13

9Safety Labels
●Safety labels provide important information for safe use of the heater. So, please do not remove or soil them.
●If any of the labels is unreadable or removed, please ask your dealer for a new one and replace with the new one.
Danger Label Hot Surface Caution Label
Specifications Label
Caution on Refueling Label
Floor Temperature Caution Label
Caution Label
14

Français
15
PRÉCAUTION
N’utilisez pas l’appareil sans la protection
de sécurité afin d’éviter qu’un accident se
produise.
Écran
DIRECTIVES RELATIVES À L’ASSEMBLAGE
DIRECTIVES RELATIVES À L’ASSEMBLAGE
Cet appareil est emballé sans protection, écran ni roues montés.
Avant d'utiliser l'appareil, montez la protection et l'écran comme il
convient.
Pour monter la protection, l'écran et les roues dans l'ordre prévu, suivez
les instructions figurant ci-dessous.
Enfin, lʼécran doit être fixé des deux côtés
au moyen des vis fournies.
No.3-3
No.3-3
Engagez lʼaxe dans le plateau dʼaxe puis
montez les roues, les rondelles et les
Posez la structure principale sur le support
de la roue et immobilisez avec les vis et les
dispositifs.
REMARQUE: Les vis qui sont utilisées
temporairement et uniquement pour
l'emballage ne sont pas nécessaires
pour le montage.
No.2
No.2
No.1
No.1
No.3-1
No.3-1 No.3-2
No.3-2
No.3-1
No.3-1 No.3-2
No.3-2
Puis, la grille de protection
doit être attachée de chaque
côté avec les vis fournis.
Tout d'abord, la grille de
protection doit être glissée
sous le crochet.
Détail
Protection
Crochet
16
Merci d’avoir porté votre choix sur le chauffage infrarouge à huile “VAL6”.
Avertissement
●Prière de lire ce manuel soigneusement et dans sa totalité avant de monter, faire fonctionner ou réparer ce chauffage. Un
mauvais emploi de ce chauffage peut causer des blessures graves ou la mort par brûlures, incendie, explosion, choc électrique
et asphyxie au monoxyde de carbone.
●Avant de mettre en service ou de réparer ce chauffage, lire toutes les instructions figurant dans ce manuel.
●Pour remplacer des pièces, n’utiliser que des pièces d’origine. Nous déclinons toute responsabilité quant aux dommages ou
accidents, quels qu’ils soient, résultant de l’emploi de pièces non agréées ou d’une autre marque.
●Nous déclinons toute responsabilité quant aux dommages et accidents pouvant résulter du non respect ou d’une mauvaise
exécution des instructions figurant dans ce manuel, ou de modification ou manipulations inadéquates.
1. Toutes les situations potentiellement dangereuses durant l’emploi de ce chauffage n’étant pas prévisibles, ce mode d’emploi
ne peut pas décrire toutes les dangers possibles. Lors de la mise en service ou l’inspection quotidiennes de ce chauffage, prière
de faire très attention non seulement au contenu du manuel et à toutes les étiquettes apposées sur le chauffage proprement dit,
mais aussi à avoir en mémoire toutes les consignes de sécurité.
2. Pour toute question ou information plus détaillée sur ce chauffage, prière de contacter le revendeur.
3. Si des pages de ce manuel devaient être anormales ou manquer, prière de contacter le revendeur pour obtenir un autre manuel.
4. Prière de garder à disposition un certain nombre de pièces standard.
5. L’opérateur doit avertir toute personne travaillant autour du chauffage des dangers qu’il encourt et des précautions qu’il doit
prendre, conformément à ce manuel.
6. Le chauffage ne doit pas être utilisé à des endroits où les enfants, les animaux domestiques ou d’autres animaux risqueraient
d’entrer en contact.
○○○○○○○○○○○○○○○○○○○○○○○○○○○○○○○○○○○○○○○○○○○○○○○○○○○○○○○○○○○○○○○○
○○○○○○○○○○○○○○○○○○○○○○○○○○○○○○○○○○○○○○○○○○○○○○○○○○○○○○○○○○○○○○○○
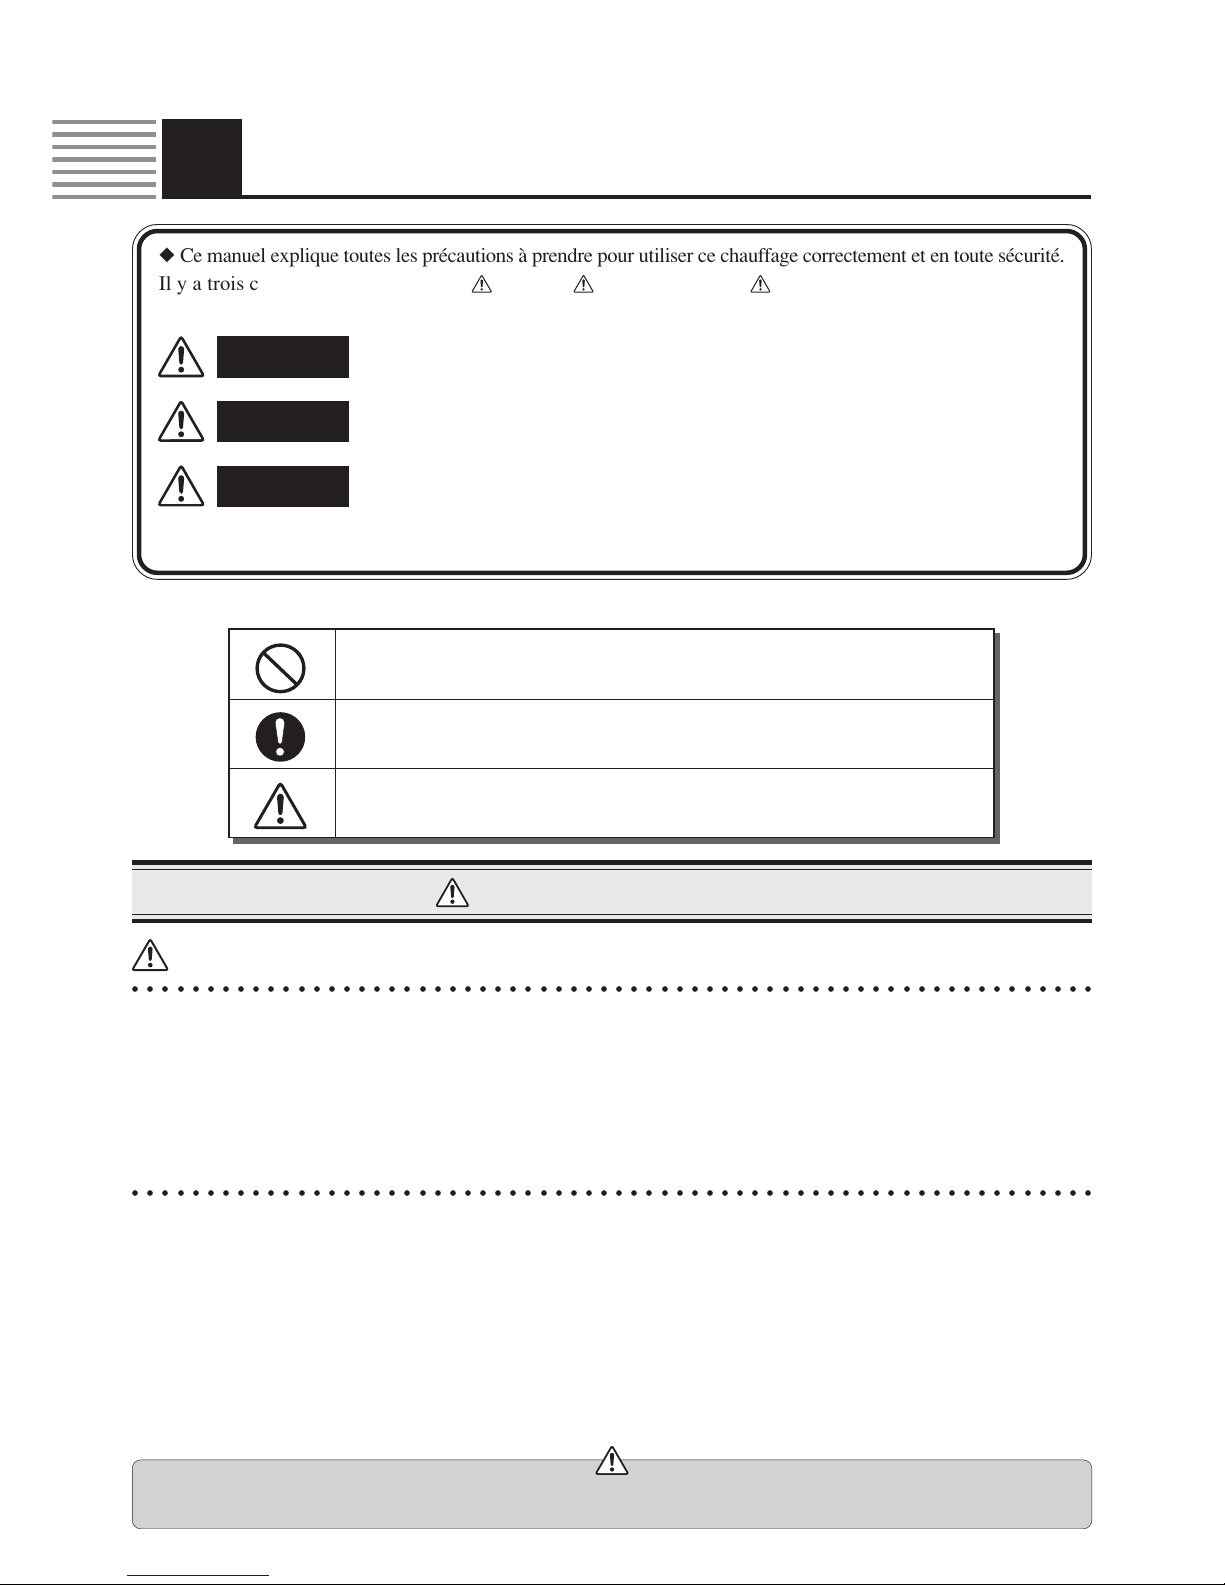
◆Ce manuel explique toutes les précautions à prendre pour utiliser ce chauffage correctement et en toute sécurité.
Il y a trois catégories de précautions: Danger, Avertissement et Attention. Prière de lire et de bien
comprendre la signification et les détails de chaque catégorie.
* Selon le cas, la catégorie “ATTENTION” peut aussi indiquer de graves dangers. Les précautions et les recommandations
sont toutes importantes quelle que soit la catégorie dans laquelle elles sont classées. Respecter les consignes des 3 catégories.
Le non respect de l’indication “DANGER” et une mauvaise manipulation peuvent
causer la mort, des blessures graves et/ou un incendie important.
Le non respect de l’indication “AVERTISSEMENT” et une mauvaise manipulation sont
susceptibles de causer la mort, des blessures graves, un incendie et/ou une explosion.
Le non respect de l’indication “ATTENTION” et une mauvaise manipulation
peuvent causer des blessures graves et/ou des dommages matériels.
DANGER
AVERTISSEMENT
ATTENTION
■Les symboles ci-dessous dans ce manuel ont la signification suivante:
Interdit
(Ceci indique des “actions”strictement interdites.)
Obligatoire
(Ce symbole indique “des actions ou instructions” devant être exécutées.)
Attention
(
Ce symbole indique “des actions” auxquelles il faut faire très attention.
)
1Consignes de sécurité
Remarque importante
• La réglementation des autorités locales doit être respectée.
• L’installation de cet appareil doit correspondre à la réglementation des autorités compétentes.
Français
17
* Les symboles suivants indiquent des points très importants pour la sécurité. Prière de les lire
soigneusement avant d’utiliser le chauffage.
Pour utiliser l’appareil en toute sécurité, faites particulièrement attention à ce qui suit
DANGER
1Utilisation
d’essence interdite L’emploi aux endroits suivants est également interdit.
2
Ne jamais utiliser d’essence,
qui causerait immédiatement
un incendie
Ne jamais utiliser le chauffage à un endroit exposé aux diluants, essence, gaz propane
liquide, vapeurs hautement inflammables, etc. qui causeraient une explosion ou un
incendie.
3Aération
indispensable
N’utilisez pas l’appareil de chauffage dans un endroit peu aéré, quelles que soient les
circonstances. Si l’apport d’oxygène est insuffisant, la combustion est incomplète, ce qui
produit de l’oxyde de carbone, un gaz toxique qu’il ne faut pas respirer. Lorsque l’appareil de
chauffage est en fonctionnement, veillez à ce que l’air de la pièce soit constamment renouvelé.
L’empoisonnement à l’oxyde de carbone est mortel.
1
2
3
5
6
AVERTISSEMENT
Tenir les bombes
d’aérosol à l’écart du
chauffage
Ne jamais approcher des bombes fermées, comme les aérosols, du chauffage, où elles
seraient exposées à la chaleur. La pression à l’intérieur des bombes chauffées peut les
faire éclater et entraîner des blessures.
Ne jamais utiliser le chauffage
à un endroit exposé à une
poussière inflammable
Ne jamais utiliser le chauffage à un endroit exposé à une poussière inflammable (bois,
papier, textile, etc.). La poussière sera aspirée et chauffée par le chauffage et expulsée
sous forme d’étincelles pouvant causer un incendie.
Attention aux
surfaces chaudes
Pour éviter de se brûler, ne jamais toucher les surfaces chaudes du brûleur pendant le
chauffage et dans les 30 minutes qui suivent l’extinction du chauffage. Ne pas non plus
déplacer ni réparer le chauffage tant qu’il chauffe ou est chaud.
Modification du
chauffage interdite
Pour éviter toute panne ou tout incendie, ne jamais modifier le chauffage de quelque
façon que ce soit.
Attention au choc
électrique
Pour éviter tout choc électrique, ne jamais utiliser le chauffage à un endroit exposé à la
pluie, à la neige ou à une humidité élevée. S’assurer que la fiche d’alimentation est
débranchée de la prise électrique avant l’inspection et l’entretien quotidiens.
4
Ne pas réparer le
chauffage quand il est
allumé
Pour éviter tout risque de blessure et/ou toute panne, ne pas réparer ou manipuler le
chauffage pendant qu’il chauffe, fonctionne, est chaud ou branché.
7N’utilisez jamais le
chauffage pour une
application résidentielle
Ce chauffage est pour une utilisation industrielle uniquement. N’utilisez jamais ce
chauffage pour quelque application résidentielle que ce soit. Une utilisation incorrecte
peut entraîner un risque potentiel de mort, de blessures graves, d’incendie et/ou
d’explosion.
1
2
3
ATTENTION
Pour éviter tout risque d’incendie, tenir les produits inflammables à plus de 2,5 mètres de
l’avant du disque de radiation et à plus de 2 m de tous les côtés (gauche/droit/ et fort/
faible) du chauffage.
Ne pas obstruer le
chauffage Pour éviter tout risque d’incendie, ne jamais placer d’objets à moins de 1 mètre de l’avant
du disque de radiation.
Ne pas essayer
d’allumer le chauffage
plus de 3 fois de suite
Si le chauffage ne s’allume pas à la première tentative, ne pas essayer plus de deux autres
fois de l’allumer pour éviter les risques d’incendie. Si le chauffage ne s’allume pas à la
troisième tentative, cesser d’essayer de l’allumer et consulter son revendeur pour un contrôle.
4Ne pas laisser le
chauffage en marche
sans surveillance
Pour éviter toute panne et incendie subits ne pas laisser le chauffage fonctionner sans
surveillance.
Tenir à l’écart des
inflammables
5Attention à la
température du sol
Le chauffage doit être utilisé sur un sol non inflammable à moins qu’un tapis ignifuge le
protège (disponible en option).

18
Pour utiliser l’appareil en toute sécurité, faites particulièrement attention à ce qui suit
ATTENTION
6
7
8
Ne pas utiliser le
chauffage à de hautes
altitudes
Des réglages seront nécessaires si le chauffage devait être utilisé à plus de 1000 m au-dessus
du niveau de la mer. Prière de contacter son revendeur à propos des réglages. Si le chauffage
n’est pas réglé comme il le doit, la combustion ou le chauffage ne seront pas corrects.
Cesser d’utiliser le
chauffage en cas
d’anomalie
Si la combustion n’est pas normale, en présence d’odeur ou fumée étranges, etc. en cours
d’utilisation, arrêter immédiatement le chauffage et contacter le revendeur.
L’emploi du chauffage dans de telles situations causera un incendie.
Ne pas déplacer le
chauffage pendant la
combustion
9
10
16
Précaution lors de l’ ex-
tinction du chauffage
Avant de débrancher la fiche de la prise électrique, s’assurer que le témoin de fonctionnement
est ÈTEINT.
Èteindre le chauffage
avant de faire le plein Pour éviter tout risque d’incendie, s’assurer que le chauffage a bien été éteint avant de
faire le plein.
Ne pas utiliser le
chauffage aux endroits
suivants
Pour éviter tout désastre, blessure, etc. ne pas utiliser le chauffage aux endroits suivants:
• Sur un sol vibrant et instable.
• Sur un sol incliné (non horizontal)
• Dans des escaliers, devant une sortie de secours, dans un couloir, etc.
• Près d’objets empilés/accumulés
• À un endroit exposé au vent, à l’humidité, à la poussière ou à des particules métalliques
• À un endroit gênant le passage des personnes, etc.
11
12
13
15
N’utiliser que sur la
tension correcte
Mise à la terre/masse
du chauffage avant
utilisation
S’assurer que le câble de mise à la terre est raccordé. L’emploi du chauffage sans câble de
terre peut causer un choc électrique.
Pour éviter tout risque d’incendie, de choc électrique et/ou dommage, n’utiliser que la
tension électrique et la fréquence spécifiées sur la plaque signalétique.
Utiliser des gants Pour éviter tout risque de blessures aux mains et aux doigts, utiliser des gants pendant le
nettoyage du chauffage.
Ne pas mettre au rebut
le chauffage n’importe
où
Si le chauffage doit être mis au rebut, ne pas l’entreposer à des endroits interdits et con-
sulter les autorités locales ou les professionnelles pour le déposer conformément à la
réglementation.
17
18
Température ambiante
S’assurer que le chauffage fonctionne à des températures situées entre –20°et 40°C. Si le
chauffage fonctionne àplus de 40°C, l’excés de chaleur peut causer un incendie. Lorsque
le chauffage doit fonctionner dans une ambiance dont la température est inférieure à 0°C
(32°F), veillez à ce qu’il soit alimenter pardu combustible d’hiver.
Manuel d’utilisation
Pour des raisons de sécurité, lire soigneusement le mode d’emploi de manière à bien
comprendre les instructions avant d’utiliser le chauffage.
Prière de conserver ce manuel pour toute référence actuelle et future.
19 Ne pas utiliser de fuel
de mauvaise qualité Ne pas utiliser de fuel de mauvaise qualité, comme les huiles de vidanges ni un mélange
fuel-eau.
Pour éviter tout risque de renversement et d’incendie, ne pas déplacer le chauffage pen-
dant la combustion ou le chauffage.
20
Attention lors du
déplacement ou range-
ment du chauffageor
Déplacer ou ranger le chauffage sur une surface horizontale pour que le fuel ne risque pas
de fuir.
14 S’assurer que la
flamme est éteinte
Après avoir arrêté le chauffage, s’assurer que la flamme est complètement éteinte avant
de partir.
21
Des enfants ou des personnes
handicapées ne doivent pas
utiliser ce chauffage
Ce chauffage ne doit pas être utilisé par des enfants, des personnes handicapées physiquement
ou des personnes qui ne possèdent pas les connaissances correctes et l’expérience pour
l’utiliser, sauf sous supervision ou instructions correctes.
22 Ne regardez jamais
directement
le disque à radiation
Pendant que le chauffage est en fonctionnement, évitez de regarder directement le disque
à radiation. Cela pourrait causer des blessures aux yeux.
Table of contents
Languages:
Other Shizuoka Seiki Heater manuals

Shizuoka Seiki
Shizuoka Seiki VAL6 User manual

Shizuoka Seiki
Shizuoka Seiki VAL6 MPX User manual

Shizuoka Seiki
Shizuoka Seiki VAL6 User manual

Shizuoka Seiki
Shizuoka Seiki VAL6 EP8JA User manual

Shizuoka Seiki
Shizuoka Seiki VAL6 MPX Series User manual

Shizuoka Seiki
Shizuoka Seiki VAL6 KBE5S User manual

Shizuoka Seiki
Shizuoka Seiki VAL6 MPX5 User manual

Shizuoka Seiki
Shizuoka Seiki VAL6 User manual

Shizuoka Seiki
Shizuoka Seiki VAL6 EPX1 User manual

Shizuoka Seiki
Shizuoka Seiki VAL6 EPX User manual


